
Knowledge base
1000 FAQs, 500 tutorials and explanatory videos. Here, there are only solutions!
This guide details the automatic translation service integrated into the Web app Mail Infomaniak (online service mail.infomaniak.com).
Preamble
- The Mail Infomaniak interface integrates an automatic translator, both for reading and writing, for French, German, English, Italian and Spanish.
- This AI solution does not rely on a third-party service (DeepL, Google Translate, etc.) contacted via API, but it is hosted, operated and partly trained by Infomaniak.
Translate the text…
… while writing
To automatically translate into a foreign language a message that you are writing in your language:
- Click here to access the Mail Infomaniak web app (online service mail.infomaniak.com).
- Compose a new email without sending it.
- Select the text to translate.
- Click on Translate.
- Change the languages if necessary.
- Click on Apply translation:

… when reading
To automatically translate into your language a received message written in a foreign language:
- Click here to access the Mail Infomaniak web app (online service mail.infomaniak.com).
- View the email to be translated.
- Select the text to translate.
- Click on Translate:

- Click on the language names to change the languages used.
- In the same place, you can also copy the translated text to the clipboard to use it later:

- In the same place, you can also copy the translated text to the clipboard to use it later:
Disable the translator
You can set the elements that appear when you click on your message:
- Click here to access the Mail Infomaniak web app (online service mail.infomaniak.com).
- Click on the Settings icon in the top right corner.
- Click on Customization in the left sidebar.
- Check or uncheck the actions you want to have on click:

This guide covers data protection regulations in Switzerland and Europe and the measures taken by Infomaniak to secure your customer data and data within Web Hosting and Mail Services.
Understanding the difference between data security and data confidentiality
Data security aims to prevent any unauthorized access to your information. It relies on measures such as encryption, firewalls, or VPNs. A security breach can have disastrous consequences: imagine a hacker stealing your entire customer database and demanding a ransom to return it. This type of attack—ransomware—can paralyze a business overnight.
Today, it is estimated that more than 50% of companies victimized by a cyberattack close within two years.
Data confidentiality concerns who can access your information and how it is used. Even if your data is secured against hacking, it can be collected, analyzed, and resold... legally.
Example: you carefully store your customers' information, but unbeknownst to you, a service you use shares—anonymously—this data with third parties. Result? Your competitors can obtain valuable market analyses and target your own customers without ever needing to hack into your systems.
LPD & GDPR
In Switzerland, the LPD (Federal Data Protection Act) and nLPD (for the "new Law" in effect since September 2023) protects the confidentiality of residents by regulating the collection and processing of personal data by organizations.
On the other hand, the GDPR (General Data Protection Regulation) of the EU, in effect since May 2018, influences global companies processing the data of European residents, including in Switzerland. While the LPD applies to the data of Swiss residents, the GDPR concerns that of EU residents. Swiss companies managing European data must comply with the GDPR's requirements, including appointing a Data Protection Officer and conducting Data Protection Impact Assessments in case of risky processing.
Your role as an Infomaniak Client
Regarding the hosted data that belongs to you and if it concerns personal data of your visitors, contacts, and clients, it is up to you to ensure compliance.
When processing this personal data, it is important to inform users about how and why it is being processed. This is usually done through a privacy statement/charter.
A GDPR certificate (in PDF format) can be generated and downloaded from the Manager (accessible to organization users who are owners or administrators):
- Click here to access DPA management on the Infomaniak Manager (need help?).
- Click the Generate button to download the customized PDF document:

Here are some tips on this topic:
- Inform about all data processing, not just that related to the website.
- Ensure easy access to the privacy statement on the website, for example in the footer of each page.
- In general, it is not necessary to obtain the user's approval for privacy statements (e.g., for forms); it is sufficient to indicate where to find the statement (example Site Creator).
- Keep in mind that new, more in-depth information rules might require adjustments to existing privacy statements.
It is crucial to differentiate between the security of the infrastructures where your data is hosted and the management and implementation of data on your side. As a hosting provider, Infomaniak acts as a subcontractor for your RGPD obligations. In this context, its privacy policies and cookie usage, as well as its terms and conditions, provide the necessary guarantees regarding its compliance as a subcontractor.
The role of Infomaniak
Like companies that work with user data, Infomaniak must comply with the LPD and, because some of these users are European citizens, the GDPR as well:
- The data privacy policy details the data that Infomaniak retains to provide and execute its services
- The policy related to the protection of your personal data describes Infomaniak's commitments as a subcontractor that hosts all of your data, including personal data
These commitments are outlined in the general terms and conditions and specific terms and conditions as follows:
- store your data within data centers exclusively located in Switzerland and never transfer your information outside of these infrastructures
- apply strict security standards and constantly improve processes to ensure a high level of security across all services
- notify you promptly in case of a breach of your data
- ensure transparency with you when Infomaniak uses subcontractors that may process your data
- strengthen and develop physical security measures to prevent any unauthorized access to the infrastructures where your data is stored
- Implement physical and/or logical isolation systems (depending on the services) to separate the hosting of different clients; moreover, Infomaniak conducts annual penetration tests to ensure data integrity between clients
- demonstrate high reactivity in the secure updating of the systems under its responsibility
Manage the cookies of the site infomaniak.com
When you visit the page infomaniak.com a choice must be made regarding the acceptance of certain cookies. To modify this choice later, access your preferences from the footer of the site:

This guide presents the email authentication mechanisms and ways to resolve the Sender Mismatch error.
Preamble
- The "Sender Mismatch" error occurs when the address used to send an email does not match the authentication address used when connecting to the SMTP server.
- This error is related to two specific elements:
- the
Return-path(also known as "envelope sender"), which is used by the mail server to handle returns and delivery errors, - and the
Fromheader, which is the sender's address visible to the recipient in the message.
- the
Resolve the Sender Mismatch error
Technically, when sending an email via an email software/client, you must authenticate using a username (= your email address) and a password.
If, after authentication, the sender address specified in the "From" header or in the "Return-path" is different from the address used for authentication, the Infomaniak server may consider this an attempt at spoofing. This inconsistency triggers the "Sender Mismatch" error.
To fix this error:
- Check that the email address used for sending is the one you authenticate with (or a valid alias).
- Do not change the
Return-pathaddress or theFromheader to an unauthorized address (if necessary, refer to this other guide to test another email application or to correctly configure your current email software/client).
This guide explains how to enable or disable dark mode on your operating system (macOS / Windows) since the theme setting "automatic" of Infomaniak tools (animation below) is based on the Dark mode or Light mode setting of the OS:

Managing dark or light mode…
… on macOS
- Click on System Preferences…

- Click on Appearance and choose the dark mode on the right:

… on Windows
- Open the start menu
- Click on Settings:
- Click on Personalize then Colors:
- Click on Dark:
And on mobile?
The dark theme is enabled on mobile devices for Infomaniak login and account creation pages; it automatically adapts to the mobile system's preferences, thus providing a consistent visual experience between mobile apps and login and account creation pages.
This guide explains how copy the content of an Infomaniak email address (all e-mail messages, folders, subfolders, in short, all the tree of your mailbox) on another of your existing addresses at Infomaniak, thanks to theimport tool Infomaniak!
Preamble
- This does not affect the content currently present on the address that will receive the content, or the content of the original address whose content will be copied.
- Any duplicates are managed: identical content will only be copied once.
- It is possible to specify a second address to be imported in the same process.
- If necessary, consult this other guide to import messages from a external mail provider other than Infomaniak.
Copy emails from one account to another
To import content from another email address:
- See you at the address https://import-email.infomaniak.com/.
- If necessary Sign in to your Infomaniak account on the Organization of your choice (import will be made to an email address attached to the Mail Infomaniak interface the account you are using).
- Click on the single import.
- Fill in the left field with your Departure email address (the content of which is to be copied).
- Fill in the right field with the password of the same e-mail address (click here to check that you use the correct password and if necessary, change the password of your email address).
- Click on Confirm.
- If necessary, enter a second email address to be imported at the same time.
- Choose which email address to import e-mails; the drop-down menu lists the email addresses currently attached to your interface Infomaniak Mail the Infomaniak account you are connected to.
- It's obviously Impossible copy the e-mails to the same address:

- After selecting the desired destination address from the list, click the blue button Import e-mails.
- The copy starts and continues in the background, you can close the window that appears, a confirmation email will automatically be sent to all email addresses affected by the operation once the import is complete, mentioning the number of messages copied.
This guide explains how to connect the email application eM Client to an email address hosted by Infomaniak.
⚠The Infomaniak messaging is compatible with any application supporting in particular IMAP/SMTP For additional assistance contact the support of the software used or partner — discover also the role of the host.
Prerequisites
- Create the address within my kSuite or on a Mail Service (Service Mail alone, or existing within a kSuite).
- Test the password of the e-mail address (without confusing it with the password used to connect to the Infomaniak interface).
- Check on the Service Mail that the automatic diagnosis is correct.
Add the email address to the app
To configure the email application:
- Open the app and choose the desired mode and click Next:

- Enter the email address to attach and click the button Start next to the field:

- Enter the password of the email address and click on Continue next to the field:

- Check the box and click on Yes:

- Check and complete the missing information:

- Choose the desired mode and click Next:

- Check and complete the missing information:
- That's it, your email address is now set up in the app:

Recommended parameters
- Incoming IMAP server = mail.infomaniak.com
- IMAP port = 993 (with SSL)
- Outgoing SMTP server = mail.infomaniak.com
- SMTP port = 465 (with SSL)
- Username/username = full & full email address ( ? )
- Password = the one assigned to the email address you want to consult ( ? )
- Mandatory authentication for sending e-mails:
- It activates in the SMTP settings of your application.
- Check " use the same settings as the incoming server"or, depending on the software/mail clients, provide a user name (= complete & full email address) and password.
Some versions of eM Client consider ports 993 and 465 as obsolete (wrong) and you will then have to specify in IMAP tcp/143 STARTTLS or tcp/993 SSL/TLS and for the SMTP tcp/587 STARTTLS.
In case of a problem
It is not necessary to contact Infomaniak Support if your email address works well outside the application. The most common error is the use of an incorrect password. Learn about the solutions given in this other guide about messaging in general.
This guide explains how to schedule the sending of an email so that your message is sent at a specific date/time in the future, this on the Web app Mail Infomaniak (online service mail.infomaniak.com), even if you are no longer connected at that time.
Scheduled sending is also possible on the mobile app Infomaniak Mail (app for iOS/Android smartphone or tablet).
COMPATIBILITY my kSuite ✔ (no customization option) | my kSuite+ ✔ ✔= Offer compatible | ✗= Not available |
Send an email at a later date and time
To do this:
- Click here to access the Mail Infomaniak web app (online service mail.infomaniak.com).
- Compose a new message as you usually do.
- Click on the dropdown arrow to the right of the Send button to access additional actions.
- Choose the time at which the message should be sent, from the suggestions or by customizing the schedule:

- You can then find your scheduled emails in a new dedicated section:

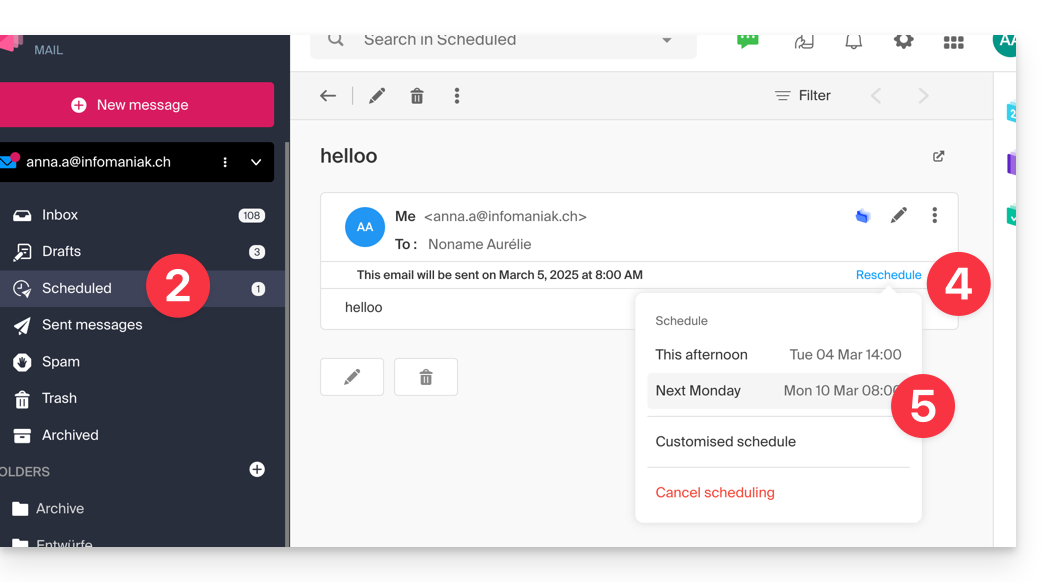
Reschedule a scheduled send
To change the send time of a message already scheduled to be sent later:
- Click here to access the Mail Infomaniak web app (online service mail.infomaniak.com).
- Click on Scheduled Sends in the left sidebar.
- Open the message for which you want to change the future send time.
- Click on Reschedule.
- Choose the time at which the message should be sent, from the suggestions or by customizing the schedule:
Cancel a scheduled send
To cancel the scheduled sending and move the message back to drafts:
- Click here to access the Mail Infomaniak web app (online service mail.infomaniak.com).
- Click on Scheduled Sends in the left sidebar.
- Open the message for which you want to change the future send time.
- Click on Reprogram.
- Click on Cancel scheduling:

- Confirm the cancellation to place the message in your drafts:

To permanently delete a message with no possibility of recovery:
- Click here to access the Mail Infomaniak web app (online service mail.infomaniak.com).
- Click on Scheduled Sends in the left sidebar.
- Hover over the message to delete and click on the trash can:

- Confirm the deletion to permanently destroy the draft.
This guide explains how to activate or disable the advertising filter Infomaniak allowing to automatically classify in specific folders e-mails detected as being of the type Newsletter or activity notification.
Preamble
- The filter...
- ...is automatically enabled when creating an email address within an Infomaniak Mail Service or when subscribing to an offer my kSuite / my kSuite+.
- ... allows you to focus on relevant and important e-mails, which improve your productivity reducing the distraction associated with advertisements and spam.
- ... helps maintain a cleaner and better organized inbox by separating ad emails which facilitates management important e-mails.
Enable the option from the Mail Infomaniak Web app
Prerequisites
- Having permission to manage filters: if you had been invited on Web app Mail Infomaniak (online service) mail.infomaniak.com)in order to manage your address, it is possible that the Mail Service Manager will have youwithdrawn this right from its admin account.
To access your Infomaniak email settings:
- Click here to access the web app Mail Infomaniak (online service) mail.infomaniak.com).
- Click on the icon Parameters Top right.
- Check or select the relevant email address from the drop-down menu in the left side menu.
- Click on Filters and rules:

- Activate the ad filter option, the effect is immediate:

- To disable the filter, simply reclick on the toggle switch (toggle switch); in this case all future messages received will go to the inbox.
Enable option from Mail Service
To access your Infomaniak email settings:
- Click here in order to access the management of your product on the Manager Infomaniak (Need help?).
- Click directly on the nameallocated to the product concerned.
- Click on the email address concerned in the table that appears
- Click on Filters and rules in the left side menu
- Activate the ad filter option, the effect is immediate:

- To disable the filter, simply reclick on the toggle switch (toggle switch); in this case all future messages received will go to the inbox.
Note that you can activating it en masse on multiple addresses At the same time.
Customize Advertising Filter
Location of e-mails
At the same place (point 5 on the images above), by clicking on Edit, you can choose the default location of the 2 folders in which the messages will automatically place (like the IMAP special folders).
This guide explains how to sort e-mails currently present in your Infomaniak inbox or subfolders, in order to e.g. quickly delete specific messages responding to the same structure, classify messages according to their subject or sender, etc.
Quickly sort an email account
Unlike the guideSort incoming emails according to rules (Sieve filters) which details how to set up filters from the Infomaniak interface that will apply to all future incoming messages, it is possible with the free Thunderbird software to apply sorting rules on messages already arrived and already present in a courier account:
- Install and then open Thunderbird.
- Set up your Infomaniak mail within the application.
- Open the menu Tools and click on Filters:

- Check the selected address and click on New...

- Configure the filter according to your preferences (here the rule is that all messages whose subject contains ER will be moved into the Trash):

- Click on Okay. to return to the list of your filters and click on Run Now:

- The result is immediately visible as the messages are moved into the basket and disappear from the window.
This guide details the part Signature present in the e-mails you send from the web app Mail Infomaniak (online service) mail.infomaniak.com).
Preamble
- It is not possible to remove the automatic addition of the Infomaniak mention in the lower part of your my kSuite emails.
- It is possible to delete the automatically inserted Infomaniak mention when writing a new message.
- It is also possible to add your contact information or any indication of your choice in the signature that automatically fits into each new message.
- If necessary, my kSuite+ offers more flexibility.
Manage signature of emails
To add your name or any indication above the Infomaniak mention at the bottom of each message:
- Click here to access the web app Mail Infomaniak (online service) mail.infomaniak.com).
- Click on New message, the writing window opens with a pre-edited integrated signature that cannot be removed or modified without a change in the offer (my kSuite+).
- Click on the chevron to the right of the signature selection menu.
- Click on Manage my signatures:

- Click on the action menu ⋮ located to the right of the signature concerned.
- Click on Edit:

- Enter a name for your custom signature.
- Enter the name you want to display for your message when it reaches the inbox of your correspondents.
- Enter the contents of your signature (formatted text, image, etc.).
- Click on the button to save:

That's it, any new written message will contain your new signature in addition to the mandatory Infomaniak mention: