Knowledge base
1000 FAQs, 500 tutorials and explanatory videos. Here, there are only solutions!
This guide explains how to connect the desktop app New Outlook (desktop application on Windows, replacing Microsoft Mail and Windows Mail) to an email address hosted by Infomaniak.
Preamble
- Although the emails themselves remain stored on the Infomaniak server, the experience in New Outlook is very integrated with the Microsoft cloud:
- Some information from your account may be used by Microsoft for centralized management and better synchronization experience.
- According to some users, it may even be mandatory to have a Microsoft Cloud account to use classic IMAP.
- If you want to have full and local control over your emails, consider using third-party email software/clients (such as Thunderbird, for example) that allow for more direct storage.
- The various services offered by Infomaniak are all compatible with the corresponding standard protocols (IMAP/SMTP for email, for example). Therefore, if you encounter a problem with a third-party software, contact its publisher or a Partner and consult the support policy as well as article 11.9 of the Infomaniak Terms of Service.
Add the email address to the application
Prerequisites
- Create the email address within my kSuite or a Mail Service / kSuite.
- Create a password for the email address on the device you are going to configure.
To configure the email application:
- Open the application.
- If necessary, click on the gear icon in the top right corner (otherwise, skip to step 4):
- Click on Add an account:
- Enter the email address to be linked.
- Click on Continue:
- Enter the password for the email address.
- Click on the See more button.
- Check and complete the missing information by scrolling down if necessary:
- Check and complete the missing information.
- Click on Continue:
- Read and go through the different Microsoft information windows:
- There you go, your email address is now configured in the application:
Recommended settings
- Incoming IMAP server =
mail.infomaniak.com - IMAP port =
993(with SSL) - Outgoing SMTP server =
mail.infomaniak.com - SMTP port & encryption protocol and command/method to activate this protocol:
587+ STARTTLS - Username = the complete & full email address ( ? )
- Password = the one generated for the email address you want to check
- Mandatory authentication for sending emails:
- It is activated in the SMTP settings of your application.
- Check "use the same settings as the incoming server" or, depending on the software/email clients, enter a username (= complete & full email address) and the generated password.
Refer to this other guide if you are looking for information about other compatible messaging ports and protocols (SSL / TLS for example).
In case of a problem
Check that the Mail Service is configured optimally.
If you are unsure of your email password, the troubleshooting guides help you resolve any potential issues:
- Refer to the solutions given in this other guide regarding email in general.
- This other guide is more specifically about Outlook.
… and if your Outlook no longer works since a change of email password, refer to this other guide.
This guide explains what the external email label, "External" on the Web app Mail (online service ksuite.infomaniak.com/mail) and the mobile app Infomaniak Mail (application for iOS/Android smartphone or tablet) means when reading certain messages:
External email label
The external email label appears in the following cases:
- The sender's domain name (or alias) does not match the email address configured in Mail.
- The sender is not part of the contacts (including suggested contacts).
- The email comes from an address hosted outside the Organization.
The label will appear as " unknown" instead of " external" with some free offers like my kSuite.
Enable or disable the label
You can enable or disable the label, the effect is immediate for incoming emails and in the case of a response to an external email. To do this:
- Click here to access the management of your product on the Infomaniak Manager (need help?).
- Click directly on the name assigned to the product concerned.
- Click on Global Configuration in the left sidebar
- Click on the Security tab.
- Enable or disable the toggle switch:

This guide explains how to increase your productivity with the Web app Mail Infomaniak (online service ksuite.infomaniak.com/mail) by using its keyboard shortcuts, functions that allow you to perform certain actions without using the mouse cursor.
Enable or disable shortcuts
To enable or disable keyboard shortcuts across the entire Mail Infomaniak interface:
- Click here to access the Web app Mail Infomaniak (online service ksuite.infomaniak.com/mail).
- Click on the Settings icon in the top right of the interface.
- Click on Shortcuts.
- Enable or disable the use of shortcuts:

Display all available keyboard shortcuts
To view existing and possible shortcuts:
- Click here to access the Web app Mail Infomaniak (online service ksuite.infomaniak.com/mail).
- Press the key combination SHIFT+ALT+H (OPTION+SHIFT+H on macOS) to display the corresponding help (or read the chapter above).
- Scroll through the list of shortcuts from this tab.
Keyboard shortcut examples
Here are a few keyboard shortcuts (refer to the chapters above to go directly to the complete list):
| Keyboard shortcuts | Definition | Action |
|---|---|---|
SHIFT+ALT+H | List of shortcuts | Displays the complete list of available keyboard shortcuts in the webmail. |
! | First message | Selects the first message in the current folder |
SHIFT+LT+A | All messages | Selects all messages in the current folder |
| DOWN | Next message | Moves the cursor to the next message. |
| UP | Previous message | Moves the cursor to the previous message. |
| LEFT | Return to the message list | Returns to the message list |
SHIFT+CLICK | Select multiple messages | Allows you to select multiple messages in a row |
CMD/WINDOWS+CLICK | Select/Deselect a message | Allows you to select/deselect a message |
SHIFT+R | Reply to the message | Allows you to reply to the sender of the message |
SHIFT+ALT+R | Reply to all | Allows you to reply to the sender and all the people in copy of the message. |
SHIFT+ALT+N | New message | Allows you to create a new message |
SHIFT+ALT+DEL | Delete the selected messages | Allows you to delete all the selected messages at once |
SHIFT+ALT+E | Archive the message | Allows you to file the message in the archive folder |
This guide explains how to regain access to Infomaniak services (manager.infomaniak.com and ksuite.infomaniak.com/mail in particular) in case of issues with the kAuth mobile app (application for iOS/Android smartphones or tablets) if this is the security method you chose during 2FA activation (two-factor authentication).
Before changing your mobile device
If you plan to change your iOS/Android device where the kAuth app is installed, before doing so:
- Log in one last time with 2FA on the Infomaniak Manager.
- Remove security temporarily (or modify the verification method to receive a code by SMS, for example).
- Then on the new device, install and open the kAuth mobile app to re-authenticate with 2FA via kAuth!
After changing your mobile device
If it's too late and you haven't followed the method above, check in the kAuth mobile app if your account is still present; it may be that you no longer receive the authorization request notification YES/NO and in this case:
- Open the mobile app kAuth (application for iOS/Android smartphones or tablets) on your device.
- Press on the account in question.
- Note the temporary code displayed.
- Enter this code on the login page for the Manager.
- Once logged in, deactivate two-factor authentication.
- Then reconfigure two-factor authentication by choosing kAuth and adding your account to the mobile device which will reactivate the notifications.
If it's too late, and no accounts are displayed in the kAuth mobile app, there's no need to call Infomaniak or add your account in the app (without having followed the first explanation at the top of this guide), the registration will loop since a code will be requested...
And in this case, no choice, you will need to provide a number of security elements manually or via the Infomaniak Check (kCheck) app to regain access to your account:
- Click here to access the Infomaniak Manager login page.
- Enter the username and correct password.
- When prompted for additional authentication, click on alternative methods:
- Choose to enter one of your recovery codes if you had downloaded the sheet during 2FA activation:
- Otherwise select the last help request option to access the form for submitting your identity documents and recognition selfie:

- Follow the procedure to the end and wait:

This guide explains how to block / blacklist email addresses or entire domains so that you are no longer bothered by specific unwanted emails in your Infomaniak mailbox.
You will learn that it is also possible to allow / whitelist addresses to bypass the anti-spam filter of your Infomaniak mailbox.
Preamble
- In addition to the Infomaniak anti-spam filter which eliminates the majority of unwanted emails as it evolves, Infomaniak offers two distinct lists that you can fill out as you wish:
- blocked senders:
- blocked emails and domains are then directly treated as spam
- authorized senders (authorized to bypass the anti-spam filter):
- authorized senders and domains will no longer be filtered by the anti-spam filter
- the list of authorized senders is only active on the original recipient of each message; if the message is addressed to an address abc@domain.xyz and then redirected to def@domain.xyz, the anti-spam filter and the list of authorized senders must be configured for the address abc.
- blocked senders:
- These lists are specific to the email address on which the operation is performed.
- A Mail Service administrator can also apply these lists to the entire Mail Service, via the global configuration of a Mail Service (refer to this other guide).
A. Address/domain formats that can be used
As indicated in points 5 & 6 below, you can enter email addresses and/or domain names that will then be blocked or authorized on your mailbox.
To refine the precision of your filtering requests, the system supports partial searches through the use of wildcard characters * and ? . This character will automatically substitute any sequence of characters at its position, thus allowing flexible matches on incomplete strings.
Here are a few examples of entry formulations, for which you must of course replace the example domain (the-spam-domain.xyz) with the one that bothers you:
Block all email addresses from a domain name
*@the-spam-domain.xyz or toto*@the-spam-domain.com …
Block a domain and all its subdomains
toto@*the-spam-domain.xyz or toto@* …
B. Manage blocks or authorizations from the Infomaniak Web Mail app
Prerequisites
- Have permission to manage security: if you had been invited to the Infomaniak Web Mail app (online service ksuite.infomaniak.com/mail) to manage your address, it is possible that the Mail Service manager has removed this right from their admin account.
To block or authorize senders from the Infomaniak Web Mail app (online service ksuite.infomaniak.com/mail):
- Click here to access the Infomaniak Web Mail app (online service ksuite.infomaniak.com/mail).
- Click on the Settings icon at the top right.
- Check or select the email address concerned in the dropdown menu of the left sidebar.
- Click on Security:

- To add a blocked sender (blacklisted), click on the Add an address button in the Blocked address box:

- To add an authorized sender (whitelisted), click on the Add an address button in the Approved address box:

- Fill in the fields as desired and/or according to the format indicated in point A above.
You can also block a sender directly from the received email:
- Click here to access the Infomaniak Web Mail app (online service ksuite.infomaniak.com/mail).
- Open the message from the unwanted sender.
- Click on the ⋮ icon at the top right of the open message.
- Choose Block the sender to add it directly to the list of blocked addresses:
If necessary, remove the address by returning to the Security tab.
C. Manage blocks or authorizations from Service Mail
To block or authorize senders from a Service Mail:
- Click here to access the management of your product on the Infomaniak Manager (need help?).
- Click directly on the name assigned to the product concerned.
- Click on the email address concerned.
- Click on the Security tab or from the left sidebar on Security:

- To add a blocked sender, click on the Add an address button in the Blocked address box.
- To add an authorized sender, click on the Add an address button in the Approved address box.
- Fill in the fields as desired and/or according to the format indicated in point A above.
Alternative
To act on your incoming mail, you can also use mail filters.
This guide explains how to quickly share content from the Web app kDrive Infomaniak (online service ksuite.infomaniak.com/kdrive) by email.
Share by email from kDrive
You can email a file (or rather a link to a file, as the email will not contain an attachment) from your kDrive:
- Click here to access the Web app kDrive (online service ksuite.infomaniak.com/kdrive).
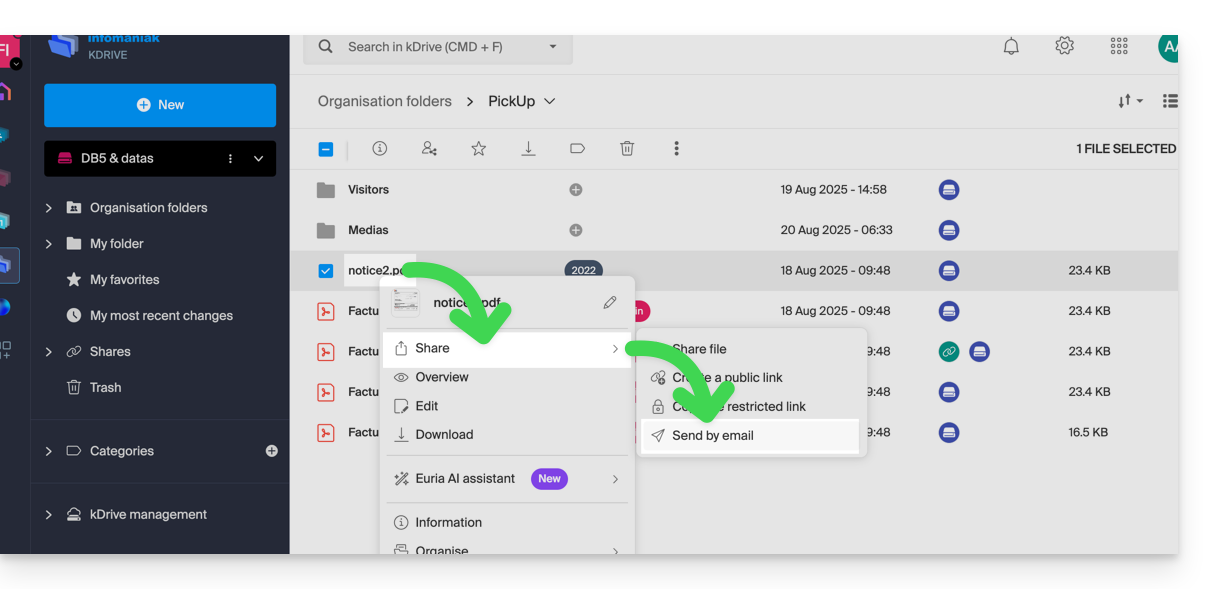
- Right-click on the file/folder in question or click on the action menu ⋮ to the right of the item in question.
- From the dropdown menu that appears, choose to share the item by email:
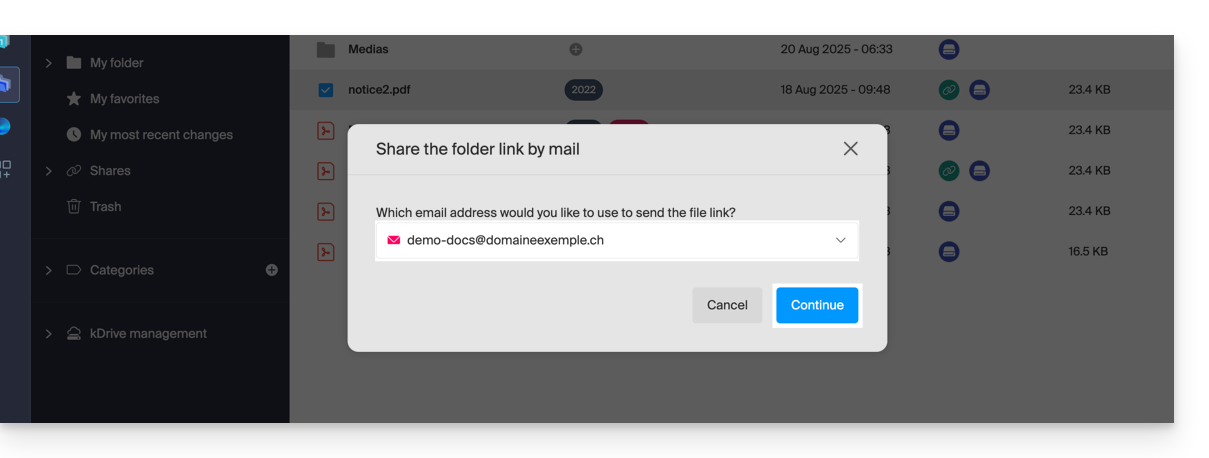
- Choose which address (from those currently linked to your Web app Mail) to send the file from.
- Click on Continue:
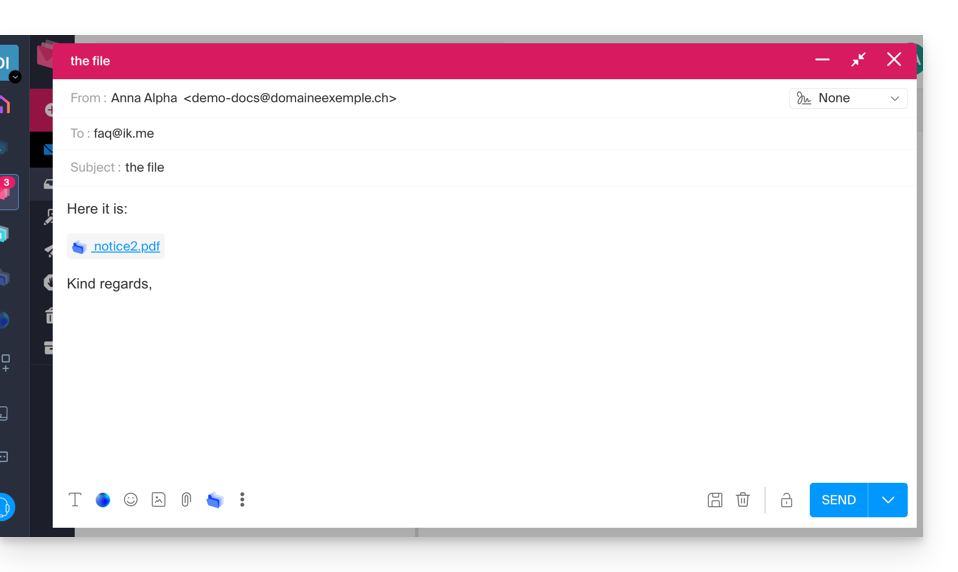
- The Web app Mail opens in the browser and the body of the message automatically contains the links to the shared content:
- This is exactly the same method as if you select the file directly from the kDrive icon on the composition window of the Web Mail app:
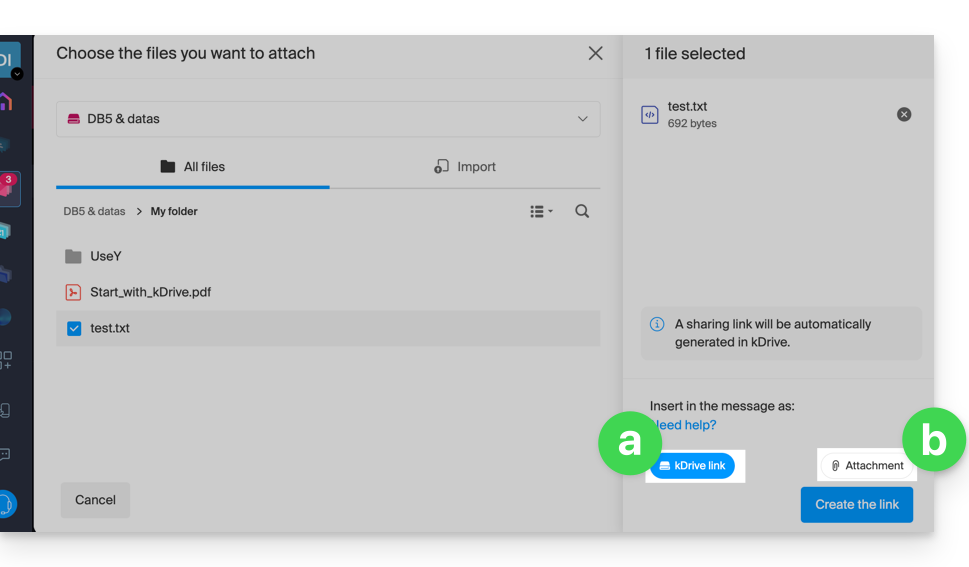
- However, by doing this (linking a kDrive file from Mail directly), an additional choice allows you to attach the file itself, as an attachment (the file will be sent in the state it is in at the moment you select it; there is no longer any notion of collaboration / sharing as is the case with the method explained in this guide and in the choice of point “
a” above).
- This is exactly the same method as if you select the file directly from the kDrive icon on the composition window of the Web Mail app:
Invite to collaborate on the file
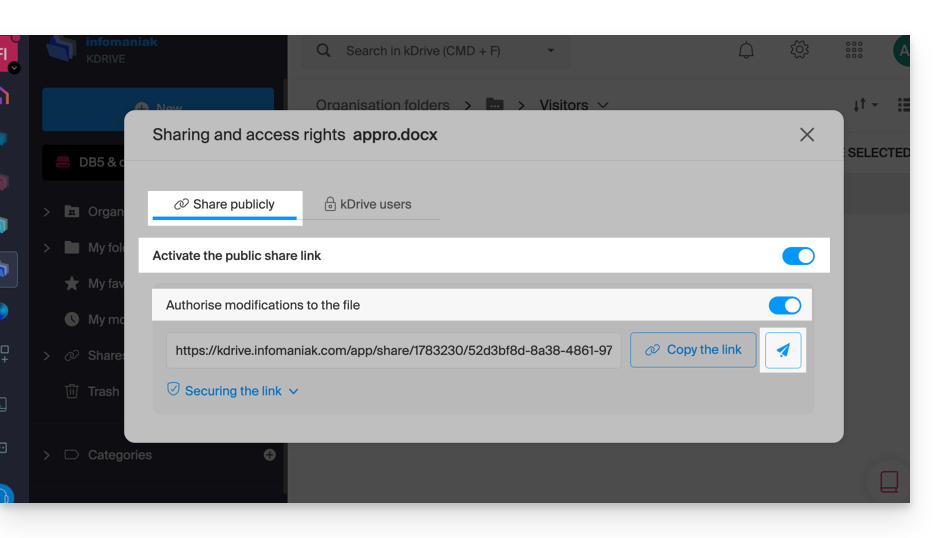
For documents with file extensions such as Office .docx, .xls, etc., it is recommended to perform a standard share of the document (see the image below) which allows you to authorize the modification of the document if you wish: 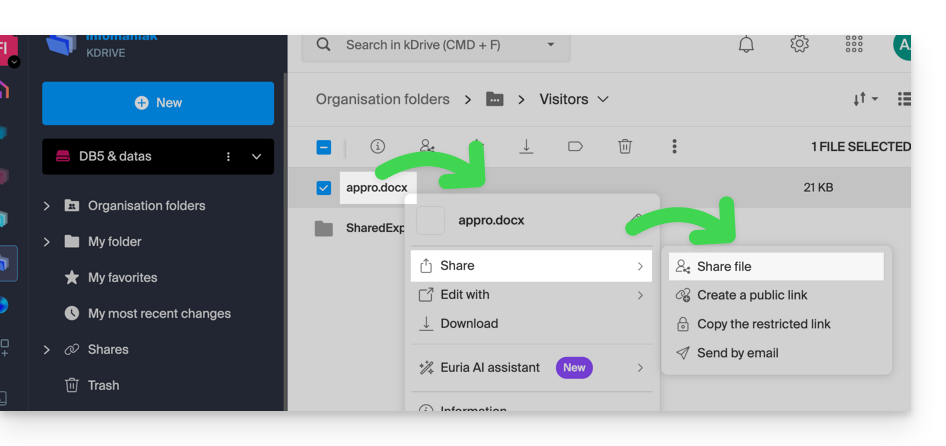
- If you authorize the modification of the document from kDrive, the user will be able to collaborate (with or without prior registration) i.e. modify in their browser and then save the document you have shared:
This guide explains how to check the storage space of your free Infomaniak mail offer and how to free up space.
Preamble
- The storage space for my kSuite emails is limited to a maximum of 20 GB (paid Mail Infomaniak offers (my kSuite+ included) have unlimited disk space).
- If you reach this limit, you will no longer be able to receive new emails, and you will need to free up space in this case.
Display the total storage space used
To do this:
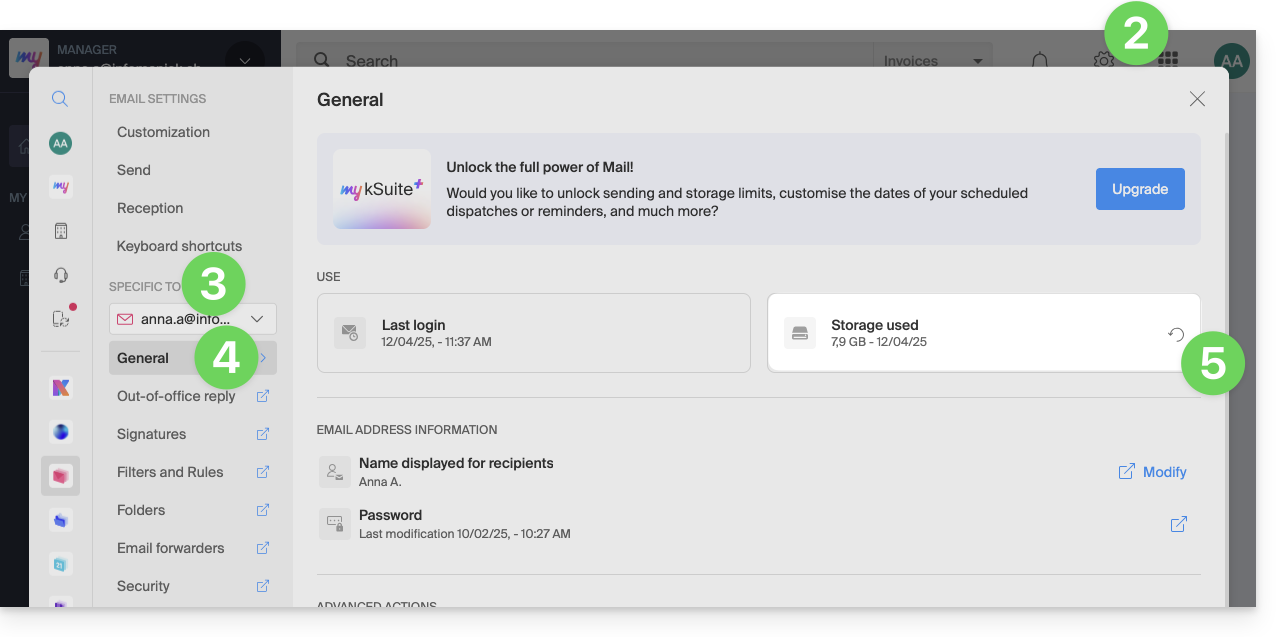
- Click here to access the Infomaniak Mail Web app (online service ksuite.infomaniak.com/mail).
- Click on the Settings icon at the top right.
- Check or select the email address concerned in the dropdown menu of the left sidebar.
- Click on General below.
- Click the button to refresh the disk space:
Free up storage space
When your mailbox is full, it is crucial to free up space to continue receiving messages. Here are some effective solutions to achieve this:
1. Delete non-essential emails
- Search for the largest messages. Delete messages with unnecessary attachments or download them to your computer before deleting the emails.
- Sort your emails by date and delete those that are too old or that you no longer need.
- After deleting emails, do not forget to empty the trash to actually free up space.
- Unsubscribe from newsletters and mailing lists that you no longer read to avoid receiving unnecessary emails in the future.
2. Use an email management application
- There are applications like Clean Email, Unroll.me, or Mailstrom that can help you quickly and efficiently clean up your inbox (be careful, however, with the terms of use and confidentiality of these applications).
3. Increase storage capacity
- Paid Infomaniak Mail offers (including my kSuite+) come with unlimited disk space.
This guide helps you find the public IP address of your device, which can be useful for certain support requests, among other things.
Display the public IP address on the connected device
Click here to obtain the public IP address of your device in IPv4 and IPv6 format.
Alternative methods
Visit ipinfo.io or ifconfig.me.
... on macOS
- From a terminal application (command line interface, CLI) on your device, run the command
curl ifconfig.meand press enter. - The displayed address is the public IP address of the computer.
Do not forget that this address can change periodically, especially if the router restarts or if the internet service provider uses dynamic IP address allocation.
To automate the search for the public IP address, use commands or scripts that query services such as api.ipify.org ...
This guide explains how to forward one or more already received emails to a recipient, by placing them either…
- … in the body of a new message directly,
- … as an attachment (this allows you to forward the entire message with its headers and not just its content).
Preamble
- To obtain a share link allowing you to view a specific email, refer to this other guide.
- To automatically redirect all future incoming messages, refer to this other guide.
- To filter and automatically redirect only certain messages, refer to this other guide.
- To know how to forward emails but from a third-party software/email client:
- From the Infomaniak Web App Mail (online service ksuite.infomaniak.com/mail) you can select up to 5 messages present in the inbox to transfer them to your correspondents from the action menu ⋮ at the top of your inbox, otherwise the transfer button will remain grayed out:
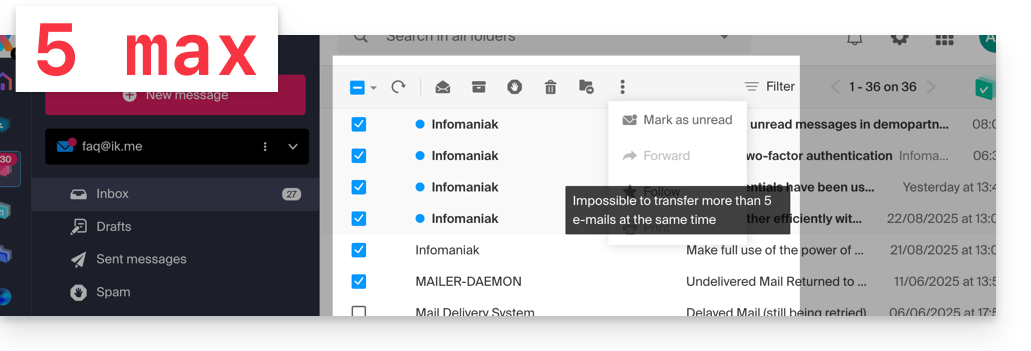
- Regardless of the transfer method recorded in the settings (body of the message or attachment — read below) if you transfer between 2 and 5 messages, these will be automatically attached as an attachment to a new email.
Transfer a message from the Infomaniak Web Mail app
To do this:
- Click here to access the Infomaniak Mail Web app (online service ksuite.infomaniak.com/mail).
- Open the message to be forwarded.
- Click on the Forward icon at the top right of your message:

- You will also find the FORWARD element in the action menu ⋮ …
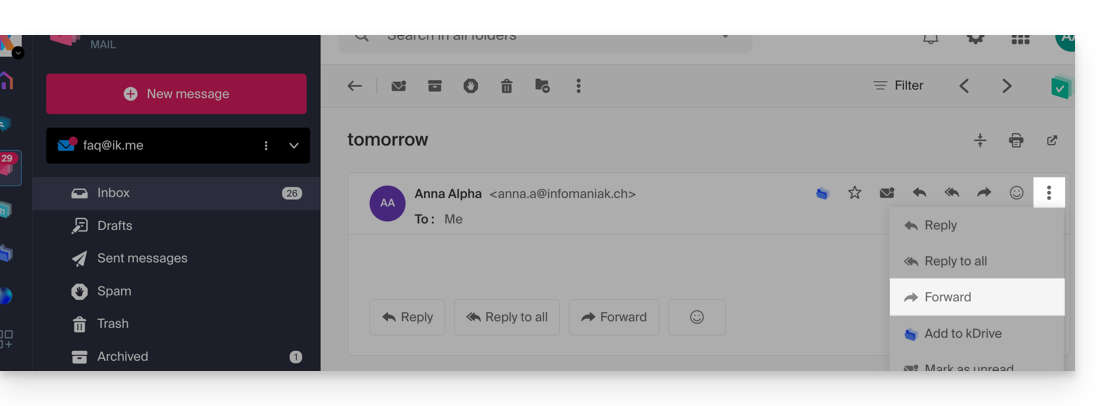
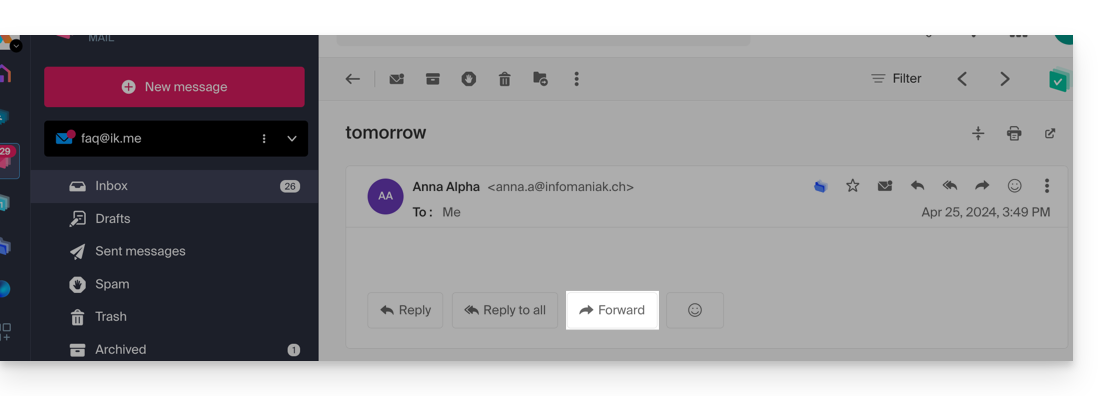
- … as well as below your emails:
- You will also find the FORWARD element in the action menu ⋮ …
Configure the transfer method of the Infomaniak Web Mail app
You can configure Mail Infomaniak so that an email forward is always done as an attachment and not quoted in the body of the message.
Indeed, by default the original email will be quoted in plain text directly in the body of the email:
To modify this and set the default forwarding method:
- Click here to access the Infomaniak Mail Web app (online service ksuite.infomaniak.com/mail).
- Click on the Settings icon at the top right.
- Click on Sending in the secondary sidebar menu.
- Click on the desired option ("As an attachment" for "Forward emails":
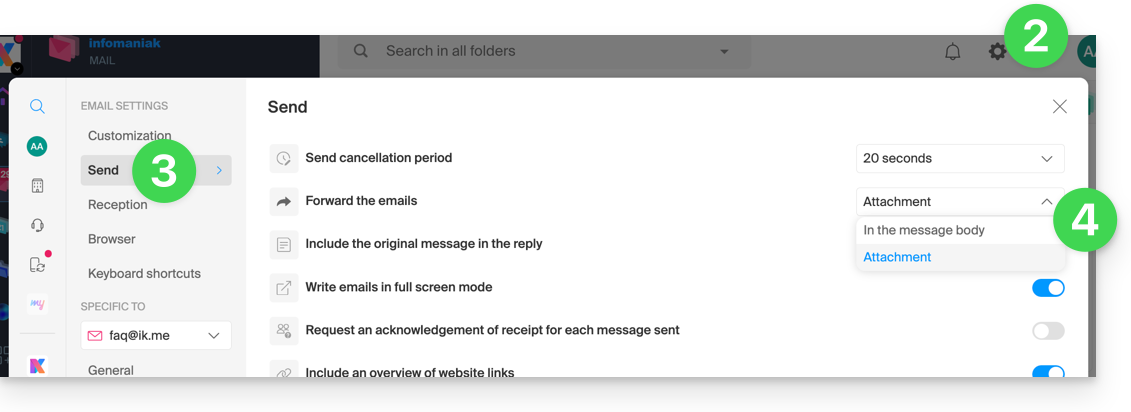
From now on, the original email will be attached as an attachment to the email:
This guide explains how to allow a user (friend, colleague, client, family member, etc.) to easily and securely use an email address that you have created within an Infomaniak Mail Service as an administrator of the concerned Organization.
Preamble
- No password should be transmitted to them.
- The email address will be automatically added to the Infomaniak Mail interface of the user, after they accept the invitation.
- Refer to this other guide to manage existing users.
- Refer to this other guide if you are looking for additional information regarding the simple creation of an email address for yourself.
Invite to use the email…
…from the Mail Service
To allow an already active user to access the email address you wish to share:
- Click here to access the management of your product on the Infomaniak Manager (need help?).
- Click directly on the name assigned to the concerned product.
- Click on the concerned email address in the displayed table:
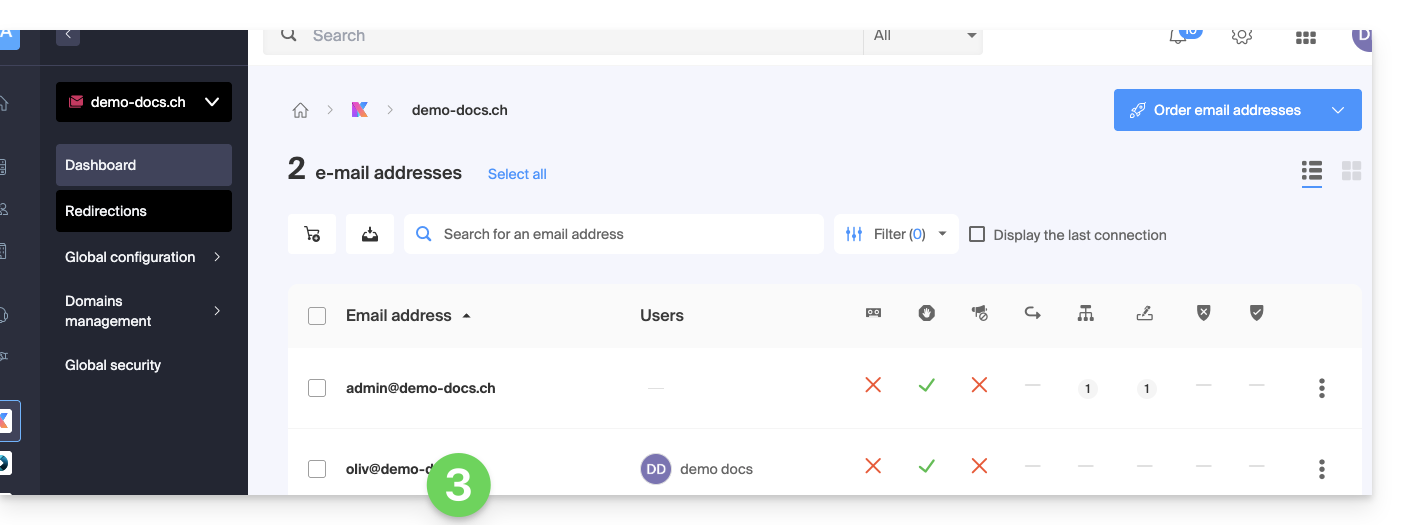
- Click on Add above the table of users currently accessing the concerned email address on Mail:
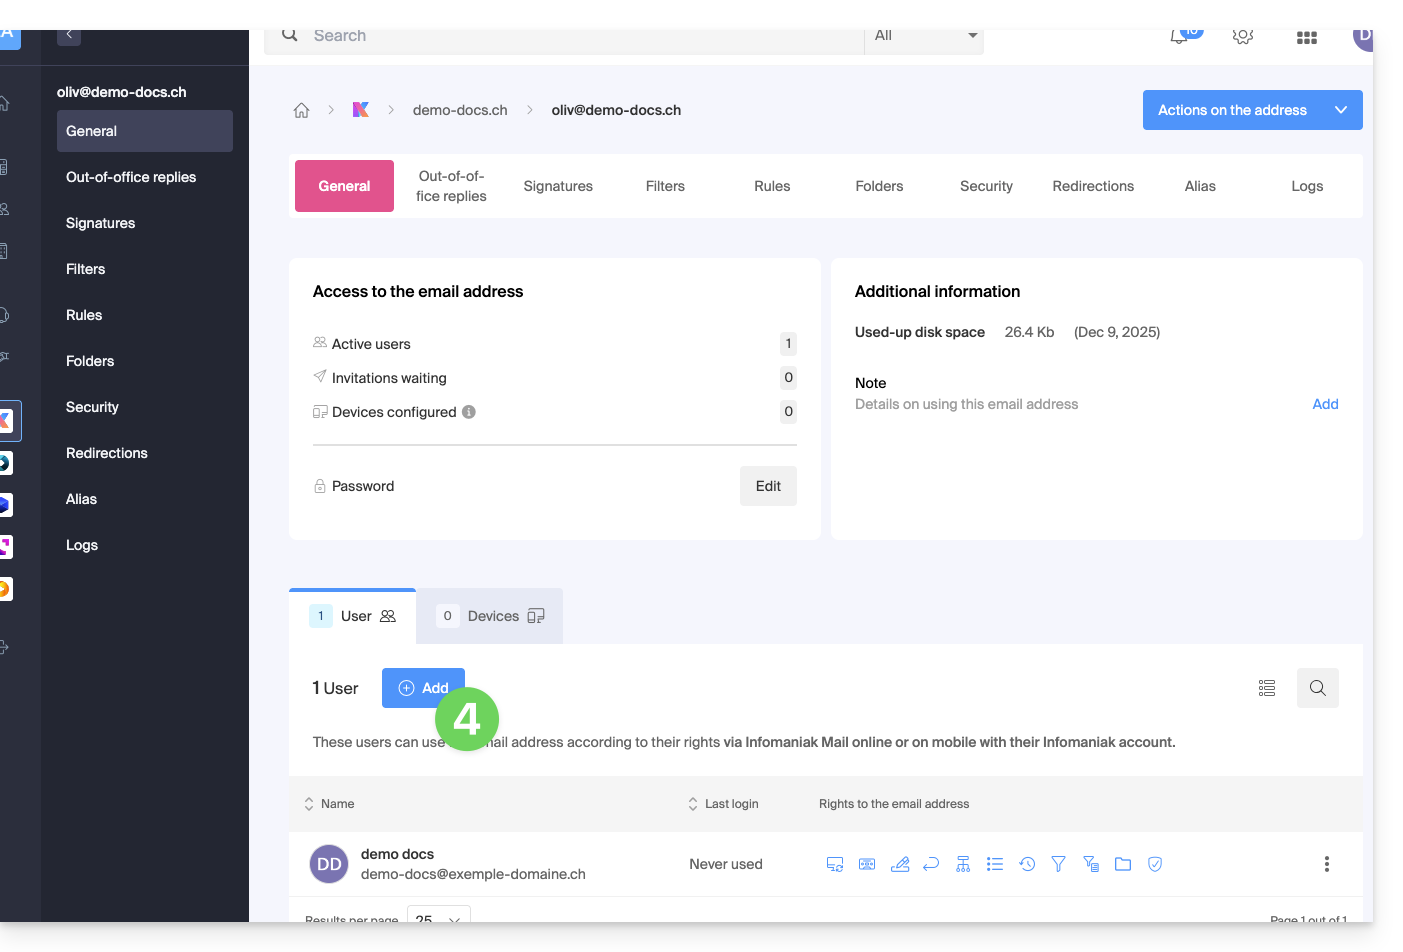
- Enter the password to log in to your Infomaniak account if prompted.
- Choose (a) one of the existing users within your Organization or (b) an external user to the Organization:
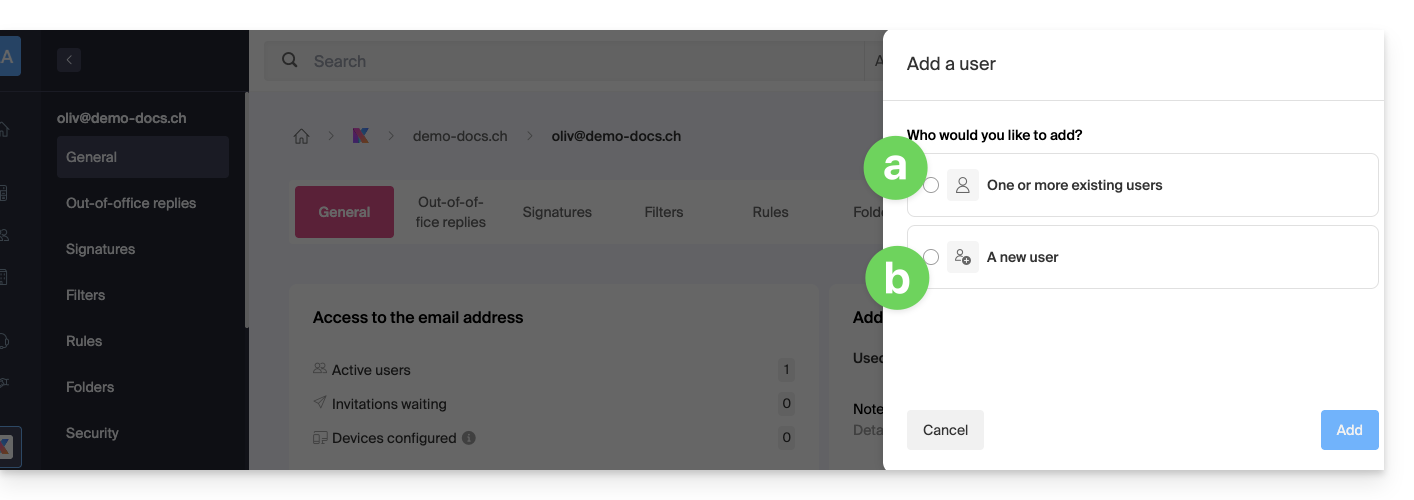
Choice [ a ]: existing user on the Organization
Nothing could be simpler:
- The concerned email address will be automatically visible and accessible to the selected user on the Infomaniak Mail web app (online service ksuite.infomaniak.com/mail) with the specified permissions.
- Click the button to Add the user:
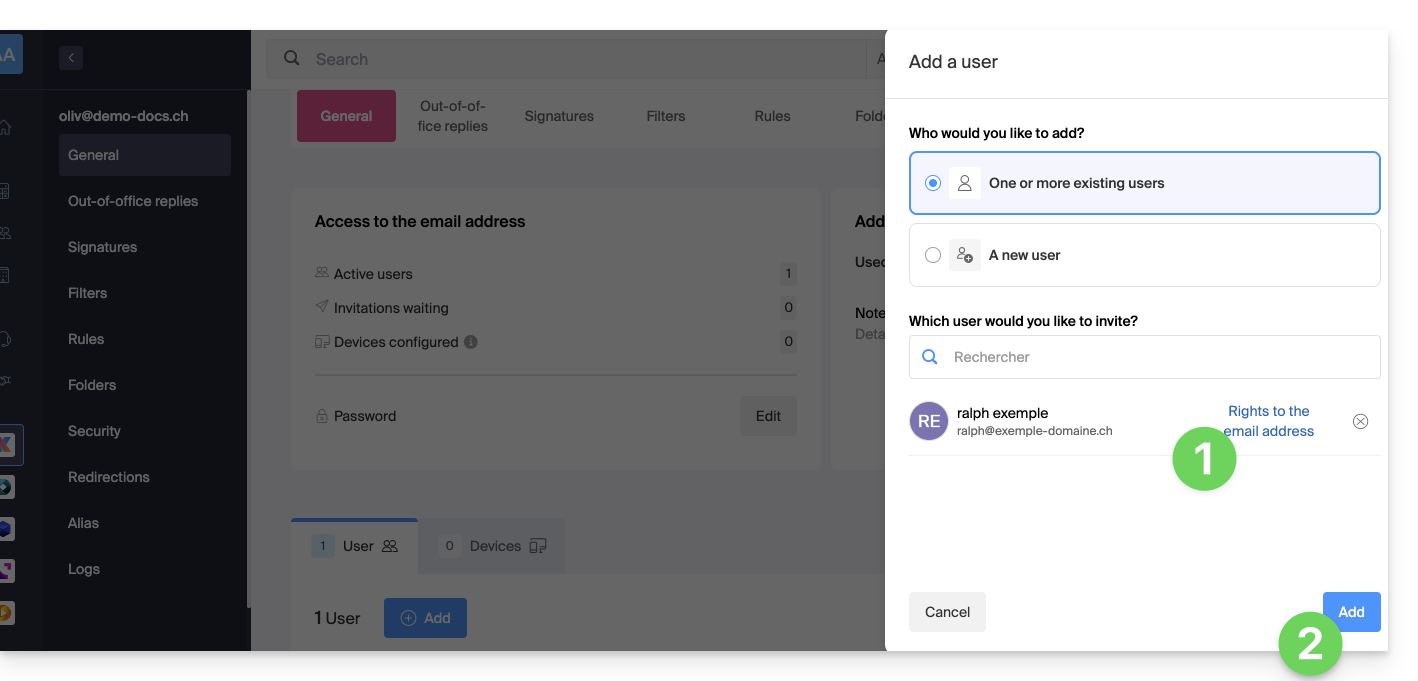
- After the addition, it is always possible to restrict the user by clicking on the icons corresponding to the permissions…
- ... or even revoke their access to the email address:
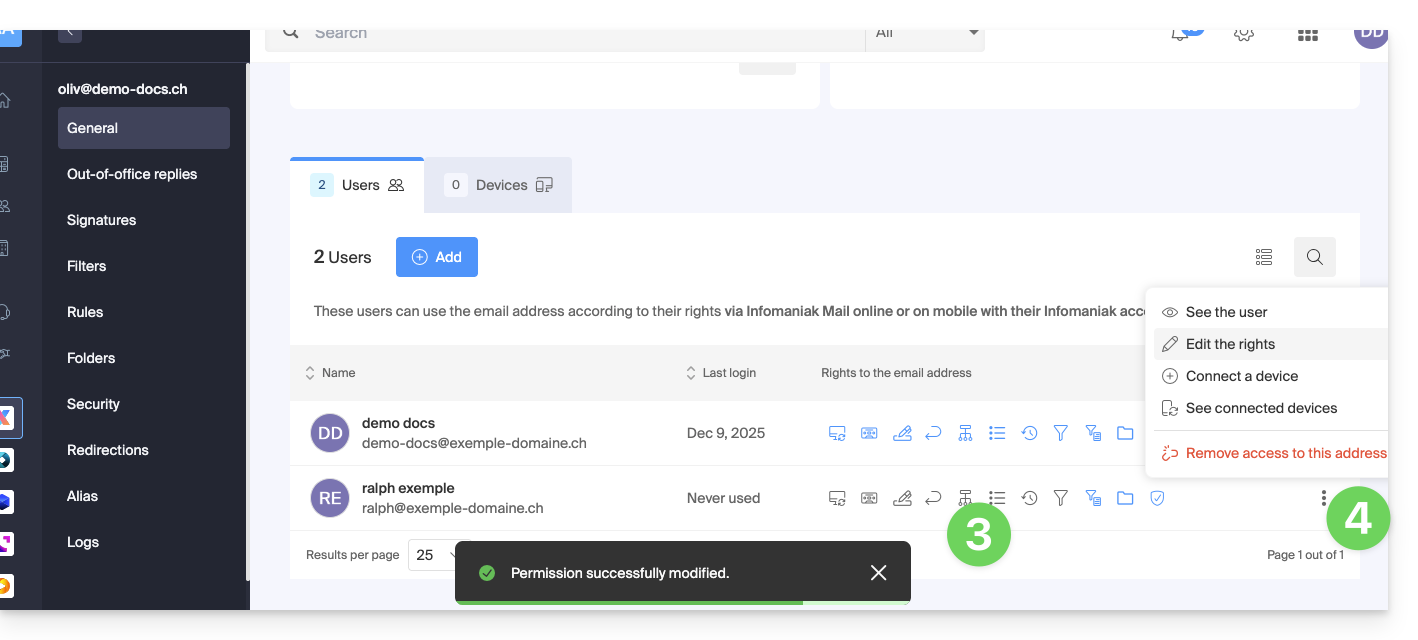
The user in question has access to the email address concerned:
Option [ b ]: external user to the Organization
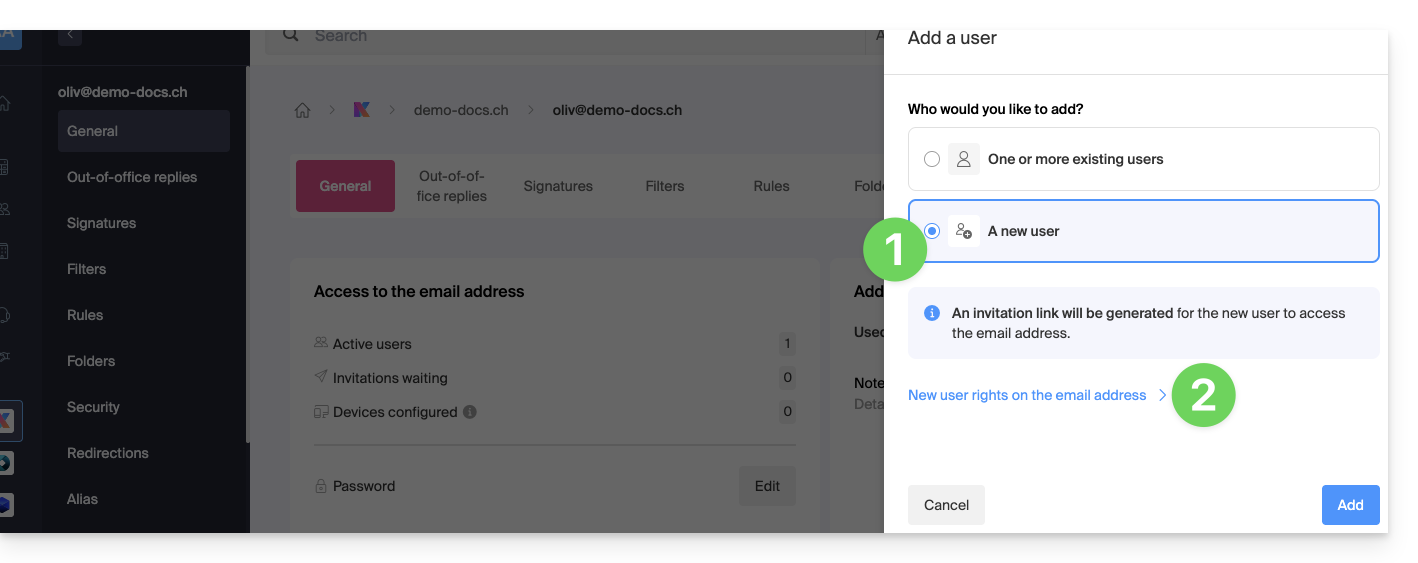
- Click the radio button to select the option for new user.
- Click to configure the user's rights:
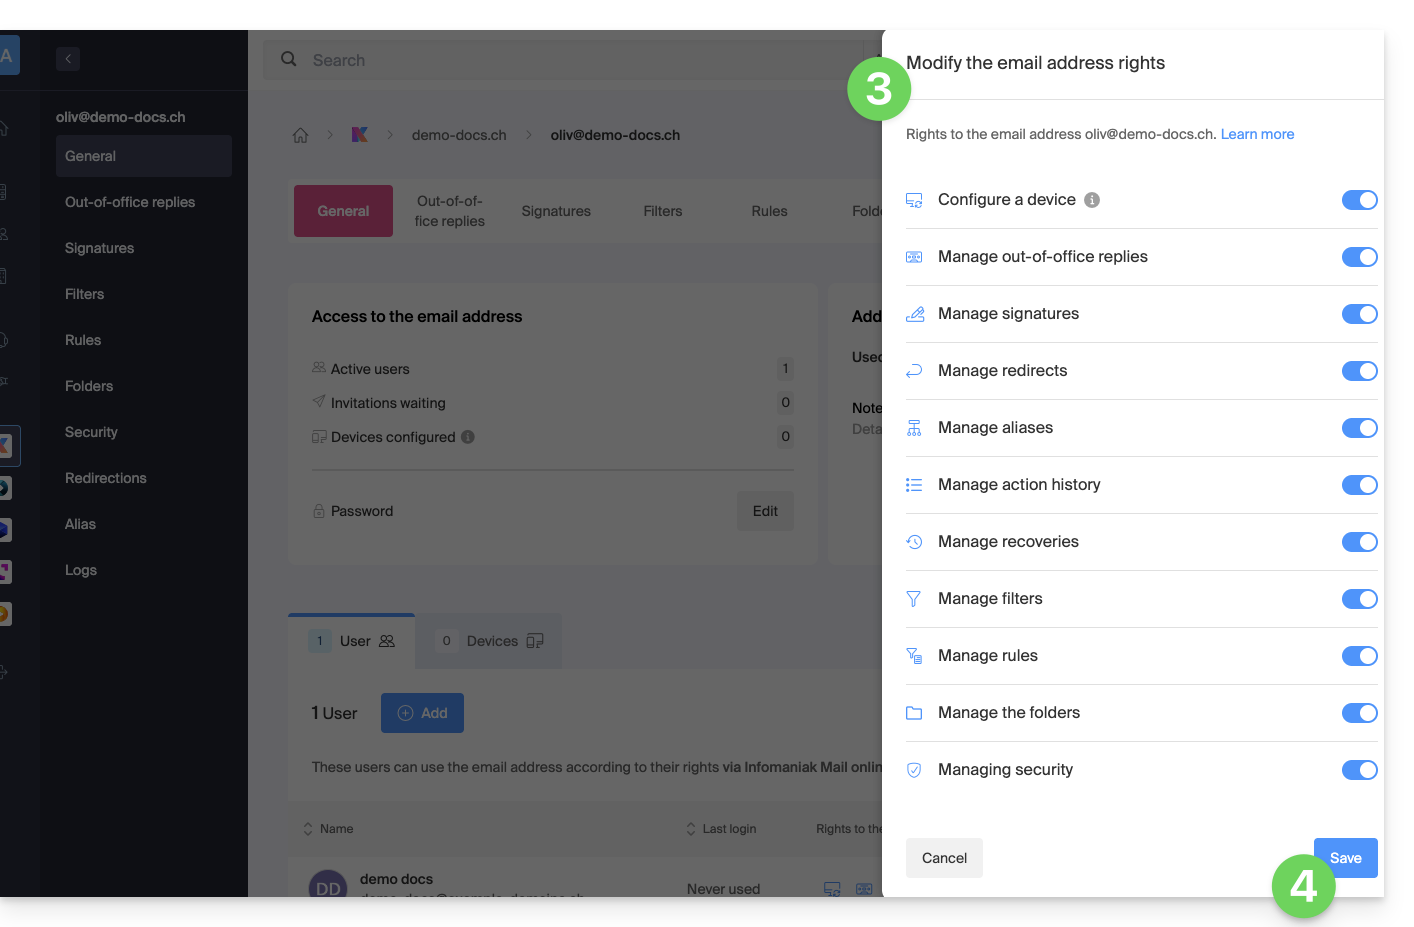
- Modify, if necessary, the permissions granted to the user for the email address concerned.
- Save the changes:
- Click the button to Add the user:

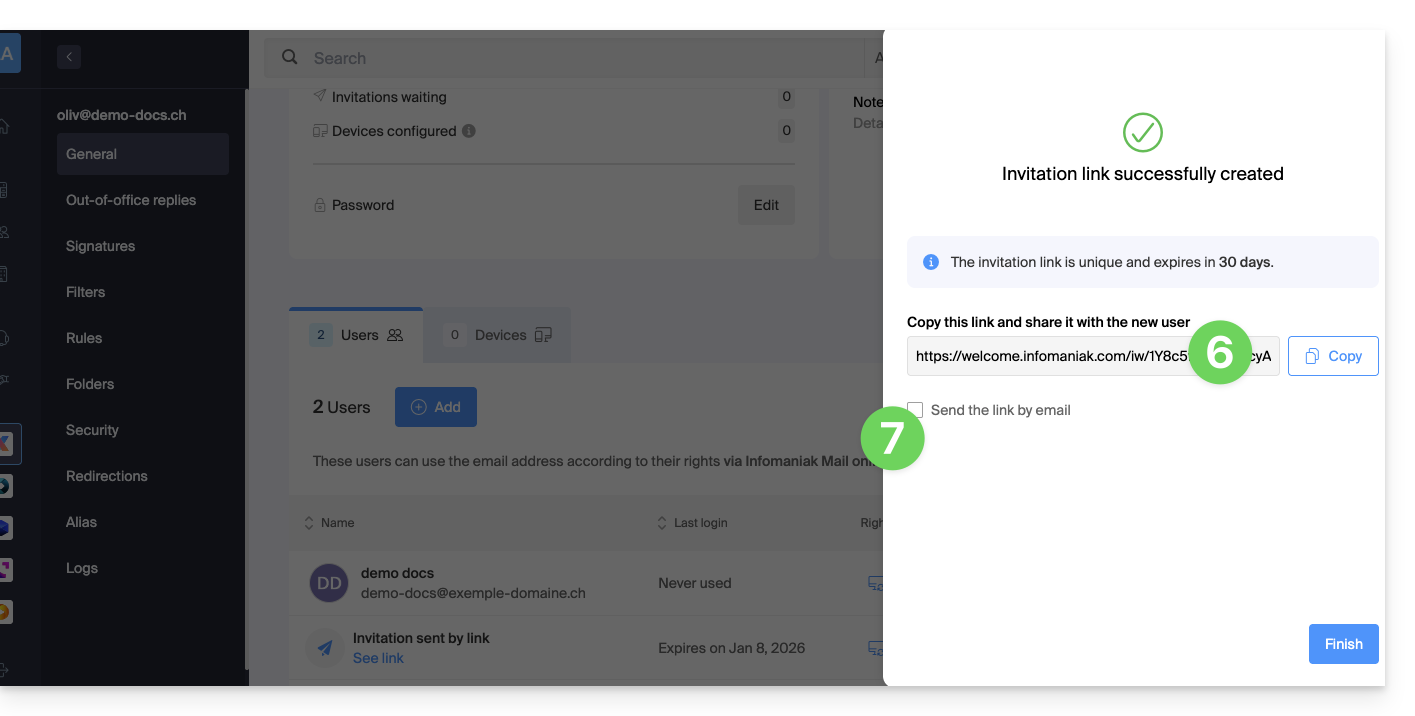
- The invitation is created, and the user just needs to execute the provided link (see below) to add the email address to their Infomaniak Mail.
- It is possible to send the invitation by email:
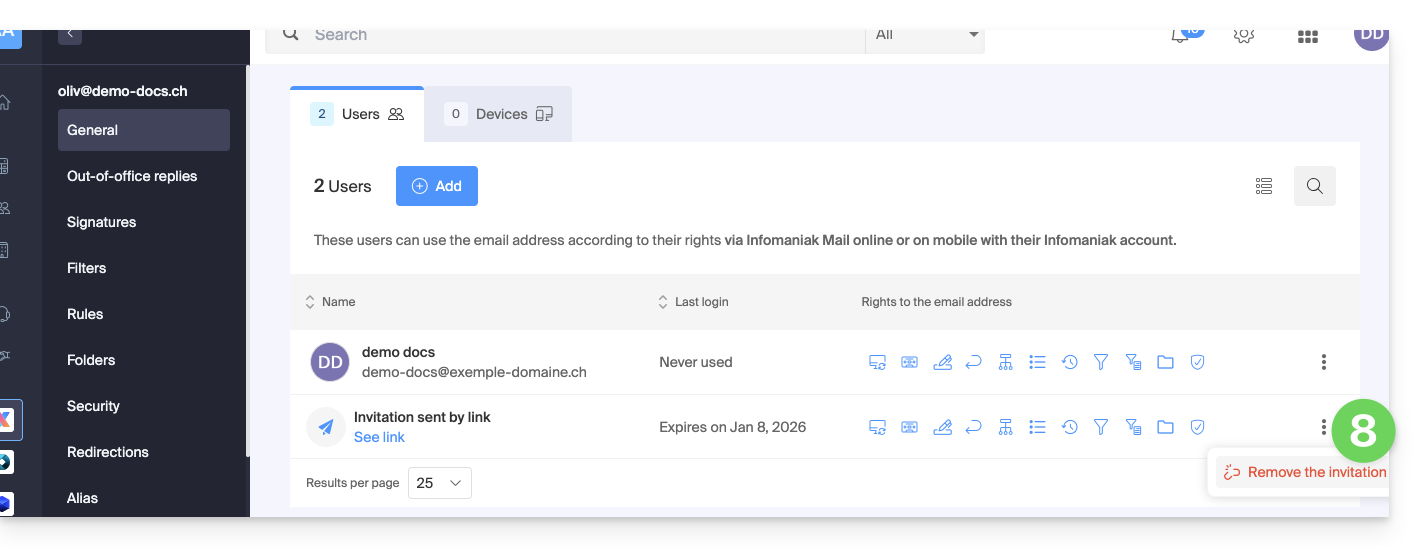
- The invitation is visible under the email address user tab, and it can be deleted at any time:
The user will have access to the email address concerned if they execute the invitation link while logged into their account…
- ... or if they log into their account after executing the invitation link:
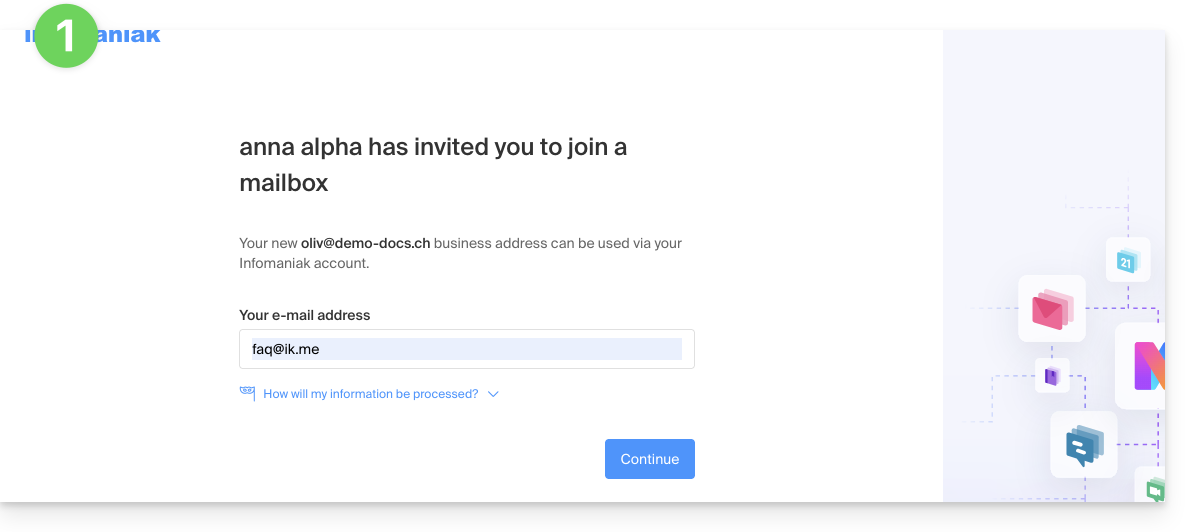
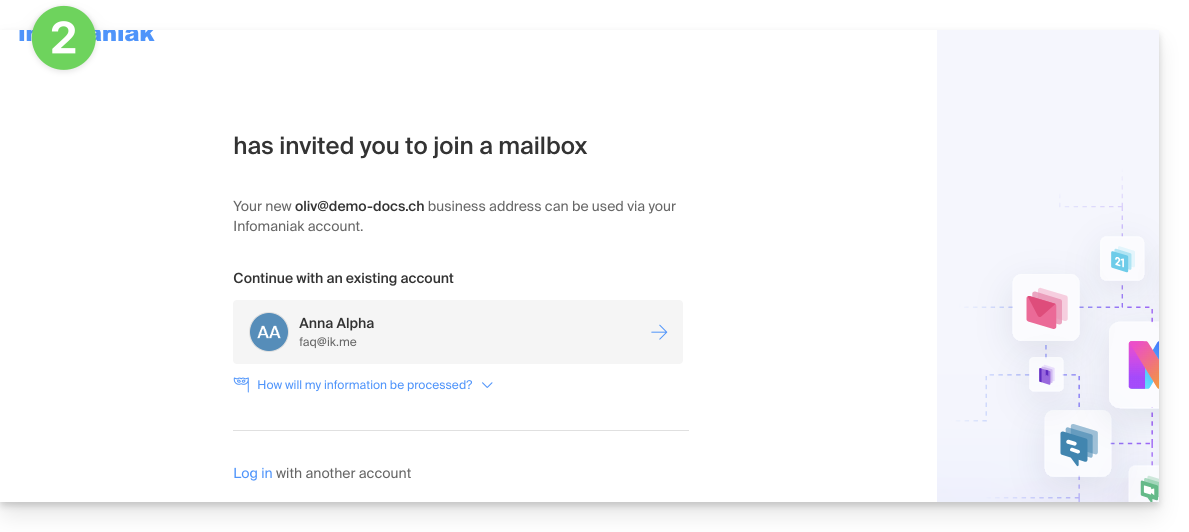
- If necessary, the user can still switch accounts before attaching the address if necessary:
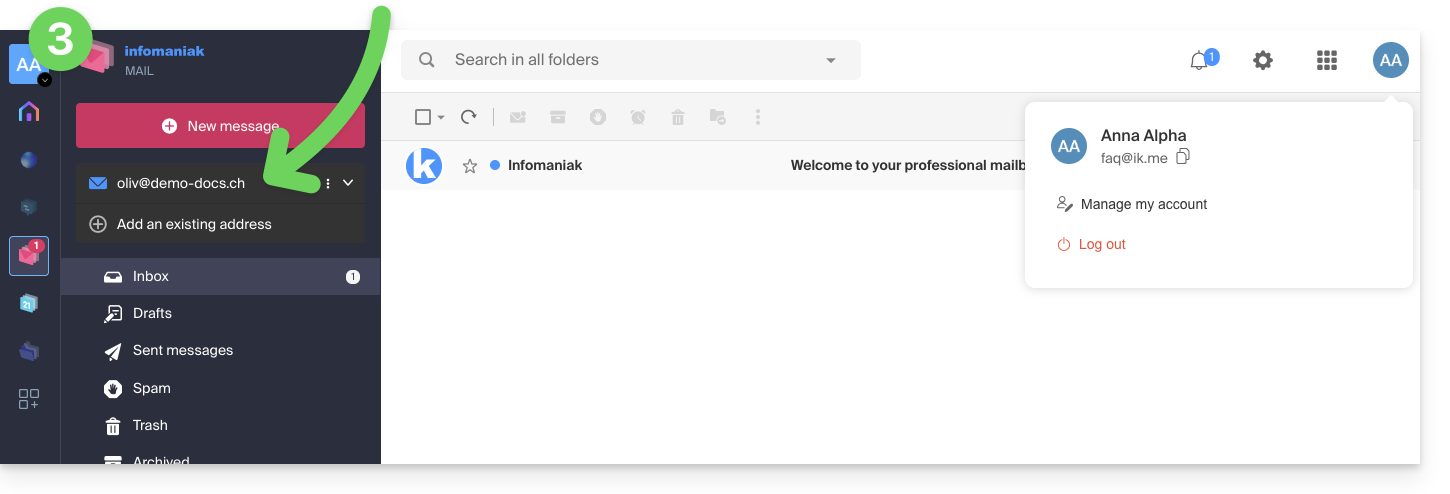
- The user in question has access to the email address concerned once they have chosen which Organization:
... from the Infomaniak Web Mail app
To access the same process as above but from the Infomaniak Web Mail app (online service ksuite.infomaniak.com/mail):
- Click here to access the Infomaniak Web Mail app (online service ksuite.infomaniak.com/mail).
- Click on the action menu ⋮ to the right of the email address concerned.
- Click on the Settings of the email address:
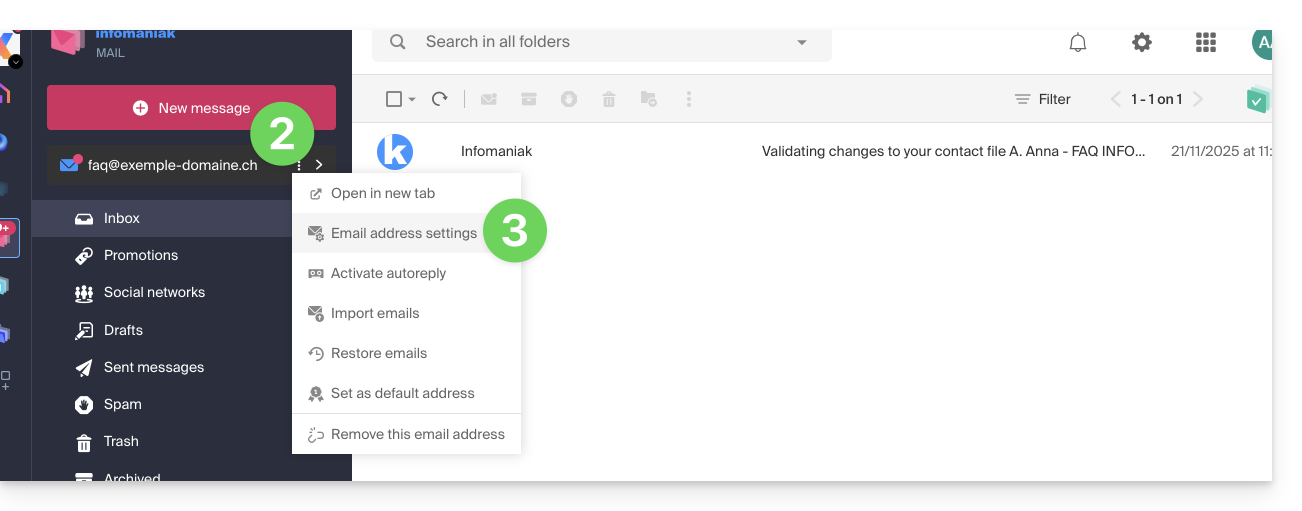
- Click on Invite a user:
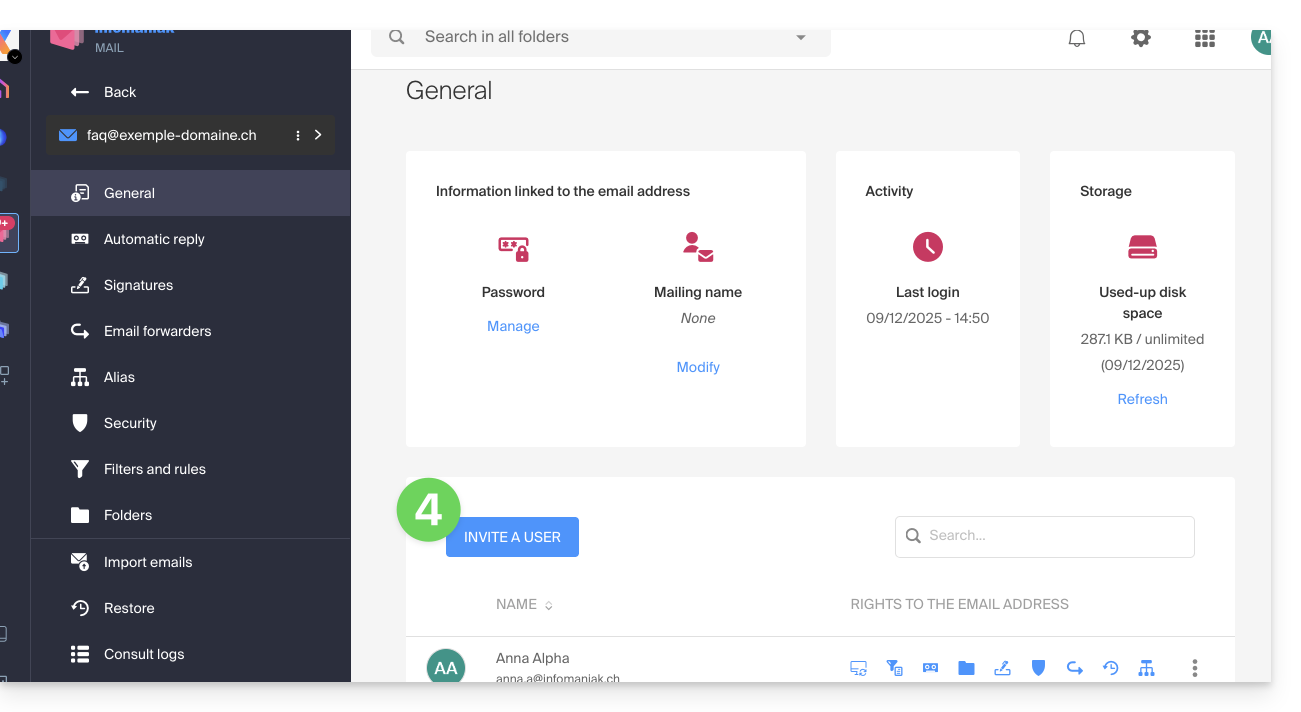
- Enter the password to log in to your Infomaniak account if prompted.
- Modify, if necessary, the permissions granted to the user for the email address in question and click on Next:
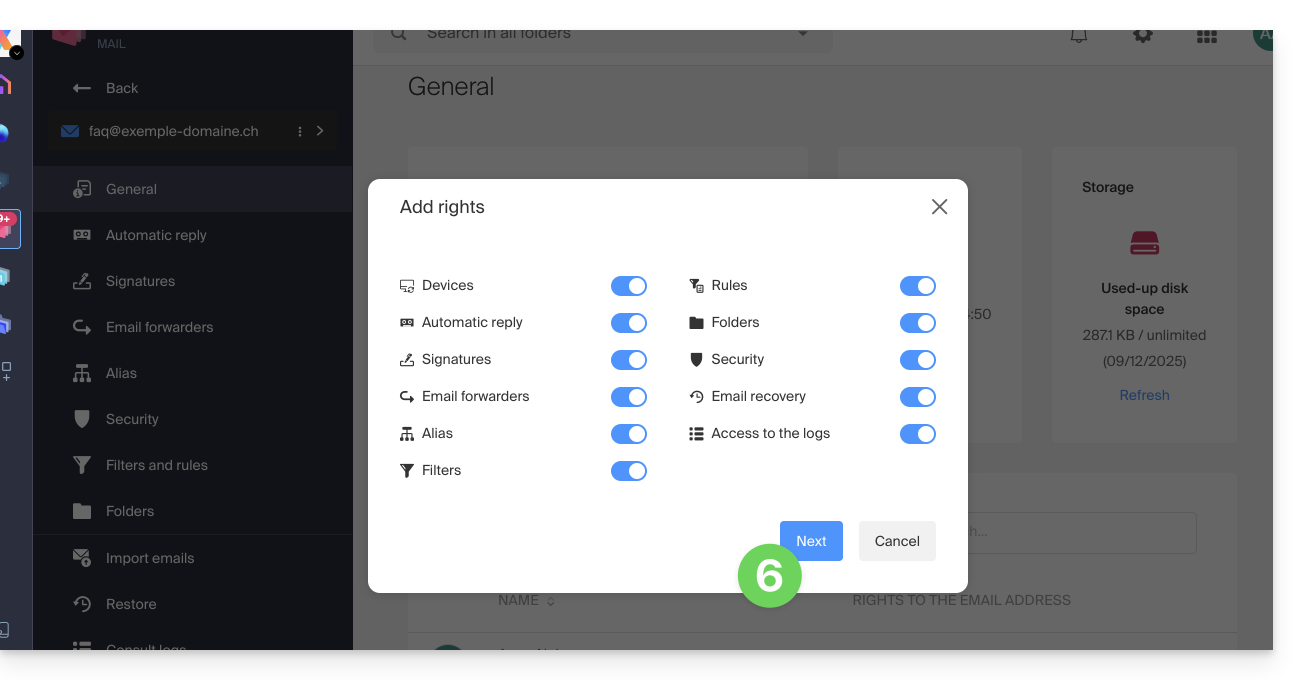
- The invitation is created and the user will only need to execute the provided link to add the email address in question to their Infomaniak Mail.
- It is possible to send the invitation by email:
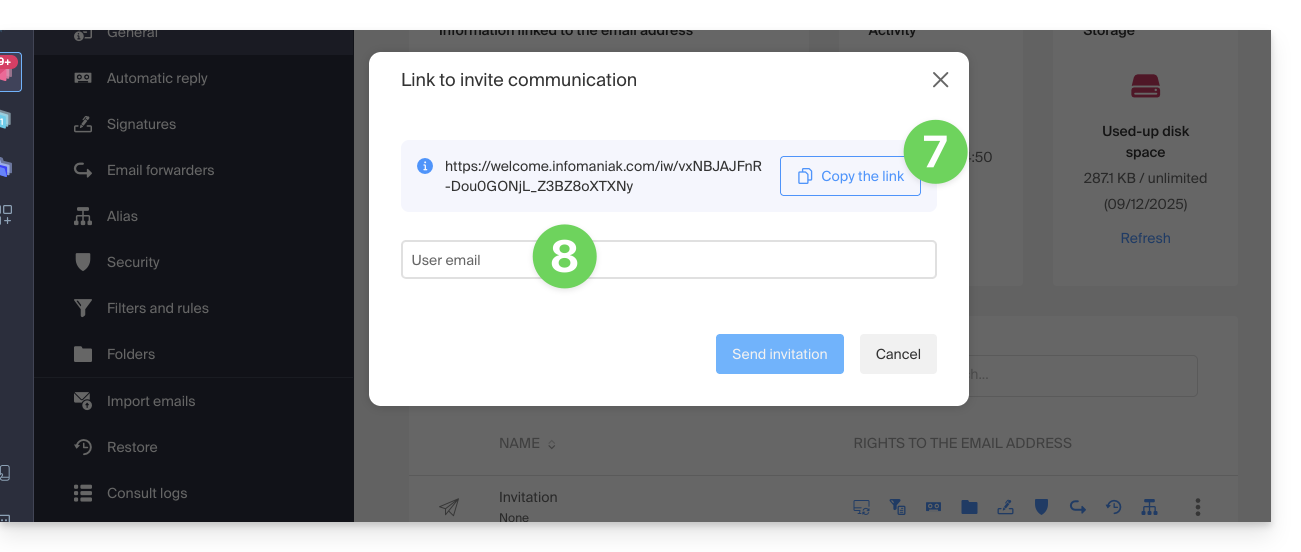
In case of a problem
If the Invite button (point 6 above) is not visible or remains greyed out, check that:
- your user account has sufficient permissions to administer the product in question
- the email address in question does not yet exist as a login identifier for an Infomaniak Organization
- the table under the button does not mention a user listed with an email address identical to the email address in question
Example: you want to invite someone to view the address anna.a@domain.xyz but the button is greyed out because a user anna.a@domain.xyz is listed in the table.
Solution: to be able to invite a new user to view the address in question, completely delete the user account with the login address being the email address in question.
This guide explains how to add a folder or subfolder as a favorite on the Infomaniak Web app Mail (online service ksuite.infomaniak.com/mail).
Preamble
- Automatically placed at the top of your folder list, you will get a shortcut and quick access to this folder.
- Several folders can be marked as favorites.
Define a folder as a favorite
To add a folder as a favorite or remove it:
- Click here to access the Infomaniak Web app Mail (online service ksuite.infomaniak.com/mail).
- Click on the action menu ⋮ to the right of the folder concerned in the left sidebar:
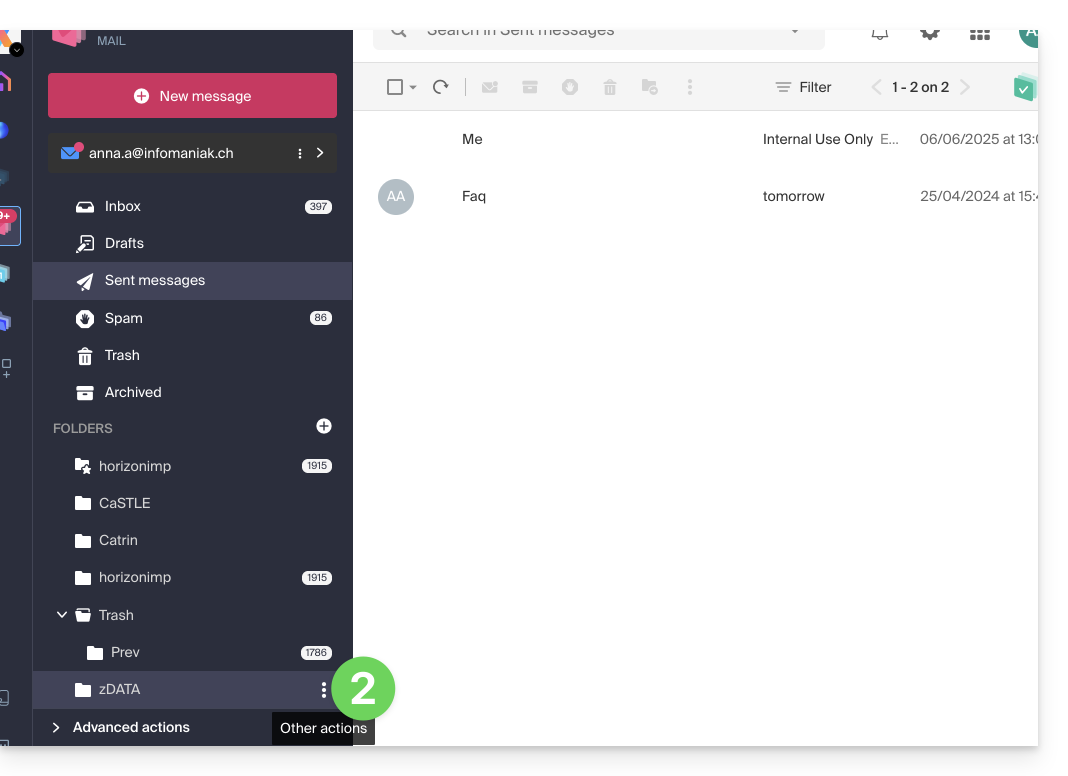
- Choose the desired action:
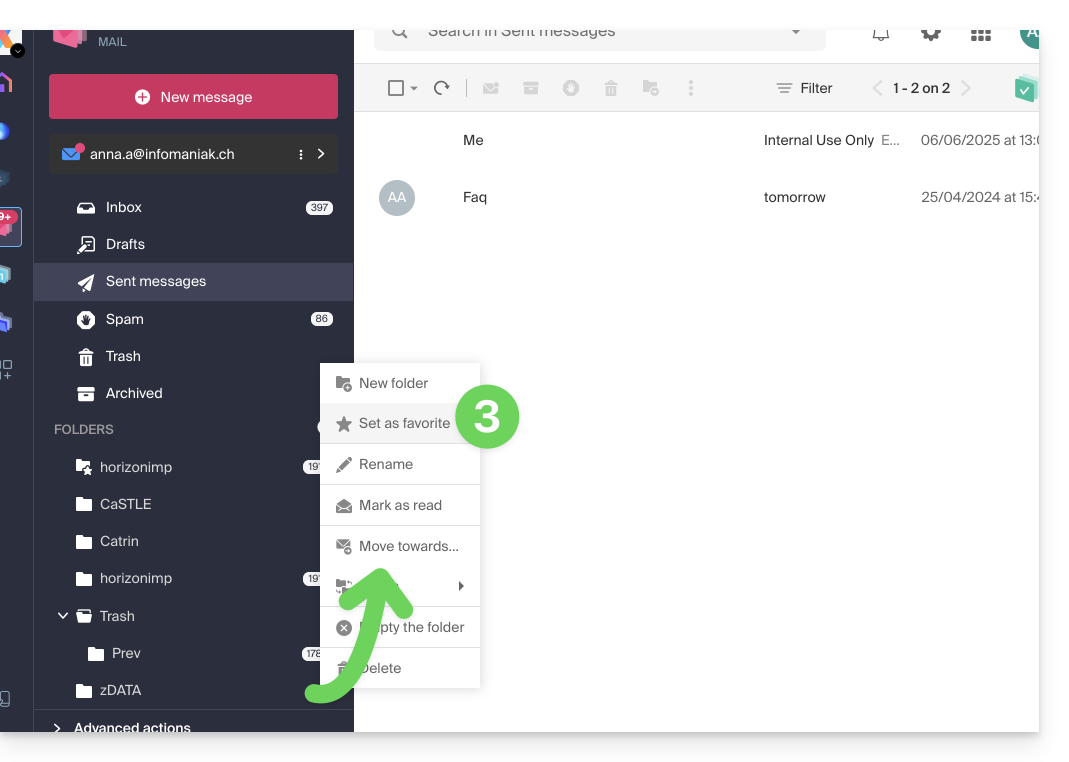
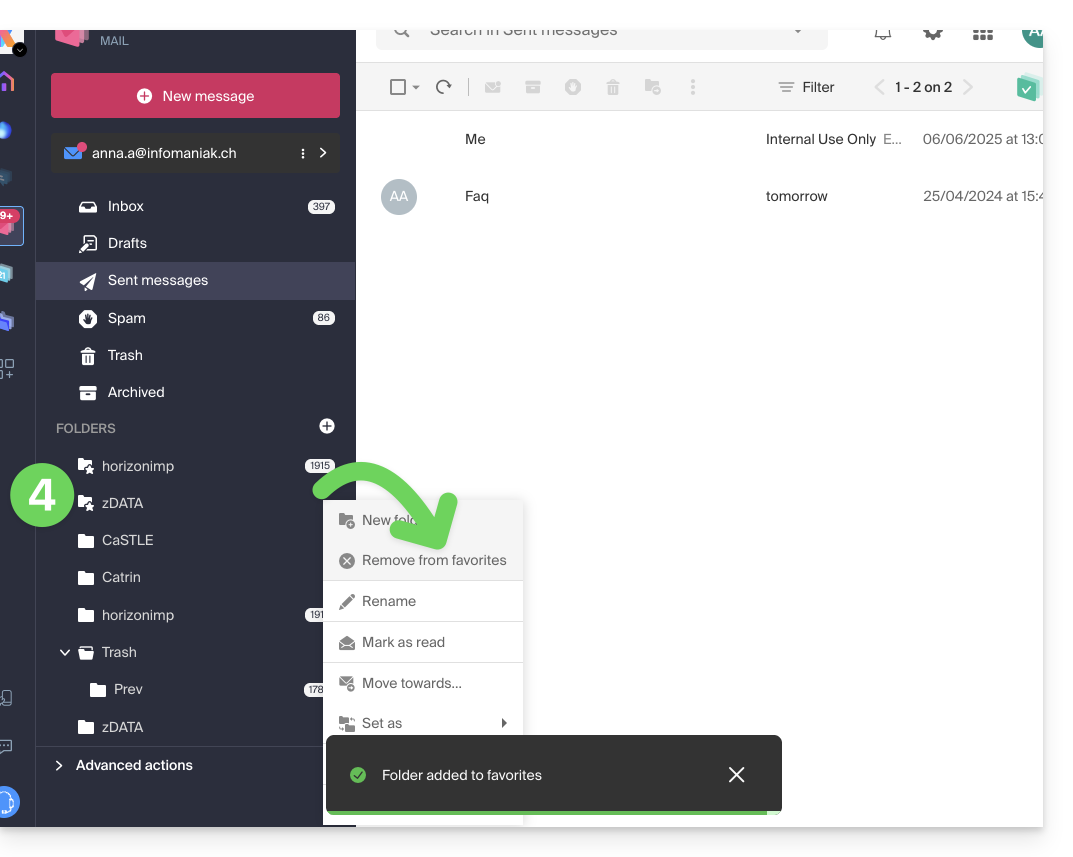
- The folder defined as a favorite is “duplicated” at the beginning of the folder list with a star on its icon (but it is the same folder as the one in the list below); you can remove a favorite at any time via the action menu:
And on the mobile app?
It is not possible to add a folder as a favorite from the Infomaniak mobile app Mail (application for iOS / Android smartphone or tablet).
You can mark messages as favorites to keep track of them.
Otherwise, to access your folders on the mobile app:
- Tap the icon at the top left of the Mail inbox.
- A panel unfolds from the left and displays several sections.
- The collapsible "Folders" section displays your folders in alphabetical order; you can create new folders, then rename or delete them by holding down on the folder name in the list.
This guide explains how to schedule the sending of an email so that your message is sent at a specific date/time in the future, this on the Web app Mail Infomaniak (online service ksuite.infomaniak.com/mail), even if you are no longer connected at that time.
⚠ Available with:
| kSuite | Free | * |
| Standard | ||
| Business | ||
| Enterprise | ||
| my kSuite | * | |
| my kSuite+ | ||
| Mail Service | Starter 1 max. address | * |
| Premium 5 min. addresses |
* without customizing the schedule
Scheduled sending is also possible on the mobile app Infomaniak Mail (application for iOS/Android smartphone or tablet).
Deferred sending: schedule a message
To send an email at a later date/time:
- Click here to access the Web app Mail Infomaniak (online service ksuite.infomaniak.com/mail).
- Compose a new message as usual.
- Click on the chevron to the right of the Send button to access additional actions.
- Choose the time the message should be sent, from the suggestions or by customizing the schedule (available only for paid offers):

- You can then find your scheduled messages in a new dedicated section:

Reschedule or unschedule a scheduled send
To modify the sending time of a message already scheduled to be sent later:
- Click here to access the Web app Mail Infomaniak (online service ksuite.infomaniak.com/mail).
- Click on Scheduled sends in the left sidebar.
- Open the message for which you want to modify the future sending time.
- Click on the pencil icon ✎.
- Accept that the message is moved to the drafts and that the scheduled sending is therefore cancelled.
- Restart at step 3 of the first chapter above to reschedule a future send.
Completely delete a scheduled message
To permanently delete a message without the possibility of recovering it:
- Click here to access the Web app Mail Infomaniak (online service ksuite.infomaniak.com/mail).
- Click on Scheduled sends in the left sidebar.
- Hover over the message to delete and click on the trash can:

- Confirm the deletion to permanently destroy the draft.
This guide explains how to activate the Infomaniak anti-spam filter, which significantly reduces the number of unsolicited messages that can reach your Infomaniak email address if you share it with third parties.
Preamble
- Spam is unsolicited mail, often of an advertising or fraudulent nature, aimed at promoting products, services, or carrying out online scams; fortunately, Infomaniak has implemented strategies to combat this form of digital pollution.
- Thanks to the anti-spam filter, the messages you genuinely want to see quickly will no longer be buried among dozens of other unwanted messages, as the latter will be automatically placed in a special folder, the
Spamfolder (or in the spam destination folder - see below) and then automatically deleted after 30 days. - Moreover, the filter is automatically activated when creating an email address within an Infomaniak Mail Service or when subscribing to a my kSuite / my kSuite+ offer.
Activate the option from the Infomaniak Web Mail app
Prerequisites
- Have permission to manage the filter: it is possible that the Mail Service manager has revoked this right from their admin account.
To access your Infomaniak mail settings:
- Click here to access the Infomaniak Web Mail app (online service ksuite.infomaniak.com/mail).
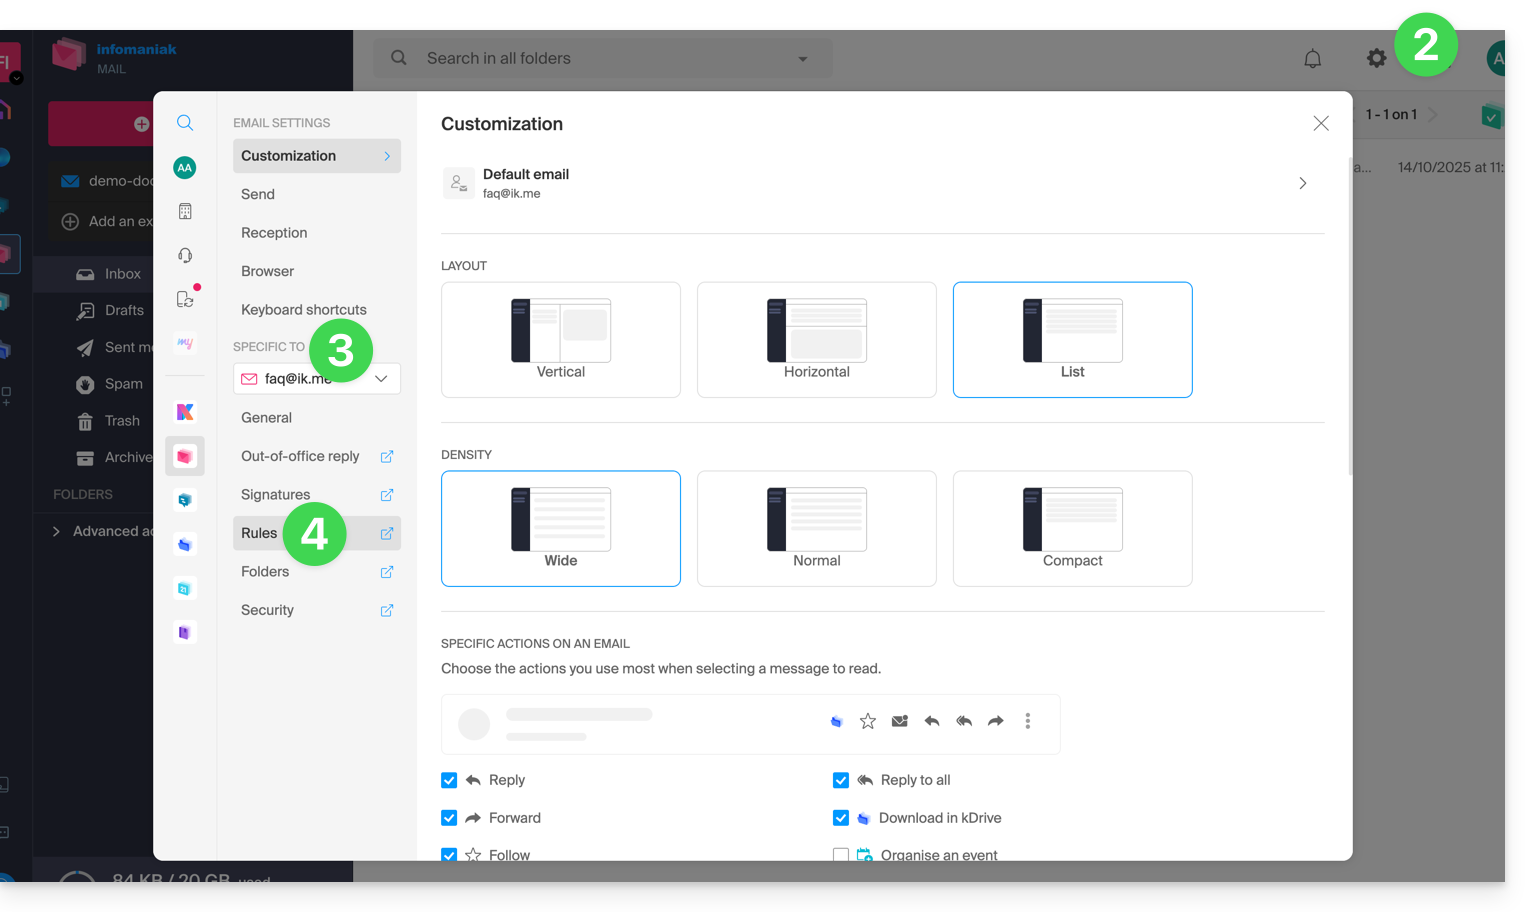
- Click on the Settings icon in the top right corner.
- Check or select the relevant email address in the dropdown menu of the left sidebar.
- Click on Filters and rules:
- Activate the spam filter option, the effect is immediate (wait for the on-screen confirmation message); in this case, all future messages with a header indicating a high spam score (and blocked senders) will go to the Spam folder:
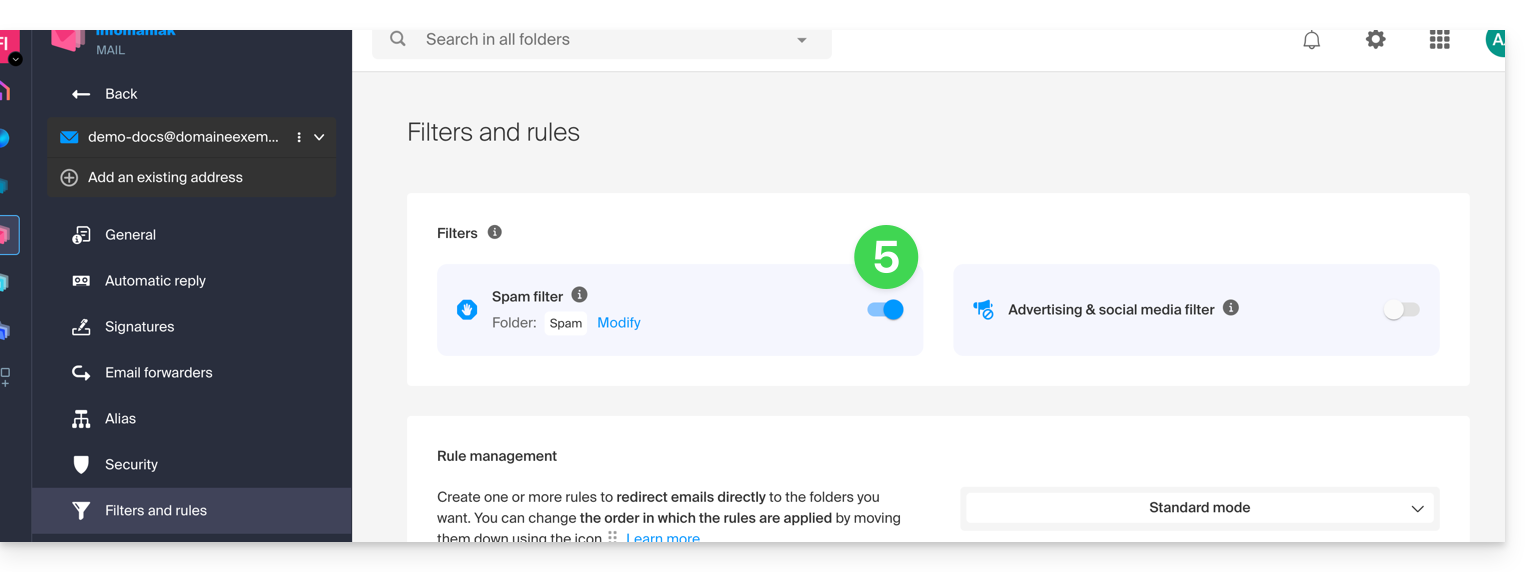
- Simply click the toggle switch again to deactivate the filter; in this case, all future messages will go to the inbox, including messages with a header indicating a high spam score.
Activate the option from a Mail Service
To access your Infomaniak mail settings:
- Click here to access the management of your product on the Infomaniak Manager (need help?).
- Click directly on the name assigned to the relevant product.
- Click on the relevant email address in the displayed table.
- Click on Filters in the left sidebar.
- Activate the spam filter option, the effect is immediate:
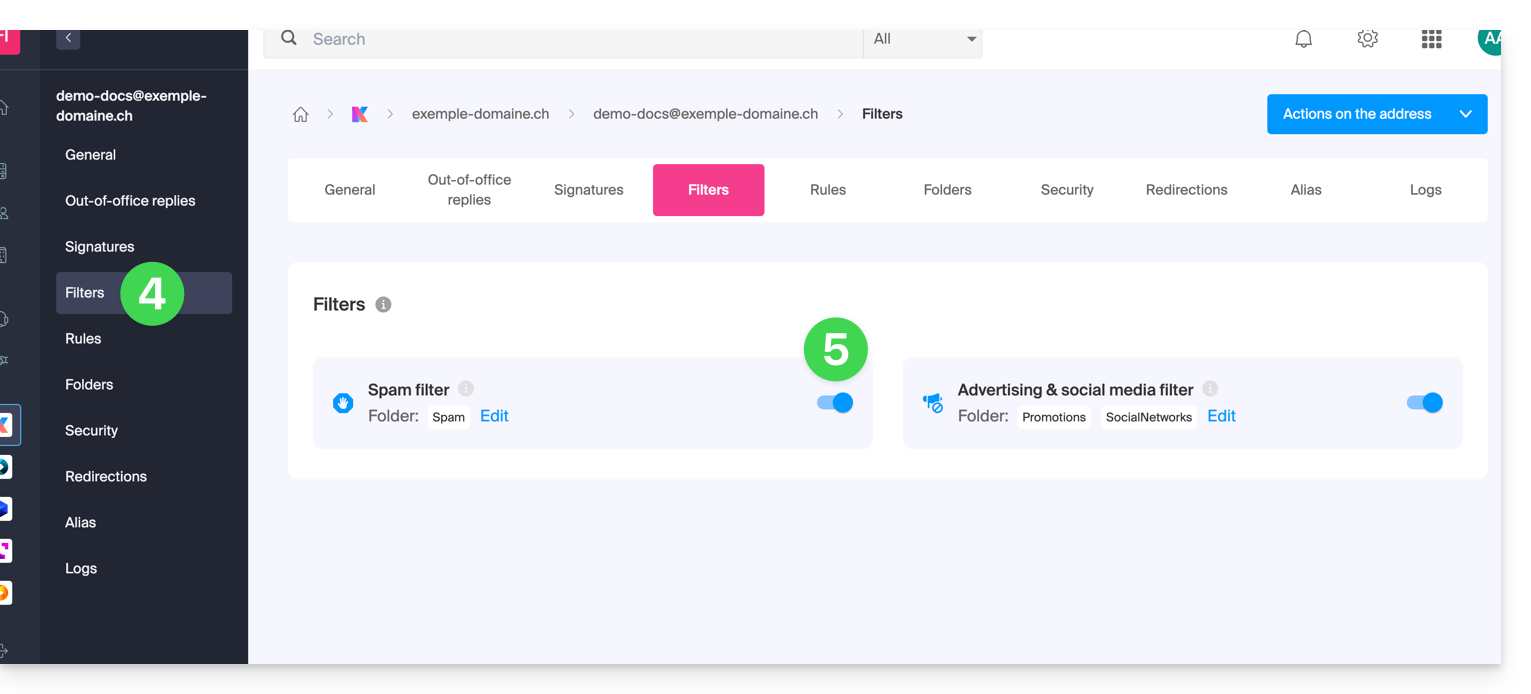
- Simply click the toggle switch again to disable the filter; in this case, all future messages will go to the inbox, including messages with a header indicating a high spam score (they can be processed downstream by your software/email client if it supports reading this type of header).
Note that you can activate it in bulk on multiple addresses at the same time.
Customize the anti-spam filter
Modify the location of spam
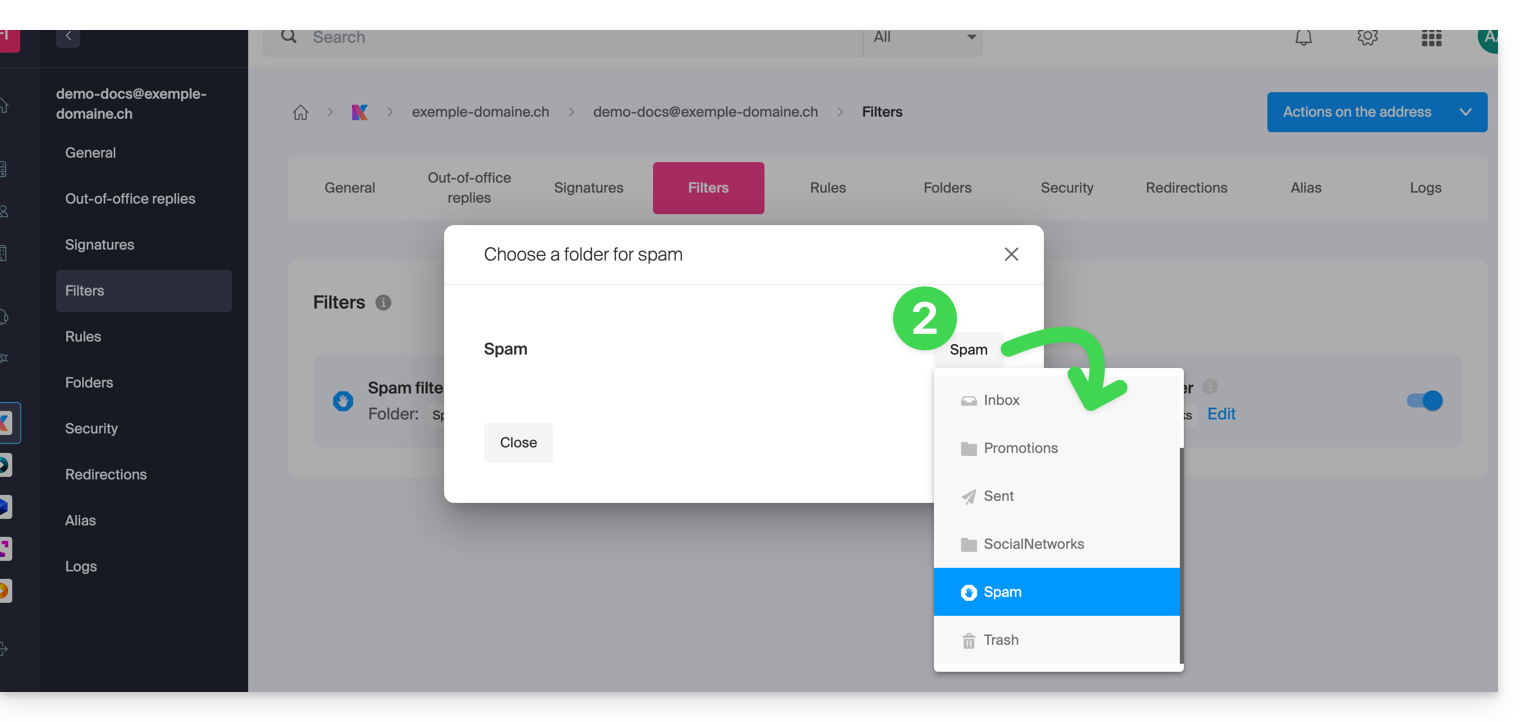
You can choose the default location of the folder where messages considered as spam will be automatically placed (similar to special IMAP folders).
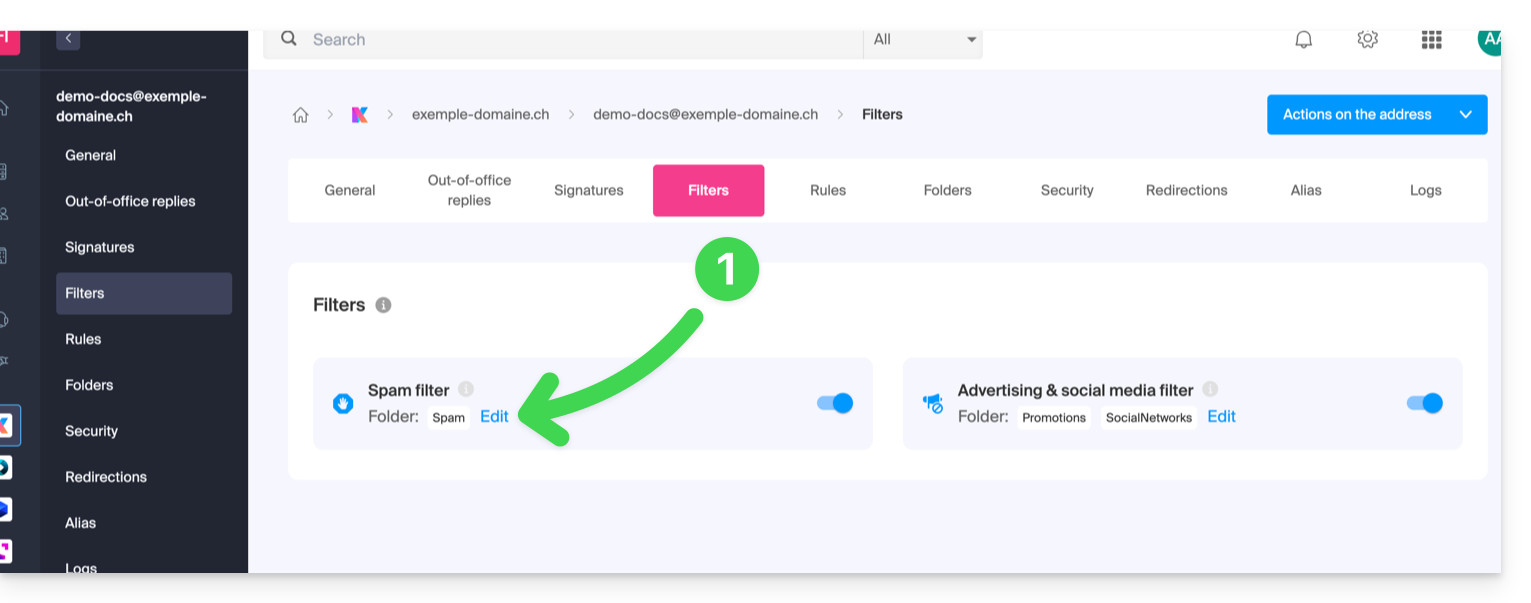
Where you have activated the spam filter:
- Click on Modify:
- Click on the folder name to choose another one (create a new one in advance if necessary):
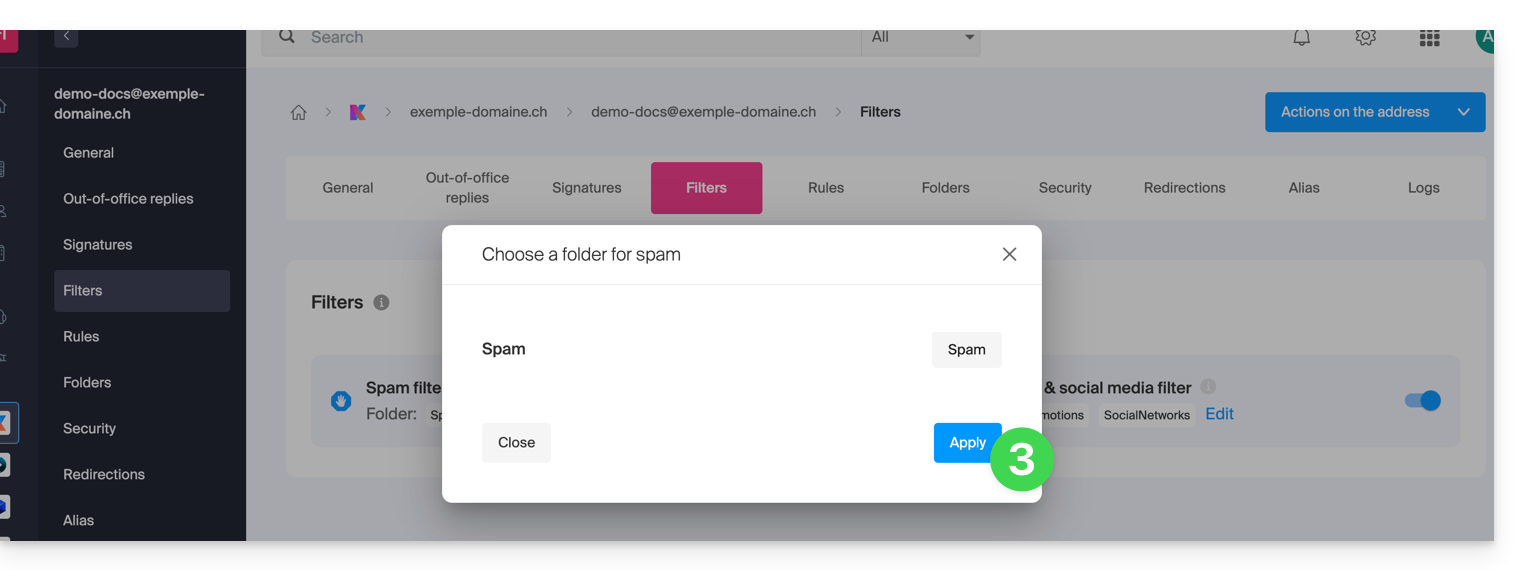
- Click on the Validate button:
Report a filtering issue or manually block senders
Report unfiltered Spam or an email filtered when it is not Spam (false positive): refer to this other guide on this subject.
You can also specify in advance which senders should always go to the Spam folder (or vice versa, if they should not be filtered): refer to this other guide on this subject.
For added security, enable the external mail mention.
This guide explains how to mark your chosen emails as "favorite" in the Infomaniak mail service to keep a "track" of these messages and display them separately if you wish.
Monitor one or several messages…
… from the Infomaniak Web Mail app
To add a message as a favorite:
- Click here to access the Web Mail Infomaniak app (online service mail.infomaniak.com).
- Click on the ☆… icon
- … to the left of a message in the message list
- … at the top right of the message reading window
- Once tracking is enabled, a dropdown menu in the top right corner allows you to display only a selection of your received messages according to several criteria: All, Read, Unread, Followed, Unfollowed.
… from the Infomaniak Mail mobile app
In the message list:
- Press and hold your finger on a message.
- Press the ☆ icon at the bottom of the screen.
- If necessary, exit the message selection by pressing the Cancel button at the top of the screen:
While reading a message:
- Press the ☆ icon at the top right of the message reading window:
It is also possible to set up a swipe gesture that would mark the swiped message as a favorite.
This guide explains how to temporarily set aside an email until a specific date/time, this on the Web app Mail Infomaniak (online service ksuite.infomaniak.com/mail).
⚠ Available with:
| kSuite | Free | * |
| Standard | ||
| Business | ||
| Enterprise | ||
| my kSuite | * | |
| my kSuite+ | ||
| Mail Service | Starter 1 max. address | * |
| Premium 5 min. addresses |
* without customizing the schedule
Snoozing is also possible on the mobile app Infomaniak Mail (application for iOS / Android smartphone or tablet).
Preamble
- At most 1000 discussions from the inbox only can be snoozed, this up to at most 1 year (this snooze can be stopped or temporarily modified at any time).
- During this snooze (function snooze, or remind):
- The discussion is moved to a folder Pending visible on the Mail app and on which the number of pending discussions is displayed.
- If a new message arrives in a snoozed discussion, it will be automatically canceled and the discussion will be visible in the inbox.
- When the deadline arrives:
- The discussion automatically returns to the inbox, in the first position, with a particular notification.
- The message, until it is read, will display an indication Pending since X (X being the date on which the message returned to the inbox).
- On an email/client software like Outlook in IMAP:
- When put on hold, the discussion will remain in its original place.
- If you manually move a message that has been put on hold, the functionality for that message is no longer effective on the web app side.
- When the deadline arrives, the discussion will move to the top as on the web app and a standard "new message" notification will be displayed.
Temporarily archive an email
Prerequisites
- Enable conversation mode for your email addresses from the Infomaniak web app Mail (online service ksuite.infomaniak.com/mail).
Then, to temporarily hide one of your messages among all your emails and have it reappear in your inbox at a future time that you have scheduled:
- Click here to access the Infomaniak web app Mail (online service ksuite.infomaniak.com/mail).
- On the message or discussion concerned, click on the clock icon in the toolbar.
- Choose how long the message should disappear from your inbox, from the predefined choices or by customizing the duration:

- Once on hold, the message appears in a new folder dedicated to pending messages.
- The end date/time of the hold is displayed next to each of the messages:

To enable access to this feature directly from the list of your messages in the inbox:
- Click here to access the Infomaniak web app Mail (online service ksuite.infomaniak.com/mail).
- Click on the Settings icon at the top right.
- Click on Customization in the left sidebar.
- Enable the on hold feature in the Hover actions section:

- Return to the inbox, you will then have the possibility to put one of your emails on hold directly in the list:

This guide explains how to insert rich text and images within your messages on the Web app Mail Infomaniak (online service ksuite.infomaniak.com/mail).
Preamble
- To set some of the settings below by default for all your new messages, refer to this other guide.
- Refer to this other guide if you are looking for information about adding and inserting images.
Customize and format an email
To modify the writing style of your emails on Mail Infomaniak:
- Click here to access the Web app Mail Infomaniak (online service ksuite.infomaniak.com/mail).
- Compose a new message and select a part of it.
- Click on the icon
Aat the bottom right of the composition window to display the toolbar. - Format your text with style options (italic / bold / underlined), size, font, alignment, colors, etc. or revert to plain text:

- It is also possible to edit the source code (HTML) of your message:

This guide explains how to enable or disable the inclusion of the original message when replying to an email from the Infomaniak Web app Mail (online service ksuite.infomaniak.com/mail) for web browser.
No longer quote the original message
By default, the text of the message you are replying to will be placed below your own reply text (A):
By following the guide below, nothing will be quoted from the original message and you will reply from a blank base with or without signature (B):
To never quote the original message when replying to a correspondent:
- Click here to access the Infomaniak Web app Mail (online service ksuite.infomaniak.com/mail).
- Click on the Settings icon in the top right corner.
- Click on Sending in the left sidebar menu.
- Disable the toggle switch to the right of the "Include original message in reply" item:

This guide explains how to connect the Apple Mail desktop app (desktop application on macOS) to an email address hosted by Infomaniak.
Preamble
- Your macOS computer will be automatically configured via .mobileconfig configuration profiles compatible with Apple, unlike a manual configuration.
- It is possible to remove a configuration profile once installed (scroll to the bottom of this page for instructions).
- The various services offered by Infomaniak are all compatible with the corresponding standard protocols (IMAP/SMTP for email, for example). Therefore, if you encounter a problem with third-party software, contact the publisher directly or a Partner and consult the support policy as well as section 11.9 of the Infomaniak Terms of Service.
Install a configuration profile
Prerequisites
- Create the email address in my kSuite or a Mail Service / kSuite.
- Create a password for the email address on the device you are going to configure.
- Check that the Mail Service is configured optimally.
You can download the profile from the device in question or send it from another device (if you already have a working email address, for example):
- Click here to access the Infomaniak configuration tool (online service https://config.infomaniak.com) — log in if necessary to your Infomaniak account on the Organization on which your email address is managed.
- Choose to install the profile on this device.
- Choose to synchronize emails.
- Enter the password for the email address (attached to Mail Infomaniak (Webmail)) that you wish to synchronize.
- Click on the blue Verify button:

- Download the configuration profile:

- Open the System Settings of the computer.
- Click on General in the sidebar, then click on Device Management (for macOS Sequoia 15 version). If you have a lower version or cannot find the profile, refer to the official documentation by changing the version of your system at the top of the page if necessary:

- Click on +:

- Locate and then open the previously downloaded file:

- Click on Continue:

- Enter the email address password.
- Click on Install:

- There you go, your email address is now configured in the Apple Mail application that you can open and control.
Delete an IMAP account
Refer to the chapter "Stop using an account" by changing the system version at the top of the page if necessary (be careful: do not delete a POP3 account without saving your messages first).
Delete an Apple profile
Refer to the official documentation by changing the system version at the top of the page if necessary.
*Why is it necessary to choose the guide version that exactly matches your macOS / iOS system version? Apple sometimes introduces subtle changes with each new system version, for example a path on iOS 15…
…becomes this on iOS 18…
This guide explains how to view the activity logs of email addresses contained within an Infomaniak Mail Service.
Preamble
- The logs of your email addresses are available for free for the last 20 days.
- Consulting the logs over a longer period is payable:
View the logs from the Infomaniak Web Mail app
Prerequisites
- Have a valid access to the Web Mail app Mail Infomaniak (online service ksuite.infomaniak.com/mail) to which the email address is attached.
- Be Administrator or Legal Representative within the Organization that manages the Mail Service.
- Have permission to view the logs: it is possible that the manager of the Mail Service has removed this right from your admin account.
Then to access the logs from Mail Infomaniak:
- Click here to access the Web Mail app Mail Infomaniak (online service ksuite.infomaniak.com/mail).
- Click on the Settings icon at the top right.
- Check or select the email address concerned in the dropdown menu of the left sidebar.
- Click on General below.
- Click on View the logs:

- Choose to view the logs of sent or received emails, and set the date and time.
- Click on Search.
View the logs from Mail Service
To access the Mail Service:
- Click here to access the management of your product on the Infomaniak Manager (need help?).
- Click directly on the name assigned to the product concerned.
- Click on the email address concerned in the table that appears:

- Click on Logs in the left sidebar menu.
- From the dropdown menu, select an email address (by default, it is the first address of the Mail Service that is selected).
- Choose to view the logs of sent or received emails, and set the date and time:

- Click on Search.
Log results
The email sending and receiving logs will be presented in the form of a table.
Hover your mouse over the possible icon ⓘ in the Status column to display more information if necessary:
This guide explains how to create a template for the automatic message tool when absent for all your messaging on the Infomaniak Web app Mail (online service ksuite.infomaniak.com/mail).
Preamble
- A template allows you to create the neutral base of a tool that can then be used by multiple users of the same Infomaniak Mail service, or even personalized according to the person who will use it.
- In the case of a reply template, the creator of the template chooses the text that will be sent when a new sender contacts an address to which the template has been applied.
- You can also hide a template so that it is no longer used.
Create a reply template
To create a template:
- Click here to access the management of your product on the Infomaniak Manager (need help?).
- Click directly on the name assigned to the product concerned.
- Click on Global Configuration in the left sidebar.
- Click on the Reply tab.
- Click on Add a reply template:

- Fill in the fields and press Add the reply template:

- If the Make visible option is enabled (during creation or possible choice afterwards), the reply templates created will be suggested to users of email addresses.
Activate a template on an existing email address
It is necessary to have an existing template to activate it on one or more email addresses:
- Click here to access the management of your product on the Infomaniak Manager (need help?).
- Click directly on the name assigned to the product concerned.
- Click on the boxes to select one or more email addresses in the table that appears.
- Depending on the screen size, click first on the action menu ⋮ or directly on Apply an answering machine template.
- Select the template of your choice.
- Only the templates made visible are available when activating.
- Click on the button Activate:


