Knowledge base
1000 FAQs, 500 tutorials and explanatory videos. Here, there are only solutions!
This guide explains how to view a website hosted by Infomaniak even if no domain name / URL is currently configured correctly to direct the visitor to this site.
Preamble
- Thanks to the preview URL of your website, you can get the current version of your content in a browser, regardless of whether the corresponding future domain name is not yet configured correctly.
- This site preview can be done using a preview URL and allows, among other things, to test a site before pointing a domain name that, for example, currently points elsewhere.
- This temporary URL provided by Infomaniak may change at any time and is only available with paid offers.
Get the preview URL of your site
To do this:
- Click here to access the management of your product on the Infomaniak Manager (need help?).
- Click directly on the name assigned to the product concerned.
- Click on More information.
- The preview address is indicated under Preview URL (e.g.:
XXX.preview.infomaniak.website):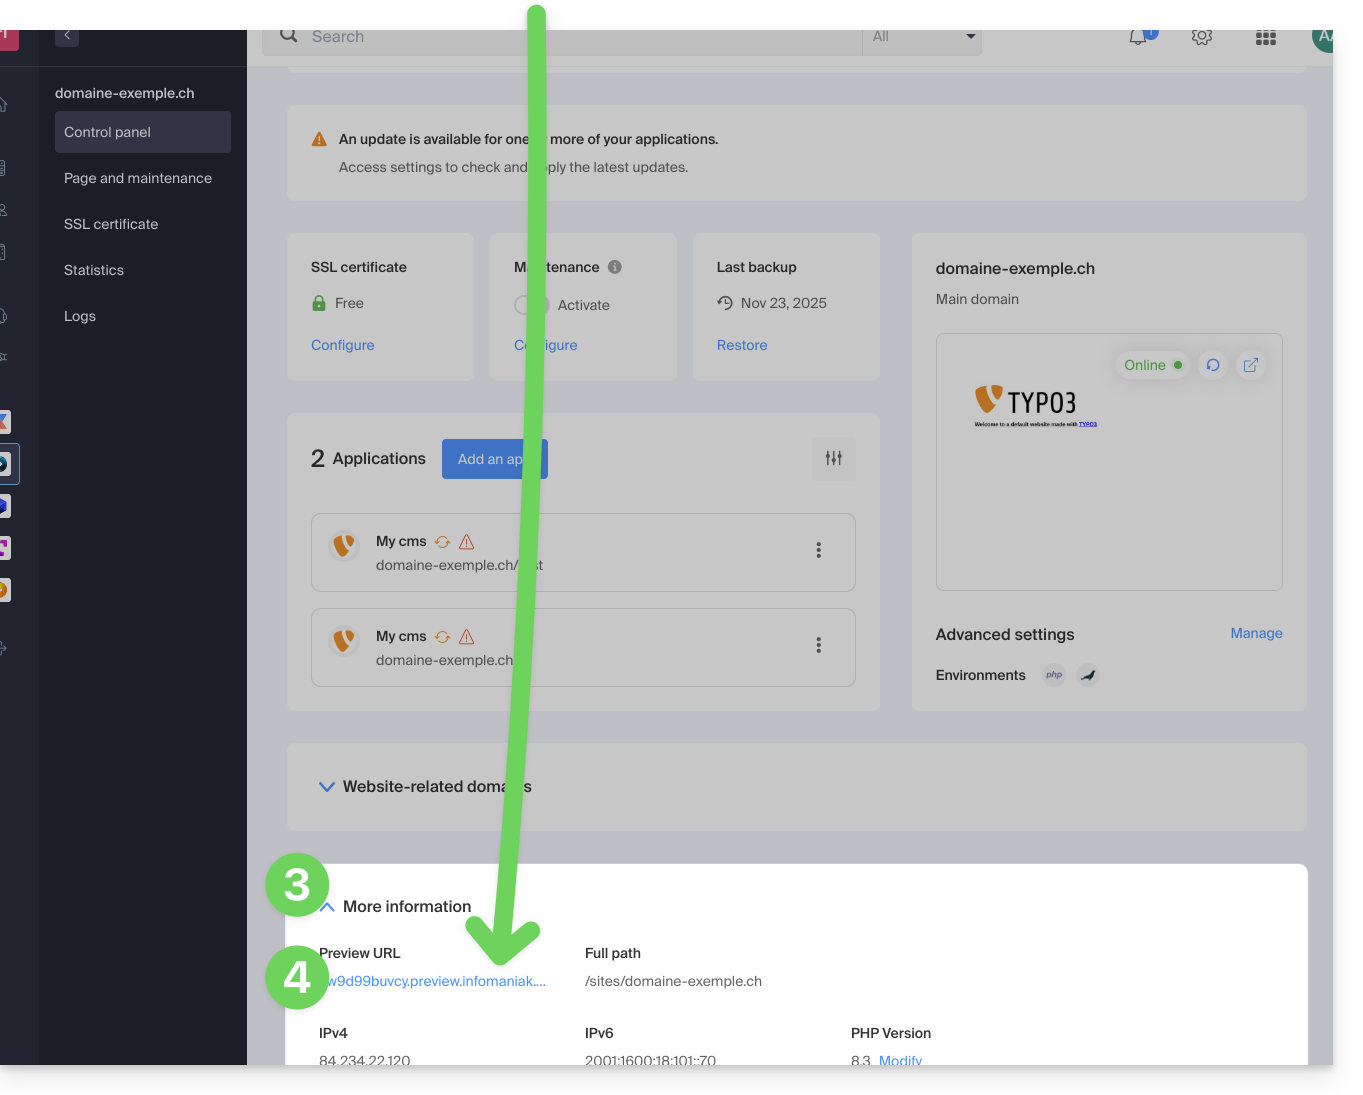
In case of problem…
If when visiting your preview address, the URL immediately changes to another, it may be a .htaccess file that you have modified to include rewrite rules. You need to deactivate it and test again.
… on WordPress
If the preview URL is always displayed even though you have done what is necessary at the domain name level, you need to assign it the final address as the main address in the options of your website.
Alternatives to preview your site
If you wish to proceed differently than with the preview address provided by Infomaniak (see above), you can modify the hosts file of your computer (including with browser extensions like this one for Firefox). You will need the IP address of your site for this.
When your tests are completed or the DNS of the domain name are up to date, do not forget to delete your possible modifications otherwise it will be impossible to display your site if the IP address of the server is modified or the site is migrated to another web hosting.
This guide details how, when activating a new WordPress theme, the formatting and content of articles and pages can be altered, this is if the new theme does not use the same shortcodes and/or the same page builder (page constructor).
Layout issues
Here is an example of how your articles and pages may appear after changing your WordPress theme:

Unfortunately, there is no automatic solution to fix this problem: you will have to:
- either revert to the old theme you were using
- or manually adapt the content of your site with the tools provided by your new WordPress theme.
Of course, you can also uninstall and reinstall WordPress, the site content will be erased and you will start fresh.
Reduce problems in the future
Here are some tips to avoid having to reformat all the content of your site in case of a theme change:
- Use as few as possible the shortcodes specific to your WordPress theme.
- Use a universal page builder that is compatible with all WordPress themes (for example Visual Composer or Thrive Content Builder).
- Take the time to test and evaluate the quality of a theme, by comparing it with 2-3 other similar themes, before using it and adapting all the content of your site.
Useful resources
- Automatically find and remove all unused shortcodes (article in English)...
This guide explains how, after purchasing a domain name from Infomaniak, you can get for free an Email Service + Web Hosting.
Preamble
- For each domain name registered or transferred to Infomaniak, you can benefit from the following for free:
- an email address that gives you access to the Infomaniak Mail app, among other things
- and a 10 MB Web space for a basic page.
- It is also possible to have a free Email Service while having a paid Web offer, or vice versa.
- Instead of a Starter type Email Service, there is also kSuite.
Activate the Starter Mail + Web Offer
Prerequisites
- Own a domain name with Infomaniak (a DNS zone is not sufficient).
- Depending on the desired type (Mail or Web), do not have a corresponding product already associated with the domain name and this in any existing Infomaniak Organization.
To order a Starter Mail Service and Starter Web Hosting included with each domain:
- Click here to access the management of your product on the Infomaniak Manager (need help?).
- Click directly on the name assigned to the product concerned:
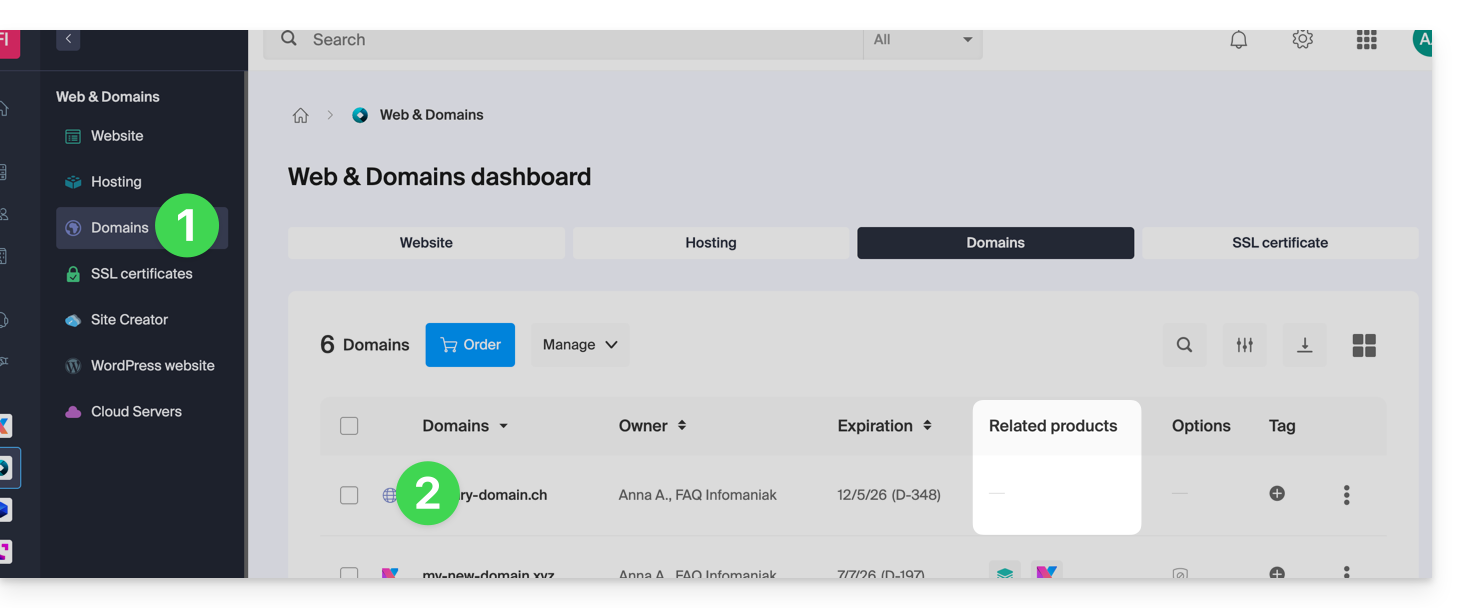
- It is necessary that no product is linked to the domain at the moment (visible in the column of linked products).
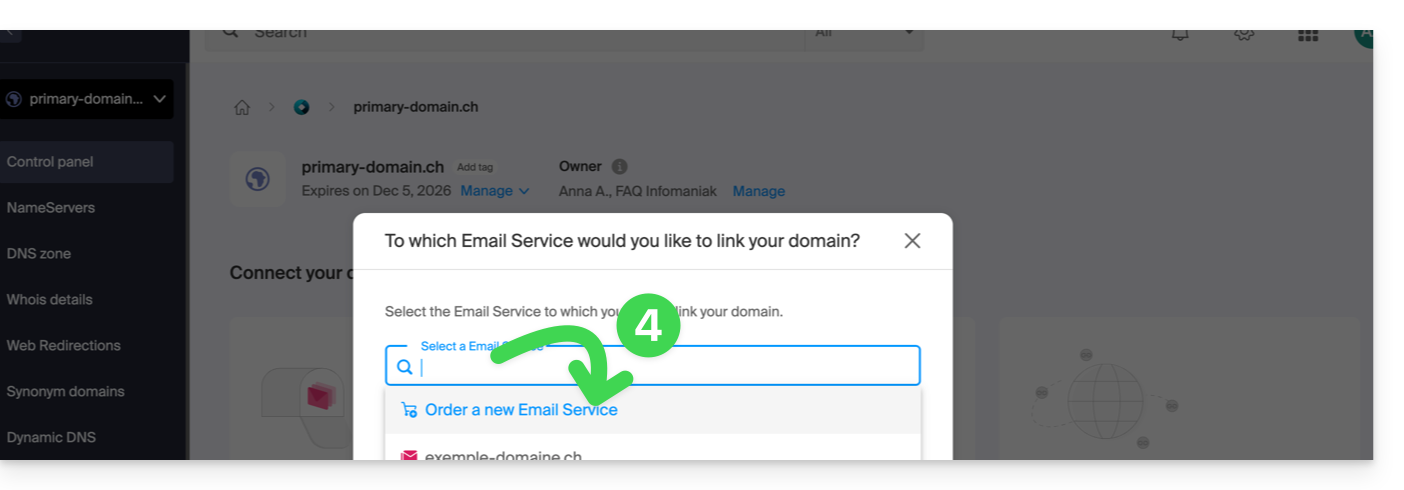
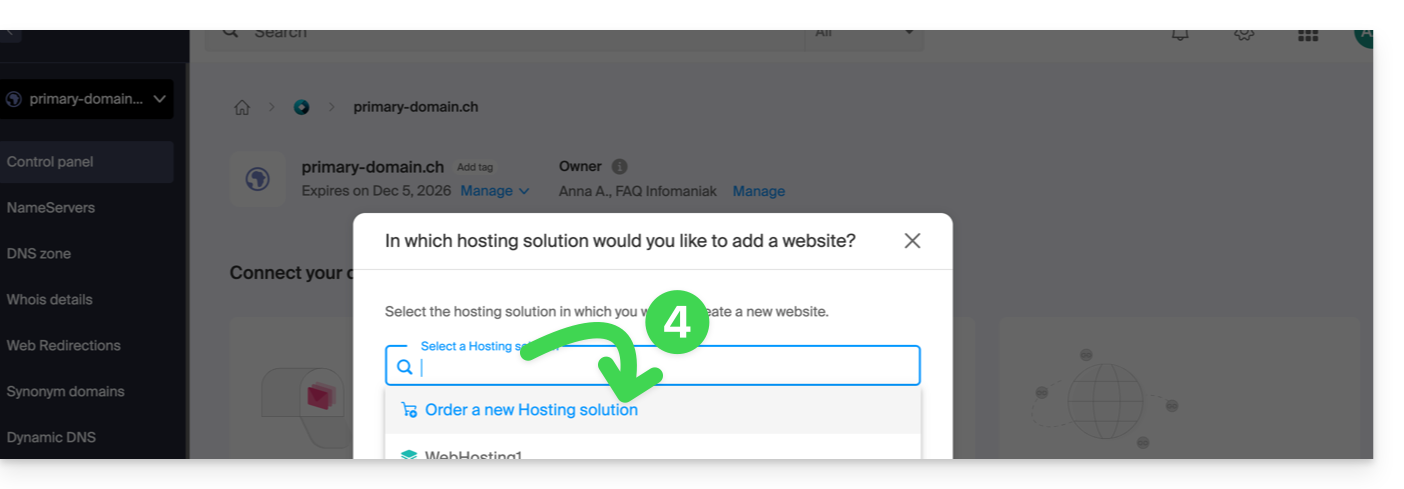
- Click on one of the shortcuts to Connect a service (mail or web):
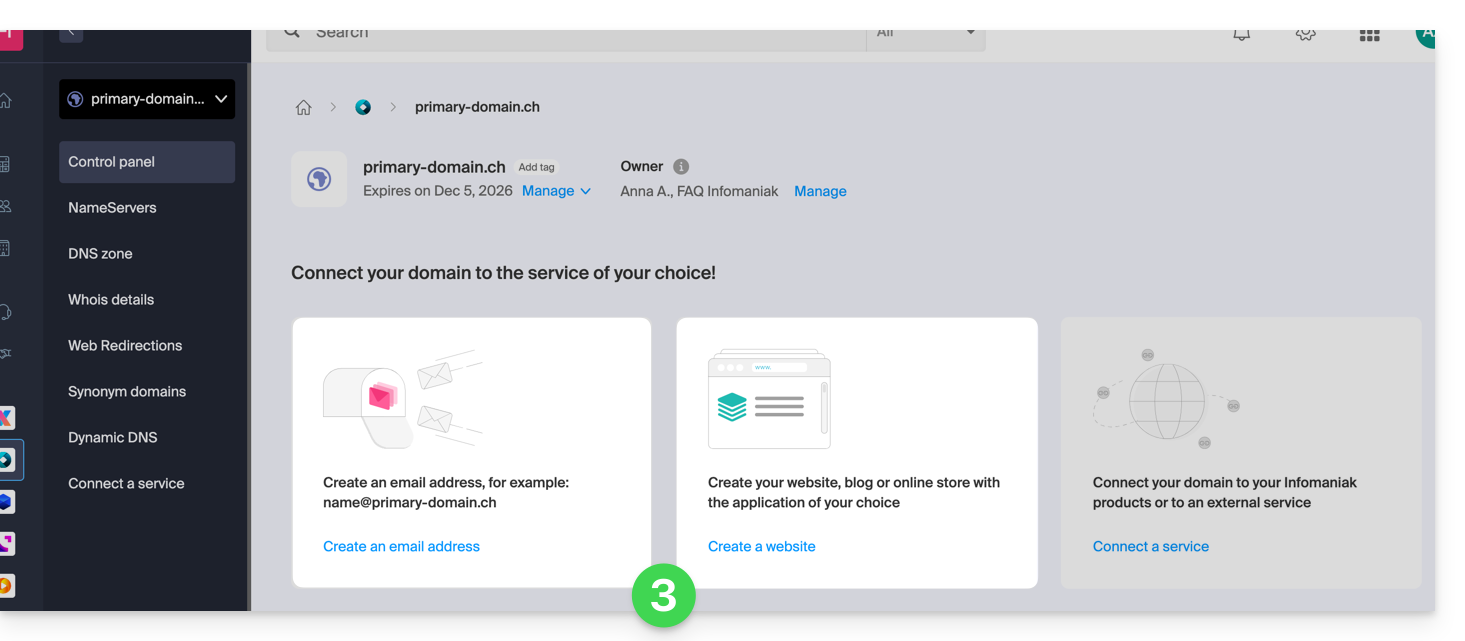
- In both cases, click on Order …:
- You will be able to choose the corresponding free service (mail or web) and the next step will offer you the choice of the other (mail or web) if desired.
- Click at the bottom of the page to continue:
- Confirm the order:
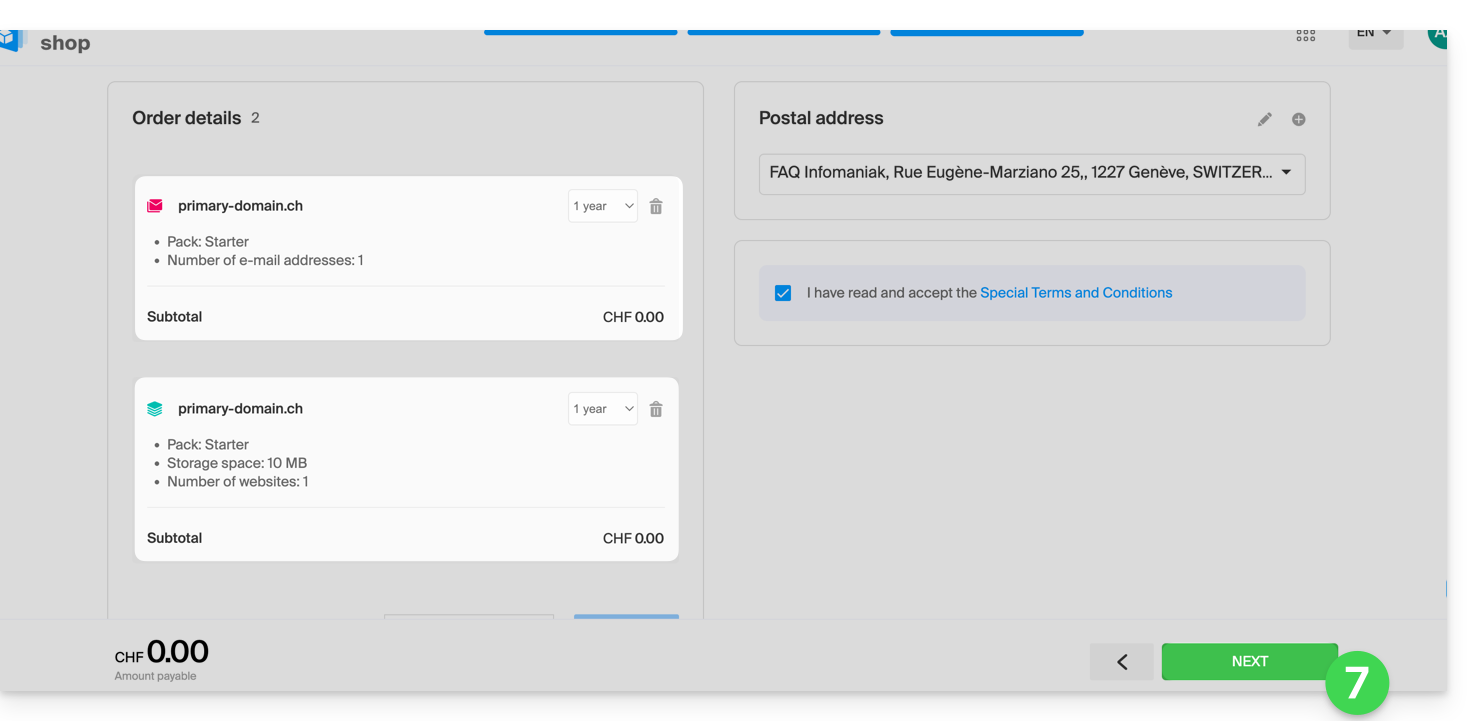
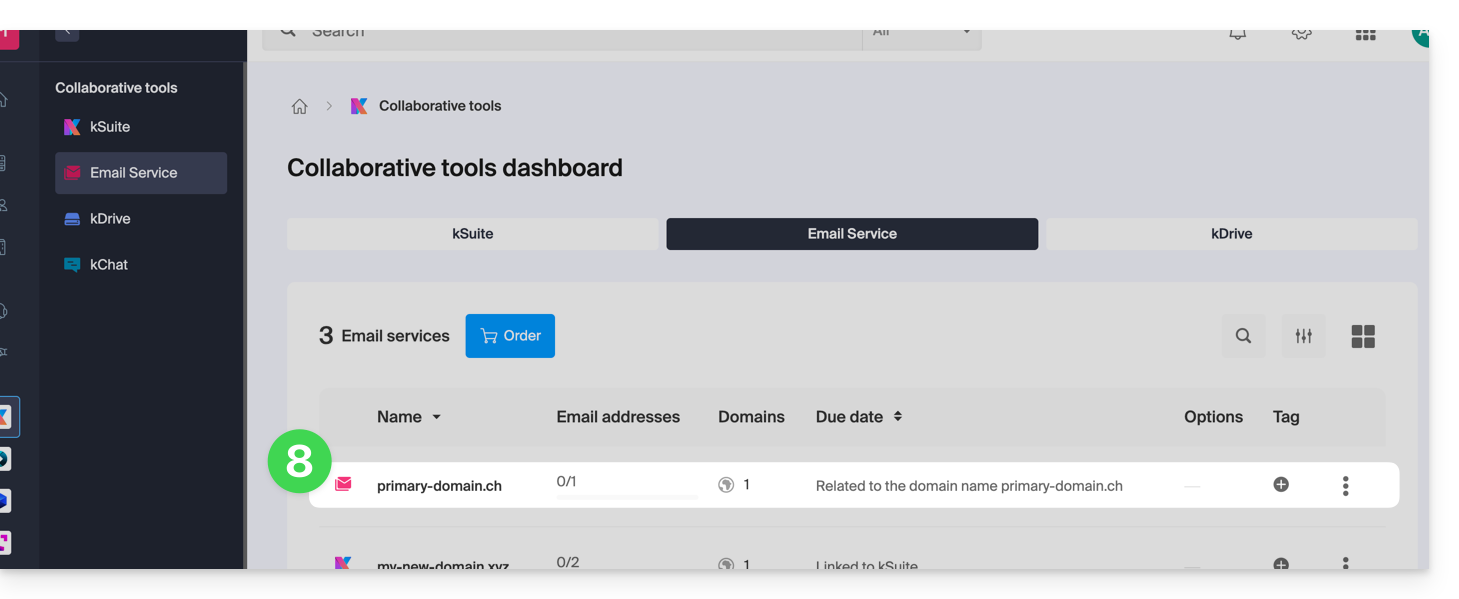
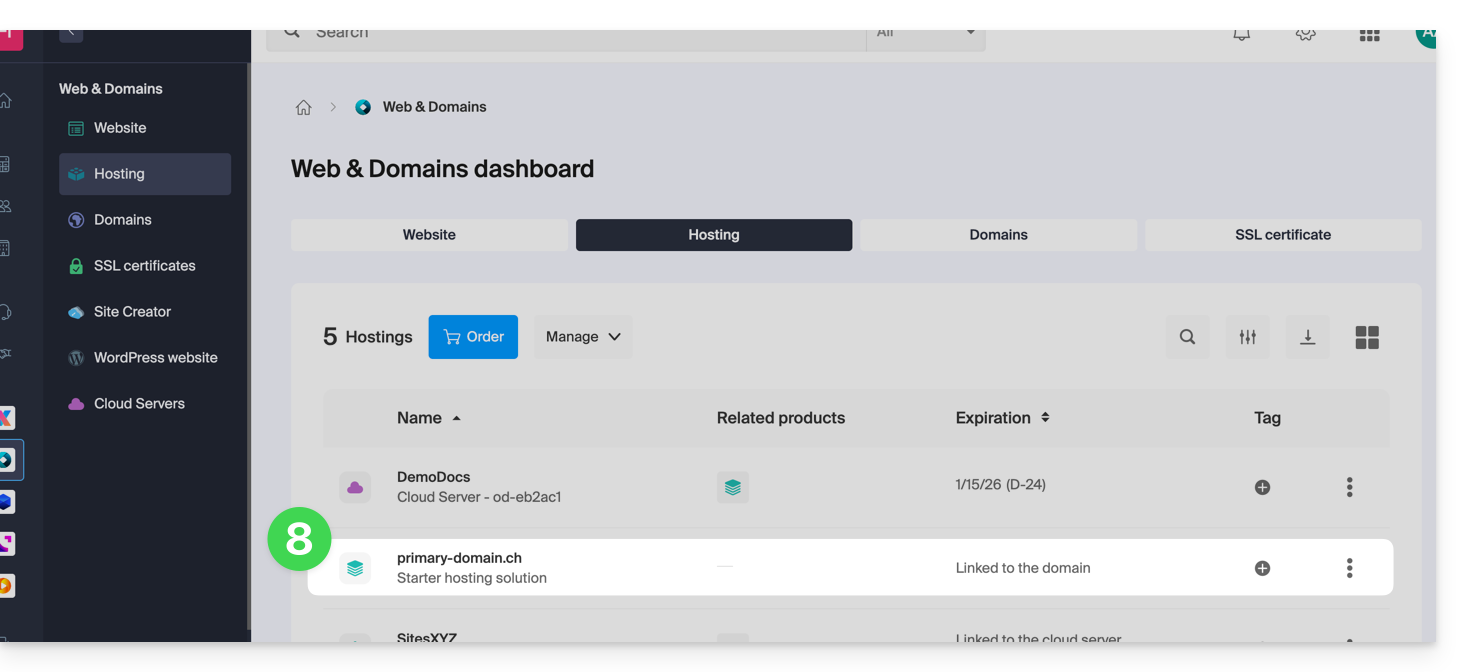
- Go back to your Infomaniak Manager to discover and use your new products:
Use your Starter products
- Create the desired email address on your Starter Mail Service.
- To use the 10 MB web space and create a basic web page on your Starter Web Hosting, use:
- the page editor
- or the FTP file manager to manage your HTML pages
- or any FTP software/client with the classic FTP protocol
Upgrade a Starter offer
- Modify a Mail offer (click here).
- Modify a Web offer (click here).
In case of a problem with a Starter hosting
A Starter type web hosting does not offer IPv6. Be careful with AAAA records in the DNS zone of the concerned domain name that can prevent you from activating SSL; also refer to this other guide.
This guide details sending emails from a website hosted by Infomaniak using the PHP function mail() which is disabled by default.
Preamble
- Infomaniak strongly discourages the use of the PHP mail() function for sending emails from your applications:
- The emails will be considered as “unauthenticated” and will therefore be subject to limits.
- Their deliverability will be affected, which can harm your website.
- It is strongly recommended to use an authenticated SMTP sending method for your email sends from your applications; Infomaniak offers a corresponding service.
Specify the sender's address
For messages to be sent correctly from your CMS/web application (and avoid an error such as Could not instantiate mail function or sender mismatch) it is necessary to specify a valid address in the site parameters on the Infomaniak side:
- Click here to access the management of your product on the Infomaniak Manager (need help?).
- Click directly on the name assigned to the product concerned.
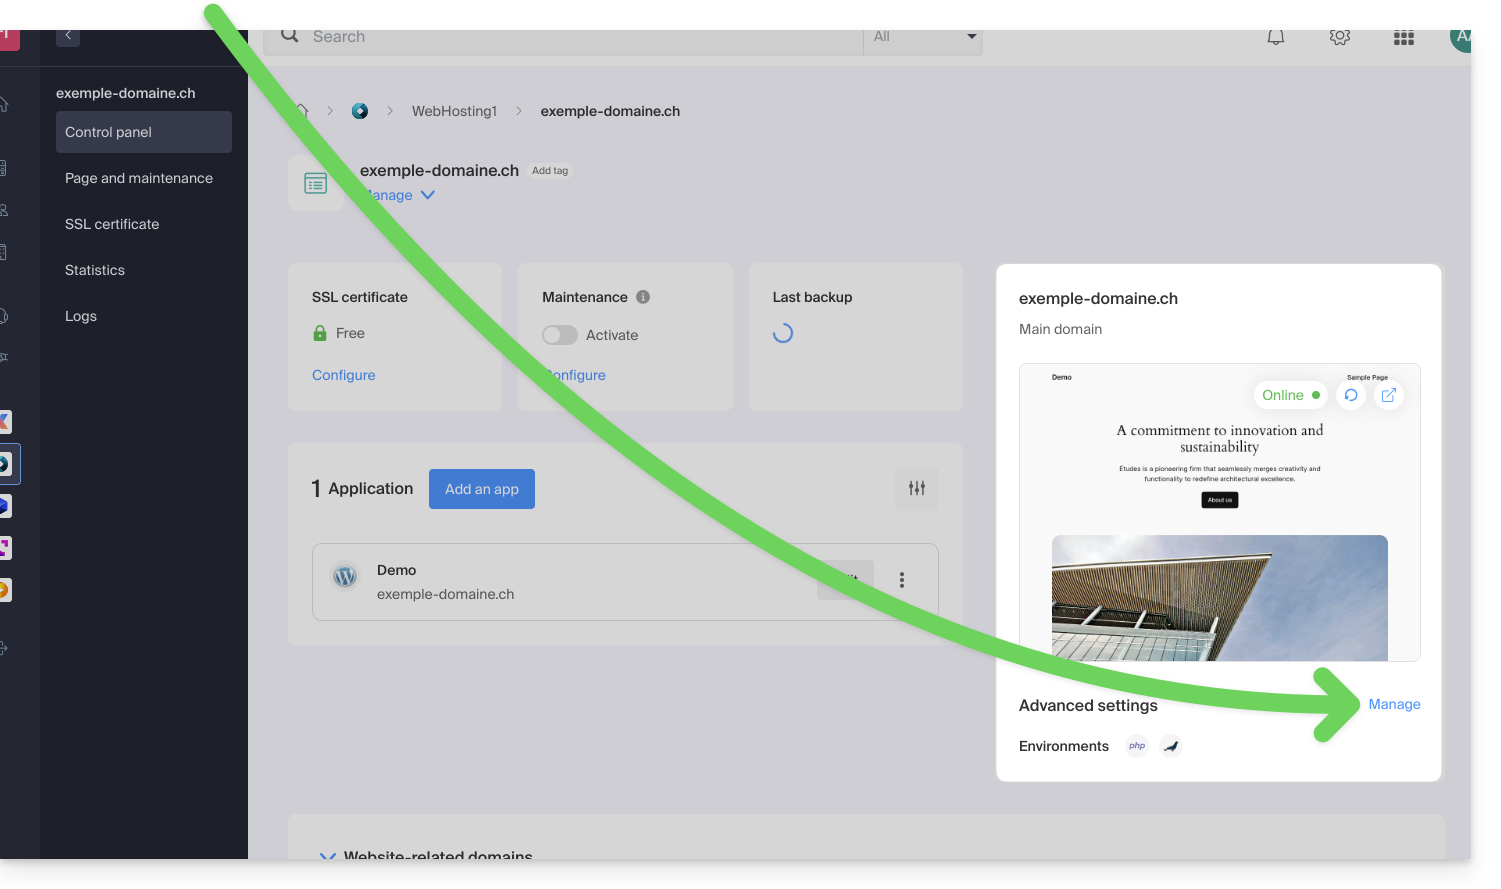
- Click on Manage under Advanced settings:
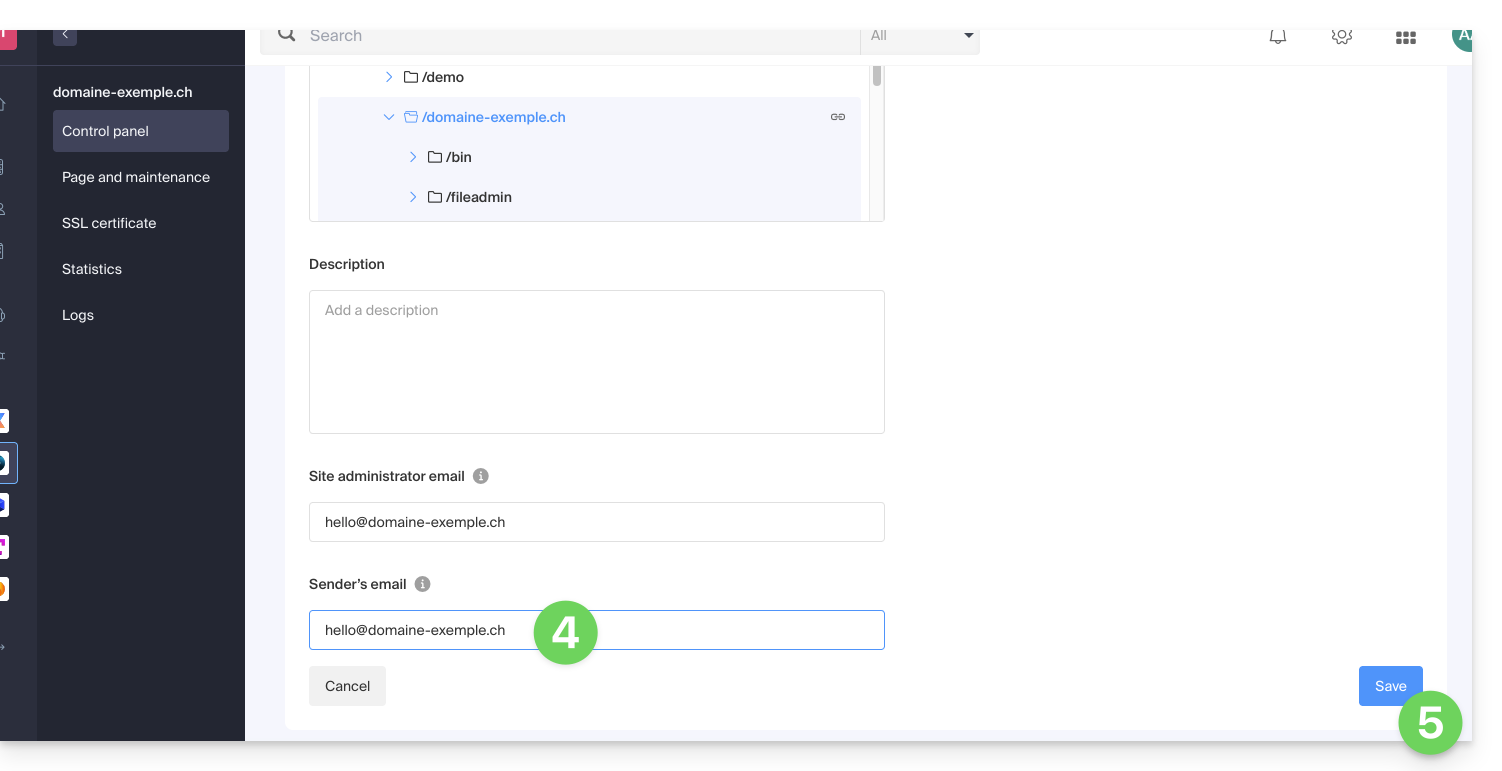
- From the General tab, enter an existing email address in the Sender email field.
- Click on the blue Save button:
Re-enable the mail function
If you still want to use the PHP mail function, you will need to enable it on each of the sites of your Web Hosting concerned:
- Click here to access the management of your product on the Infomaniak Manager (need help?).
- Click directly on the name assigned to the product concerned.
- Click on Manage under Advanced settings.
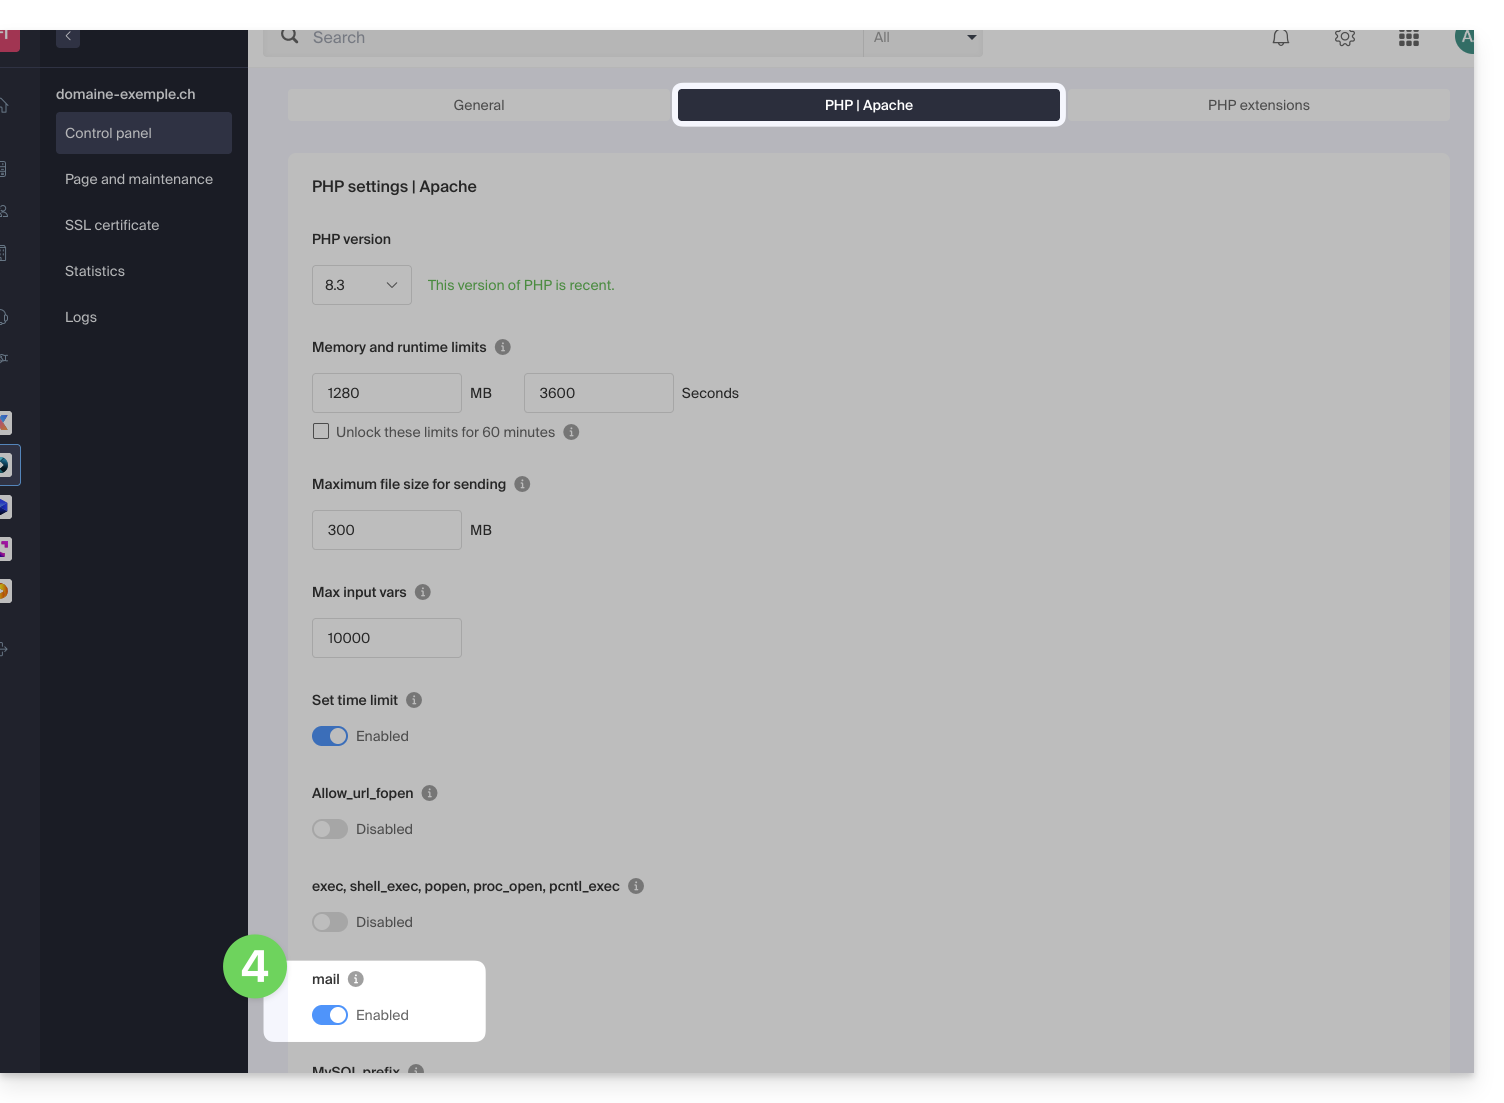
- From the PHP / Apache tab, enable the mail function:
- Click on the blue Save button.
PHP mail() examples...
...on WordPress
Configure the sending of the default contact form included with Divi Builder:
- Log in to the WordPress admin dashboard.
- Go to the Divi editor of the page containing the contact form.
- Click on the Settings icon to configure the Divi contact form:

- Under EMAIL, enter the email address that will receive the form submissions and save:

- By default, when a visitor uses the form to contact you, you will receive an email from
mail@your-site-nameand if you reply, the recipient will automatically be the email address indicated by the visitor when filling out the contact form.
... on Prestashop
Go to Prestashop's advanced settings:
- Specify the SMTP mode.
- Enter
localhostas the server. - Enter port
25. - Do not specify a username or password.

... on Joomla
Configure email sending via PHPmail (not recommended) in Joomla:
- Log in to the admin dashboard of your Joomla site.
- Go to Configuration then Server.
- Do not enter ANYTHING in the Site Email field:
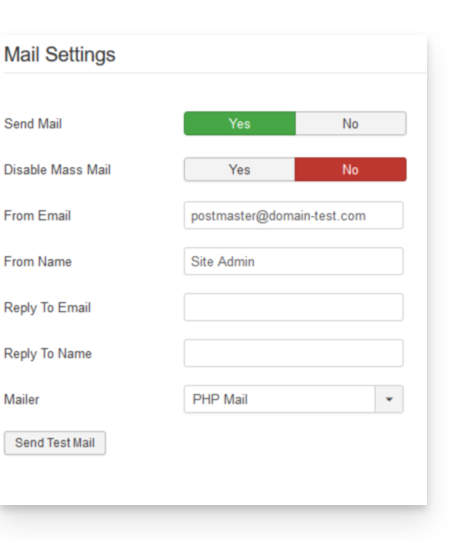
This unfortunately prevents any test sending via the button for this purpose, but it will work if you configure a contact form on your site. Click on Save once the box is left empty.
PHP mail() reply address
When sending an email with PHP's mail() function, the return-path will be written in the form root@h2web3.infomaniak.ch for example. However, the header Reply-To: present in the code of your form allows you to specify a valid reply address.
This guide explains how to migrate a Web Hosting from MySQL to MariaDB.
Preamble
- MariaDB is an enhanced version of MySQL, featuring numerous powerful built-in features and many improvements in terms of usage, security, and performance:
- MariaDB has a larger connection pool supporting up to 200,000 connections, whereas MySQL has a smaller connection pool.
- When comparing the performance of MariaDB and MySQL, it is evident that replication is faster in MariaDB and slower in MySQL; MariaDB is generally faster than MySQL.
- MariaDB is Open Source, whereas MySQL uses proprietary code in its Enterprise edition.
Using MariaDB as a replacement for MySQL
The update to MariaDB is irreversible and all sites on your hosting will subsequently run with this version of MariaDB. Check the compatibility of your scripts before proceeding.
To migrate a Web Hosting to MariaDB:
- Click here to access the management of your product on the Infomaniak Manager (need help?).
- Click directly on the name assigned to the product in question.
- Click on Databases in the left sidebar.
- Click on the link Migrate to MariaDB.
To migrate a Cloud Server, refer to this other guide regarding the migration to a new generation of Cloud Server.
Connecting to a remote Oracle database is not available with shared hosting and servers.
For example, you can install OCI8 for PHP on VPS Cloud / VPS Lite.
This guide provides tips to perform operations related to a WordPress site, which allows, among other things, to…
- … copy and migrate a WordPress site from a competing host to Infomaniak,
- … modify the domain name of a WordPress site,
- … backup an entire WordPress site…
Preamble
- Depending on the context, instead of doing a WordPress transfer, you can simply…
- … change the site address (the associated domain name) very easily if you have installed WordPress via the Infomaniak installer,
- … duplicate a WordPress site to work in parallel in a development environment…
- Make your life easier! If needed, local partners referenced by Infomaniak can handle these procedures. Launch a free call for tenders. They handle everything, freeing you from technical details.
Transfer a WordPress site…
… with the All-in-One WP Migration extension
- Requires installing a new clean WordPress (for example via the Infomaniak automatic installer) to import the old site onto it.
- —> Be aware of this guide.
… with the Duplicator extension
- Requires connecting to the hosting via FTP to send a
.ziparchive and a PHP file to reinstall the old site.- —> Be aware of this guide.
This guide explains how to add a free Elegant Themes extension (Monarch, Divi Builder, Bloom, etc.) or a theme to an already installed WordPress site via the Infomaniak installer.
Prerequisites
- Your WordPress site must be installed via the Infomaniak WordPress tools to use these themes and extensions.
- Extensions can be added during installation (approximately step 16 of this other guide) or activated later.
- To benefit from Elegant Themes support (customer service) you must subscribe to an Elegant Themes offer.
Add an Elegant Themes plugin
To do this:
- Click here to access the management of your WordPress site on the Infomaniak Manager (need help?).
- If your site does not appear here, it means it was not installed via the Infomaniak tools... Refer to the prerequisites above.
- Click directly on the name assigned to the product concerned:
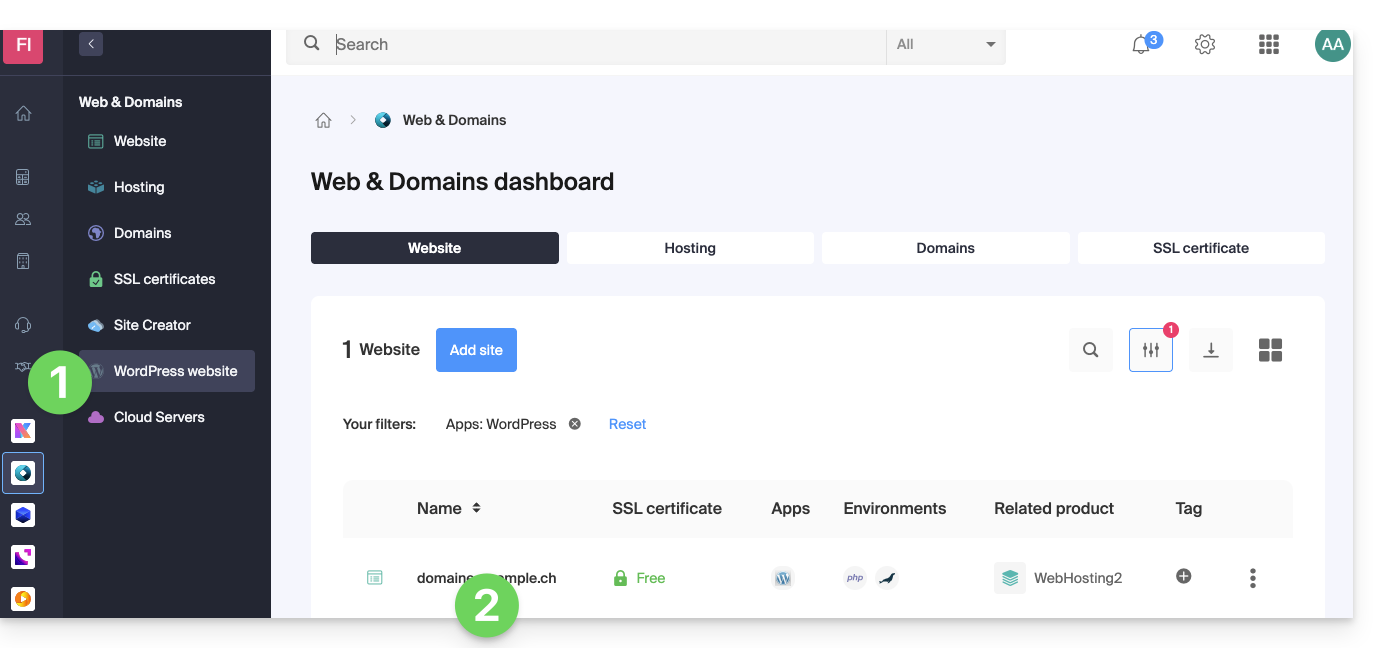
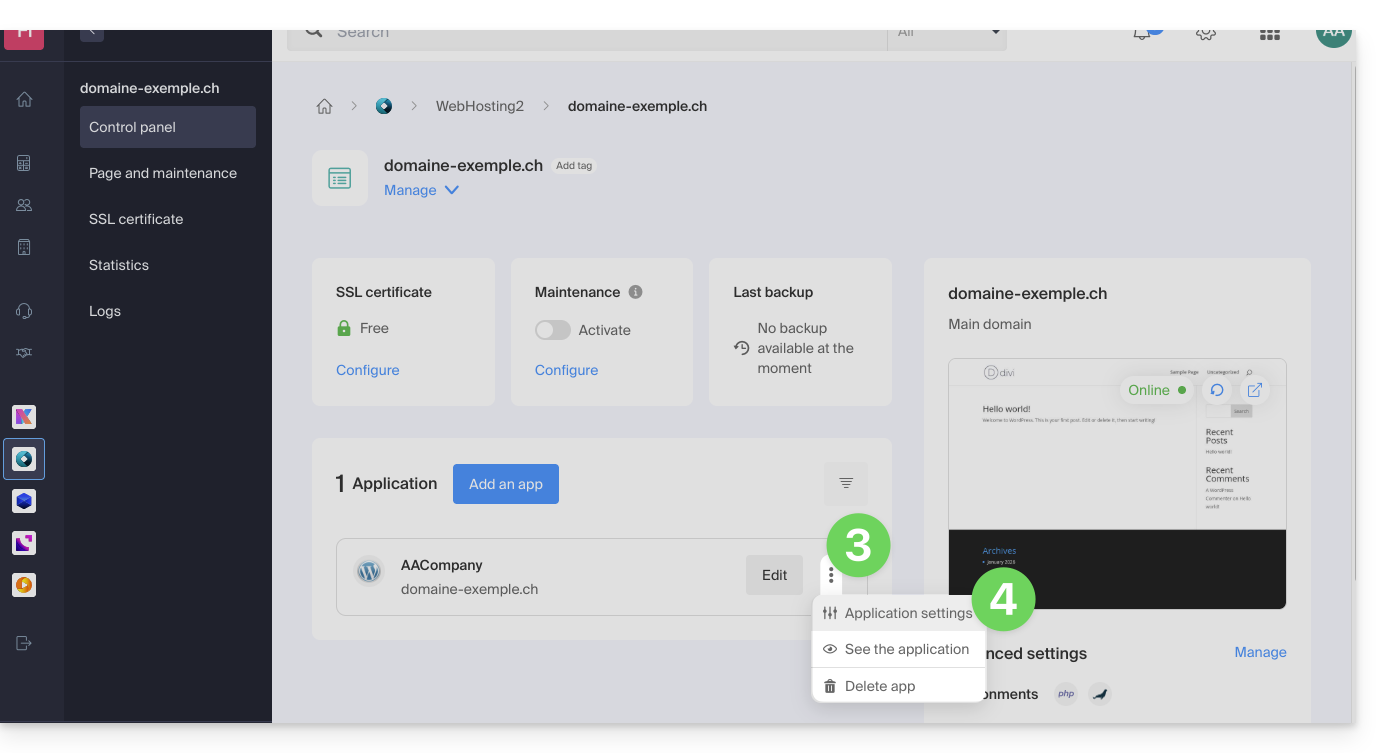
- Click on the action menu ⋮ located to the right of the Web Application concerned.
- Click on Settings of the application:
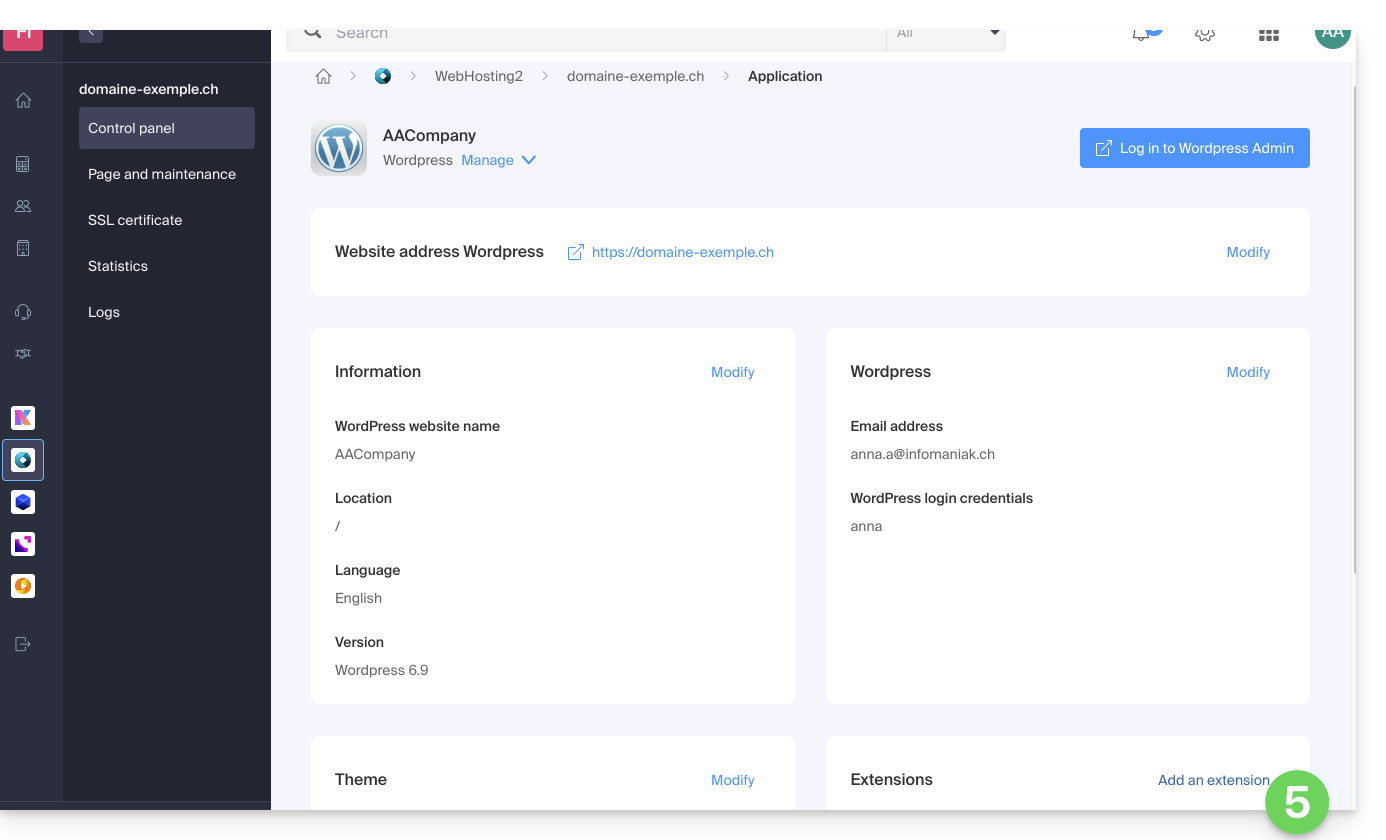
- Click on Add under Extensions:
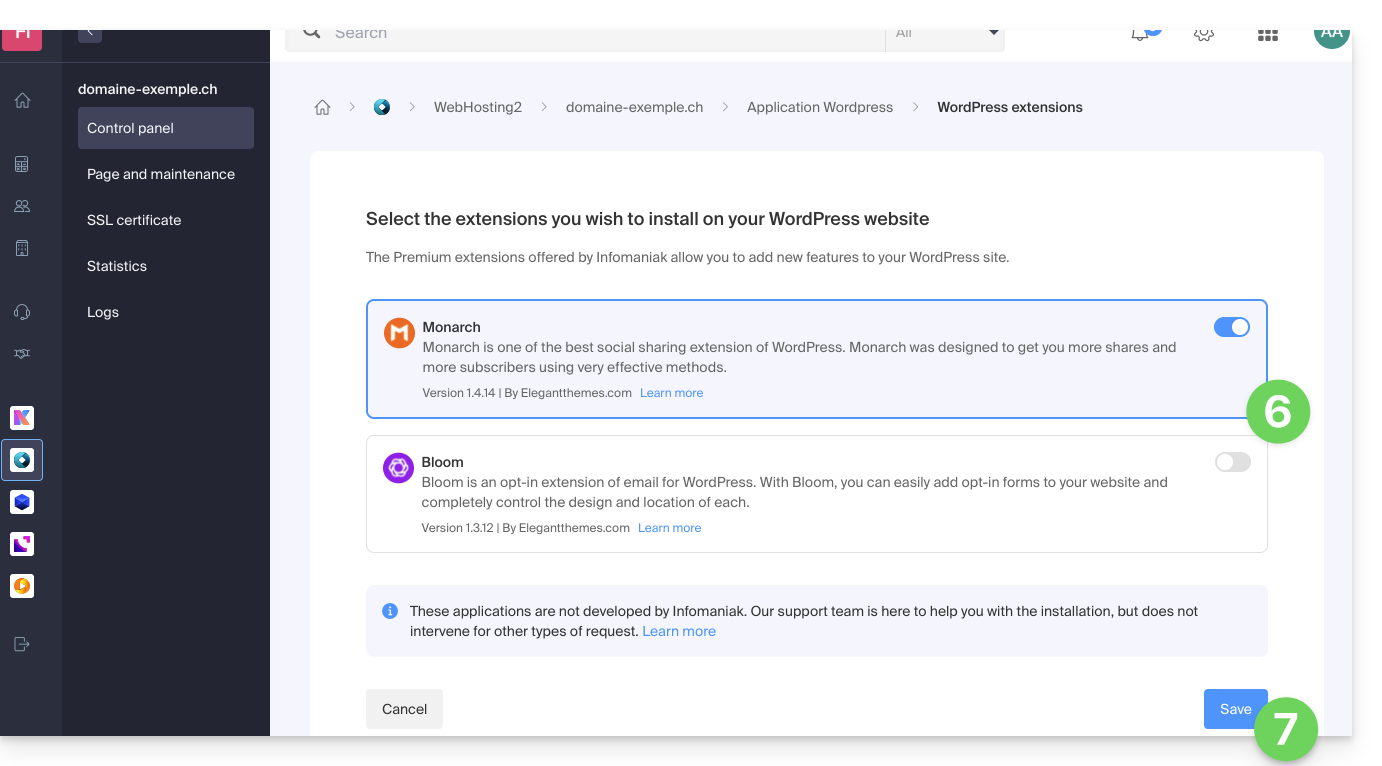
- Activate the desired extensions.
- Click on the Save button:
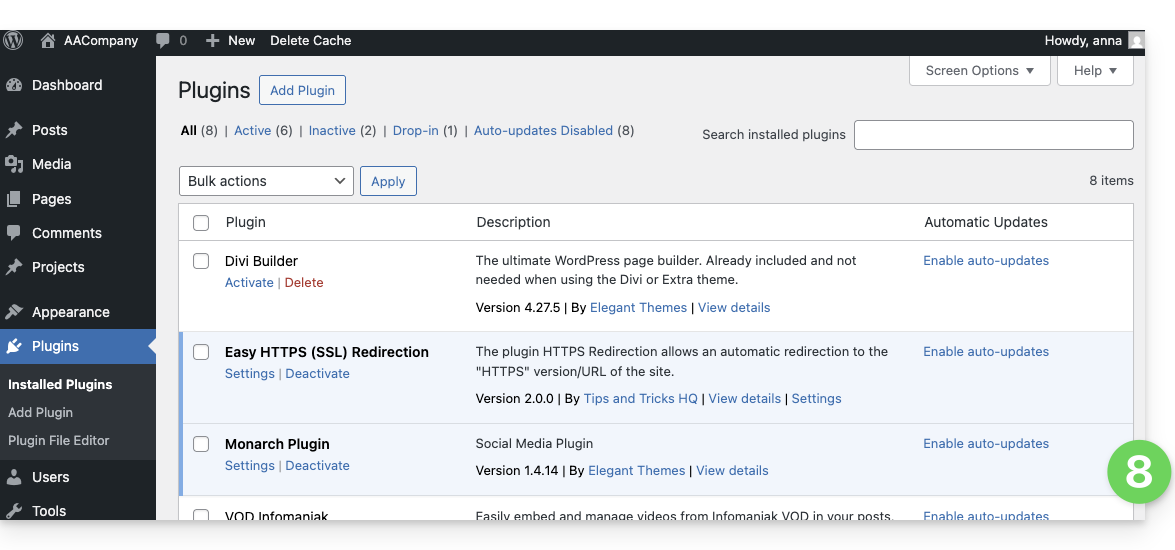
- The extensions are then available in your WordPress administration interface:
Use an Elegant Themes theme
Refer to this other guide to install an Elegant Themes theme with Infomaniak.
This guide concerns Django, an open-source web development framework in Python.
Installing Django
It is possible to install Django on web offers such as VPS Cloud / VPS Lite: discover the different web hostings from Infomaniak.
This guide explains how to delete a folder or file via SSH, which can be particularly useful when it is impossible to delete a file with an FTP software/client or the FTP Manager.
SSH command to delete a folder/file
Infomaniak disclaims all responsibility in case of data loss related to these instructions.
To delete a file or directory, you need to use the rm command.
To delete the files Data.php and Data.txt, for example, you need to execute the following command:
rm Data.php Data.txtTo delete a directory, you first need to delete its contents and then use the following command:
rmdir Folder/To delete all files in html format, you need to execute the following command:
rm *.html- Other useful commands (external link)
This guide explains how to move a shared web hosting to a Cloud Server while retrieving all its data, websites, databases, etc.
Preamble
- If you already have a Cloud Server, go directly to step 2 of this guide.
- To move a web hosting from one Cloud Server to another Cloud Server, refer to this other guide.
- To move a web hosting from a Cloud Server to a shared web hosting, refer to this other guide; note that this is a manual operation you will have to perform.
- Note:
- Database names and database user names are preserved.
- FTP accounts are preserved with the same names, but the host server changes to an address of type
xxxx.ftp.infomaniak.com. - The IP addresses of the sites will change except for dedicated IPs.
1. Order a Cloud Server
To do this:
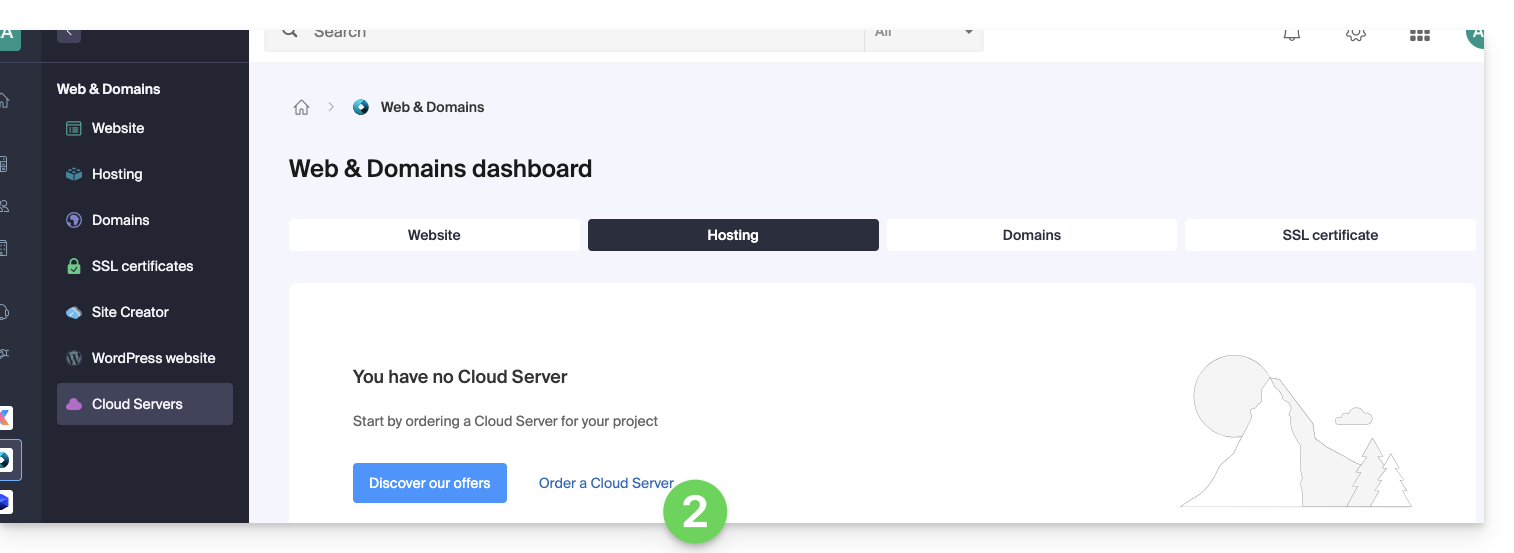
- Click here to access the management of Cloud Servers on the Infomaniak Manager (need help?).
- Click on Order, choose a managed Cloud Server and follow the wizard to complete the order:
2. Migrate the hosting to the Cloud Server
Once the Cloud Server is in service:
- Click here to access the management of your product on the Infomaniak Manager (need help?).
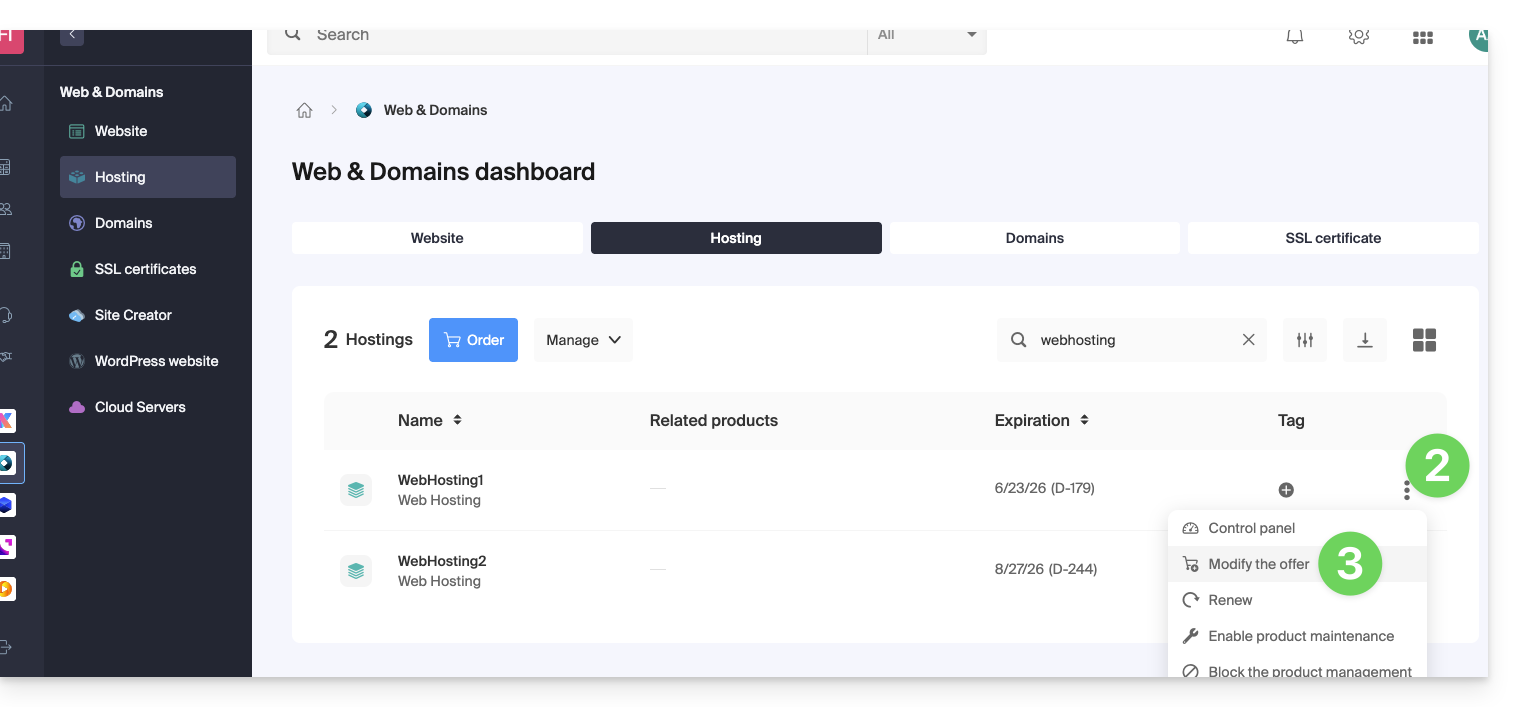
- Click on the action menu ⋮ located to the right of the item concerned.
- Click on Modify the offer:
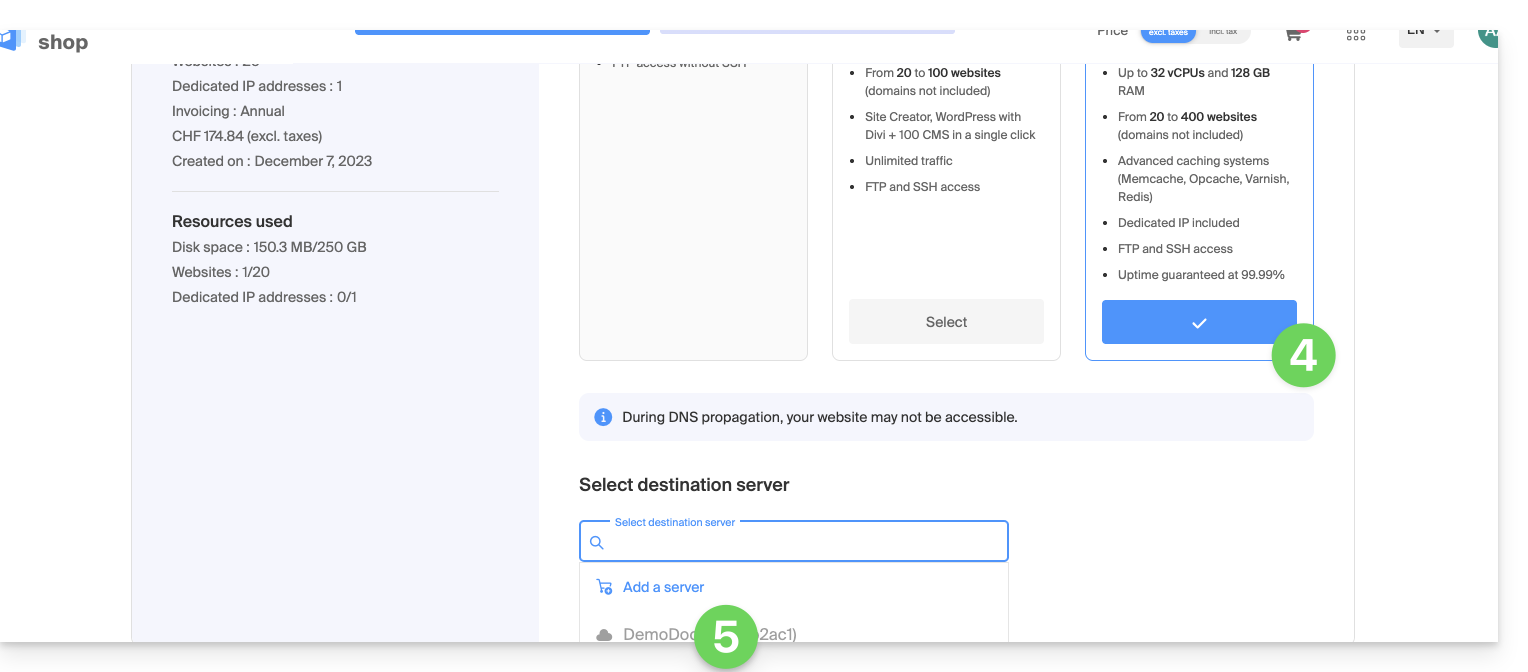
- Select the free transfer offer.
- Select the Cloud Server to which to migrate your hosting:
- Click on the Next button at the bottom of the page and complete the procedure entirely.
- Wait for the hosting migration to complete, a service interruption will be felt during the process.
This guide explains how to enable the compression of css, html, json, xml etc. resources on your chosen 'Web Hosting'.
Preamble
- Thus, you will reduce the size of the resources to be loaded by your visitors, which will have the effect of reducing the loading time of your web pages.
- The
.htaccessand.user.inifiles will be automatically updated with the necessary directives.- As a security measure, a backup copy of these two files is made with each change.
- Any modification may take several minutes to take effect.
Compress files with Gzip
To enable compression with Gzip:
- Click here to access the management of your product on the Infomaniak Manager (need help?).
- Click directly on the name assigned to the product in question.
- Click on the Advanced Settings button.
- Click on the APACHE tab.
- Enable the File Compression option.
- Click the blue Save button:

It is possible to disable file compression by clicking the activation button again.
Test compression
It is possible to easily test the compression of your pages using tools such as:
This guide explains how to activate a CDN to optimize an Infomaniak Web Hosting.
Preamble
- CDN stands for "Content Delivery Network" in English, which translates to "Content Distribution Network" in French.
- A CDN stores a copy of your site's content (images, videos, CSS/JS files) on multiple geographically dispersed servers.
- When a user accesses your site, the CDN provides this content from the server closest to their location, thus reducing loading times:
- Your site loads faster for visitors, which can reduce the bounce rate and improve the user experience.
- By distributing content, the CDN reduces the load on your main server, improving its performance and availability.
- Some CDNs offer security features such as protection against DDoS attacks and data security.
Setting up a CDN
To use a CDN, you will generally need to make adjustments to your domain name configuration, specifically to the DNS records. This will direct your website traffic to the CDN's network of servers. Therefore, in general:
- Create an account on the website of your chosen CDN and add your site to it.
- Modify the DNS zone of your domain name according to the instructions provided by the CDN.
- Test your site to ensure the CDN is working correctly.
Cloudflare-specific guide
For clients who want to optimize their site against the overload caused by the intensive passage of bots, using a CDN like Cloudflare is often recommended. The Cloudflare CDN allows you to optimize the performance and security of a website with features such as:
- caching of a site's static content
- minification of HTML, CSS, and JavaScript code
- basic anti-DDoS protection
- etc.
To set up Cloudflare:
- If necessary, create an account with Cloudflare.
- Add the domain name of the site in question.
- Report all DNS zone records of the domain in question to Cloudflare (A records, MX, TXT, NS, etc.).
- On the Infomaniak Manager, modify the DNS of the domain in question with the DNS servers indicated by Cloudflare.
- Configure DKIM and DNSSEC if necessary.
- Any DNS addition/modification can take up to 48 hours to propagate.
Note: mod_cloudflare is enabled by default on all paid web hostings.
Enable Cloudflare Rate Limiting
By default, Cloudflare simply acts as an intermediary between the site and Infomaniak, forwarding all requests to the Infomaniak servers. Thus, during traffic spikes or attacks, requests still reach the origin server, but with Cloudflare IP addresses, making it difficult to manage mitigation on a shared server.
Setting up "rate limiting" rules in Cloudflare's application firewall is now an effective solution offered. This feature limits the number of requests sent to the server, blocking aggressive scans and protecting the server from excessive overloads.
And also…
… Amazon CloudFront
If you are already using AWS services, CloudFront is easy to set up. Create a distribution, configure the settings, and link it to your site.
… Fastly
Sign up on Fastly, configure your service by adding your site and setting the cache parameters. Fastly offers advanced configuration options.
This guide explains how to use PHPMailer with Infomaniak Web Hosting.
Preamble
- PHPMailer is a library that allows sending HTML-formatted emails from a website.
- It supports attachments, SMTP authentication, and multipart/alternative for clients that cannot read HTML-formatted emails.
Using PHPMailer
To use PHPMailer, you need to install it manually:
- Click here to download the PHPMailer library.
- Copy the files to a directory on your website via FTP.
Link your script to PHPMailer, example:
require_once('chemin_a_modifier/class.phpmailer.php');
Resolve a Sender mismatch error
In the SMTP (Simple Mail Transfer Protocol) protocol, the From header specifies the sender's email address of the message. This is the address that will appear in the 'From' field of the message received by the recipient.
In PHPMailer, the setFrom method is used to set the sender's email address, while the From header is used to specify this same address when sending the message. The setFrom method also sets the Reply-To field of the email.
The error Sender mismatch SMTP code: 550 Additional SMTP info: 5.7.1 occurs when the email address specified in the setFrom field does not match the email address specified in the From header when sending the message.
To avoid this error:
Instead of using the
setFrommethod to set the sender's email address, use theFromproperty of the PHPMailer object, example:$mail = new PHPMailer(); $mail->From = 'expediteur@domain.xyz';Make sure the value specified in the
Fromproperty exactly matches the email address used in thesetFromfield.Example, if you use
setFromwith a sender's name like this:$mail->setFrom('expediteur@domain.xyz', 'Nom Expediteur');… then make sure the value of
Fromis also set with the sender's name:$mail->From = 'expediteur@domain.xyz'; $mail->FromName = 'Nom Expediteur';
Then, continue the email configuration and sending as usual.
Learn more
This guide explains how to generate a certificate signing request (CSR) for a domain name and all its subdomains with a Web Hosting (excluding free hosting of type Starter).
This allows you to encrypt the connection to your domain name and all its subdomains via SSL.
Set up a Wildcard certificate
1. Add an alias domain with an asterisk *
To add an alias of type * to your website:
- Click here to access the management of your product on the Infomaniak Manager (need help?).
- Click directly on the name assigned to the product concerned:

- Click on the chevron to expand the Domains section of this site.
- Click on the Add a domain button:

- Enter the domain name to be added in this format:
*.domain.xyz(the asterisk is mandatory, followed by a dot, then the domain name of the website which is domain.xyz in this example)
- Click on the Confirm button to complete the procedure:

2. Install an SSL certificate or update it
Example of updating the existing certificate to include the wildcard subdomain *:
- Click here to access the management of your product on the Infomaniak Manager (need help?).
- Click directly on the name assigned to the product concerned.
- Click on SSL in the left sidebar.
- Click on the action menu ⋮ located on the right.
- Click on Change the certificate:

- Select the same certificate that you already own.
- Click on the Next button:

- Make sure the recently added subdomain is selected.
- Click on the Install button at the bottom:

- Wait for the creation or update to complete.
This guide explains how to view and download Apache logs from Web Hosting, which are useful for analyzing PHP errors or diagnosing certain application behaviors.
Preamble
- The access and error logs are kept for at least 7 days.
- Once the retention period has expired, older entries cannot be restored, even upon request.
- You can also find these files directly on the server via SSH/FTP in the
ik-logsfolder at the root of your hosting.
Accessing access and error logs
To display these logs:
- Click here to access the management of your product on the Infomaniak Manager (need help?).
- Click directly on the name assigned to the product in question.
- Click on Logs in the left sidebar.
- Click on Errors or Access to display the error log or access log.
- Choose a period if necessary.
- Click on the icon to view the details.
- Click on Send by email to immediately receive all entries by email to your user address.
- Click to export the data in
.logformat: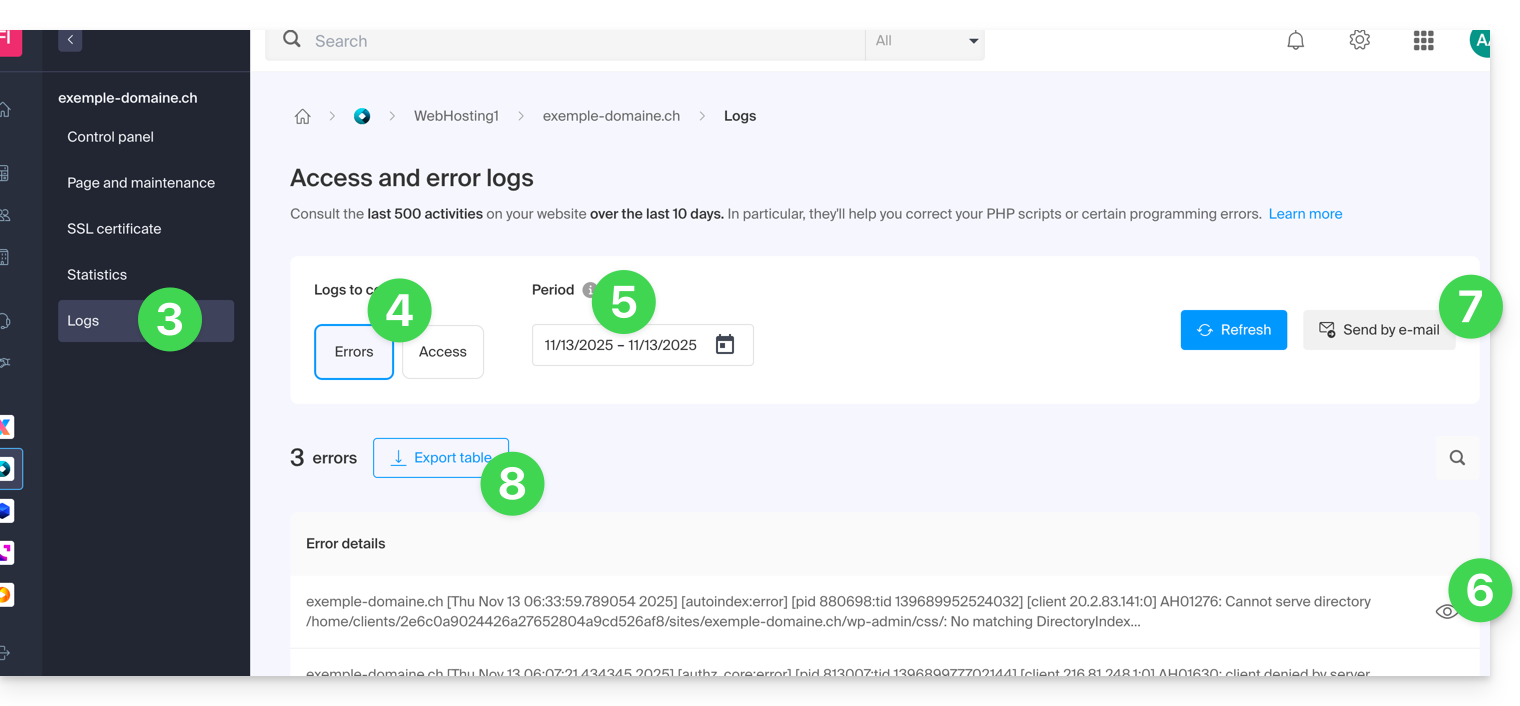
Identify the most active IP addresses in the access logs
To do this, connect to the server via SSH (need help?).
The line to execute in SSH is as follows:
cat ik-logs/access.log | awk '{ print $2}' | sort -n | uniq -c | sort -n | tail -n 20This guide explains how to prevent cyberattacks and how to avoid a website hack for the site you manage.
WordPress users: refer to this dedicated article.
The role of the host
Infomaniak's job is to provide quality hosting, so it is crucial to respond extremely quickly to the various attacks that any Internet actor may be subject to. Infomaniak therefore does everything possible to take the maximum of precautions against hacking, notably by keeping the different versions of the technologies used up to date.
In the event of a proven hack, if it is possible to trace back to the author and the machine has been compromised due to a security flaw on Infomaniak's part, if the integrity of the servers is at stake, Infomaniak takes matters into its own hands.
The role of the site owner and the webmaster
If the hacking of your site is your responsibility (an outdated script, a security patch that has not been applied, etc.), Infomaniak contacts you to warn you of a problem that will need to be resolved quickly. Some organizations like Saferinternet can also suspend the domain name upstream, which will disable the site but also the messaging.
Infomaniak cannot counter exploits related to a bug in your PHP code or other. If the hacking is not detected, you will generally notice the intrusion quite quickly through suspicious elements in your pages or by receiving numerous error emails.
It is therefore your responsibility to take care of the evolution of your website over time and not to let it "die" in a corner, even if it means calling on a webmaster whose job it is.
Don't have time to manage your services? Launch a free tender to find an Infomaniak partner who will take care of everything.
Infomaniak recommendations
- Regularly update all your web applications (WordPress, Joomla, Drupal, ownCloud, etc.).
- Keep the PHP version of your site on Infomaniak servers up to date.
- Keep your site up to date by migrating to new offers when they are proposed to you.
- Add a protection system on your contact forms (captcha, etc.) and on any "recommend to a friend" tools (tell-a-friend...).
- Regularly run an antivirus analysis of the hosting.
- Monitor the vulnerability detection tool.
- Remove anything you have not developed yourself and for which the author has not provided an update/correction for several months.
- Make a regular backup of your site (refer to this other guide if you use WordPress) when everything is fine and keep it in a safe place (because automatic backups are only kept for a few days and this is sometimes not far enough back to go back after you notice an intrusion).
- Consult ibarry.ch.
If a problem has occurred...
- Modify the passwords of your Web applications, your FTP accounts and your databases by first checking that no virus is on your computer.
- Restore a backup but update immediately whatever can be updated as soon as the restoration is complete.
Be aware of these additional recommendations!
This guide explains how to order, link or remove a dedicated IP from a website.
Manage dedicated IPs on a hosting plan
Order one or several first dedicated IP addresses
To do this:
- Click here to access the management of your product on the Infomaniak Manager (need help?).
- Click directly on the name assigned to the relevant product.
- Click on Web in the left sidebar.
- Click on Dedicated IPs in the left sidebar.
- Click on the button to order one or more IP addresses:

Order one or several additional dedicated IP addresses
To do this:
- Click here to access the management of your product on the Infomaniak Manager (need help?).
- Click directly on the name assigned to the relevant product.
- Click on Web in the left sidebar.
- Click on Dedicated IPs in the left sidebar.
- Click on Order :

Associate a dedicated IP address with a website on a hosting plan
Once the IP has been ordered and paid for, familiarize yourself with the prerequisites below, as switching to a dedicated IP address for a website may cause a temporary interruption, especially in the presence of a certificat SSL Let’s Encrypt. To limit the impact:
- Start by reducing the TTL of the DNS records
AandAAAA(for@andwww) to 5 minutes. - Wait for the previous TTL duration before making any changes.
- The change below should be made during a period of low traffic to limit the inconvenience caused by the inevitable interruption.
- At the end of the procedure, you will need to wait for the new TTL to propagate the new configuration and for the SSL certificate to be regenerated, then check the accessibility of the site in HTTPS to ensure that everything is working correctly.
To switch to a dedicated IP address:
- Click here to access the management of your product on the Infomaniak Manager (need help?).
- Click directly on the name assigned to the relevant product.
- Click on Web in the left sidebar.
- Click on Dedicated IPs in the left sidebar.
- Click on the button to dedicate the IP to a site on your hosting:

- Select the site to assign the new IP address to.
- Check the box after reviewing the warnings.
- Click on the Associate button:

Remove a dedicated IP address from a website
Once the IP is installed, to uninstall it:
- Click here to access the management of your product on the Infomaniak Manager (need help?).
- Click directly on the name assigned to the relevant product.
- Click on Web in the left sidebar.
- Click on Dedicated IPs in the left sidebar.
- Click on the action menu ⋮ located to the right of the relevant item.
- Choose Unbind:

- Take note of the warnings and confirm the deletion to complete the IP uninstallation procedure.
Refer to this other guide if you are looking for information on potential issues related to your IP.
This guide helps you understand the different HTTP status codes.
1xx - Information
Error 100: Continue
The server has received the request headers and the client can continue to send the request body.
Error 101: Switching Protocols
The server agrees to change the communication protocol as requested by the client.
2xx - Success
Error 200: Request successful
The request has been successfully processed by the server.
Error 201: Document created (reason: new URI)
The request was successful and resulted in the creation of a new resource.
Error 202: Request completed asynchronously (TBS)
The request has been accepted but processing is not yet complete.
Error 203: Request completed incompletely
The server successfully processed the request, but the returned information comes from a third-party source.
Error 204: No information to return
The request was successfully processed, but there is no content to return.
Error 205: Request completed but form empty
The server successfully processed the request and asks the client to reset the document that submitted the request.
Error 206: Incomplete GET request
The server returns only part of the data, as requested by the client with the Range header.
3xx - Redirections
Error 300: The server cannot determine the return code
The request has multiple possible responses, and the server cannot automatically choose one of them.
Error 301: Document permanently moved
The requested resource has been permanently moved to a new URL.
Error 302: Document temporarily moved
The requested resource is temporarily located at another URL.
Error 303: Redirection with new access method
The response to the request can be found at another URL using a GET method.
Error 304: The 'If-Modified-Since' field was not modified
The resource has not been modified since the last request. No new data will be returned.
Error 305: Redirection to a proxy specified by the header
The requested resource must be accessed through a specified proxy.
Error 307: Temporary redirection
The requested resource is temporarily located at another URL, but the client must use the same method to make the next request.
4xx - Client errors
error 400: Syntax error in the document address
The request is incorrect or malformed.
error 401: No authorization to access the document
Access to the resource requires authentication.
error 402: Access to the document subject to payment
This code is reserved for future use regarding online payments. Some services outside of Infomaniak use it in certain cases to indicate a payment problem, but these uses are specific to these platforms — not a global standard.
error 403: No authorization to access the server
The server understands the request but refuses to authorize it.
error 404: The requested page does not exist
The server cannot find the requested resource.
error 405: Form request method not authorized
The method specified in the request is not authorized for the target resource.
error 406: Request not accepted by the server
The requested resource is not able to generate acceptable content according to the Accept headers sent in the request.
error 407: Proxy authorization required
Access to the resource requires authentication by a proxy.
error 408: Time to access the requested page expired
The server did not receive the complete request within the allotted time.
error 409: The user must resubmit with more information
The request cannot be processed due to a conflict with the current state of the resource.
error 410: This resource is no longer available
The requested resource is no longer available and this is permanent.
error 411: The server refused the request because it has no length
The server refuses to process the request without a valid Content-Length header.
error 412: The precondition given in the request failed
One of the conditions specified in the request headers has failed.
error 413: The request entity was too large
The server refuses to process the request because the entity size is too large.
error 414: The request URI was too long
The server refuses to process the request because the URI is too long.
error 415: Unsupported media type
The server refuses to process the request because the format of the request entity is not supported.
5xx - Server errors
error 500: Internal server error
The server encountered an unexpected condition that prevents it from processing the request.
error 501: Request made to the server not supported
The server does not support the functionality required to process the request.
error 502: Bad gateway
The server, acting as a gateway or proxy, received an invalid response from the upstream server.
error 503: Service unavailable
The server is not available at the moment (overloaded or maintenance).
error 504: Gateway timeout
The server, acting as a gateway or proxy, did not receive a timely response from the upstream server.
error 505: HTTP version not supported
The server does not support the HTTP protocol version used in the request.
This guide is for users making changes around a hosting environment where WordPress is installed.
Preamble
- Following a change in your web hosting plan (migration from the old v1 60 Go hosting plan to the current plans), it is possible that you will need to update the connection between the MySQL/MariaDB database and your WordPress site (to avoid errors such as "
error establishing a database connection" for example) and thus restore the link between WordPress and the MySQL/MariaDB database.
Modify important elements
Here are the details to update in the wp-config.php file so that your WordPress site works (in general, a prefix has simply been added before the existing database name and the username):
- the MySQL database name (bddname before, abcd_bddname after for example)
- the MySQL database host server (mysql.domain.xyz before, abcd.myd.infomaniak.com after for example)
- the username accessing the MySQL database (userbdd before, abcd_userbdd after for example)
Modify the WordPress wp-config.php file
To do this:
- Find and keep your current MySQL information according to the list above.
- Create an FTP account.
- Connect via FTP.
- Edit the
wp-config.phpfile located in the root folder of your WordPress site. - Find the relevant paragraph and update the 3 pieces of information (according to the list above).
- Save the file and that's it, your WordPress will now connect to the correct database!


