Knowledge base
1000 FAQs, 500 tutorials and explanatory videos. Here, there are only solutions!
This guide concerns RTMP (Real-Time Messaging Protocol), a service that allows real-time multimedia content to be streamed over the Internet:
- This is a proprietary protocol developed by Adobe and its use requires the configuration of a dedicated RTMP server or the use of RTMP hosting services.
- Viewers can access the live stream using an RTMP-compatible media player, such as VLC.
By default, RTMP is blocked by Infomaniak security rules.
- Refer to this other guide to open the corresponding port.
This guide details the priority actions to take if you do not see any difference between your website after a change you have made to it, and its previous version. These tips are also valid if you encounter issues while using the Infomaniak product interface.
Preamble
- During your browsing, a web browser saves the data consulted in a reserved space, in order to avoid requesting the data already consulted from the server again, to save time and resources.
- Your cache may contain a lot of data and sometimes the browser gets confused. Sites may then display incorrectly or display an outdated version.
- Clearing the cache ensures that you have the very latest version of the page or folder consulted.
Clear the web browser cache …
… on Safari
Choose your macOS version to view the corresponding Apple help.
… on Google tools (Chrome, Android, etc.)
View the Google help.
… on Firefox
View the Mozilla help.
… on Edge / Internet Explorer
View the Microsoft help.
This guide provides basic instructions for creating and using a .htaccess and .user.ini file with an Infomaniak Web Hosting.
Preamble
- A
.htaccessfile is placed at the root of a website and allows you to configure the Apache HTTP server.- As a decentralized configuration file, it offers significant flexibility to adjust the server's behavior according to the specific needs of the site.
- This file allows you to define URL rewrite rules, impose access restrictions, manage HTTP errors, and even customize security aspects such as disabling the display of files/folders.
- It also facilitates the setup of redirects and aliases, thus providing precise control over the organization and accessibility of the site.
- A
.user.inifile allows you to customize the PHP directives of the folder (and its subfolders) in which it is located.- By acting at the PHP interpreter level, this file allows you to define specific configurations for a given folder and its subdirectories.
- Thanks to its clear syntax, it offers the possibility to modify various parameters such as memory limit, script execution time, error handling, and other PHP-related directives.
- This granular approach allows developers to finely customize the behavior of PHP according to the specific requirements of each section of the site.
Create a file…
… .htaccess
- Connect to your hosting via FTP or SSH.
- At the root of the concerned website, create a new file and name it:
.htaccess. - Write the desired directives in the file, refer to this other guide for example.
… .user.ini
- Connect to your hosting via FTP or SSH.
- At the desired location, create a new file and name it:
.user.ini. - Write the desired PHP configuration parameters in the file.
Modifying the .user.ini file takes several minutes to take effect,
This guide explains how to import a MySQL/MariaDB database on an Infomaniak Web Hosting.
Import a database
To import a database on Infomaniak:
- Click here to access the management of your product on the Infomaniak Manager (need help?).
- Click directly on the name assigned to the product in question.
- Click on Databases in the left sidebar menu.
- Click on the “More actions” button/menu for more choices.
- Choose Import a database:
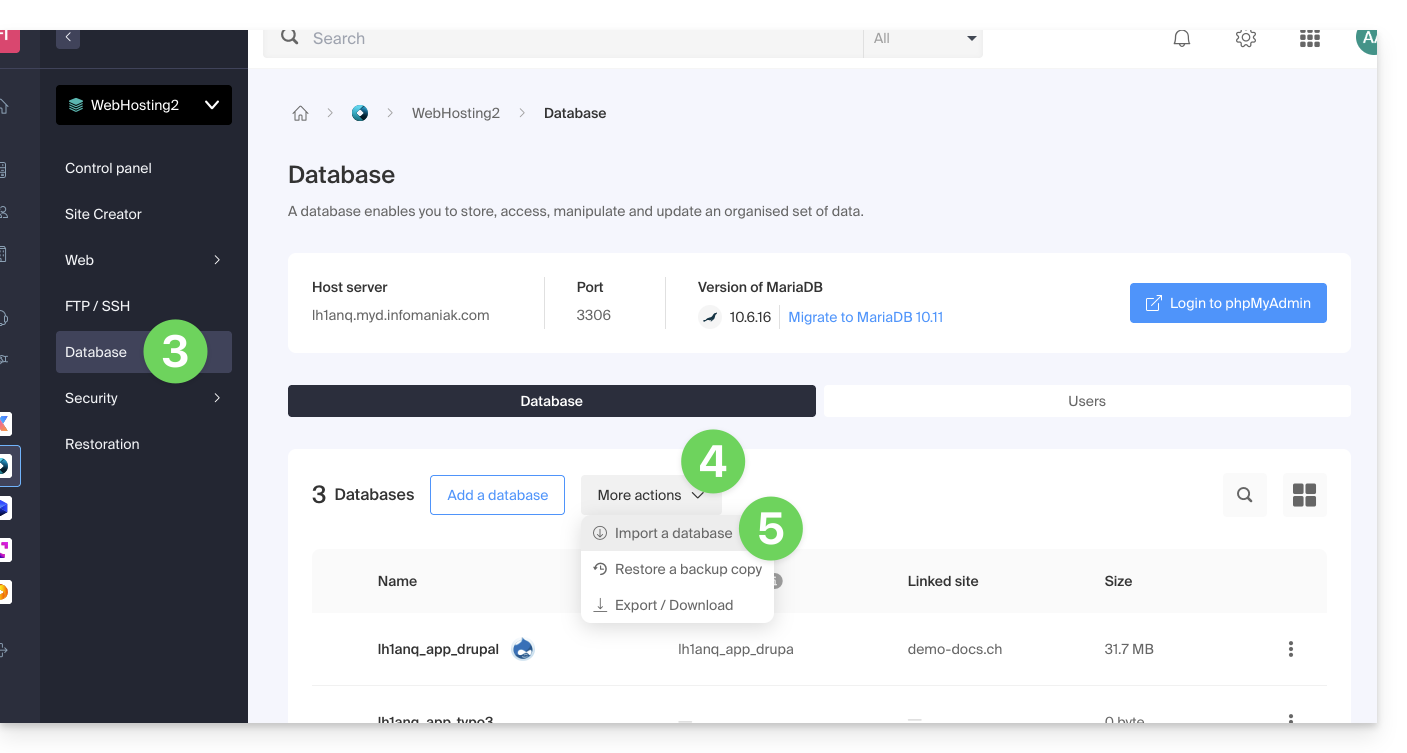
- Follow the assistant to the end.
You will then have the choice…
- … to send your database directly (
sql,gz,bz2,zip, 300 Mo max) from your computer - … to select the file to import from your hosting after uploading it to the server via FTP
- … to choose a backup from those that are done automatically
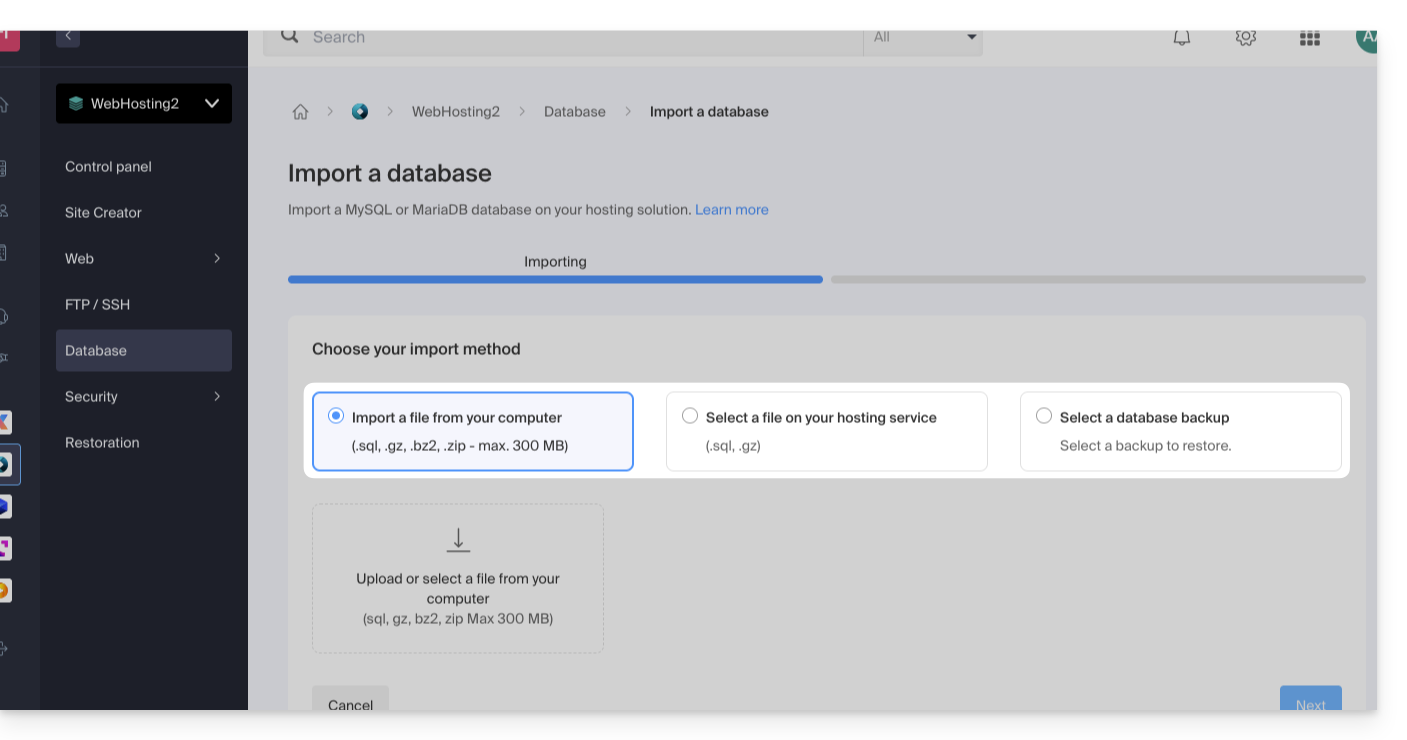
… then also choose:
- import data into a new database (creation)
- import into an existing database (replacement/overwrite)
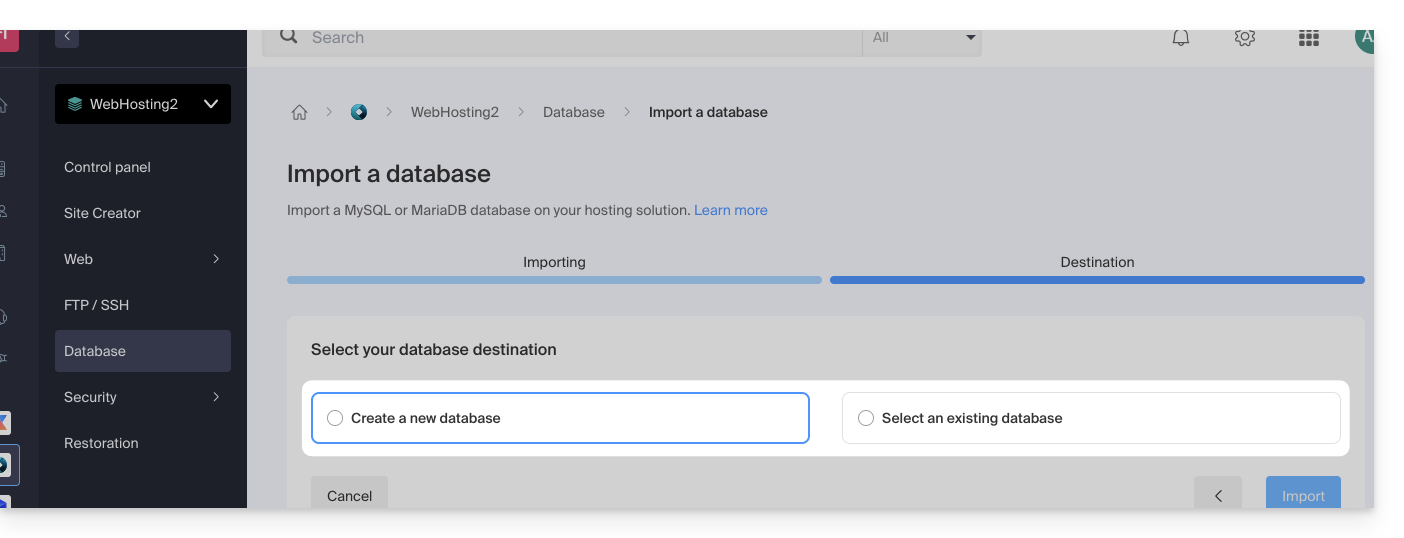
Warning: a MySQL/MariaDB import following an export requires an action on your part if you use TRIGGERS/VIEWS: refer to this other guide!
Alternative method (SSH - for advanced users)
Prerequisites
- Have the
.sqlfile of the database to import. - Have created a new blank database.
- Have a user who has all rights on the database.
- Have an FTP + SSH account.
To import via SSH:
- Send the database to import via FTP to your hosting.
- Open an SSH terminal/console,
- From a
Terminaltype application (command line interface,CLI / Command Line Interface) on your device, for example the application PuTTY (to download and install on Windows) or Terminal (installed by default on macOS), run and adapt the following command: ssh ftp-user@adresse-du-serveur- replace
ftp-userwith the FTP + SSH account username (for exampleabcd_user) - replace
adresse-du-serveurwith the web server address of your hosting
- replace
- Enter the FTP + SSH account password.
Enter and adapt the following command:
mysql --verbose -u db-user -p db-name -h db-host < path- replace
db-userwith the database username (for exampleabcd_user) - replace
db-namewith the database name (for exampleabcd_sample) - replace
db-hostwith the MySQL server of your hosting - replace
pathwith the path where you sent the database in step 1 of this procedure (if you have a single website stored in the default location, the path would be for example~/web/test.sql)
- replace
- Wait during the import (this can take several minutes depending on the size).
This guide covers the database management features available with Infomaniak hosting.
Discover also the high-availability managed database solution (DBaaS) hosted in Switzerland, allowing you to easily deploy performant and secure clusters (MySQL, MariaDB, PostgreSQL) without having to manage the underlying infrastructure.
MySQL, SQLite, MariaDB, PostgreSQL…
At the Database Management System, the hosting supports…
- … MySQL databases via PHP MySQL access or via Perl DBI+DBD::mysql
- You can use MySQL as a database management system (DBMS) on Infomaniak servers.
- You can access it either via PHP using the built-in MySQL database functions, or via Perl using the DBI and DBD::mysql modules
- … MySQLI, the native MySQL access interface (PHP5)
- MySQLI is a PHP extension that allows access to a MySQL database.
- It is an improved and more recent version of the old MySQL extension of PHP, offering improved features and performance.
- … SQLite 3.x
- SQLite is a lightweight, standalone, and serverless SQL database engine.
- Infomaniak servers support SQLite version 3.x, which means you can use SQLite to store data on these servers.
- … MariaDB
- MariaDB is a fork of MySQL and is often used as an alternative to MySQL
- You can therefore use MariaDB as a database management system on Infomaniak servers
- … the PGSQL module
- PGSQL is a PHP module that allows you to connect to a PostgreSQL database
- This specific feature allows you to connect to a REMOTE PostgreSQL database via PHP; this requires opening the appropriate port to the specific IP of the PostgreSQL database from the Infomaniak manager.
Dba, dbm, db2, sqlite are not supported, SQL Server either (it is a database server that requires a Microsoft architecture).
This guide explains how to enable support for certain file types (e.g., .inc) on an Infomaniak web hosting via PHP so that they are processed in the same way as a .php file.
Preamble
- Previously, you had to add the following line in a
.htaccessfile:AddType application/x-httpd-php .inc- This prevented the file content from being displayed as text instead of being correctly interpreted by PHP when accessed via a browser.
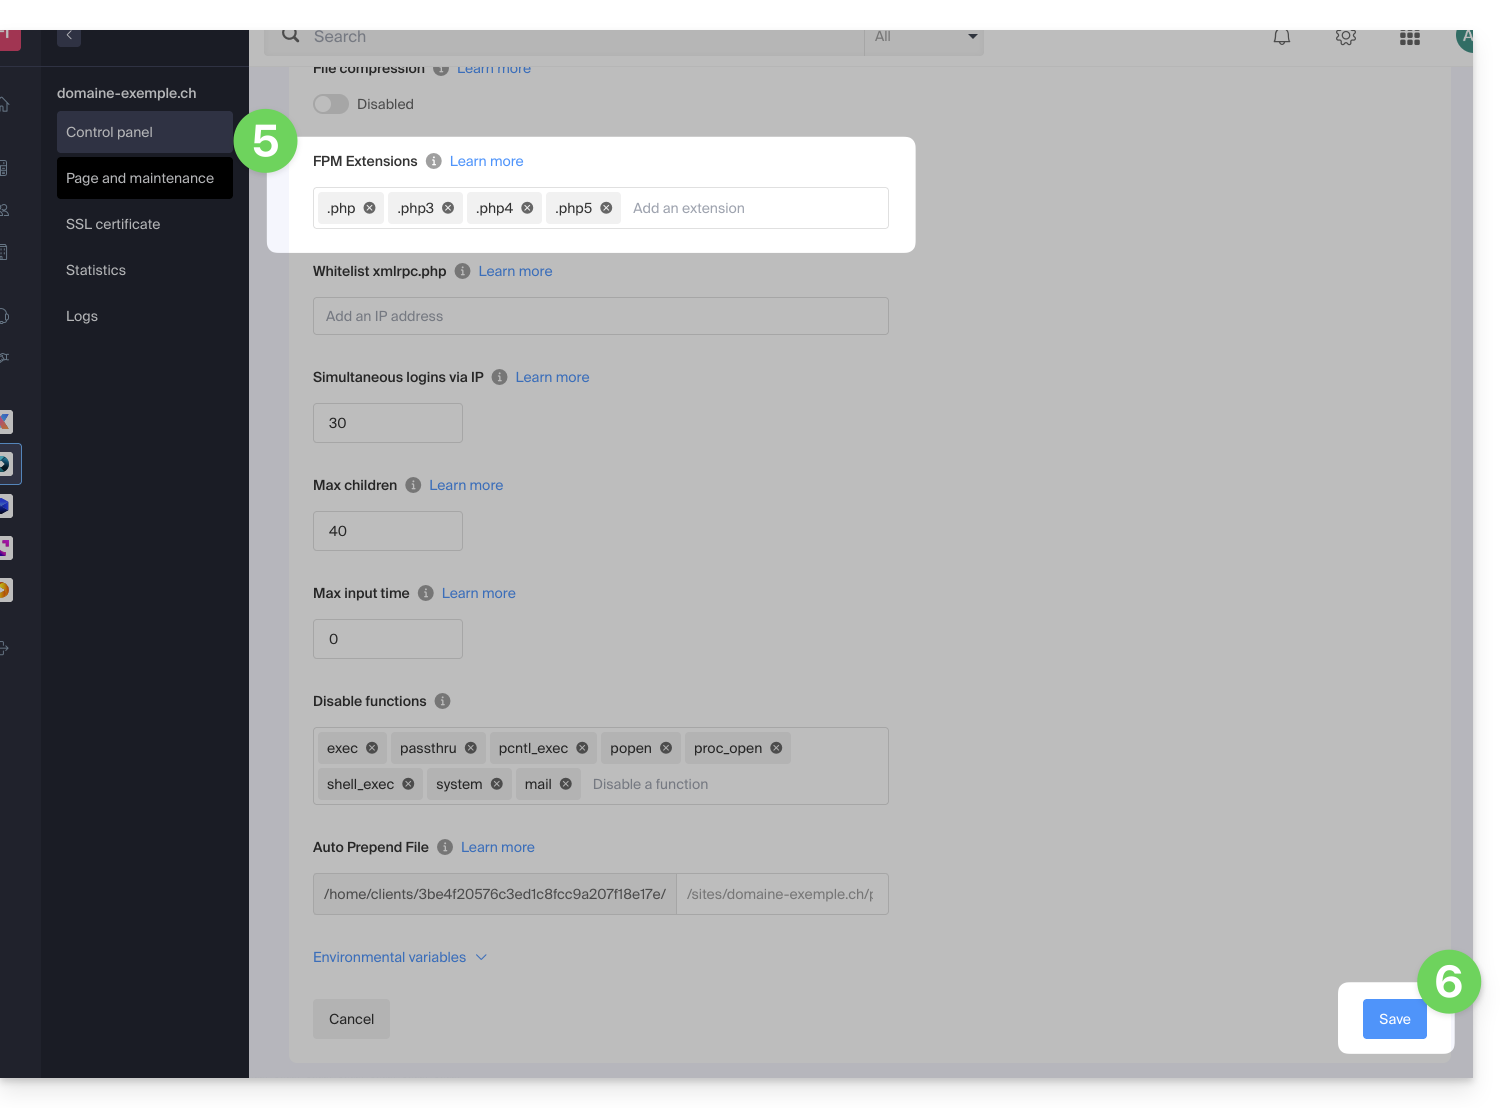
- Now you can manage file extensions via the FPM Extensions field in the Manager of your hosting.
Manage extensions recognized by PHP
To add support for a specific file type:
- Click here to access the management of your product on the Infomaniak Manager (need help?).
- Click directly on the name assigned to the product in question.
- Click on Manage under Advanced settings:
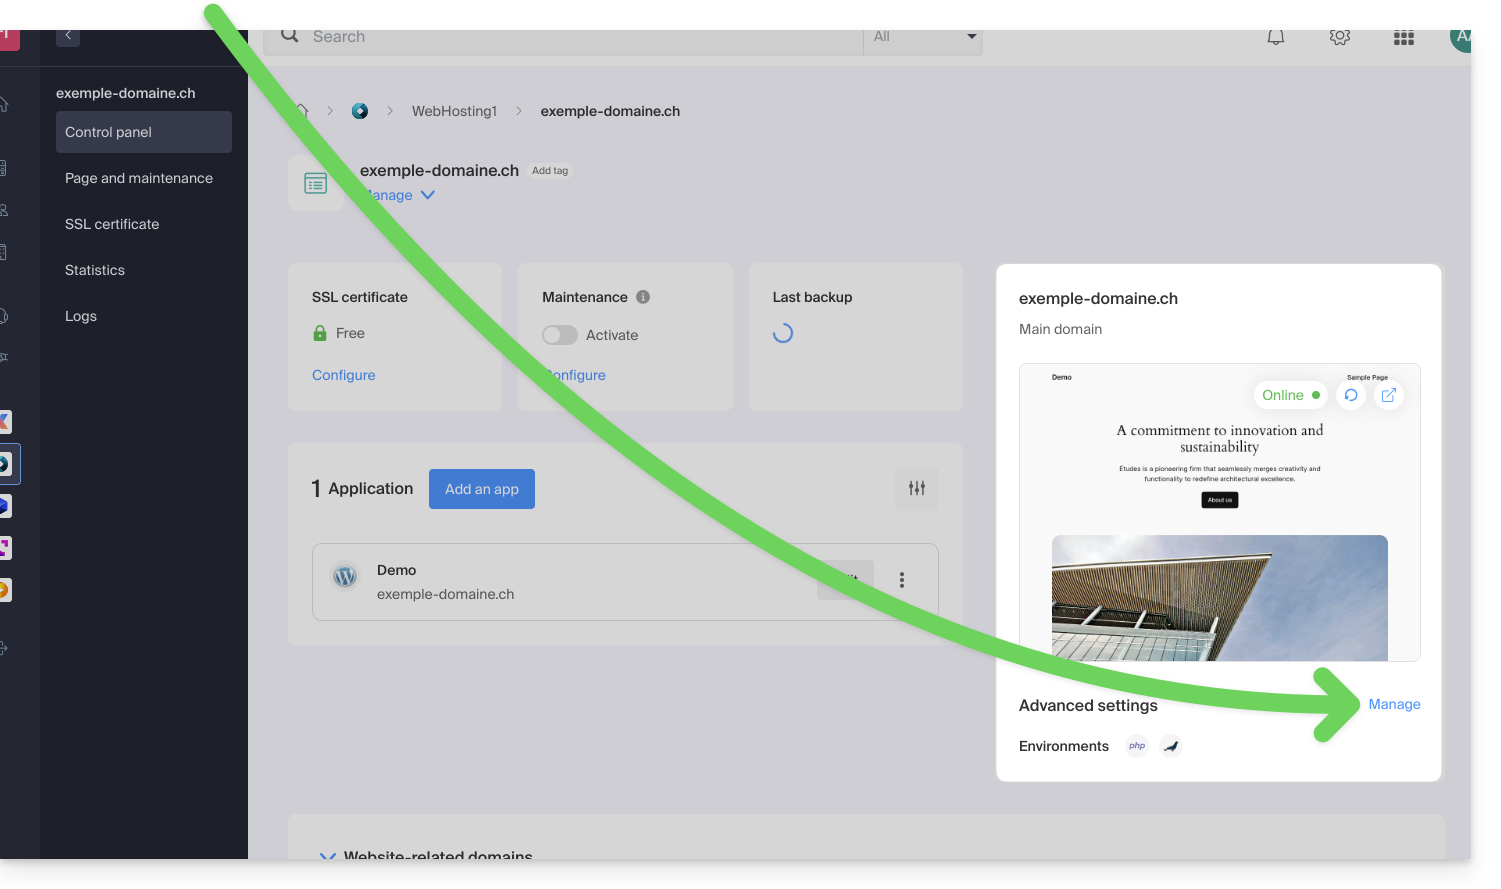
- Click on the PHP / Apache tab.
- Edit the FPM Extensions field to add the desired extension.
- Click the button at the bottom of the page to save:
This guide helps you set up the header Access-Control-Allow-Origin, an HTTP header that specifies which origin (domain, protocol, and port) can access resources on a server. This header is used to control cross-origin (CORS) access from a web application.
⚠️ For additional help contact a partner or launch a free call for tenders — also discover the role of the host.
List of authorized domains
You can add the origin of a request to the list of authorized domains to access server resources by adding it to the values of the header Access-Control-Allow-Origin.
To authorize, for example, the site https://domain.xyz to access resources with CORS, the header must be as follows:
Access-Control-Allow-Origin: https://domain.xyzYou can set it via the header() function of PHP by drawing inspiration from this guide in particular.
If you need this header to be applied everywhere, you can use an auto-prepend.
This guide explains how to update Web Applications installed via Infomaniak tools.
Preamble
- If an application is manually updated via FTP, it is then impossible to update it via the Manager and benefit from automatic updates.
- When installing your Web Application, automatic updates (at least security updates) are usually enabled by default:

Updating an application installed via Infomaniak
To access the Infomaniak Web Application and update it:
- Click here to access the management of your product on the Infomaniak Manager (need help?).
- Click directly on the name assigned to the relevant product:

- Click on the action menu ⋮ located to the right of the relevant Web Application.
- Click on Settings for the application:

- Click on Edit in the Information block:

- Click on the dropdown menu to select a newer version.
- Click on the Save button:

This guide explains how to enable or disable the PHP function set_time_limit of a Web Hosting.
Preamble
set_time_limitis a PHP function that sets the time limit for a script, in seconds; if this limit is reached, the script stops and returns a fatal error.set_time_limitcannot be used to set values beyond the script execution time limit (max_execution_time) defined in the Manager.
Enable or disable the PHP set_time_limit function
To access website management:
- Click here to access the management of your product on the Infomaniak Manager (need help?).
- Click directly on the name assigned to the product concerned:
- Click on Manage under Advanced settings:

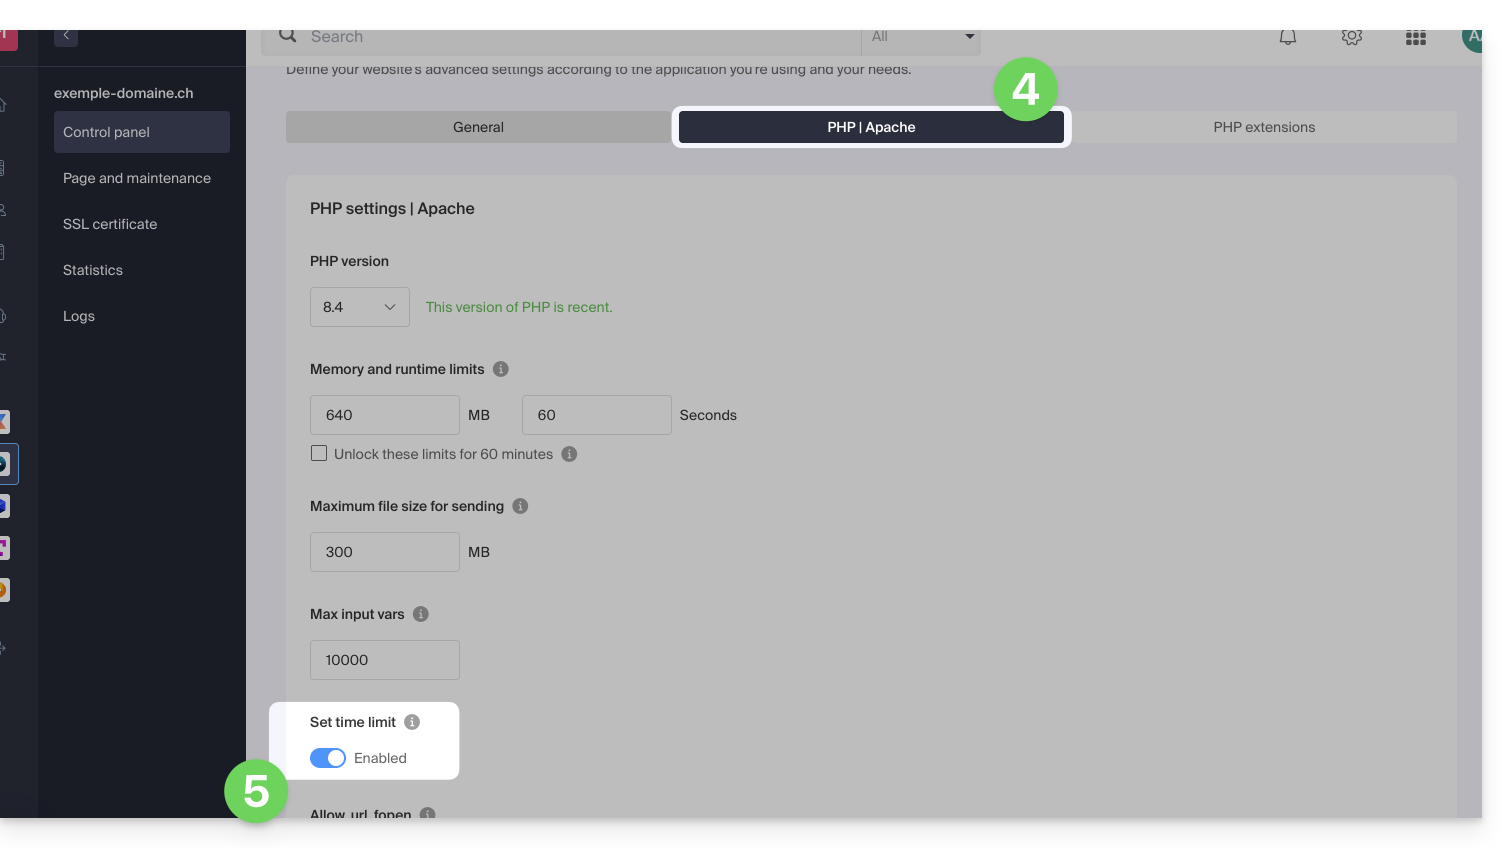
- Click on the PHP / Apache tab.
- Click on the toggle switch On/Off as desired:
- Click on the Save button to validate the changes.
This guide explains how to add or modify one or more TXT record entries in the DNS zone (of a domain name) managed on the Manager Infomaniak.
Preamble
- The
TXTrecord type allows you to insert readable text in the DNS zone of a domain name. - This is the method generally used to help prevent spam and to verify domain ownership (Google may ask you to do this before using some of their services: refer to this other guide for an example of adding a
TXTrecord to authenticate a domain).
Modify the DNS zone
Refer to this other guide to manage this type of record in a DNS zone.

This guide explains how to add or modify one or more CNAME and DNAME type records in the DNS zone (of a domain name) managed on the Manager Infomaniak.
Preamble
- The
CNAMErecord type allows a subdomain to point to a website address.- This is the method generally used to make the
wwwsubdomain work with your site, or to redirect a subdomain to a folder on the web server where your website is hosted.
- This is the method generally used to make the
- The
DNAMErecord type for "delegation name" is particularly useful when reorganizing domains or for smooth transitions of part of your infrastructure to another, while preserving the hierarchical structure of subdomains.- A
DNAMEcreates an alias for an entire domain and all its subdomains.
- A
- Unlike the
CNAMEwhich only applies to a single specific host name, theDNAMEautomatically redirects all subdomains. Example:- A
DNAMEforabc.site1.compointing tosite2.comwill automatically linkxyz.abc.site1.comtoxyz.site2.com,new.login.abc.site1.comtonew.login.site2.com, and so on.
- A
- ⚠ A
DNAMErecord cannot be used at the root zone level of a domain (likesite1.comdirectly). It is generally used on a subdomain. If you want to redirect the main domain itself, you will need to use other types of records such as anA,AAAAorCNAME(with some restrictions for the latter).
Modify the DNS zone
Refer to this other guide to manage this type of record in a DNS zone.
This guide explains how to save or export a MySQL/MariaDB database via the Infomaniak Manager or via SSH.
Export a database via the Manager
To export an Infomaniak database:
- Click here to access the management of your product on the Infomaniak Manager (need help?).
- Click directly on the name assigned to the product concerned.
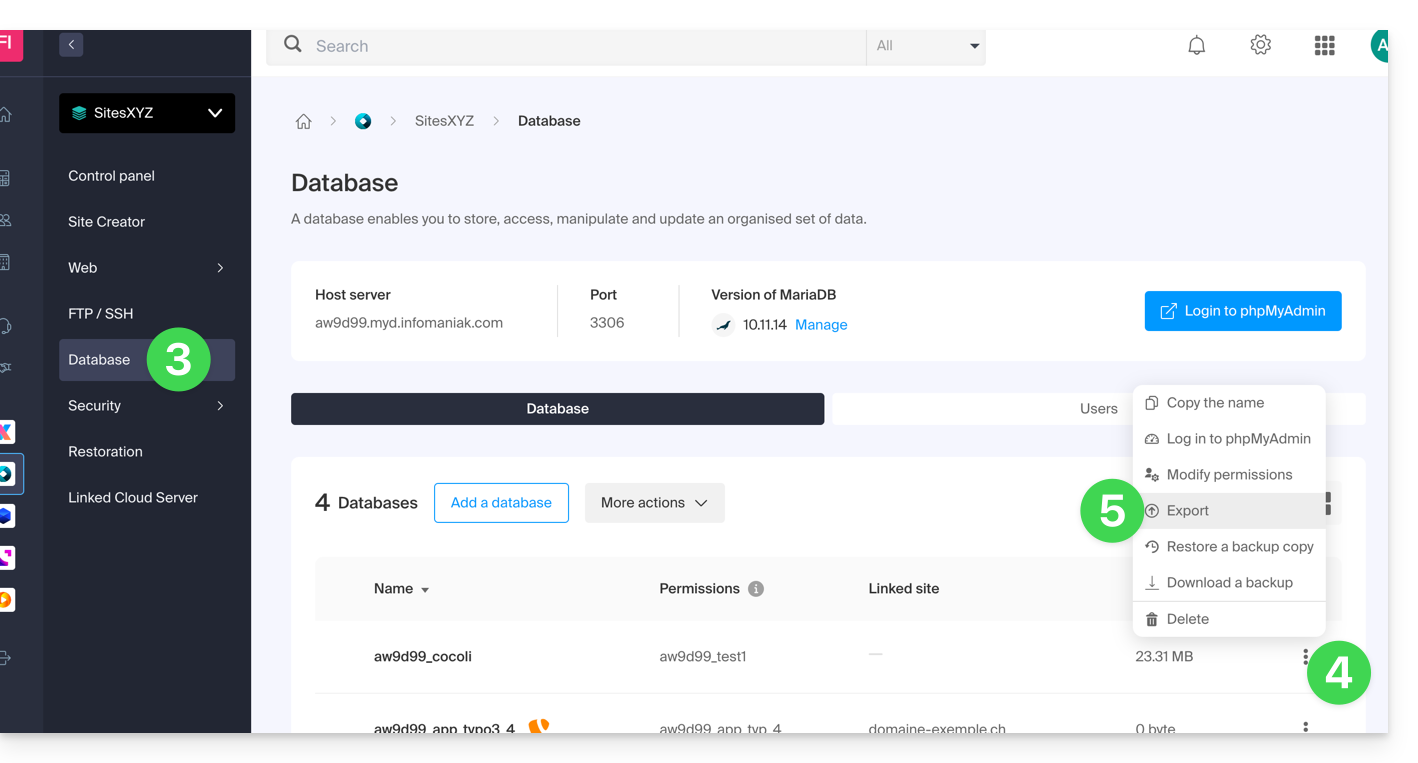
- Click on Databases in the left sidebar menu.
- Click on the action menu ⋮ to the right of the object concerned in the table that appears.
- Click on Export (or on Download a backup):
- Click on the export method and choose the database to download from the drop-down menu.
- Click on the Next button.
- Click on any desired instructions:
- Compression
Gzip Drop TableCreate Table if not existsInsert ignore into
- Compression
- Click on the Export button.
Export a database via SSH
If you are unable to export the database via the console or if the database is large:
- If necessary, create an SSH FTP account.
- Log in to the server via SSH (need help?).
Adapt and execute the following SSH command:
mysqldump --host=votre_serveur_mysql -u votre_user_mysql --password=password_du_user_mysql nom_de_la_base_de_données --no-tablespaces > sauvegarde.sql- Wait while the SSH command is running (the terminal may freeze for a few seconds).
- Connect to the server via an FTP software/client.
- Download the generated SQL file.
Additional help
Example of command to run in step 3 of the second procedure:
mysqldump --host=fhzc.myd.infomaniak.com -u lfcz_test --password=monpassword lfcz_test --no-tablespaces > sauvegarde.sql- Refer to this other guide if you are looking for information related to the MySQL server, the database username, and password.
This guide explains how to display the IP address of a site on your Web Hosting.
Preamble
- The IPv4 address is generally the same for each of the sites on the hosting (unless you have acquired a dedicated IP).
Display the IP address of your site
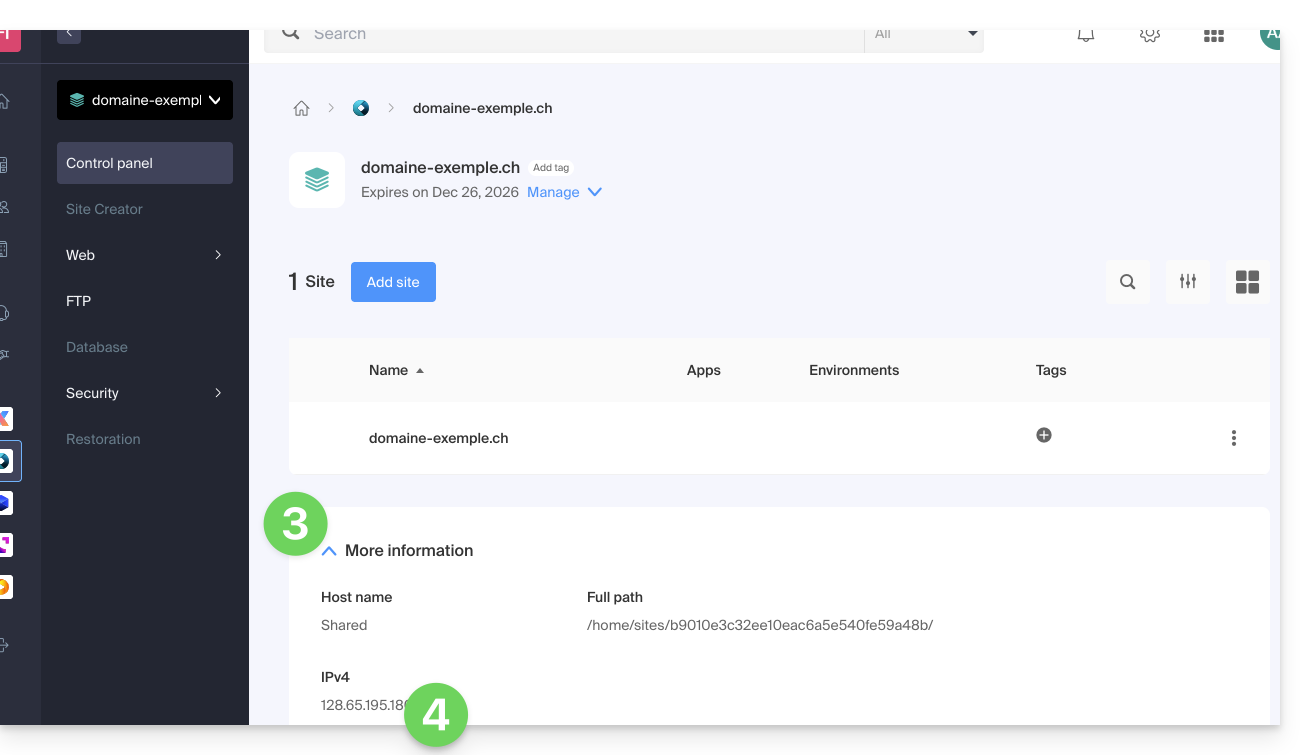
The IP address is specified on the hosting management page (Starter or containing multiple sites):
- Click here to access the management of your site on the Infomaniak Manager (need help?).
- Click directly on the name assigned to the product concerned.
- Then click on the chevron to expand the Information section of this hosting.
- The IPv4 address is displayed on the page:
- The IPv6 address is also displayed in the case of paid hosting:
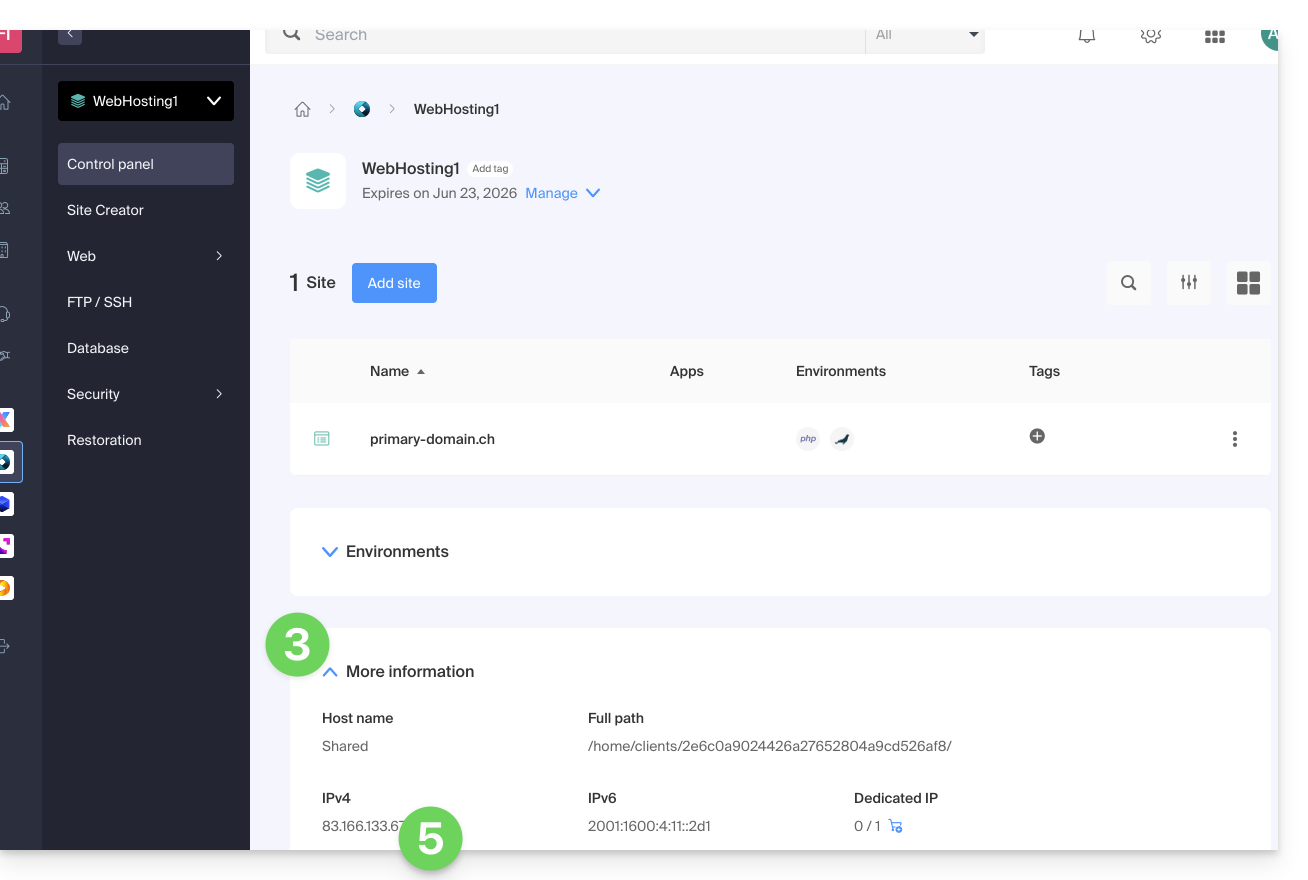
This guide explains how to disable all extensions installed on your WordPress on a Web Hosting.
Preamble
- If you encounter a problem with your website, disabling WordPress extensions allows you to quickly identify if one of them is causing the issue and draw the necessary conclusions to repair your site.
- For additional help contact a partner or launch a free tender — also discover the role of the host.
Quickly disable WP extensions
To disable all WordPress extensions:
- Log in to the server via FTP (need help?).
- Go to the site location (folder corresponding to your WordPress site).
- Rename
/wp-content/pluginsto/wp-content/_pluginsfor example.- To disable a specific extension, rename
/wp-content/plugins/PluginNameto/wp-content/plugins/_PluginNamefor example.
- To disable a specific extension, rename
This guide explains how to move an existing website within an Web Hosting Infomaniak to another Infomaniak Web Hosting.
Preamble
- There are not many turnkey solutions for moving a website.
- Generally, few hosts offer the export or import of a complete site with its databases; this is largely due to the fact that there are many ways to build a site and just as many languages that are largely incompatible with each other.
- If the site to be transferred is built with WordPress, refer to this other guide illustrating a simplified solution.
- It is also possible to move a complete Web Hosting (read below).
- Make your life easier! If needed, **local partners recommended by Infomaniak can handle these procedures**. Launch a **free tender**. They take care of everything, freeing you from the technical details.
Manual solution: example of site transfer
To do this manually, it is necessary to:
- retrieve the web data as well as the associated databases,
- re-publish this on a site created on the destination web hosting,
- and if the associated domain name is the same, the first site will need to be deleted or renamed.
For the rest, here is an example of how to proceed:
- Order the other Web Hosting / Cloud Server if you haven't already.
- Create a «fake site» on this new hosting (for example dev.domain.xyz - read more below).
- Manually copy your data via FTP and MySQL (export / import).
- Adjust your site if necessary (database address, etc.).
- Once you are satisfied with the «new site», delete the old one.
- Change the name of the new site to give it its true name.
An alternative, at point 2 above, is to work with the alias www. which you can detach beforehand from your current site. Indeed, the alias www(.domain.xyz) is often installed as an alias for your site, and it is enough to detach it, which allows the creation of a site on the other hosting with the name www.domain.xyz (do not forget, at point 6, to add your alias of type "domain.xyz" without the www to this new site).
Moving entire Web Hostings
There is an automated way to move a Infomaniak Web Hosting to:
- an Infomaniak Cloud Server (if the hosting is currently shared or if the hosting is already on Cloud Server)
- another Infomaniak Organization
A Starter hosting cannot be moved but it can be converted.
This guide explains the principle of on-the-fly URL rewriting.
Preamble
- On-the-fly URL rewriting is a technique that allows modifying the appearance of a web page's URLs without actually changing the resource's path.
- This process is done through virtual redirects, transforming a visible URL into a more aesthetic one while preserving the initial destination, invisible to visitors.
- This method is often used to make URLs simpler and more readable, by hiding the parameters of dynamic pages.
- In addition to improving aesthetics for visitors, it is beneficial for referencing, as search engines generally prefer URLs without complex parameters.
URL rewriting example
Take the example of the URL: article.php?id=25&categorie=4&page=3. It can be rewritten as: article-25-4-3.html or titre-article-25-4-3.html. Here is how to configure this in a .htaccess file if article.php is located in the web/admin/ directory:
Options +FollowSymlinks
RewriteEngine on
RewriteBase /admin/
RewriteRule ^article-([0-9]*)-([0-9]*)-([0-9]*).html$ article.php?id=$1&categorie=$2&page=$3 [L]- Options +FollowSymlinks: allows the use of symbolic links
- RewriteEngine on: enables Apache's URL rewriting module
- RewriteBase /admin/: specifies the working directory
- RewriteRule: defines the rewrite rule
With this configuration, when a user accesses article-25-4-3.html, they are redirected to article.php?id=25&categorie=4&page=3 without this being visible.
Even if URL rewriting is in place, the old URL remains functional. It is therefore crucial to update all internal links of your site to adopt the new URL format.
Redirect to another domain
If you own multiple domains pointing to the same site, you can redirect all requests to a main domain. For example, if www.domaine.xyz and www.mon-domaine.xyz lead to the same site, but www.mon-domaine.xyz is your main domain, use this rule in the .htaccess of www.domaine.xyz:
RewriteEngine On
RewriteRule ^(.*)$ http://www.mon-domaine.xyz/$1 [R=301]
This will redirect all pages from www.domaine.xyz to www.mon-domaine.xyz transparently, with a permanent redirect (R=301).
Also refer to this other guide on this subject.
This guide helps you download all the data related to your website hosted by Infomaniak.
Preamble
- Automatic backups are performed daily on Infomaniak installations.
- However, you can download a clean and personal version of your website to secure it on your local installation, USB key,
.ziparchive on kDrive, etc. - To download a site created with WordPress, refer to this other guide specific to 2 extensions allowing for local backup of information.
- With the exception of Site Creator, the data of a website hosted by Infomaniak are accessible and visible on the server via an FTP connection (which means that to create a backup of the data, you simply need to download the content of the parent folder on the server).
- All that will remain is to add a backup of the database of the site (which contains information that is not listed in the files accessible via FTP).
Site Location
When you arrive in the folder tree on the server, it will not always be easy to know where to go to download the information related to the site you are interested in.
Start by noting the exact location of the site you want to download, by going to manager.infomaniak.com on the site's dashboard within your Web Hosting:
The highlighted indication above is the location of the example site. Check yours!
Connecting to the server
To access the server, you need to use an FTP software/client or the quick Web FTP access which is suitable in most cases:
Site Download
When you arrive on the Web FTP, you need to go to the location noted in the first chapter above, and click on the download icon to the right of the folder corresponding to your site:
The download starts and you obtain a .zip archive with all the files making up your website (except for files beginning with a "." like .htaccess).
Downloading the database
In most cases, your site uses a database to function. You should therefore download it as well.
To do this:
- Click on Databases in the left sidebar.
- Click on the action menu ⋮ located to the right of your database name (if you are not sure which one to take, repeat the operation for each of them).
- Click on Download:

You will need to confirm the download (or export) of the most recent correct file in the next step to obtain a .sql.gz file that corresponds to all the tables in your database, which you should keep safely. The download link is sent by email.
This guide details the compatibility of Infomaniak Web Hosting with IPv4 and IPv6.
Preamble
- Infomaniak supports both IPv4 and IPv6, thus ensuring optimal connectivity for all users.
- Only Starter (free) hosting and old hosting plans are not compatible: upgrade to a Cloud Server or shared hosting.
- Compatibility with IPv4 and IPv6 means that Infomaniak's hosting service allows websites to be accessible to users using both IPv4 and IPv6 addresses.
- This ensures that your site can be visited by all types of devices and networks, providing an optimal experience for your users, regardless of the protocol they use to connect to the Internet.
IPv4, or Internet Protocol version 4
This is the first version of the Internet protocol widely used since the 1980s. It uses 32-bit IP addresses, which allows identifying and locating devices connected to the Internet. However, with the exhaustion of IPv4 addresses, it has become necessary to develop a new version (read below):
- Example of an IPv4 address: 192.168.0.1
- In this example, the IPv4 address consists of four groups of numbers separated by dots…
- Each group can contain a number from 0 to 255.
- The address 192.168.0.1 is often used to represent a local IP address in a private network.
- Find the IP of your website: refer to this other guide…
- Get the public IP of your current Internet connection: https://chk.me/ip
IPv6, or Internet Protocol version 6
This is the latest version of the Internet protocol introduced to solve the problem of IPv4 address exhaustion. IPv6 uses 128-bit IP addresses, offering practically unlimited address space. It also provides enhanced features such as security, quality of service, and automatic address configuration:
- Example of an IPv6 address: 2001:0db8:85a3:0000:0000:8a2e:0370:7334
- In this example, the IPv6 address consists of eight groups of numbers and letters separated by colons…
- Each group can contain a hexadecimal number from 0 to FFFF.
- The IPv6 address is much longer than the IPv4 address, thus offering a much larger address space.
This guide is intended for developers and webmasters experiencing issues with the display of special characters (e.g., accents, Arabic characters, Chinese characters, emojis, etc.), whether on an Infomaniak website or in its database.
Preamble
- Common causes of incorrectly displayed characters that appear in place of special characters or emojis like
??:- PHP connection in
utf8instead ofutf8mb4 - MySQL table or column in
latin1orutf8instead ofutf8mb4 - SQL file encoded differently from the import parameter
- HTML/CSS/JS files incorrectly encoded
- Missing or incorrect declaration of the charset in HTML, PHP, or HTTP
- PHP connection in
- Common solutions:
- Use
utf8mb4everywhere: database, connections, tables, columns, files, headers - Validate the encoding of all files and dumps
- Test the display of emojis, accents, and other multilingual characters
- Use
- Also refer to this other guide to force another encoding when connecting to a MySQL database.
Use a text editor that supports saving in UTF-8 without BOM (Visual Studio Code, Sublime Text, Notepad++...)
1. Use UTF-8 or UTF-8MB4 everywhere
The utf8 encoding of MySQL does not support 4-byte characters, such as emojis. These will display as ??. Therefore, you need to use utf8mb4, which is a complete implementation of UTF-8.
2. HTML – Correct declaration of encoding
In the <head> of your HTML pages:
<meta charset="UTF-8">Also ensure that CSS/JS files are saved in UTF-8 (without BOM).
3. PHP – Force UTF-8 or UTF-8MB4
a) HTTP headers
header('Content-Type: text/html; charset=utf-8');b) MySQL connection (MySQL API)
$connection = mysql_connect($host, $user, $pass);
mysql_set_charset('utf8mb4', $connection);
c) PDO connection
 $dsn = "mysql:host=localhost;dbname=ma_base;charset=utf8mb4";
$pdo = new PDO($dsn, $user, $pass, [
    PDO::ATTR_ERRMODE => PDO::ERRMODE_EXCEPTION
]);
4. MySQL database
a) Configuration in phpMyAdmin
- Database, tables, and columns must be in
utf8mb4_unicode_ciorutf8mb4_general_ci. - In the Operations tab, choose
utf8mb4_unicode_cifor the collation.
b) Useful SQL commands
ALTER DATABASE ma_base CHARACTER SET = utf8mb4 COLLATE = utf8mb4_unicode_ci;
ALTER TABLE ma_table CONVERT TO CHARACTER SET utf8mb4 COLLATE utf8mb4_unicode_ci;
c) After PHP connection
mysqli_query($conn, "SET NAMES 'utf8mb4'");
mysqli_query($conn, "SET CHARACTER SET 'utf8mb4'");
5. .user.ini / .htaccess
To force server-side (Apache) encoding:
AddDefaultCharset utf-8
Header set Content-Type "text/html; charset=utf-8"
# Pour PHP
php_value default_charset UTF-8
php_value mbstring.internal_encoding UTF-8
6. SQL dump import / export
Errors such as é becoming ? or an emoji ☺ becoming ?? often come from encoding misalignment.
Check the SQL file encoding before import. Use iconv if necessary:
iconv -f ISO-8859-1 -t UTF-8 dump.sql > dump_utf8.sqlIn phpMyAdmin, specify the import encoding (e.g., UTF-8, UTF-8MB4 or latin1 depending on the file).
This guide details the use of Perl or Python scripts on Infomaniak hosting and the management of their modules.
Preamble
- Shared Web Hosting: the CGI module is no longer available; the execution of Perl and Python scripts is therefore not supported.
- It is necessary to migrate to a Cloud Server.
- Managed Cloud Servers: to benefit from the latest technologies, it is possible to upgrade your Cloud Server.
Web Configuration (Apache/CGI)
To run Python or Perl scripts via Apache on a Cloud Server, the interpretation of files with the extensions .py and .pl is not active by default.
Using your FTP software/client or the FTP Manager, add and adapt the following directive in the .htaccess file located in the folder containing your scripts:
AddHandler cgi-script .pl .cgi .py
Options +ExecCGI
Installation of additional modules
On a Cloud Server, you have the possibility to install third-party libraries that are not present by default.
Python
- The installation is done via
PIP, which is a package manager used to install and manage packages written in Python. - Infomaniak offers
PIPandPIP3via the Fast Installer tool. - Once PIP is installed, you will be able to install Python modules by specifying
--userduring the command. For example: pip3 install mysql-connector-python --user
Perl
- The addition of Perl modules is also done via SSH (console). It is necessary to install them in the user directory and to define the full path within the scripts.
Important technical information
- Path of the interpreter (Path):
/usr/bin/python - Extensions: Scripts must have the extension
.pl,.cgior.py. - Limitations: The
mod_pythonmodule is not supported.
Error Resolution (CGIWrap)
If you encounter the following error when loading an image:
CGIWrap Error: Execution of this script not permitted
Request Data:Extra Path Info: /dossier/.../image.PL.12.34.gif
The server interprets the file as a script because it contains ".PL" (or .PY) in its name.
Solution: Simply rename the file to remove this mention (example: image-12-34.gif).

