Knowledge base
1000 FAQs, 500 tutorials and explanatory videos. Here, there are only solutions!
This guide explains how to report a phishing attempt (Phishing, Fishing, Filoutage...) of which you may be a victim.
Preamble
- Phishing is an attempt at fraud and scam, aiming to obtain sensitive information fraudulently.
- Generally, the victim receives in their inbox a message seemingly from Infomaniak, their bank, or a trusted organization, indicating that a problem has occurred on their account or in their daily life:
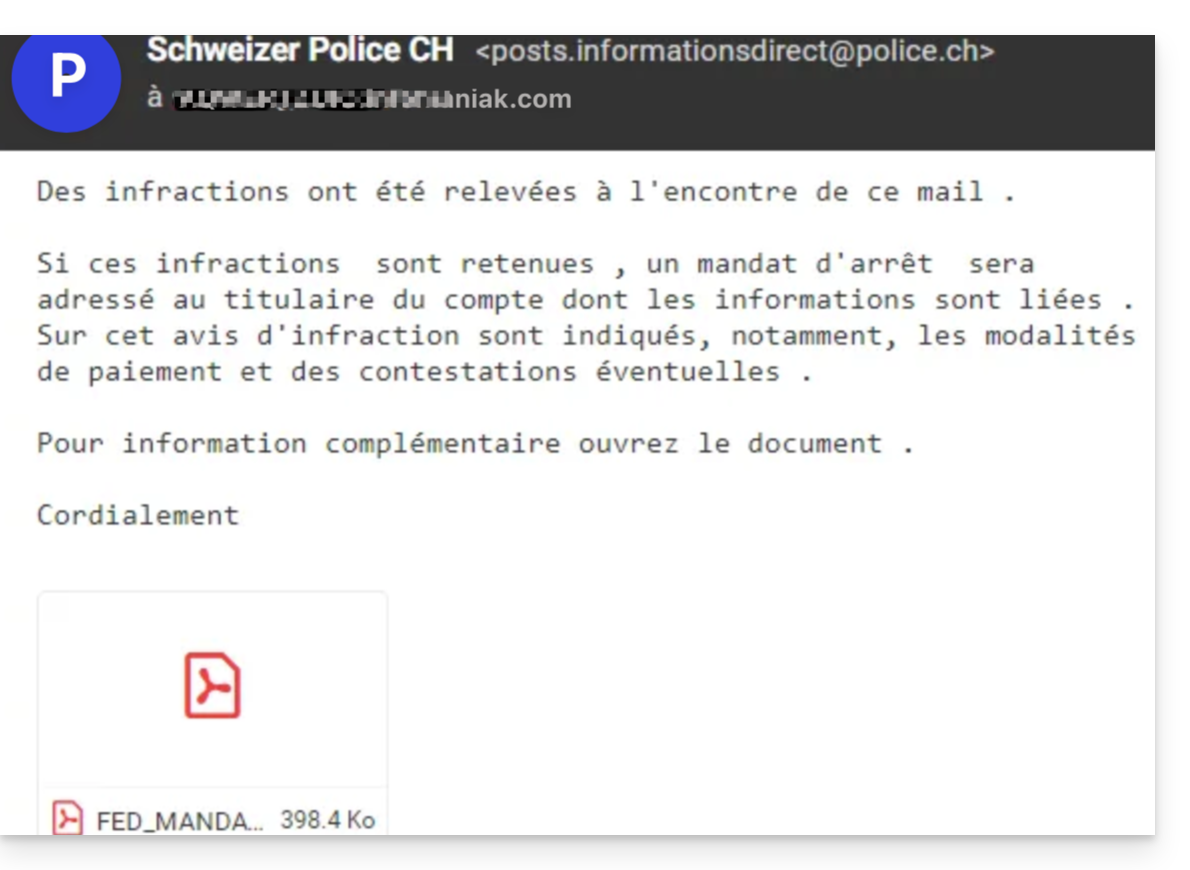
- The goal of this identity theft is generally for the user to voluntarily go to a page and share private information that will then be exploited for various purposes, mainly financial.
- If it is not a message “pretending to be something it is not”, but simply an unsolicited advertising message, it is better to report it as Spam.
Report a Phishing Email
Prerequisites
- Check that the spam filter is active.
- For added security, enable the external mail mention.
Then, if you find an email of this type in your inbox, you have the option to act so that these messages decrease and eventually disappear from the messaging systems:
- Click here to access the Infomaniak Mail Web app (online service ksuite.infomaniak.com/mail).
- Open the phishing message
- Click on the action menu ⋮ on the right.
- From the menu that appears, select
Report as phishing :
- Confirm sending for processing.
- Delete the email
Once you have clicked on Report as phishing, an email is automatically sent to Infomaniak with all the necessary information for processing the scam report.
In case of a more serious problem (when the message is directly addressed to you by an acquaintance or contact without it being a mass mailing) it is recommended to contact an organization such as report.ncsc.admin.ch.
This guide explains how to create a homepage on your Infomaniak website using the welcome page creation tool, a simplified help to create content quickly and easily. To create a more complete site, there is Site Creator.
Prerequisites
- Have a website on Infomaniak hosting (even a simple Starter, the basic web page to activate if necessary).
Create a welcome page on an Infomaniak site
To access the simple creation tool:
- Click here to access the management of your product on the Infomaniak Manager (need help?).
- Click directly on the name assigned to the product concerned.
- Click on Page and maintenance in the left sidebar.
- Check or select the domain name of the site on which you want to install the web page.
- Click on Create a homepage or Customize:
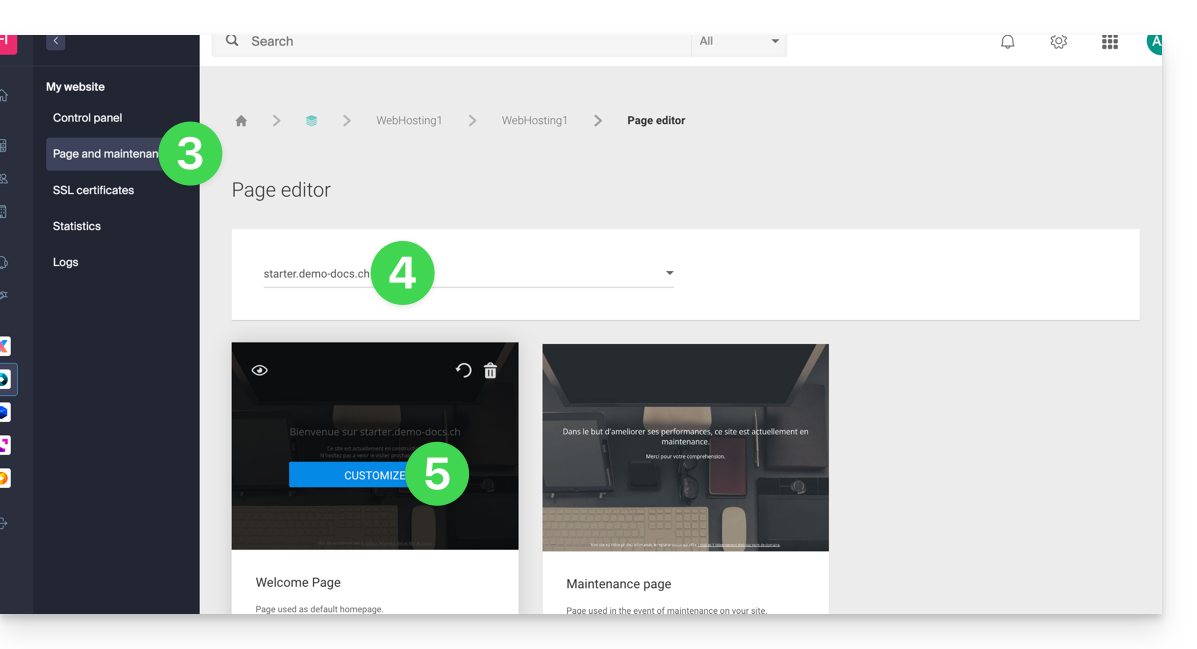
You can then choose a theme, define the text visible to your visitors, insert an image into the body of the page, manage the SEO content of your page, add a background image, specify social network usernames if necessary, etc. and all of this can be modified at any time.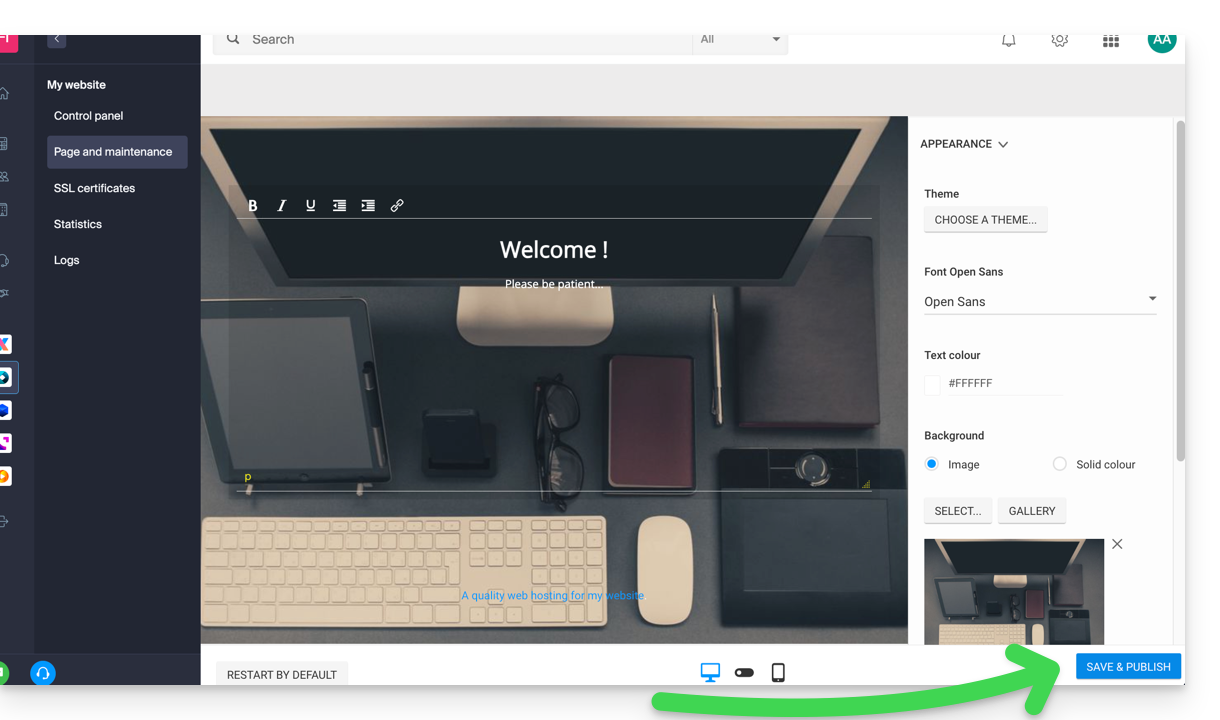
Click on the blue button at the bottom of the page to save and publish your changes.
Note that the tool can be used in conjunction with FTP management of your web hosting if necessary.
Disable and delete the welcome page
To delete the homepage that has been automatically placed at the root of your website's directory:
- Click here to access the management of your product on the Infomaniak Manager (need help?).
- Click directly on the name assigned to the product concerned.
- Click on Page and maintenance in the left sidebar.
You will be able to delete the welcome page using the trash can icon; this will permanently delete the content of the welcome page!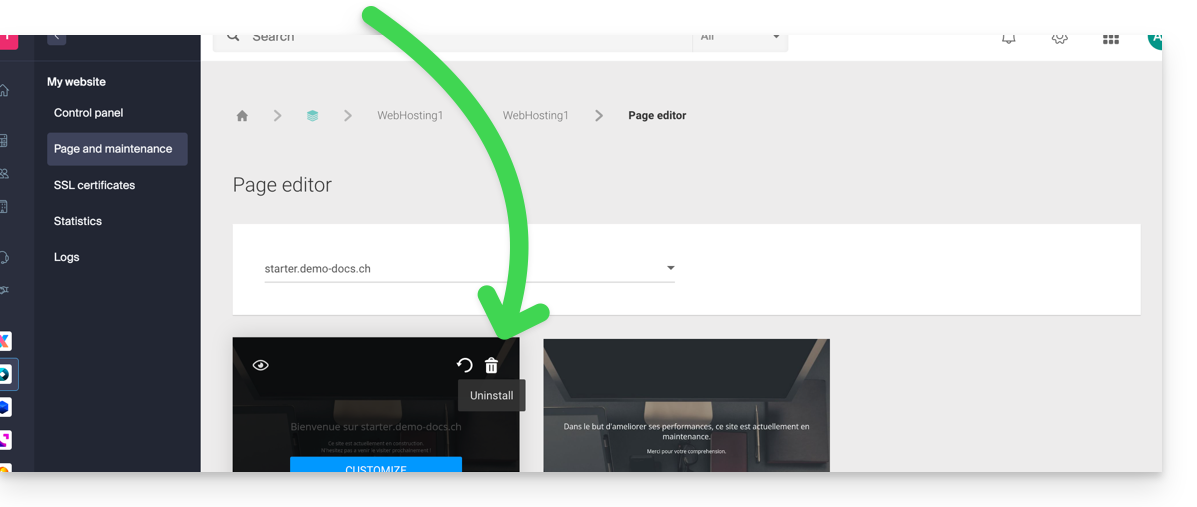
This guide explains how to change the PHP version used in the command line (PHP CLI) on an Infomaniak Web Hosting.
Preamble
- This guide is useful if you need to temporarily adjust settings for a specific script or for a PHP session executed in the command line (CLI).
- To modify the general PHP version used by your hosting on the web server (FPM/Apache) via the Infomaniak Manager, refer to this other guide.
Default PHP version in command line
When you run the php command (usually via /usr/bin/php), it is the default PHP version configured on the server that is used. This version may evolve over time according to the platform updates.
To find out the exact version currently active on your hosting, run:
php -vTo ensure the stability of your scripts, it is recommended to use an explicit version (php7.4, php8.0, php8.1, etc.) or to adjust your PATH variable to point to the directory of the desired version (for example /opt/php8.1/bin).
Modify the PHP version used in CLI
There are two main files that can be used to configure the PHP version automatically loaded in your SSH session:
1. Using ~/.bashrc (recommended)
The .bashrc file is read by Bash when opening an interactive shell (non-login), i.e., in the majority of cases when you open a normal SSH session or execute commands via deployment tools.
Create the
~/.bashrcfile if it does not exist, then open it:touch ~/.bashrc nano ~/.bashrcAdd the following line to specify the desired PHP version (example: PHP 8.1):
export PATH="/opt/php8.1/bin:$PATH"Reload your environment:
source ~/.bashrcCheck the currently used version:
php -v
which php
You should see a path of the type
/opt/php8.1/bin/php.
2. Using ~/.profile (alternative)
The .profile file is read only when the shell is launched in login mode (for example during an initial SSH connection). If your environment does not automatically load .bashrc, you can define the PHP version directly there.
Create the
~/.profilefile if it does not exist, then open it:touch ~/.profile nano ~/.profileAdd the following line:
export PATH="/opt/php8.1/bin:$PATH"Reload your environment:
source ~/.profile
3. Load .bashrc from other profiles
To ensure that the configuration is loaded in all types of sessions (login and non-login), it is recommended to include in your ~/.bash_profile and ~/.profile files the following line:
if [ -f ~/.bashrc ]; then . ~/.bashrc; fiThus, your PHP configuration defined in .bashrc will always be applied, regardless of how the SSH session is opened.
Run a specific version occasionally
If you want to run a script with a specific version of PHP without modifying your environment, you can call the corresponding binary directly:
/opt/php8.1/bin/php mon_script.php
/opt/php8.2/bin/php -v
After these steps, the chosen PHP version will be loaded automatically each time a new session is opened, and your CLI scripts will run with the desired version.
This guide explains how to quickly install applications, PHP extensions, and technologies (non-exhaustive list below) in a few clicks on Managed Cloud Server only.
Refer to this other guide if you are looking for information about additional Web Applications that can be installed on any type of hosting, including standard/shared offers.
Install (or uninstall) apps / PHP extensions...
To find the list of technologies and proceed with their installation:
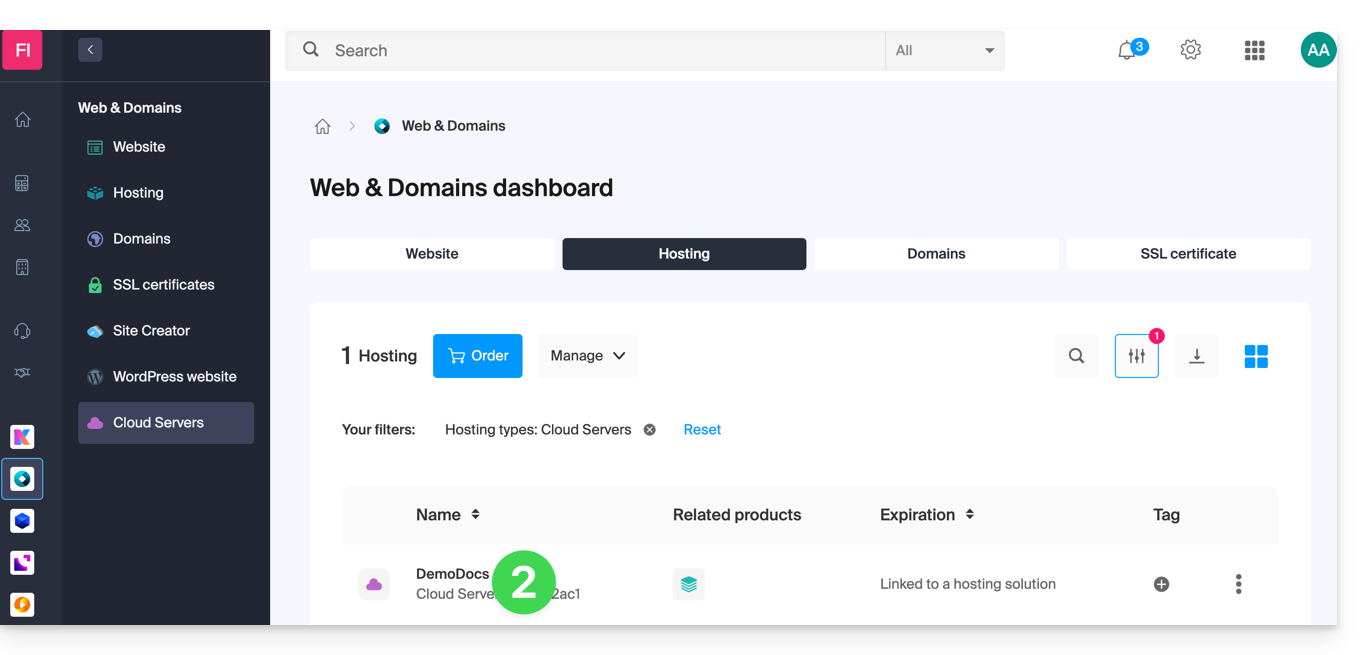
- Click here to access the management of your Managed Cloud Server on the Infomaniak Manager (need help?).
- Click directly on the name assigned to the relevant Managed Cloud Server:
- Click in the left sidebar:
- PHP Extensions

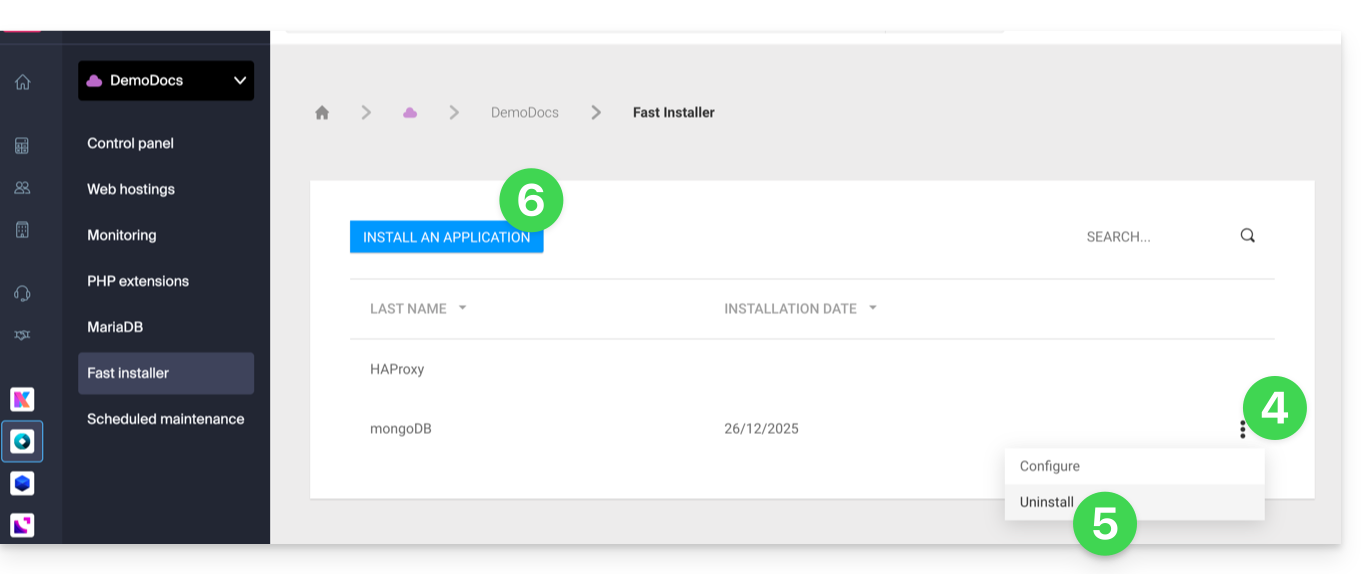
- Fast Installer

- PHP Extensions
- Click on the action menu ⋮ to the right of the extension you want to uninstall in the table that appears.
- Click on Uninstall.
- Otherwise, click on the blue button Install an extension / Install an application:
- Then make your choice for a new installation:
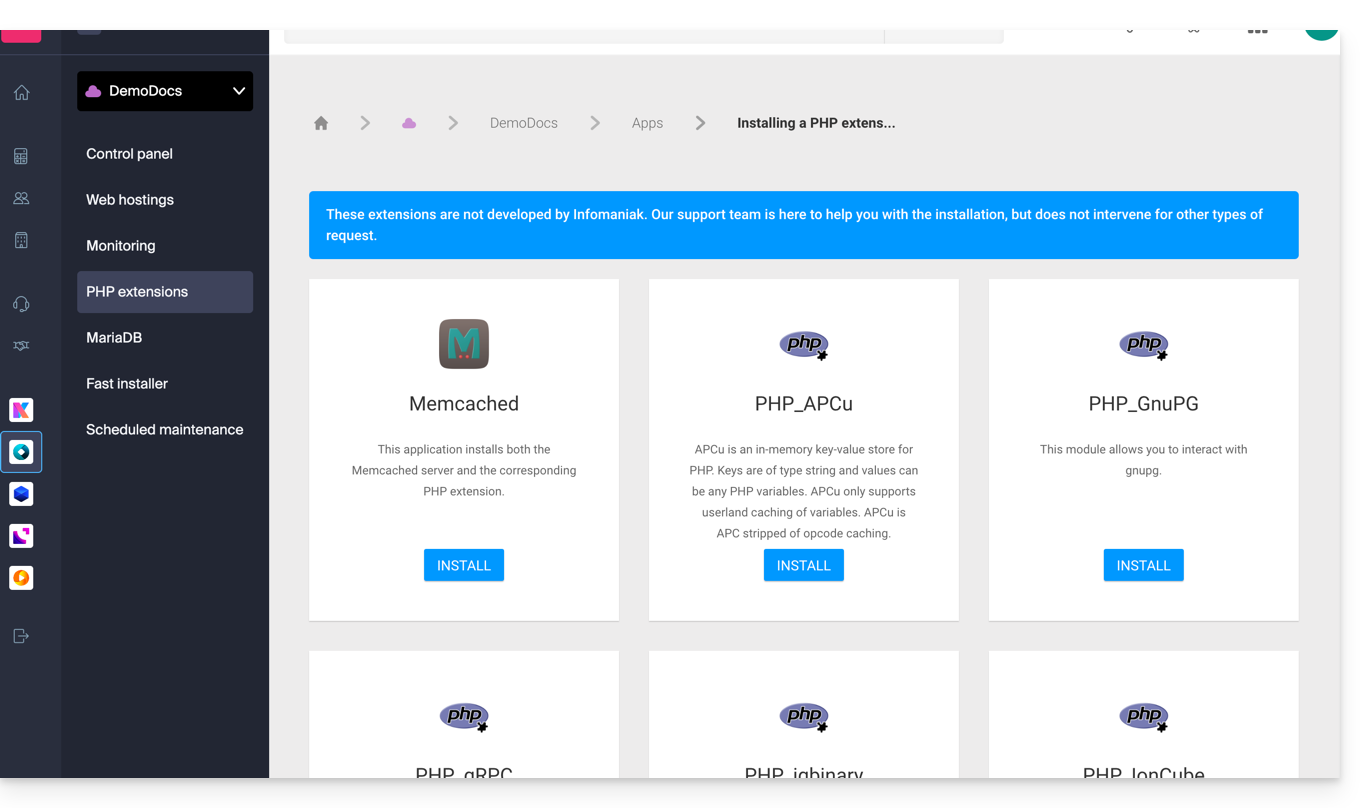
Non-exhaustive list of available apps & extensions
AdvanceCOMPBuildEssentialelectron_devExifToolFFmpeg↗ guideGhostscriptGifsicleGraphicsMagickHAProxyImagemagick↗ guideJpegoptimlibjpeg_turbolibqrencodelibX11_xcb1MidnightCommanderMemcached↗ guidemongoDB↗ guideNVM Node Version ManagerOptiPNGp7zipPDFtkPHP_APCuPHP_CLI↗ guidePHP_FPMPHP_GnuPGPHP_gRPCPHP_igbinaryPHP_IonCube↗ guidePHP_OPcachePHP_PDFPHP_PDO_ODBC↗ guidePHP_SwoolepipPngcrushPngquantRedis↗ guideRRDTool The Round Robin Database ToolRubyCompasssystemd↗ guidetesseract_ocrvarnish↗ guidevirtualenvWebPxauthxpdfxvfbZSH
This guide explains why it is recommended to abandon the MySQL function mysql_num_rows() which simply returns the number of rows in a result.
The disadvantage of this function is that it is very heavy for the server since it is a loop that goes through each line to count them.
For example:
$SQLstr = "SELECT * FROM commentaires WHERE affiche=1";
$r = mysql_query($SQLstr);
$num = mysql_num_rows($r);
MySQL has a count() function that handles this and is much less heavy. Use this:
$SQLstr = "SELECT count(*) FROM commentaires WHERE affiche=1"
$r = mysql_query($SQLstr);
$result = mysql_fetch_row($r);
$num = $result[0];
or
$SQLstr = "SELECT count(*) as total FROM commentaires WHERE affiche=1"
$r = mysql_query($SQLstr);
$result = mysql_fetch_array($r);
$num = $result['total'];This guide concerns the task scheduler, a feature that allows you to run scripts on Web Hosting at the time and frequency of your choice to automate repetitive tasks.
Also refer to this other guide if you are looking for information about crontab (crons via SSH) on Cloud Server.
Access the task scheduler (webcron)
To access the task scheduling tool:
- Click here to access the management of your product on the Infomaniak Manager (need help?).
- Click directly on the name assigned to the product concerned.
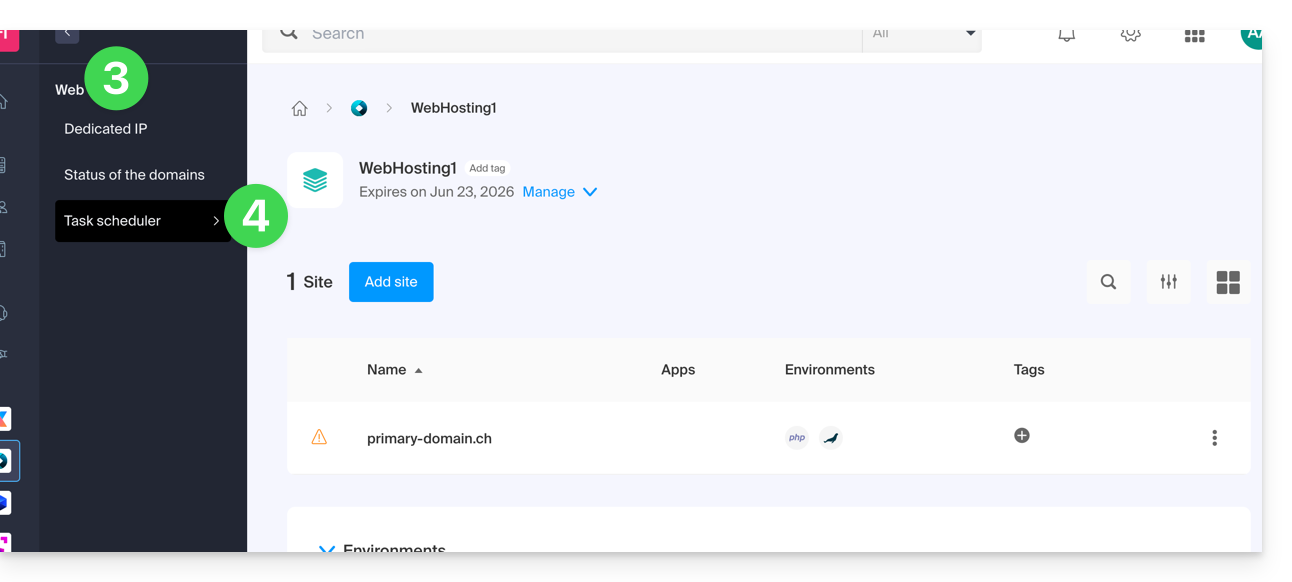
- Click on Web in the left sidebar.
- Click on Task Scheduler in the left sidebar:
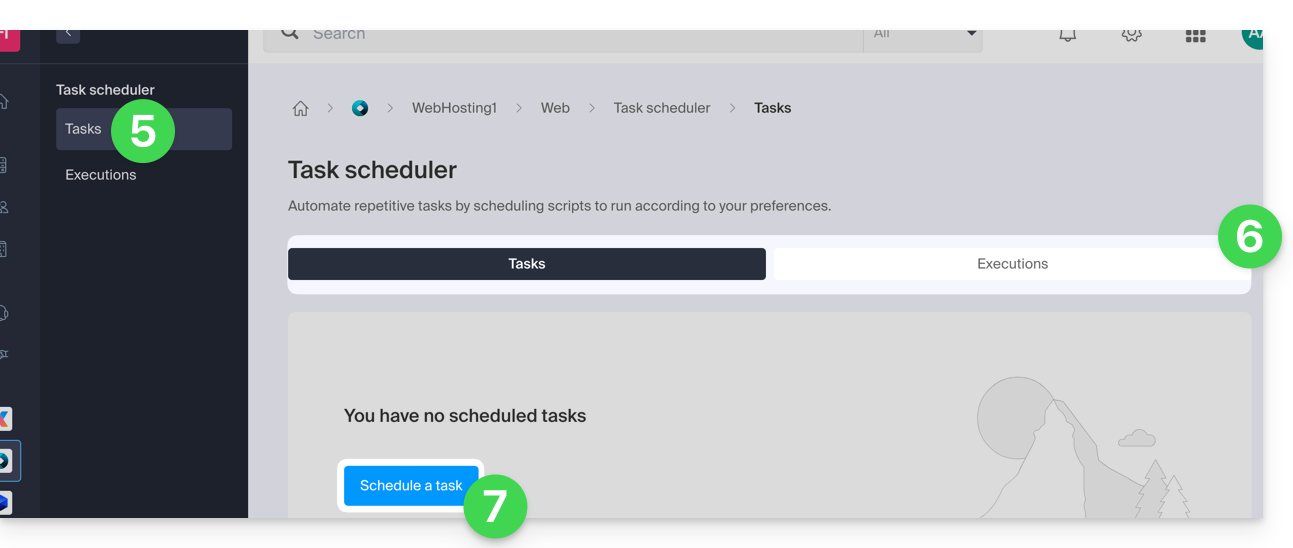
- Click on Tasks in the left sidebar.
- Existing crons and running tasks are displayed under the 2 tabs of the page.
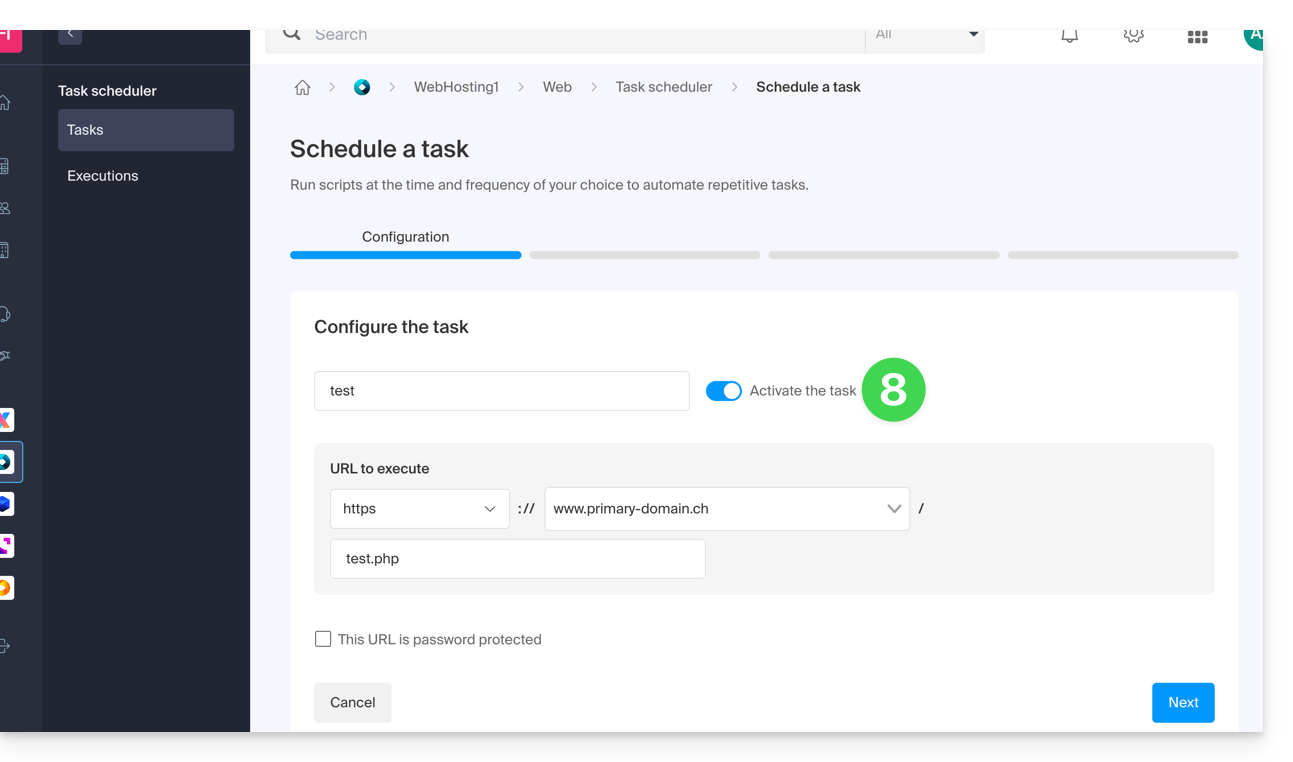
- Click the Schedule a Task button to create a scheduled task by specifying, among other things, whether the URL of the script to be executed is password-protected, whether you want to receive notifications, and of course the desired interval (see below), etc.:
- Do not forget to activate the task with the toggle switch:
Minimum intervals
In the next step, you can schedule the cron according to…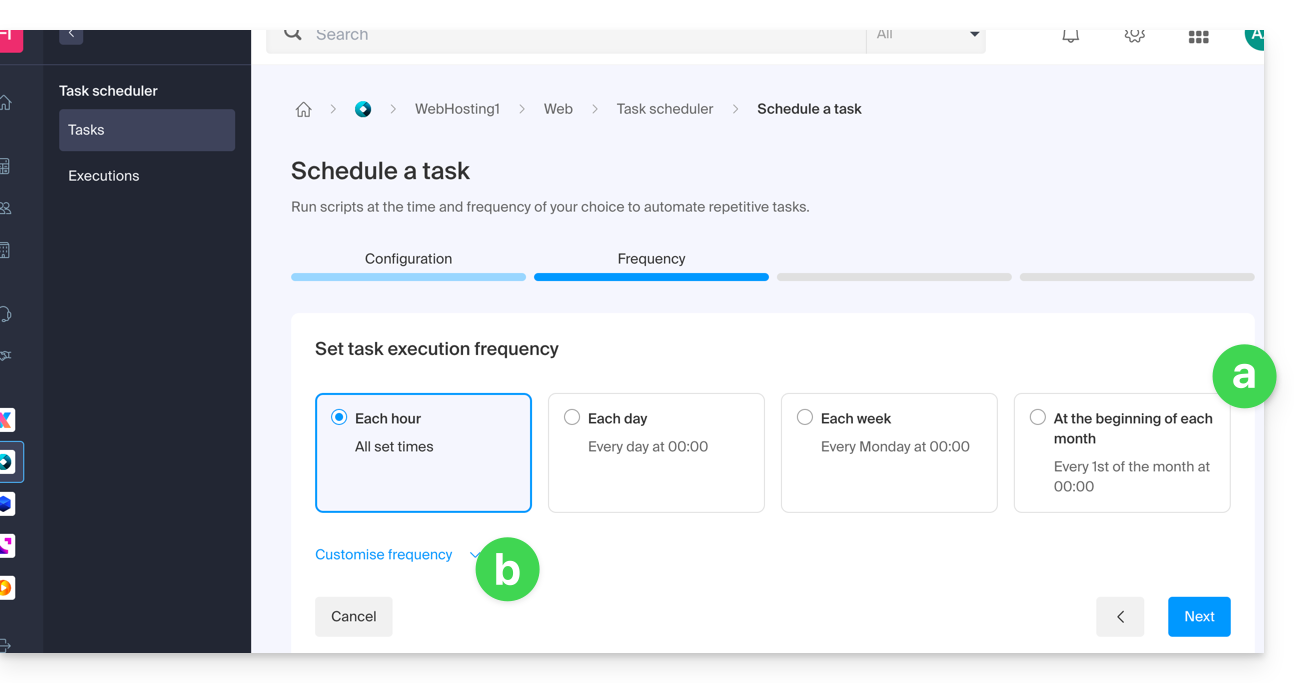
- [ a ]… predefined intervals such as once a week…
- [ b ]… or customization to a minimum interval of:
- 15 minutes with a shared hosting
- 1 minute on Cloud Server
Notifications & analysis
In the next step, you can activate notification emails: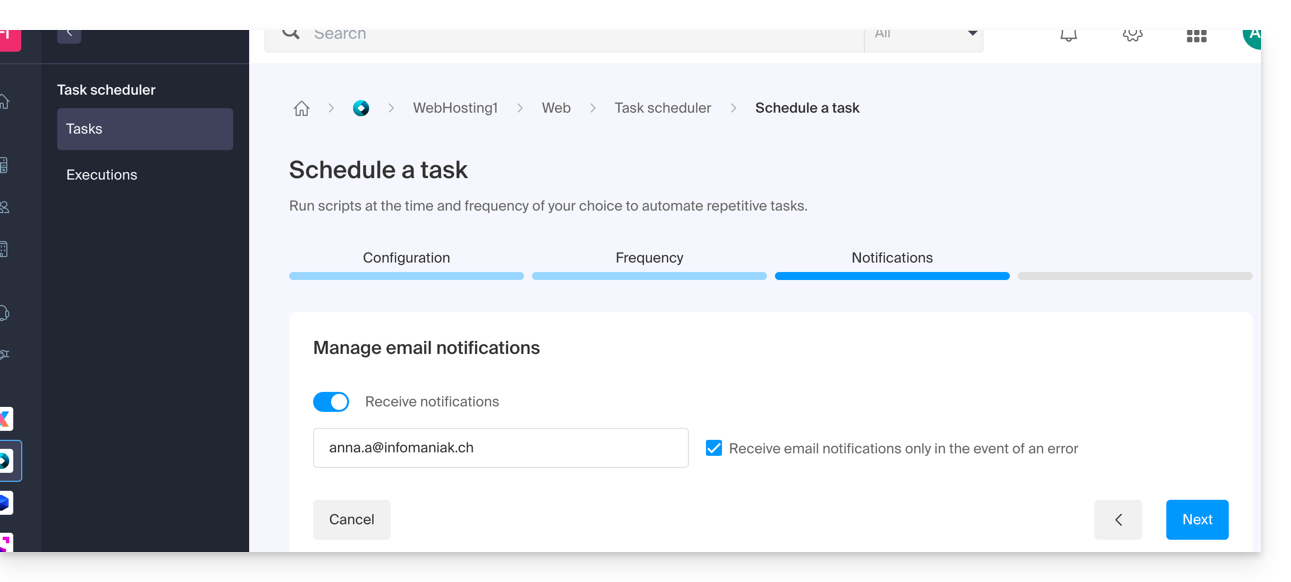
The next step allows you to activate an analysis of the task: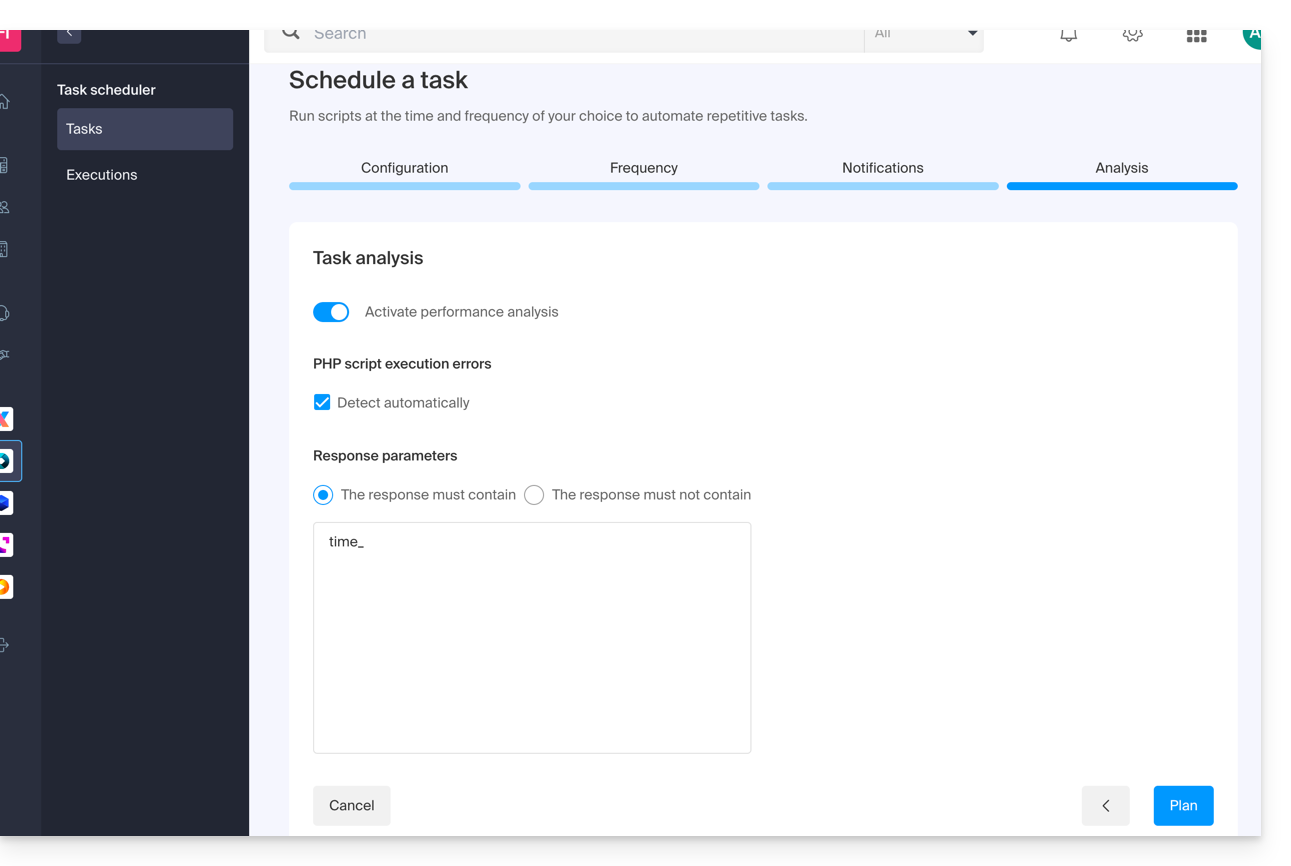
Run the task manually 1 time
Once the task is created, click on the action menu ⋮ located to the right of the item concerned to access the quick management of your task and its execution log: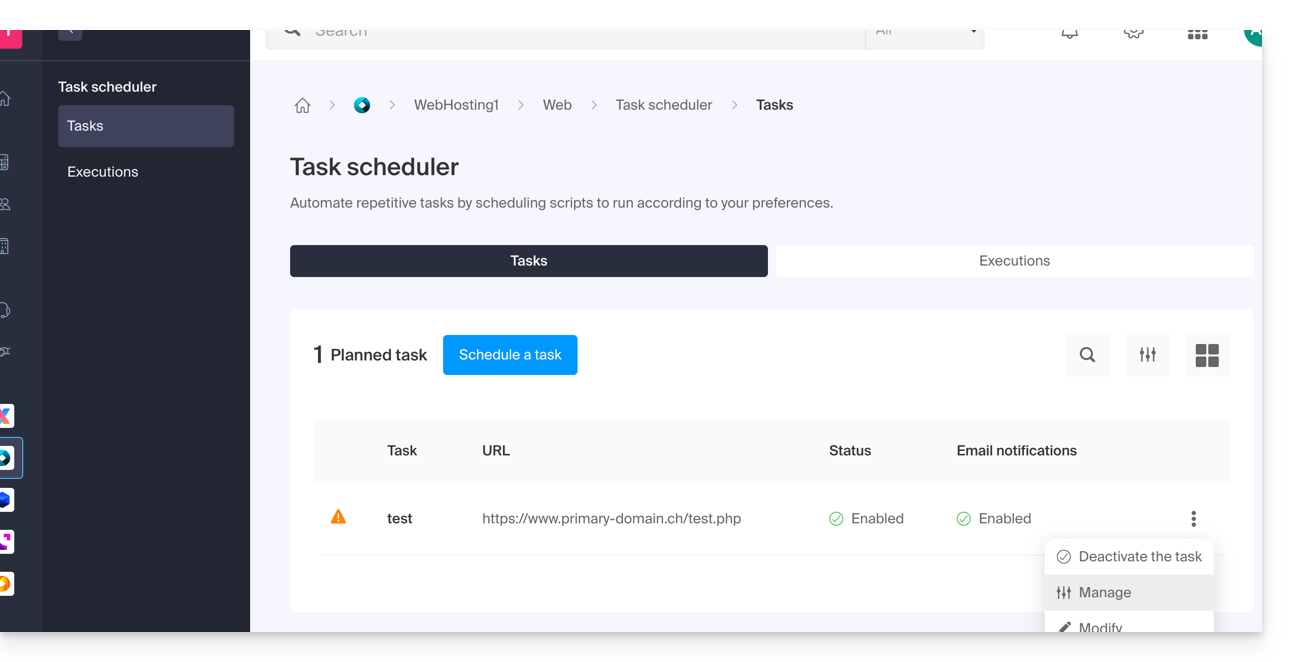
At the top of the page, you can click the button to manually run the task 1 time: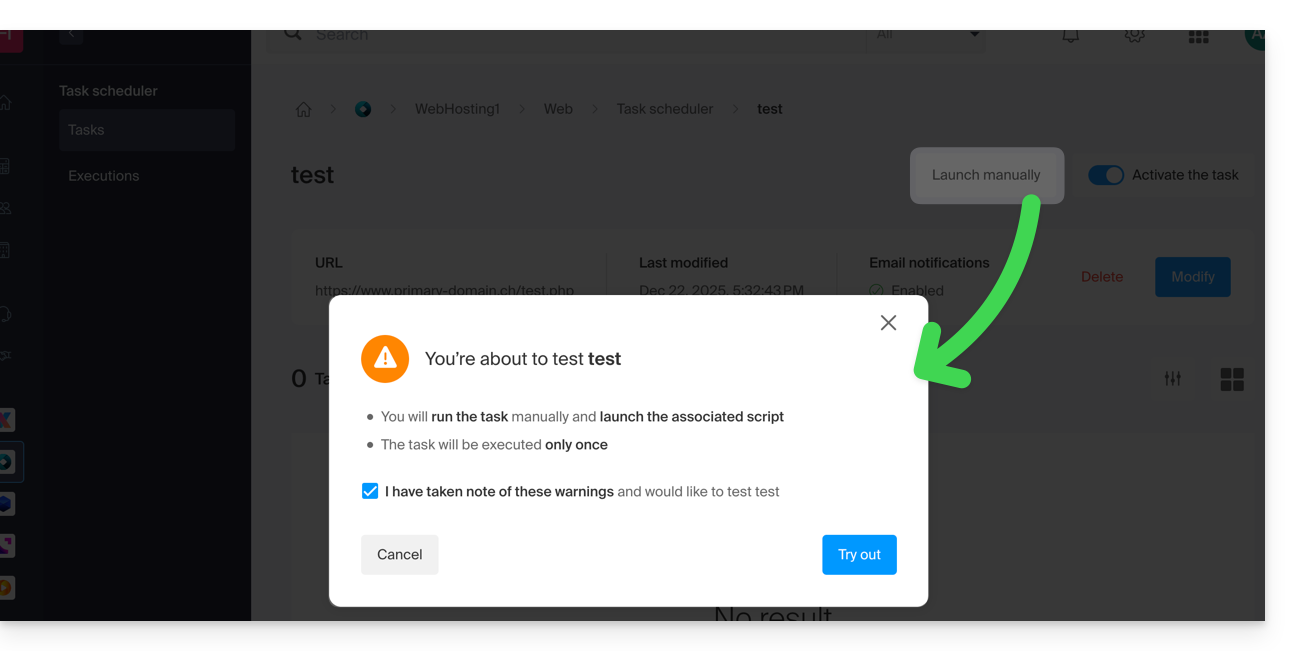
This guide explains how to add a free Elegant Themes (Divi) theme to an already installed WordPress site via the Infomaniak installer.
Prerequisites
- Your WordPress site must be installed via the Infomaniak WordPress tools to use these themes and extensions.
- The theme can be added during installation (approximately step 14 of this other guide) or activated later.
- To benefit from Elegant Themes support (customer service) you must subscribe to an Elegant Themes offer.
Add an Elegant Themes theme
To do this:
- Click here to access the management of your WordPress site on the Infomaniak Manager (need help?).
- If your site does not appear here, it means it was not installed via the Infomaniak tools… Refer to the prerequisites above.
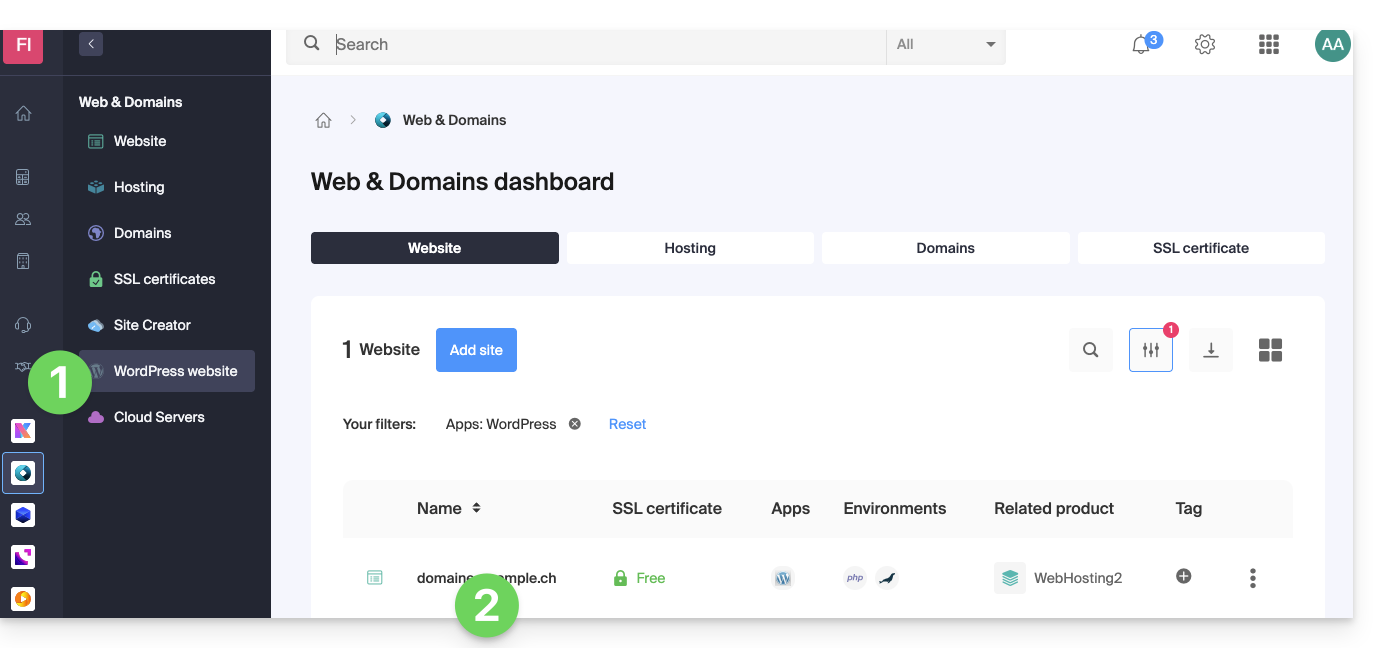
- Click directly on the name assigned to the product concerned:
- Click on the action menu ⋮ located to the right of the Web Application concerned.
- Click on Settings of the application:
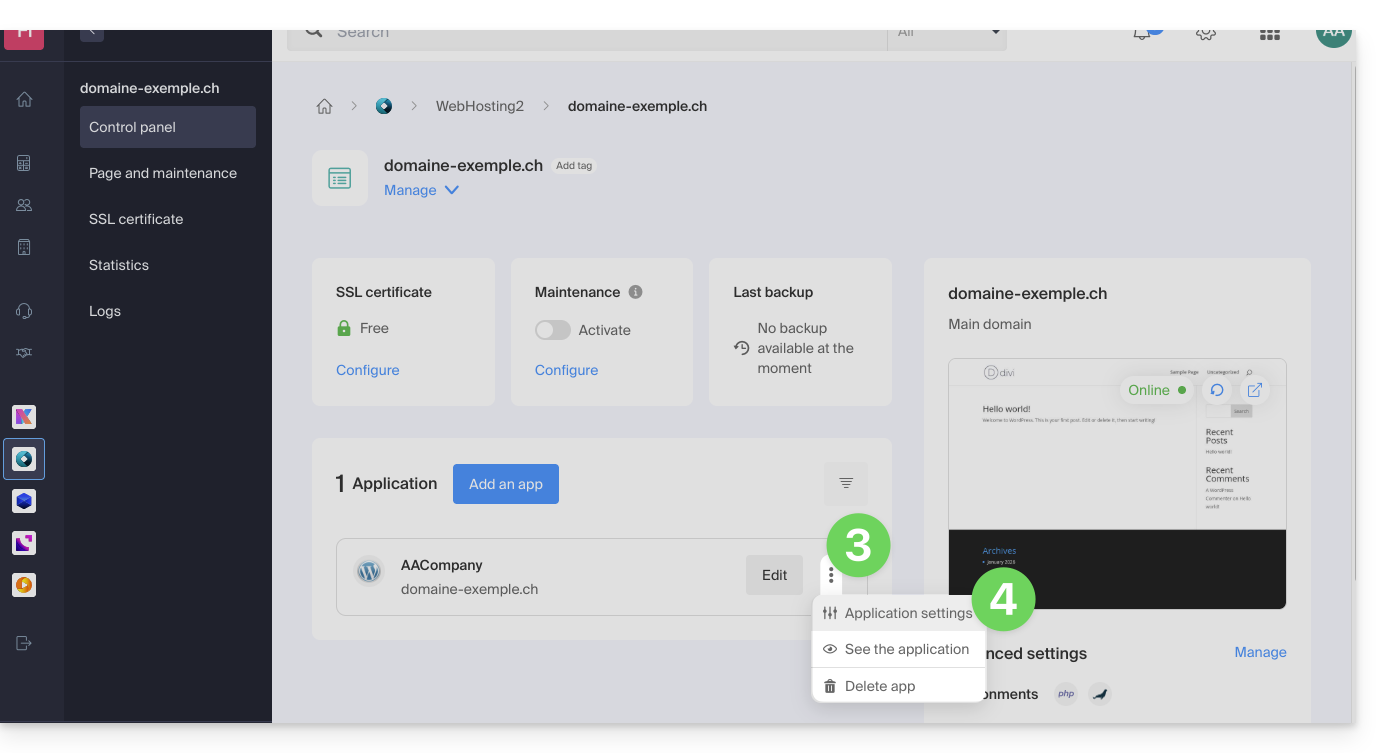
- Click on Modify under Theme:
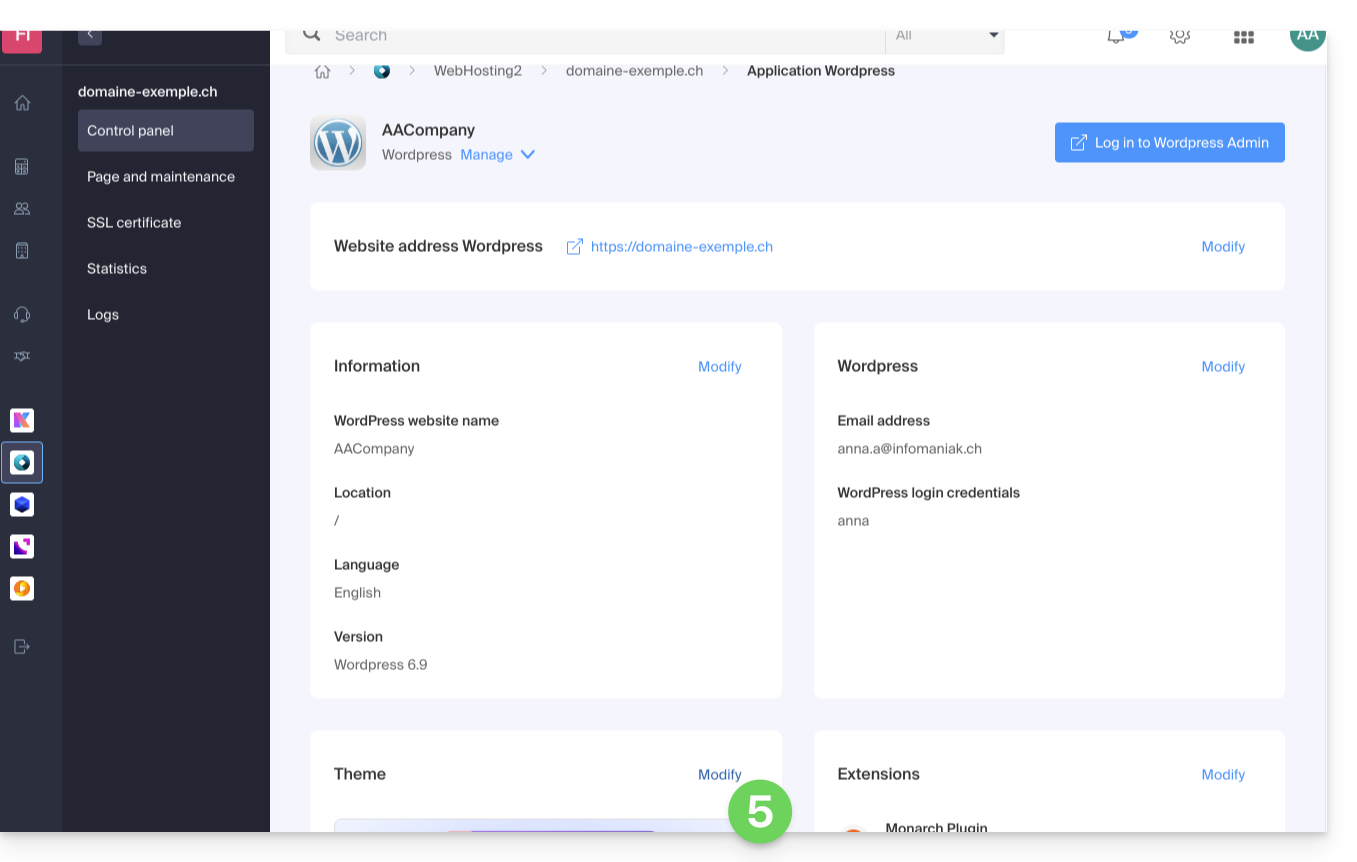
- Select the desired theme.
- Click on the Save button:
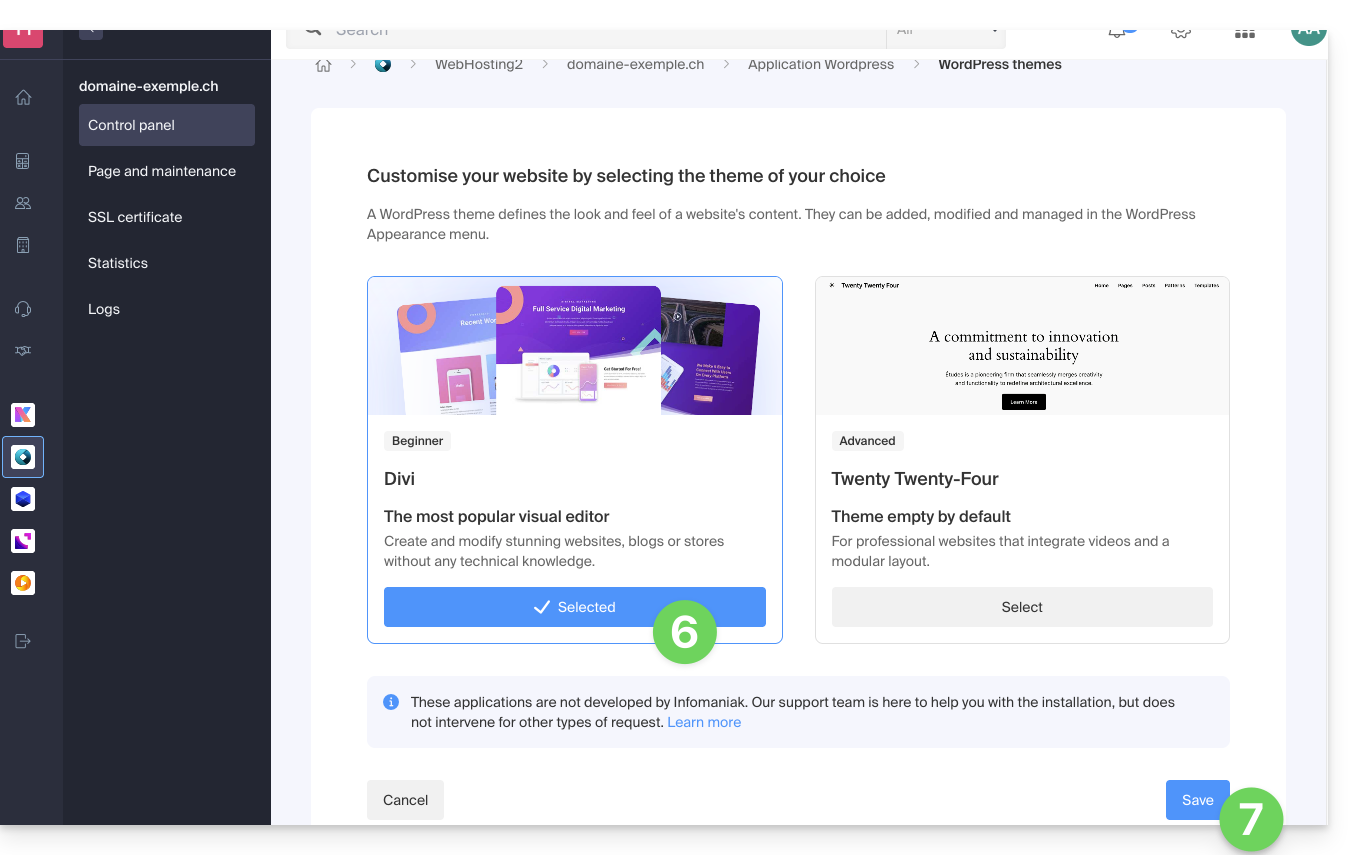
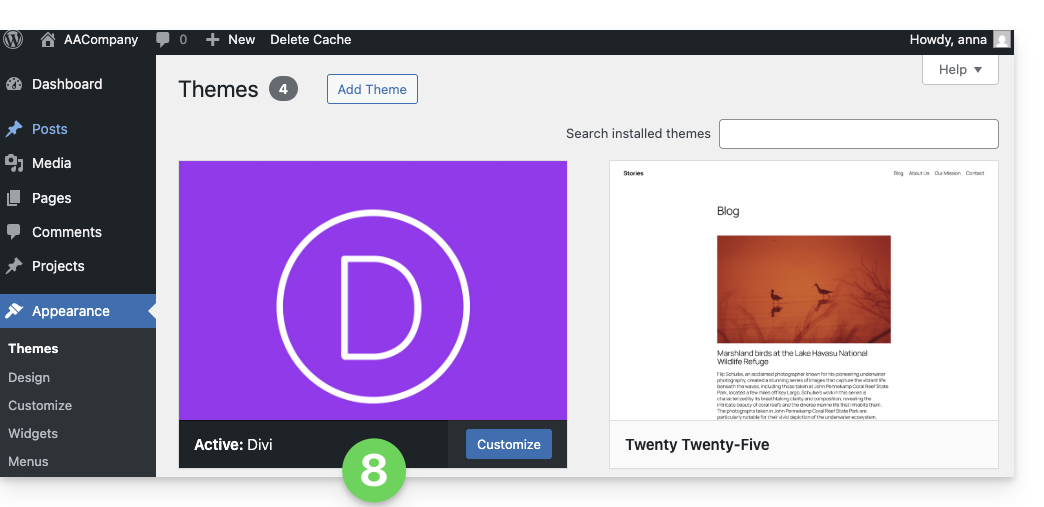
- The theme is applied and available to be configured in your WordPress admin interface:
Use an Elegant Themes extension
Refer to this other guide to install an Elegant Themes extension with Infomaniak.
This guide explains how to connect to your Web Hosting using an SSH key.
Prerequisites
- Create an FTP + SSH account from the Infomaniak Manager.
- Create an SSH key with a secure algorithm, for example
ed25519:ssh-keygen -t ed25519because with an rsa key (
ssh-keygenorssh-keygen -t rsa), the connection will be refused and the following error will be returned in verbose mode:debug1: send_pubkey_test: no mutual signature algorithm
Upload the SSH key
To do this:
- Log in to the server via SSH (need help?).
Go to the root of your hosting:
cd ~Create the directory «
.ssh»:mkdir .ssh- Change the permissions of the
.sshdirectory to CHMOD 700. - Create the
authorized_keysfile and paste your public SSH key on a single line (important). - Change the permissions of the
authorized_keysfile to CHMOD 600.
This guide explains the "Options +Indexes" directive for Web Hosting, which facilitates navigation for visitors and allows for more advanced customization of how files are displayed.
Preamble
- One of the main advantages of enabling directory indexing is that visitors can view and list all files and subdirectories of a given directory, even if they do not know the exact name of the file they are looking for. This can be particularly useful for file-sharing websites or download sites.
- Directory indexing also facilitates navigation for visitors who are not familiar with the file structure of the site. They can simply browse through the subdirectories to find the file or folder they need.
- The "
Options +Indexes" directive can be customized to display additional information, such as the size and modification date of files, or to hide specific files or directories. - Without this directive, a visitor may encounter an error of the following type:
Accès interdit!
Vous n'avez pas le droit d'accéder au répertoire demandé.
Soit il n'y a pas de document index soit le répertoire est protégé.
Si vous pensez qu'il s'agit d'une erreur du serveur, veuillez contacter le gestionnaire du site.
Error 403
Listing the contents of a web folder
To list the items contained in a folder without a specific index:
- Create a .htaccess file in the folder in question.
- Enter the following command:
Options +Indexes
It should be noted that this solution will only work if you have no index in the directory in question; you need to remove the index.php, index.html, index.htm files, etc. but also the possible welcome.php file...
Customizing the display
Here is an example of code to customize the appearance of the file list generated by Apache:
Options +Indexes
IndexOptions FancyIndexing
IndexOptions FoldersFirst IgnoreCase NameWidth=* DescriptionWidth=* Charset=UTF-8
HeaderName header.html
ReadmeName footer.html
In this example, the user enables the "Indexes" option, adds the "FancyIndexing" option for a more aesthetic appearance, specifies the sorting order of the files, defines the width of the columns for the name and description of the files, and specifies the names of the files to use for the header and footer of the file list.
This guide explains how to access phpMyAdmin with a Web Hosting.
Access phpMyAdmin
To access the Web Hosting in the Databases section:
- Click here to access the management of your product on the Infomaniak Manager (need help?).
- Click directly on the name assigned to the product concerned.
- Click on Databases in the left sidebar menu.
- Click on Connect to phpMyAdmin:

- The correct server and a temporary user are automatically filled in.
You can also click on the action menu ⋮ located to the right of a database user:
- The correct server is automatically filled in.
- The password to enter corresponds to the database user (the one you chose when creating the MySQL user to redefine if you have forgotten it).
This guide is about IP addresses, those…
- …assigned to sites/housing/servers, dynamic or static, shared or dedicated,
- …assigned by your Internet Service Provider (ISP) when establishing an Internet connection to your Infomaniak product.
Preamble
- A dedicated or static IP address for a website is a permanent IP address specifically assigned to it.
- Unlike a shared IP address, which is used by multiple websites, a dedicated IP address ensures that only this platform is associated with this address.
- Dedicated IP addresses for websites are often used in cases where stability, customization, and security are important, such as server hosting, firewall configuration, or activating SSL certificates (although it is possible to proceed without a dedicated IP address to install an SSL certificate).
- Here are the main advantages:
- Configuring a PTR entry or reverse DNS on dedicated IPs is useful, especially for installing a mail server, as some email providers check the PTR record before accepting emails sent from a server.
- Better connection stability.
- Reduced risk of a bad reputation linked to websites sharing the same IP address.
- Ease of configuring certain technical aspects.
- A dedicated IP can improve a website's referencing (although there are differing opinions among SEO specialists).
- Attention: Infomaniak does not allow access to websites via HTTP(S) by IPs (dedicated) on managed servers; you must use a domain name that points to the IP (or use the preview URL).
Add a dedicated IP to the website
To add a dedicated IP to your website, refer to this guide.
If you encounter issues directing web traffic to a defined port, refer to this other guide.
Blocking the IP address (Internet connection)
If you can no longer access…
- … all your email addresses that you own with Infomaniak (which usually work well) and this with a software/email client from the same Internet network (i.e., from the same IP address provided by your ISP)…
… or if you unfortunately performed this type of operation:
- repeated unsuccessful connection attempts via FTP, SSH, or access points such as the WordPress login…
- requests returning too many errors such as mass 403 errors…
… your access to Infomaniak servers may be blocked following the banning of the IP address (banip / ipban) of your Internet connection.
To unblock the situation, contact Infomaniak support by email and specify the domain concerned and especially your public IP address concerned.
Permanent Unblocking (IP on Whitelist)
With a Cloud Server, you can request to permanently authorize the IP address in question so that the blocking never happens again, regardless of the situation. To do this, you must:
- Have a dedicated IP associated with your Cloud Server.
- Be aware that Infomaniak will no longer block any potential attacks from this IP; attacks or malicious access attempts from this address will no longer be automatically blocked by the security systems.
- Confirm by email and from a contact address associated with the account (owner or administrator) that you understand and accept full responsibility in case of an attack from this IP.
This guide concerns Laravel, an open-source web framework written in PHP that follows the model-view-controller (MVC) principle. Also refer to their documentation.
Prerequisites
- Have a Shared Web Hosting or Cloud Server with the latest MySQL/MariaDB.
- Site under PHP 8.2.
- Create an SSH access.
- Create a database.
Installing Laravel 11
To do this:
- Connect to the server via SSH (need help?).
- Navigate to the site directory by running the command “cd path-to-site” (for example
cd sites/laravel.domain.xyz). - Create a new project by running the command
composer create-project laravel/laravel example-app. - Modify the
.envfile at the root of the hosting to update the connection parameters to the new database:- DB_CONNECTION=mysql
- DB_HOST=xxxx.myd.infomaniak.com
- DB_PORT=3306
- DB_DATABASE= the name of the MySQL database (xxxx_newbdd)
- DB_USERNAME= the MySQL user with rights to this database
- DB_PASSWORD= their password
- Navigate to the project directory and publish via SSH:
cd example-appphp artisan migrate - Modify the target directory to point to the “public” subdirectory of the project, here
/sites/laravel.domain.xyz/example-app/public.
For additional help contact a partner or launch a free tender — also discover the role of the host.
This guide explains what the “MySQL Prefix” option in a site’s settings is for and what its implications are for the operation of your Web applications (CMS) and PHP scripts.
Preamble
- When the “MySQL Prefix” option is enabled for a site, it is no longer necessary to add the prefix “
wxyz_” before the name and users of your MySQL databases. - A PHP script can thus connect to MySQL with the user “monuser” and a database “mabase” and access will be automatically made with the user “wxyz_monuser” and the database “wxyz_mabase”.
- ⚠ If you are migrating from an old Infomaniak offer:
- After migrating a site from the old console, the “MySQL Prefix” option is enabled by default in order to automatically maintain the connection of your Web applications (WordPress, Joomla, Drupal, etc.) and PHP scripts with your MySQL databases.
- To ensure the proper functioning of your sites in case of migration of your hosting to another server, it is strongly recommended to disable this function and make the necessary adjustments.
Manage the MySQL Prefix option
Go further with environment variables
It is possible to configure environment variables directly from the Manager for your entire website:
- Click here to access the management of your product on the Infomaniak Manager (need help?).
- Click directly on the name assigned to the product concerned:
- Click on Manage under Advanced Settings:
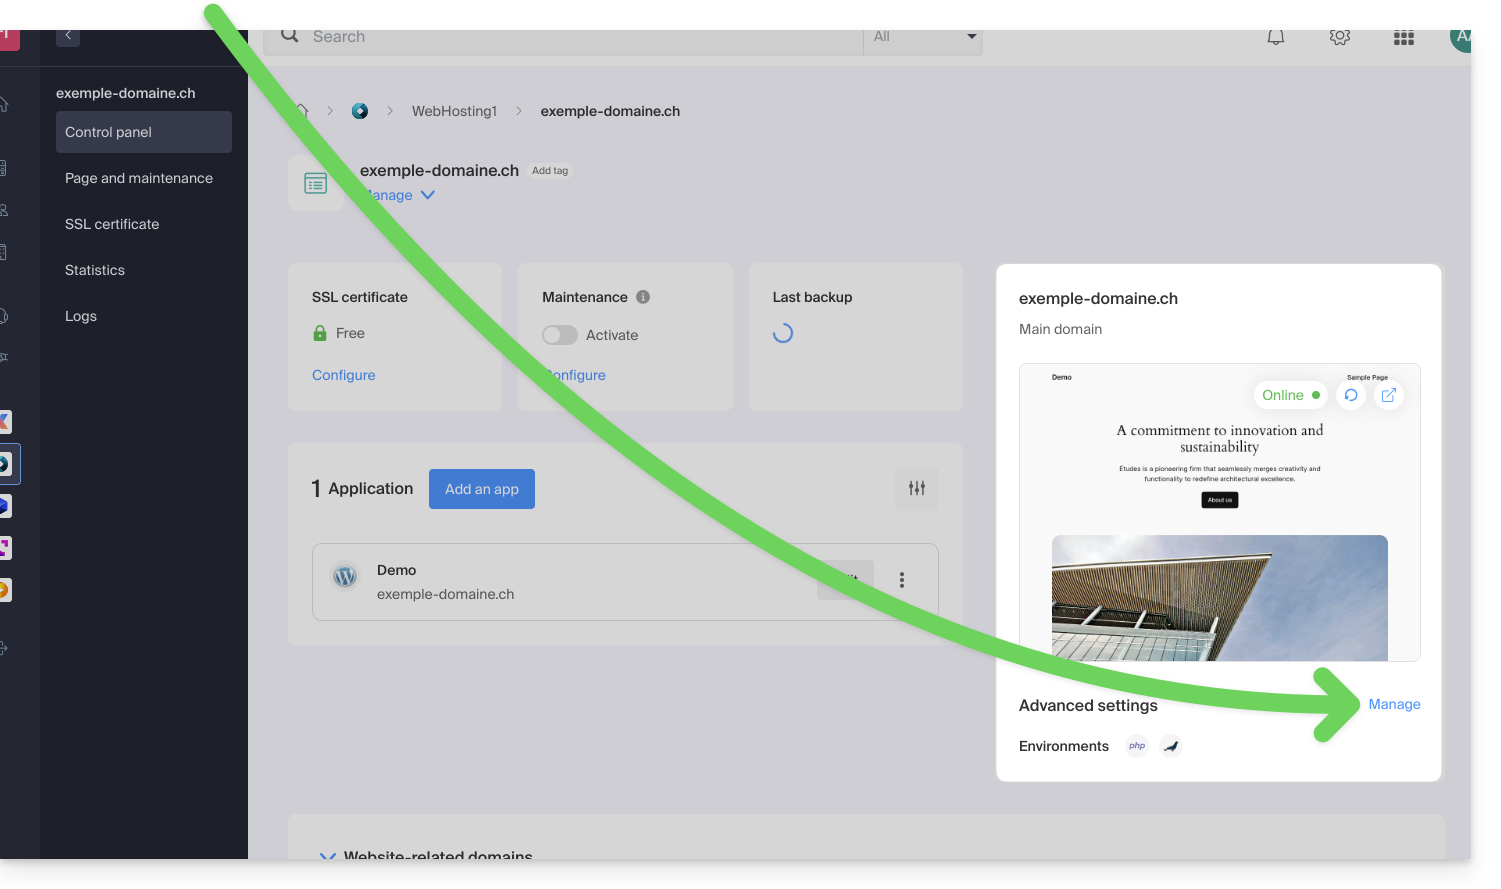
- Click on the PHP / Apache tab.
- Enable or disable the toggle switch MySQL Prefix:
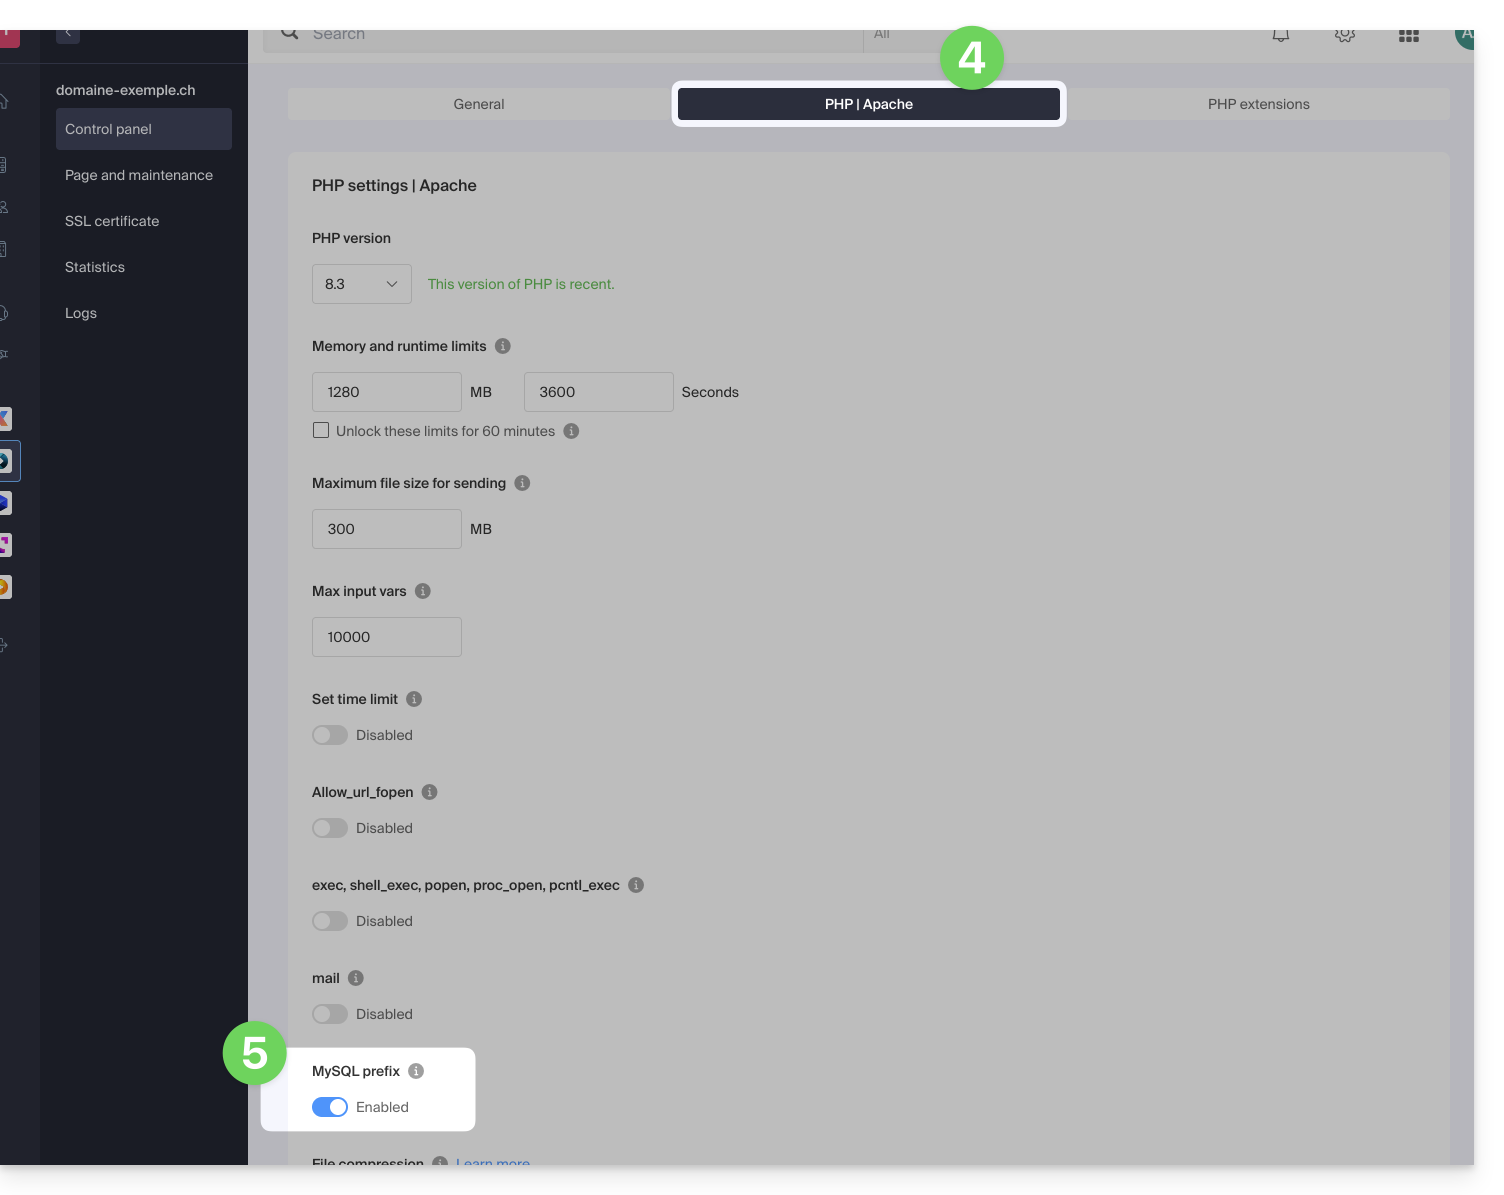
- Click on the Save button at the bottom of the page.
- Make the necessary adjustments in the configuration files of your Web applications and PHP scripts…
Implications and adjustments to be made
After disabling the MySQL Prefix option for a site, some PHP scripts or CMS may no longer work. To restore the connection to your databases, you must update the following information in the configuration file(s) of the scripts concerned:
- The name of the MySQL database: you will need to add the prefix of your server
- before:
mabase - after:
wxyz_mabase
- before:
- The user of the MySQL database: you will need to add the prefix of your server
- before:
monuser - after:
wxyz_monuser
- before:
This guide concerns MySQL/MariaDB and more specifically index analyses and queries with Web Hosting.
Slowlog for long queries
The MySQL slowlog is enabled on all MySQL servers and groups queries that take more than 5 seconds* to execute. If your queries are well constructed, you will never see these files. Otherwise, check regularly to correct any potential issues and ensure the proper functioning of your site.
Contact Infomaniak support in writing to obtain them (except for old v1 hosting directly viewable from the FTP Manager file manager one level above /web in the /logs directory).
And the logs?
No MySQL log is created (except for slowlogs) as MySQL servers would not support the load of millions of simultaneous logs to record. If necessary, Infomaniak can enable this MySQL log for 5 minutes to allow you to analyze them with EXPLAIN and determine useful indexes, for example. To do this, contact Infomaniak support in writing.
* elapsed time. And regarding locks, the documentation provides the following clarification: "The time to acquire the initial locks is not counted as execution time"
This guide explains how to add a synonym domain to a domain name.
Preamble
- A synonym domain is a domain name that can serve as a secondary name for another domain.
- When a synonym domain is added, it automatically inherits the content of the DNS zone of the main domain (including
MX,A, etc. records), as well as its Web and Mail hosting. - Alternatively, you can also add a (domain) alias to a website or add a (domain) alias to a Mail Service.
Add a synonym domain to a domain
Prerequisites
- The domain name of the future synonym or the management of its DNS zone…
- … must be reserved with Infomaniak,
- … must be configured with the Infomaniak DNS,
- … must not be linked to any product yet.
- The domain name on which the synonym will be placed…
- … must not be associated with the Infomaniak Newsletter product.
To access your domain names:
- Click here to access the management of your product on the Infomaniak Manager (need help?).
- Click directly on the name assigned to the product in question.
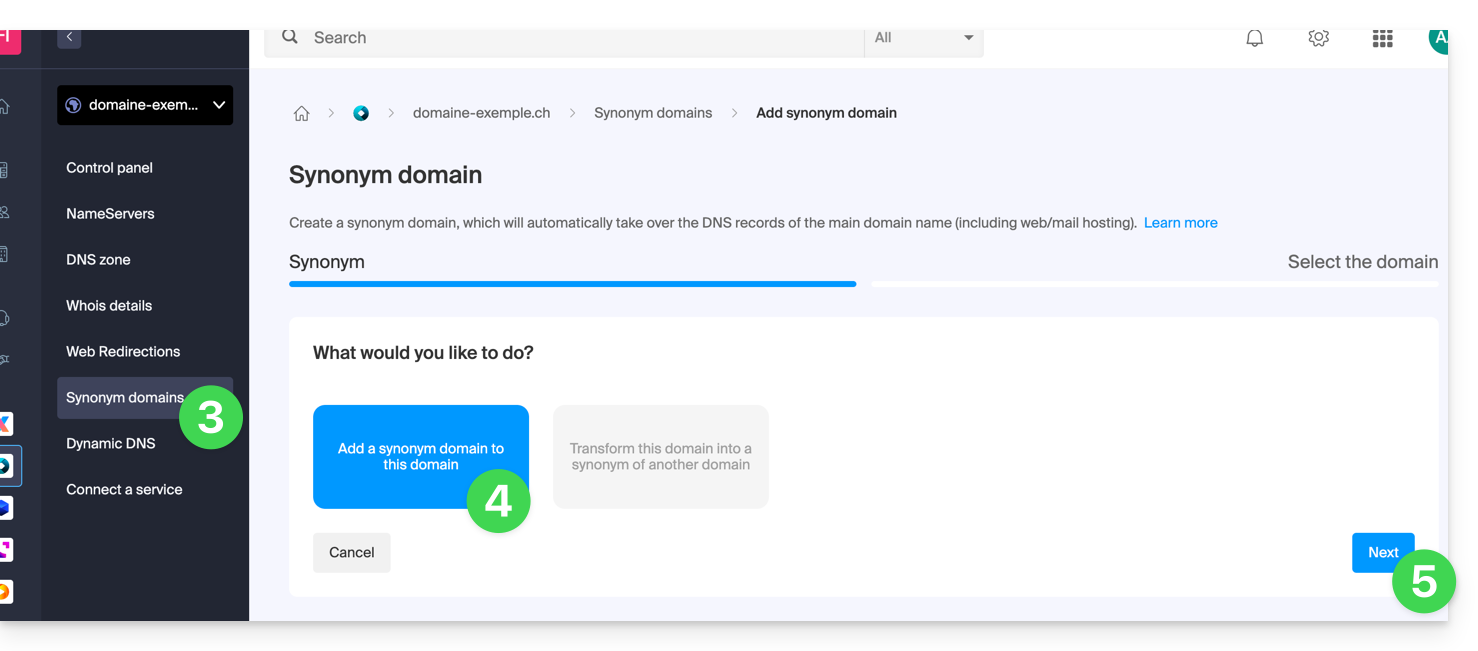
- Click on Synonym Domains in the left sidebar.
- Choose to add a synonym.
- Click on Next:
- Choose an existing domain in the current Organization, or order a new domain in advance.
- Click the button to Confirm:
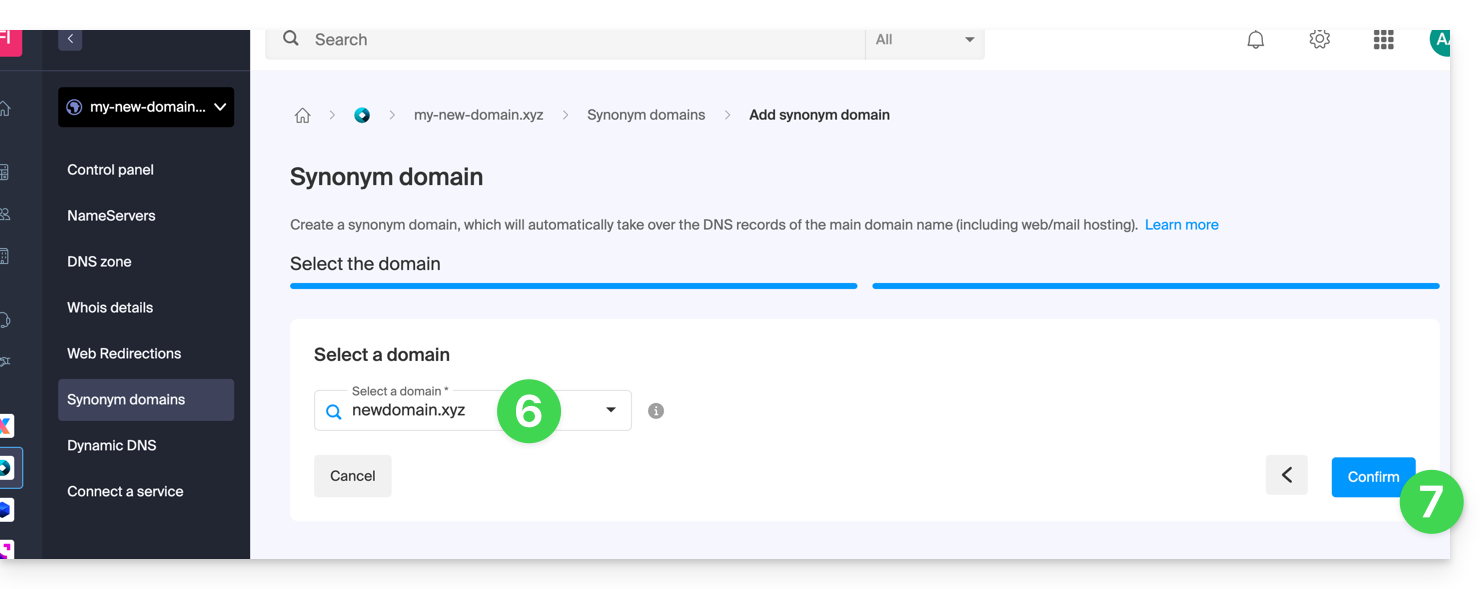
- That's it:
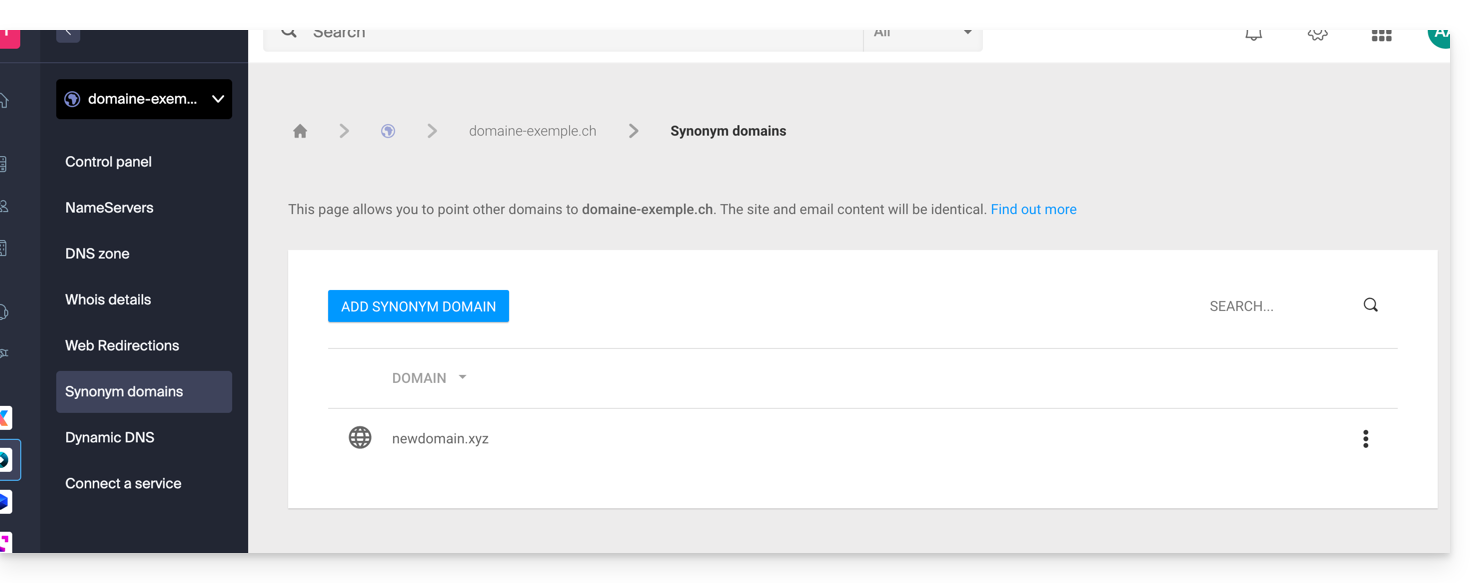
Refer to this other guide if you are looking for information to dissociate a synonym domain name.
This guide explains how to change the password of an FTP or FTP/SSH account for an Infomaniak Web Hosting site.
Change the password of an existing FTP user
To access the site on Web Hosting to modify its FTP access:
- Click here to access the management of your product on the Infomaniak Manager (need help?).
- Click directly on the name assigned to the product concerned.
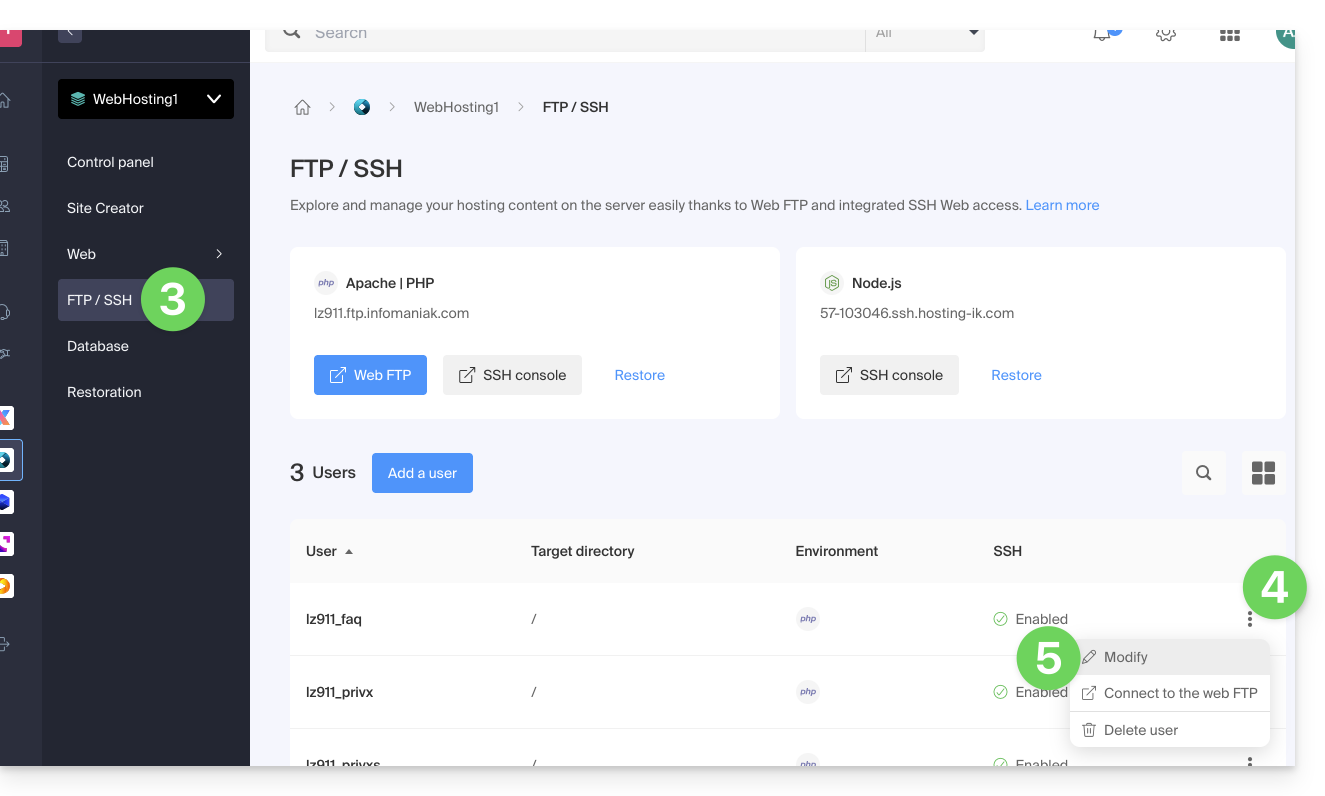
- Click on FTP/SSH in the left sidebar menu.
- Click on the action menu ⋮ to the right of the user concerned in the table that appears.
- Click on Modify:
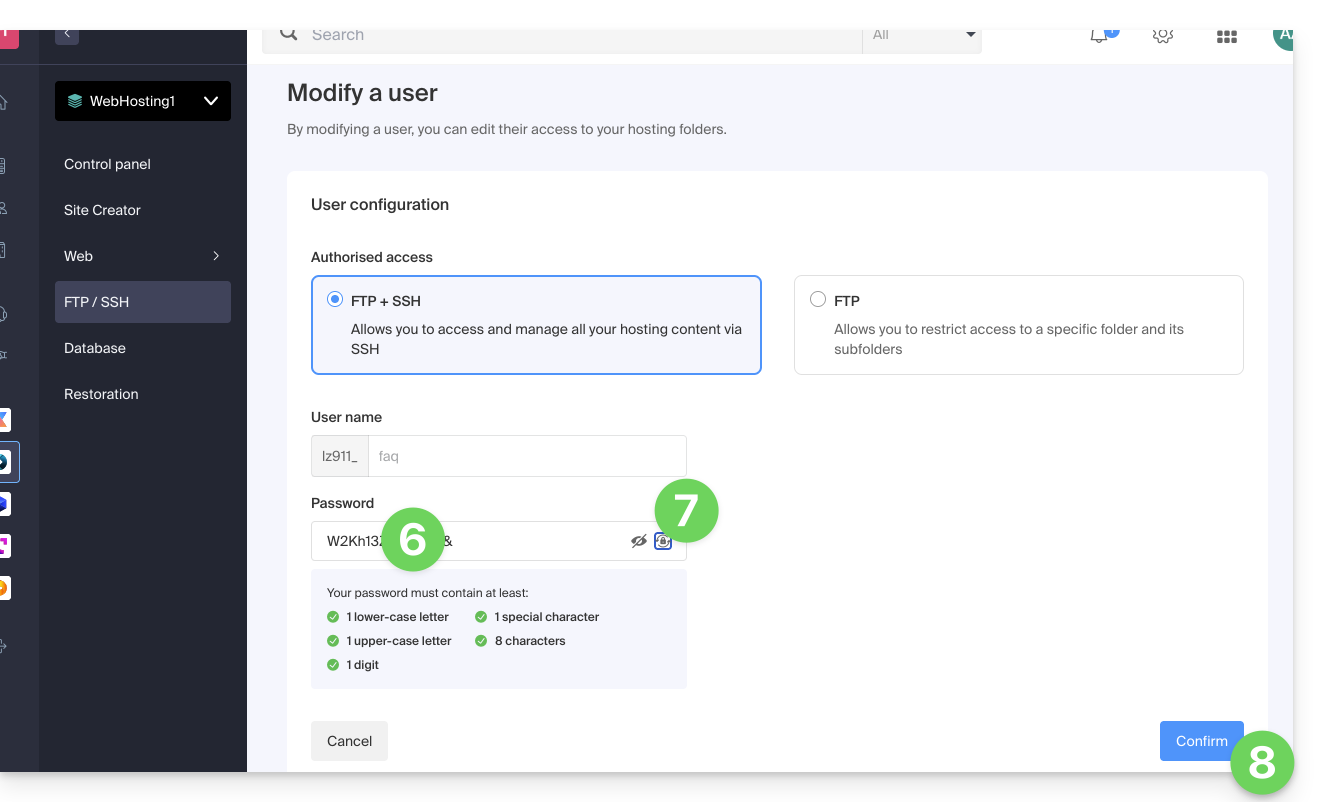
- Enter the new password that will be used for your FTP or SSH access directly.
- If necessary, you can generate a strong password.
- Confirm the changes:
This guide helps to resolve a potential 530 error by reducing the number of simultaneous FTP connections to Web Hostings.
Resolve a 530 error
The number of simultaneous FTP connections that can be established to the FTP space of a hosting is limited to 25.
The error message 530 Sorry, the maximum number of clients (25) for this user are already connected generally appears following multiple and simultaneous connections with an FTP software/client that poorly manages disconnections or attempts to open multiple connections at the same time in an attempt to speed up the download.
Once you have received this error, you need to close the FTP program then wait 30 minutes so that the server disconnects the active connections and you can reconnect.
You can also create a new FTP user and connect with it.
To avoid this situation with FileZilla, go to the menu Edit -> Settings then under the Transfers tab and set the number of simultaneous transfers to 2.
It is recommended to use the FTP Manager file manager.
This guide explains how to remove an alias domain from an Infomaniak Web Hosting. The main domain name of the site will then no longer be linked to any other domain name.
This allows you to create a new Web Hosting or distinct site for the domain name thus unlinked.
Prerequisites
- Have dissociated the synonym domain name from the main domain name if there was an association before.
Remove the alias domain
To remove an alias domain from your site:
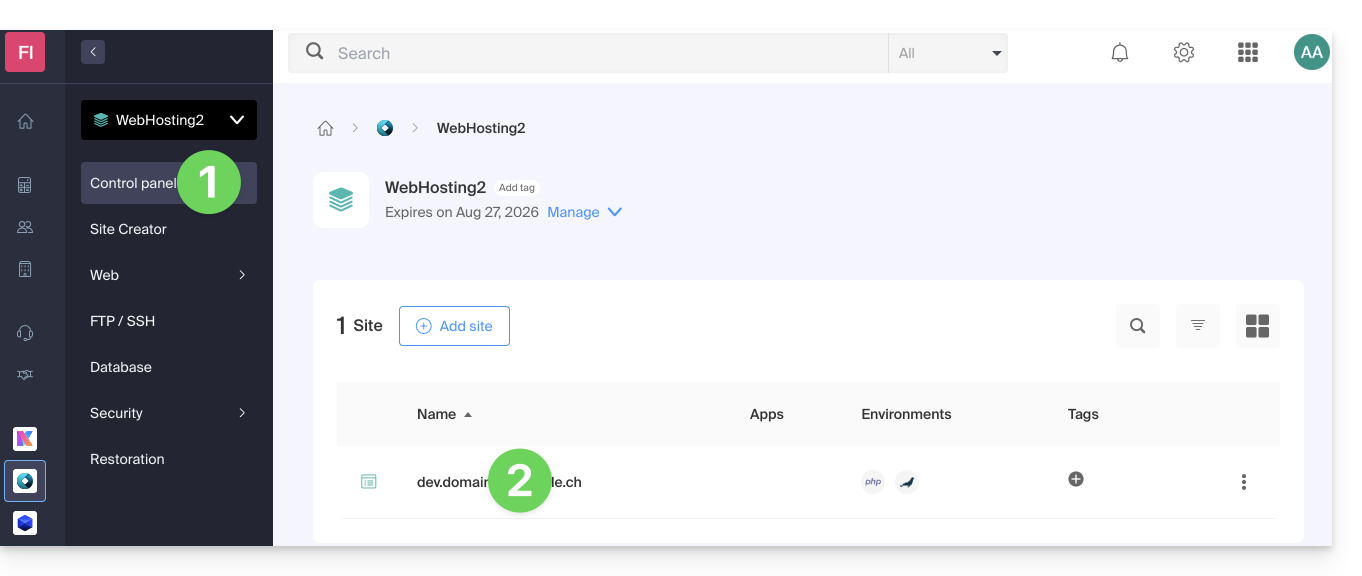
- Click here to access the management of your site on the Infomaniak Manager (need help?).
- Click directly on the name assigned to the site concerned:
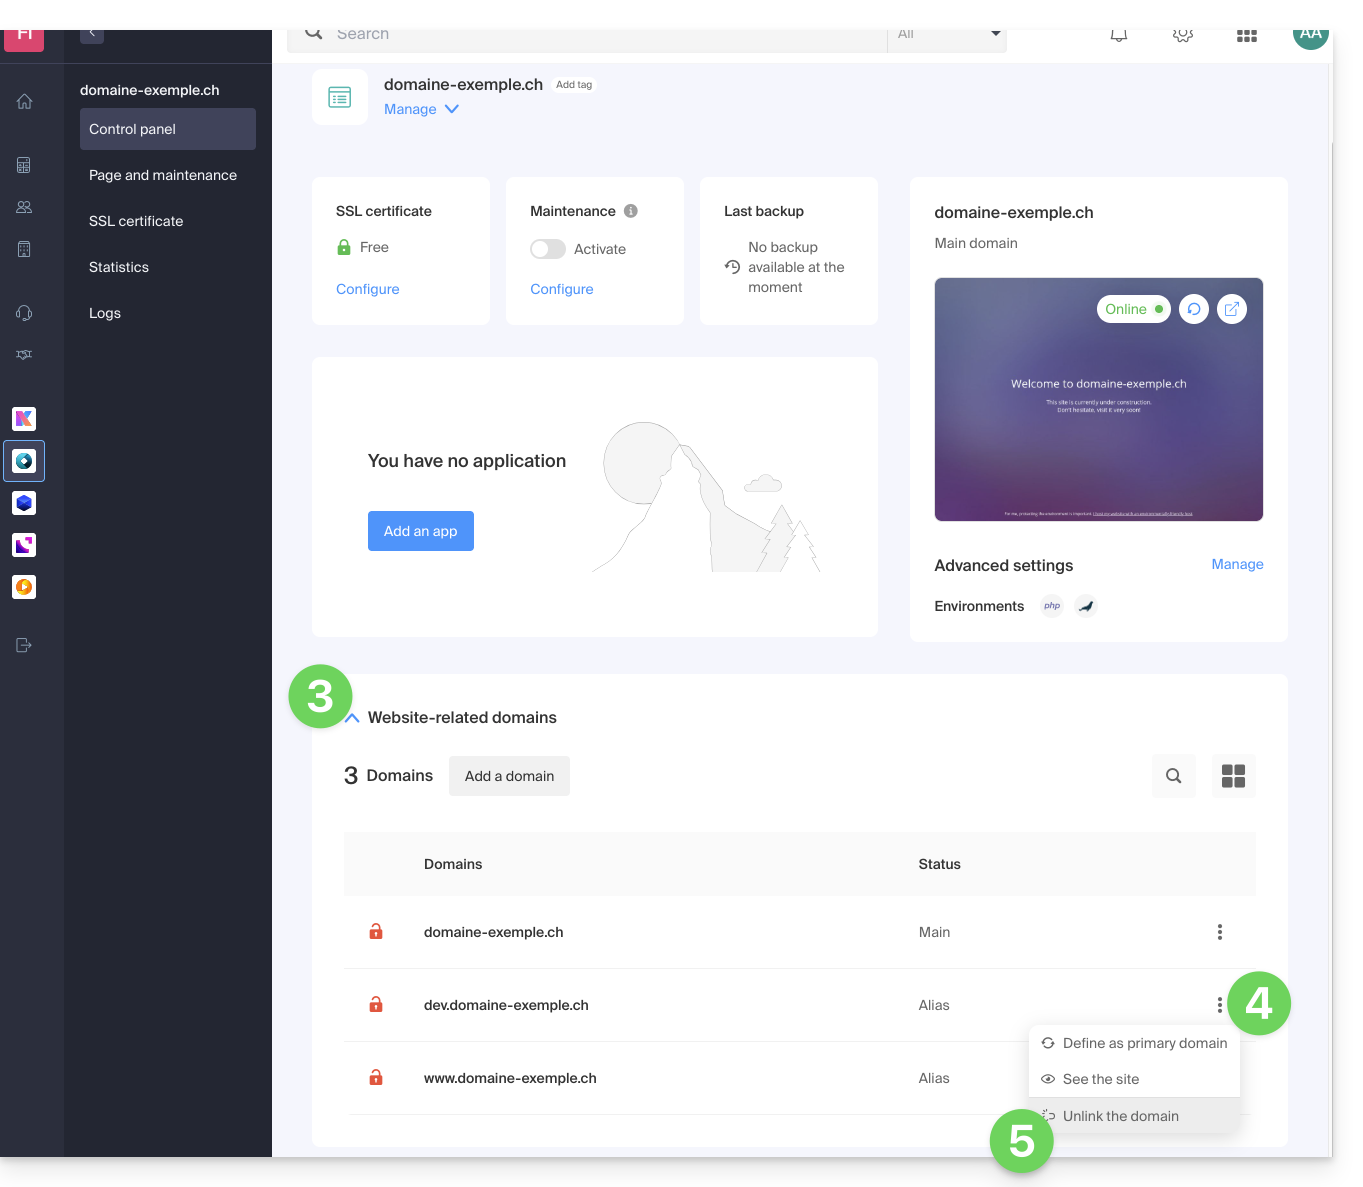
- Click on the chevron to expand the Domains section of this site.
- Click on the action menu ⋮ to the right of the domain to be removed.
- Choose Unlink:
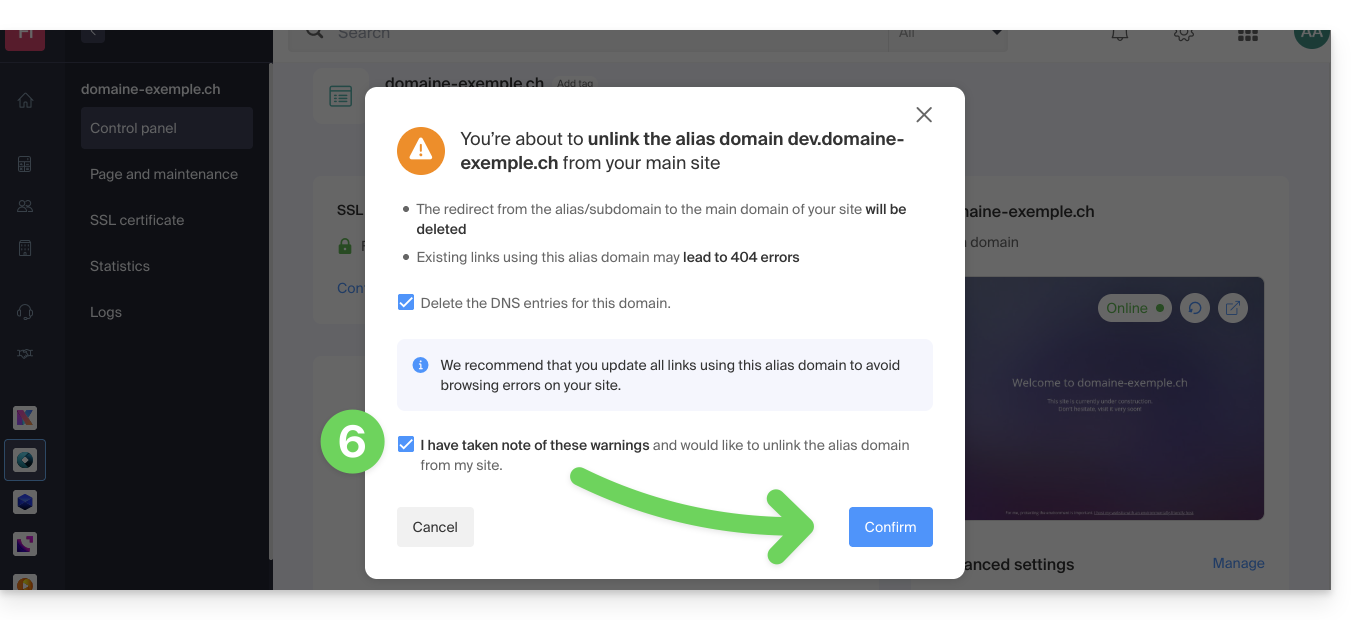
Confirm the deletion of the alias:
- If necessary, you can choose to delete the DNS records related to the domain…
This guide details the errors of type Rejected, too many connections from this host if they occur when visiting a website.
Error origins
429 Too Many Requests
This error occurs when the server is overwhelmed by a large number of requests in a short period of time, which can be due to heavy use of the site or abuse.
503 Service Unavailable
This error can be caused by several factors, including scheduled maintenance work on the server, server overload due to high traffic, or running a script that exceeds the server's resource limits.
Rejected, too many connections from this host
This error occurs when the server rejects connections due to a high number of simultaneous connections from the same IP address. Check the "Access and error logs" on your hosting dashboard to find multiple entries of the form:
[Fri Sep 02 11:40:31] [error] [client 222.111.123.123] Rejected, too many connections from this host. (vhost:domain.xyz uri:/js/modules/blocktopmenu/js/superfish-modified.js current:34 limit:30

[Fri Sep 02 11:40:31] [error] [client 222.111.123.123] Rejected, too many connections from this host. (vhost:domain.xyz uri:/js/modules/blocktopmenu/js/hoverIntent.js current:34 limit:30

[Fri Sep 02 11:40:31] [error] [client 222.111.123.123] Rejected, too many connections from this host. (vhost:domain.xyz uri:/js/modules/productscategory/productscategory.js current:34 limit:30

[Fri Sep 02 11:40:31] [error] [client 222.111.123.123] Rejected, too many connections from this host. (vhost:domain.xyz uri:/modules/feeder/rss.php current:35 limit:30

[Fri Sep 02 11:40:31] [error] [client 222.111.123.123] Rejected, too many connections from this host. (vhost:domain.xyz uri:/js/modules/favoriteproducts/favoriteproducts.js current:34 limit:30
In this example, the IP 222.111.123.123 is executing 30 simultaneous connections on each page, consequently, it is automatically rejected as this may resemble an attack or scan.
Resolution tips
A few tips to resolve these errors:
- Check the scripts that make multiple connections to the server to display data.
- Optimize the affected script(s) so that they require fewer resources.
- Increase the limits of the affected site to allow the script to do everything it needs to do and/or limit the number of simultaneous connections (especially on a Cloud Server where the limits — RAM, execution time, simultaneous connections — can be significantly increased).
- Migrate your hosting to a Cloud Server.
This guide explains how to protect a part of a website on a Web Hosting by making it mandatory to enter a password before viewing a directory (including subdirectories) from a browser.
Note, this does not prevent a user from accessing the folder via FTP.
Simple method
Password protect (authentication Digest) a directory using the "Folder Protection" tool:
- Click here to access the management of your product on the Infomaniak Manager (need help?).
- Click directly on the name assigned to the product concerned.
- Click on Security in the left sidebar:
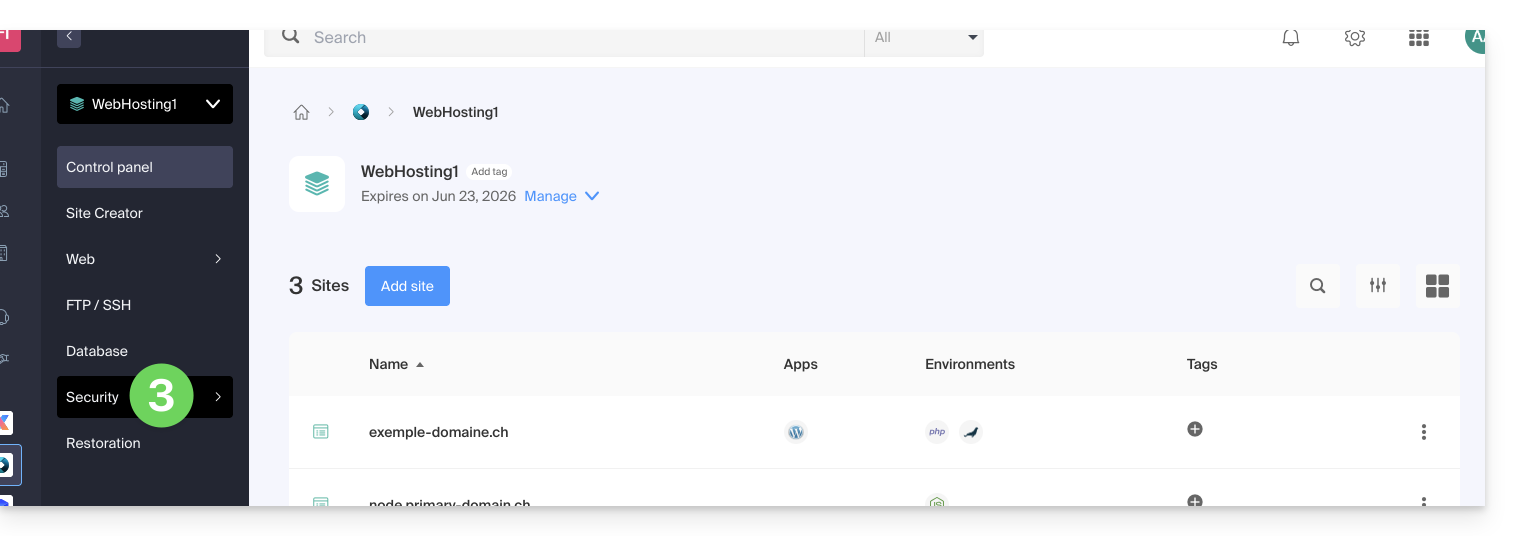
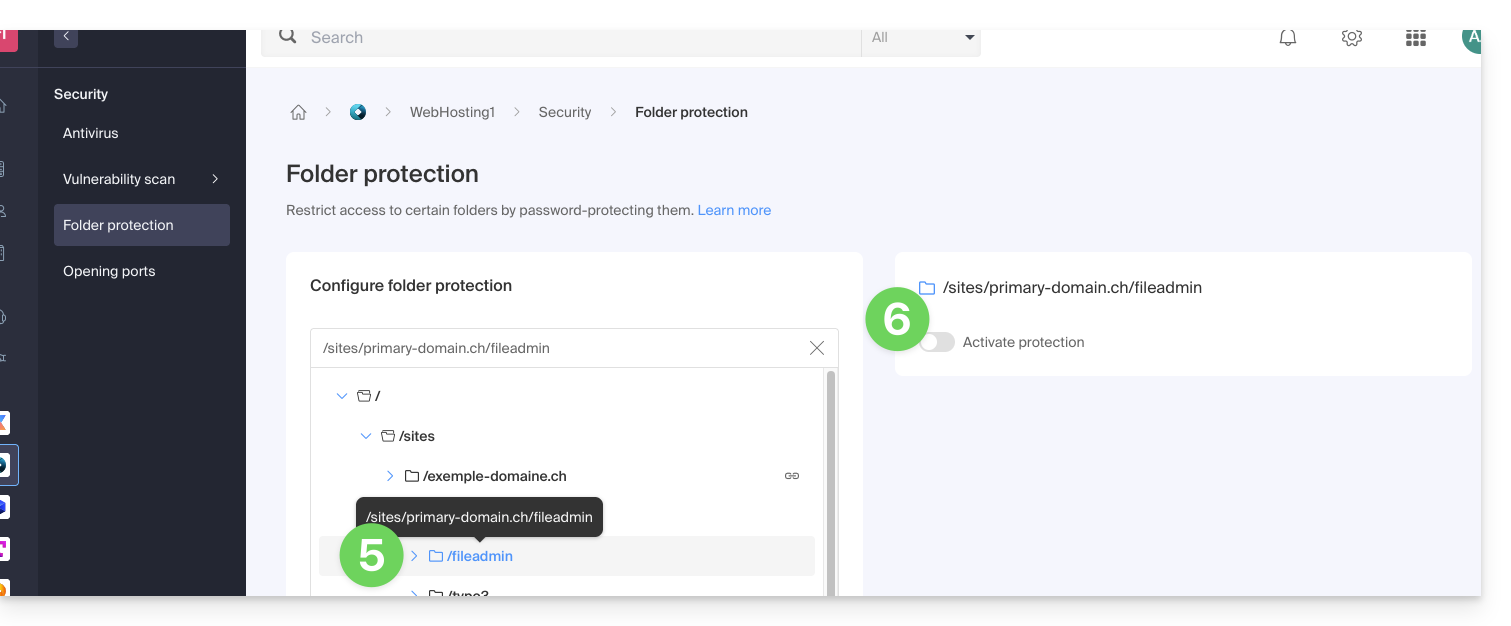
- Click on Folder Protection in the left sidebar.
- Click on the directory to protect.
- Activate the protection with the toggle switch, then create one or more users*:
- * Users are defined per directory; the tool does not allow managing user groups:
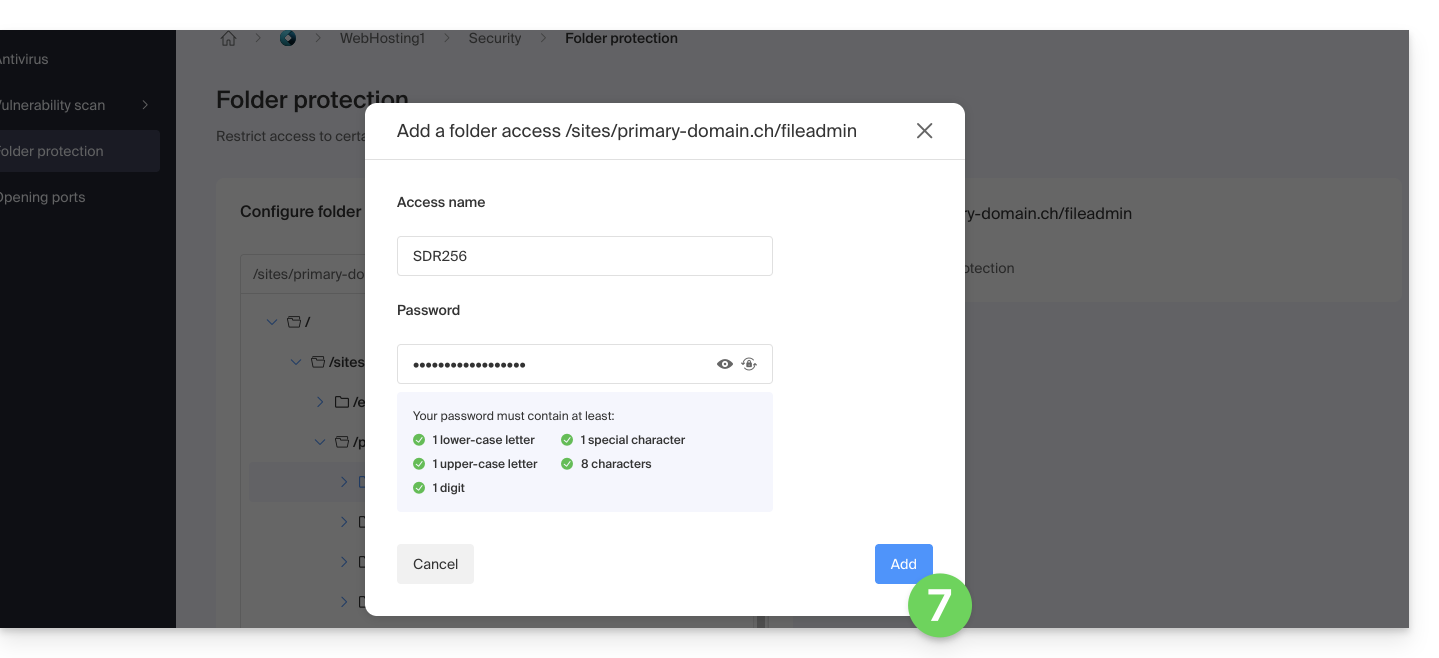
- * Users are defined per directory; the tool does not allow managing user groups:
- Click on the Add button.
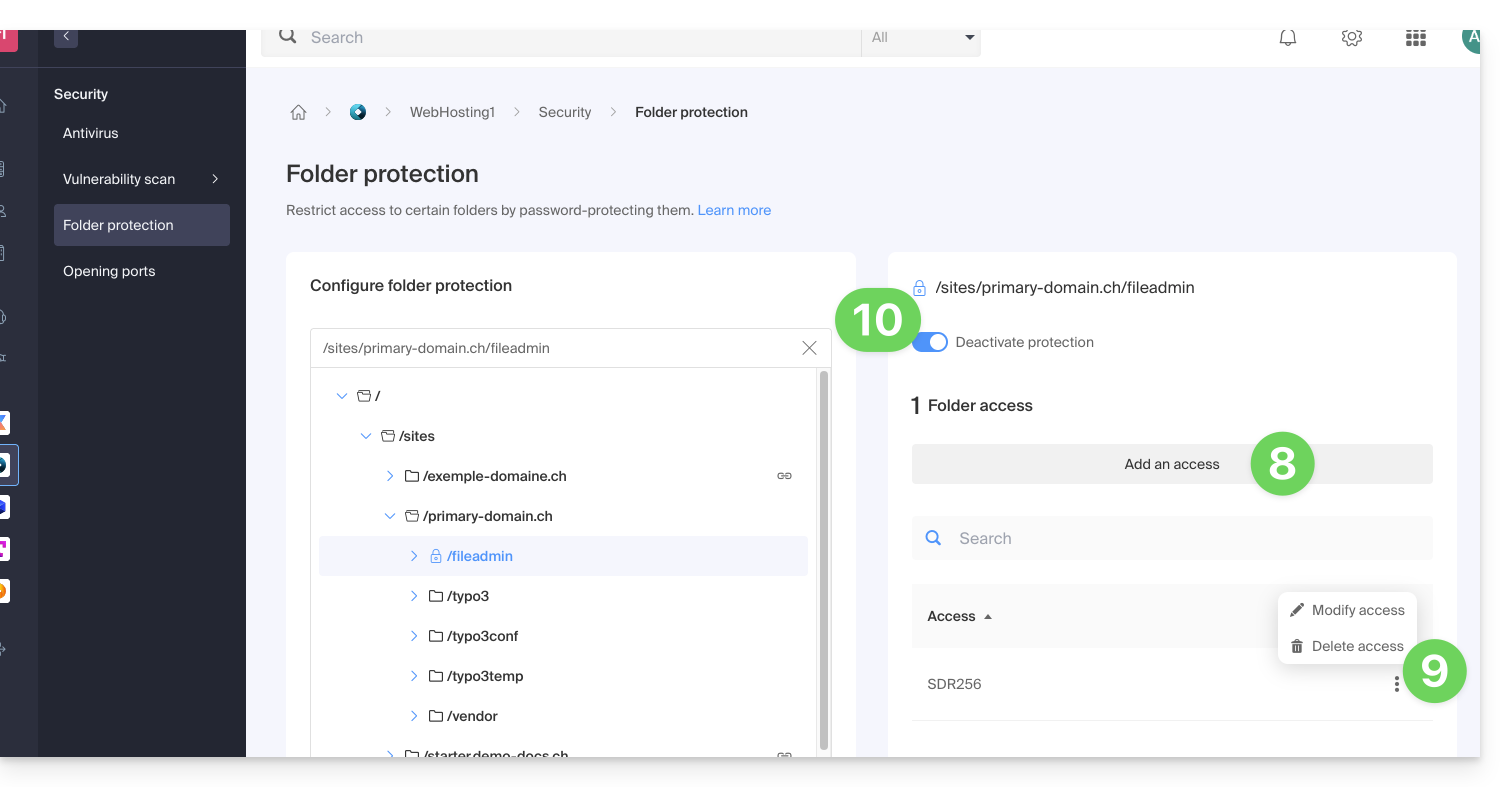
- Click on the button to add access for an additional user if necessary.
- Click on the action menu ⋮ located to the right of the user concerned to modify or remove them.
- Click again on the toggle switch to completely disable the directory protection:
Manual method via .htaccess
To password protect a folder using the .htaccess file of your site:
- Connect to your hosting via an FTP software/client or the FTP Manager.
In the folder to protect, create a file called
password.phpand adapt the following content inside by replacing12345with the desired password:<?php $pass = "12345"; echo password_hash($pass, PASSWORD_DEFAULT); // Affiche le mot de passe chiffré ?>- Open a web browser and display the
password.phpfile (example: domain.xyz/folder-to-protect/password.php). - The web browser displays your encrypted password; copy the encrypted password, it will be needed later...
In the folder to protect, create a file named .htaccess and adapt the following content inside:
AuthName "Page d'administration protégée"
AuthType Basic
AuthUserFile "/exemple/.htpasswd"
Require valid-user
Replace /exemple/ with the absolute path of the folder to protect. Example:
AuthUserFile "/home/clients/0f83c7afb710e5ae2645a1b704d8772f/web/dossier_a_proteger/.htpasswd"In the folder to protect, create a file named htpasswd.txt and adapt the following content inside:
login:password_chiffré- Replace
loginwith the desired login. - Replace
password_chiffréwith the encrypted password copied in step 1 of this guide.
Once the file htpasswd.txt is saved, rename it as follows: .htpasswd.
Open a web browser and try to display one of the pages contained in the protected folder. If the guide has been followed correctly, the login and password (not encrypted) chosen allow access to the protected folder.
Other restrictions can also be added by .htaccess.

