Knowledge base
1000 FAQs, 500 tutorials and explanatory videos. Here, there are only solutions!
This guide explains how to automatically restore an entire web hosting from backups made by Infomaniak.
Preamble
- Infomaniak performs a daily backup, and the last 7 are available to you in the Manager (or more if you use a Web Application).
- During the restoration, the sites will be automatically put in maintenance until the end of the process.
- Since automatic file backups and database backups are not performed simultaneously, it is recommended to check the proper functioning of the sites after restoration.
- Outside of these options, there is no other backup that you could obtain; it is therefore not necessary to contact Infomaniak for this purpose, but consider other backup methods for the future.
Restoring a web hosting
To access the web hosting:
- Click here to access the management of your product in the Infomaniak Manager (need help?).
- Click directly on the name assigned to the corresponding product.
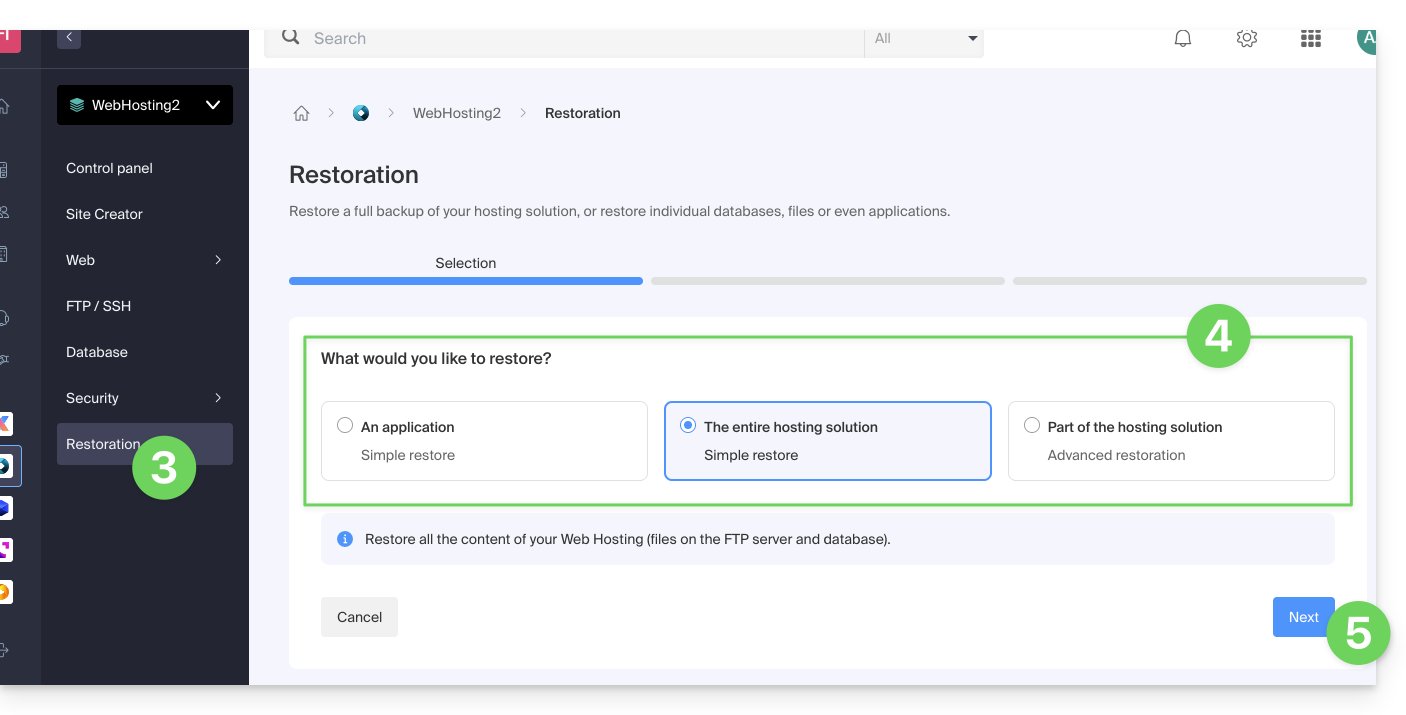
- Click on Restore in the left sidebar menu.
- Choose the type of restoration desired:
- Restore one of the Web Applications that you have installed.
- Simple restoration to restore all sites and databases of the hosting.
- Advanced restoration allows you to choose the sites and databases to restore.
- Click on the Next button:
- Choose the desired restoration date and complete the procedure.
This guide explains how to redirect a domain name directly to another or how to automatically send visitors to your website to another page address (internal or external URL).
Preamble
- To redirect traffic, you will need to act…
- … either on the domain name itself (it must be hosted by Infomaniak and its DNS must also be those of Infomaniak),
- … or on the code present in your pages (page .htaccess, homepage, etc.) if you have a website.
- Make your life easier! If needed, local partners referenced by Infomaniak can handle these procedures. Launch a free call for tenders. They handle everything, freeing you from technical details.
Act on the domain name
via Web Redirection Tool
The tool available on the Manager allows you to act simply on the domain name (or subdomain) to redirect it to the Internet address of your choice.
via DNS modifications or A record
Change the DNS of the domain name or modify its A/AAAA records to direct web traffic to another provider.
Act on the page code…
… via HTML code to insert
Insert this line of code between the <head> and </head> tags of your homepage (usually named index.html):
<meta http-equiv="refresh" content="5;url=INSERT-HERE-NEW-URL">Replace 5 with the desired wait time in seconds (0 for immediate).
The search engine Google indicates that it is preferable to use a 301 type redirection on the server side (see below). The W3C also advises not to use it.
… via PHP code to insert
If the site page has a .php extension, insert this header function call at the very top of the file:
header("refresh: 5; url=INSERT-HERE-NEW-PAGE-URL");… via .htaccess file
To redirect all traffic targeting your site (regardless of the page called) to another address, insert this in the .htaccess file at the root of your site:
RewriteEngine On
RewriteRule ^(.*)$ INSERT-HERE-NEW-URL/$1 [R=301]
To target the page that needs to be redirected:
Redirect permanent /ancienne_page.html insérer ici adresse URL de destinationRedirectpermanent, Redirect permanent and Redirect 301 are equivalent commands.
Here is another example of redirecting a sub-section to the homepage (this directive has the advantage of working with "deep links" unlike a permanent redirect):
RewriteEngine on
RewriteRule "old/path/url "/" [L]
Refer to this other guide on this topic.
This guide provides tips that can help you optimize the referencing of your site in search engines like Google.
Preamble
- Infomaniak is one of the most performant hosts on the French-speaking market, which contributes to the good referencing of your sites.
- On the other hand, Infomaniak will not intervene on the content or development of hosted sites.
Natural referencing (SEO)
Natural referencing (Search Engine Optimization) is the optimization of a website to ensure that your site is visible in search engines based on certain keywords entered by users. The efforts you invest in SEO will have a long-term impact.
A few technical tips to optimize your natural referencing:
- Install an SSL certificate on your site.
- Activate gzip compression to speed up the loading of your site.
- Compress the images of your site with software (FileOptimizer, Imageoptim) or an online service like Imagify.
To learn more, refer to the Infomaniak guide on natural referencing.
Google has also updated its guide "Getting started with natural referencing (SEO)" in 2024, with new fundamental "best practices" to optimize your visibility on the search engine.
Paid referencing (SEA)
Paid referencing (Search Engine Advertising) is the purchase of sponsored links in advertising spaces with the aim of quickly positioning your site on specific keywords. The goal is to place the best bid on keywords with good targeting to have the best chance of being visible at the best cost. The efforts you invest in SEA will cease to have a direct impact as soon as you stop your advertising campaigns.
This guide is for you if you encounter the error The web host does not exist when visiting the address of a site on an Infomaniak Web Hosting.
Preamble
- This type of error usually occurs because your domain name is not correctly linked to your site (your domain name is probably pointing to the wrong IP address or is misconfigured).
- Example: a domain
abc.xyzthat is misconfigured and would point to an IPv4 Starter hosting and to a shared hosting in IPv6...
- Example: a domain
Resolve a Domain - Website Linking Issue
To be able to put your site back online:
- Check the DNS zone of your domain name, especially its A records.
- Correct them if necessary by indicating the IP address of your hosting.
- Any DNS addition/modification can take up to 48 hours to propagate.
To do this, the simplest way is to use the Infomaniak DNS Diagnostic Tool to automatically correct the pointing, by previously grouping the products in the same Organization if necessary.
This guide details the restrictions on the number of simultaneous connections allowed on MySQL databases for web hosting.
Simultaneous MySQL connection thresholds
To maintain server stability, security, and responsiveness for all users, the system enforces limits on simultaneous connections.
For each database user at Infomaniak, the limit is set to 38 simultaneous MySQL connections.
This quota prevents shared resource saturation. If this threshold is exceeded, access is temporarily blocked, and errors such as User has already more than 'max_user_connections' active connections or Too many connections may appear.
In practice, this threshold is rarely reached. If necessary, it is entirely possible to distribute the load by creating distinct MySQL users for the various scripts or services of your site.
No hourly connection quota
Infomaniak imposes no restrictions on the volume of queries per hour. Parameters such as MAX_QUERIES_PER_HOUR or MAX_CONNECTIONS_PER_HOUR are not enabled.
Unlike some competing offers, you will not encounter resource exhaustion errors of type SQL Error : 1226 related to hourly activity volume.
Learn more
This guide presents the vulnerability detection tool for your Web Hosting.
Preamble
- There are thousands of cyber threats, and if your website were to be infected, your business could suffer, not only due to its unavailability, but also due to the loss of trust from your visitors and customers.
- The tool offered by Infomaniak is a free and complementary protection to the antivirus that protects all Infomaniak hostings against malware and security vulnerabilities.
How this service works
The tool works in the background to detect potential security issues. These vulnerabilities can allow malicious individuals to alter the content of your sites, which would harm your reputation with your customers and search engines.
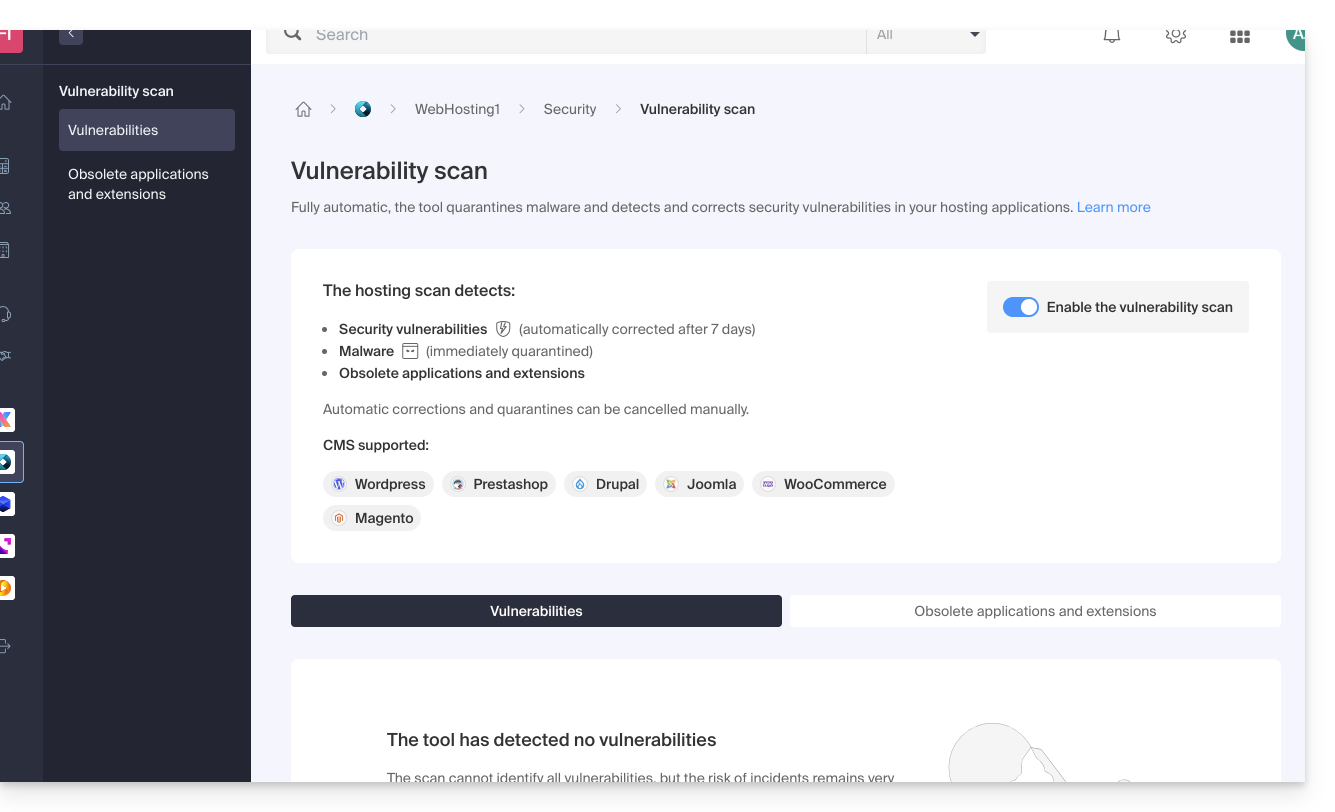
If no action is taken on your part within 7 days following detection, the tool automatically corrects the security vulnerabilities of the majority of CMS and/or quarantines malicious software without affecting the proper functioning of your sites.
If necessary, it is possible to…
Following a detection by the tool, it is also recommended to check your entire hosting if you notice suspicious file modifications that the protection would not have detected automatically.
A second tab allows you to analyze and display obsolete applications and extensions on your hosting: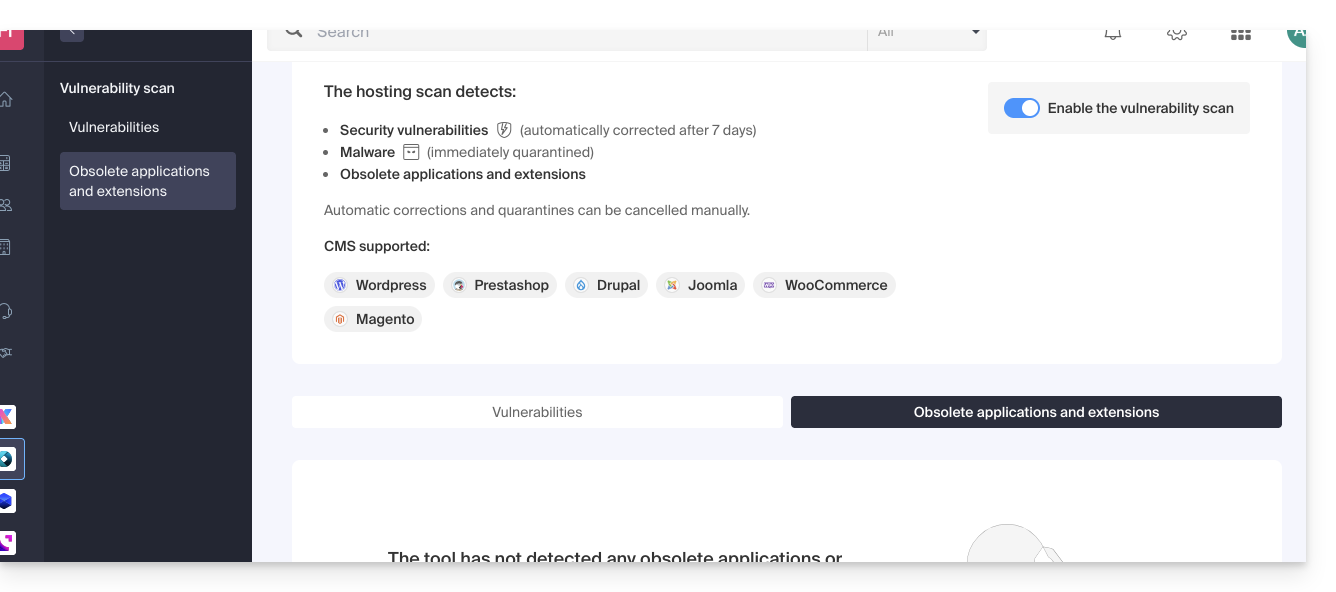
Data confidentiality
Like Infomaniak, the tool is compliant and respects the General Data Protection Regulation of the European Union: the analyses are performed locally on Infomaniak's servers. The content or signatures of the scanned files are not transmitted outside the infrastructures.
In accordance with the privacy policy, the data processed is limited to the strict minimum and concerns the username, email address, path, and name of the files, primarily for the purpose of being able to communicate the detections to the customer.
This guide explains how to change the password of a MySQL / MariaDB database from a Web Hosting.
Preamble
- Refer to this other guide if you are looking for information about updating connection details (scripts, sites...) related to a database password change.
- A database user created after the installation of a Web Application (offered by Infomaniak) cannot be modified (a lock icon appears next to it, see point 5 below).
- To access the database to which it is linked, you must create a new database user with the password of your choice and then assign rights to the desired database.
Change the MySQL MariaDB password, etc.
To do this, you need to intervene on the user associated with the database in question and change the password (without having to provide the old one) from the Infomaniak Manager:
- Click here to access the management of your product on the Infomaniak Manager (need help?).
- Click directly on the name assigned to the product in question.
- Click on Databases in the left sidebar.
- Click on the Users tab.
- Click on the action menu ⋮ located to the right of the item in question.
- Click on Modify:
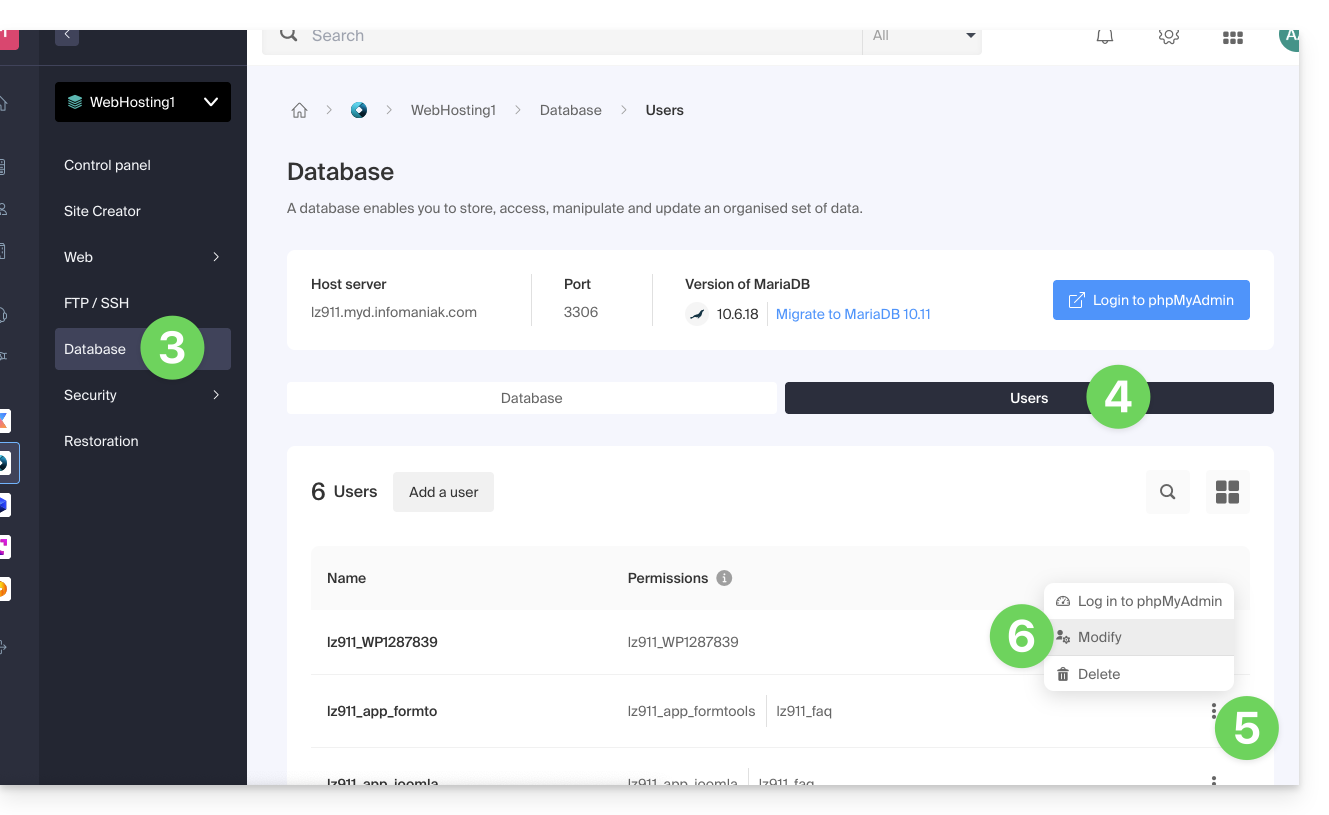
- Click on Change Password.
- Enter the desired new password.
- Click on the Save button:
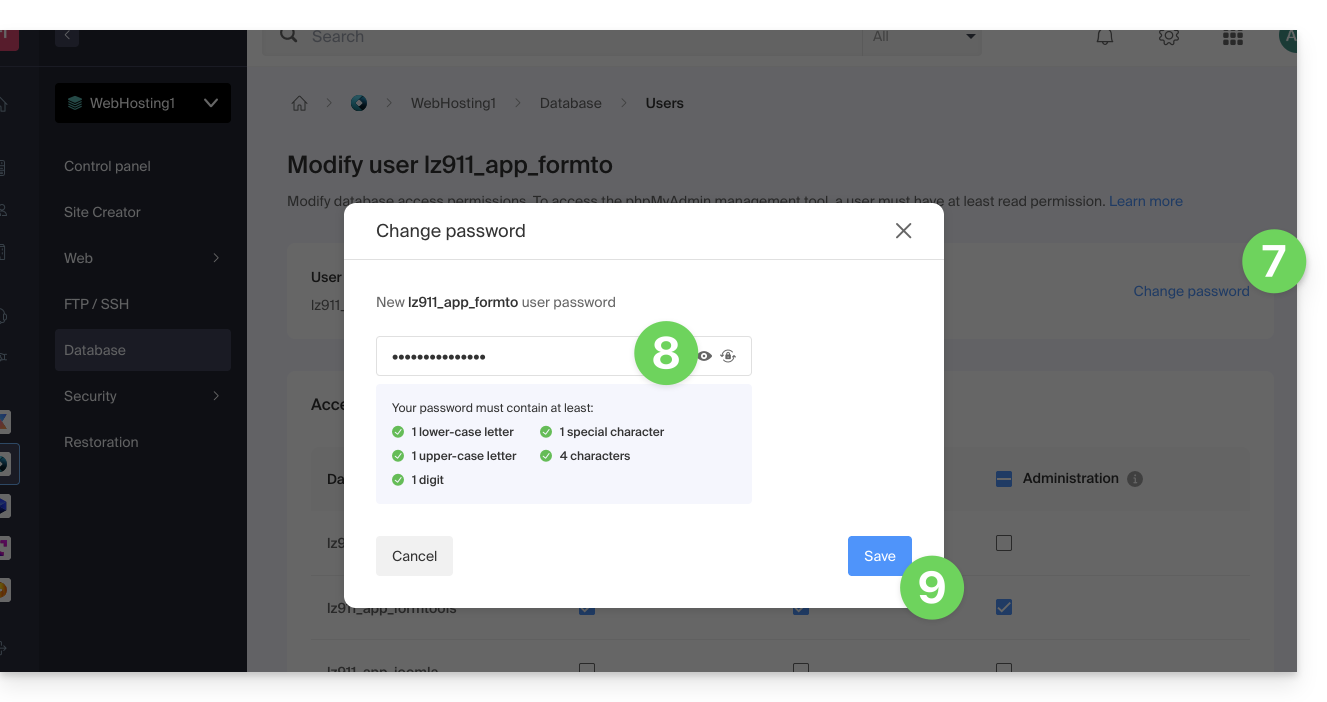
- If necessary, you can configure the new possible rights (read/write/administration) of the user for accessing existing databases on the hosting.
This guide explains how to modify the automatic backup configuration of Infomaniak Web Applications (Joomla, Drupal, Typo3, PrestaShop, ownCloud, etc.) included in the paid Web Hosting offers.
Preamble
- This does not concern WordPress, which can be backed up and restored via:
- the automatic backup of hosting,
- the extensions allowing you to manually create a complete backup including a facilitated reinstallation file.
Configure backups
To manage the backups of the Apps:
- Click here to access the management of your product on the Infomaniak Manager (need help?).
- Click directly on the name assigned to the product concerned:

- Click on the action menu ⋮ located to the right of the Web Application concerned.
- Click on the Settings of the application:

- Click on Modify to the right of the Application:

- Under the Configuration tab, click on the box to access the advanced configuration:

- Choose the desired update and backup modes:
- 7 recent backups are kept as well as those from 15 and 30 days ago.
- Save the changes using the button at the bottom right.
Learn more
- Install or uninstall a Web Application
- Modify the domain name associated with the Web Application
- Restore a Web Application
This guide explains how to order a Web Hosting at Infomaniak.
Order new Infomaniak Web Hosting
To order your first Web Hosting:
- If necessary, create a user account.
- Click here to access the Infomaniak Manager.
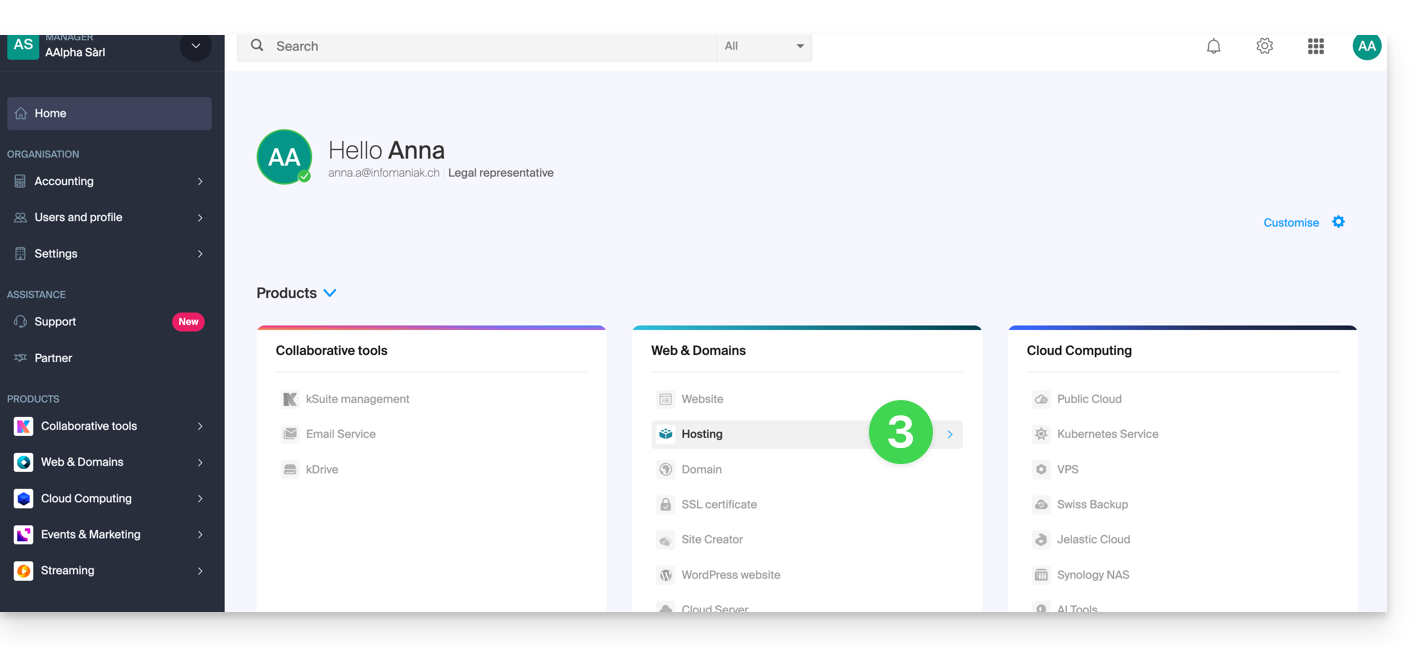
- Click on Hosting (Web & Domain universe):
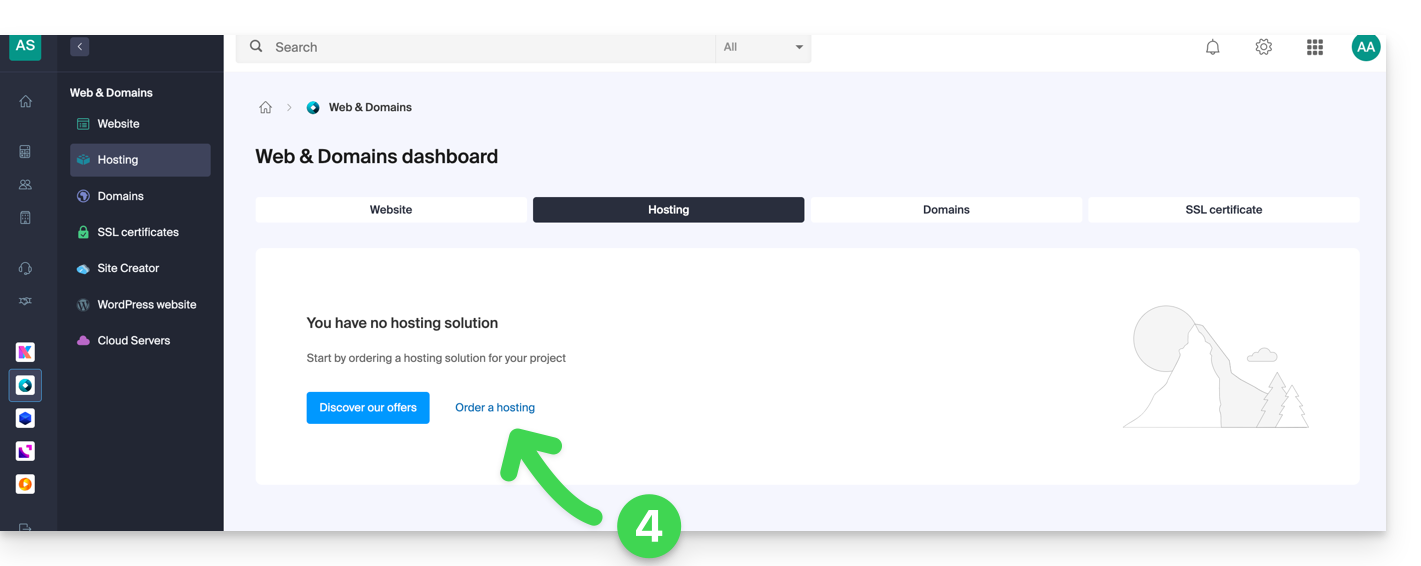
- Click to order new hosting:
- Once in the Shop, make sure you are ordering in the desired Organization (select another from the list if necessary or create a new one at point 6 below):
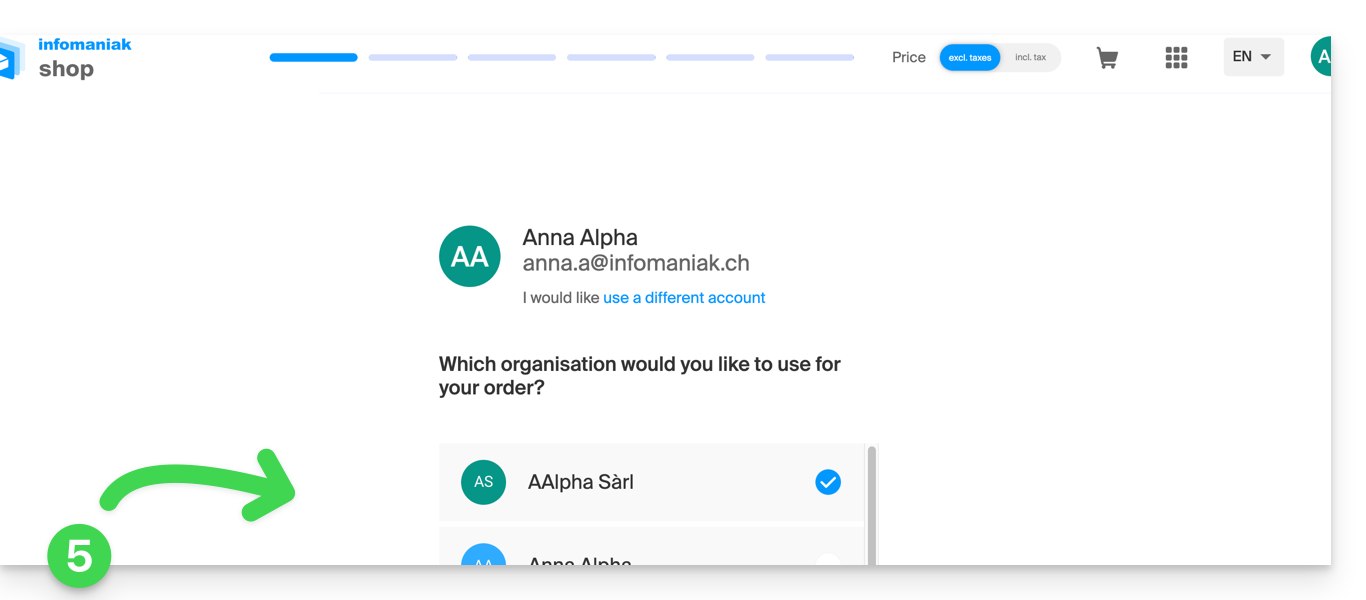
- Confirm your choice by clicking the blue button at the bottom of the page (or first create a new Organization if necessary using the dedicated blue link):

- At the top, enter the domain name of your hosting and click Search (even if you already manage it with another registrar):

- Two scenarios are then possible:
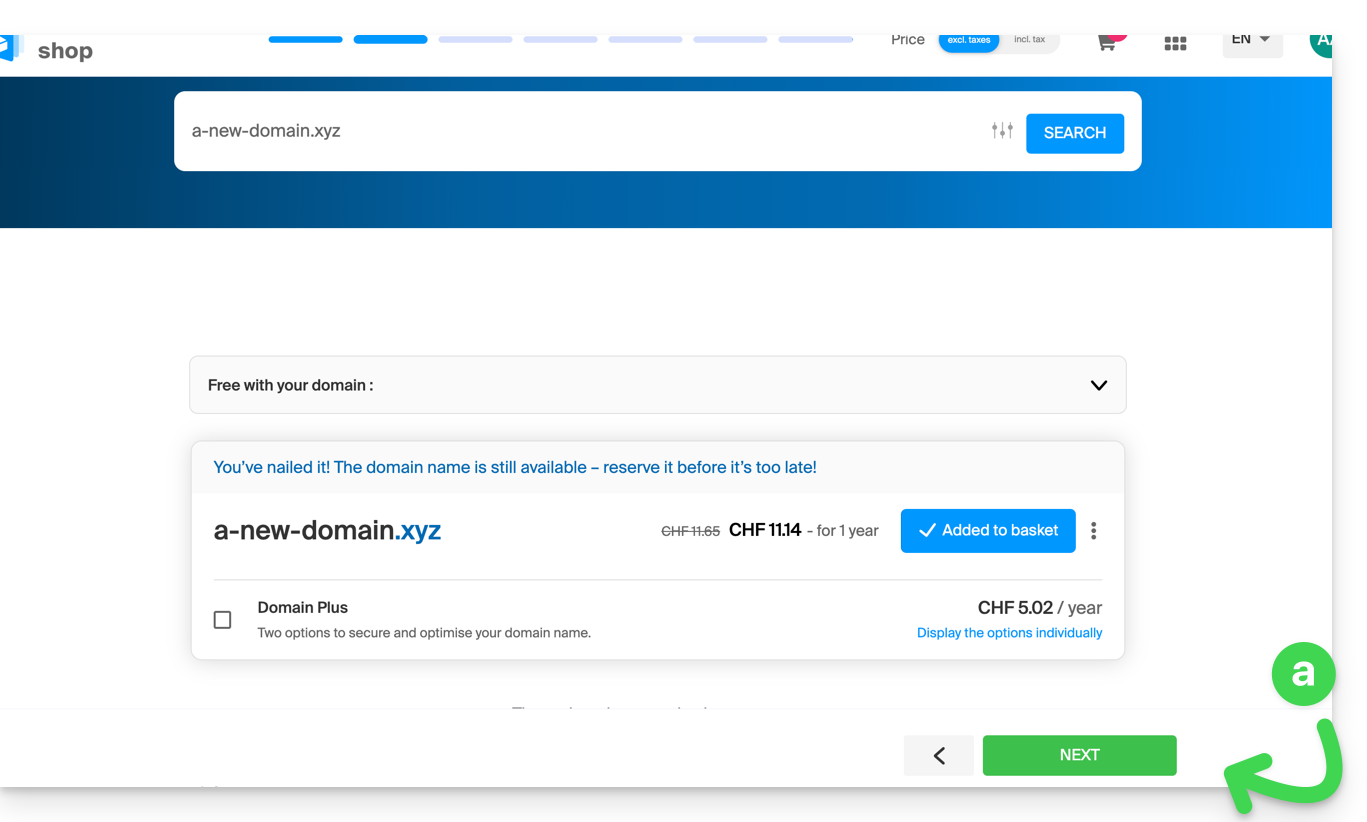
- You do not yet own the domain name: check the information and options on the screen, then click the Next button:
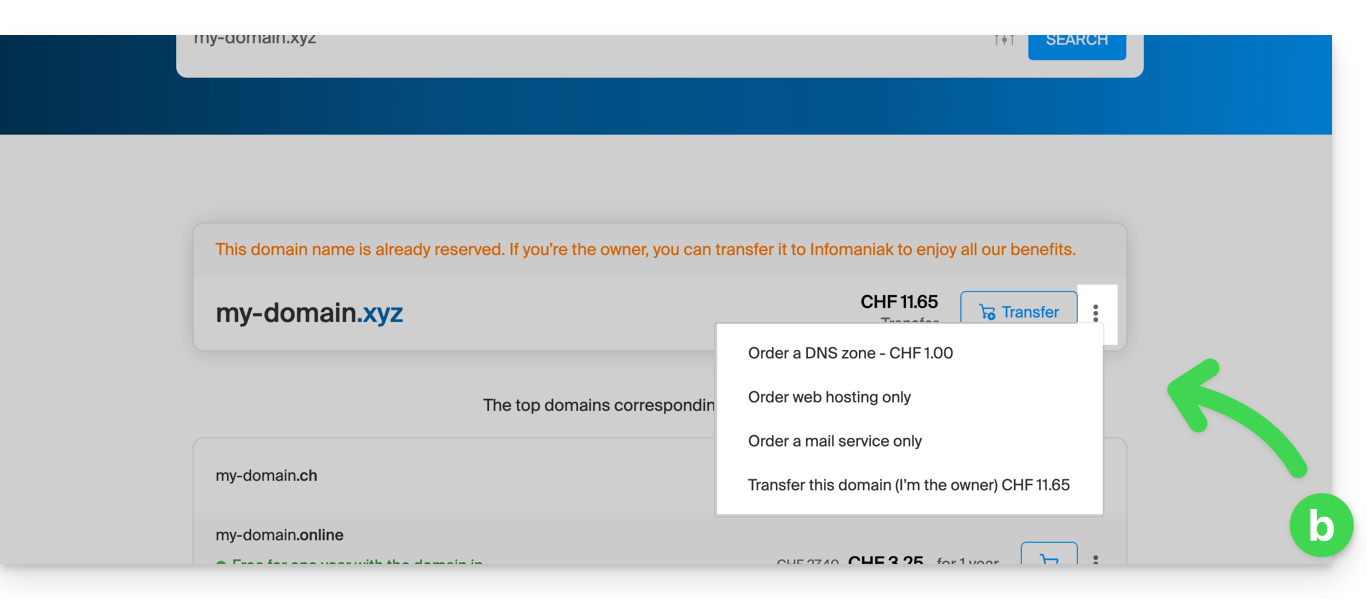
- You own and manage your domain names with another registrar: click the action menu ⋮ to the right of the domain name to Order hosting only:
- You do not yet own the domain name: check the information and options on the screen, then click the Next button:
- Choose the hosting that suits you.
- Click on Next.
- Complete the order.
Already a customer, you already have hosting
To order additional hosting:
- Click here to access the management of your product on the Infomaniak Manager (need help?).
- Click on the supermarket cart icon:
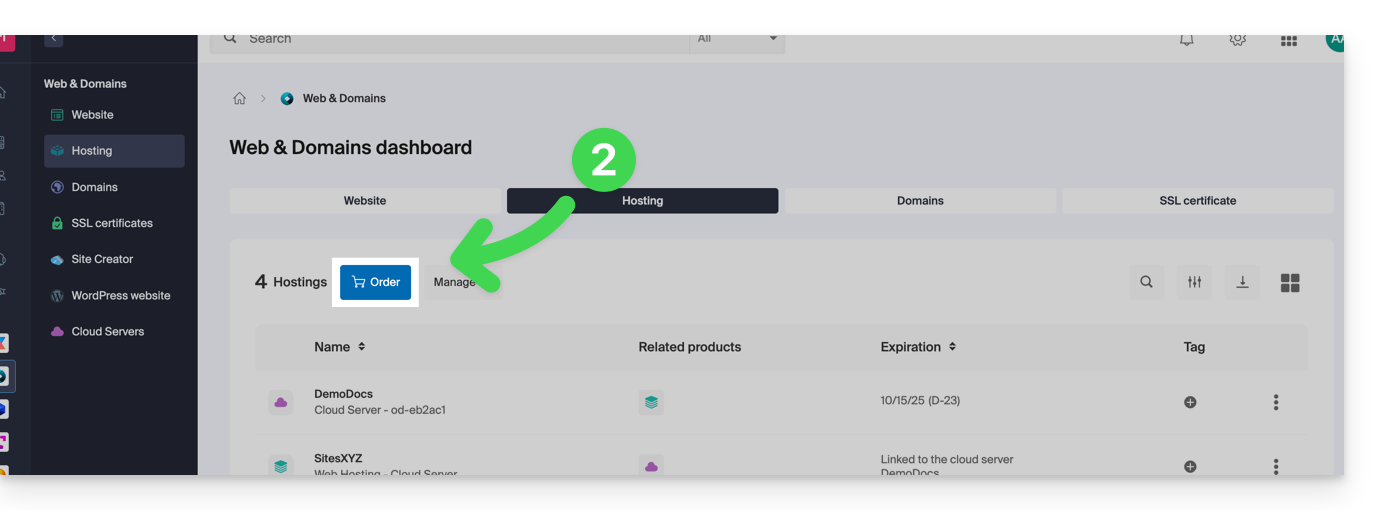
If you already have a web hosting, you can also add a site to an existing hosting without ordering or paying for a new hosting (multi-site / multi-domain management).
This guide explains how to start a content analysis of a Web Hosting to detect and clean files containing viruses and other malicious scripts that could threaten the security of websites.
Start an antivirus scan of the sites
To analyze potentially infected content:
- Click here to access the management of your hosting on the Infomaniak Manager (need help?).
- Click directly on the name assigned to the hosting concerned.
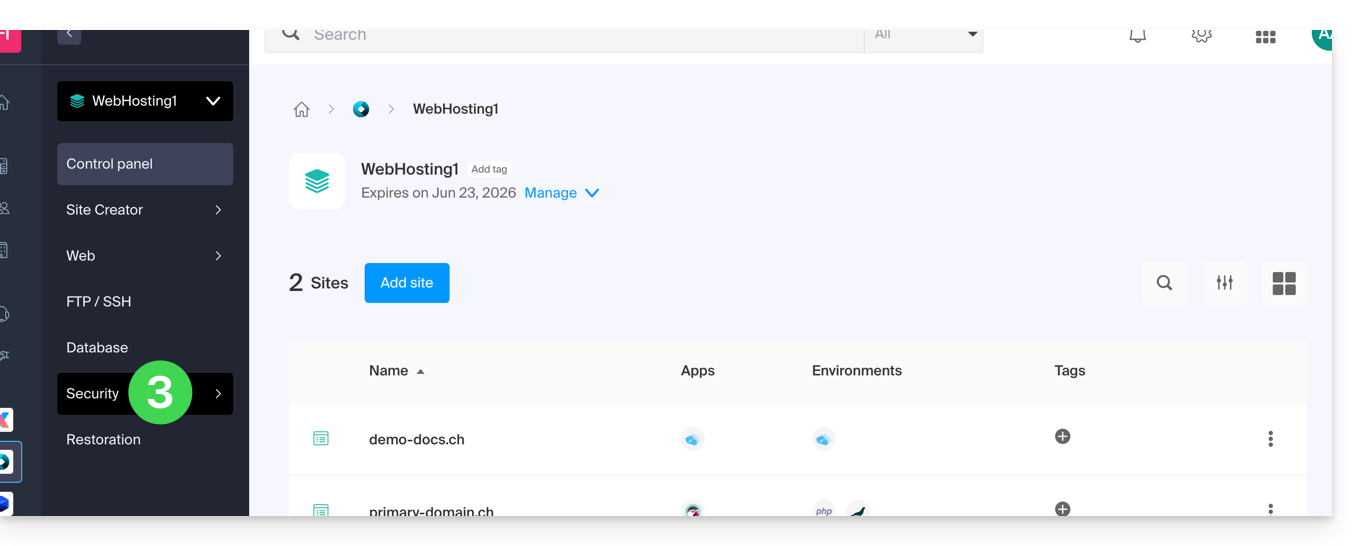
- Click on Security in the left sidebar:
- Click on Antivirus in the left sidebar.
- Click on the blue button Analyze:
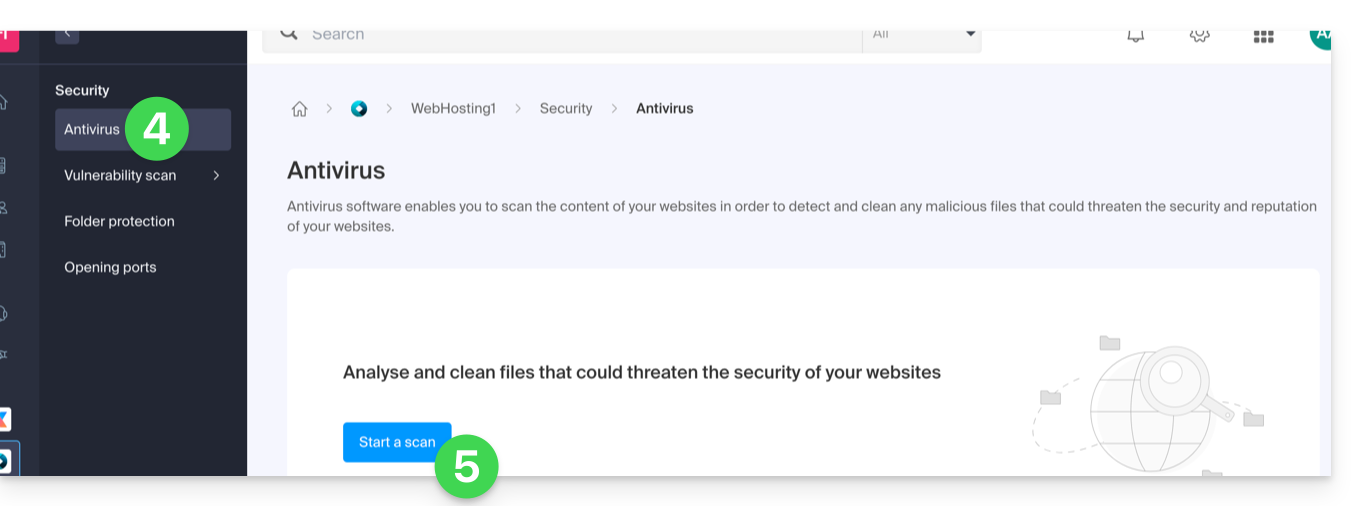
- Select the site(s) to analyze.
- Click on the blue button Start the analysis:
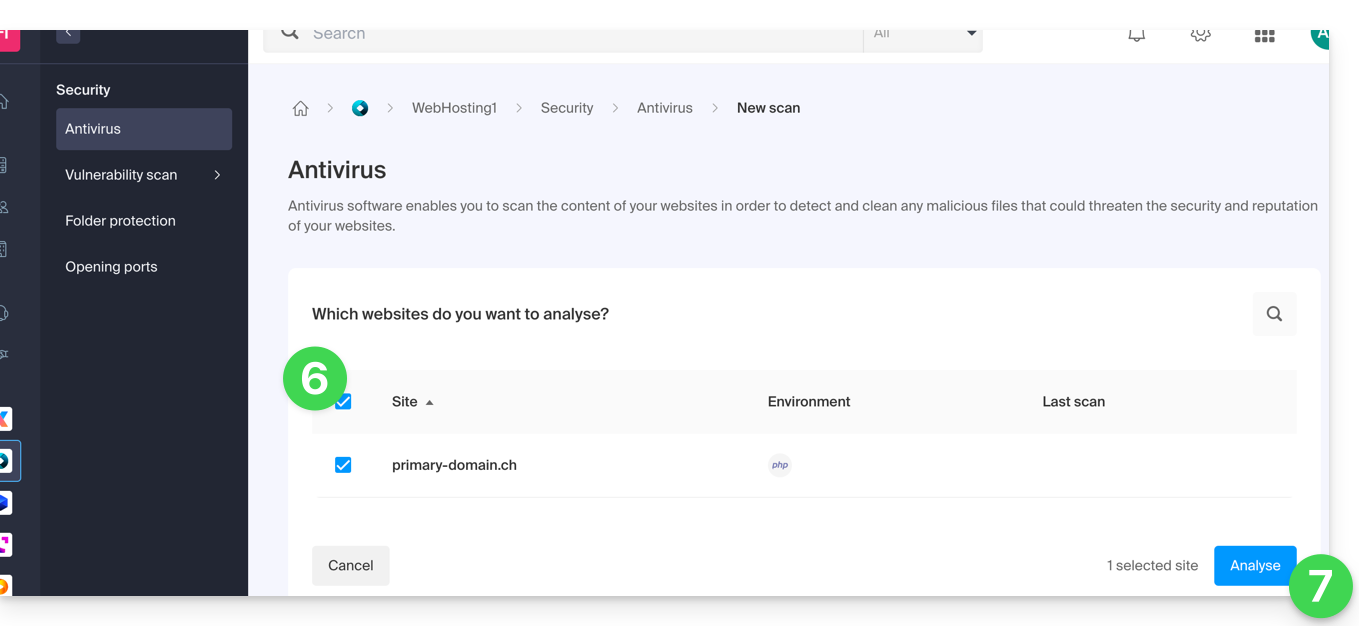
The antivirus scan may take some time, but the Manager can be closed. You will receive an email when the operation is complete.
Also consider the vulnerability detection tool to monitor potential vulnerabilities automatically corrected on your websites.
This guide explains how to allow certain incoming and/or outgoing ports in the firewall (firewall) of a Web hosting or a Cloud Server.
Preamble
- On a shared Web hosting, it is only possible to open outgoing ports.
- On a Cloud Server, it is possible to open incoming and outgoing ports.
- Opening ports allows certain applications to function properly but can reduce the security of your hosting.
Access the tool and add a rule
To manage port opening from the Manager:
- Click here to access the management of your hosting on the Infomaniak Manager (need help?).
- Click directly on the name assigned to the hosting concerned.
- Click on Security in the left sidebar.
- Click on Port Opening in the left sidebar.
- Click the Open a port button:
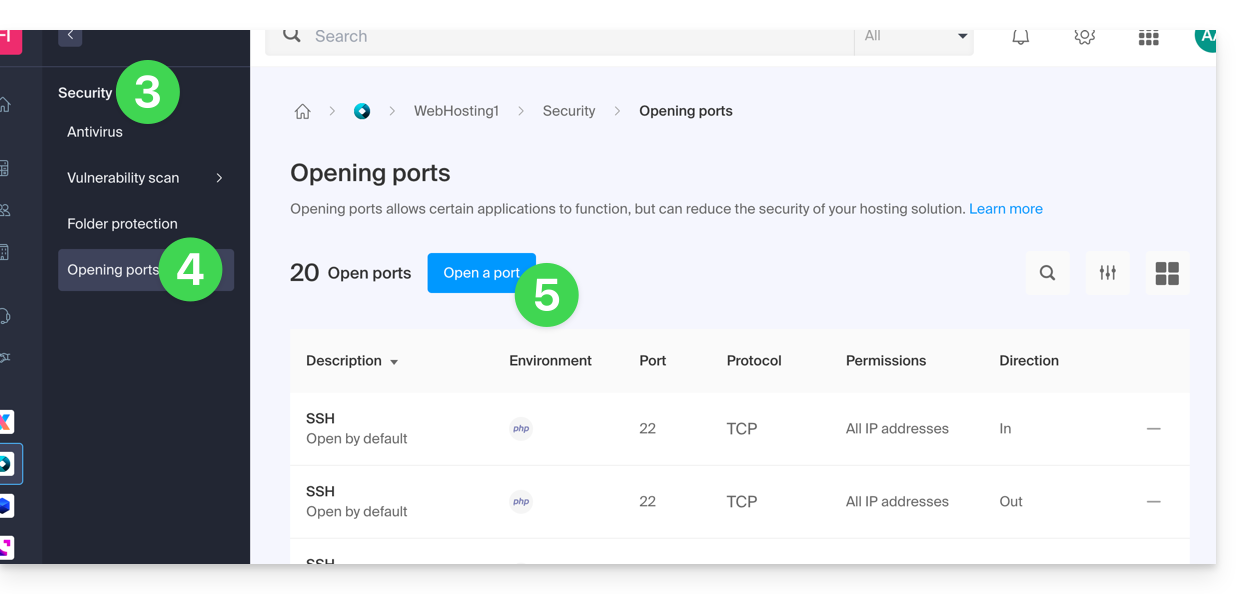
Open a port
It is only possible to set one port per rule, and only one IP / host per field: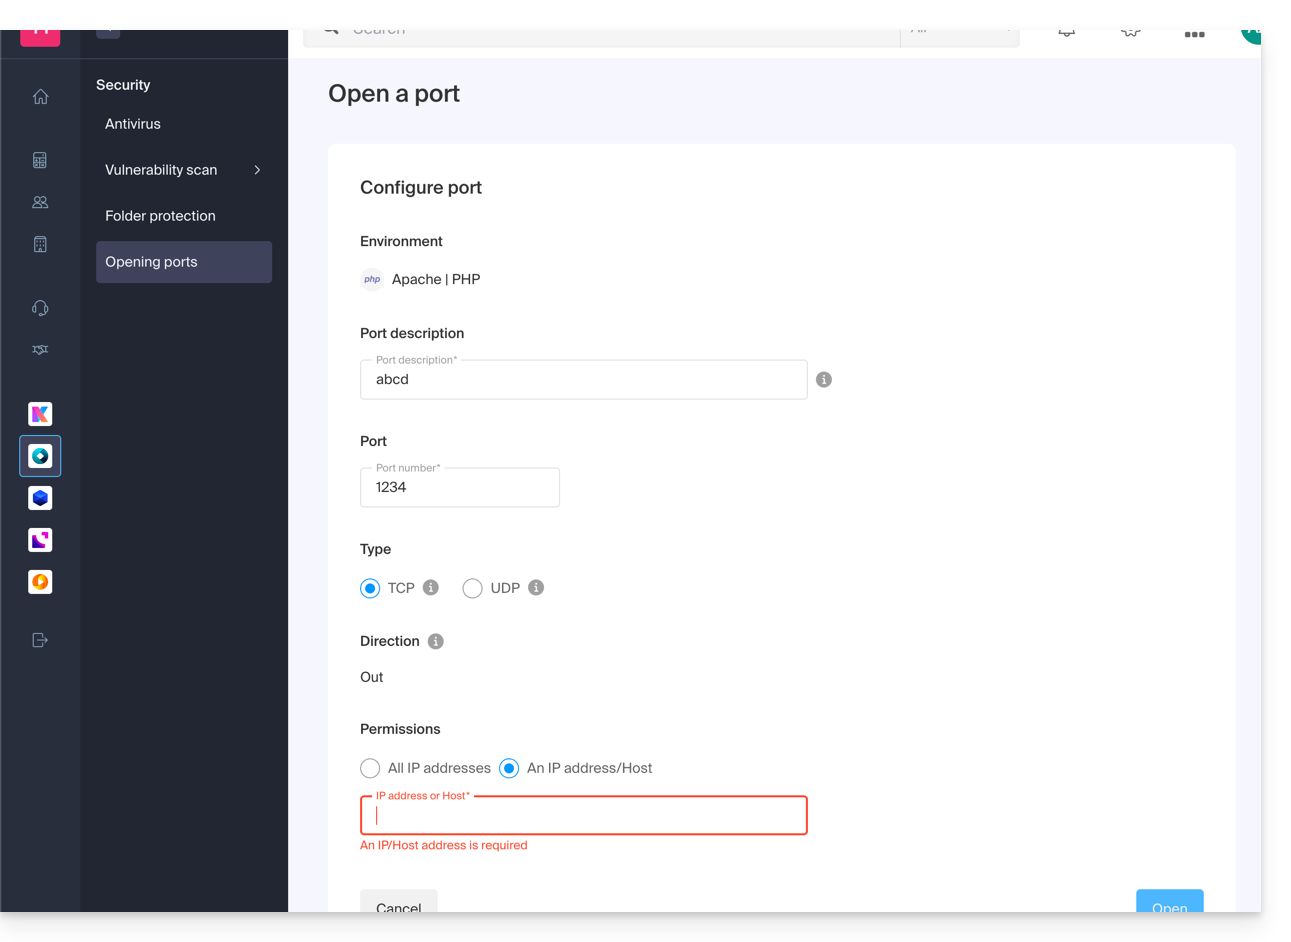
By specifying an IP or a host, the connection will only be allowed in these cases:
Incoming rule: if the connection comes from this IP or the specified hostOutgoing rule: if the connection is made to this IP or this host
Same for the "Type" of connection, if the protocol used for the connection is not the one specified in the rule, the connection is not allowed.
Open the outgoing port 25 globally
You can open the outgoing port 25 from the manager if a destination host is specified.
With a Cloud Server, to open this port to the world, contact Infomaniak support and justify your request.
Default open ports
Once you have accessed the port opening tool, you will find the list of default open ports on the page.
With a Cloud Server, to exceptionally close some of the listed ports, contact Infomaniak support and justify your request.
The display may sometimes be spread over several pages: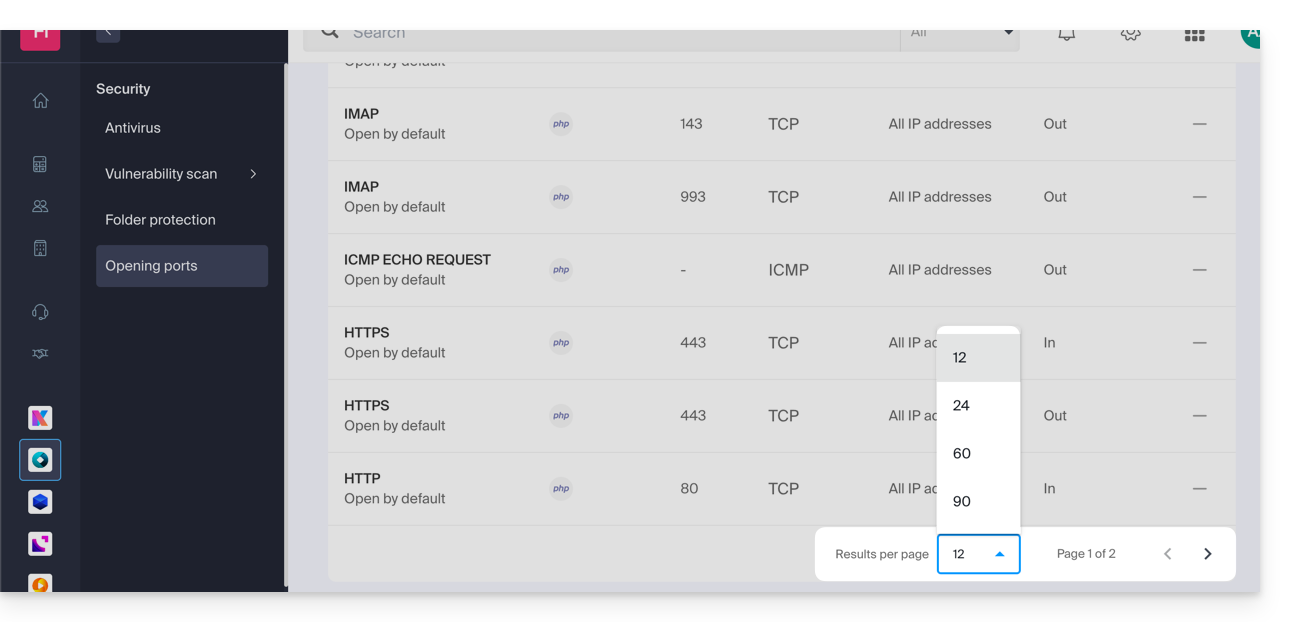
MySQL ports
Regarding database ports, refer to these guides:
Check the activity of a port (Cloud Server)
On Cloud Server, to check if an application is listening on a particular port (1234 in the example below) and to know the name of the application in question, run in SSH:
netstat -anpe | grep "1234" | grep "LISTEN"This guide explains how to optimize a website hosted on a Web Hosting to make it faster and provide a smooth navigation experience for all your visitors, regardless of their connection speed.
The role of the host
The loading speed of a website depends on many factors: server performance, host network infrastructure, visitor's internet connection, and site optimization itself.
As a host, Infomaniak strives to offer the best in hosting by continuously evolving its products and infrastructure:
- All hosting solutions run on the latest generation of SSD disks.
- The infrastructure benefits from over 70 Gbit/s of interconnection and redundancy with partners like Cogent or Level3.
- To handle traffic spikes, servers use regularly renewed 64-bit Intel Xeon processors. Shared servers use, on average, only 40% of their CPU power.
When you submit a support request regarding slowness, Infomaniak checks the following points:
- Your hosting server is functioning normally and has not encountered any incidents in the last 48 hours.
- The network infrastructure has not experienced any disruptions during this same period.
The role of the site owner and the webmaster
Infomaniak does not intervene on the content of the servers or on the development of the sites. The creation and maintenance of a site are distinct professions, although they use the tools and services provided by the host.
Analyze the cause of slowness
Here are the actions to take if you notice slowness on your site:
- Apply the Google PageSpeed Insights recommendations. These points concern the design of the site and not the server configuration. Refer to this other guide if the test recommends enabling resource compression.
- In case of slowness noticed from abroad, activate the DNS Fast Anycast.
- Install a caching system to reduce redundant database accesses and speed up display.
- Consider using a CDN.
- Test the server response time or TTFB.
- Scan your hosting to detect any potential viruses.
- Purge your databases regularly by deleting unnecessary entries.
- Use the latest PHP version compatible with your site or CMS.
- Avoid images, counters, or media hosted on external servers: if they are unreachable, your site will appear slow.
- Deactivate unnecessary or resource-intensive WordPress extensions.
- Keep your CMS and web applications regularly updated.
- Limit the impact of overly aggressive indexing robots by configuring a Crawl-delay.
- Analyze the error-logs: correcting the errors generated by your site improves its performance.
- Check the slowlogs to identify SQL queries taking more than 5 seconds to execute and optimize them (optimization examples).
- Add a server cache engine like Memcached (available on Cloud server only).
- Increase the max_children value (only on Cloud server).
If the problem persists
If you or your webmaster cannot find the source of the slowness, contact Infomaniak support in writing, providing the following information:
- Name of the hosted site.
- Exact dates and times of the slowness.
- Name of the database or FTP account possibly concerned.
- Your public IP address during tests (visible on https://www.infomaniak.com/ip).
- Type of slowness (display, FTP transfers, etc.).
- Indicate if you can normally access the Infomaniak site during these episodes.
- Complete result of a traceroute to
84.16.66.66. - Result of a speed test on speedtest.net by selecting Infomaniak as the destination server.
If your needs evolve
If shared hosting is no longer sufficient, consider switching to a Managed Cloud Server. Your site can be easily migrated to benefit from dedicated resources and advanced caching technologies.
Make your life easier! If needed, local partners referenced by Infomaniak can handle these procedures. Launch a free call for tenders to delegate these technical aspects.
This guide explains the differences between a Domain (or main site), a Subdomain and an Alias.
Preamble
- Although they are related, these three elements (Domain, Subdomain, and Alias) have different functions and purposes.
- They can impact a Web Hosting via its domain name, or even the email service since it is quite possible to have email addresses on a subdomain, for example.
What is a Domain?
The domain or domain name is the main entrance to your website. It is from this that your users will access your content. It is this main domain that defines what will appear in the URL bar of your users' browsers.
Prerequisites
- Own a domain.
- Own an Infomaniak Web Hosting.
Refer to the guide Create a new site on your Web Hosting.
What is a Subdomain?
The Subdomain is symbolized by an additional word that is in front of your main domain name. This is very useful in several cases, for example:
- this can be used to display "exclusive" or targeted content, for example, by going to
faq.infomaniak.comyou arrive at the knowledge base where all the guides are located - this can also be used (temporarily or permanently) when creating a new site or redesigning an existing site, for example, by creating
new.domain.xyzwhen the main site was previouslydomain.xyz
Prerequisites
- Own at least one domain.
- Own an Infomaniak Web Hosting.
Refer to the guide Add a subdomain to your Web Hosting.
What is an Alias?
An Alias or Alias Domain is a second domain name that points directly to your main site; they share the same web pages. The alias is another entrance to your website. For example, the main site of the Swiss Confederation is www.ch.ch and www.suisse.ch is its alias.
Prerequisites
- Own multiple domain names.
- Own an Infomaniak Web Hosting.
Refer to the guide Add an alias to your Web Hosting.
The equivalent also exists for a Mail Service.
The benefit of an Alias is that it allows you to increase the visibility of your site with your target audience by offering them more entry points to access it.
This guide explains why a website may be "broken" or no longer display anything, following a password change at the level of a Web Hosting.
Broken link with the database
When your website and more particularly a script (CMS, WordPress, Prestashop or any other application using MySQL databases) can no longer connect to the MySQL MariaDB or other database, an error message may be displayed, such as:
Erreur lors de la connexion à la base de donnéesDatabase Error: Unable to connect to the database:Could not connect to MySQLLink to database cannot be established
Remember your last action...
In the event of an error on your site, you should always examine the recent history. In this case, has there been...
- ... an action on your part regarding the configuration file of the script in question? Has it been touched, modified, moved?
Sometimes, the involuntary insertion of a space before or after a word can cut the link between the web server and the database server. Go back over your file modifications.
If necessary, restore an old version of the files that you have modified recently.
- ... an action regarding the database password in the Infomaniak Manager?
If you change the password of your database via the Infomaniak Manager, then your script, which retrieves its information from the databases, will no longer display anything.Changing something in the Infomaniak Manager means you have to change it everywhere else. This change that you made in the Manager must also be reported / reflected in the script's configuration file by connecting via FTP and modifying the appropriate file, usually "wp-config.php", "configuration.php" or similar.
- ... a server move announced by Infomaniak?
If this error follows a server move or another operation announced by email and related to the product in question, do not hesitate to contact Infomaniak support.
This guide explains how to access MySQL/MariaDB backups and restore a specific database from an Infomaniak hosting.
Restore a specific database
To access the Web hosting:
- Click here to access the management of your product in the Infomaniak Manager (need help?).
- Click directly on the name assigned to the corresponding product.
- Click on Restore in the left sidebar menu.
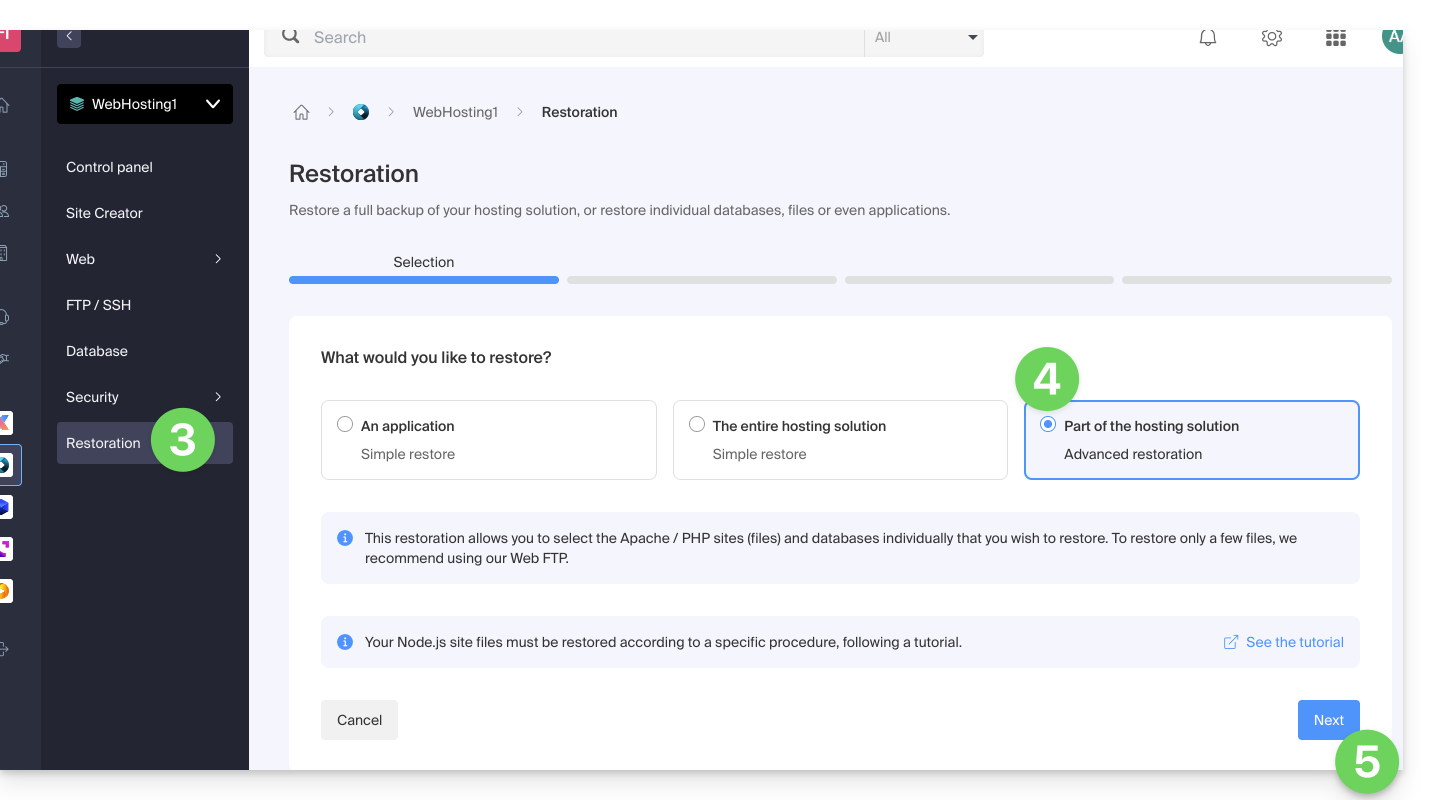
- Choose the type “Advanced Restore” which allows you to choose the databases to restore.
- Click on the Next button:
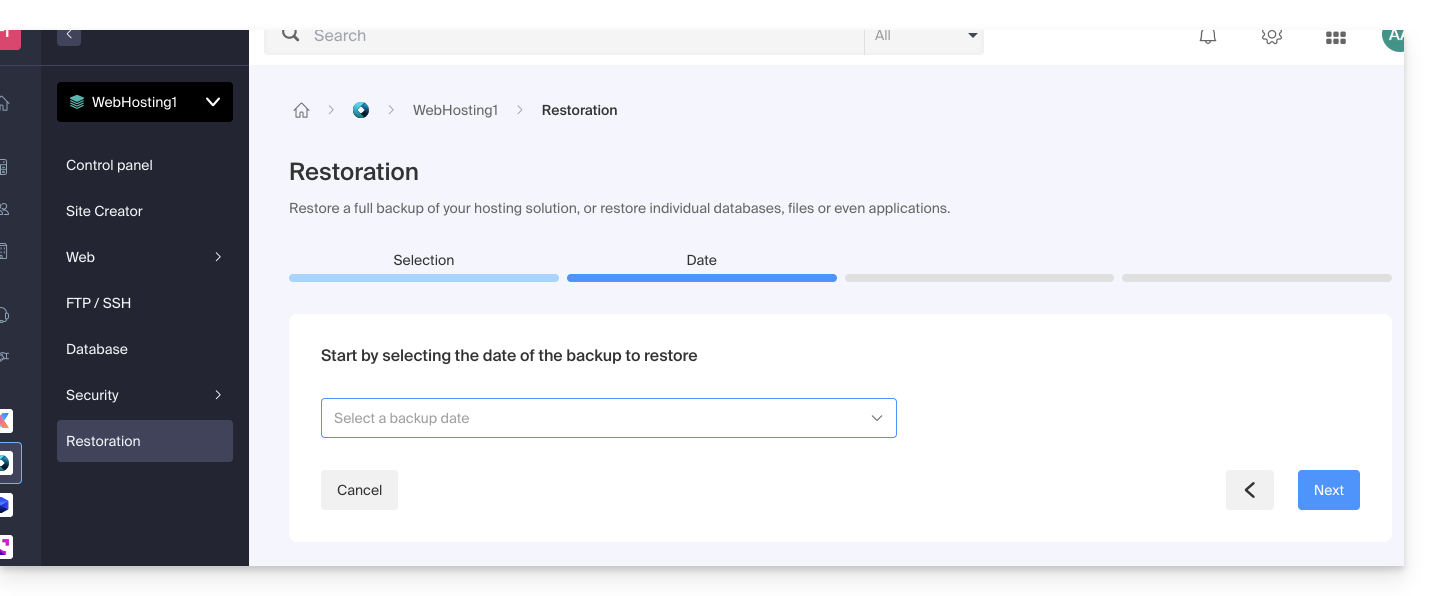
- Choose the desired restore date and click on the Next button:
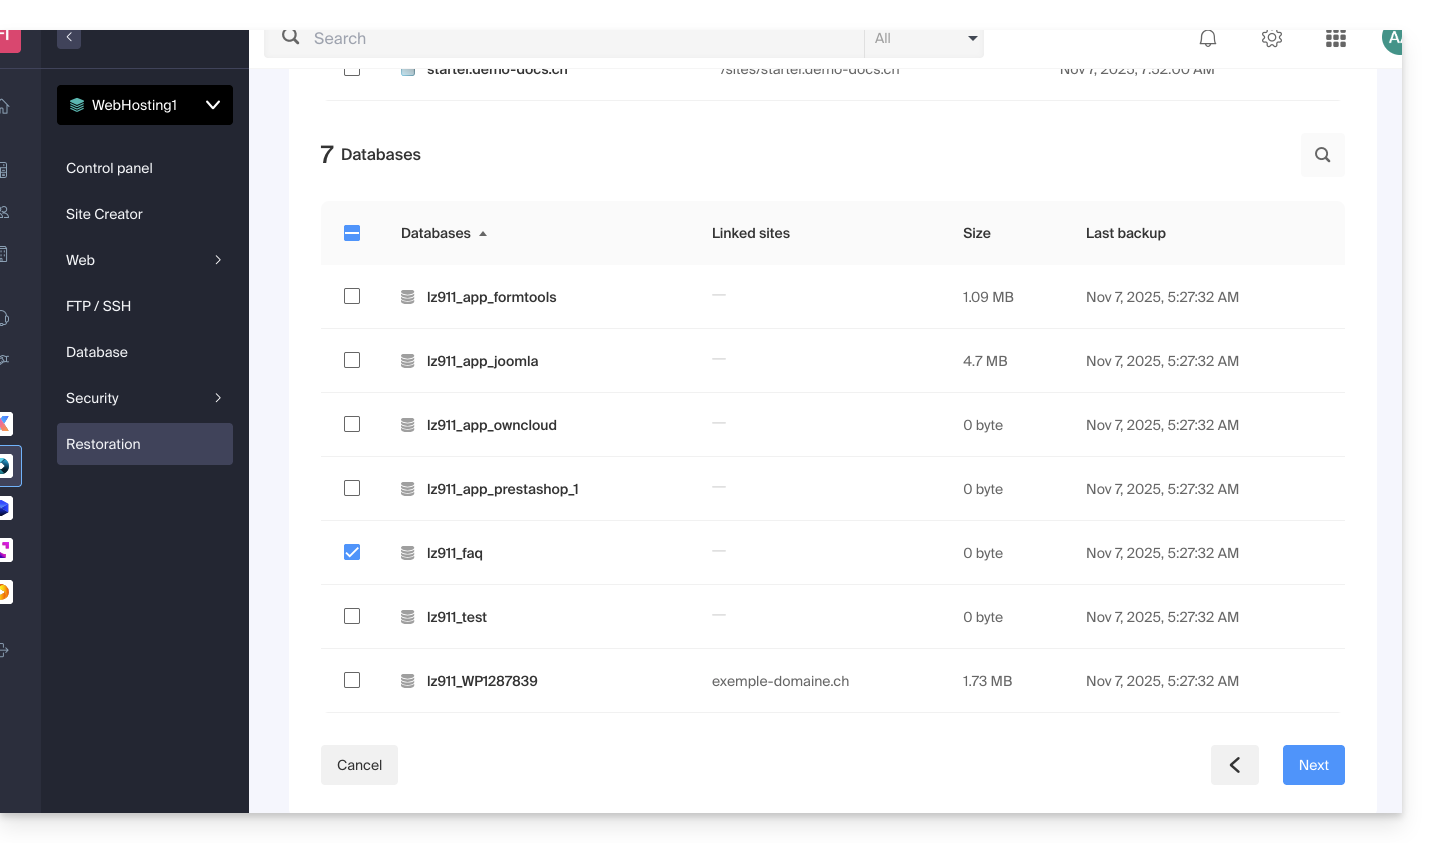
- In the Databases section, choose the database(s) to restore (closest date indicated on the right) and click on the Next button:
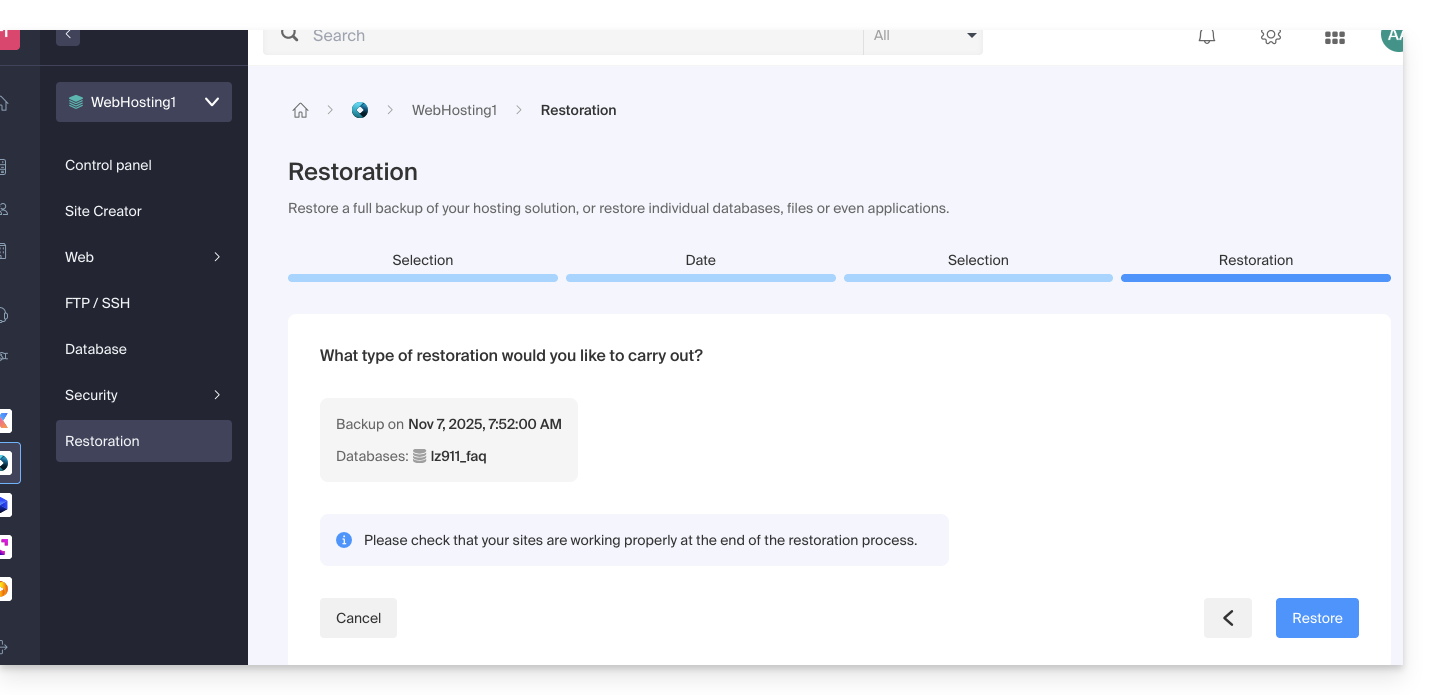
- Choose (if offered) the way to re-import the content and click on the Restore button:
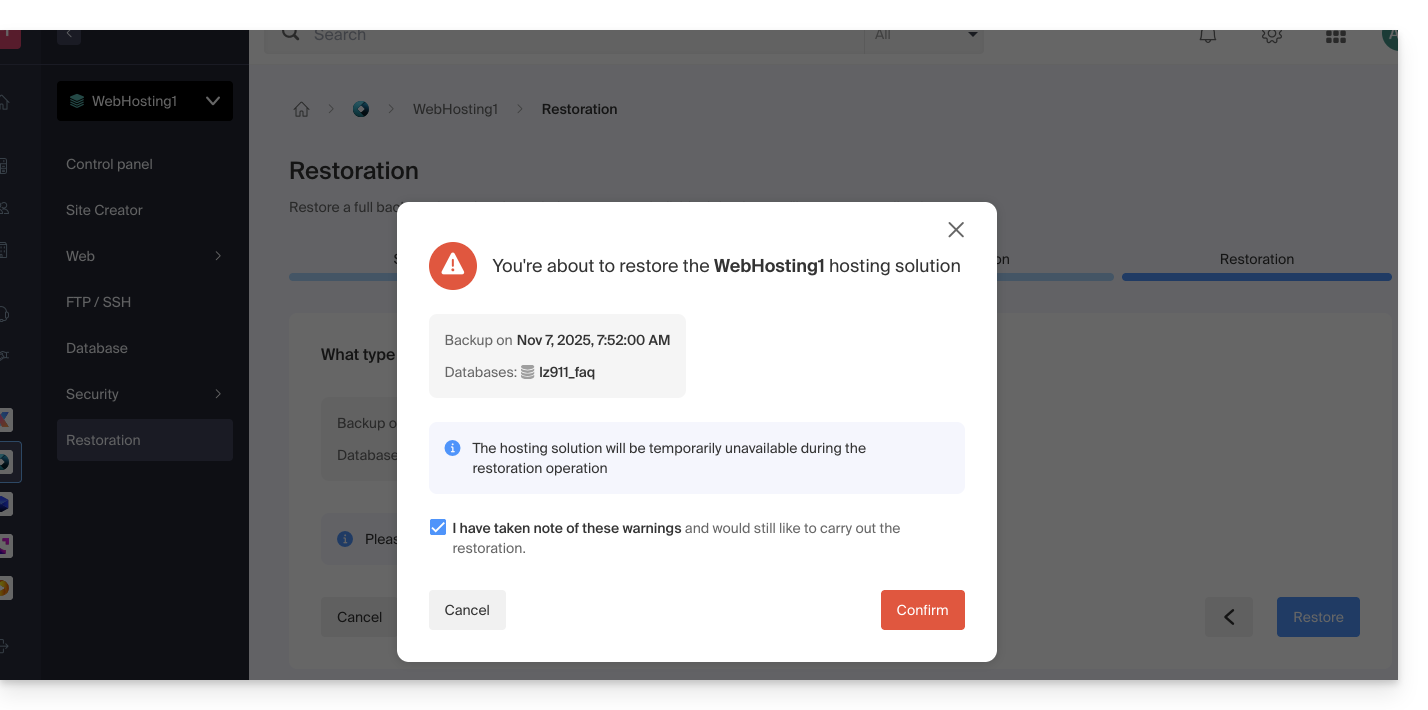
- Confirm the re-import method and its implications:
- You will receive an email when the operation is complete.
Infomaniak's Node.js sites allow you to run Node.js applications in a flexible, ready-to-use environment without having to manage server infrastructure.
Preamble
- Offering the flexibility of a server without the complexity of its administration, this type of hosting is particularly suitable for REST API projects, for deploying the CMS Ghost, n8n, Strapi, or frameworks like Express.js, NestJS, or socket.io, next.js, business tools, or prototypes for:
- developers who want to deploy Node.js applications without managing infrastructure.
- webmasters looking to experiment or learn Node.js.
- agencies and freelancers working on multiple client projects.
- students, teachers, and schools needing a simple environment to test code.
- The NPM and Yarn package managers are supported.
- If you install
Node.json a Web Hosting within a Cloud Server, your site will not work with the guaranteed resources of the managed Cloud Server.- Refer to this other guide to use Fast Installer and deploy NVM.
Node.js= official name of the language/environment;NodeJS= "technical" or simplified name in some contexts (often for practical reasons, no real technical difference).
Create a Node.js site
To access a Web Hosting plan and add a Node.js site:
- Click here to access the management of your products in the Infomaniak Manager (need help?).
- Click directly on the name assigned to the product in question.
- Click the blue Add button:

- Choose a project with advanced technologies.
- Click on Next:

- Choose Node.js.
- Select any other version if necessary.
- Click on Next:

- Choose the type of domain to assign to this new site:
- an already acquired domain name
- a subdomain created from an already acquired domain name
- an available domain name and to be ordered
- Enter the domain name or subdomain.
- Choose any advanced options.
- Click on Next:

- Choose one of the two possible approaches:

- Quick method:
- A preconfigured sample project is automatically installed.
- This approach is ideal for discovering Node.js or quickly starting a functional base.
- Custom method:
- The source code can be imported via Git, ZIP archive, SSH, or SFTP.
- You define the scripts, entry points, listening port, and necessary build commands yourself.
- Quick method:
- Each site has a dedicated dashboard to control the application (start, stop, restart), view the execution console, manage Node.js versions, configure domains, and activate SSL certificates:

To go further in the configuration of your Node.js site, refer to this other guide.
This guide helps you diagnose and resolve the error "Your connection is not private" (or NET::ERR_CERT_AUTHORITY_INVALID). This security alert can affect both visitors to a site and its administrators.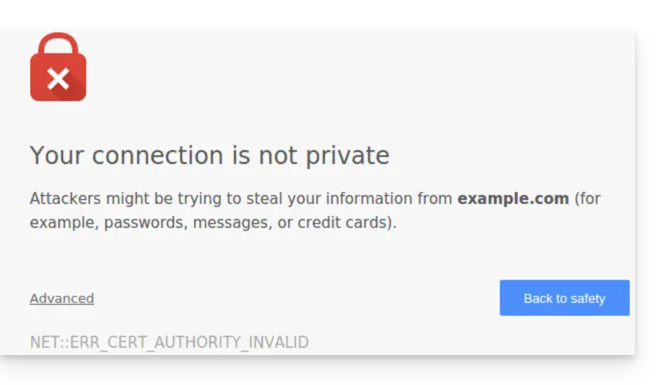
Preamble
- This alert is a protection mechanism of your browser. It indicates that a secure connection could not be established with the server for one of the following reasons:
- The site does not have an SSL/TLS security certificate.
- The installed certificate is expired or misconfigured.
- The connection between your device and the server is intercepted or disrupted.
- Warning: On a site showing this error, the data you enter (passwords, card numbers) are not encrypted and can be intercepted by third parties.
Solutions for visitors
If you encounter this error on a site you do not manage, the problem may sometimes come from your own configuration. Here are the points to check:
- Check the time on your device: If your computer or smartphone is not at the correct date/time, the certificate validation will systematically fail.
- Test in private browsing: If the error disappears, clear the cache and cookies of your browser.
- Check your network: Avoid public Wi-Fi networks that may force their own login portals.
- Antivirus and Firewall: Some security software analyze HTTPS connections and can cause false positives.
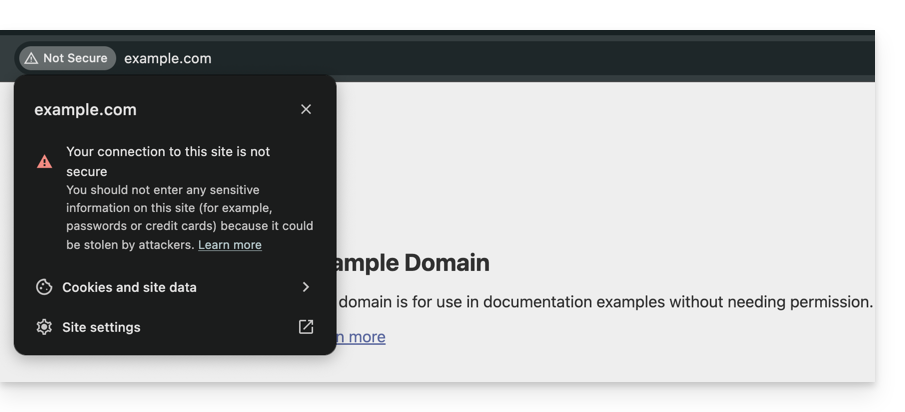
Solutions for Infomaniak site owners
If you are the site administrator, you must ensure that your SSL certificate is active and valid to cover all of your domain names.
1. Is the SSL certificate installed?
If your site is still in HTTP, you need to generate a certificate (free via Let's Encrypt or paid). Learn about the certificates available at Infomaniak.
Important: If you have added aliases (secondary domain names) to your site after installing SSL, you must update the certificate to include them.
2. Check validity and expiration
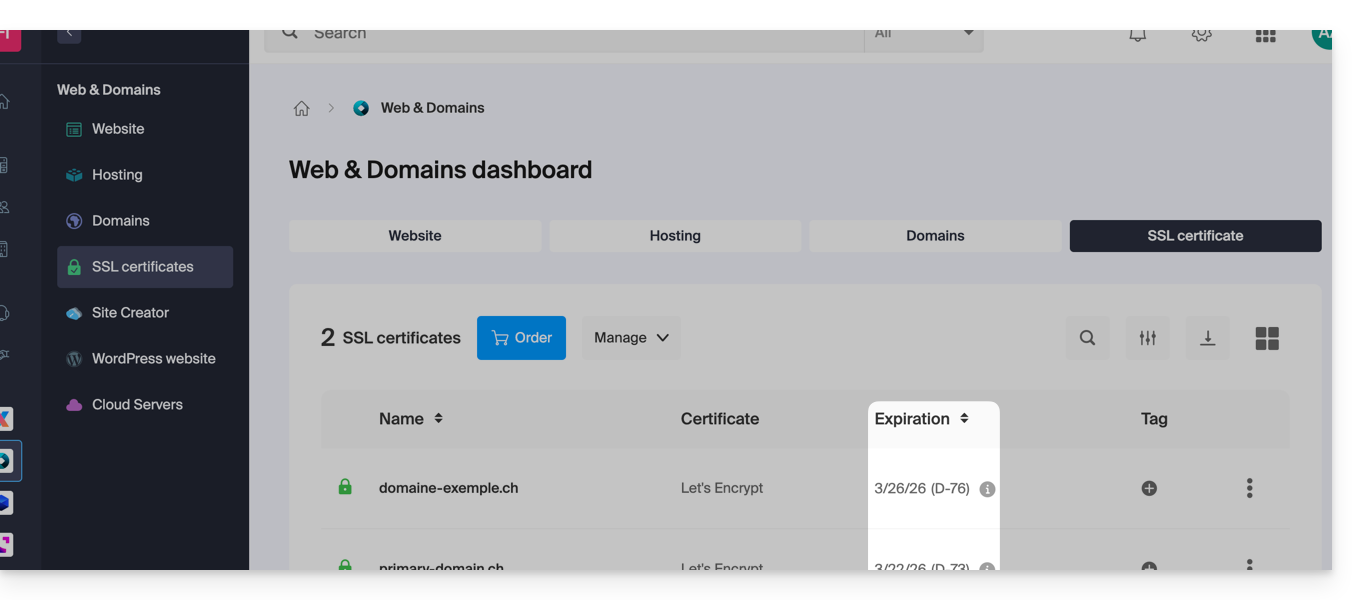
At Infomaniak, certificates are renewed automatically, but a technical issue may sometimes occur. To check the status of your certificate:
- Click here to access the management of your certificates in the Manager (need help?).
- Check the status and expiration date in the dashboard:
3. Force HTTPS and fix the "Mixed Content"
If your certificate is valid but the error persists (or the padlock is not green), it is possible that your site is still loading elements (images, scripts) in HTTP. To fix this, refer to this other guide.
This guide provides important details regarding the launch and execution of command-line scripts (SSH) on various types of Infomaniak hosting.
Executing scripts via SSH and managing resources
Unlike scripts executed via a web browser, there is generally no strict time limit (timeout) for commands launched via SSH. Your script can therefore theoretically run as long as necessary.
Execution time and persistence
If your SSH session closes (loss of internet connection or terminal closure), the running script will be immediately interrupted.
To avoid this during long tasks, it is recommended to run your scripts in the background or, in the case of a VPS, use terminal multiplexing tools (such as screen, tmux, or the nohup utility). This allows the process to continue its work even after you disconnect.
Resource limits (RAM and CPU)
If time is not limited, hardware resources are.
The execution of your scripts remains subject to the machine's capabilities and its configuration:
- Memory (RAM): if a process consumes more memory than the allowed limit (for example, the
memory_limitof PHP or the available physical RAM), it will be killed by the system to preserve the server's stability. - Processor (CPU): prolonged abusive use of the processor can result in throttling or interruption of the process.
It is possible to adjust these resource limits on dedicated environments (such as Cloud Server). However, on shared hosting, these limits are fixed and non-modifiable to ensure performance for all users hosted on the same server.
This guide compares the different Infomaniak Cloud solutions to help you choose the infrastructure best suited to your needs. In all cases, you benefit from dedicated and scalable resources.
Jelastic Cloud (PaaS)
Jelastic Cloud is a platform that allows you to create development environments on the fly without managing system administration:
- Maximum flexibility: the platform automatically adjusts your resources according to real-time load.
- Advantage: ideal if your consumption (CPU, RAM) varies greatly depending on the time of year.
- Billing: you only pay for the resources actually consumed.
Managed Cloud Server
A Cloud Server allows you to manage websites and web applications via a simplified interface, while allowing the installation of specific software:
- Simplicity: as easy to use as shared hosting, but with the power of dedicated resources.
- Advantage: ideal if your resource consumption is stable and predictable.
- Management: Infomaniak handles the technical maintenance and security updates of the server.
Cloud VPS and VPS Lite
The Cloud VPS or VPS Lite offer complete root access to a Linux distribution:
- Total control: you manage your entire server and software configurations.
- Required skills: solid technical expertise in system administration is essential.
- Usage: recommended for specific needs with stable resource consumption.
For large-scale infrastructure needs, learn about the Public Cloud offer.
This guide explains why it is dangerous to use a PHP version that is no longer officially maintained and how to use a more recent PHP version with a website hosted by Infomaniak.
Is an outdated PHP version dangerous?
When you use a (soon-to-be) vulnerable PHP version on one or more of your websites, a warning message appears in the dashboard of the affected hosting.
The PHP language evolves regularly and when you use a PHP version that is no longer maintained, you expose your website to security risks. Malicious individuals could, for example, exploit known security vulnerabilities to gain access to your site and modify its content. It is therefore strongly recommended to always use a recent PHP version.
3 situations are possible:
- The PHP version is fully supported: no action is required
- The PHP version only receives security updates: it is recommended to use a more recent PHP version
- The PHP version is no longer maintained: it is strongly recommended to use a more recent PHP version
Learn more: http://php.net/supported-versions.php
Using a more recent version
The latest PHP versions are more performant and speed up the loading of websites.
Before using a more recent PHP version, it is important to follow the following precautions:
- If your site uses a CMS or a web application (WordPress, Joomla, Drupal, etc.), make sure the current version of the CMS is supported by the PHP version you wish to use.
- If your site was developed manually, consult the official PHP documentation to learn about modified functions and any potential changes that may affect the operation of your code.
In case of malfunction after migrating to a more recent PHP version, it is sometimes possible to revert to a previous version, provided that it is still supported!

