Knowledge base
1000 FAQs, 500 tutorials and instructional videos. Here, there are only solutions!
This guide explains how to protect videos imported to an Infomaniak VOD service with a unique key.
Preamble
- Note that token protection is only effective in the case of standard integration via iframe and therefore through the use of the Infomaniak Player.
- Other access restrictions can be activated: password | geoip
Protect a video with a unique key
You have the option to protect all media in a folder by creating a token. The latter will be unique for each of your visitors and must be passed as a parameter to your media to limit access to it. Only you will be able to generate the unique key, necessary for each user to view the videos. This key therefore allows you to authorize only those previously verified by you.
This allows you to control access to videos and authorize only certain people, while denying access to others; useful in cases such as pay-per-view or limited broadcasts. However, please note that you are responsible for developing the integration with your existing system.
If the hash is not valid, access to the video will return an error page "403 forbidden".
Activate the restriction on the import folder
When the password is set once and for all at the destination folder level, all new media imports will automatically include this mode when played. To configure this folder:
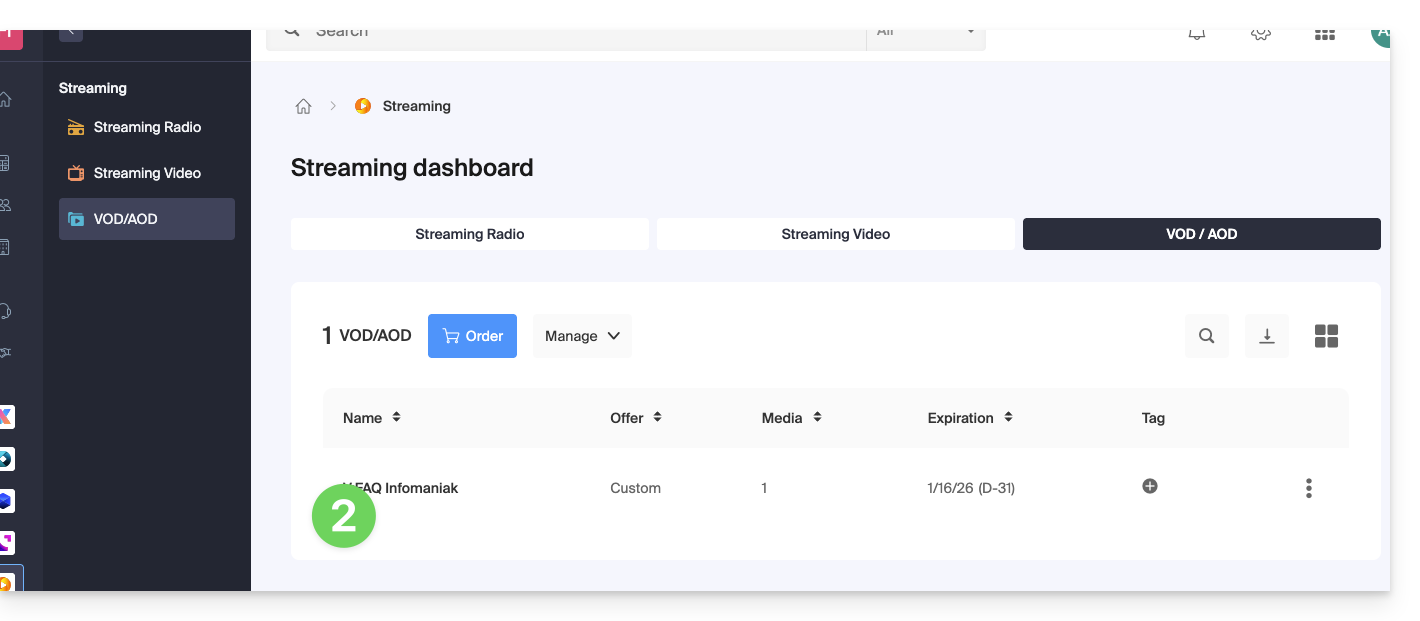
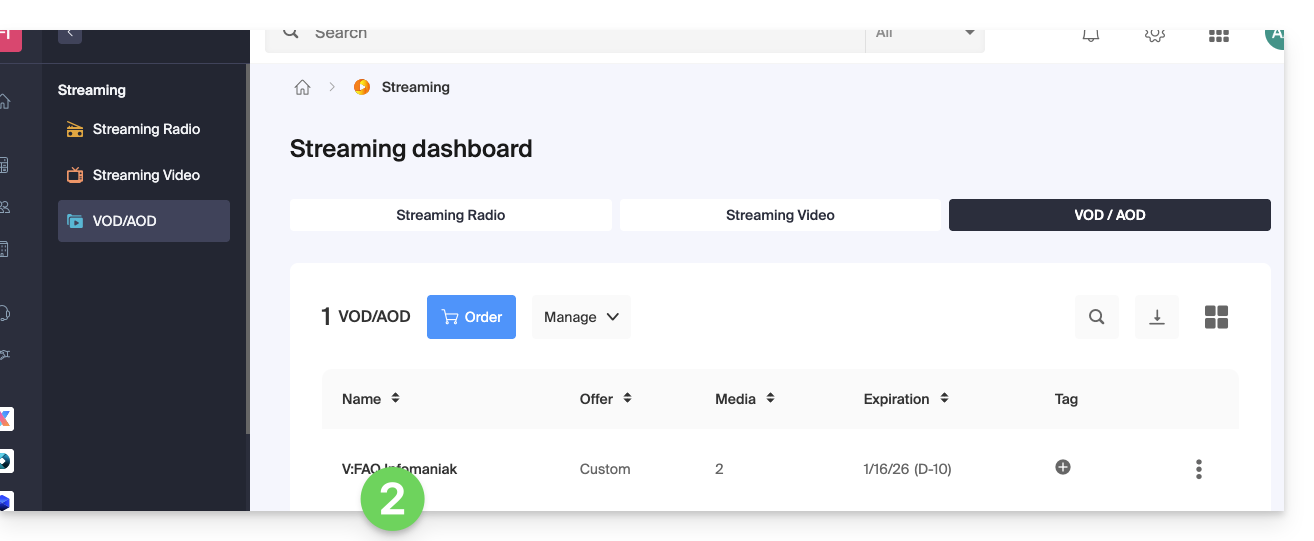
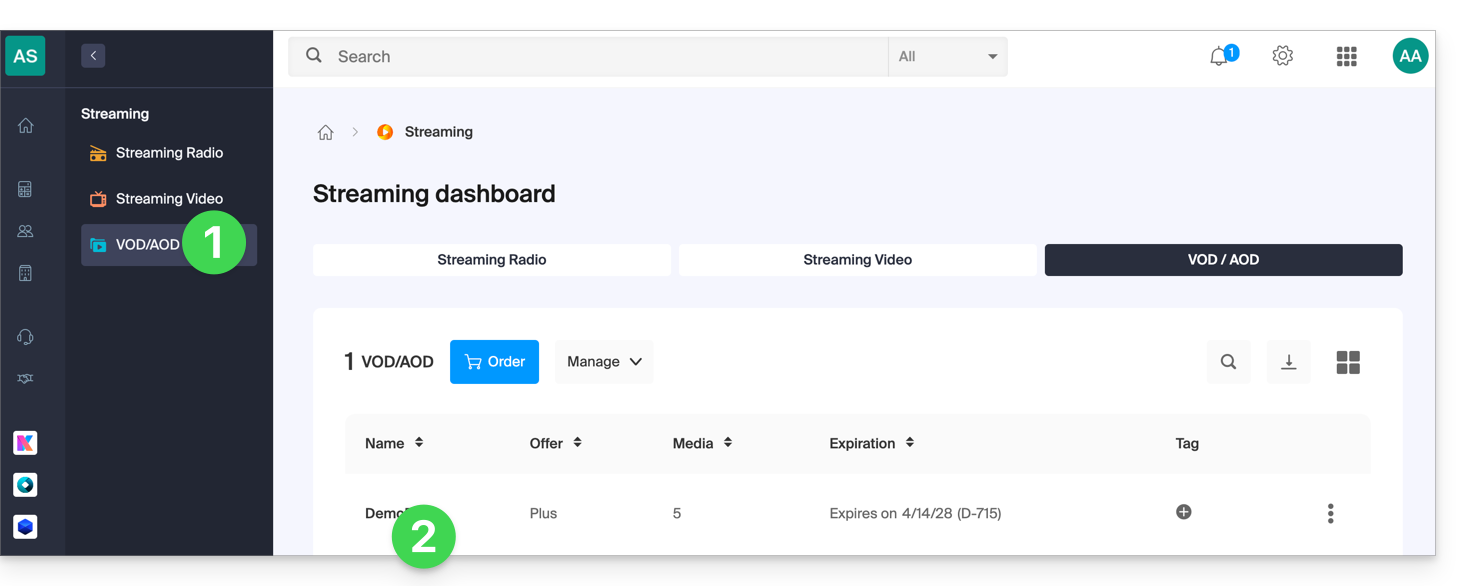
- Click here to access the management of your VOD/AOD on the Infomaniak Manager (need help?).
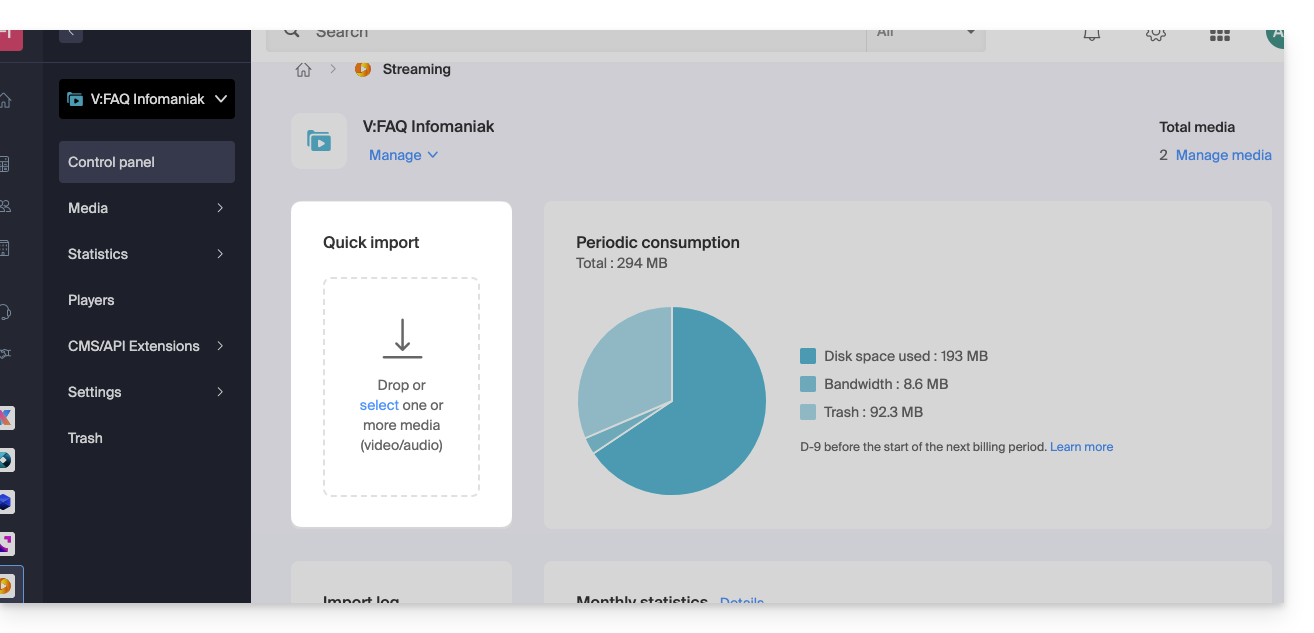
- Click directly on the name assigned to the product concerned:
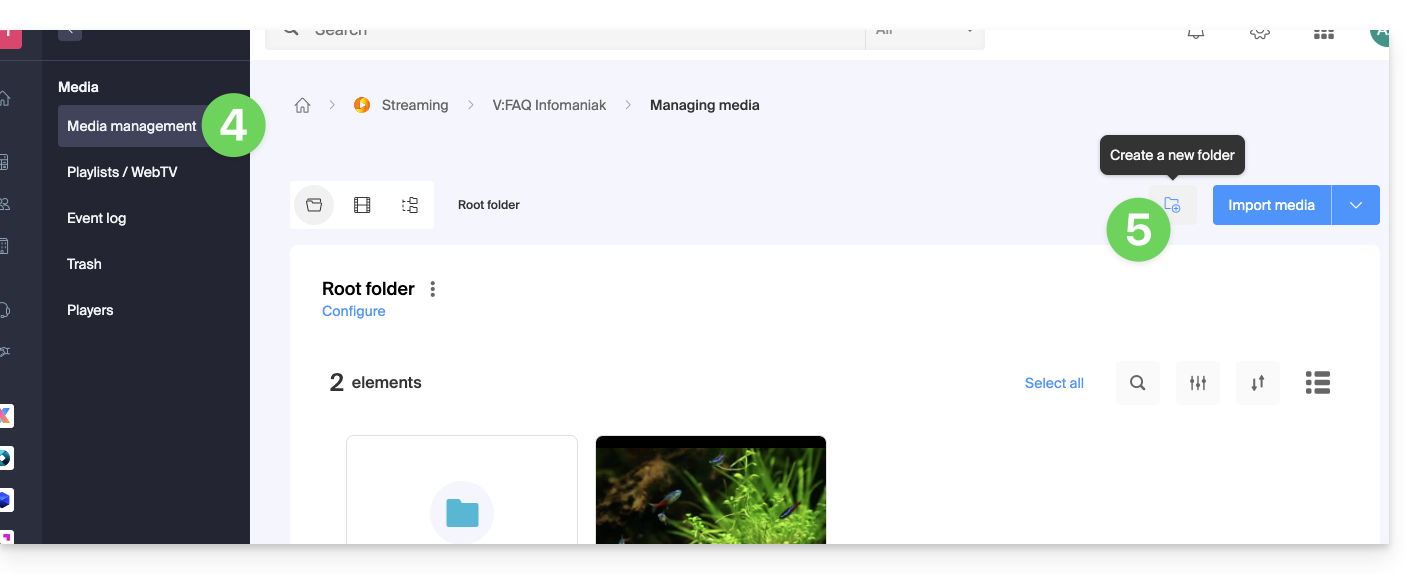
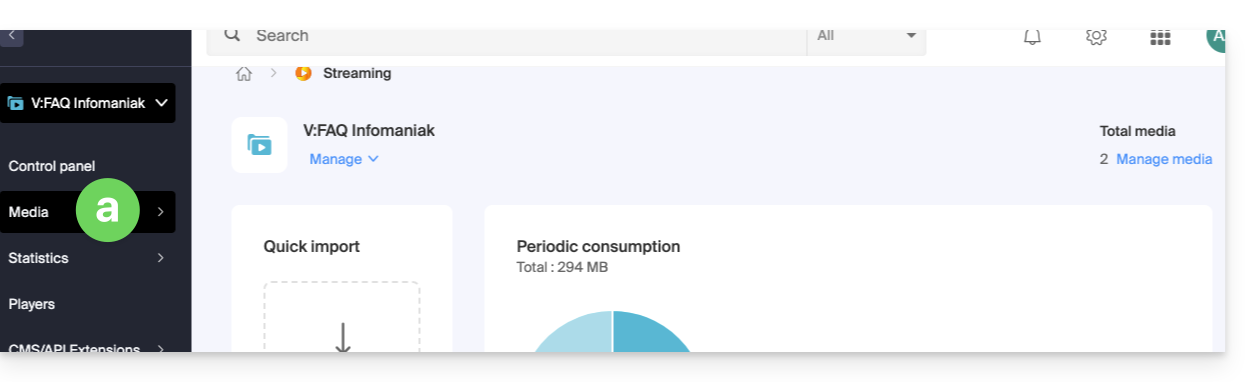
- Click on Media in the left sidebar menu.
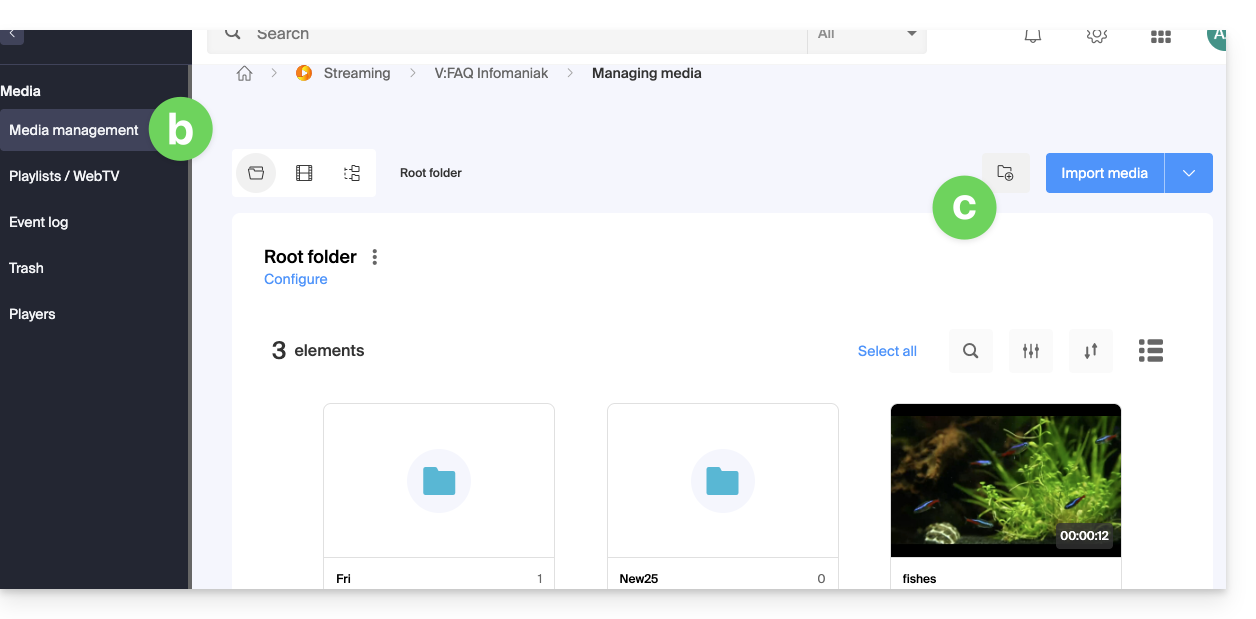
- Click on Media Management in the left sidebar menu.
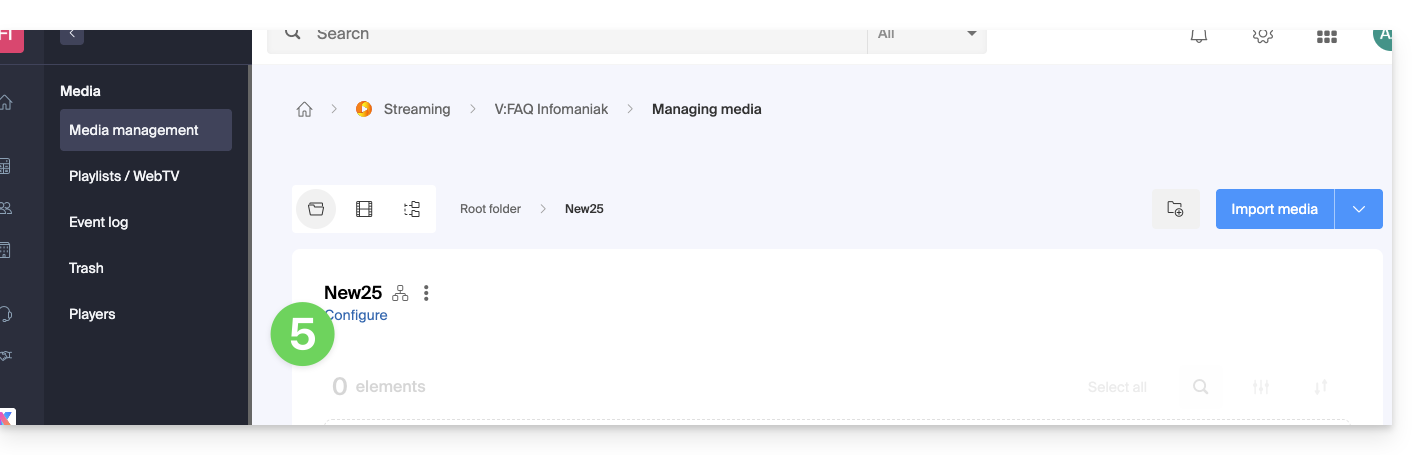
- Click on the icon to create a New Folder:
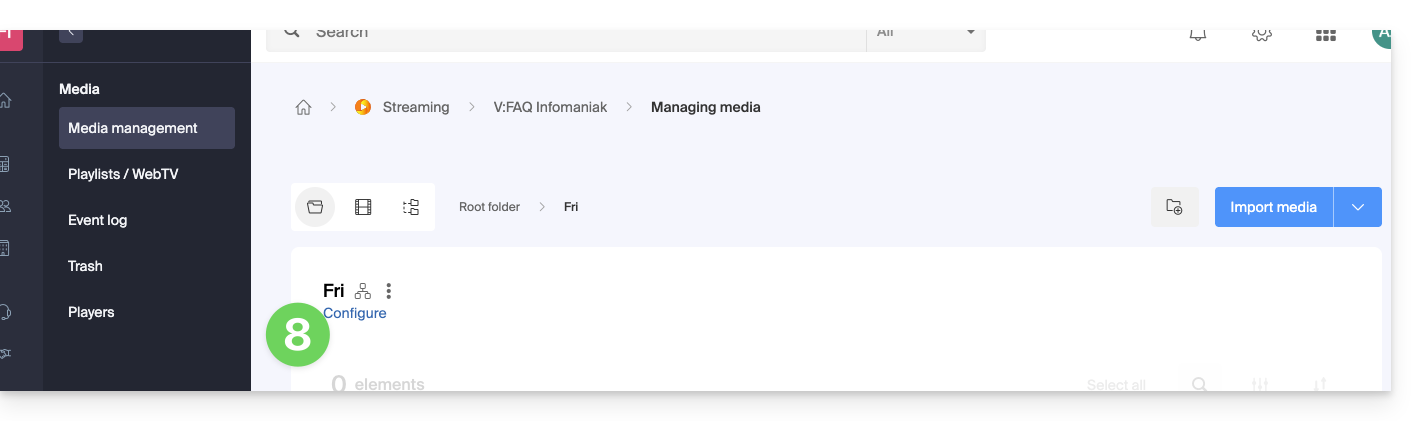
- Name the folder.
- Click the blue button to Create the folder.
- Click on Configuration:
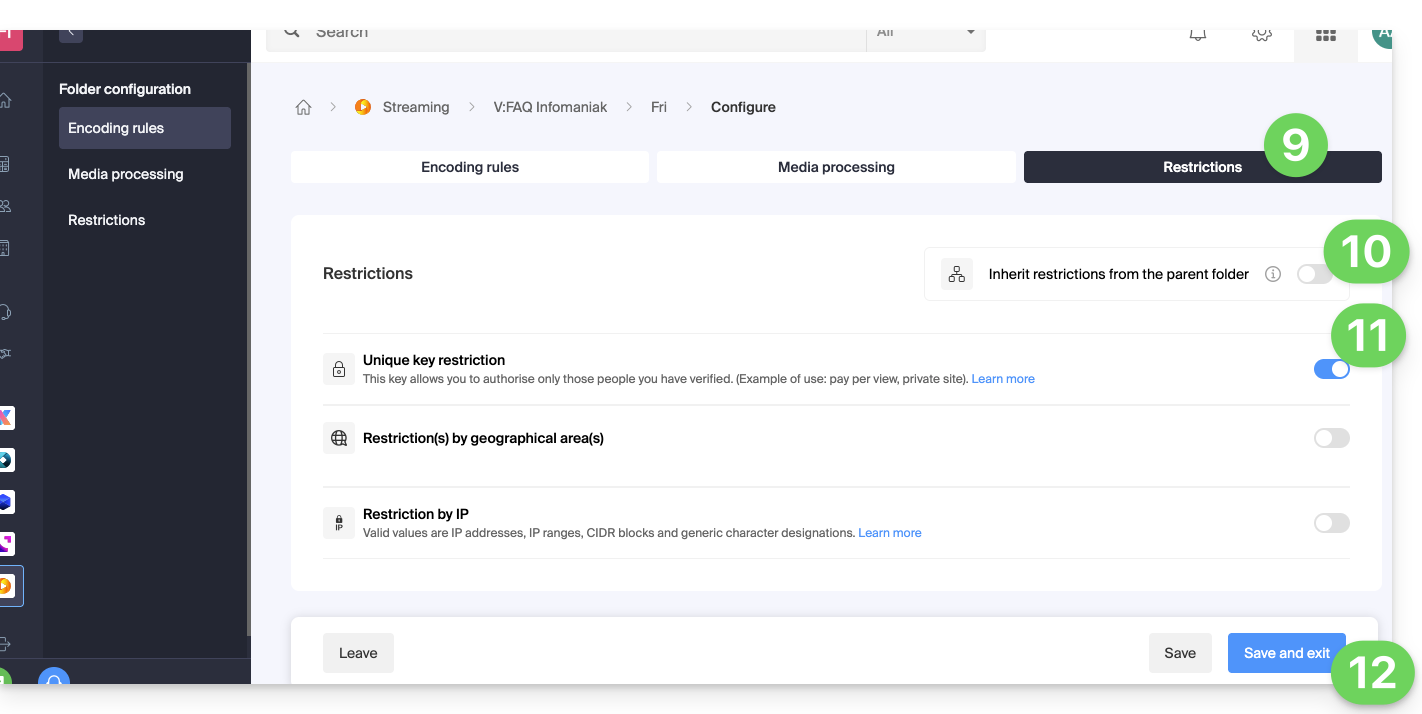
- Click on the Restrictions tab.
- If necessary, deactivate the toggle switch to remove the inheritance from the parent folder, so that you can configure your own rules for this specific folder.
- Enable the toggle switch to configure the unique key restriction.
- Click on Save once the desired options have been configured:
1. Create a VOD API token
To access the VOD API, you must first authenticate using a token (to be done only once - it will be common for all folders you wish to protect); refer to this other guide and then the documentation https://developer.infomaniak.com/getting-started#authentication.
2. Create the playback token
This step will need to be done on your website/application, and this token must be unique, so generated for each visitor.
It is therefore important that the page responsible for token generation does not have a cache, to guarantee the uniqueness of the token.
POST https://api.vod2.infomaniak.com/api/pub/v1/channel/channel_id/share/share_id/tokenchannel_id = 1227share_id = corresponds to the identifier of your video
Example: https://api.vod2.infomaniak.com/res/embed/1jhvl2uqa5rdf.html
The list of parameters is available in the documentation https://developer.infomaniak.com/docs/api/post/channel/share/token
3. Use the unique token on a media
The token retrieved in point 2 above will thus be passed as a parameter to the media, it will be unique and therefore different for each visitor:
<iframe frameborder="0" width="720" height="360" src="https://api.vod2.infomaniak.com/res/embed/1jhvl2uqa5rdf.html?token=st=1637143497~exp=1637143797~acl=/hls/1jhvl2uq4dnra/1jhvl2uq4dnmd/*~hmac=914aa838bdba141ec85db74266b54278572a1353a49e8851e4fd096dc6372127" allowfullscreen></iframe>Link to this FAQ:
Has this FAQ been helpful?
This guide explains how to insert a logo or watermark on your videos from the Infomaniak VOD space to strengthen your brand image and protect your content against unauthorized use.
Preamble
- There are two distinct methods to display an image on your media:
- via the configuration of a Player
- or via the rules of an Import Folder.
- These two technologies are independent: if you activate them simultaneously, the Player logo will overlay the logo already embedded in the video.
1. Overlay via the video Player
In the management of a Player, the selected logo is added as an overlay at the time of playback: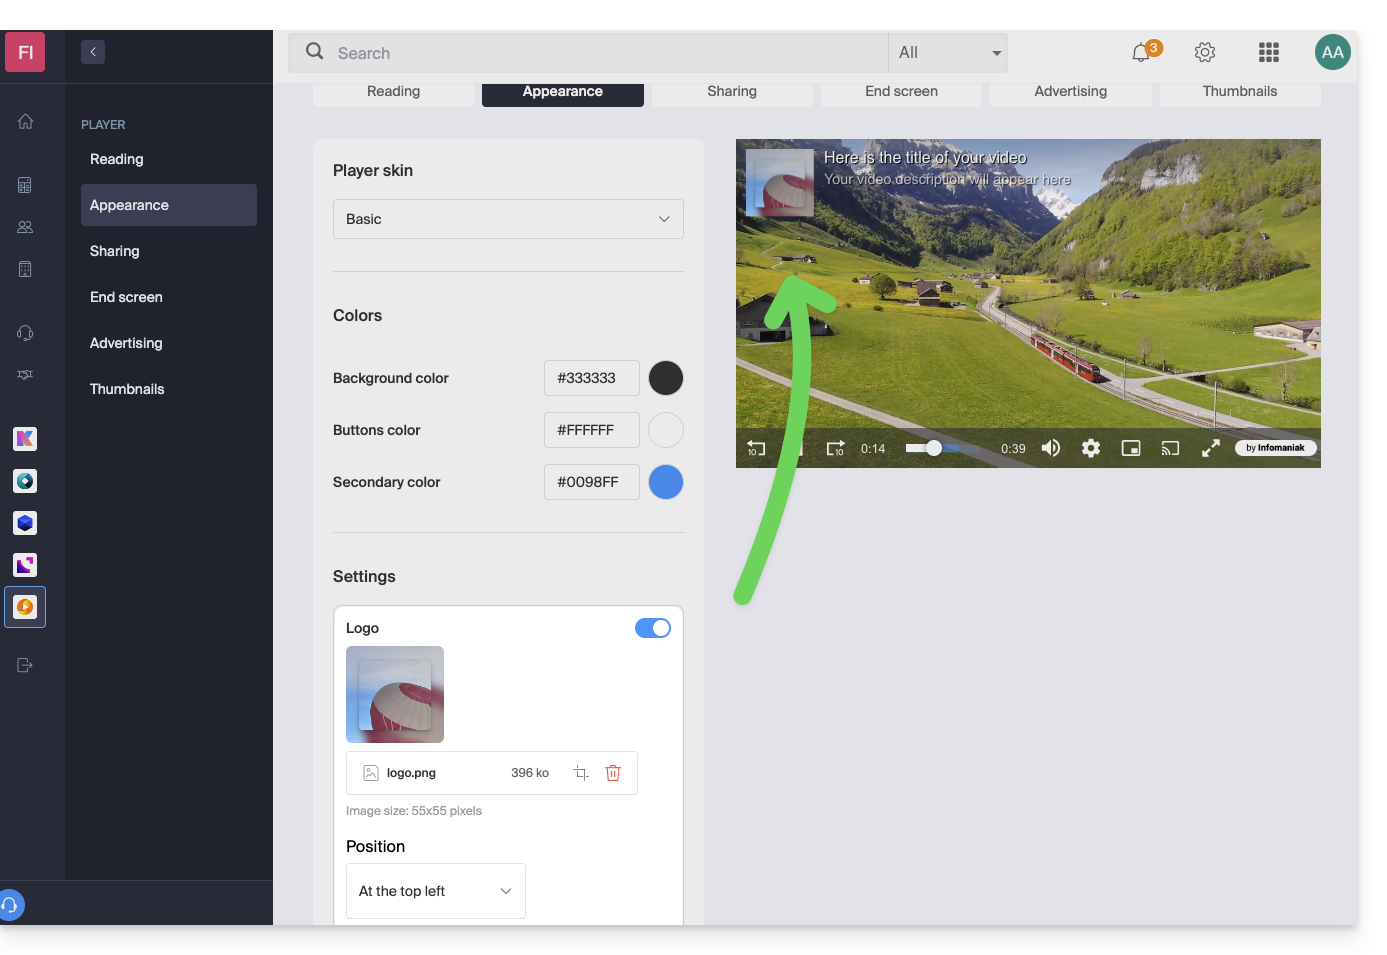
- Advantages: great flexibility.
- You can modify or remove the logo at any time without altering the source file.
- A single media can be broadcast via different Players with distinct logos.
- Limit: if a user accesses the source stream of the video directly (direct URL), the logo will not be visible.
2. Embedding via an Import Folder
In the configuration of a folder (root or subfolder), the image is directly embedded in the video stream during the encoding process: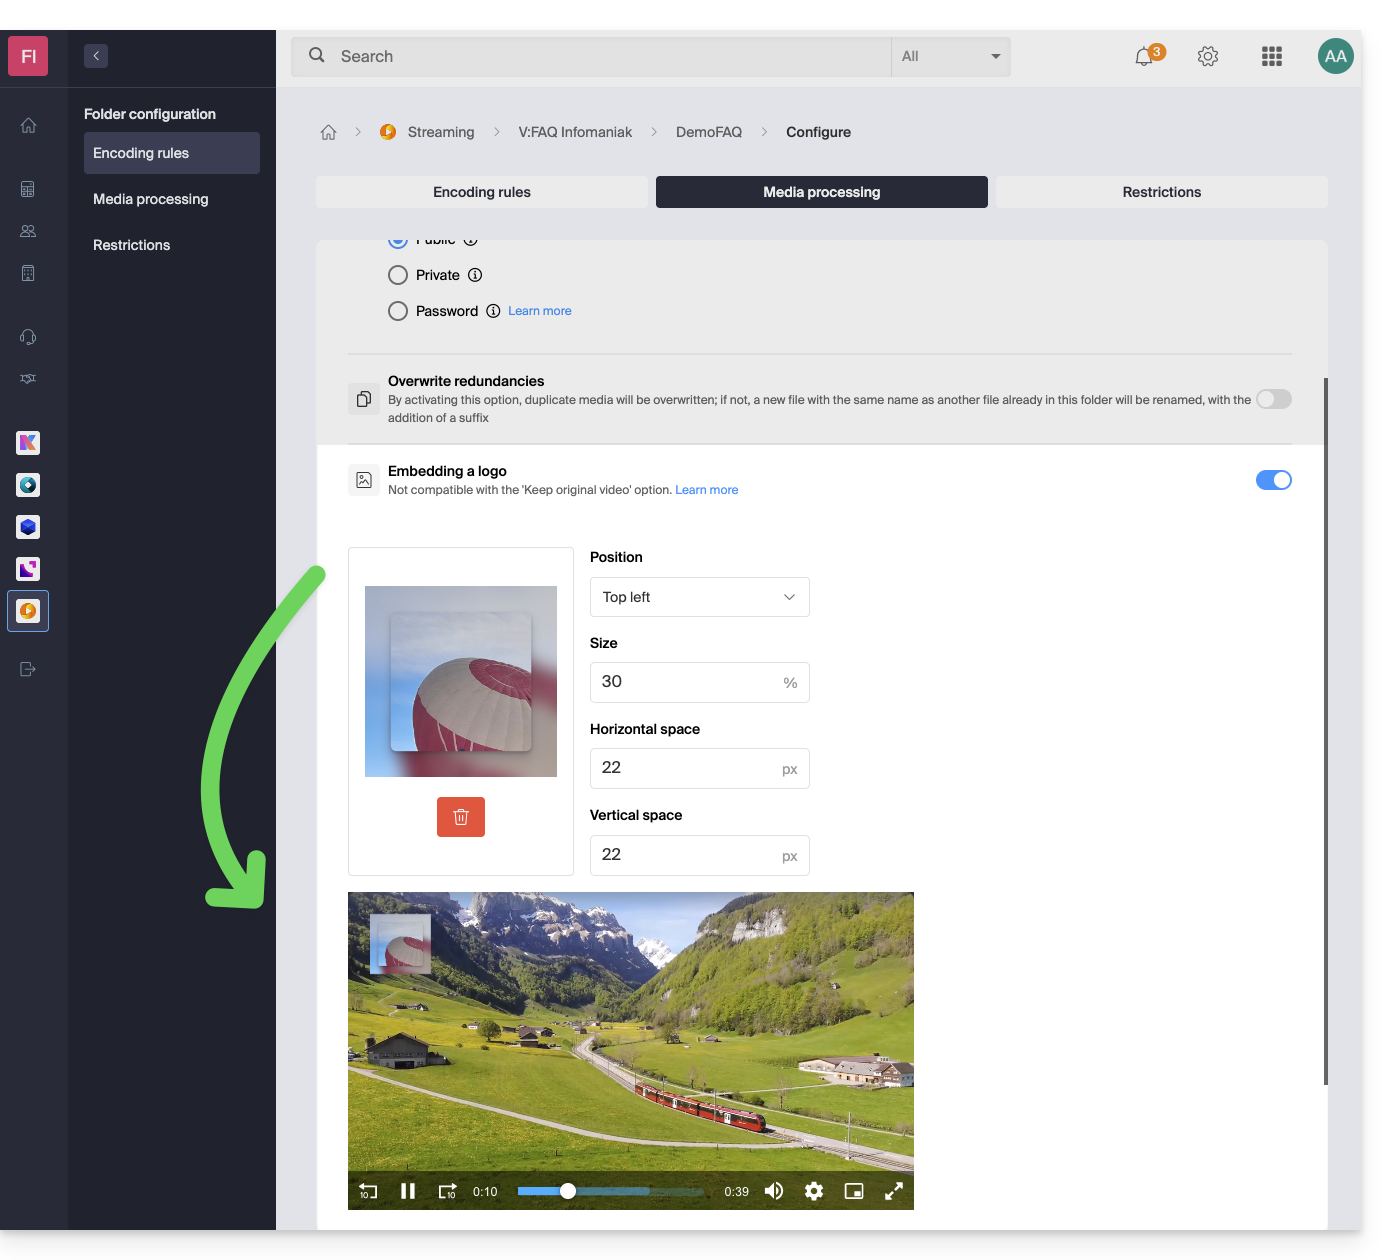
- Advantage: maximum security.
- The logo is an integral part of the video file (burn-in).
- It remains present regardless of the playback or download mode.
- Disadvantage: lack of flexibility.
- Once the video is processed, the logo can no longer be modified or removed.
- Any subsequent change requires a new import of the media.
Link to this FAQ:
Has this FAQ been helpful?
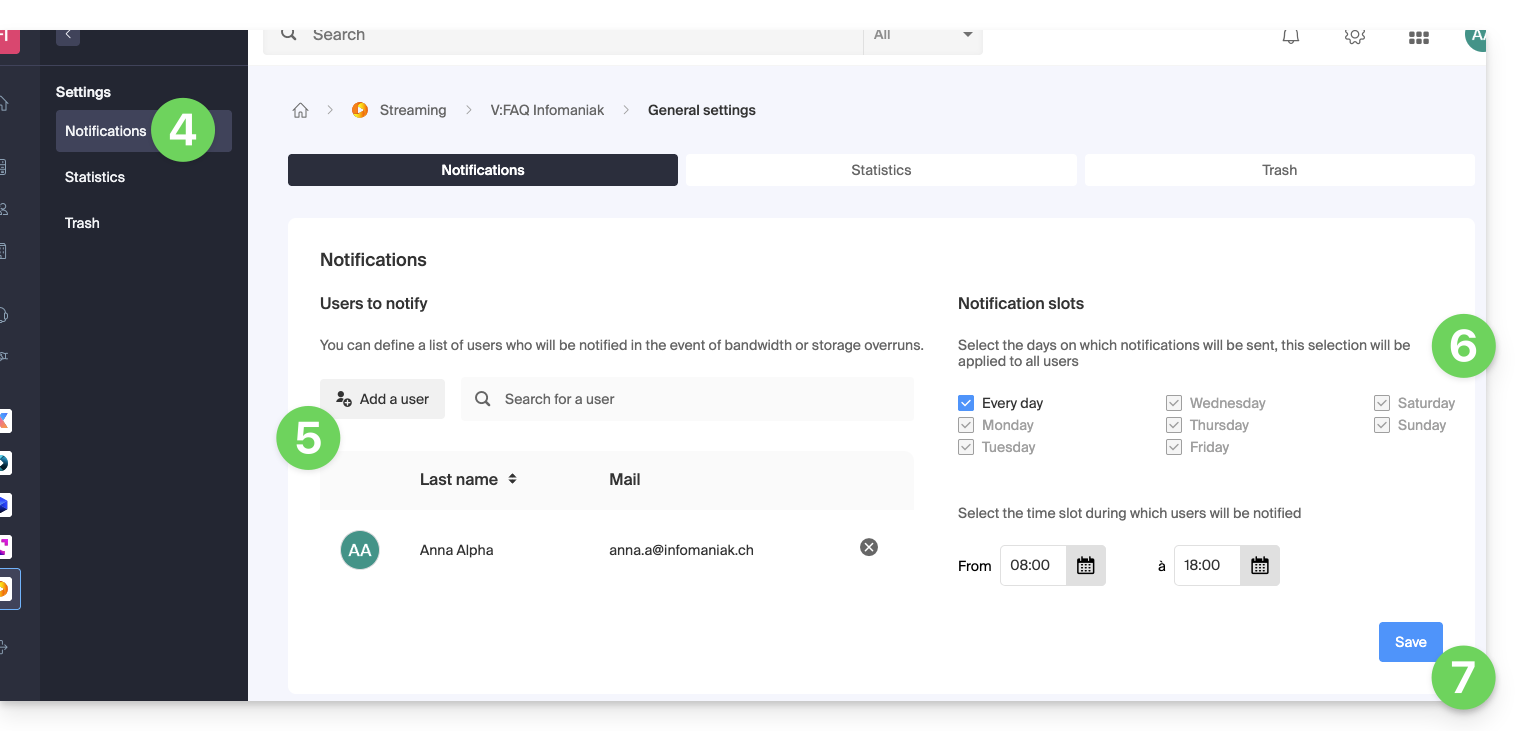
This guide explains how to obtain and configure notifications in case of an incident or exceeding the consumption of VOD/AOD.
Email warnings
To configure notifications:
- Click here to access the management of your product on the Infomaniak Manager (need help?).
- Click directly on the name assigned to the product concerned.
- Click on Settings in the left sidebar.
- Click on Notifications in the left sidebar.
- Add the Organization users who should be notified by email.
- Configure monitoring schedules (days of the week / hours).
- Save the changes:
Link to this FAQ:
Has this FAQ been helpful?
This guide explains how to live stream a list of videos from the VOD service using the Video Streaming product.
Preamble
- This feature allows you to use the VOD service to create a video playlist and then use the Video Streaming service to broadcast it live, for example as part of a music video channel, teleshopping, documentaries, etc.
- It is possible to insert advertisements between each video, manually or using VAST tags.
- The playlist will loop indefinitely until the user stops it.
Broadcast a VOD playlist in live streaming
Prerequisites
- Have a VOD service (at least the free VOD space with the Video Streaming service).
- Have a Video Streaming service in the same Organization and managed by the same account.
To create the playlist, import some videos:
- Click here to access the management of your product on the Infomaniak Manager (need help?).
- Click directly on the name assigned to the product concerned:
- Select the media to import in the Quick Import section or from the Media Management:
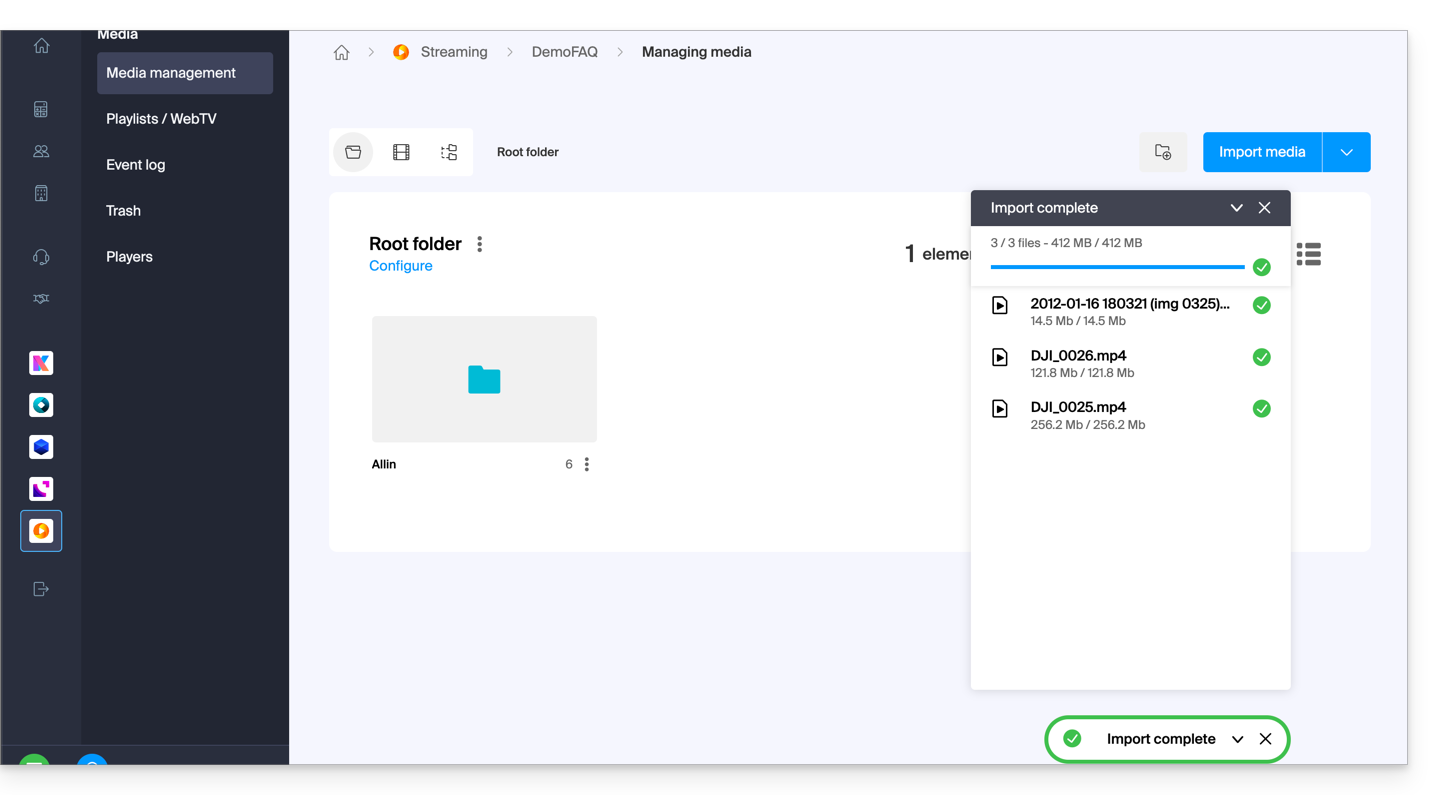
Once the videos are imported:
- Click on Media in the left sidebar menu.
- Click on Playlists / WebTV in the left sidebar menu.
- Click the button to add a new playlist:
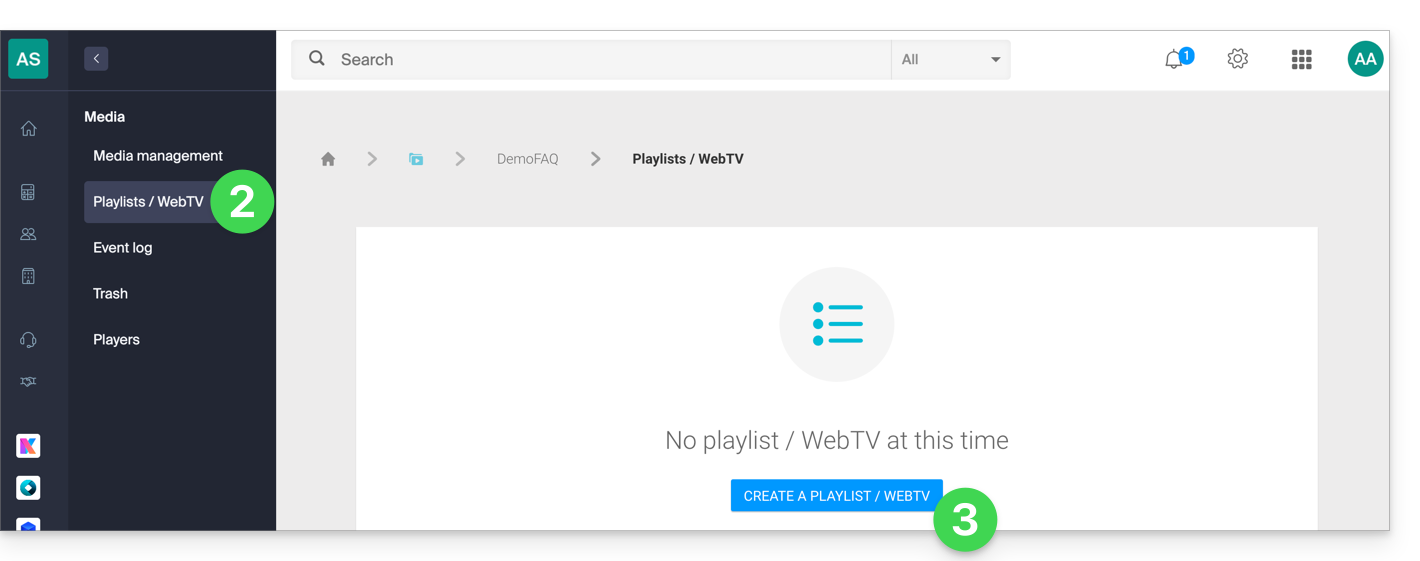
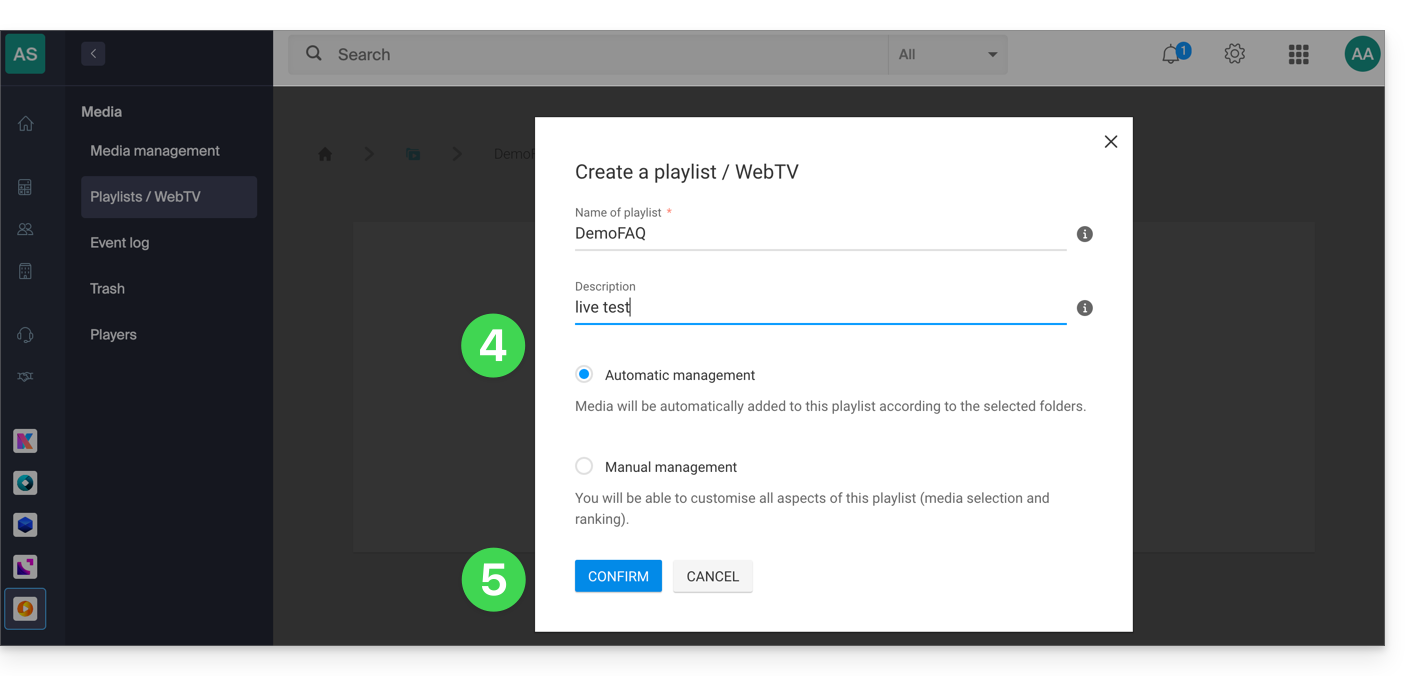
- Name the playlist and determine if it should be automatic (linked to a folder) or manual.
- Confirm:
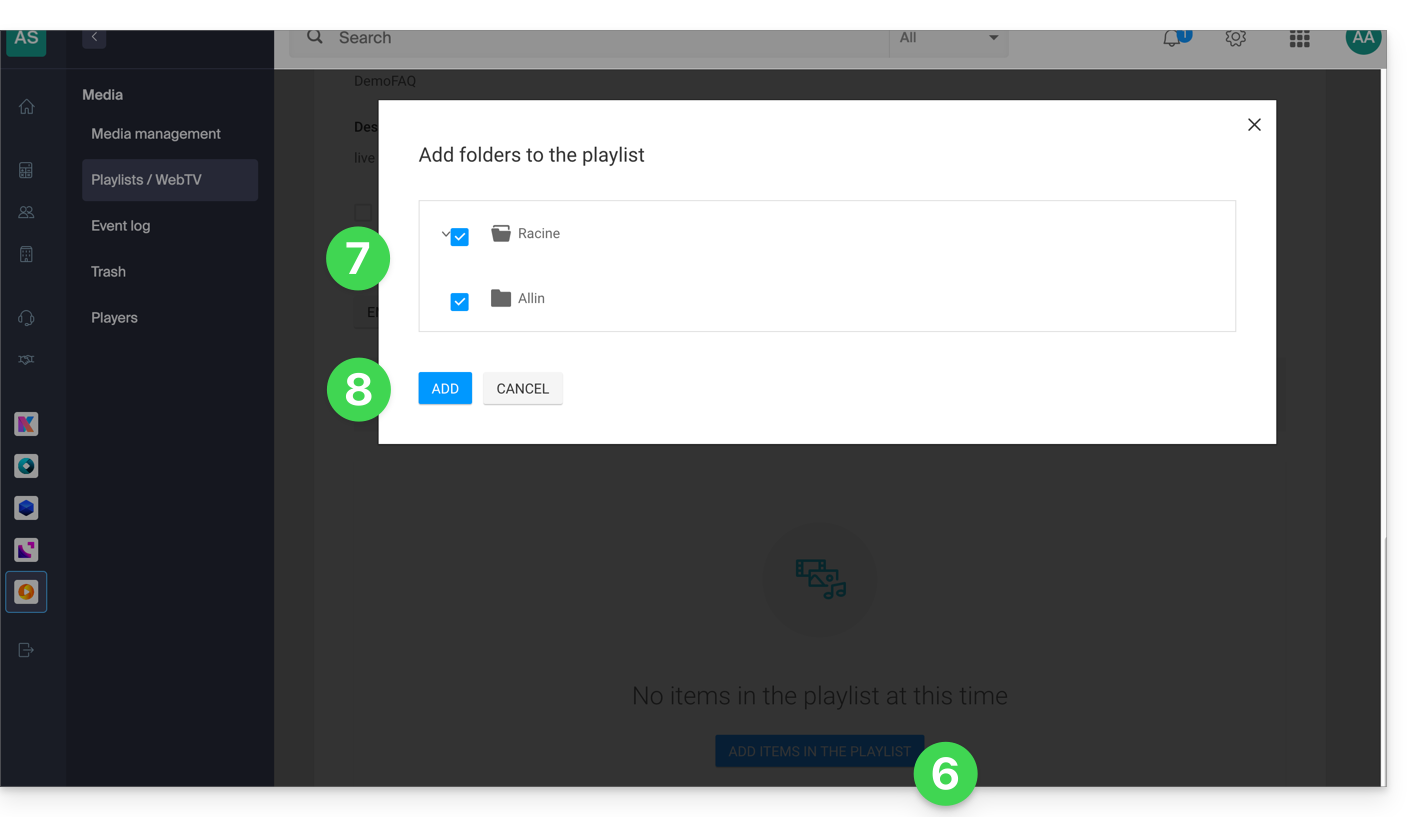
- Click to add media.
- Choose the folder or specific videos to use to create the playlist.
- Add media:
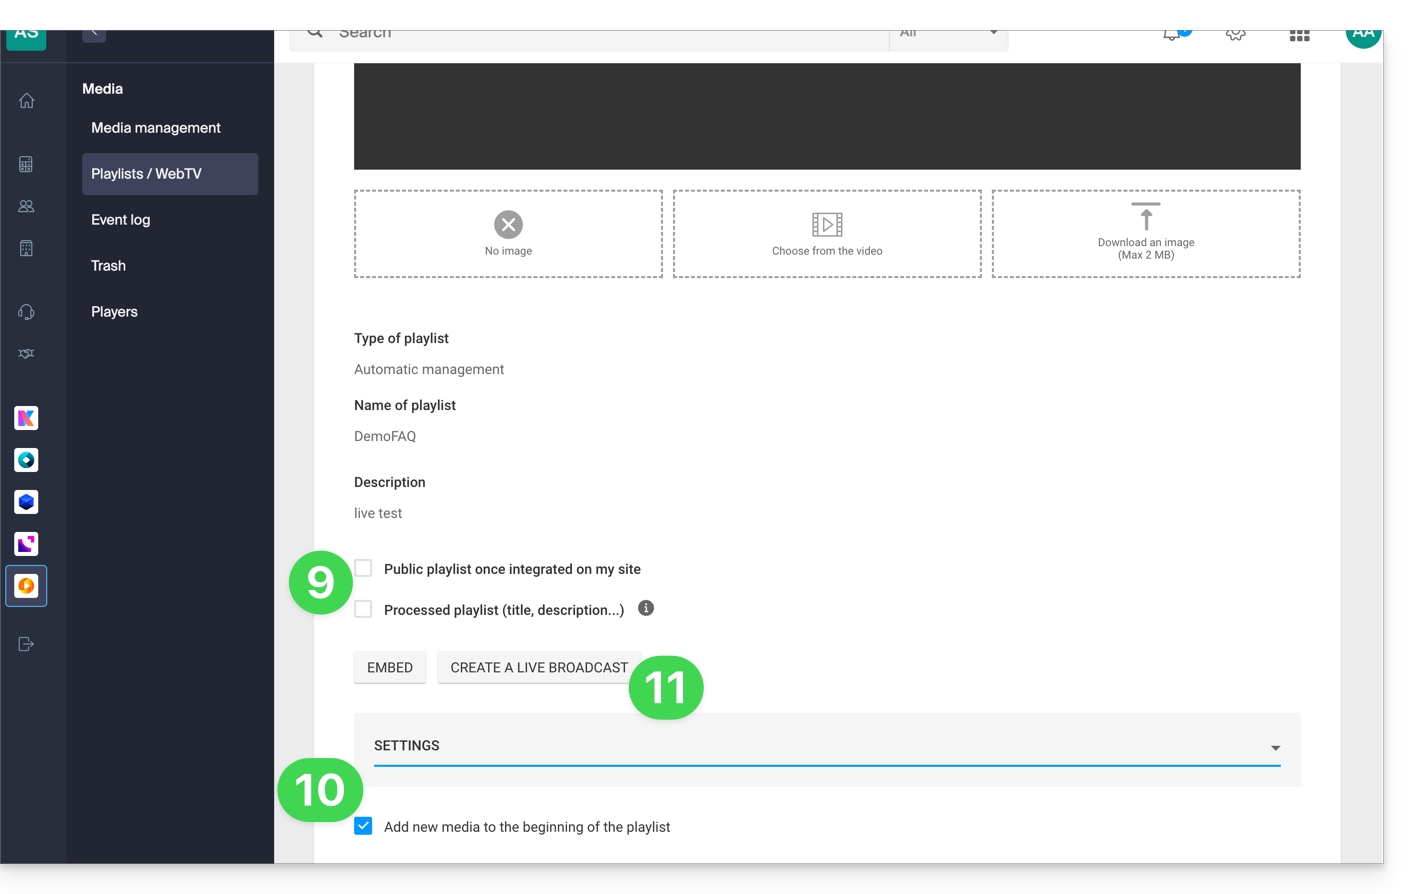
- Choose whether the playlist should be public and whether, like your media, it needs to be “marked” as “processed” (status visible only to you).
- In the additional settings, you can choose to add media to the beginning of the playlist instead of the end.
- Click the Create Live button:
- Choose the stream from the Video Streaming service that will broadcast the playlist and set your preferences:
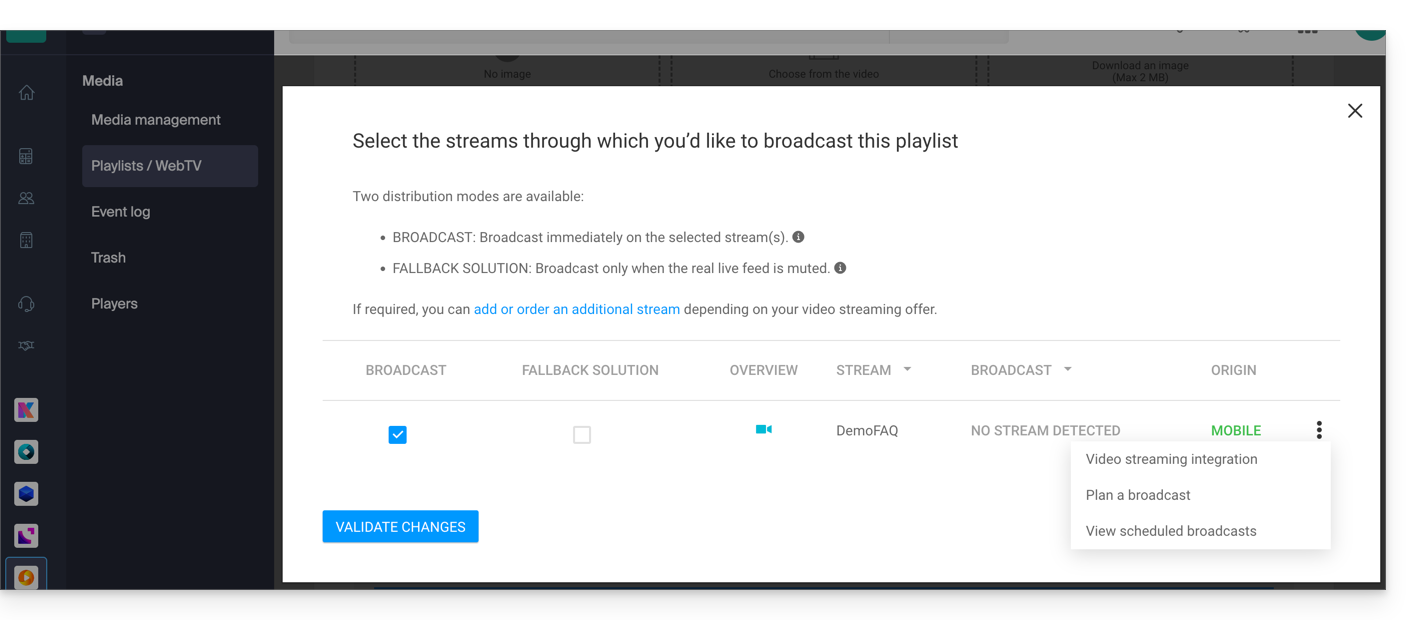
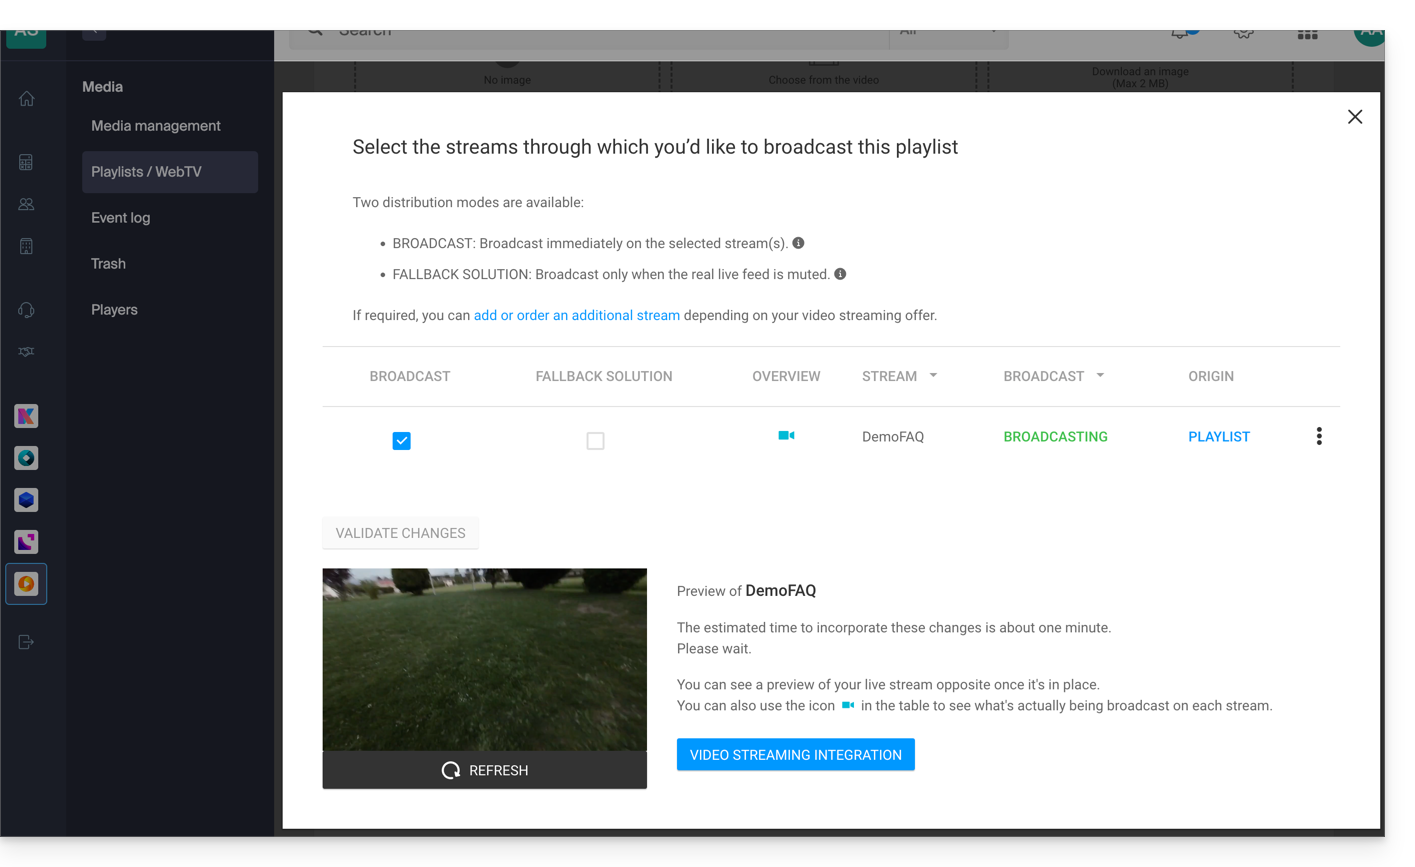
- Confirm when you are ready to broadcast; the preview will appear below:
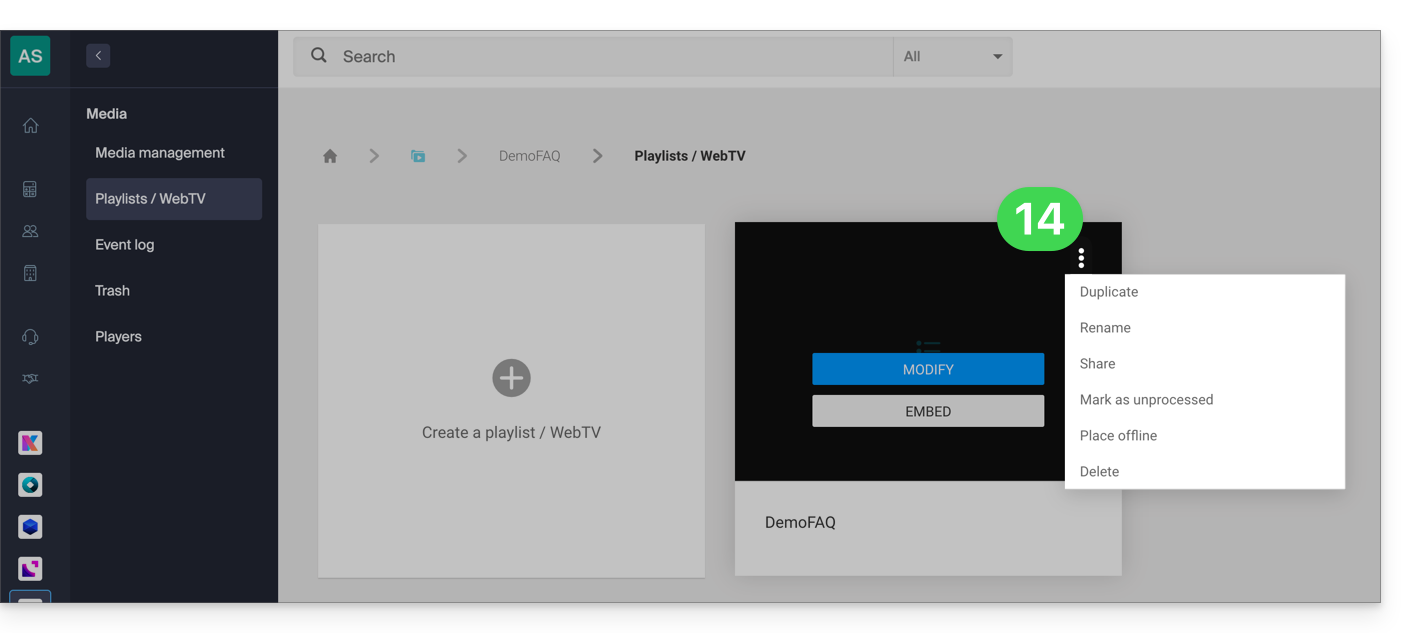
- Each playlist can be duplicated, renamed, shared, deleted, etc., directly from the playlists page:
A few usage examples
Broadcasting a playlist can serve as a fallback solution as soon as a live stream is interrupted (voluntarily or involuntarily) and in this case take over the air. As soon as the live encoder pushes a stream, it takes control of the playlist. This allows you to broadcast alternative content if there is a problem with the live stream or if the user only broadcasts real live content in the evening, for example, they can automate the broadcasting of content from playlists for the rest of the day.
It is also possible to schedule the broadcasting of a playlist from the Video Streaming scheduling tool. Thus, you can choose to broadcast unique or different playlists in advance, either one-time or recurrently. The encoder broadcasting live will be automatically disconnected and this for the entire duration of the playlist broadcast; once the time slot is over, the encoder will reconnect and its content will be broadcast.
A VOD playlist can be created and then edited manually (by retrieving the video that needs to complete the list) or be dynamic if automatically composed by a batch of videos located in a specific folder and fed over time. In both cases, stop then restart the live broadcast to take into account any new video added to the playlist - note that this will no longer be necessary in a future update of the tool.
Link to this FAQ:
Has this FAQ been helpful?
This guide explains how to retrieve the media on your device once it has been uploaded to your VOD/AOD space.
Preamble
- When you send a video to your VOD space, you get the link corresponding to the video address on the server.
- Most browsers, once this address is loaded, will "stream" the video, meaning the video will be played bit by bit without allowing you to download the entire file to your hard drive.
- If you have deleted the original video from your hard drive, you may want to retrieve it.
- There is no direct access (via FTP, for example) to the server hosting the videos.
Download the source media
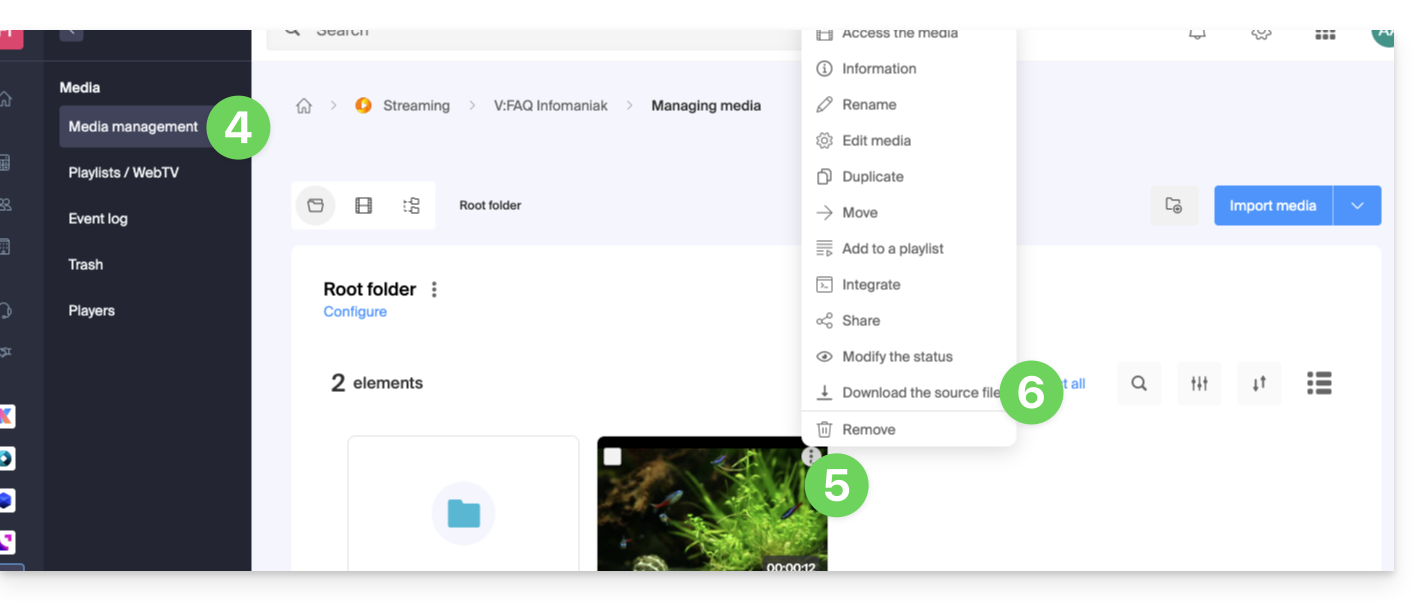
To access a media from the VOD space:
- Click here to access the management of your VOD/AOD on the Infomaniak Manager (need help?).
- Click directly on the name assigned to the product concerned:
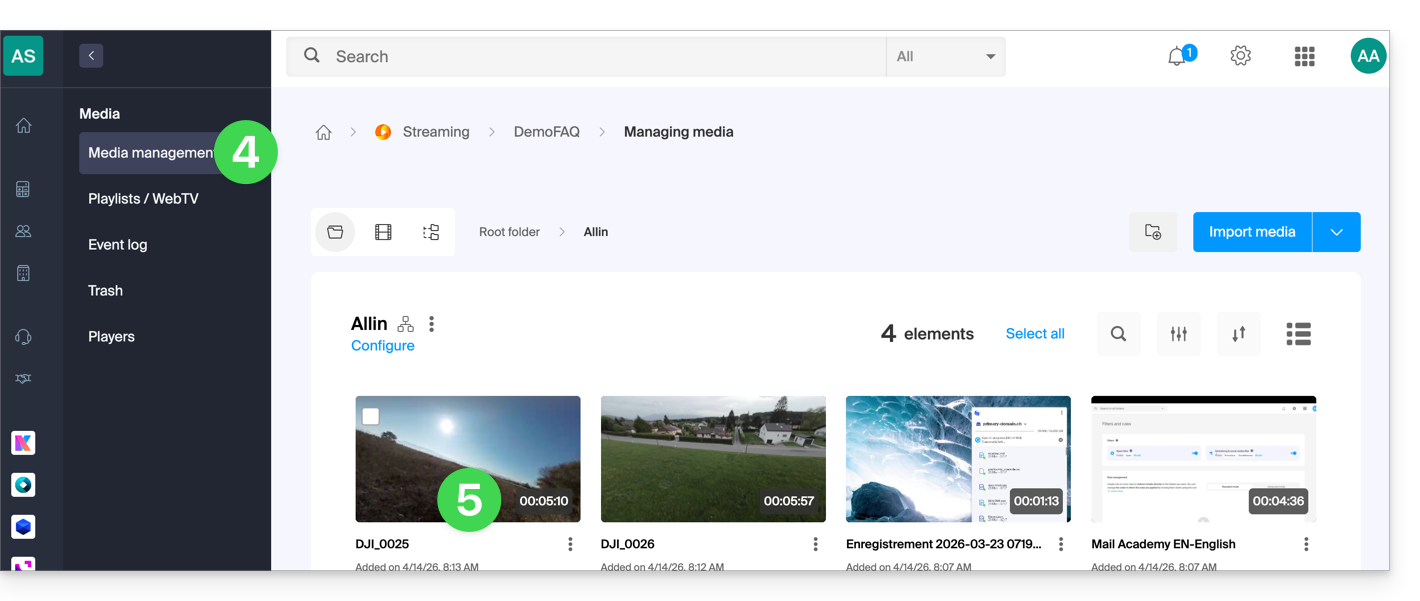
- Click on Media in the left sidebar menu.
- Click on Media Management in the left sidebar menu.
- Click on the action menu ⋮ in the top right corner of the media thumbnail concerned.
- Click on Download the source file so that your web browser offers to download the source media to your device:
Link to this FAQ:
Has this FAQ been helpful?
This guide details the resolution of incidents related to the automatic recovery of media with the VOD/AOD extension for WordPress, particularly when synchronization fails despite an established connection between the extension and the VOD space.
Preamble
- If the VOD plugin of your CMS can no longer automatically retrieve the videos from your VOD space, it is likely that the MySQL user of the database on which the CMS is installed does not have administrator rights.
- This situation can cause a problem during the installation of the VOD plugin on your CMS.
Repair automatic video recovery
To be done on your web hosting
- Click here to access the management of your hosting on the Infomaniak Manager (need help?).
- Click directly on the name assigned to the hosting concerned.
- Click on Databases in the left sidebar menu.
- Click on Users in the left sidebar menu.
- Click on the action menu ⋮ located to the right of the user who manages the database of your CMS.
- Click on Modify:

- If necessary, add the ADMIN right to the user on the line of the database concerned:
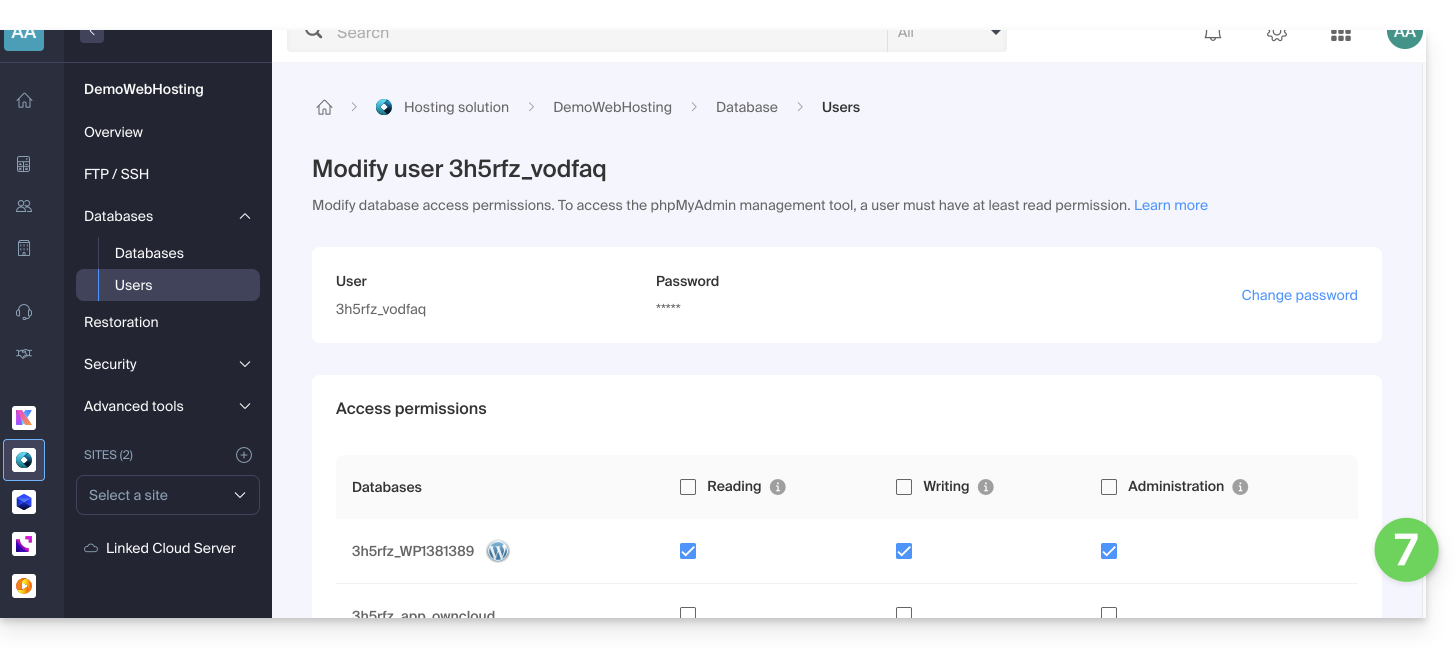
- Click on the button to Confirm at the bottom of the page.
To be done on WordPress
- Uninstall the VOD plugin
- Reinstall and activate the VOD plugin (refer to this other guide)
- Reconfigure the plugin connection to the Infomaniak VOD account
- Request the linking of video files again
Once the configuration is restored, the administrator privileges of the MySQL user can be revoked if necessary.
If an imported video shows a "conversion in progress" status that persists even though it is finalized on the Manager, there is likely a conflict with access restriction extensions (such as Members Only).
In case of abnormal behavior, temporarily disable your third-party extensions to identify any potential software incompatibility.
To force the refresh of a video stuck in the conversion state, use the Synchronize function available in the settings of the VOD extension under WordPress.
To be done on the Infomaniak Manager
Although the extension periodically synchronizes with your account, the appearance of new items (Players, folders, or playlists) may be delayed on your CMS.
For an immediate update, go to the VOD Management > Configuration section of your Manager and enable Quick Synchronization.
If new media does not appear in the CMS list, check the accessibility of the callback URL. This address, used by the encoding system to notify your site of a video's availability, must be public. Refer to the VOD Management > Configuration page for more details.
Link to this FAQ:
Has this FAQ been helpful?
This guide explains how to manage interactions between your Infomaniak VOD/AOD space and any of your WordPress sites, using an extension developed by Infomaniak
Preamble
- This WordPress extension allows you to retrieve and manage all your videos present on an Infomaniak VOD/AOD space, with automatic updates when new videos are added.
- It manages the automatic retrieval of existing Players and playlist management.
- You will be able to search for your videos when writing an article or page or import media directly from the CMS administration.
- Possible incompatibilities:
- The plugin is not compatible with Elementor.
- Test if the problem persists after installing another editor.
- The plugin is not compatible with WordPress Multisite.
- The plugin is not compatible with Really Simple Security (Really Simple SSL).
- Test if the problem persists by activating or deactivating this setting of the Really Simple Security extension:

- Test if the problem persists after using another similar module.
- If problems persist, refer to this other guide.
- Test if the problem persists by activating or deactivating this setting of the Really Simple Security extension:
- The plugin is not compatible with Elementor.
Get the Infomaniak VOD extension
Go to your VOD space to obtain the information necessary for the external WordPress module:
- Click here to access the management of your product on the Infomaniak Manager (need help?).
- Click directly on the name assigned to the product concerned:
- Click on CMS Extensions/API in the left sidebar menu.
- Click on CMS Extensions in the left sidebar menu.
- Download the WordPress extension.
- Configure the extension using the provided instructions:

- It is recommended to create a new user in your Organization with only technical rights on the VOD/AOD product and then create the application password from this dedicated account.
You can also download the extension directly from the WordPress extension library:
A similar feature exists for Typo3 with the dedicated extension that you can find and install from its extension library: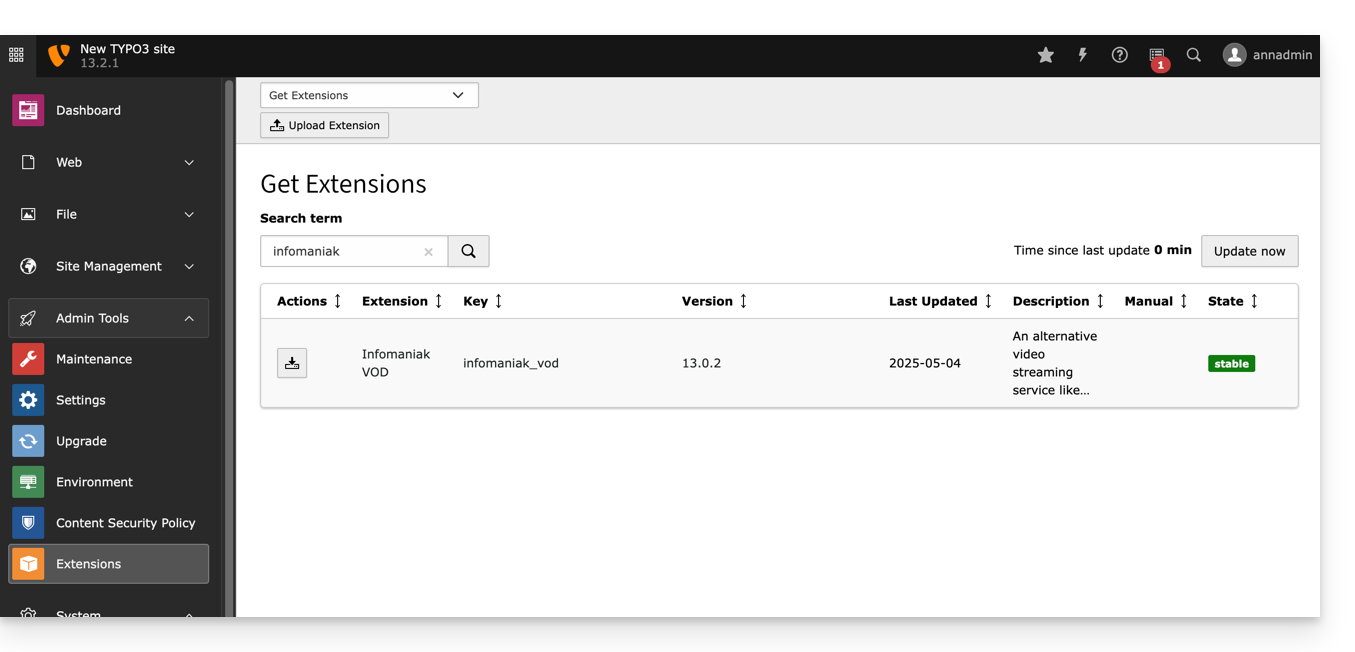
Link to this FAQ:
Has this FAQ been helpful?
This guide explains how to change the thumbnail (preview image) representing a video on a VOD service.
Preamble
- The use of animated gifs is not possible.
Modify the video thumbnail
To access a media file from the VOD space:
- Click here to access the management of your VOD/AOD on the Infomaniak Manager (need help?).
- Click directly on the name assigned to the product concerned:
- Click on Media in the left sidebar menu.
- Click on Media Management in the left sidebar menu.
- Click on the media concerned:

- Click on the Edit button:

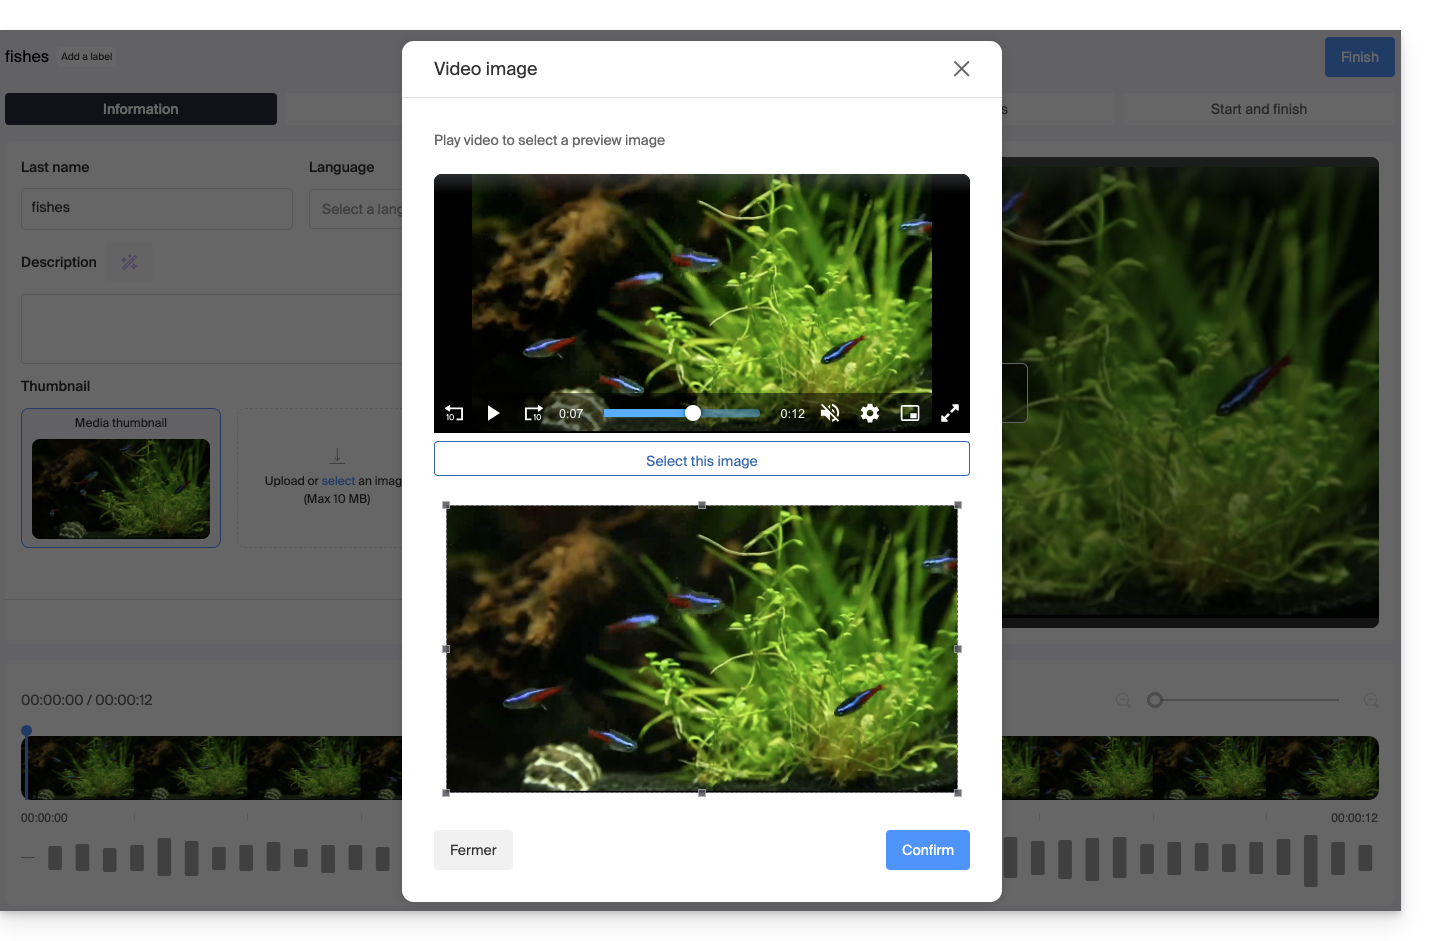
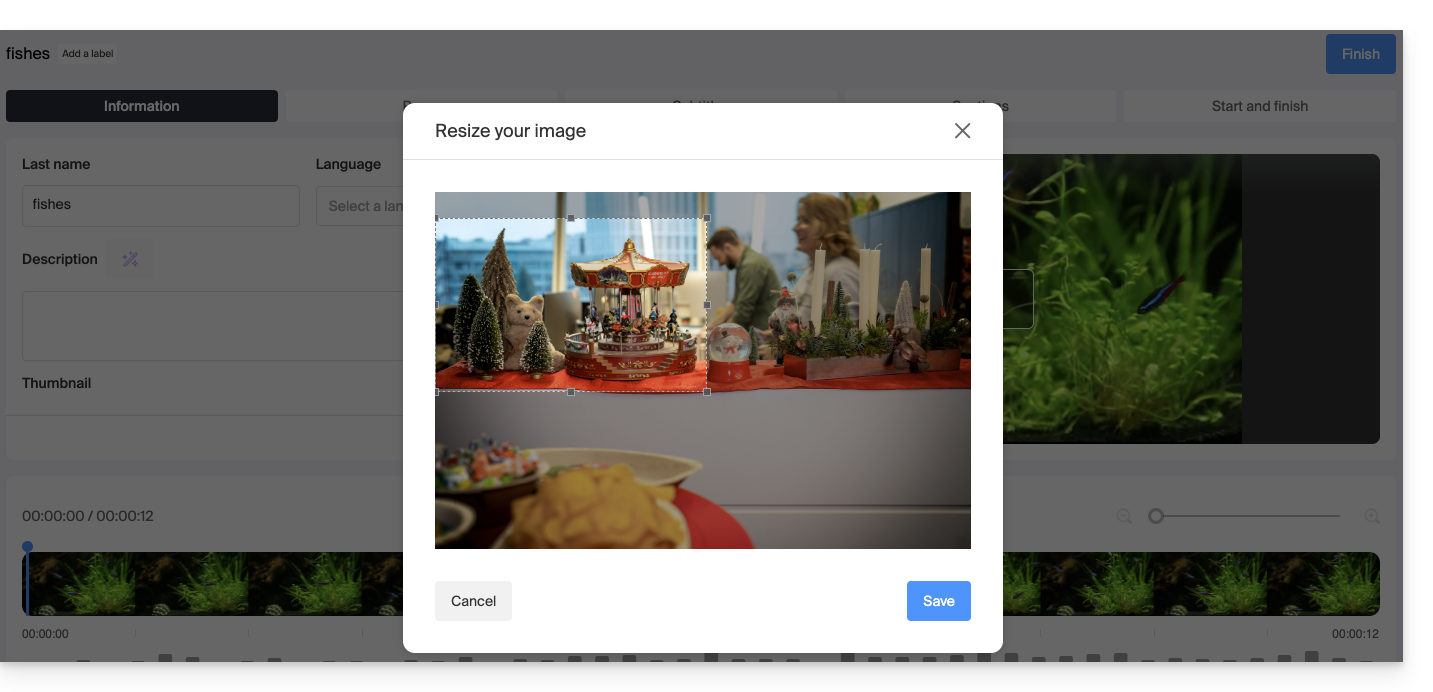
You have two options to replace the default image of the paused video: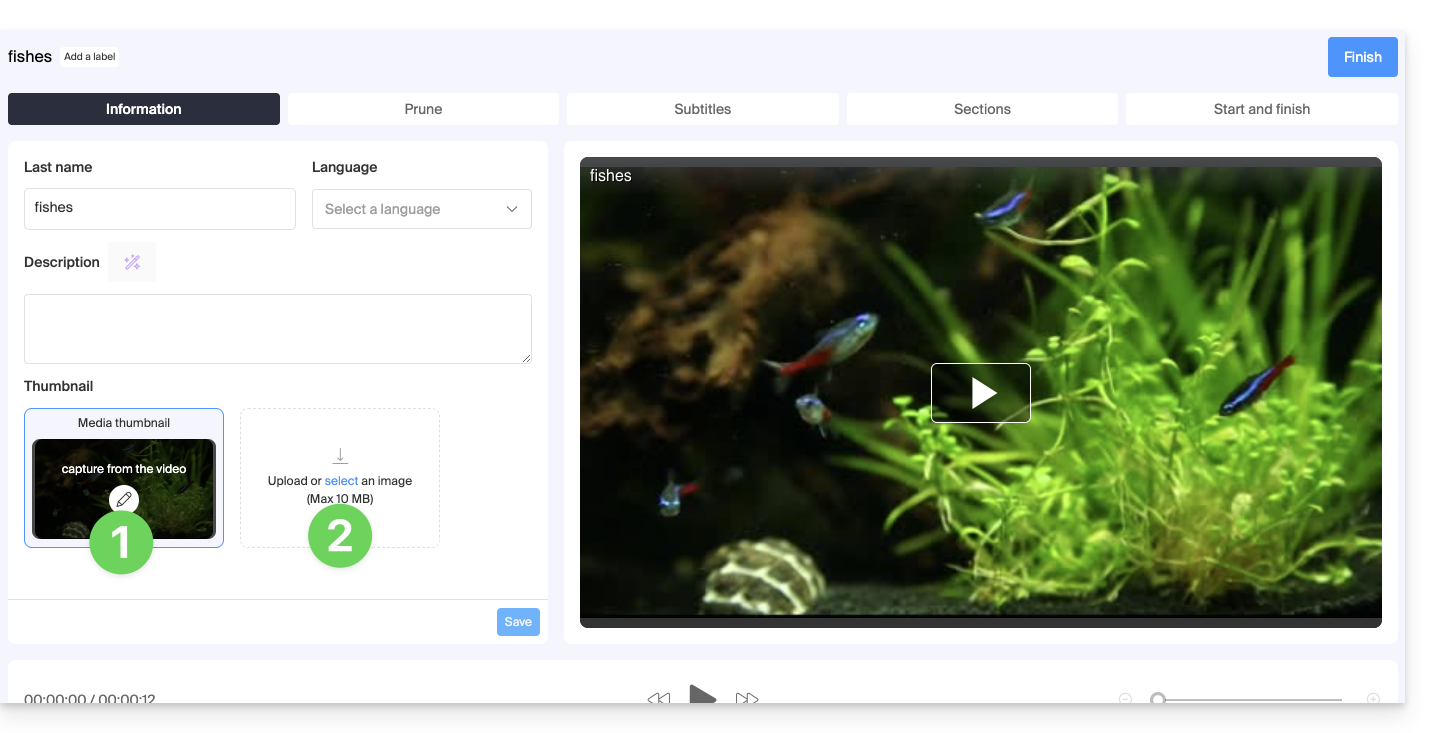
- Select an image within the video itself (click to scroll through the video and press the button to extract the image that you can then crop/resize):
- Upload an image from your hard drive (max. 10 MB) that you can then crop/resize:
Confirm by clicking on the blue Save button: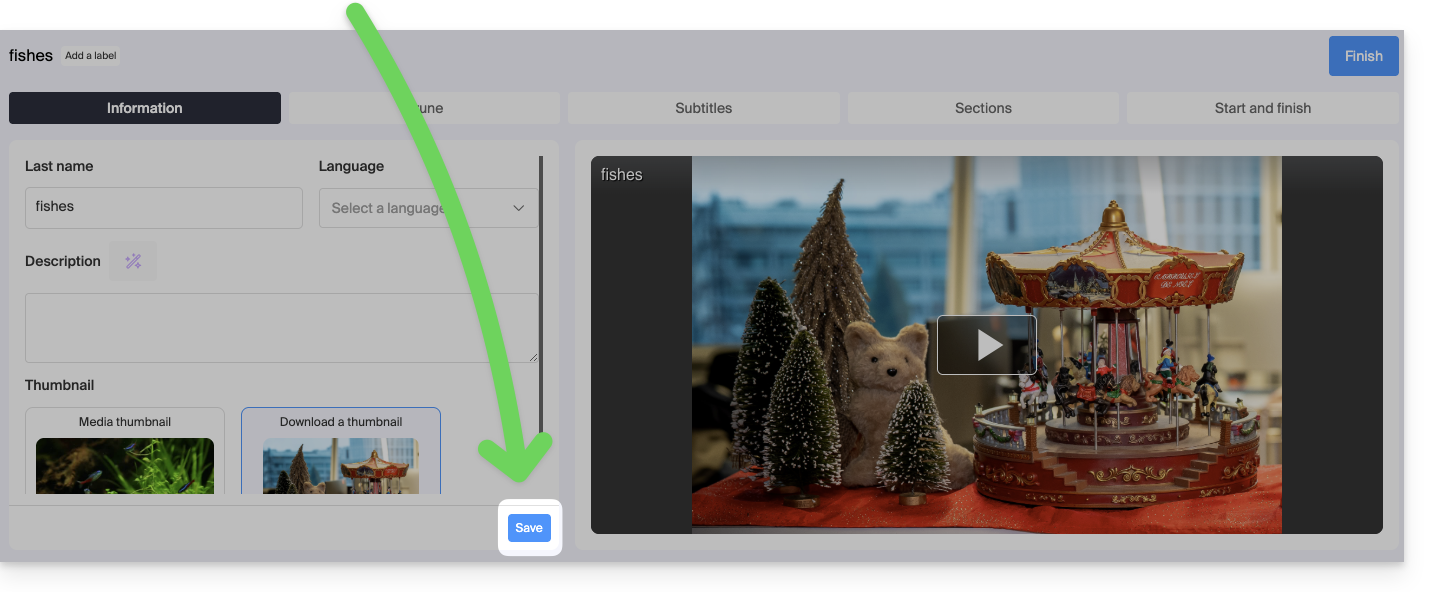
Link to this FAQ:
Has this FAQ been helpful?
This guide details certain background operations performed by the Infomaniak VOD / AOD service.
Operation of SOAP requests and callbacks
In the VOD (video on demand) and AOD (audio on demand) service, certain operations such as file downloads go through SOAP requests, a protocol that allows two systems to communicate with each other, often used to exchange data between servers.
When a file is requested via SOAP, there may be a delay before the server responds. This delay depends on several factors, such as the file size, server load, or connection quality. The download starts as soon as possible, but it is important to know that there is a queue: if several users make requests at the same time, each one is processed in order, and each user has a limit on simultaneous downloads.
Callback: a notification at the end of the download
A callback is a system that notifies the client (for example, your application) once the download is complete. In other words, instead of waiting while monitoring the download, the system "calls" you or sends a response when everything is ready. This is useful to avoid blocking your application while the file is downloading.
However, there is also a maximum wait time, called a timeout. If this time is reached before the end of the download, a response is still sent. This does not mean that the download has failed, but that the response was given before it was completed. In this case, the processing continues in the background.
Large files take more time
When the requested file is large (for example, several hundred megabytes or even several gigabytes), the download can take several minutes. This time depends a lot on the remote server: some are very fast, others less so. The system tries to manage this as best as possible, but it is important to keep in mind that the response time will not always be immediate.
Blocking and non-blocking calls
By default, some SOAP clients wait for the server to finish responding before continuing. This is called a blocking call : your application is frozen until the response arrives. This can be a problem if the response takes time.
Fortunately, it is often possible to configure the SOAP client so that it does not block. This is called a non-blocking call. This allows you to send multiple requests one after the other without having to wait for the response to each call. It is faster and more efficient, especially when processing multiple files in succession.
Link to this FAQ:
Has this FAQ been helpful?
This guide explains how to add subtitles to the media in your Infomaniak VOD space.
Introduction
- The subtitles for your videos are non-destructive; the video itself is not altered. It is simply a .srt file uploaded by the Player.
- You can manage the automatic start of subtitles from the Player itself (tab #1).
Managing Subtitles
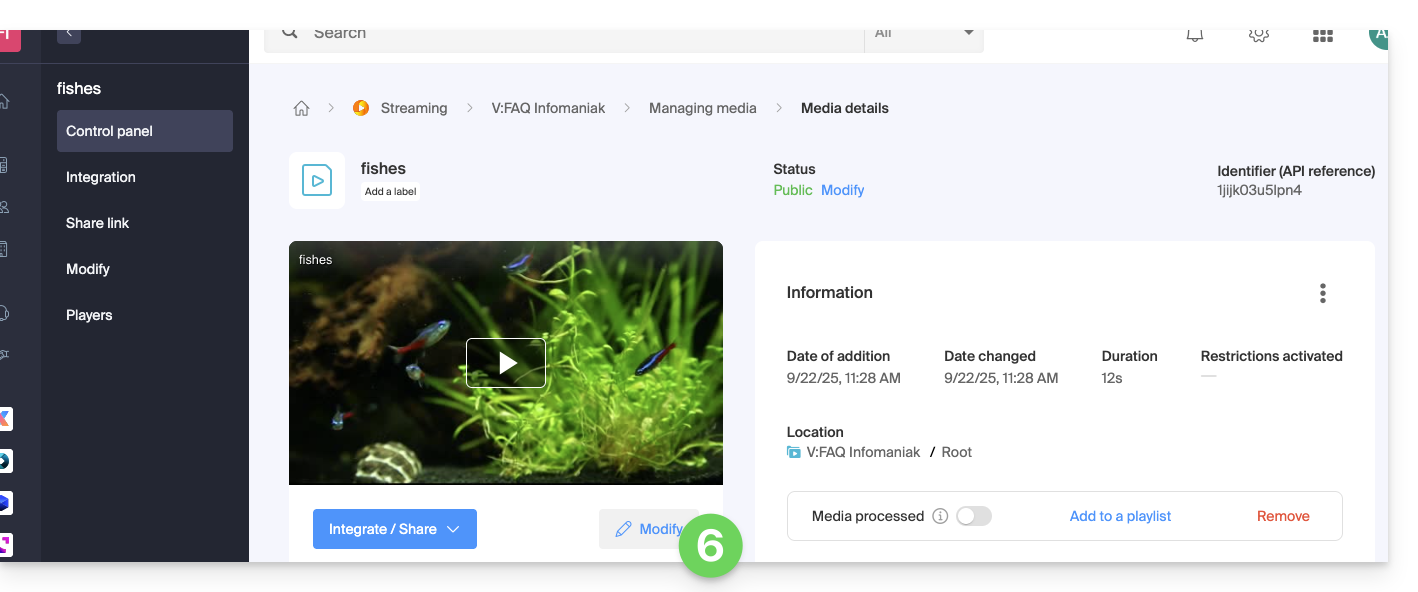
To access a media file in the VOD space:
- Click here to access the management of your VOD/AOD in the Infomaniak Manager (need help?).
- Click directly on the name assigned to the product in question:
- Click on Media in the left-hand menu.
- Click on Media Management in the left-hand menu.
- Click on the media in question:
- Click on the Edit button:
- Click on the Subtitles tab.
- Click on the Add Language button to choose one of the 3 subtitle generation methods:
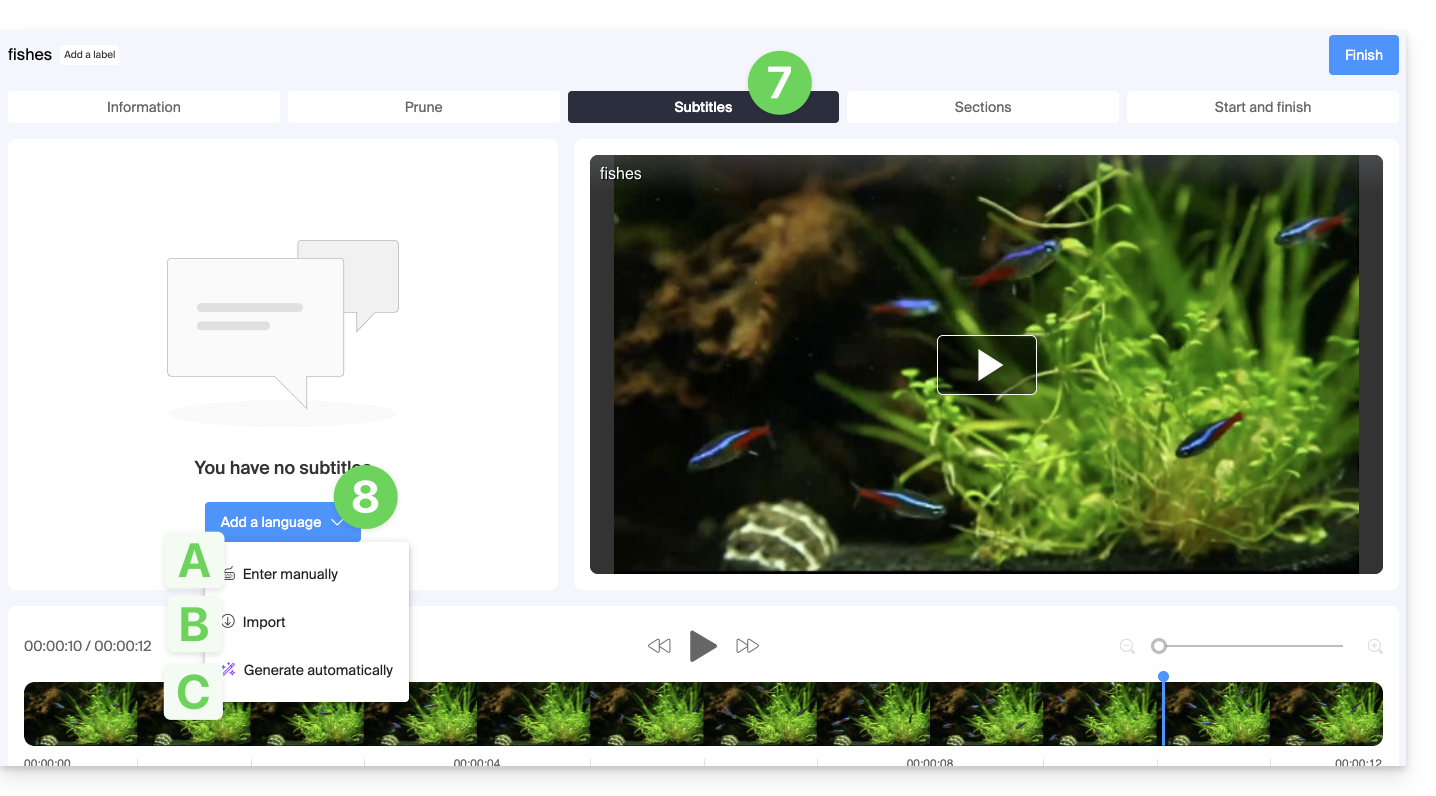
A. Create subtitles manually
With this subtitle mode, you manually enter each of the texts that should appear at the specified timecode, and this for each of the languages: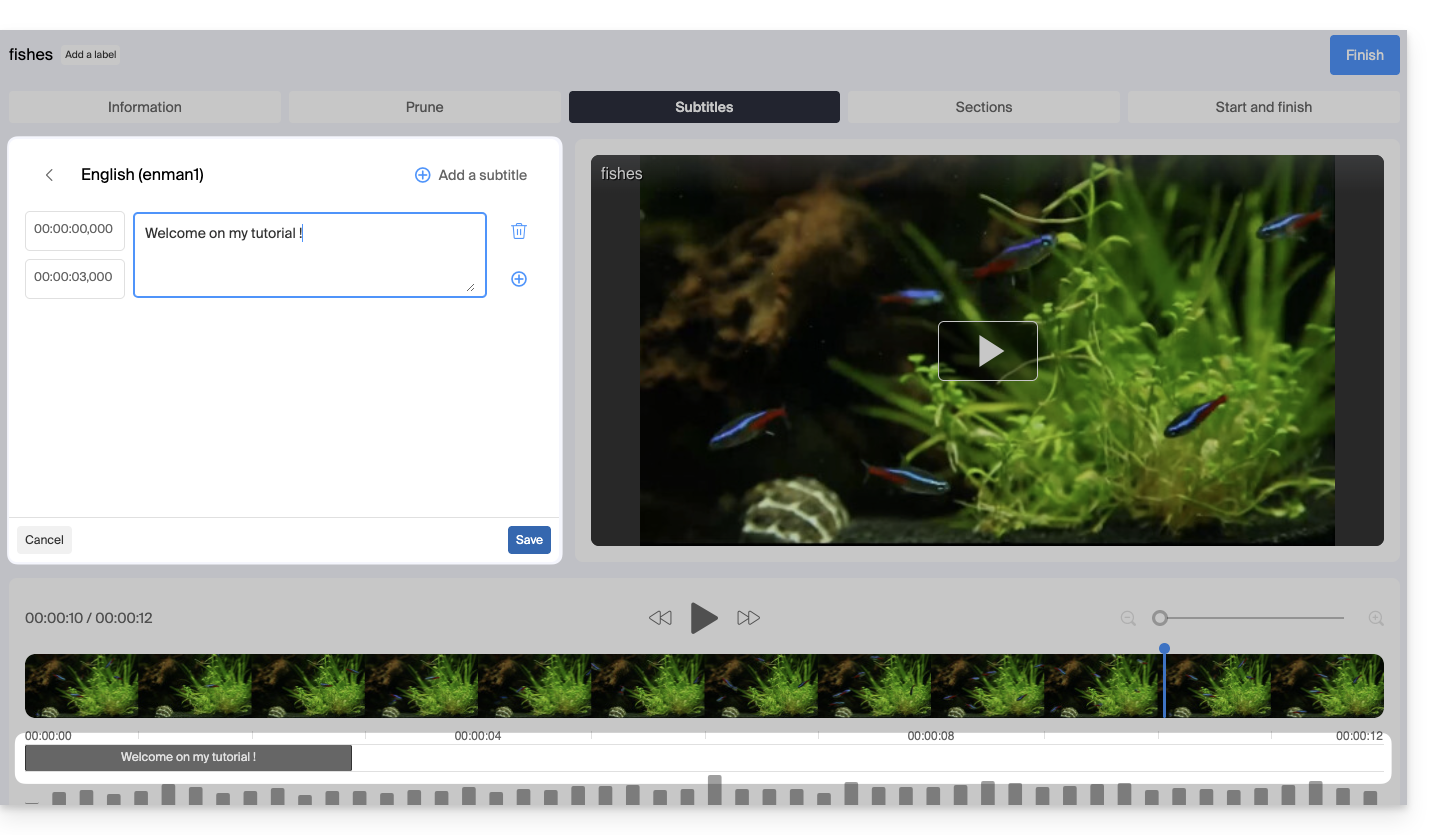
B. Import a subtitle file
You can import a SubRip (*.srt) or SubViewer (*.sbv and *.sub) file to enhance your video with subtitles prepared in advance in a separate file: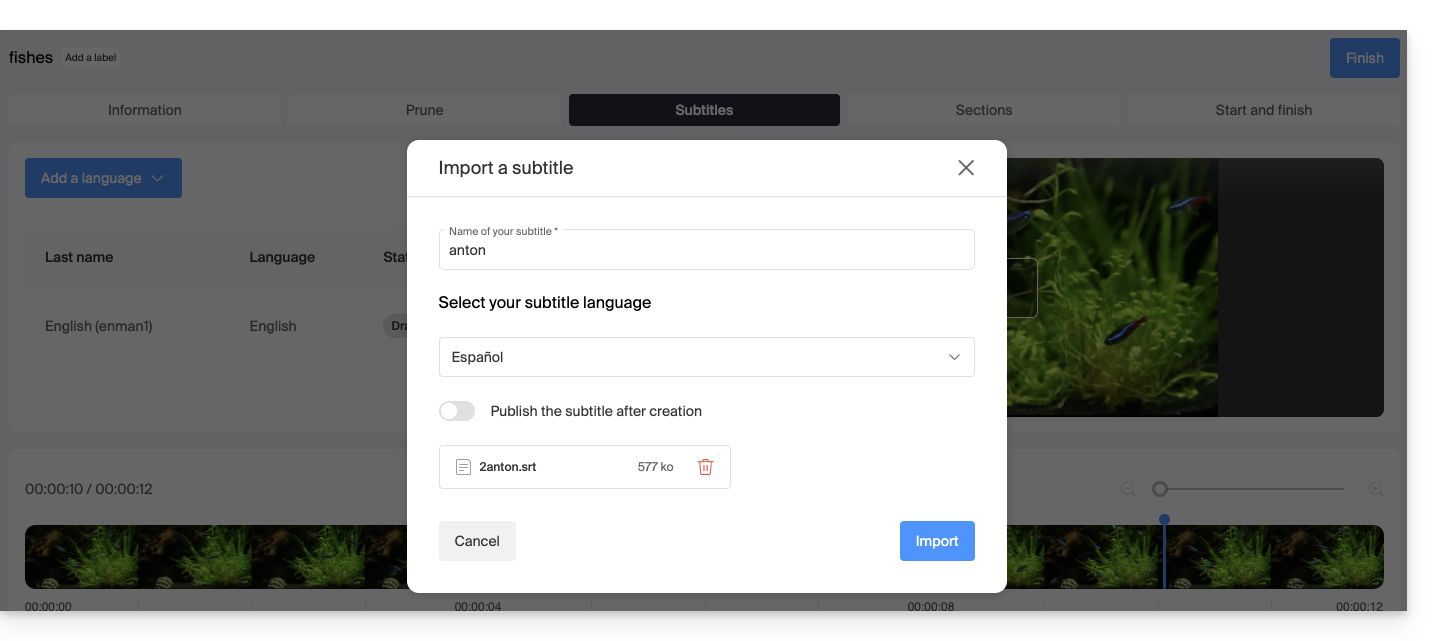
The toggle switch allows you to enable or disable the publication of subtitles on the Player; this allows you, in particular, to verify that the content is correct before publishing and sharing the video.
C. Generate subtitles automatically
You can create subtitles directly from the audio available on your media. The texts are generated using artificial intelligence (AI).
Read and understand this other guide about the model used and the responsibilities of each party. It is also recommended to manually check the generated content, especially proper nouns that are sometimes misspelled.
Translate subtitles automatically
When subtitles already exist, you can add an additional language in the same place by having the text automatically translated (specify the current language):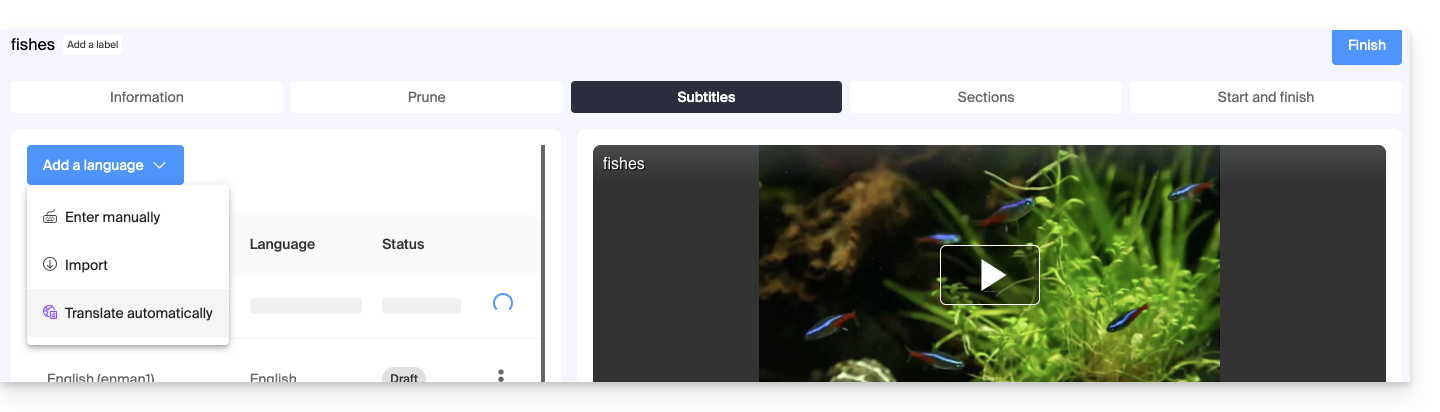 This will generate the appropriate subtitles in the desired language:
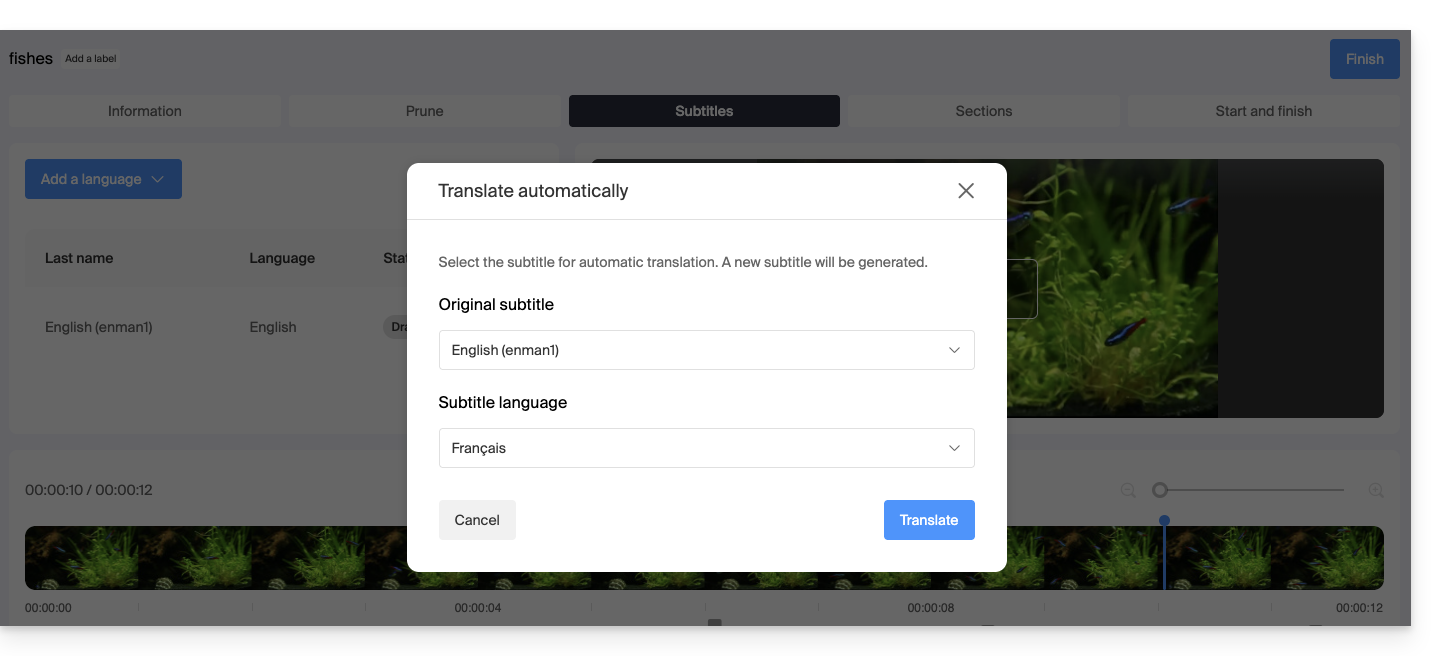
Actions on a subtitle
Click on the action menu ⋮ located to the right of a subtitle language to access additional options such as duplication or automatic translation: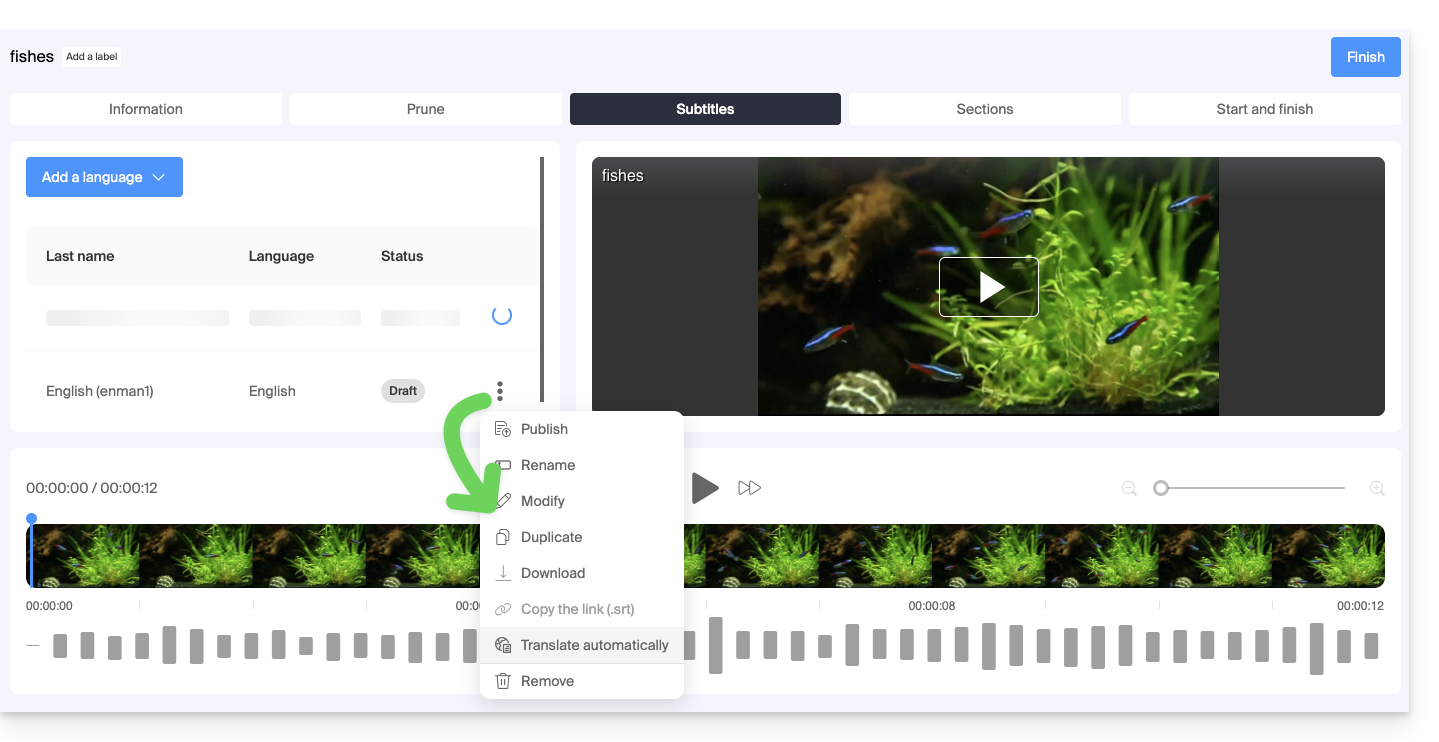
Automatically subtitle new videos
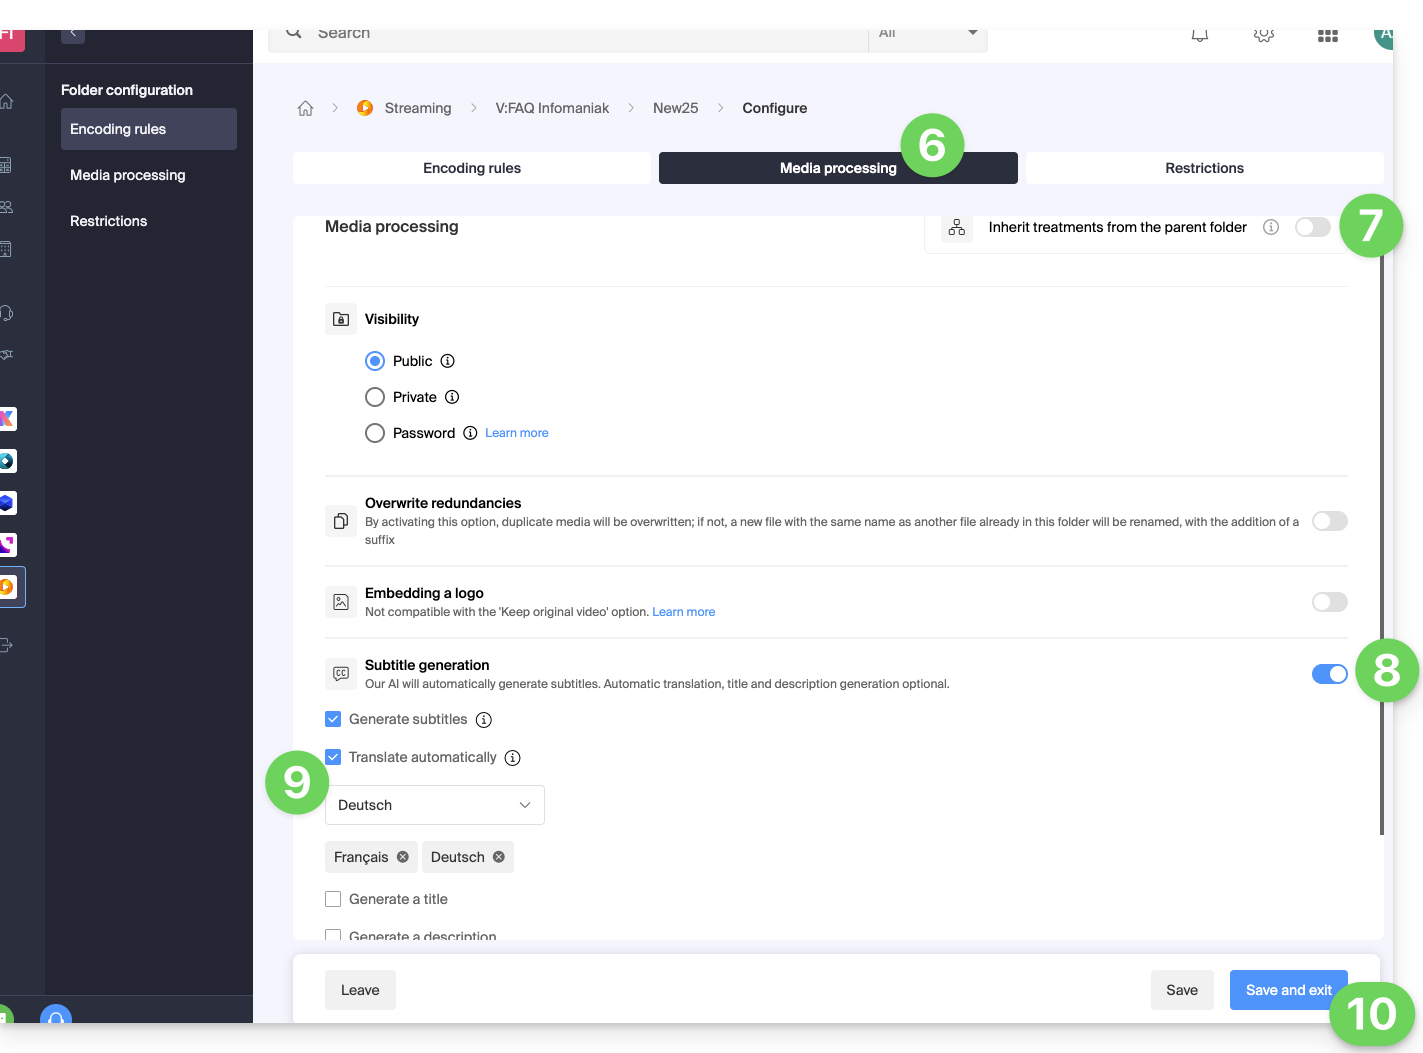
The Root folder or subfolders within your VOD space can have rules that are executed whenever new media is added. One of these rules can instruct the system to automatically generate subtitles using the C method described above. To set up this rule:
- Click here to access the management of your VOD/AOD in the Infomaniak Manager (need help?).
- Click directly on the name assigned to the product in question.
- Click on Media in the left-hand menu.
- Click on Media Management in the left-hand menu.
- Click on Configure on the Root folder page or the folder of your choice:
- Click on the Media Processing tab.
- Make sure that the processing settings are not configured to be inherited from the parent folder (or configure the parent folder directly) and then save the changes if necessary (point 10 below).
- Enable text generation.
- Configure what should be generated (subtitles, video title, summary/description, as well as any translations based on the visitor's language).
- Save the changes:
Link to this FAQ:
Has this FAQ been helpful?
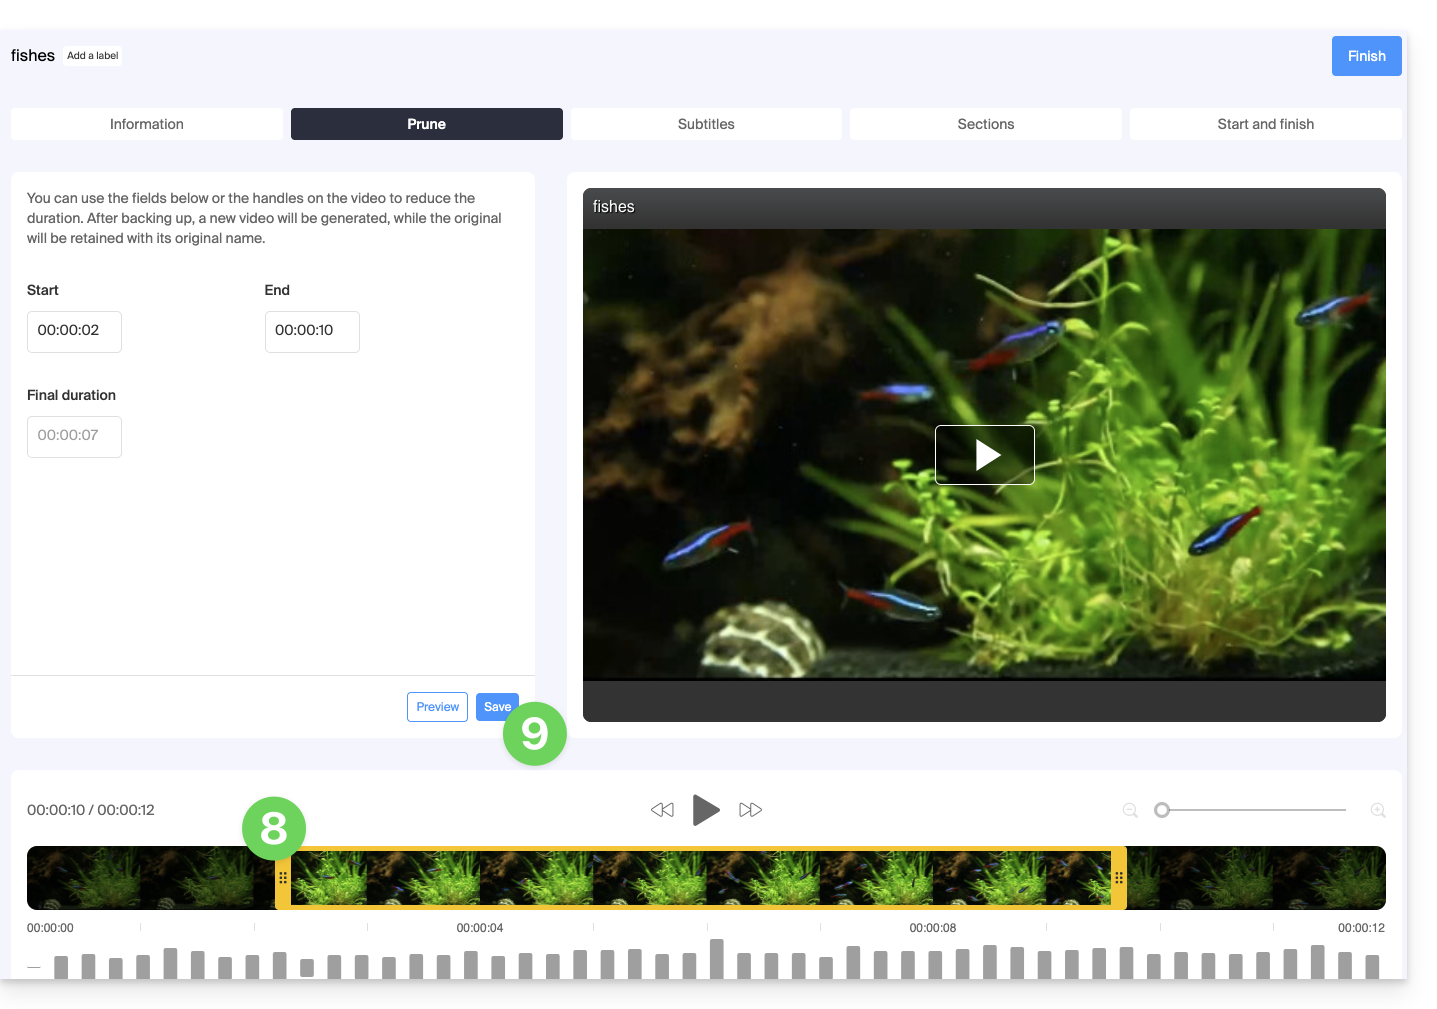
It is possible to modify a video that has already been uploaded to a VOD service. It is not possible to use this tool in the case of an audio-only media.
Trim / Cut a video
To access a media from the VOD space:
- Click here to access the management of your VOD/AOD on the Infomaniak Manager (need help?).
- Click directly on the name assigned to the product concerned:
- Click on Media in the left sidebar menu.
- Click on Media Management in the left sidebar menu.
- Click on the media concerned:
- Click on the Edit button:
- Click on the EDIT tab.
- Trim the video at the bottom of the page according to your needs.
- Click on Save (or Preview if necessary):
- The cutting of your media will generate a new video, the original will be kept with its original name:
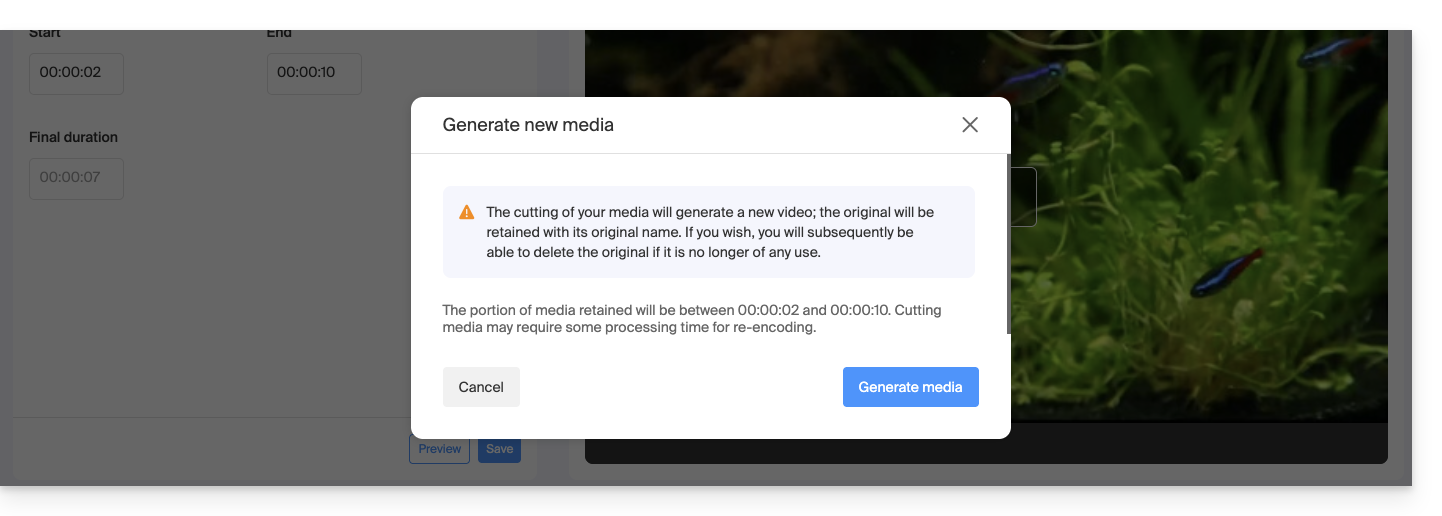 You can, if you wish, delete the latter afterwards, if it is no longer useful.
Link to this FAQ:
Has this FAQ been helpful?
When playing an embedded video on a page, the message "Account suspended" appears when the VOD/AOD product, to which the video belongs, has been blocked.
The cause of the blockage can be multiple, so contact the VOD/AOD space administrator as soon as possible to find out more.
Link to this FAQ:
Has this FAQ been helpful?
This guide covers the creation of chapters on a video from the VOD service and the customization of the menu display (thumbnail, title, description, etc.).
Preamble
- The video file must be encoded in
MP4to access chapter editing (creation + modification). - Chapter editing will not be possible on a FLV video, but the latter will still display the chapters on the video Player if it has also been encoded in MP4 in parallel.
- If the MP4 video is deleted, the chapters will remain on the FLV but without the possibility of editing.
- It is not possible to use this tool in the case of an audio-only media.
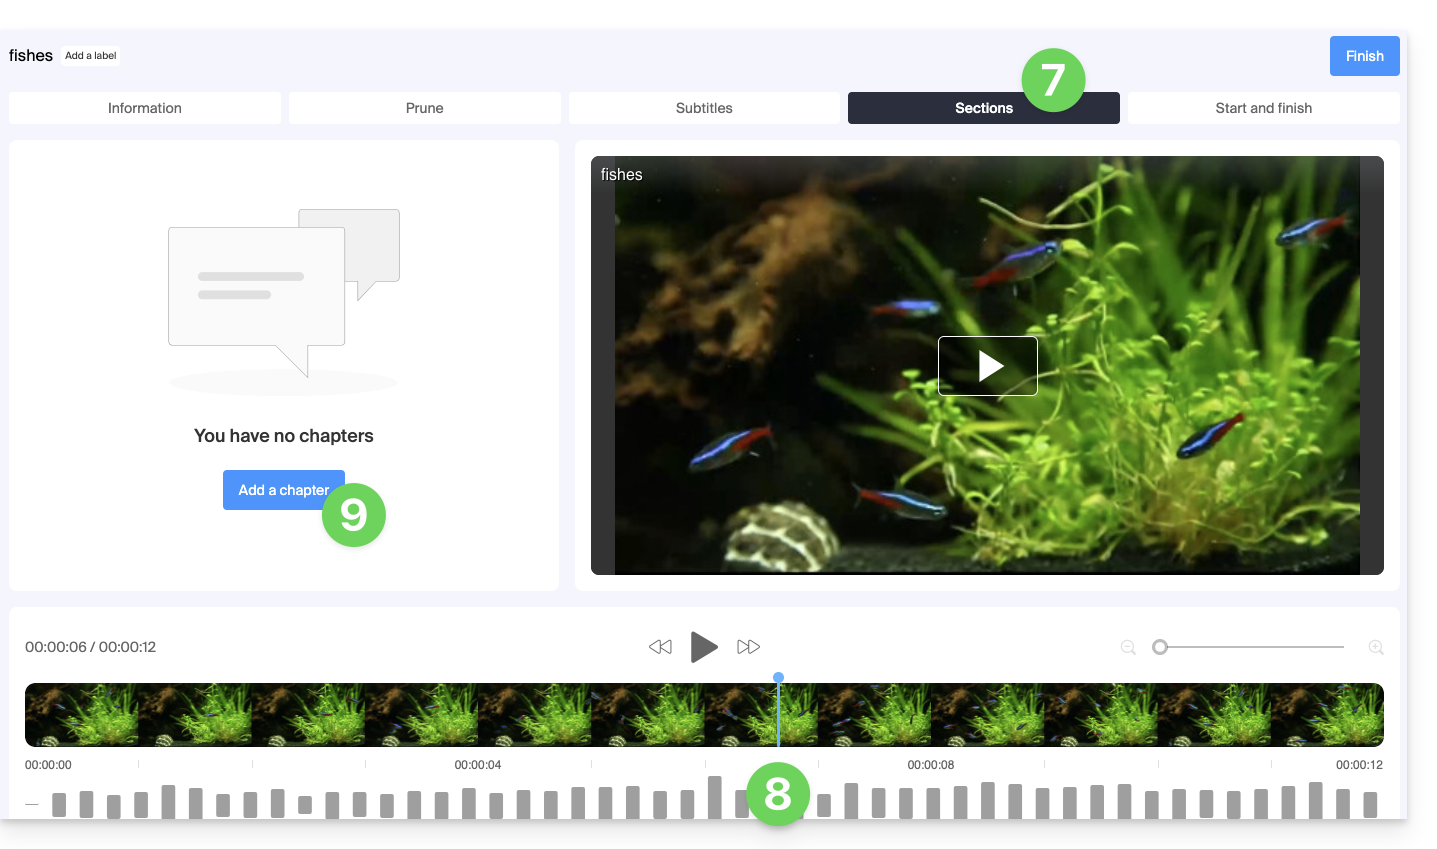
Chapter creation
To access a media from the VOD space:
- Click here to access the management of your VOD/AOD on the Infomaniak Manager (need help?).
- Click directly on the name assigned to the product concerned:
- Click on Media in the left sidebar menu.
- Click on Media Management in the left sidebar menu.
- Click on the media concerned:
- Click on the Edit button:
- Click on the Chaptering tab.
- Choose the position of the first chapter.
- Click on the blue button to create and configure the first chapter:
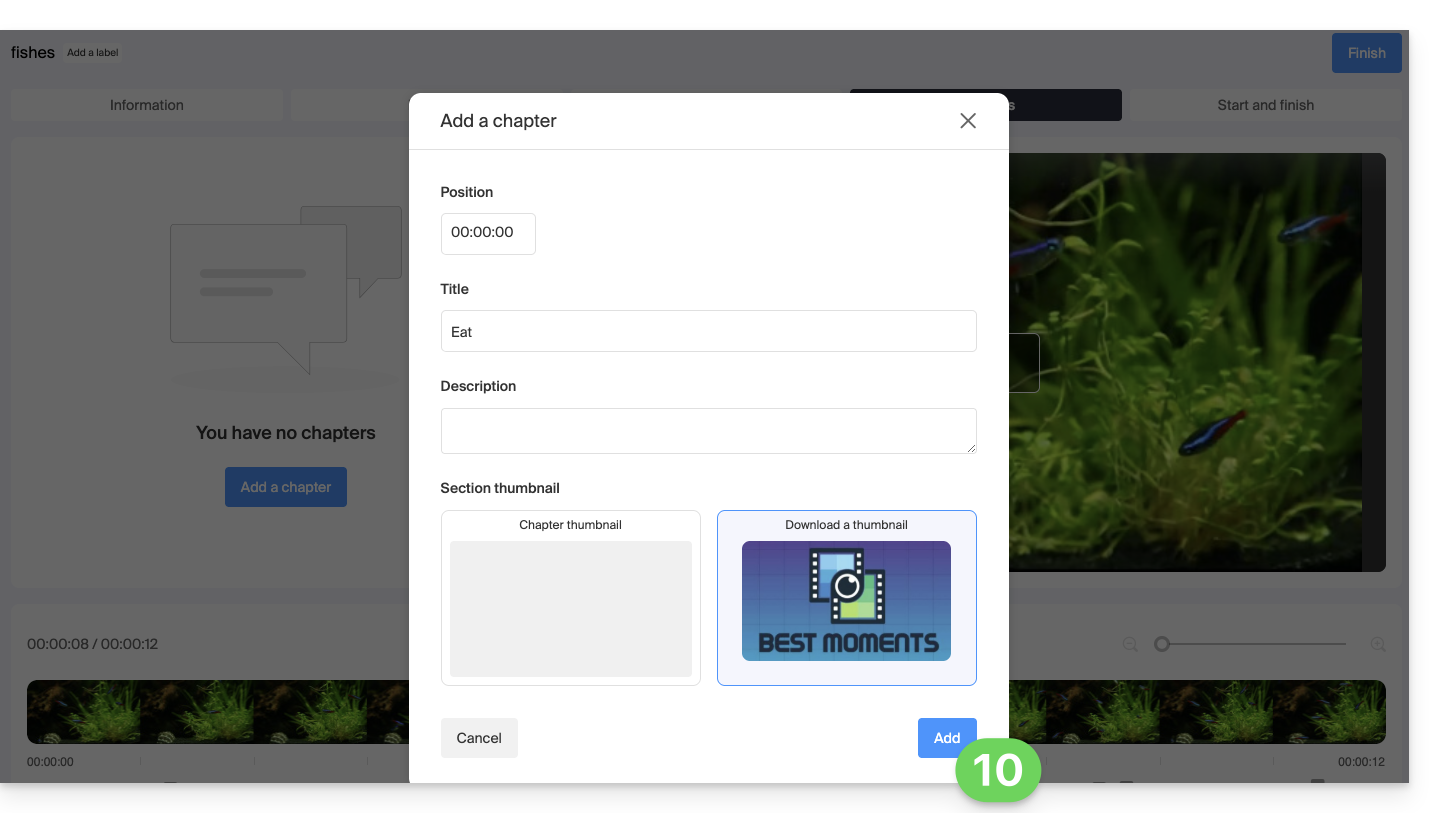
- Edit the first chapter (info, thumbnail) and save with the button to Add the chapter:
- Repeat for the following chapters.
- You can modify the location of your chapters by clicking directly on the timeline:
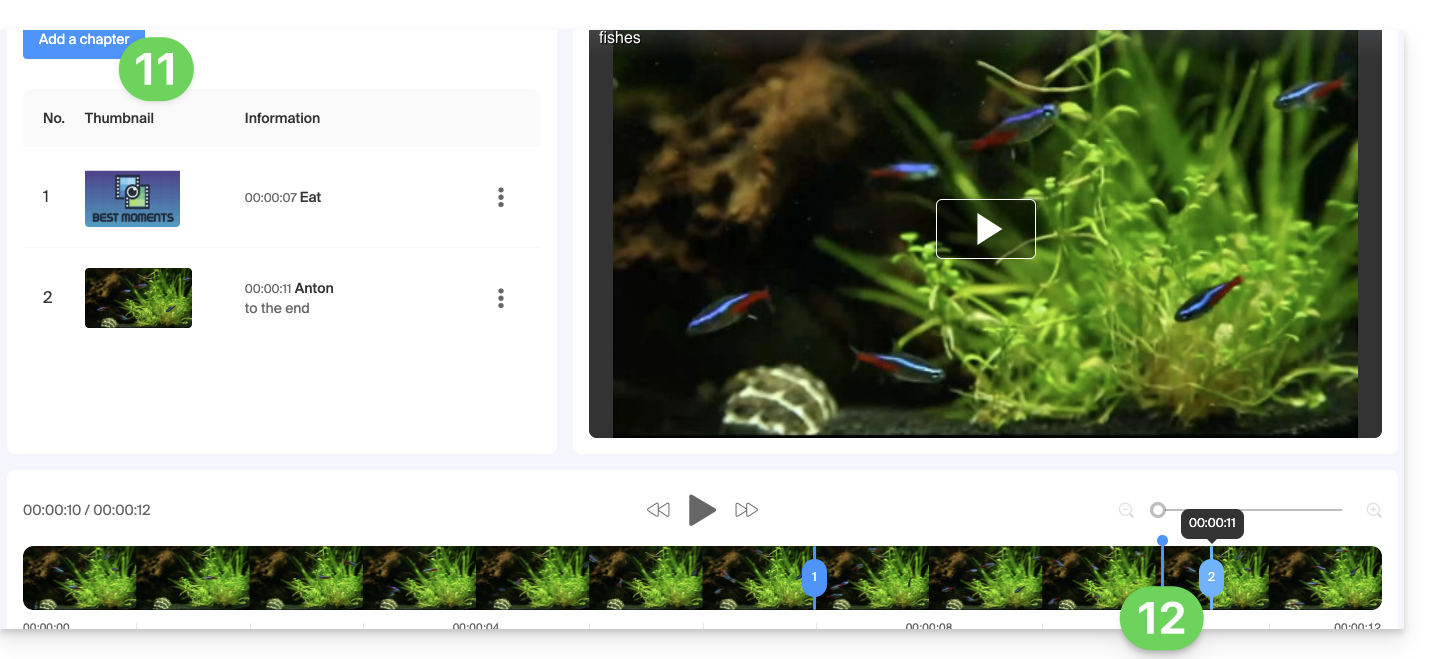
- Finish editing the chapters with the button at the top right.
Link to this FAQ:
Has this FAQ been helpful?
This guide explains how to integrate a button overlay on the video in the VOD/AOD Player, which is used to stream your video. Viewers can click this button to easily share the video link (or embed the video itself).
Preamble
- Automatic sharing is available for Facebook, X (formerly Twitter), LinkedIn, WhatsApp, but it is also possible to provide an HTML code to embed the Player at the desired location by the visitor.
- A share can also be initiated within the media library itself.
Add a share link to the Player
To access the VOD space:
- Click here to access the management of your product on the Infomaniak Manager (need help?).
- Click directly on the name assigned to the product concerned:

- Click on Players in the left sidebar menu.
- Click on the relevant item in the displayed table.
- Click on the Share tab.
- Enable one or the other of the shares with the desired parameters:
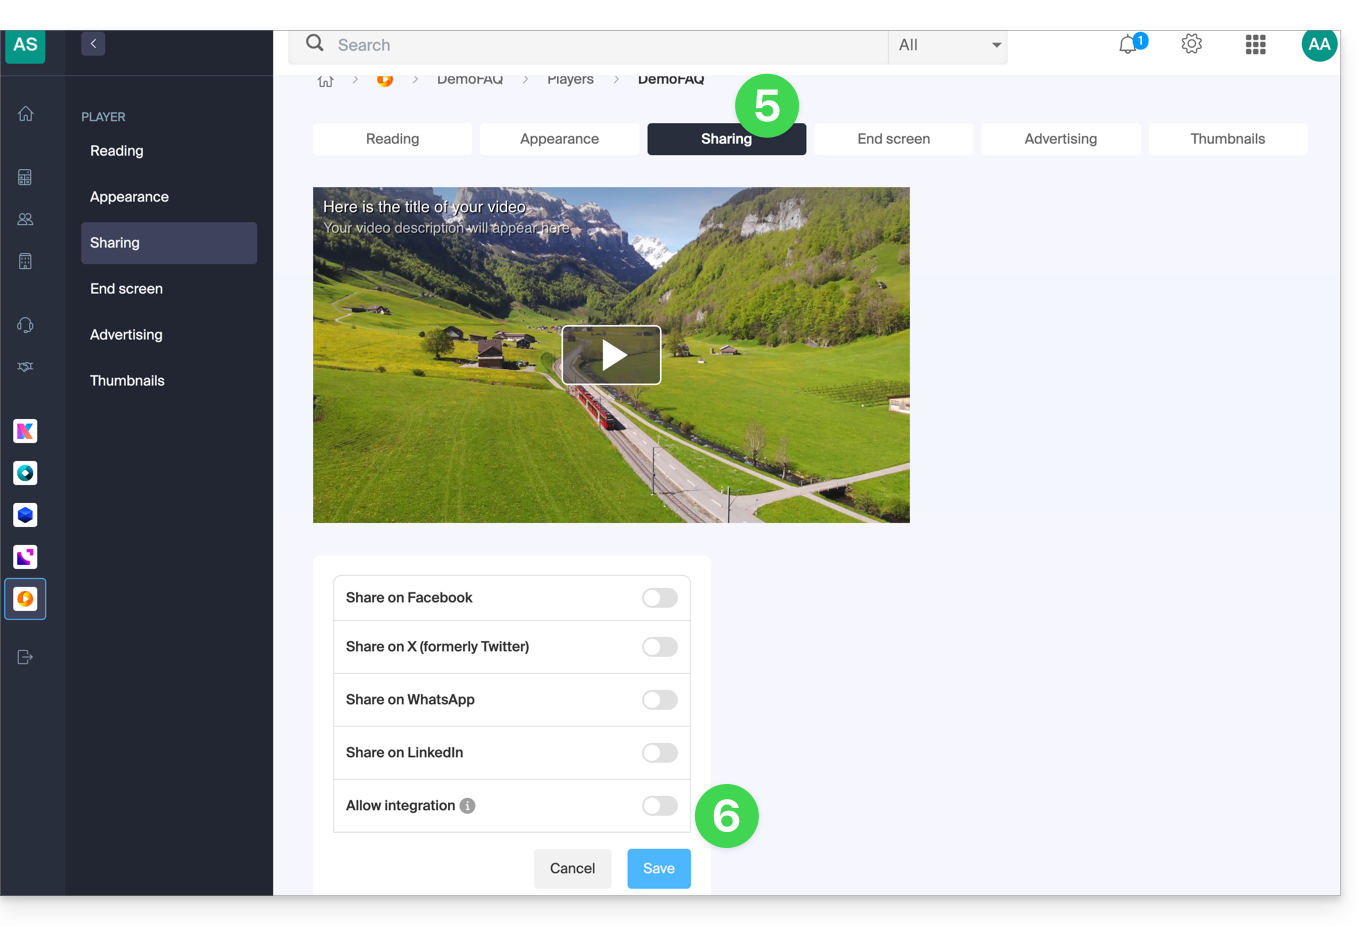
- An icon appears on the Player representing the sharing option for the user:
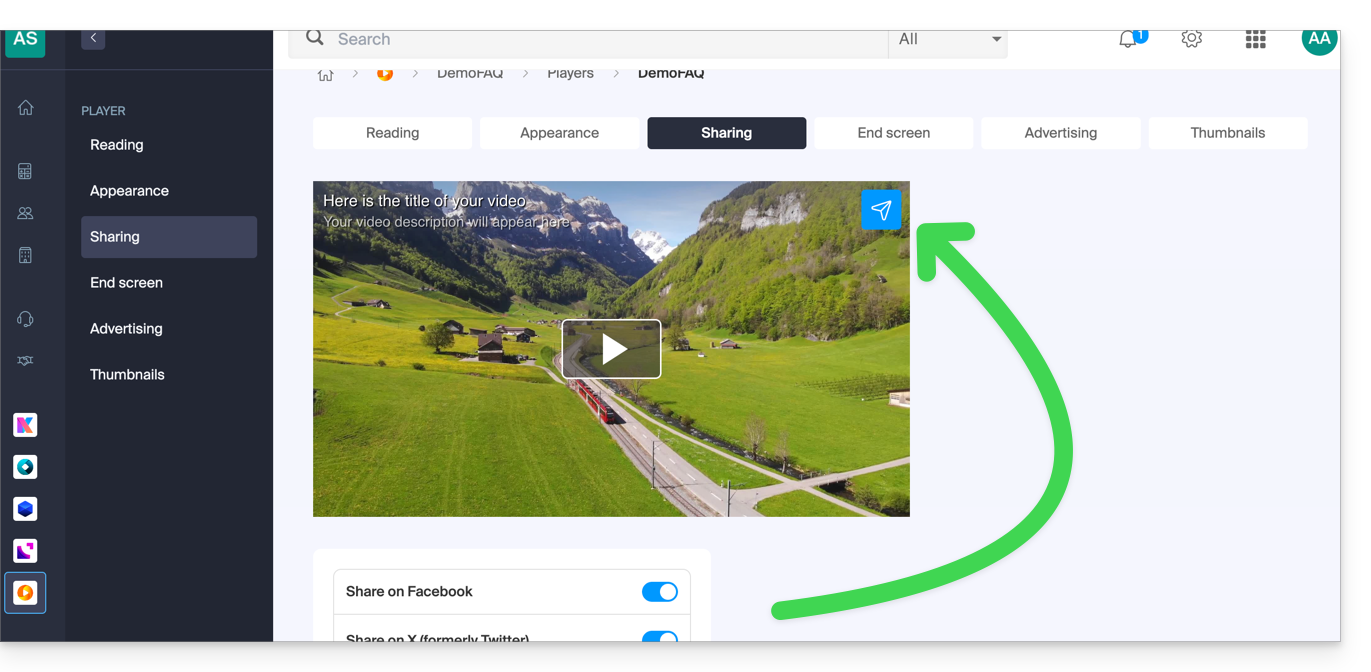
- Do not forget to save your changes if necessary.
Link to this FAQ:
Has this FAQ been helpful?
This guide explains how to password-protect videos uploaded to an Infomaniak VOD service.
Introduction
- Playing a video within a Player configured on the VOD service will require a password, without which viewing will not be possible.
- It is not possible to specify multiple different passwords for the same video.
- Other access restrictions can be enabled and apply to file access: token | geoip
Password-protect a video
Password protection can be configured in several ways.
1. Password at the import folder level
If the password is defined once for the destination folder, all new media uploads will automatically have this password when played. However, it is still possible to change the visibility of each video individually (see below).
To configure this folder:
- Click here to access the management of your VOD/AOD on the Infomaniak Manager (need help?).
- Click directly on the name assigned to the product in question:
- Click on Media in the left-hand menu.
- Click on Media Management in the left-hand menu.
- Click on the icon to create a New folder:
- Give the folder a name.
- Click on the blue button to Create the folder.
- Click on Settings:

- Click on the Media Processing tab.
- If necessary, disable the toggle switch to remove the inheritance from the parent folder, so that you can configure your own rules for this specific folder.
- Under Visibility, choose the Password option and enter a new password with a minimum of 6 characters.
- Click on Save once the desired options have been configured:
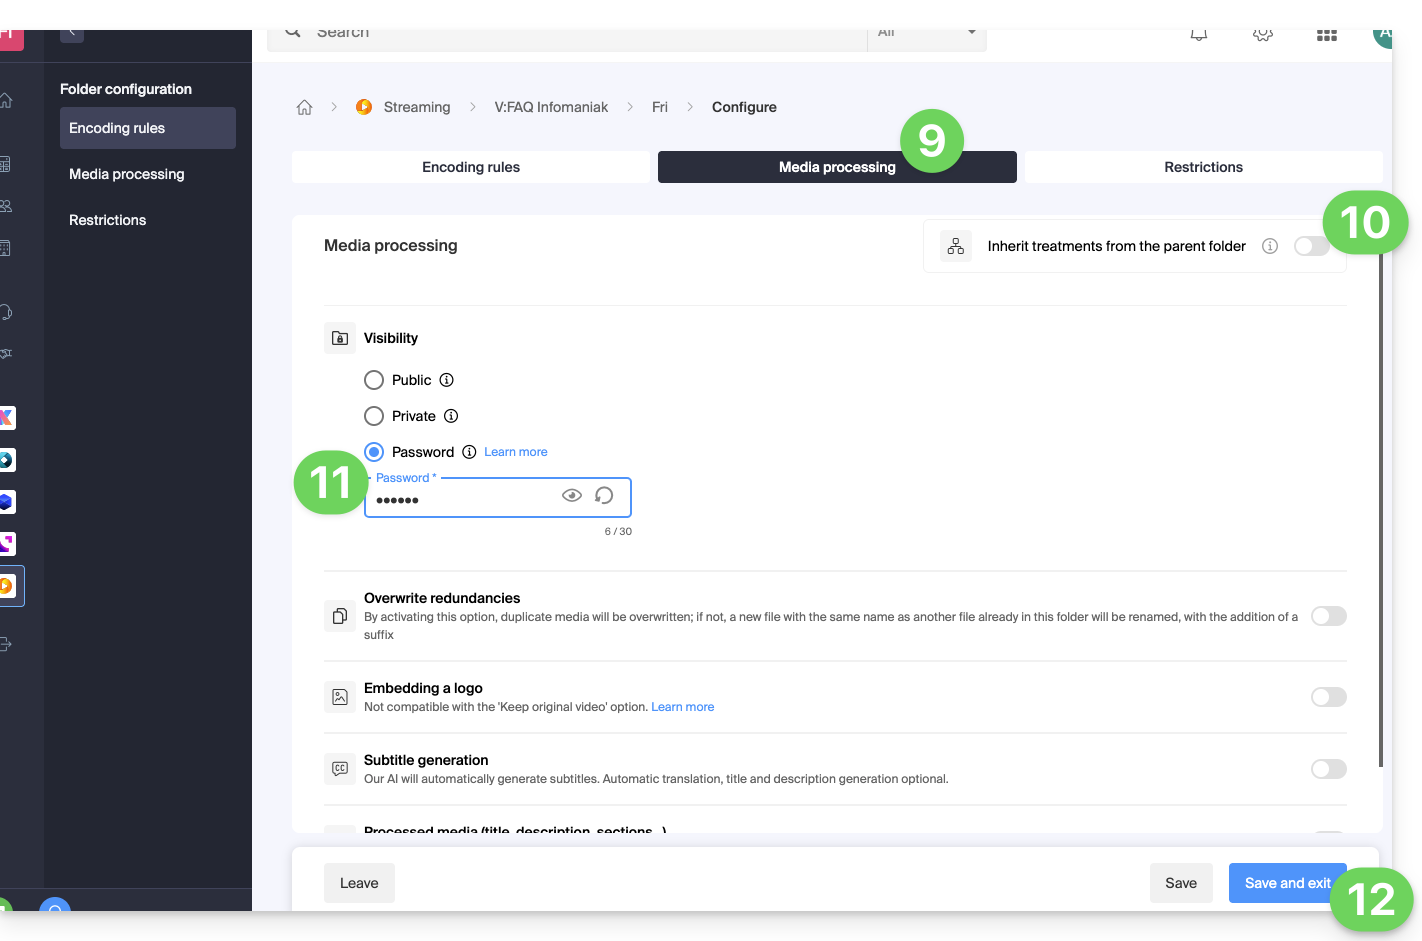
- Upload new videos to this folder so that they are password-protected when played.
A video that has already been encoded in another location in your VOD space will not be automatically protected, even if it is moved into this folder. You will need to change its status manually (see below).
2. Password defined manually for each video
To change the visibility of a video on a VOD service:
- Click here to access the management of your VOD/AOD on the Infomaniak Manager (need help?).
- Click directly on the name assigned to the product in question.
- Click on Media in the left-hand menu.
- Click on Media Management in the left-hand menu.
- Click on the video in question.
- Click on Edit in the Status section.
- To change the visibility of this media, choose the Password option and enter a new password with a minimum of 6 characters.
- Click on the blue button to Change the status:
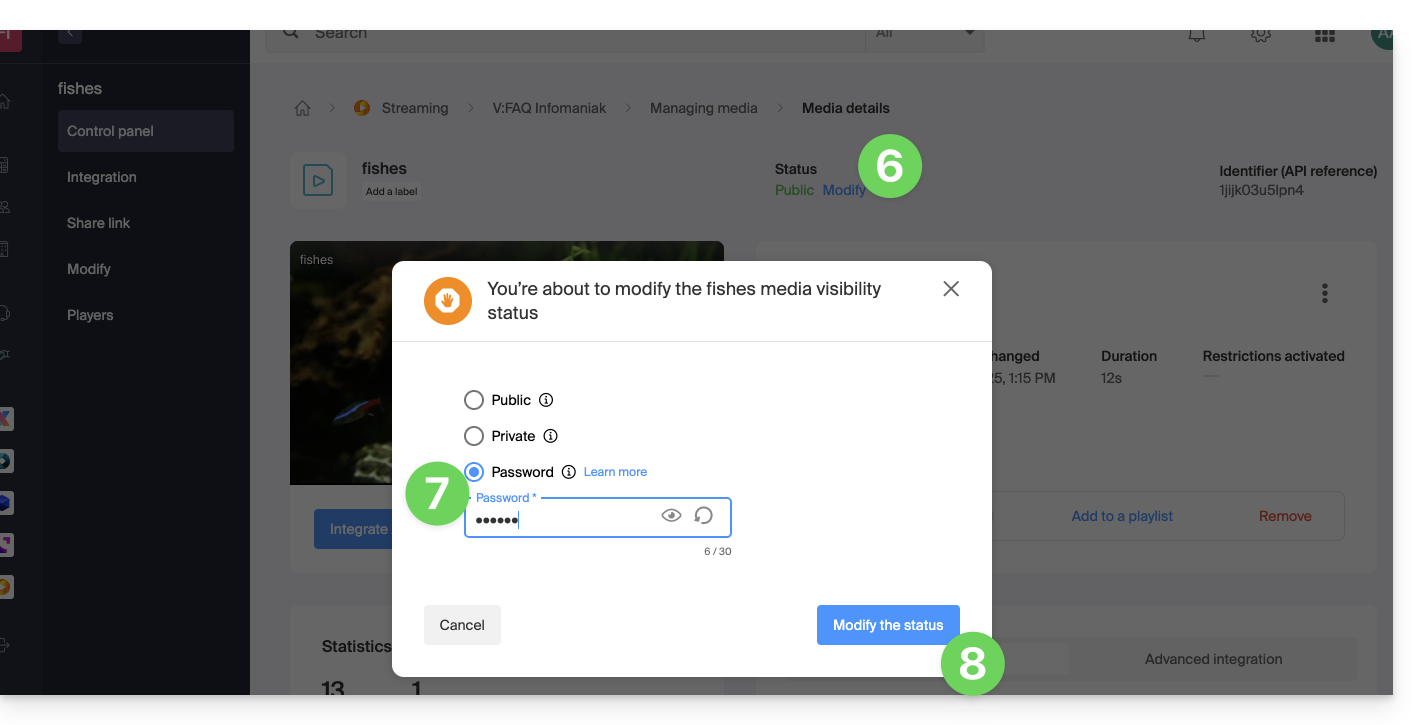
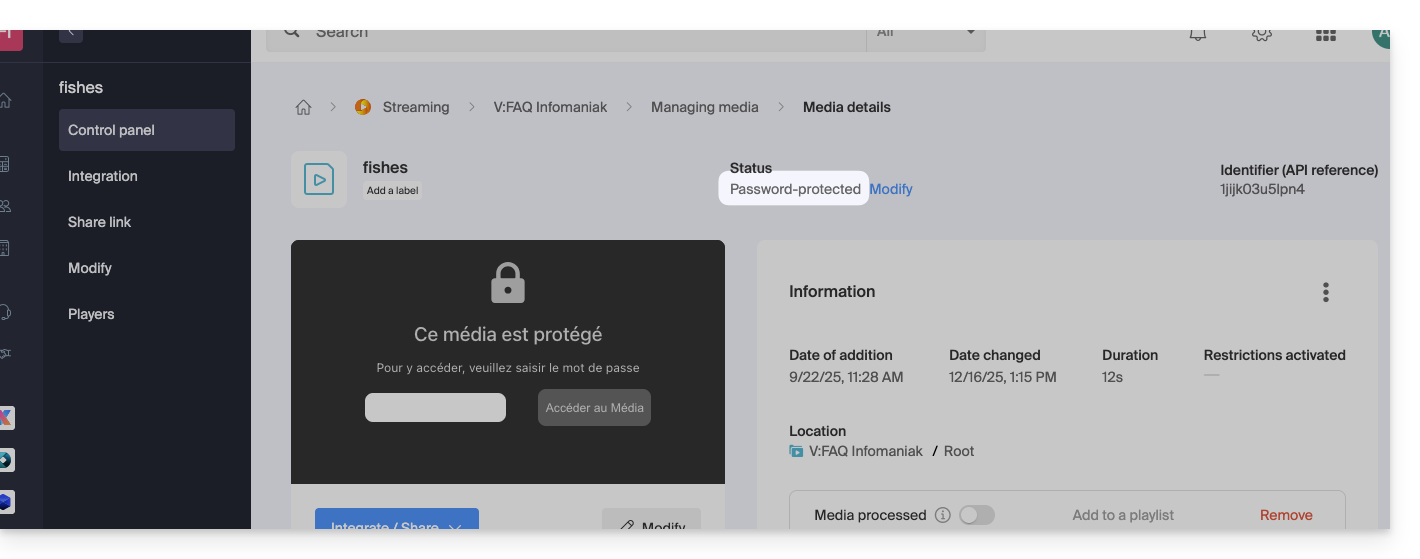
- The video is now password-protected:
Link to this FAQ:
Has this FAQ been helpful?
This guide explains how to move a media file that has been uploaded to a VOD/AOD space to another folder.
Preamble
- When moving, the media retains its different encodings.
- It is not re-encoded and therefore does not inherit the encodings of the destination folder.
Manage VOD/AOD media
To access the media:
- Click here to access the management of your product on the Infomaniak Manager (need help?).
- Click directly on the name assigned to the product concerned.
- Click on Media in the left sidebar.
- Click on Media Management in the left sidebar.
- Select one or more media files.
- Choose the desired option at the bottom of the page:
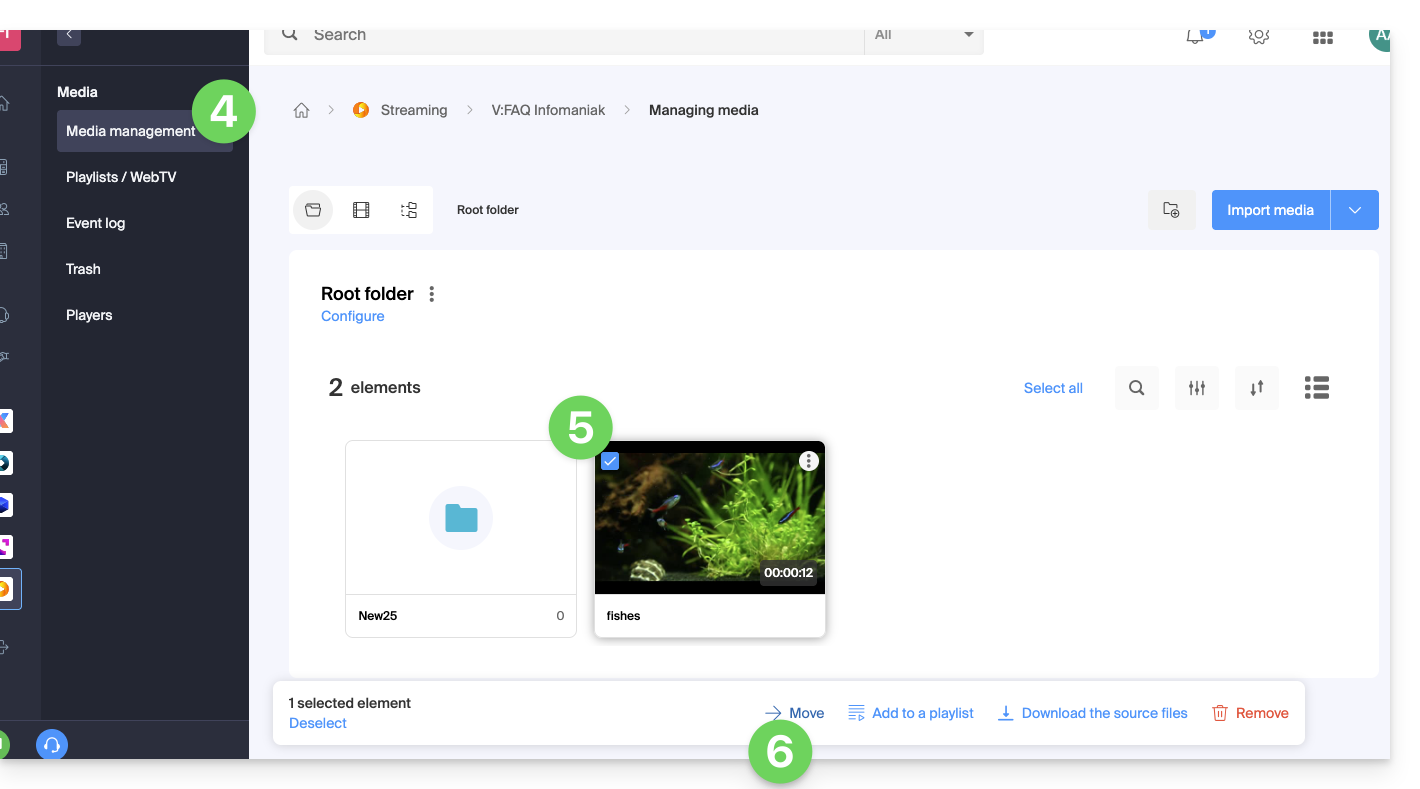
- … or click on a media file to open it and click on the action menu ⋮ on the right:
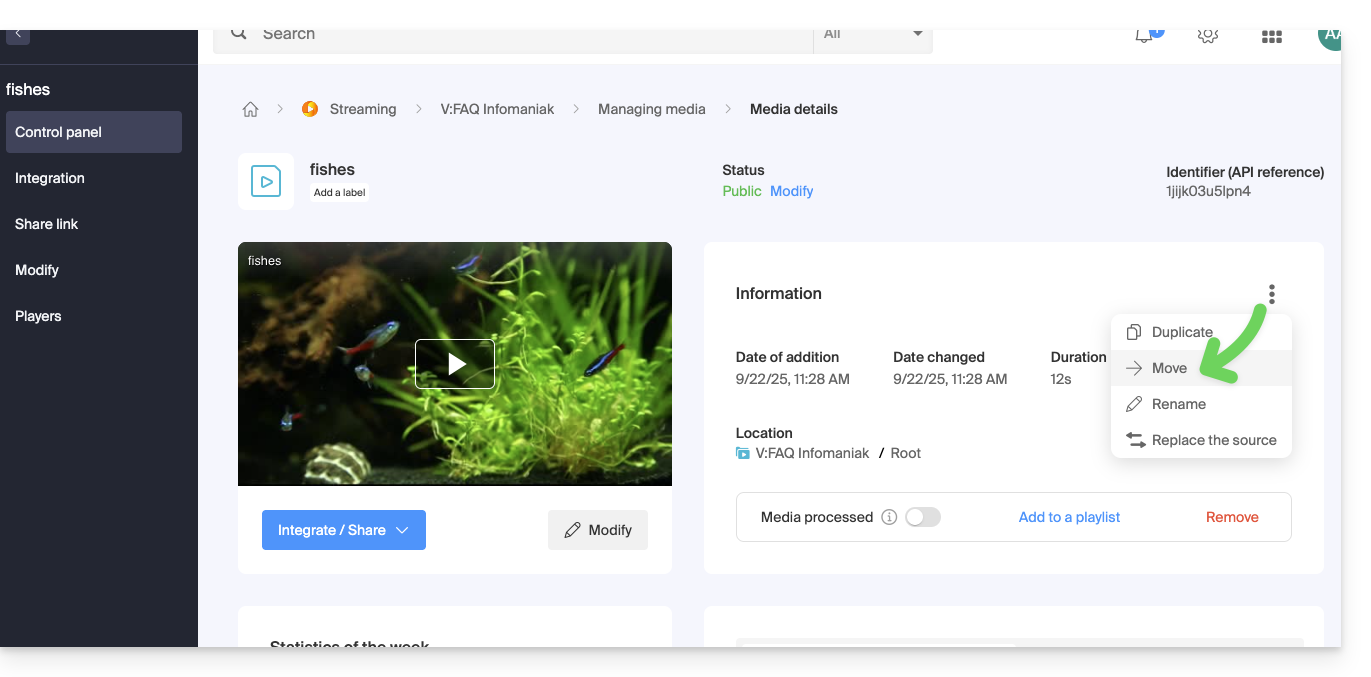
- … or click on a media file to open it and click on the action menu ⋮ on the right:
Link to this FAQ:
Has this FAQ been helpful?
This guide explains how to restrict access to imported videos on an Infomaniak VOD service based on geographical criteria and/or IP addresses.
Preamble
- Note that token protection is only effective in the case of standard integration via iframe and therefore through the use of the Infomaniak Player.
- Other access restrictions can be activated and concern access to the file: token | password
Restrict access via GeoIP
Geographical and IP restrictions are configured at the import folder level and will protect all videos in the folder. To configure this folder:
- Click here to access the management of your VOD/AOD on the Infomaniak Manager (need help?).
- Click directly on the name assigned to the product concerned:
- Click on Media in the left sidebar menu.
- Click on Media Management in the left sidebar menu.
- Click on the icon to create a New Folder:
- Name the folder.
- Click on the blue button to Create the folder.
- Click on Configuration:
- Click on the Restrictions tab.
- Deactivate if necessary the toggle switch to remove the inheritance from the parent folder, this in order to be able to configure your own rules on this specific folder.
- Activate the toggle switch to be able to define a list of countries and what should be done with:
- Allow only the countries in the list to access the media (the rest of the world is blocked).
- Allow the whole world except the countries in the list which will be blocked.
- Activate the toggle switch to be able to define a list of IPs or IP ranges that must be allowed or denied (the character
*is allowed). - Click on Save once the desired restrictions have been configured:
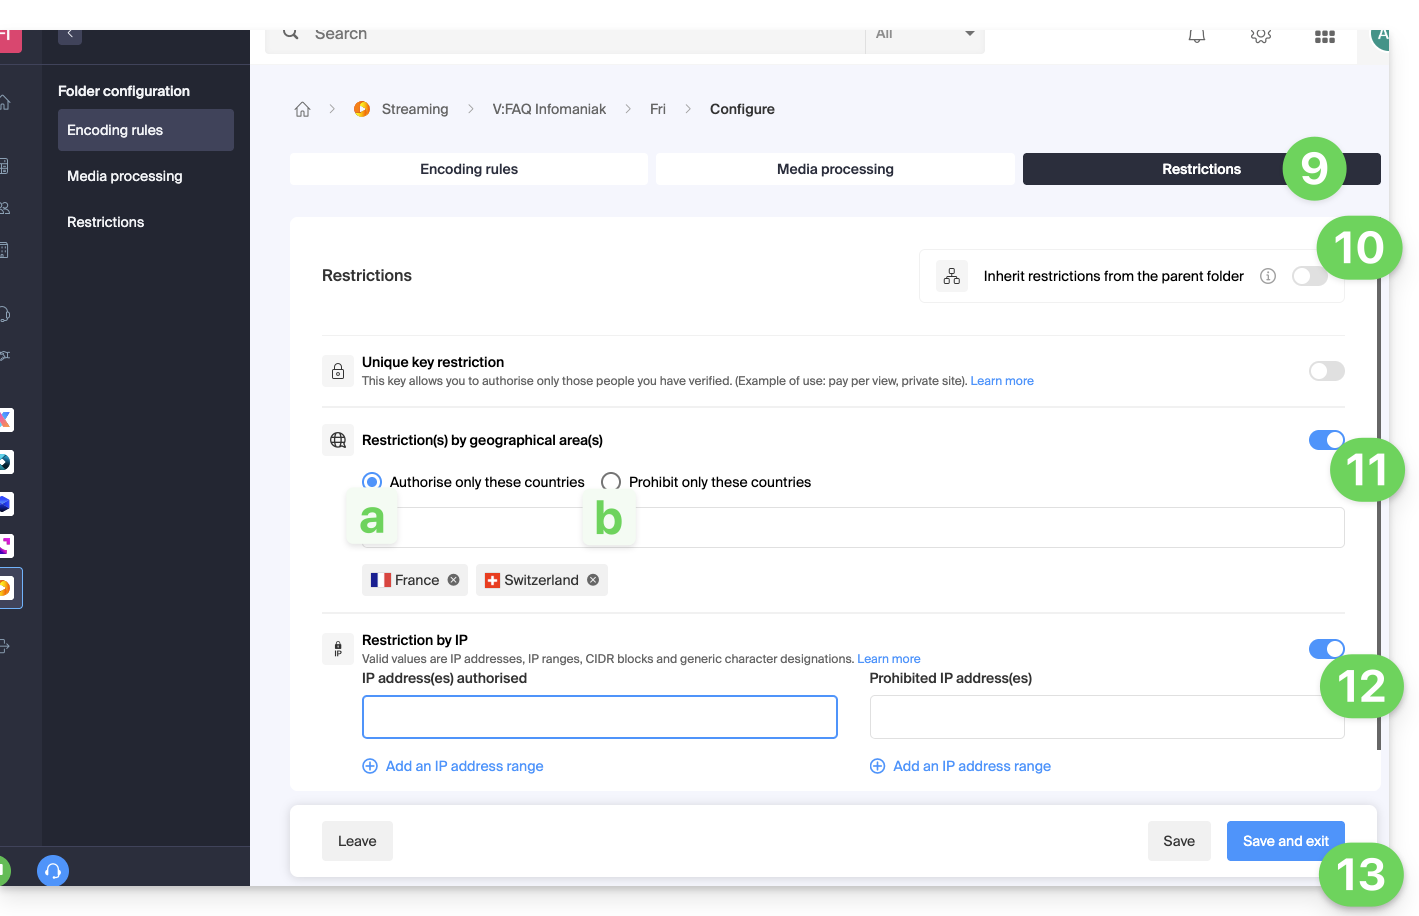
- Upload new videos to this folder so that they are restricted according to your strict rules when played.
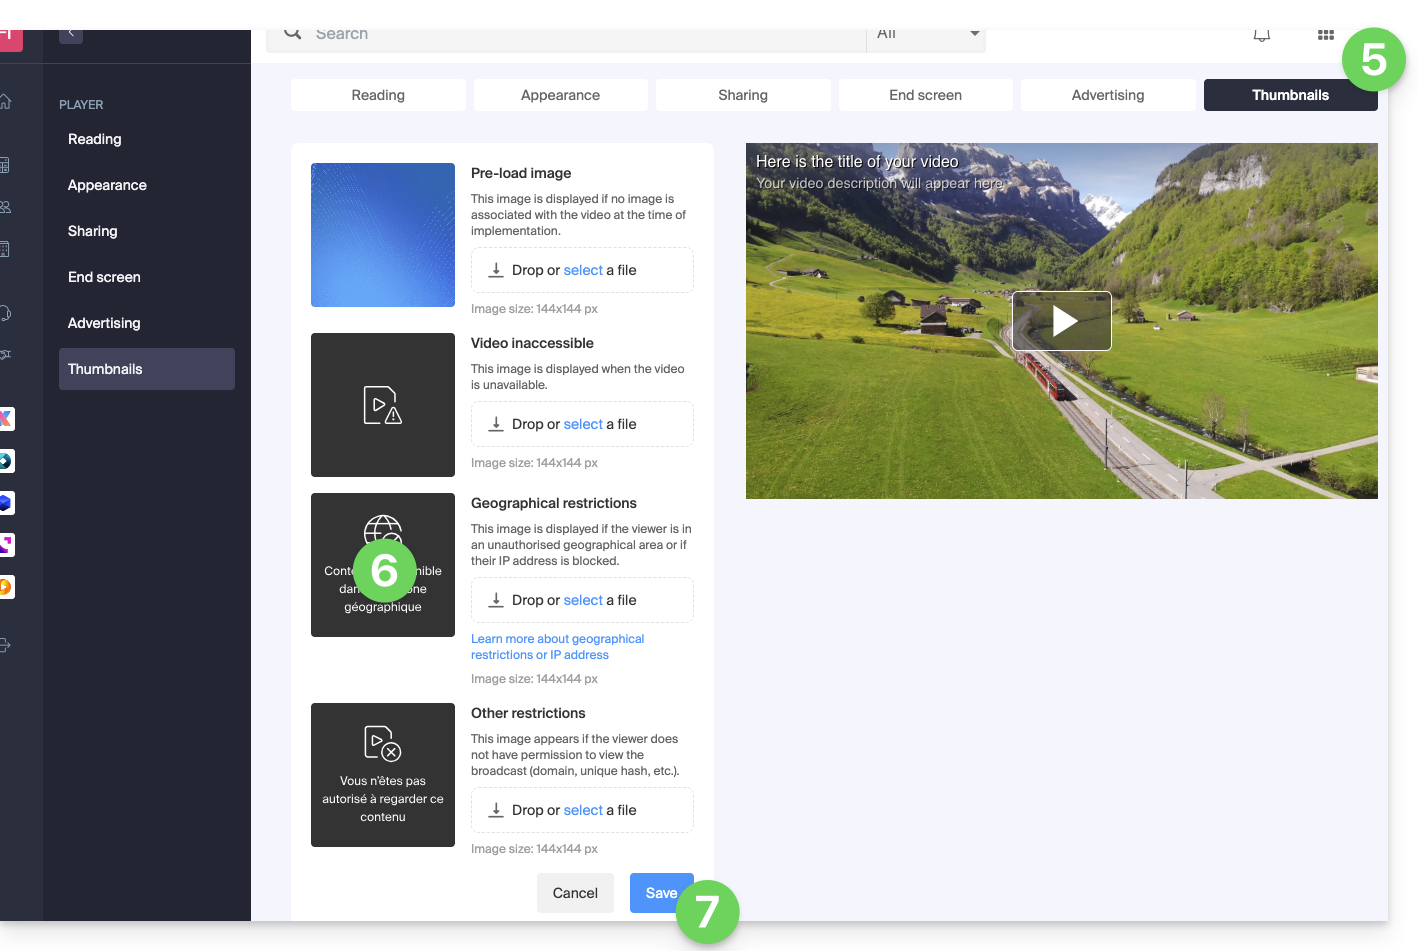
Thumbnails to display in case of GeoIP restrictions
To modify the images that should be displayed to the viewer affected by a restriction you have set up:
- Click here to access the management of your VOD/AOD on the Infomaniak Manager (need help?).
- Click directly on the name assigned to the product concerned.
- Click on Players in the left sidebar.
- Add a new Player or modify an existing Player.
- Click on the THUMBNAILS tab.
- Upload the desired images for the different situations described on the page.
- Click the blue button at the bottom of the page to Save:
Link to this FAQ:
Has this FAQ been helpful?
This guide explains how to upload new media to an Infomaniak VOD/AOD space. Refer to this other guide if you wish to replace an already imported media.
Add and encode a new media
To upload a media so that it is encoded and streamed from your VOD space:
- Click here to access the management of your product in the Infomaniak Manager (need help?).
- Click on the name of the product concerned:
There are then several ways to import your media:
- From the homepage (dashboard of the VOD/AOD space):
- From the Media page:
- Click on Media in the left sidebar:
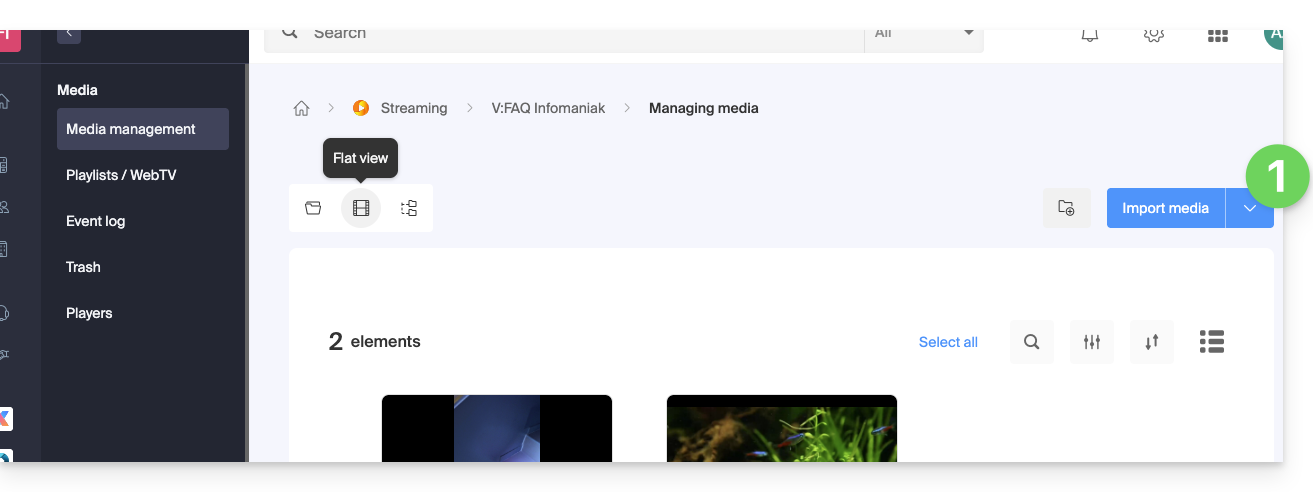
- Click on Media Management in the menu.
- Create or access an import folder if necessary:
- Click on Media in the left sidebar:
From this page, several options are available to you:
- Click on the blue Import Media button:
- Choose a sending method:
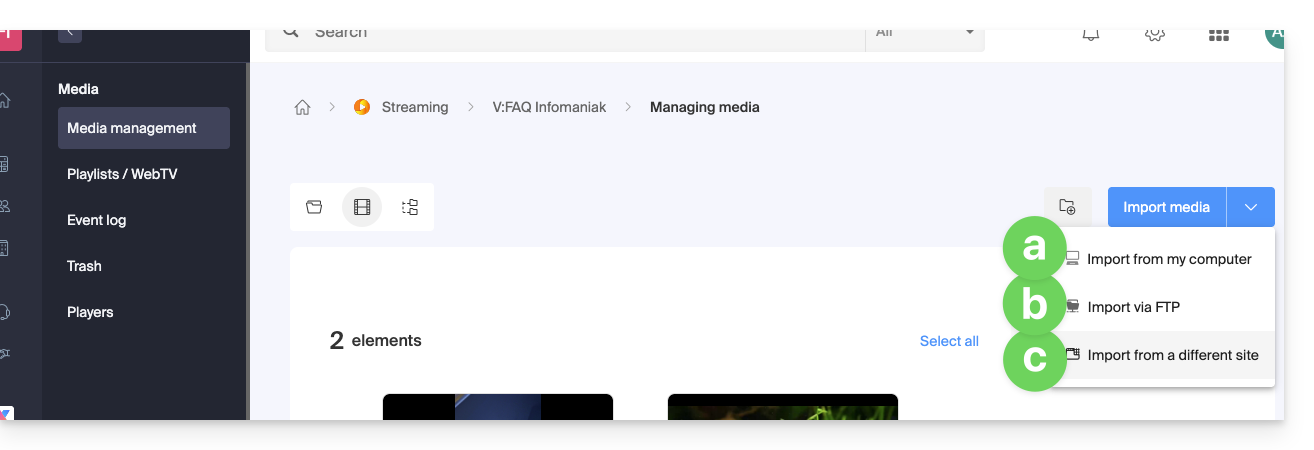
- Import from device (maximum limit per file:
50 Go)
Allows you to select a file from your hard drive or external storage: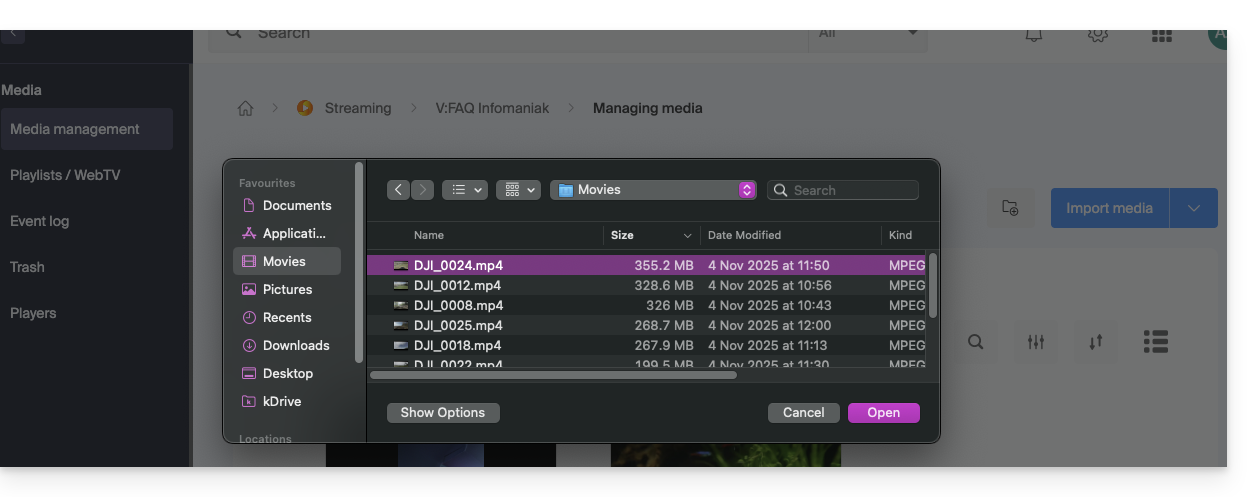
- Import via FTP (no size limit, but depends on the available disk space)
Activate TLS mode in your FTP software. The parameters and management of FTP users are customizable from the page: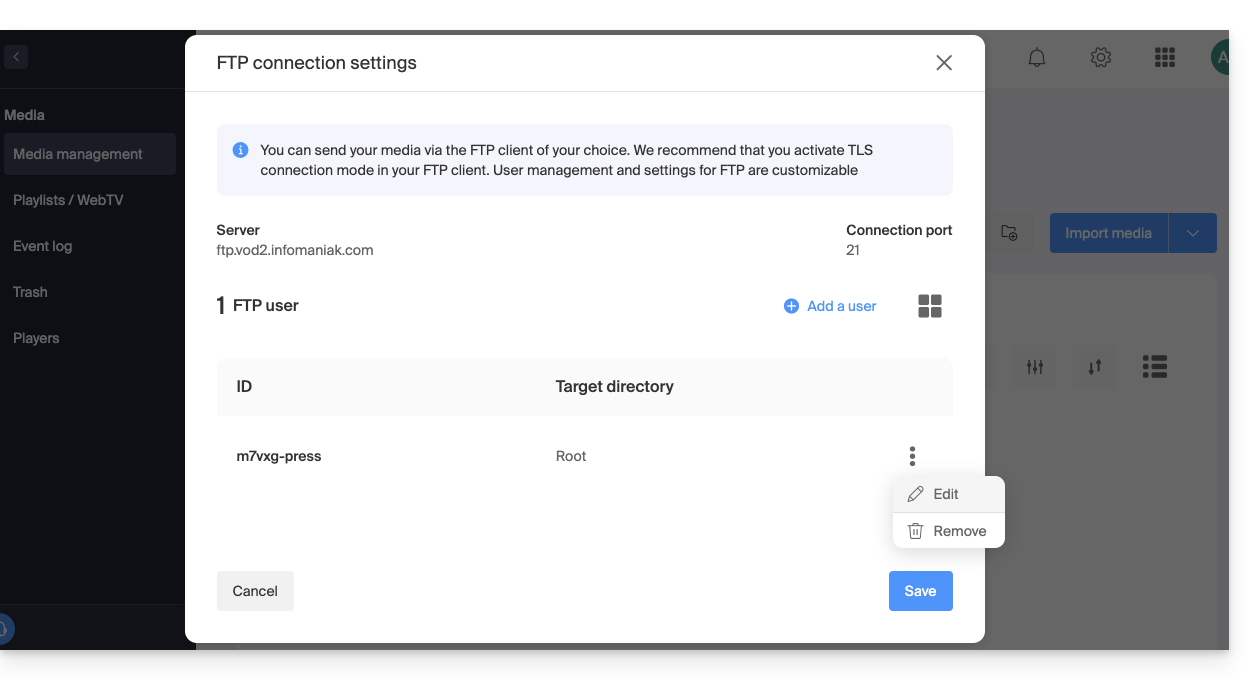
If you are using an editing software that supports FTP publishing (such as Adobe Premiere), you can export directly to the VOD space. Encoding will start automatically. Otherwise, use an FTP client such as FileZilla. - From an external site (maximum limit per file:
40 Go)
Allows you to enter the URL of an online-hosted media, including password-protected:
- Import from device (maximum limit per file:
Another method is to use the Infomaniak API (maximum limit per file: 40 Go). The documentation is accessible in the left sidebar, under API: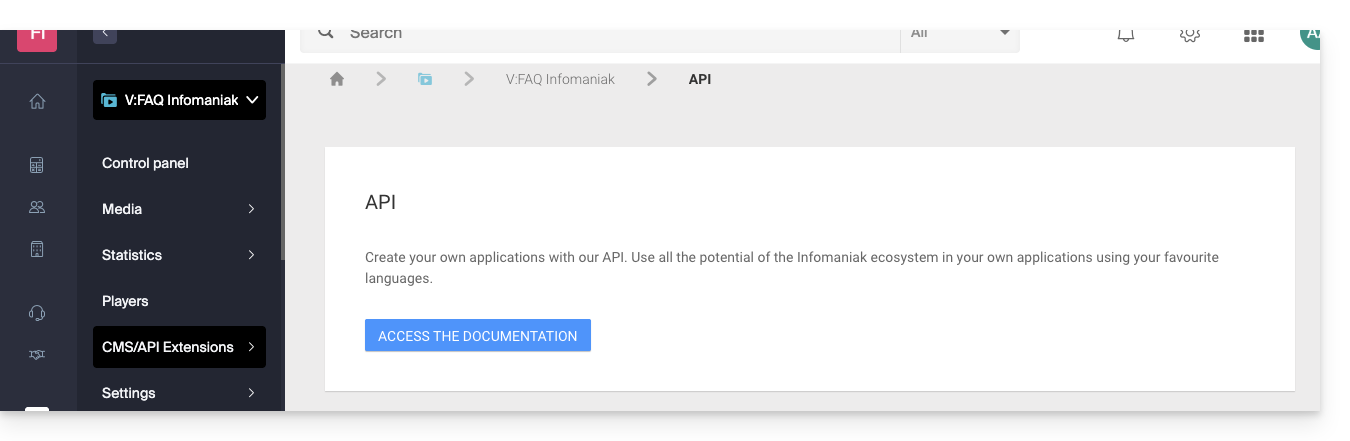
Supported formats
Supported file types:
- Video:
3gp,asf,avi,f4v,flv,m2ts,m2v,m4v,mkv,mov,mp4,mpeg,mpg,rm,ts,webm,wmv - Audio:
aac,flac,m4a,mp2,mp3,ogg,tta,vob,wav,wma
Link to this FAQ:
Has this FAQ been helpful?
It is possible to manage the start and end actions of a video that has already been uploaded to a VOD service. It is not possible to use this tool in the case of an audio-only media.
Manage the end screen (and skip the introduction)
To access a media from the VOD space:
- Click here to access the management of your VOD/AOD on the Infomaniak Manager (need help?).
- Click directly on the name assigned to the product concerned:
- Click on Media in the left sidebar menu.
- Click on Media Management in the left sidebar menu.
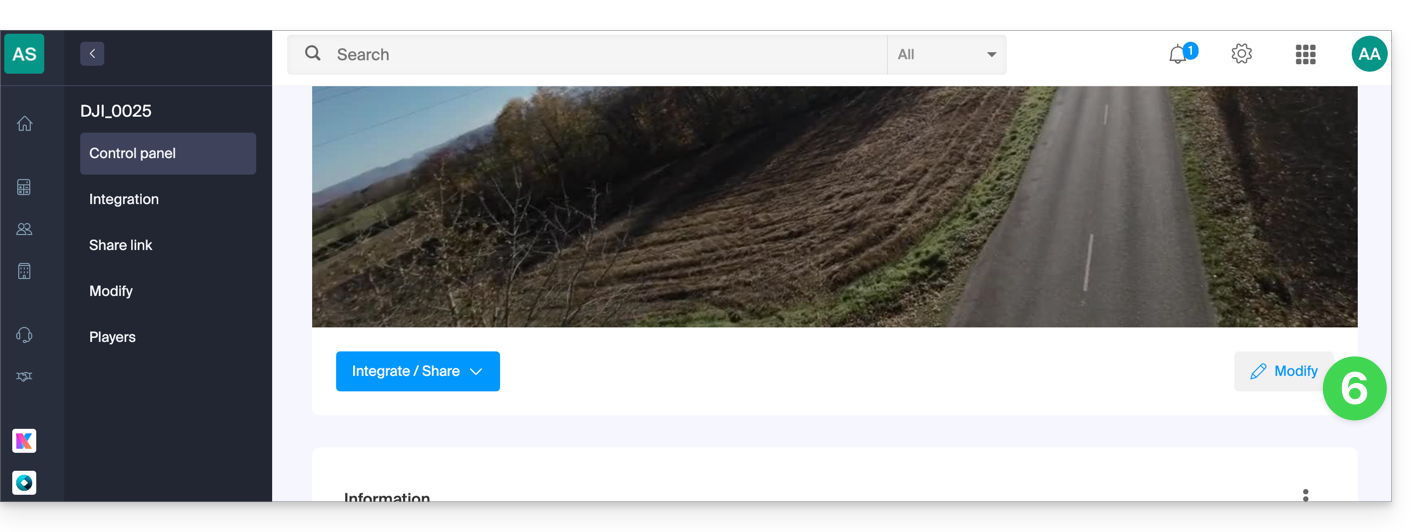
- Click on the media concerned:
- Click on the Edit button:
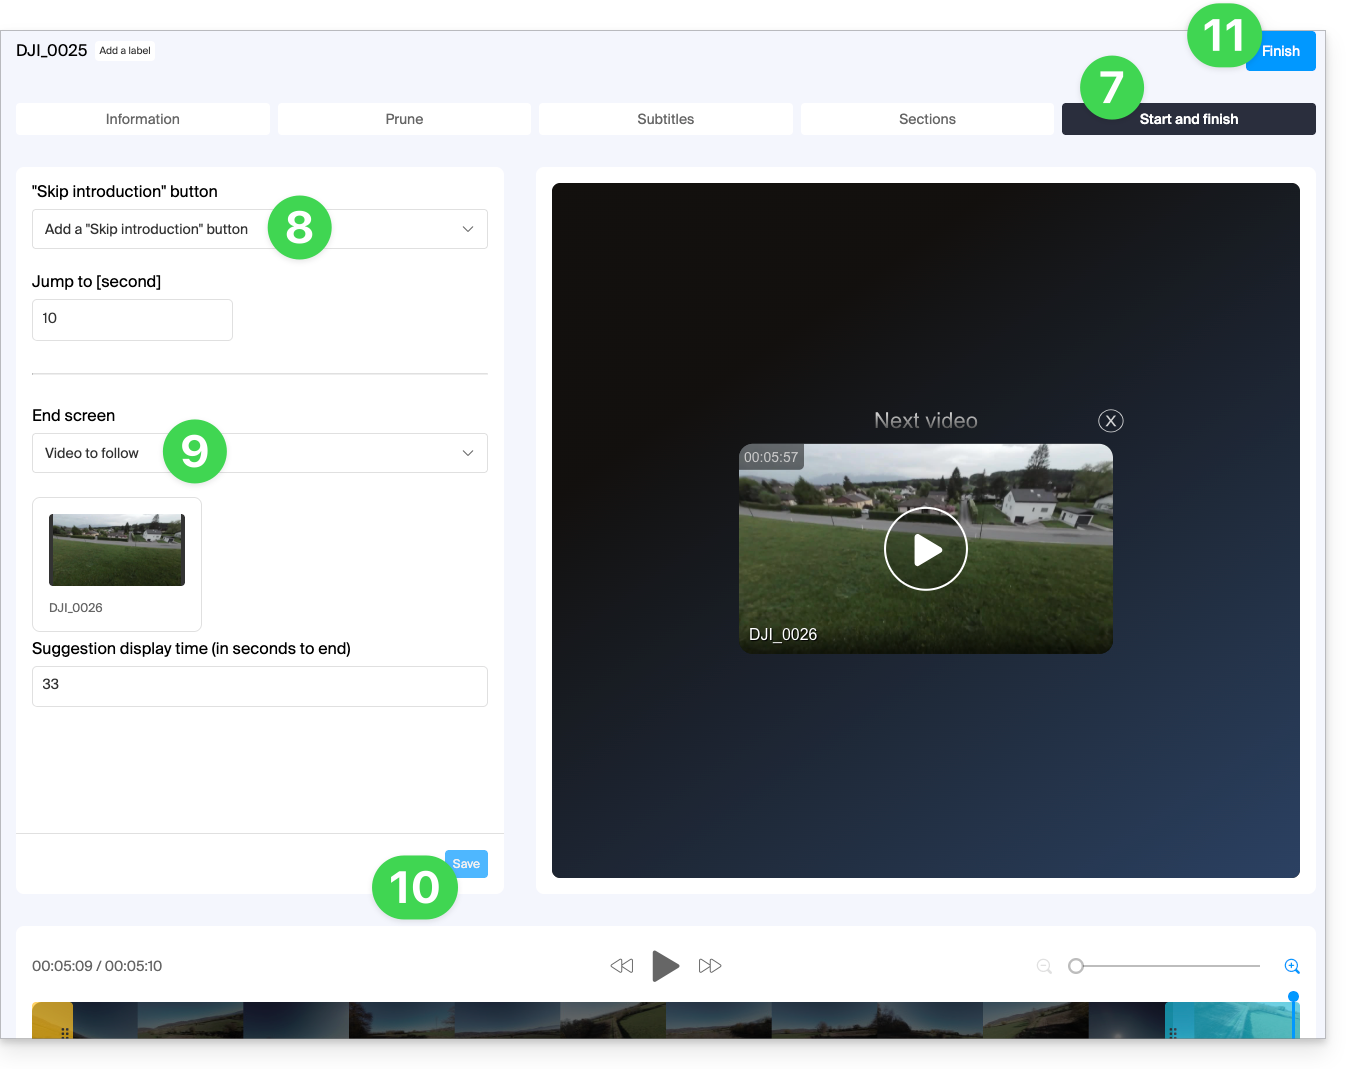
- Click on the START AND END tab.
- Choose the action desired for the start of playback: add a button to skip a predefined number of seconds, to skip an introduction for example…
- otherwise, you can choose if this setting should rather be based on the preferences of the Player (find out about the point
dof this other guide):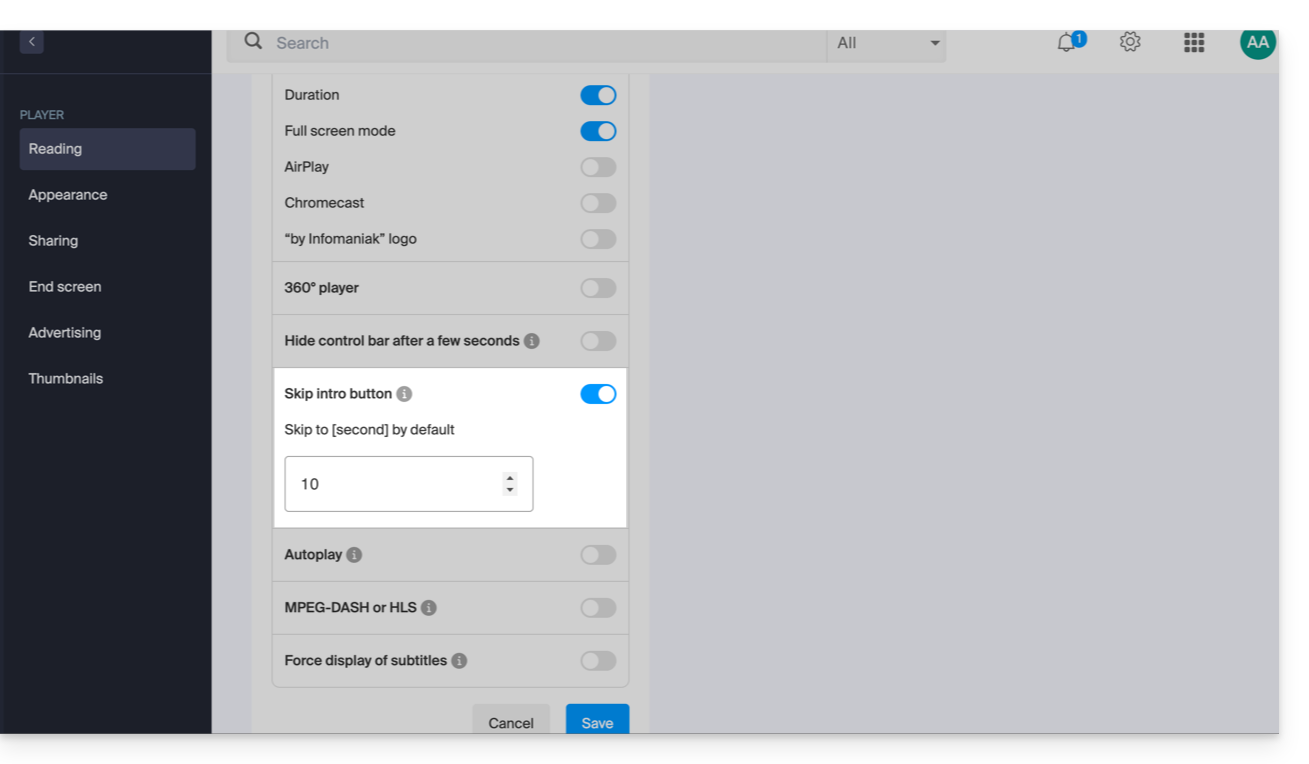
- otherwise, you can choose if this setting should rather be based on the preferences of the Player (find out about the point
- Choose the action that should be proposed at the end of the video: propose a video selected manually in advance, displayed for a predefined number of seconds, or display a proposal of 6 videos.
- Click on Save.
- Click on Finish to exit:
Link to this FAQ:
Has this FAQ been helpful?
This guide explains how to obtain the link for video/audio files imported on an Infomaniak VOD/AOD service.
Retrieve the media link according to its encoding
The link is obtained on your VOD interface:
- Click here to access the management of your product on the Infomaniak Manager (need help?).
- Click directly on the name assigned to the product concerned:
- Click on Media in the left sidebar menu.
- Click on Media Management in the left sidebar menu.
- Click on the media concerned in the displayed table:

- Click on the action menu ⋮ to the right of the encoding concerned in the displayed table.
- Choose Copy the link to obtain the direct link to the media, for example in
.mp4format: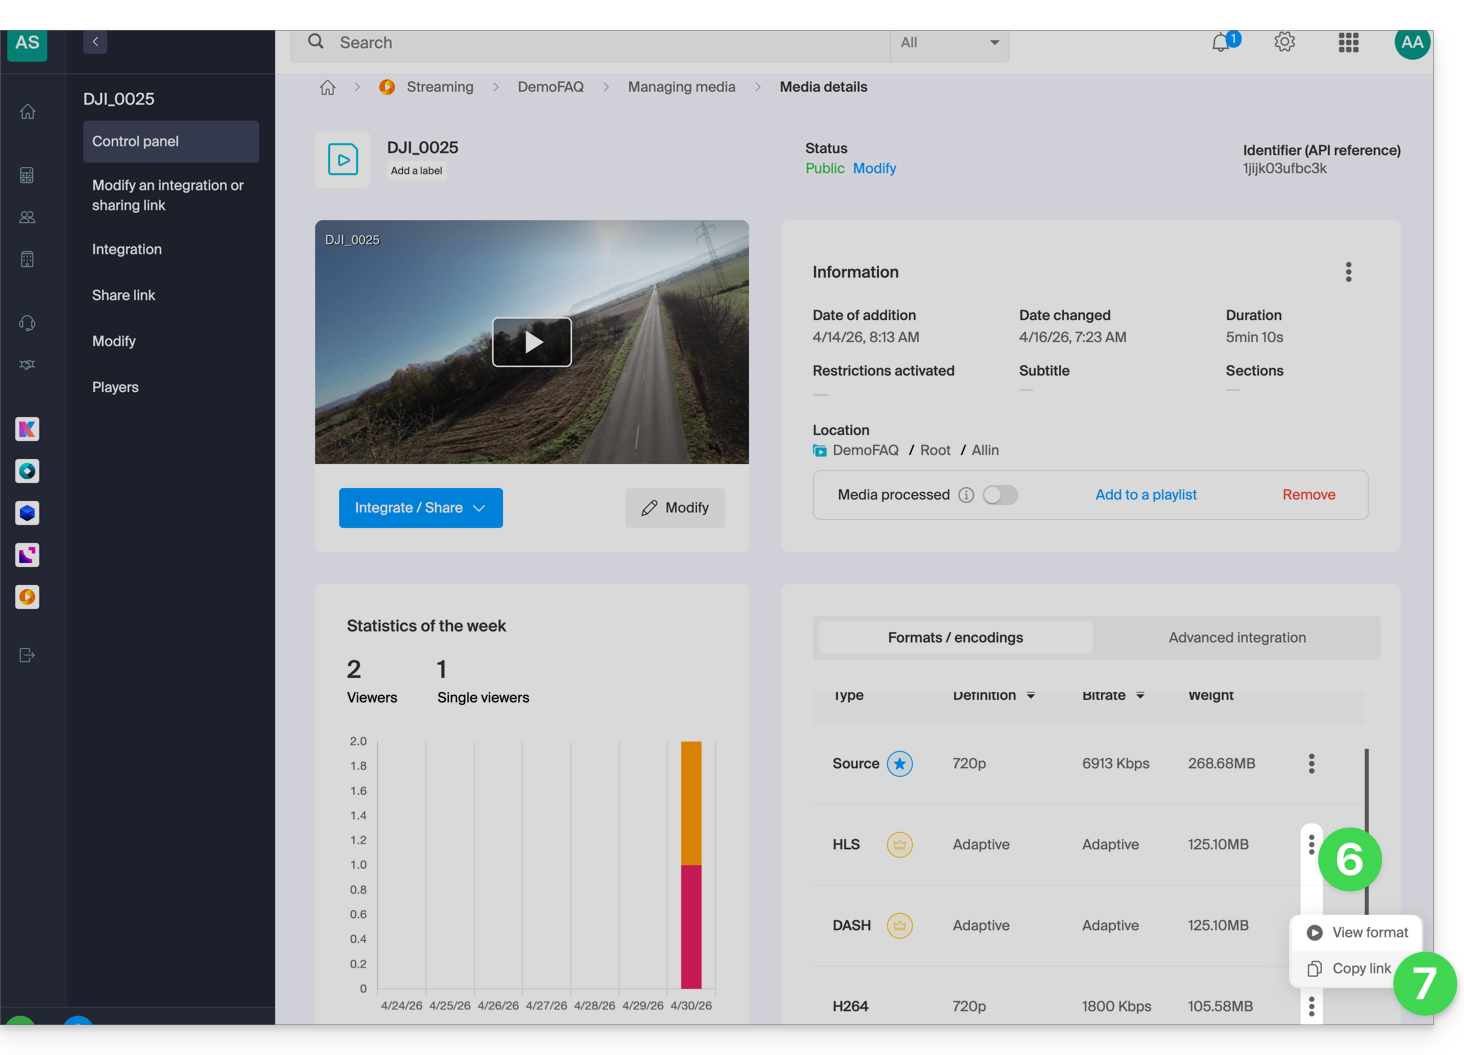
Link to this FAQ:
Has this FAQ been helpful?