Knowledge base
1000 FAQs, 500 tutorials and instructional videos. Here, there are only solutions!
This guide explains how to broadcast an online meeting kMeet in a separate stream accessible via a unique URL thanks to Infomaniak Video Streaming.
✘ UNAVAILABLE with
kSuite free / kSuite Standard
my kSuite / my kSuite+ (ik.me, etik.com, ikmail.com)
Preamble
- Broadcasting a conference-type meeting in a Video Streaming stream rather than within the kMeet application has several advantages:
- Large-scale public broadcasting without having to restrict access to an audience limited to invited people.
- Attract a wider audience, such as conferences, webinars or live events where hundreds or thousands of viewers can follow the event without joining a private call.
- Allows to reach an unlimited number of viewers.
- No need to manage access for each participant, the stream is simply viewable via a link.
- A simple web browser is sufficient to access the streaming stream.
- Passive access: viewers are not forced to actively participate or interact; they can simply watch the event without registering or logging in, which is better suited for large events.
- No vocal interruptions or disruptions related to microphone management; this allows for a smoother and more presenter-focused stream.
- Higher broadcast resolution when kMeet can be limited by bandwidth constraints and lower video quality to avoid network overload.
Create the Video Streaming share link
Prerequisites
- You must be a moderator of kMeet to be able to create a live broadcast link but it is not necessary to have an Infomaniak Video Streaming offer.
Next:
- Start kMeet via ksuite.infomaniak.com/kmeet or from one of the applications for computer or mobile devices.
- Once in the meeting, click on the action menu ○○○ in the kMeet toolbar.
- Choose to Start live streaming:

- Click the button to Start:

- Wait for the Video Streaming stream to be created:

- In the same place, once the stream link is displayed, click on the icon to the right to copy the URL corresponding to the live stream; paste the URL in a message to the participants or to anyone who should attend the live broadcast.
- A symbol displayed on kMeet as well as an audible signal indicates the start of the broadcast via Video Streaming:

The stream is broadcast continuously for a maximum of 24 hours, and will no longer be accessible as soon as the kMeet meeting is stopped.
Link to this FAQ:
Has this FAQ been helpful?
This guide explains how to live stream a list of videos from the VOD service using the Video Streaming product.
Preamble
- This feature allows you to use the VOD service to create a video playlist and then use the Video Streaming service to broadcast it live, for example as part of a music video channel, teleshopping, documentaries, etc.
- It is possible to insert advertisements between each video, manually or using VAST tags.
- The playlist will loop indefinitely until the user stops it.
Broadcast a VOD playlist in live streaming
Prerequisites
- Have a VOD service (at least the free VOD space with the Video Streaming service).
- Have a Video Streaming service in the same Organization and managed by the same account.
To create the playlist, import some videos:
- Click here to access the management of your product on the Infomaniak Manager (need help?).
- Click directly on the name assigned to the product concerned:
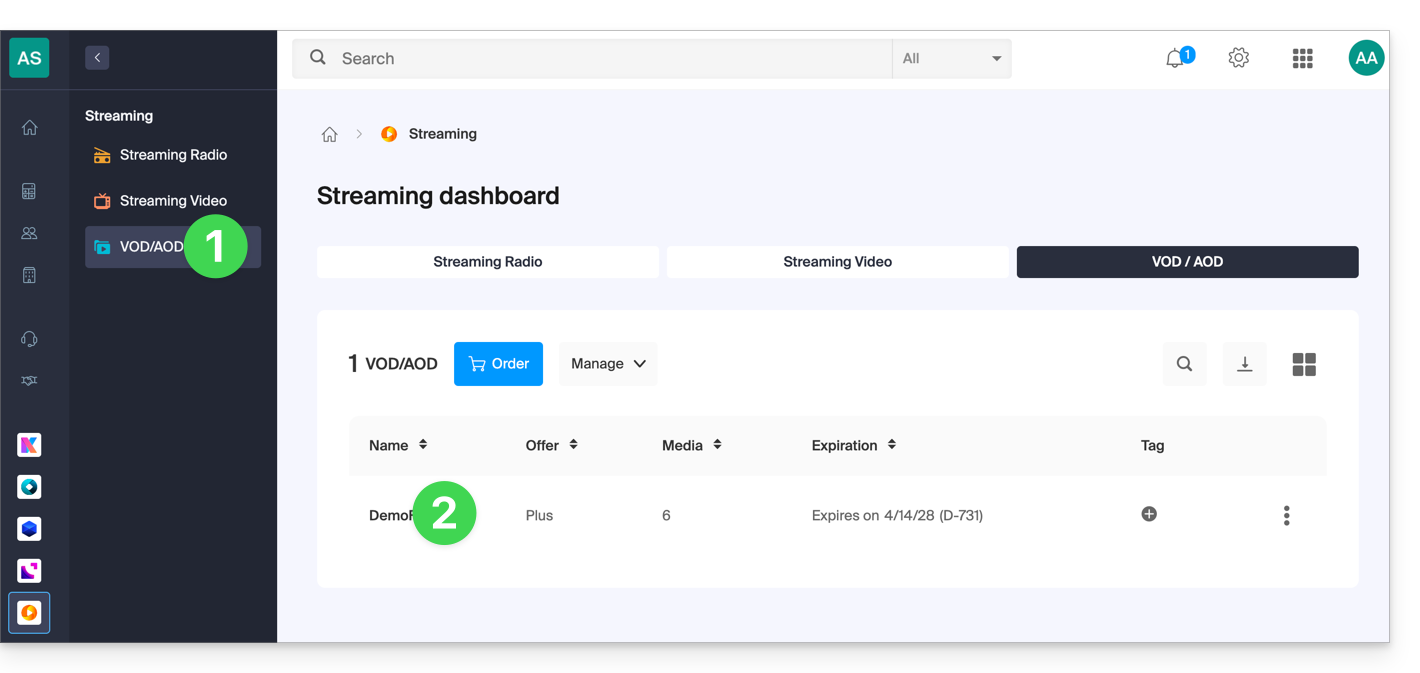
- Select the media to import in the Quick Import section or from the Media Management:
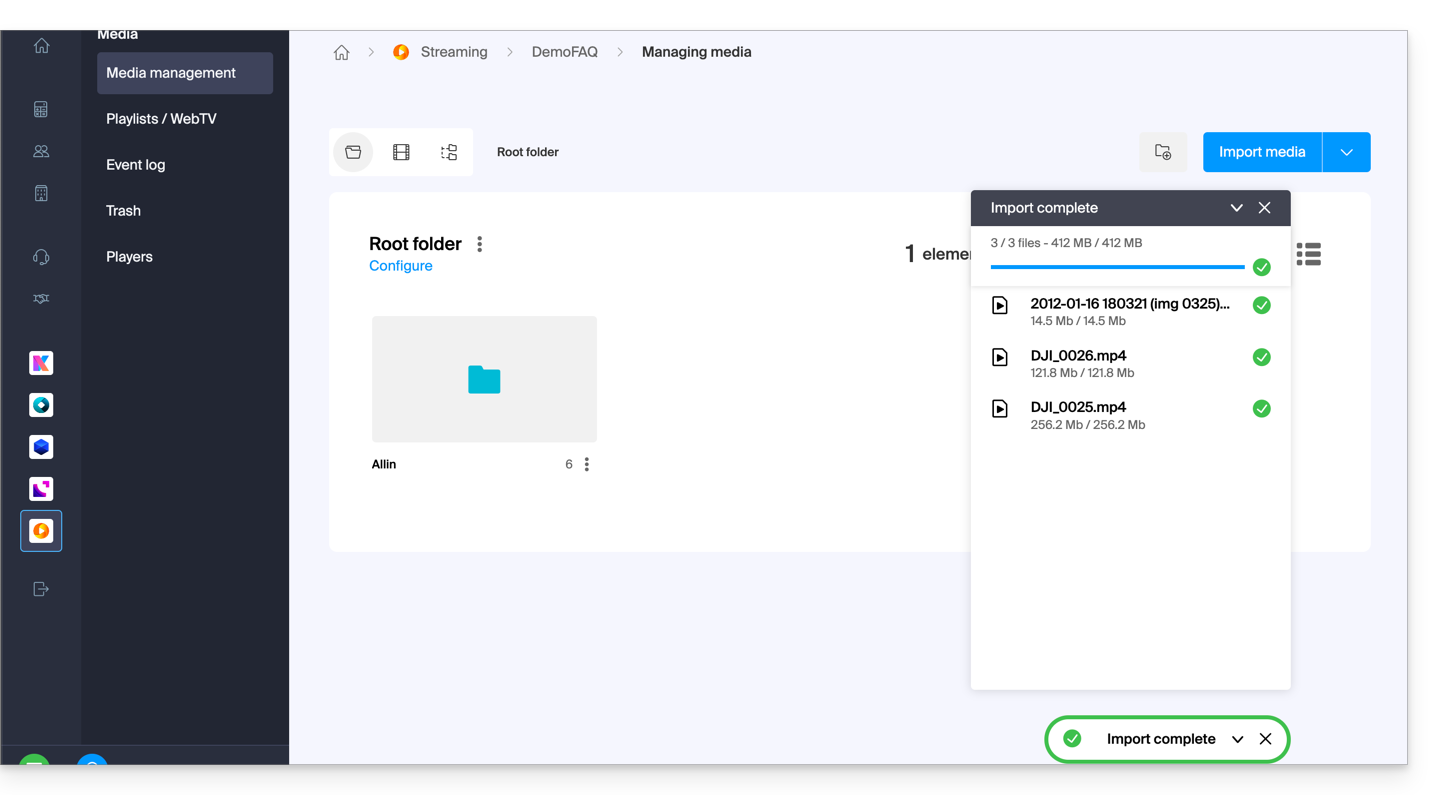
Once the videos are imported:
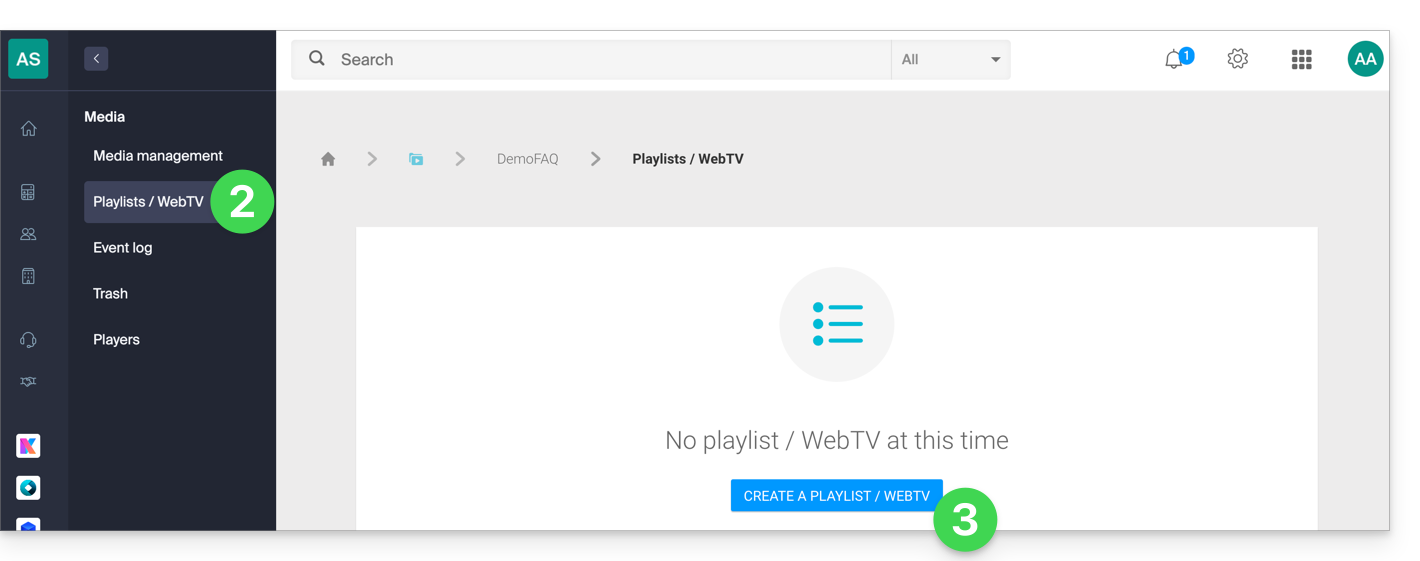
- Click on Media in the left sidebar menu.
- Click on Playlists / WebTV in the left sidebar menu.
- Click the button to add a new playlist:
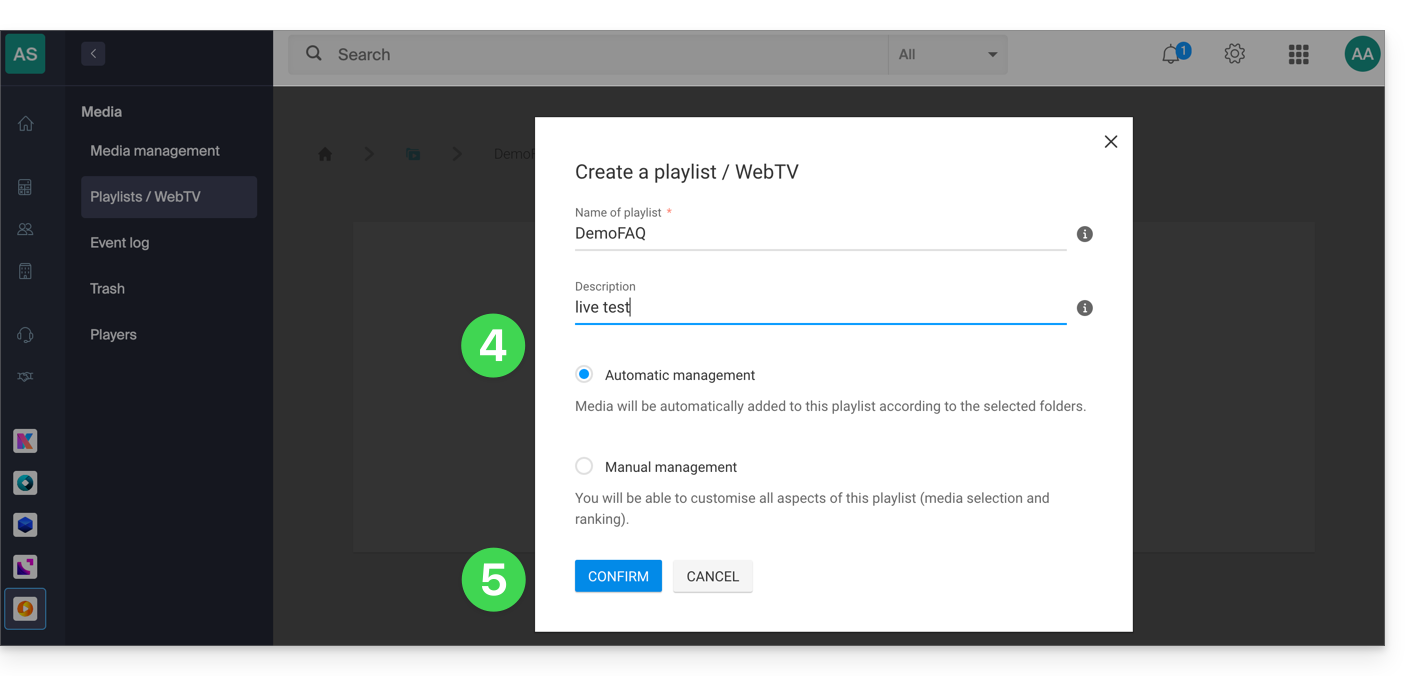
- Name the playlist and determine if it should be automatic (linked to a folder) or manual.
- Confirm:
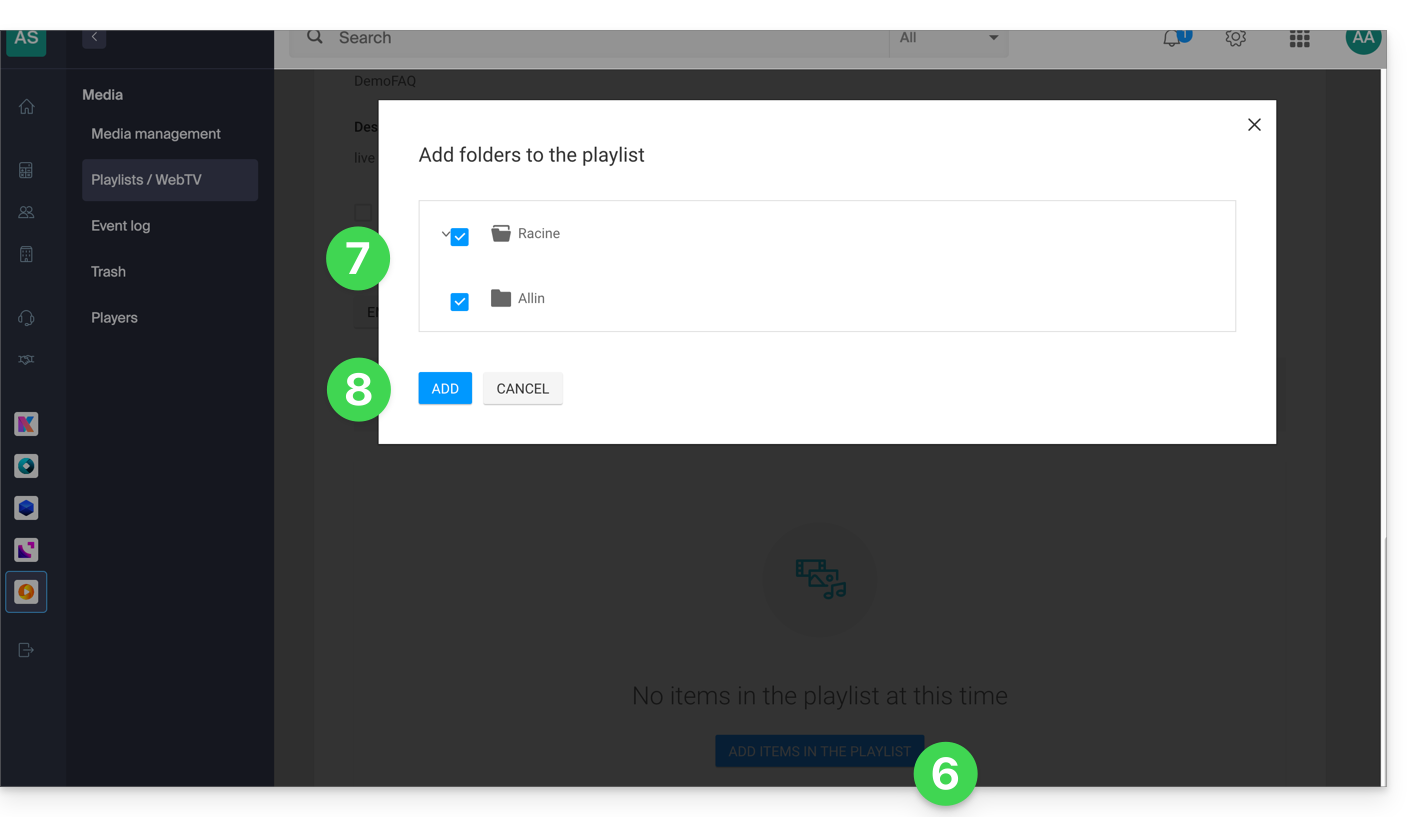
- Click to add media.
- Choose the folder or specific videos to use to create the playlist.
- Add media:
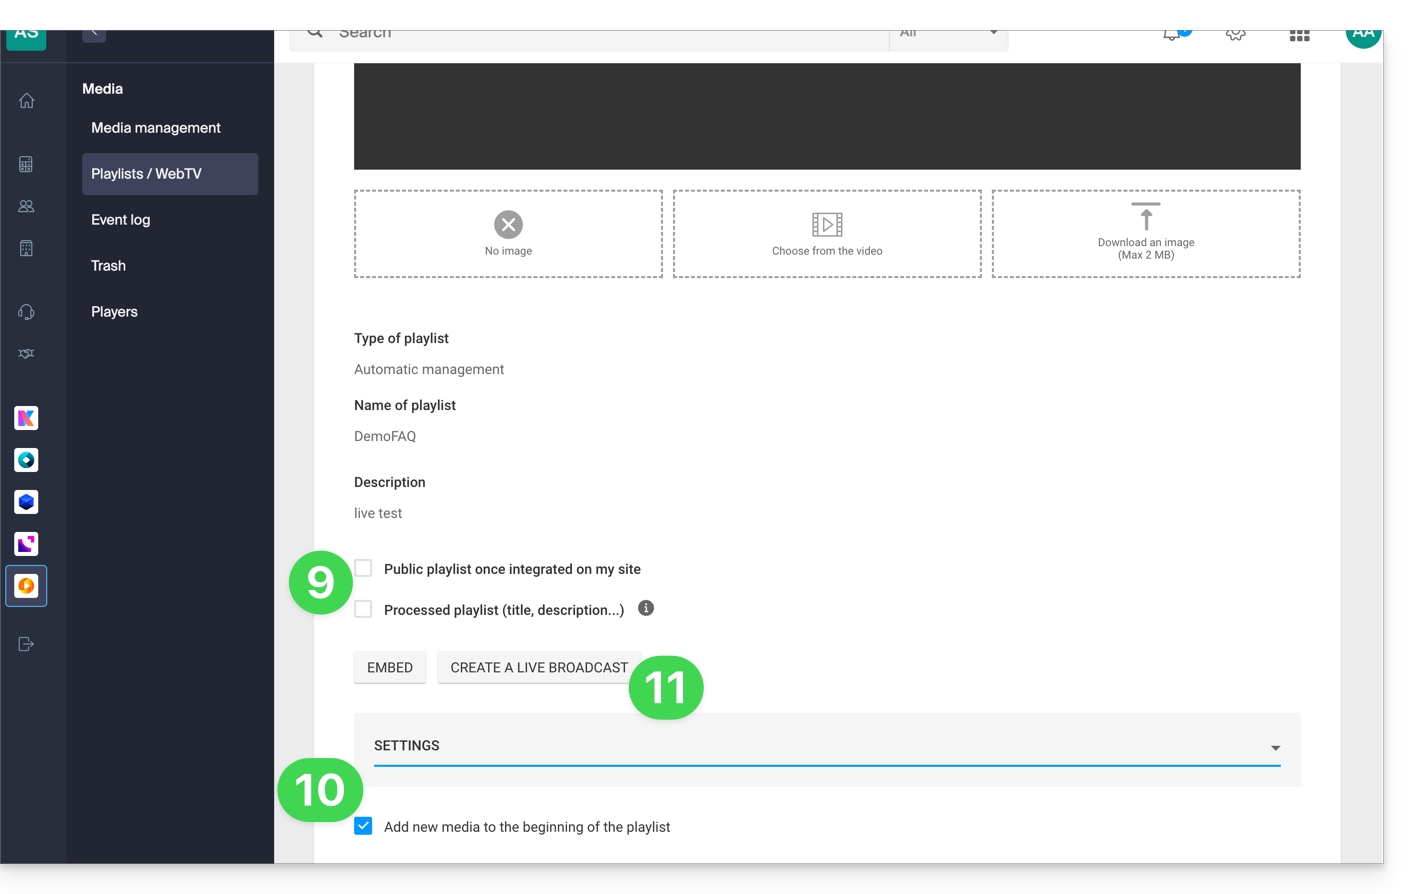
- Choose whether the playlist should be public and whether, like your media, it needs to be “marked” as “processed” (status visible only to you).
- In the additional settings, you can choose to add media to the beginning of the playlist instead of the end.
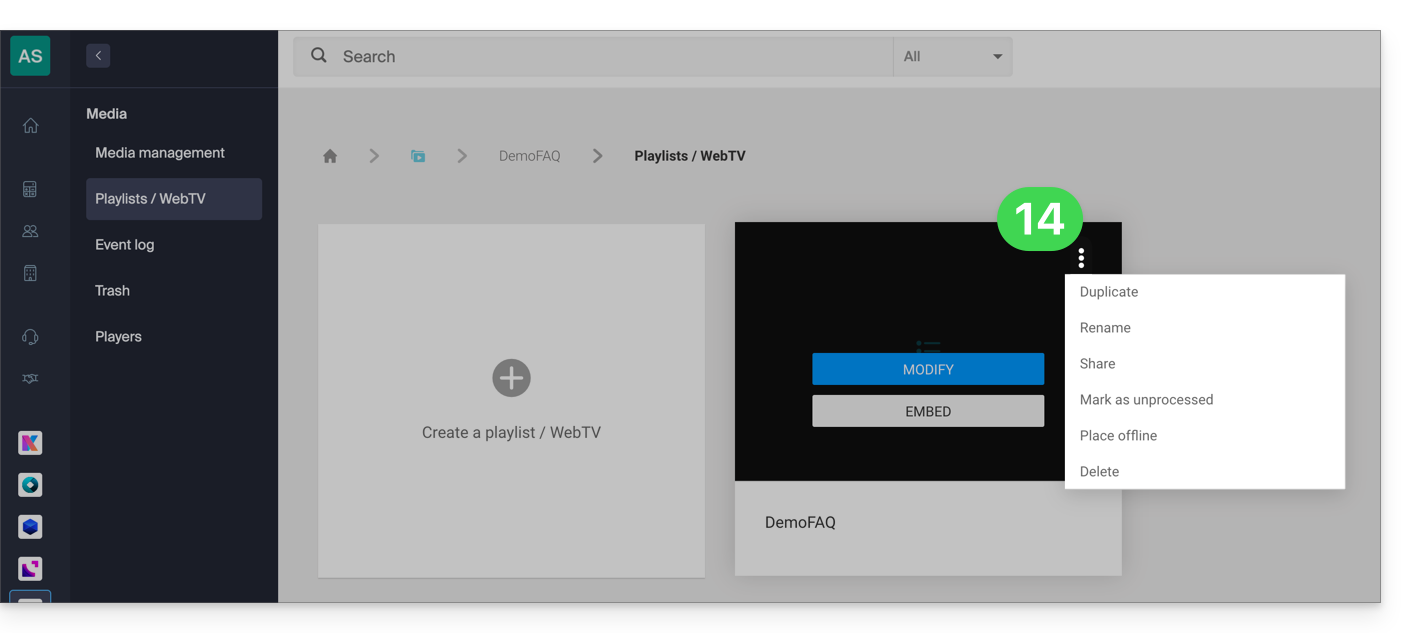
- Click the Create Live button:
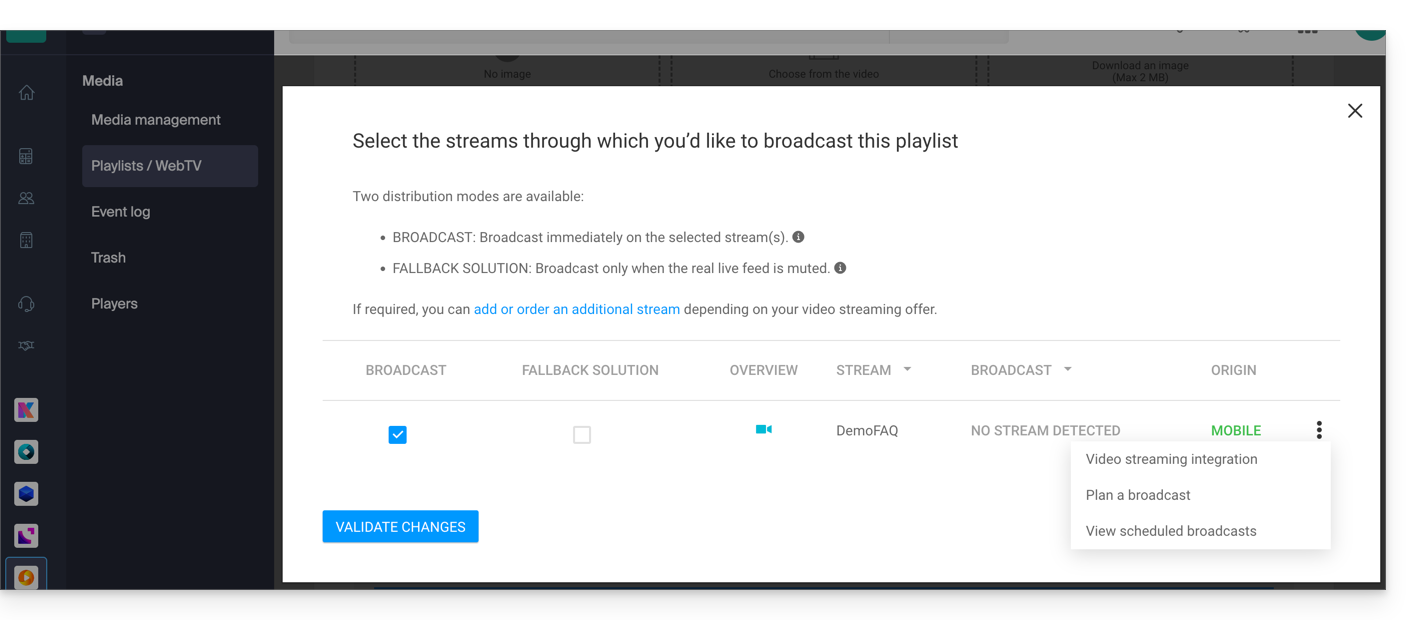
- Choose the stream from the Video Streaming service that will broadcast the playlist and set your preferences:
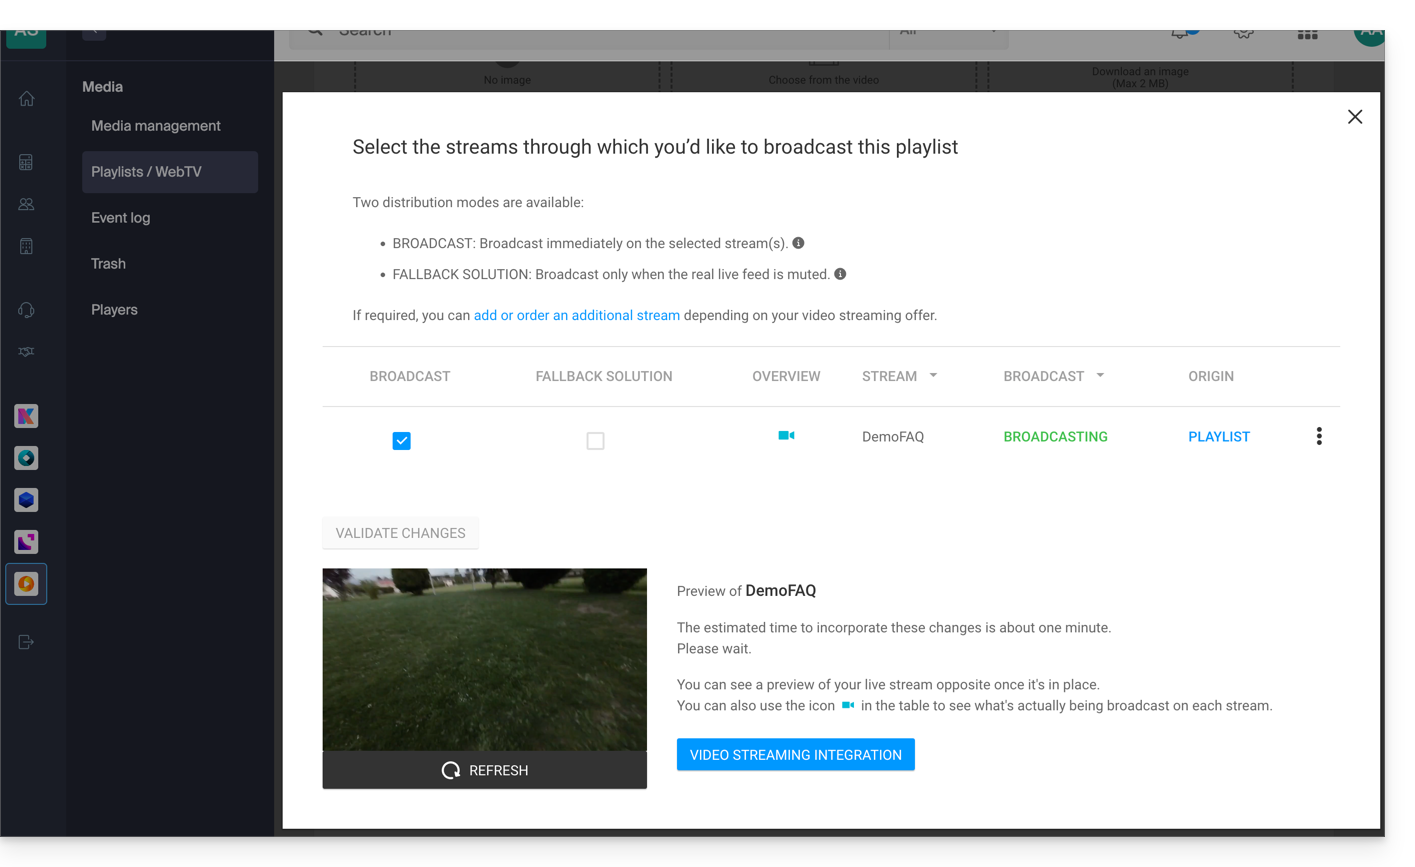
- Confirm when you are ready to broadcast; the preview will appear below:
- Each playlist can be duplicated, renamed, shared, deleted, etc., directly from the playlists page:
A few usage examples
Broadcasting a playlist can serve as a fallback solution as soon as a live stream is interrupted (voluntarily or involuntarily) and in this case take over the air. As soon as the live encoder pushes a stream, it takes control of the playlist. This allows you to broadcast alternative content if there is a problem with the live stream or if the user only broadcasts real live content in the evening, for example, they can automate the broadcasting of content from playlists for the rest of the day.
It is also possible to schedule the broadcasting of a playlist from the Video Streaming scheduling tool. Thus, you can choose to broadcast unique or different playlists in advance, either one-time or recurrently. The encoder broadcasting live will be automatically disconnected and this for the entire duration of the playlist broadcast; once the time slot is over, the encoder will reconnect and its content will be broadcast.
A VOD playlist can be created and then edited manually (by retrieving the video that needs to complete the list) or be dynamic if automatically composed by a batch of videos located in a specific folder and fed over time. In both cases, stop then restart the live broadcast to take into account any new video added to the playlist - note that this will no longer be necessary in a future update of the tool.
Link to this FAQ:
Has this FAQ been helpful?
This guide details the elements necessary for optimal streaming of your streams on the Infomaniak Video Streaming service.
Recommended bitrate according to video quality
When encoding your streams, it is essential to adapt the bitrate to the desired quality:
- SD video (480p): minimum 1000 kbit/s.
- HD video (720p): between 2500 and 4000 kbit/s.
- Full HD video (1080p): between 5000 and 8000 kbit/s.
- 4K Ultra HD video (2160p): from 15000 kbit/s.
Ensure sufficient Internet bandwidth
To guarantee uninterrupted streaming, it is recommended to have an Internet bandwidth at least twice the bitrate of your encoded stream, for example:
- For a Full HD stream encoded at 6000 kbit/s, a minimum Internet bandwidth of 12 Mbit/s is required.
- This margin avoids interruptions due to connection variations or other devices using the same network.
Use multi-bitrate for maximum adaptability
The multi-bitrate allows your stream to be available in several qualities, adapted to the viewers' connections. This guarantees:
- A smooth experience for those with limited bandwidth.
- Optimal quality for viewers with a fast connection.
Optimize your streams for mobile users
Mobile viewers may encounter fluctuating network conditions. To improve their experience:
- Encoding at a maximum bitrate of 1000 kbit/s per stream for lower resolutions.
- Implement multi-bitrate to automatically adapt the quality.
Best practices for successful encoding and streaming
- Test your Internet connection before each stream.
- Prioritize a reliable encoder and update its parameters according to the recommendations above.
- Make sure your network is dedicated to streaming to avoid disruptions caused by other uses.
- Plan a backup solution (such as a 4G/5G modem) in case of connection issues.
Link to this FAQ:
Has this FAQ been helpful?
This guide covers the broadcasting of video streams directly from mobile cameras on the Infomaniak Video Streaming service.
Broadcast live...
... with an encoder
The classic operation of Video Streaming involves using an encoder to transform the stream from a camera or webcam source.
Example with a GoPro: to broadcast what it films live (setting up a live webcam, for example), you can connect it via its HDMI cable to your capture card (AVerMedia or Blackmagic Design card, for example) that has an HDMI input.
Use software like OBS Studio and configure it to recognize the video source from the capture card and encode the video stream and transmit it to the streaming server (Infomaniak).
... without an encoder
With suitable cameras that deliver native h.264, there is no longer a need for an encoder; you can connect your camera directly to the Video Streaming system. The camera directly encodes the video stream in a compatible format (H.264) and transmits it via RTSP (Real-Time Streaming Protocol) directly to the streaming server. This system only works with a limited list of cameras (see below). Some modules, such as video recording, are not compatible with this mode of operation.
To access the configuration:
- Click here to access the management of your product on the Infomaniak Manager (need help?).
- Click directly on the name assigned to the product concerned.
- Click the button to configure the encoder:

- Click on the IP CAM / EXTERNAL source

Be aware of the prerequisites on the configuration page before continuing the setup. Also, refer to this other guide.
Compatible Cameras
- Axis
- M Series: M10X, M11X, M30X, M31X, M7001
- P Series: P13X, P33X, P55X
- Q Series: Q1755, Q60X, Q16, Q17, Q19, Q35, Q61, Q62
- Sony
- SNC-CH110, SNC-DH110, SNC-CH210, SNC-DH210
- SNC-CH120, SNC-DH120, SNC-CH140, SNC-DH140
- SNC-CH160, SNC-DH160, SNC-CH180, SNC-DH180
- SNC-CH220, SNC-DH220, SNC-CH240, SNC-DH240
- SNC-CH260, SNC-DH260, SNC-CH280, SNC-DH280
- SNC-RH124, SNC-RH164
- SNC-EB600, SNC-EM600, SNC-EM602RC, SNC-VM600, SNC-VM601, SNC-VB600, SNC-VB630, SNC-WR600, SNC-WR602 Series
- Hikvision
- DS-2CD2020, DS-2CD2032, DS-2CD2042, DS-2CD2120, DS-2CD2132, DS-2CD2142, DS-2CD2152
- Dahua
- IPC-HFW1120S, IPC-HFW1220S, IPC-HFW1320S, IPC-HFW1400S, IPC-HDW1120S, IPC-HDW1220S, IPC-HDW1320S
- Bosch
- NDE-3502, NDE-4502, NDE-5502, NIN-50022, NIN-70122
- Panasonic
- WV-S1110, WV-S1131, WV-S2110, WV-S2131, WV-S3110, WV-S3131
- Samsung Hanwha Techwin
- QND-6010R, QND-6020R, QND-6030R, QND-7010R, QND-7020R, QND-7030R
Link to this FAQ:
Has this FAQ been helpful?
This guide explains how to manage any potential overconsumption of Infomaniak's Video Streaming services.
Preamble
- In case of exceeding the allowance, an overage bill will be generated, which may result in additional costs, more or less significant.
- It is therefore important to choose the right option that will be applied in case of overconsumption.
Act before exceeding the limit
To access the Video Streaming service:
- Click here to access the management of your product on the Infomaniak Manager (need help?).
- Click on the action menu ⋮ to Manage the Streaming Video product.
- Click on Manage overage:
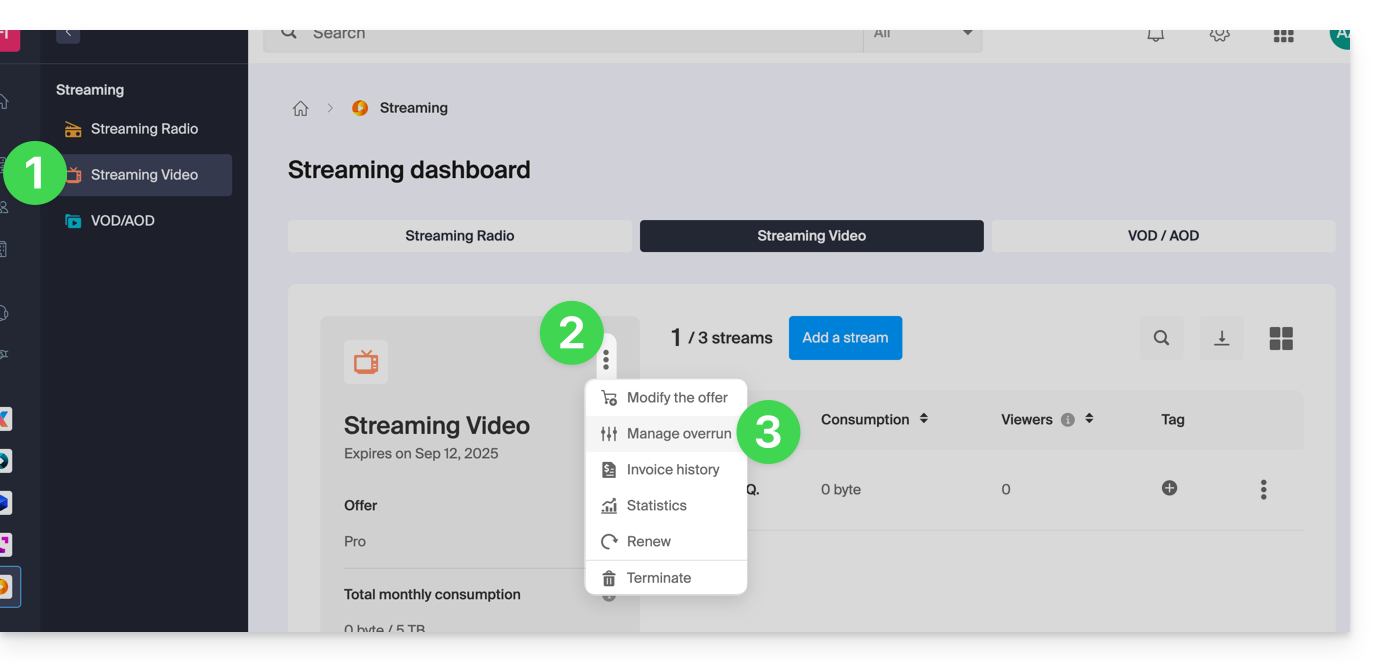
- The 3 possibilities in case of overage are:
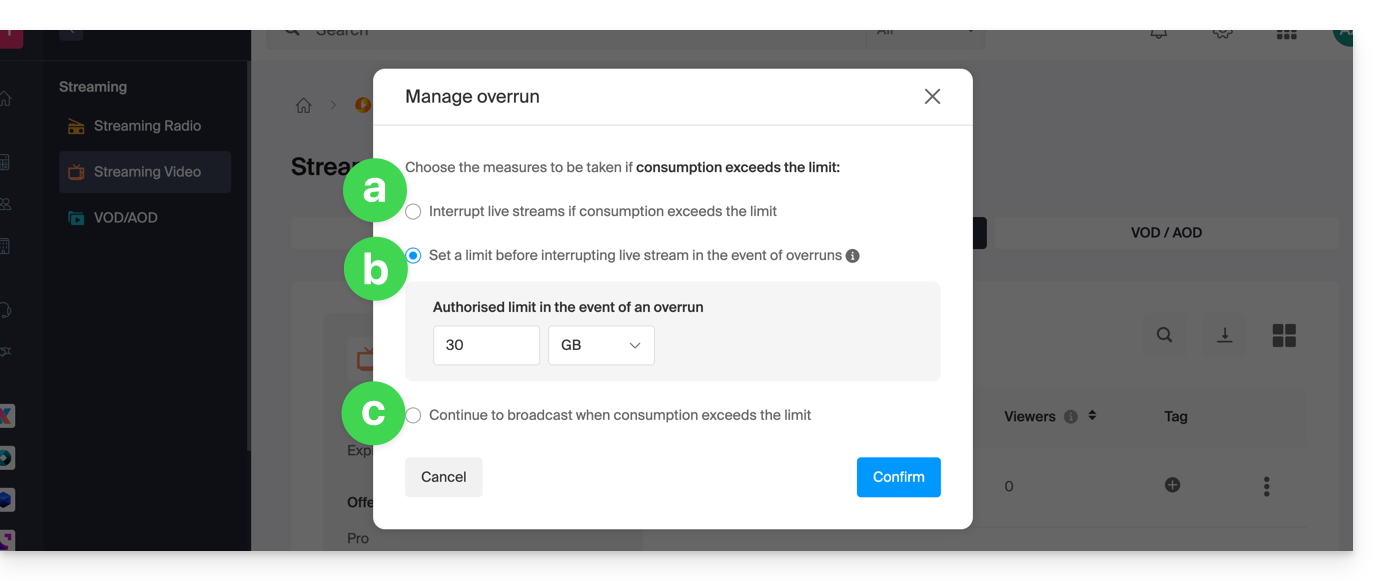
- stop the live stream
- set a limit (in
GBorTB) before live streams are interrupted - continue streaming
Link to this FAQ:
Has this FAQ been helpful?
This guide explains how to restrict access to Infomaniak's Video Streaming streams to your own site only.
This protection does not prevent the integration of a stream via an HTML iframe tag. Use the unique hash protection for a higher level of security.
Restrict access to broadcasts to a domain
To do this:
- Click here to access the management of your product on the Infomaniak Manager (need help?).
- Click directly on the name assigned to the product in question.
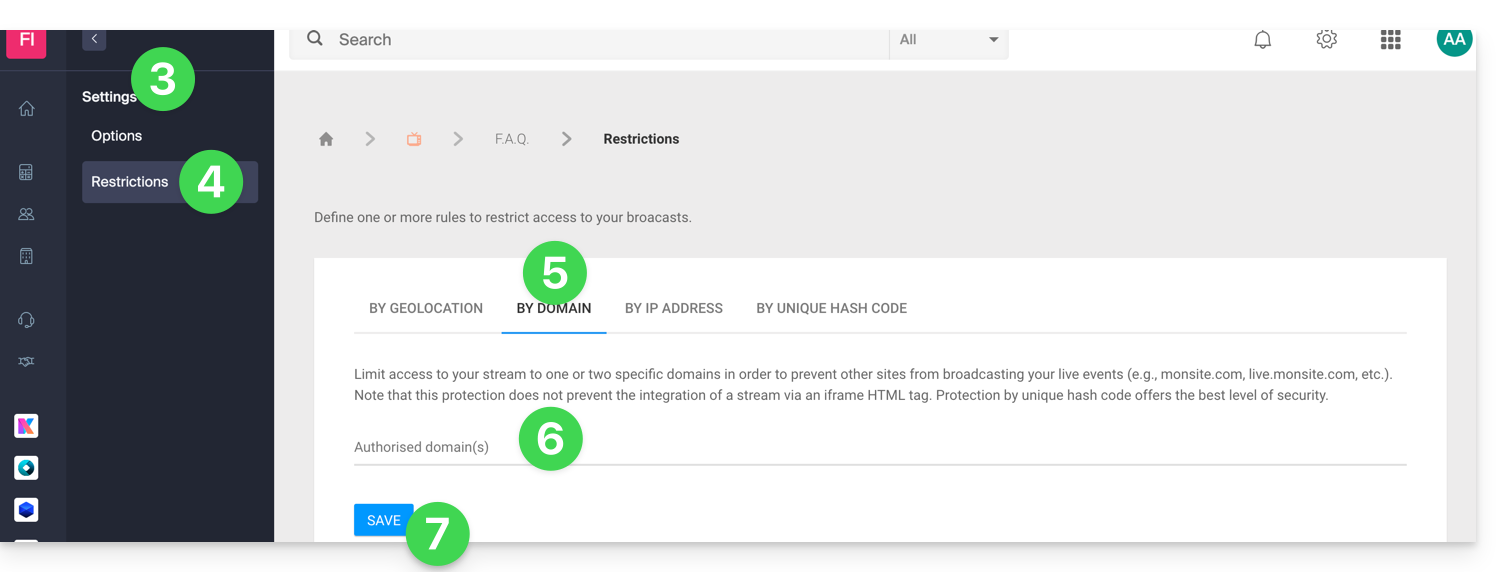
- Click on Settings in the left sidebar.
- Click on Restrictions in the left sidebar.
- Click on the Domain Restriction tab.
- Define the sites that should be specifically authorized to load the stream.
- Click on the Save button:
Refer to this other guide to customize the replacement image offered to blocked viewers.
Link to this FAQ:
Has this FAQ been helpful?
This guide explains how to broadcast a live video with multiple audio tracks via the Infomaniak Video Streaming service. It does not cover VOD or an audio streaming service (used only as a complement if you choose approach A below).
Preamble
- A live Video Streaming stream does not offer selectable multi-audio tracks in a single player.
- Two possible topologies:
- Approach A — 1 video stream + 1..N separate audio players (language selection on the page side).
- Approach B — N Video Streaming streams broadcasting the same image with different audio (one player per language).
Method to obtain a multilingual live stream
Approach A — 1 video player + separate audio players
- General idea: you send a single live video to Infomaniak and, on your page, you add audio players (one per language). The user mutes the video player's sound and activates the audio player of the desired language.
- Simple on the sending side: one video stream to send to Infomaniak.
- Less simple on the page side: the user must juggle between the video player's sound (muted) and the audio player (activated). A slight delay between the image and the audio may exist.
To do this:
- Retrieve the streaming address and key in the Infomaniak Manager (this is the "ingest"). Copy them into your streaming software.
- Start your live video from the software: Infomaniak receives the image and publishes a video player (player) that you can integrate on your site.
- On your web page, add the audio players (one per language). They are separate from the "Video Streaming" product: you place them right next to the video player.
- Provide a small language selection interface (FR/EN/ES... buttons). When the user selects a language, mute the video player and activate the corresponding audio player.
- Reduce the delay (if it is important to you): avoid "rewind" options and unnecessary processing that add delay; keep stable settings in your software.
Ingest is the step of connection : Infomaniak provides you with a receiving address and a key ; you paste them into your broadcasting software (e.g. OBS or a hardware encoder). When you click on “Start”, your video is sent to this address: Infomaniak receives it and can then broadcast it to viewers; without this address and this key, nothing happens on the platform.
Approach B — multiple video players (one per language)
- General idea: you create multiple live videos at Infomaniak, all with the same image, but each with a different language. On your page, the user chooses their language and you display the corresponding video player.
- More fluid for the user: they simply choose a player “in their language”.
- More demanding for you: multiple lives to create/maintain and more data to send in parallel.
To do this:
- Create a live per language in the Infomaniak Manager. For each live, note the address and the broadcast key (the “ingest”).
- In your broadcasting software, duplicate the video output and assign the correct audio track (FR, EN, etc.) to each copy. Send each copy to the address/key of the corresponding live.
- Let Infomaniak handle the playback qualities (resolution/quality adapted to the viewer’s connection). If you prefer to set everything yourself, it’s possible but more advanced; stay simple if you’re a beginner.
- Integrate a language selector on your page: when the user chooses “FR”, you display the FR live player; if they choose “EN”, you display the EN live player, etc.
- Check your upload connection: the more languages there are, the more data you send at the same time. Do a load test before the big day.
Each language has its own live, therefore its own receiving address and its key ; you must send the same image multiple times (once per language) to Infomaniak: this is always the step of connection that allows the platform to receive each version.
Link to this FAQ:
Has this FAQ been helpful?
This guide explains how to display a countdown before the next live stream or during a scheduled interruption on Infomaniak's video streaming service.
Access the scheduling calendar
To do this:
- Click here to access the management of your product on the Infomaniak Manager (need help?).
- Click directly on the name assigned to the product concerned:
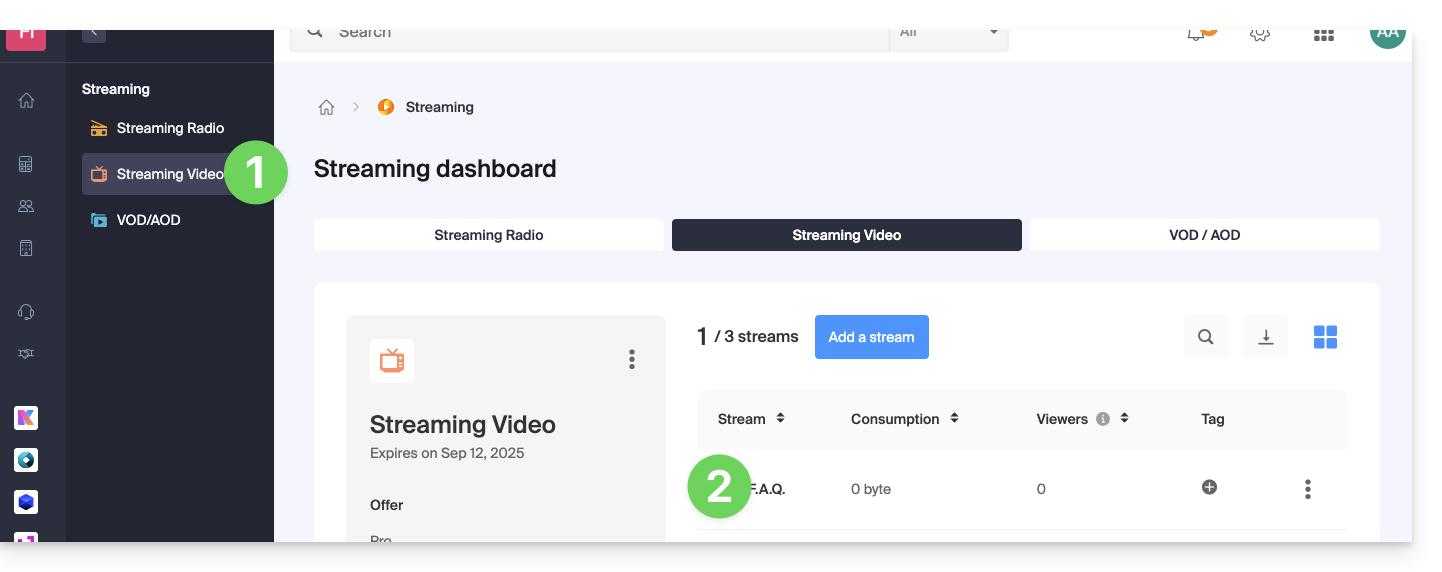
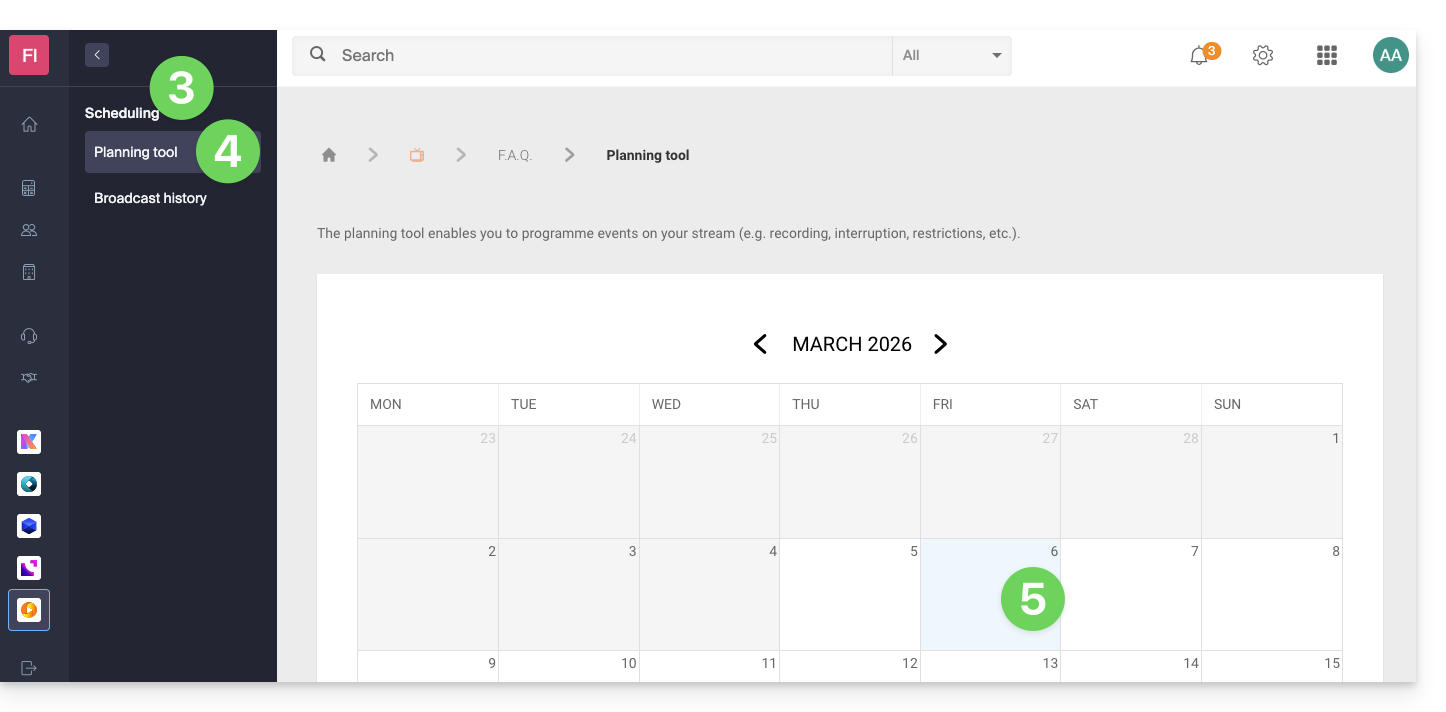
- Click on Scheduling in the left sidebar.
- Click on Scheduling tool in the left sidebar.
- Click on the desired date:
Interruption function on the schedule
For example:
- This configuration on the calendar to interrupt a live program…
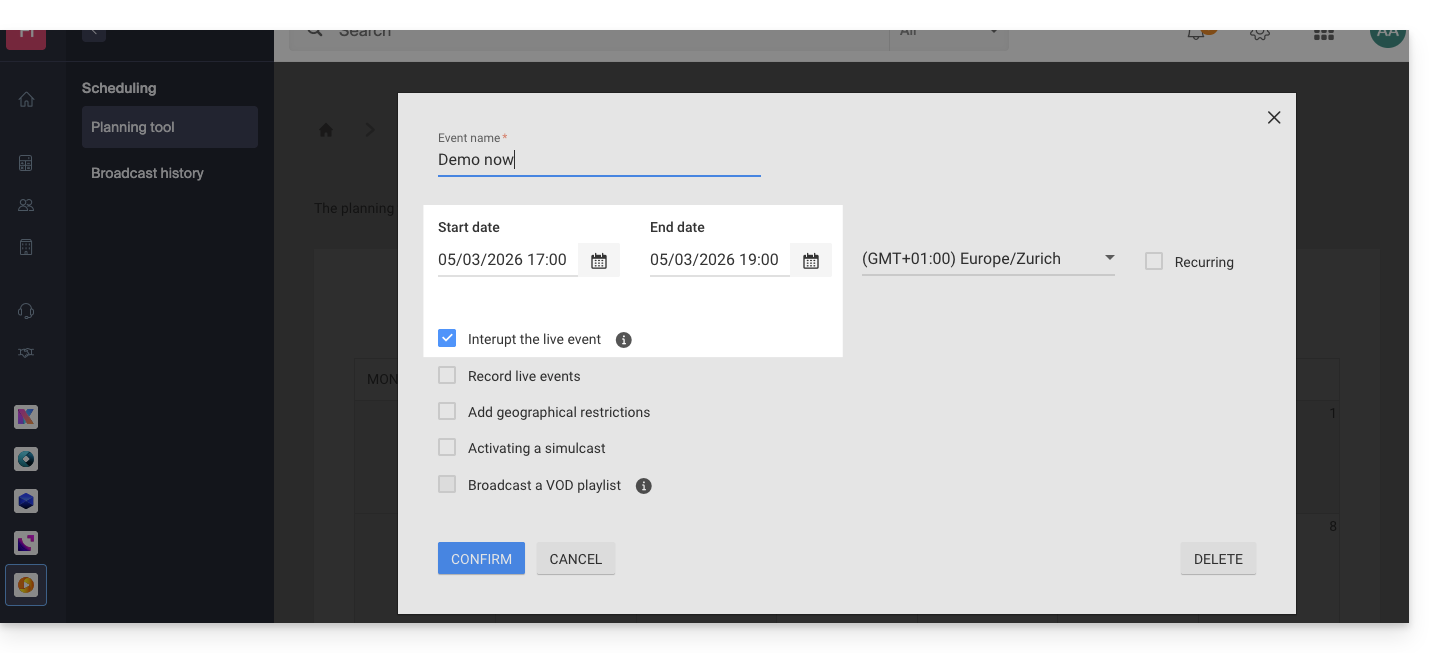
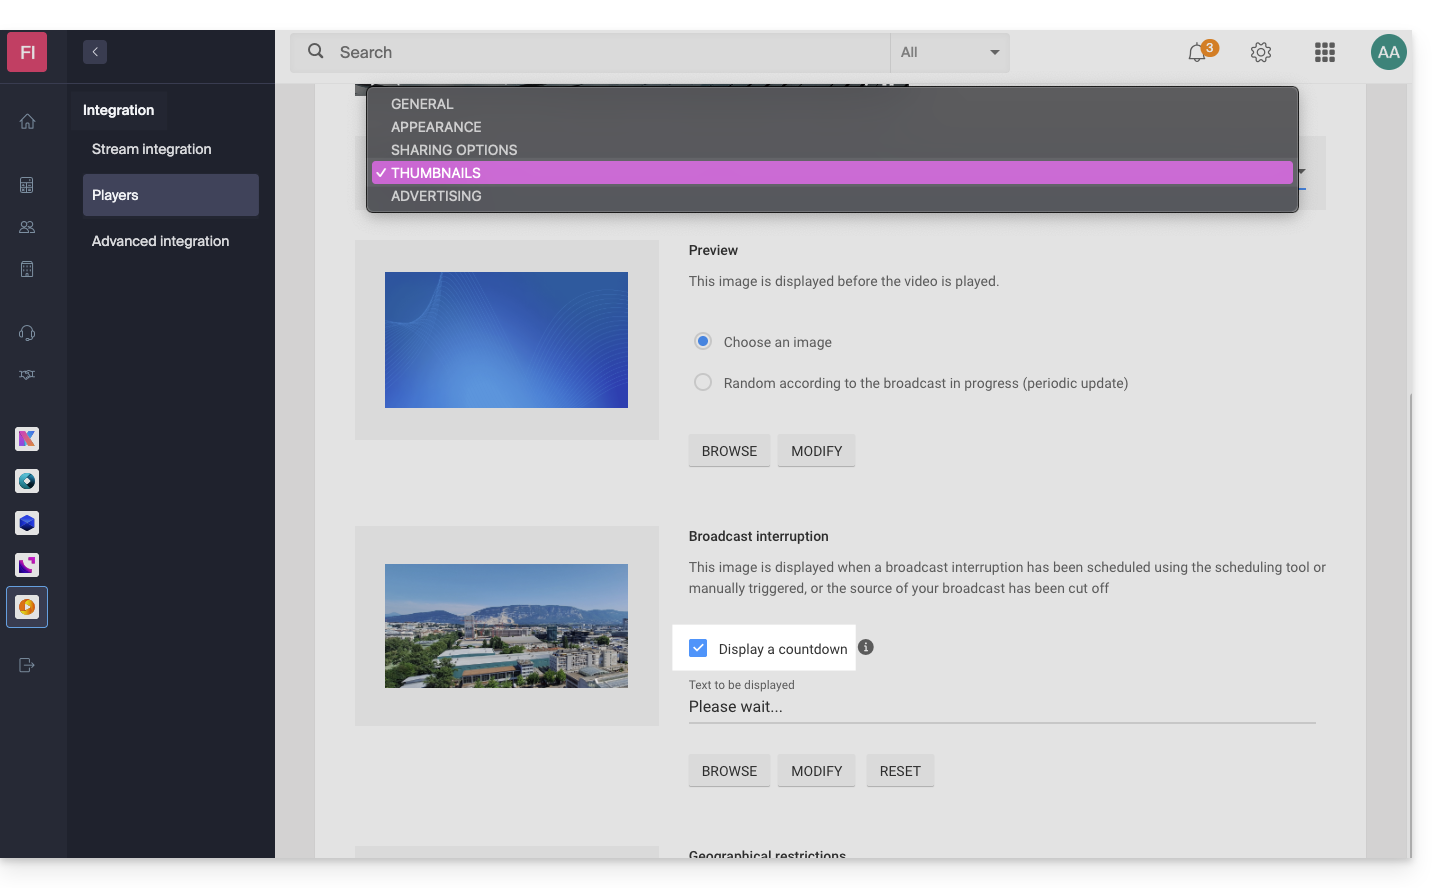
- … and this configuration at the level of the image (thumbnail) and text choice of the video player…
- … will display this result from 5 PM, with a 2-hour countdown in seconds visible on the player of your TV stream:

The countdown, once scheduled, works in correlation with stream interruptions if you set one (or more in succession, thus managing the overlap). Note: it takes 2 minutes for a scheduled interruption to be reflected in the countdown.
Link to this FAQ:
Has this FAQ been helpful?
This guide describes the technical requirements for using an IP camera (RTSP or RTMP) with the Infomaniak Video Streaming platform.
Preamble
There are two types of compatible cameras:
- RTSP cameras: Infomaniak servers connect to the camera to pull the stream via the RTSP protocol
- RTMP cameras: the camera acts as an encoder and pushes the stream to Infomaniak's streaming servers
1. RTSP Camera (PULL mode)
Some cameras can directly stream a video and audio stream over the Internet without a dedicated encoder. In this case, it is necessary to verify that your device meets the following requirements:
- support for the RTSP protocol
- support for the H264 video codec (the mention of MPEG4 is insufficient)
- the device must be reachable from the Internet on port 554 (other ports are refused)
- the camera access address must work in a video player (VLC, MPlayer, etc.) and this, including from a network external to that of the camera
2. RTMP Camera (PUSH mode)
Any camera capable of sending an H264 video stream and AAC audio to a server via the RTMP protocol should be compatible with the Video Streaming platform.
Link to this FAQ:
Has this FAQ been helpful?
This guide covers multi-bitrate or transcoding, which allows you to stream a video stream in the best possible quality based on your viewers' Internet connection.
Preamble
- Without the multi-bitrate or transcoding feature, your stream is only broadcast in one quality, and viewers with a poor Internet connection may not be able to watch your stream.
Local transcoding vs Cloud transcoding
There are two ways to offer this feature to your visitors: local transcoding or cloud transcoding.
Advantages and disadvantages
Let Infomaniak handle the transcoding
The entire process is automatic: Infomaniak configures and transcodes the necessary qualities, and your viewers are guaranteed to be able to follow your broadcasts in the best possible conditions, regardless of their Internet connection speed.
- Only one maximum quality stream will be sent from your side.
- A software encoder is sufficient, although it is recommended to have a hardware encoder for better reliability and performance.
Manually manage transcoding locally
The entire process is manual: you must configure the qualities and their number, as well as have the required network and hardware configuration to ensure transcoding and data transmission:
- An encoder is required for transcoding (Infomaniak offers them for sale if necessary).
- The encoder (or the server dedicated to this task) must be powerful enough to simultaneously transcode your stream in different qualities. Otherwise, the stream will be cut and unstable for your viewers.
- A good Internet connection is required to simultaneously send the stream in different qualities.
Link to this FAQ:
Has this FAQ been helpful?
This guide helps you configure your encoder with the Infomaniak Video Streaming service.
Preamble
- The structure of this guide is organized based on the encoding quality chosen for your stream:
- The URL authentication system offered by Infomaniak differs from the authentication offered by default by some encoders.
- This information is provided for informational purposes only and the configuration of your encoder may vary depending on your device, your software, and the options of your product (e.g., Infomaniak hardware).
- Specific guide for OBS Studio (Open Broadcaster Software).
Configuration required by the encoder
Here's how to access the configuration information required by your encoder:
- Click here to access the management of your product on the Infomaniak Manager (need help?).
- Click on the action menu ⋮ to the right of the item concerned in the table that appears.
- Click on Configure the encoder:
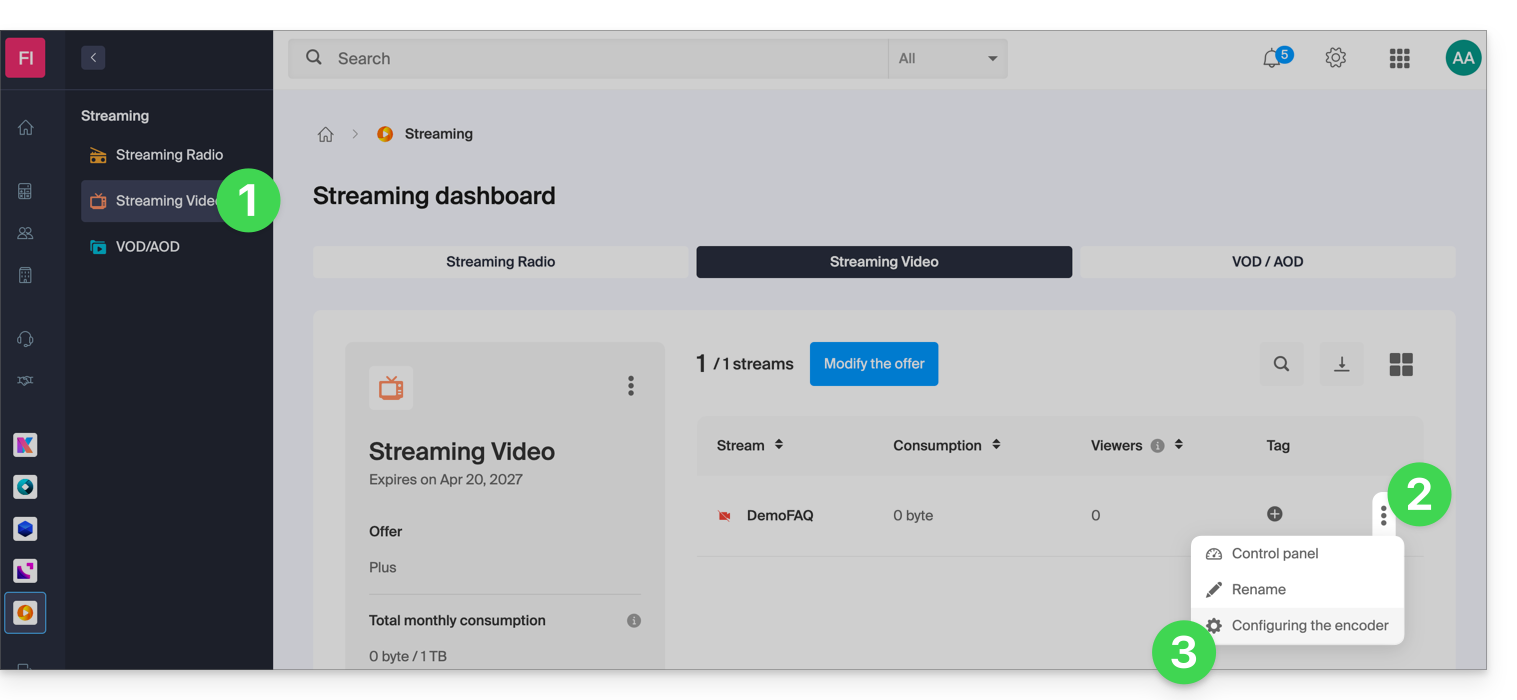
- Follow the instructions adapted to your situation.
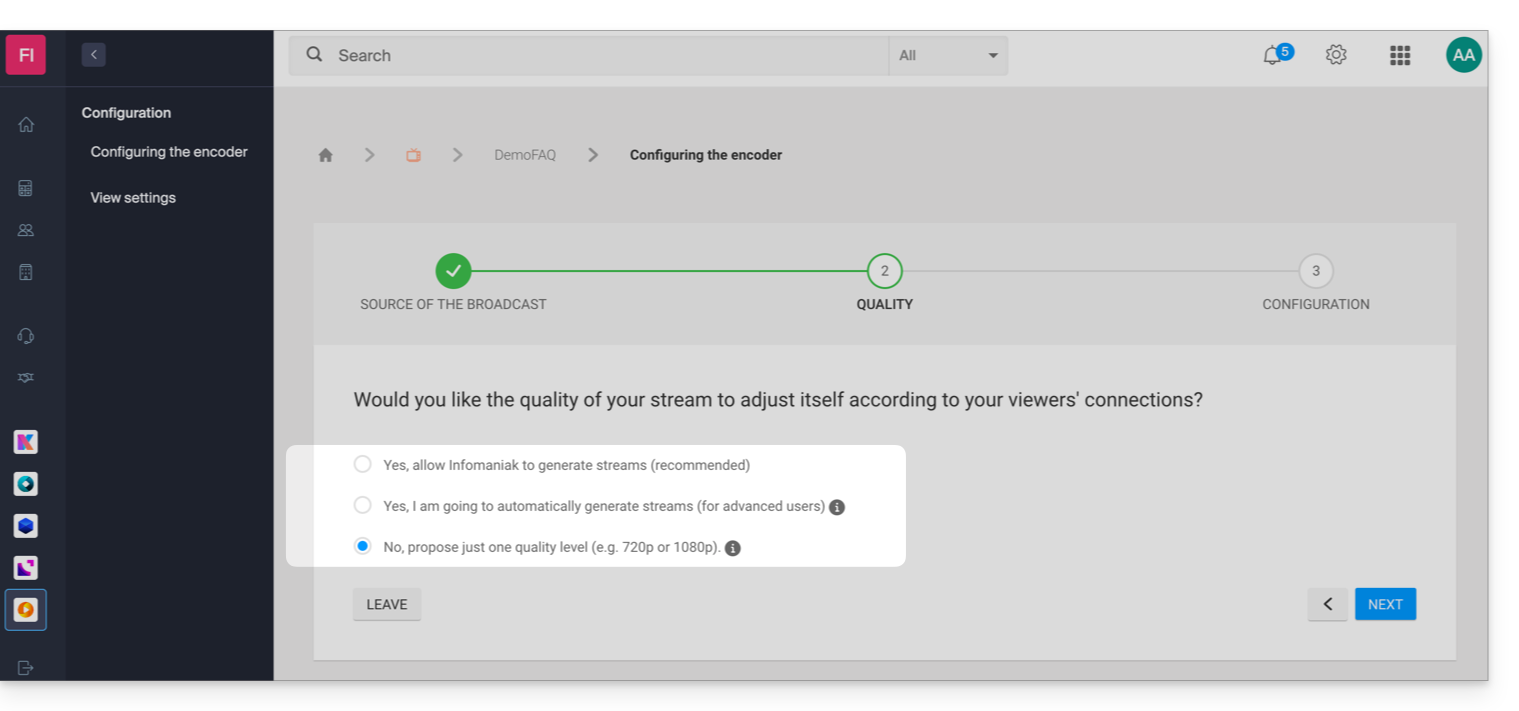
1. Automatic multi-bitrate management by Infomaniak
If you have chosen to let Infomaniak automatically manage the quality of your stream:
- In this case, the following configuration information is available:
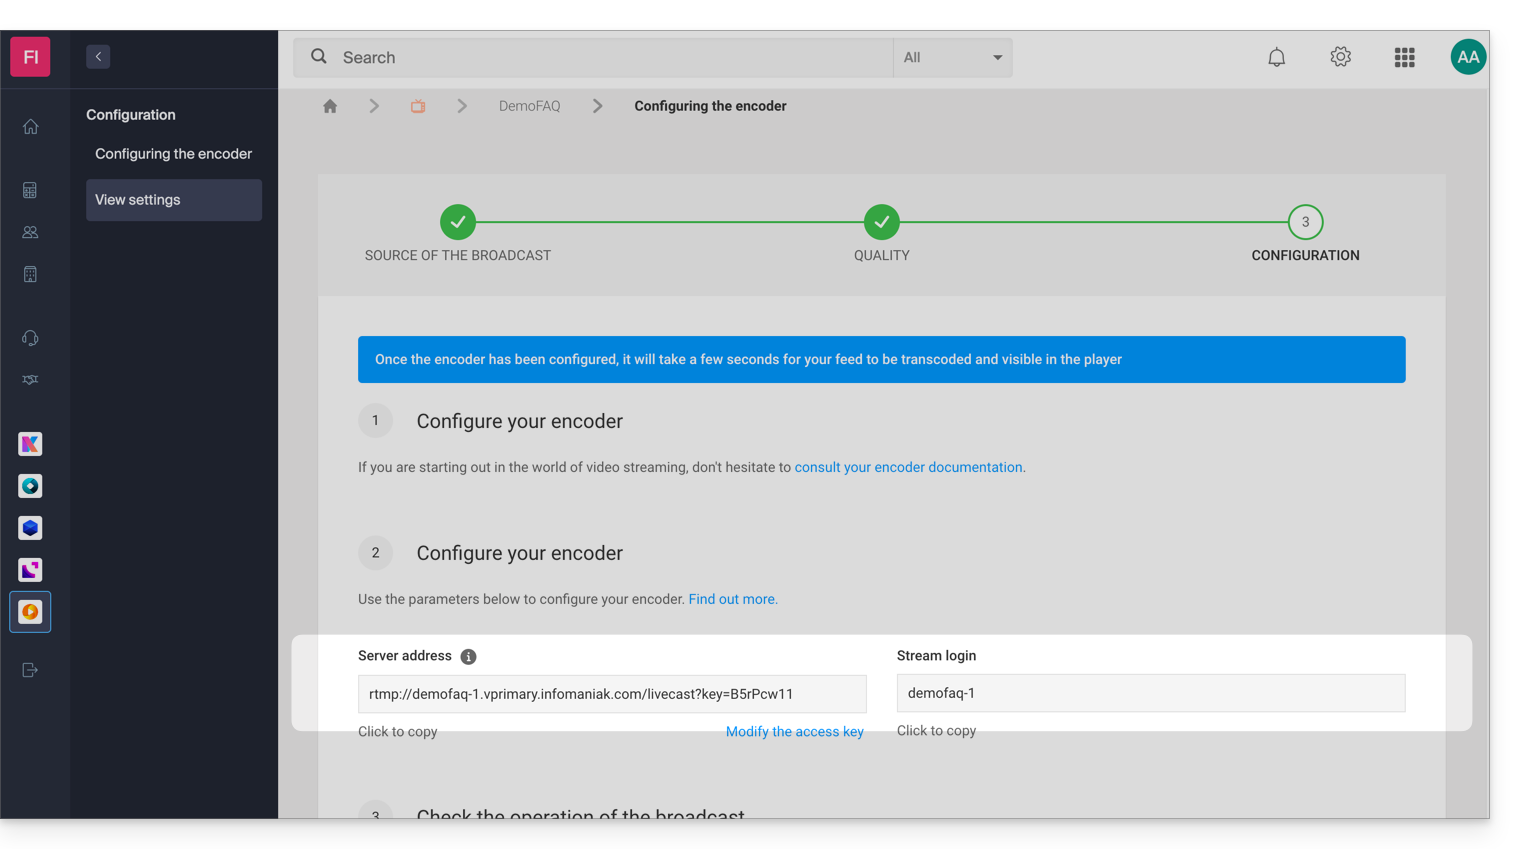
- In this example, the stream is named "DemoFAQ" and its authentication key is "B5rPcw11" :
- Server address:
rtmp://demofaq-1.vprimary.infomaniak.com/livecast?key=B5rPcw11 - Stream ID:
demofaq-1
- Server address:
1.1 Configuration of the source quality
The stream qualities generated by Infomaniak will depend on the quality of your source (bitrate). For reference, here is the list of qualities that could be generated when connecting your encoder:
- 1080p with a bitrate of 3 Mbps
- 720p with a bitrate of 1.8 Mbps
- 480p with a bitrate of 0.8 Mbps
- 360p with a bitrate of 0.5 Mbps
- 240p with a bitrate of 0.3 Mbps*
* 240p will only be offered if your source bitrate is less than 0.8 Mbps.
It is ideally recommended to set a 1080p source with a bitrate of 3.2 Mbps to generate all available qualities. If the bitrate of your source is limited to 1 Mbps, only the following resolutions will be generated: 480p, 360p, and 240p.
Important: check that the bitrate control is set to CBR (constant bitrate) mode on your encoder. The ABR (adaptive bitrate) mode can indeed distort the detection of your source bitrate.
1.2 Your encoder requires a connection address and a stream identifier
If your encoder requires a connection address and a stream identifier, simply enter the server address and the stream identifier in your encoder.
In this example, the following information would be:
- Server address:
rtmp://demofaq-1.vprimary.infomaniak.com/livecast?key=B5rPcw11 - Stream identifier:
demofaq-1
1.3 Your encoder requires only a URL
If your encoder requires only a URL, it is necessary to group the server address and the connection identifier; in this example, it would therefore be the following URL:
rtmp://demofaq-1.vprimary.infomaniak.com/livecast?key=B5rPcw11/demofaq-1
1.4 Your encoder offers advanced configuration
If your encoder offers a wide range of parameters, follow the following instructions which are always based on the same example:
- RTMP Server Address:
demofaq-1.vprimary.infomaniak.com - RTMP Server Port:
1935 - RTMP Username: leave this field blank (authentication is done by key with a key on the stream identifier)
- RTMP Password: leave this field blank (authentication is done by key with a key on the stream identifier)
- RTMP Application Name:
livecast?key=B5rPcw11 - RTMP Stream Name:
demofaq-1
2. Manual multi-bitrate management
If you have decided to manually manage the qualities of your stream:
- If you are using the Cloud Transcoding option, refer to the 3. Single bitrate point below.
In this scenario, you will find a table containing the different qualities (bitrate/resolutions) that you defined during the configuration of your encoder: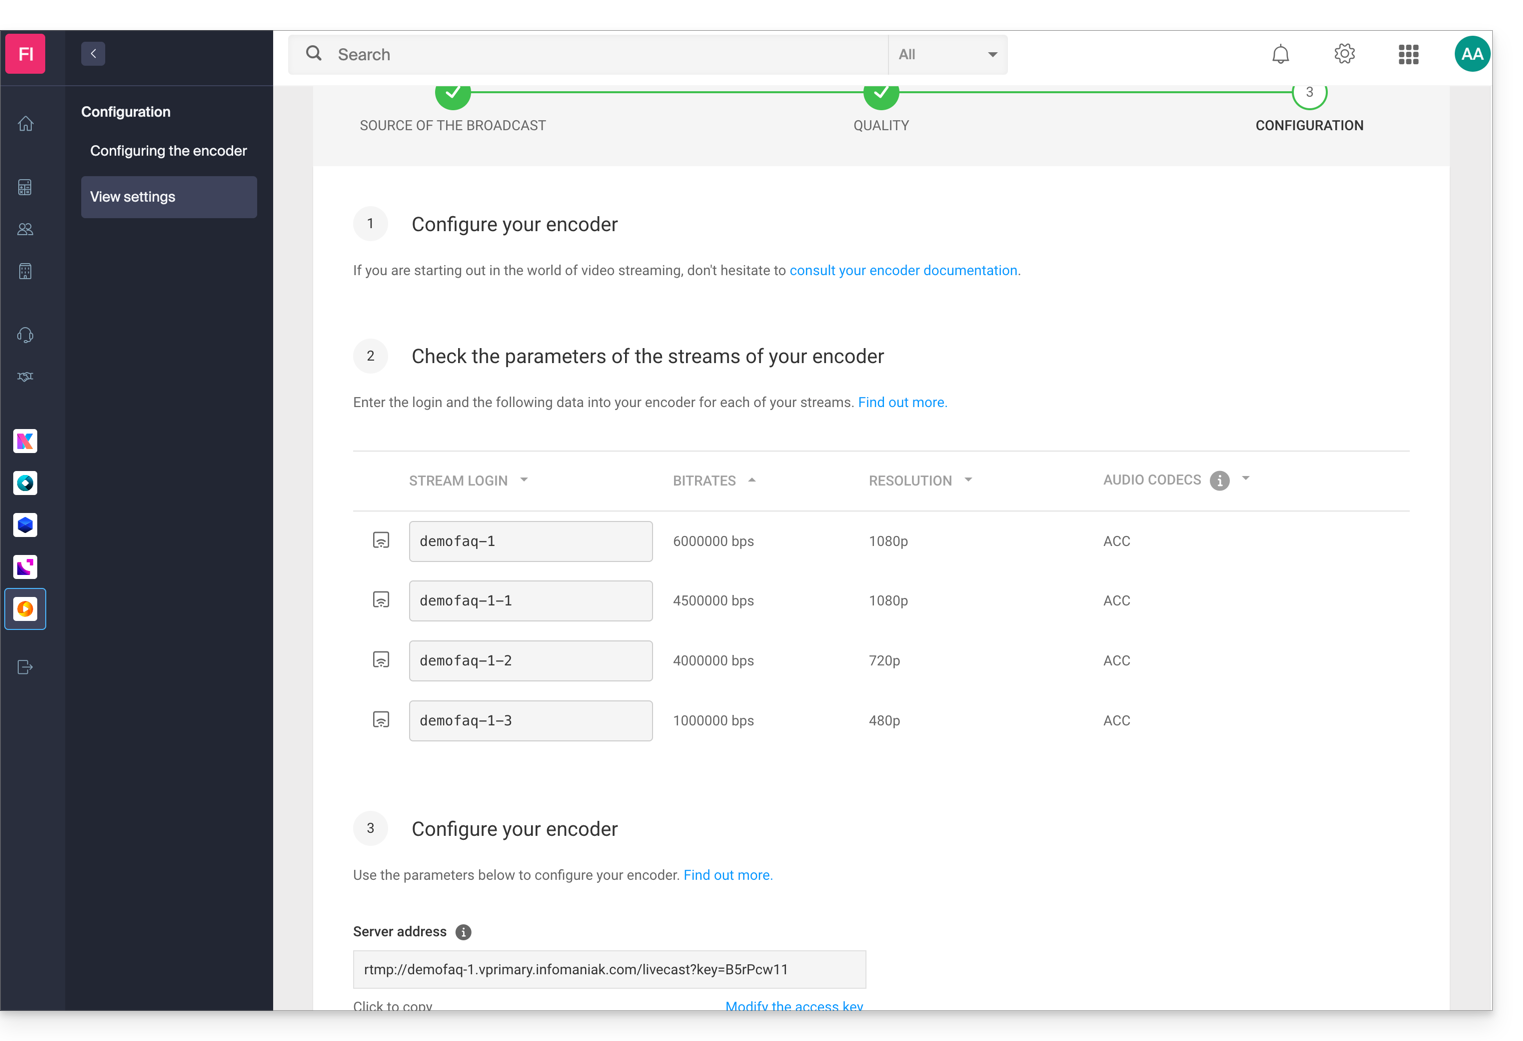
In this example, the following information would be:
- Server address:
rtmp://demofaq-1.vprimary.infomaniak.com/livecast?key=B5rPcw11 - Stream identifier:
demofaq-1
2.1 Your encoder requires a connection address and a stream identifier
If your encoder requires a connection address and a stream identifier, simply enter the server address and the identifier for each stream in your encoder.
2.2 Your encoder requires a URL per stream
If your encoder requires specific configurations per URL, it is necessary to group the server address and the connection identifier for each bitrate. In this example, the URLs would therefore be:
- Bitrate 6000000:
rtmp://demofaq-1.vprimary.infomaniak.com/livecast?key=B5rPcw11/demofaq-1 - Bitrate 4500000:
rtmp://demofaq-1.vprimary.infomaniak.com/livecast?key=B5rPcw11/demofaq-1-1 - Bitrate 4000000:
rtmp://demofaq-1.vprimary.infomaniak.com/livecast?key=B5rPcw11/demofaq-1-2 - Bitrate 1000000:
rtmp://demofaq-1.vprimary.infomaniak.com/livecast?key=B5rPcw11/demofaq-1-3
3. Single bitrate (single quality)
Refer to the information provided in 1. Automatic multi-bitrate management by Infomaniak ignoring point 1.1.
Link to this FAQ:
Has this FAQ been helpful?
This guide concerns the Infomaniak Video Streaming platform, which offers two possibilities for retrieving video streams to broadcast them:
- The PUSH mode: you push the stream to the Infomaniak platform...
- The PULL mode: you provide a source URL address from which Infomaniak will retrieve the stream; this method allows you to broadcast an existing stream via Infomaniak.
IP Camera (PUSH mode)
The most common use case involves IP cameras, accessible from a URL address or an IP address.
For optimal operation:
- Your equipment must support the RTSP protocol and the H264 video codec (do not rely on the MPEG4 indication).
- Your equipment must be publicly reachable from the Internet on port 554 (any other port will be refused).
- The RTSP address must work in a video player (VLC, mplayer, ...).
- The RTSP address must be retrievable via the administration interface of your equipment.
External Source (PULL mode)
It is also possible to retrieve the stream from an external source, which allows, for example, to process an existing stream by adding a watermark and using Infomaniak's streaming servers to reach a wide audience.
Currently, the following stream formats are supported:
- RTP
- RTSP
- RTMP
Link to this FAQ:
Has this FAQ been helpful?
This guide explains how to insert an image, a logo, a watermark, on your Video Streaming broadcasts to strengthen your brand image and protect your content from copying or potential misuse.
Add the image to the stream
You have the option to add an image that will appear on your video stream:
- either from the configuration of a Player (free)...
- The logo is superimposed on the video and will not be visible if the stream is embedded outside the Player.
- or by embedding the logo via transcoding (paid option)...
- The logo is embedded in the video and will be visible in all cases; this requires the complete re-encoding of the stream(s) by a transcoding server, which explains the cost of this method.
In both cases, it is possible to customize the following parameters:
- Position of the logo (in one of the four corners of the player, spacing from the edge, etc.).
- Size of the logo (for example, a 50% logo will be twice as small):
- It is recommended to use the native size to optimize the loading and quality of the rendering.
- In the case of video transcoding, the size of the logo is calculated relative to the source video (or maximum quality); the logo will be automatically resized if lower qualities are present in order to maintain an identical ratio.
- Opacity of the logo.
1. Superimpose a logo via the Player (free)
- Click here to access the management of your product on the Infomaniak Manager (need help?).
- Click directly on the name assigned to the product in question.
- Click on Integration in the left sidebar menu.
- Click on Players in the left sidebar menu.
- Click on the name of the Player to customize.
- Click on the tab (or dropdown menu) Appearance.
- Add the desired logo in
png,jpgorgif(non-animated) format and save at the bottom of the page: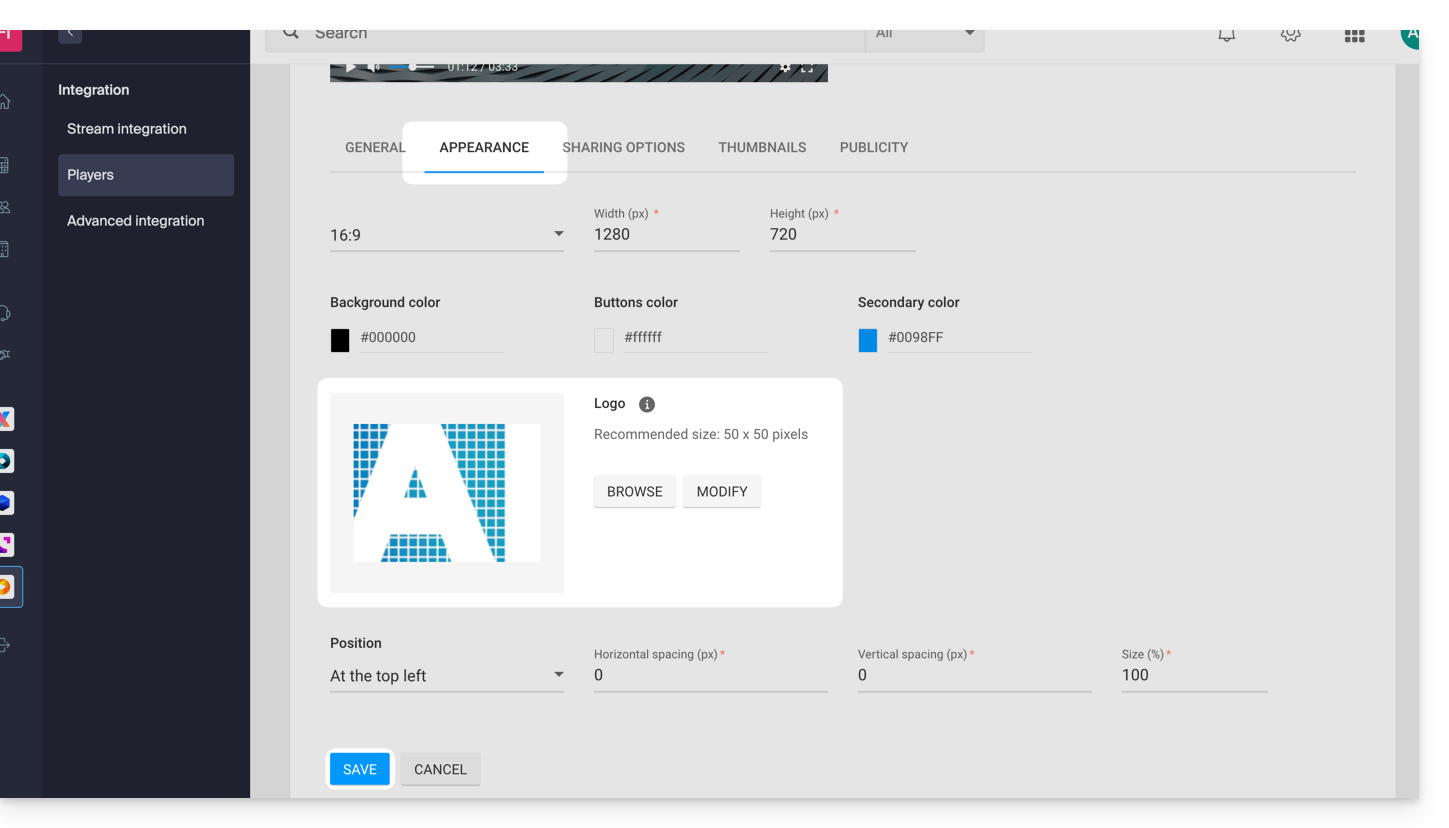
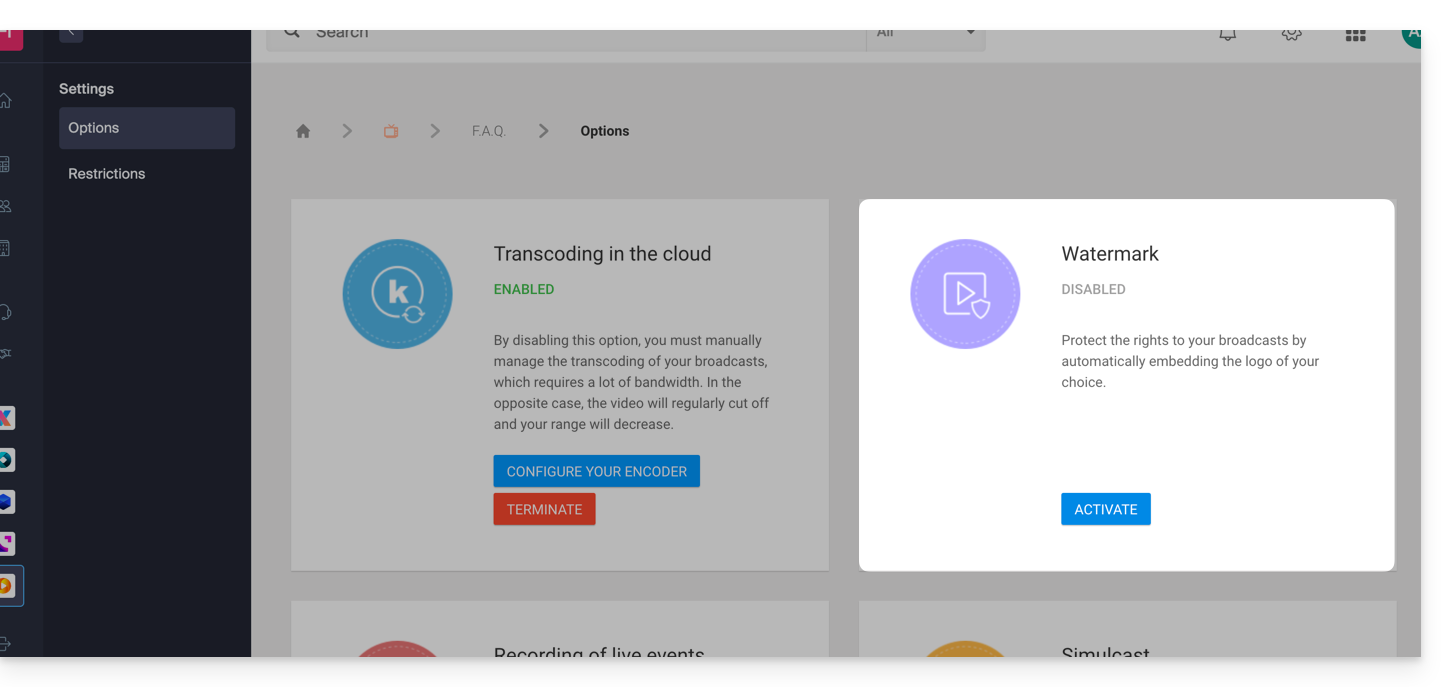
2. Enable the watermark option (paid option)
- Click here to access the management of your product on the Infomaniak Manager (need help?).
- Click directly on the name assigned to the product in question.
- Click on Settings in the left sidebar menu.
- Click on Options from the left sidebar menu.
- Enable the Watermark option:
- Add the desired logo in
png,jpgorgif(non-animated) format.
Link to this FAQ:
Has this FAQ been helpful?
This guide explains how to customize an Infomaniak Video Streaming Player so that an image of your choice is offered to viewers, especially in case of stream restrictions.
Preamble
- A video stream can be restricted:
- Scheduled broadcast interruption (possibility to display a countdown before the broadcast resumes)
- Geographical restrictions or other restrictions (blocking via IP, domain(s), token, etc.)
Customize the Video Streaming Player
To do this:
- Click here to access the management of your product on the Infomaniak Manager (need help?).
- Click directly on the name assigned to the product in question.
- Click on Players in the left sidebar menu.
- Click on the name of the Player to customize:

- Click on the tab (or dropdown menu) Thumbnails.
- Customize the desired thumbnails:

- Save your changes.
Link to this FAQ:
Has this FAQ been helpful?
This guide explains how to record or archive all of your Video Streaming broadcasts, which can be useful for creating TV replays or reviewing videos recorded by surveillance cameras, for example.
Manage automatic recording of live broadcasts
To activate this option:
- Click here to access the management of your product on the Infomaniak Manager (need help?).
- Click directly on the name assigned to the product concerned.
- Activate the recording of live broadcasts by the toggle switch from the stream dashboard:

Once this feature is activated, the stream will be automatically and permanently recorded from the moment it is sent to (or pulled by) the Infomaniak platform.
Be mindful of your FTP space, which could quickly become saturated. If necessary, you also have the option to manually schedule recordings from the scheduling tool.
Operation of automatic recordings
Once this option is activated, an mp4 file will be automatically generated after each broadcast, which will be transferred to the FTP or VOD space configured by you.
Important details:
- A broadcast is defined as the time between connection and disconnection up to the video encoder.
- Recording quality: in the case of a multi-bitrate stream, the maximum source quality will be preserved.
- File size limitation: in the case of continuous broadcasting, you have the option to define the maximum duration of each mp4 file; this option allows you to avoid generating files that are too large and to ensure the recording of your archives to the FTP or VOD space of your choice (and once the duration is reached, the recording is automatically stopped, then sent by FTP and a new recording is started).
Customization of recording names
To allow you to easily identify and classify your archives, the name of the recordings can be customized dynamically using parameters specified between curly braces.
Example:
template_{stream_id}_{date|format:YYYY-MM-dd_hh:mm:ss}_{fragment_id|from:1|prefix:fragment_(|suffix:)}.{extension}stream_id= represents the stream identifier in the form of a string.date|format: ISO 8601 = date of the recording day.time|format: ISO 8601 = time of the recording.datetime|format: ISO 8601 = date and time of the recording.fragment_id|from:number|prefix:string|suffix:string: = fragment number in case a recording is split with the possibility of prefixing and/or suffixing it.- Each fragment will be incremented, "
from" allowing to indicate what will be the first reference fragment.
- Each fragment will be incremented, "
extension= final extension of the file.
These parameters and their options are optional and their order is completely free. They can be used as many times as desired. If you provide the same option multiple times, only the last one will be taken into account. Any unrecognized option will simply be ignored.
Example 1
Situation: you have two daily schedules, the first starts at 10:00 and the second at 20:05. By configuring the file naming in this way template_{date|format:hh:mm:ss} you will obtain the following file names:
For the day of December 5, 2019:
- The first recording at 10:00 will be called:
template-10:00:00.mp4 - The second recording at 20:05 will be called:
template-20:05:00.mp4
For the day of December 6, 2019:
- The first recording at 10:00 will be called:
template-10:00:00.mp4
The recording from the previous day with the same name will be overwritten and replaced by this one. - The second recording at 20:05 will be called:
template-20:05:00.mp4
The recording from the previous day with the same name will be overwritten and replaced by this one. - etc.
This logic can be particularly useful for having a loop recording system, for example for video surveillance. The user will retrieve the video only if needed and this avoids archiving a potentially infinite number of videos at the risk of saturating the FTP space.
Example 2
Situation: this time you have a perpetual recording, 24/7, with a limitation of the duration of the files set to 360 minutes. By configuring the file naming in this way template_{date|format:YYYY-MM-dd}_{fragment_id|from:1|prefix:fragment_(|suffix:)}.{extension} you will obtain the following file names:
- The first file of the day at 00:00 will be called:
template_2019-02-05.mp4 - The second file of the day at 06:00 will be called:
template_2019-02-05_fragment(1).mp4 - The third file of the day at 12:00 will be called:
template_2019-02-05_fragment(2).mp4 - The fourth file of the day at 18:00 will be called:
template_2019-02-05_fragment(3).mp4
By configuring the file naming in this way template_{date|format:YYYY-MM-dd}_{fragment_id|from:0|prefix:fragment_(|suffix:)}.{extension} you will get the following names:
- The first file of the day at 00:00 will be named:
template_2019-02-05_fragment(0).mp4 - The second file of the day at 06:00 will be called:
template_2019-02-05_fragment(1).mp4 - The third file of the day at 12:00 will be called:
template_2019-02-05_fragment(2).mp4 - The fourth file of the day at 18:00 will be called:
template_2019-02-05_fragment(3).mp4
Link to this FAQ:
Has this FAQ been helpful?
This guide explains how to stream a live video on both the Infomaniak streaming platform and Facebook Live.
Prerequisites
- Enable the Simulcast option:
- Click here to access the management of your product on the Infomaniak Manager (need help?).
- Click directly on the name assigned to the product in question.
- Click on Settings in the left sidebar.
- Click on Options in the left sidebar.
- Subscribe to the Simulcast option by clicking the ACTIVATE button.
Stream a video on Infomaniak and Facebook
To do this:
- Click here to access the management of your product on the Infomaniak Manager (need help?).
- Click directly on the name assigned to the product in question.
- Click on Settings in the left sidebar.
- Click on Options in the left sidebar.
- Click on Configure in the Simulcast box.
- Click on Add.
- Choose Facebook Live.
- Choose a name for the simulcast and log in to the Facebook account that manages your page.
- Accept the terms and click on Add:

- Live streaming on Facebook is available after 30 seconds on the selected page
In case of a problem
- Despite the visibility type defined in the simulcast options, it may happen that the internal configuration on Facebook overrides the choice made. In this case, it is necessary to modify the following parameter in the Facebook options:

- Warning, the stream will be sent directly to Facebook at the time of addition. If you wish to schedule the simulcast:
- Disable the Enable this simulcast option when adding a simulcast.
- Use the scheduling tool to set your preferred times.
- The simulcast is automatically stopped at the end of the broadcast. You have two options to restart the simulcast:
- Enable the simulcast from the configuration of this option (see procedure explained above).
- Schedule another event from the scheduling tool.
Link to this FAQ:
Has this FAQ been helpful?
This guide explains how to stream a video live on both the Infomaniak streaming platform and YouTube Live.
Prerequisites
- Read and accept the YouTube terms of service.
- The Infomaniak platform uses YouTube API services only to create and stream a live event on your channel; by using it, you accept the YouTube API terms of service as well as the Google privacy policy.
- Enable the "live" feature on YouTube (this may take 24h).
- Enable the Simulcast option:
- Click here to access the management of your product on the Infomaniak Manager (need help?).
- Click directly on the name assigned to the product in question.
- Click on Settings in the left sidebar.
- Click on Options in the left sidebar.
- Subscribe to the Simulcast option by clicking the ACTIVATE button.
Stream a video on Infomaniak and YouTube
To do this:
- Click here to access the management of your product on the Infomaniak Manager (need help?).
- Click directly on the name assigned to the product in question.
- Click on Settings in the left sidebar.
- Click on Options in the left sidebar.
- Click on Configure in the Simulcast box.
- Click on Add.
- Choose YouTube Live.
- Choose a name for the simulcast and log in to the Google account that manages your YouTube channel.
- Accept the terms and click on Add:

- Click here to open the YouTube live streaming page.
In case of a problem / Scheduling
- Note, the stream will be sent directly to YouTube at the time of addition.
- If you wish to schedule the simulcast:
- Deactivate the Enable this simulcast option when adding a simulcast.
- Use the scheduling tool to set your preferred times:

- Your source stream must have a framerate defined (this is not always the case with some IP cameras).
- The simulcast is automatically stopped at the end of the broadcast; two options are available to you to restart the simulcast:
- Enable the simulcast from the configuration of this option (refer to the procedure explained above).
- Schedule another event from the scheduling tool.
Link to this FAQ:
Has this FAQ been helpful?
This guide explains how to restrict access to Infomaniak's Video Streaming streams using a unique key (hash).
Preamble
- This method offers the highest level of protection and allows you to restrict your broadcasts to a member area that requires authentication, for example.
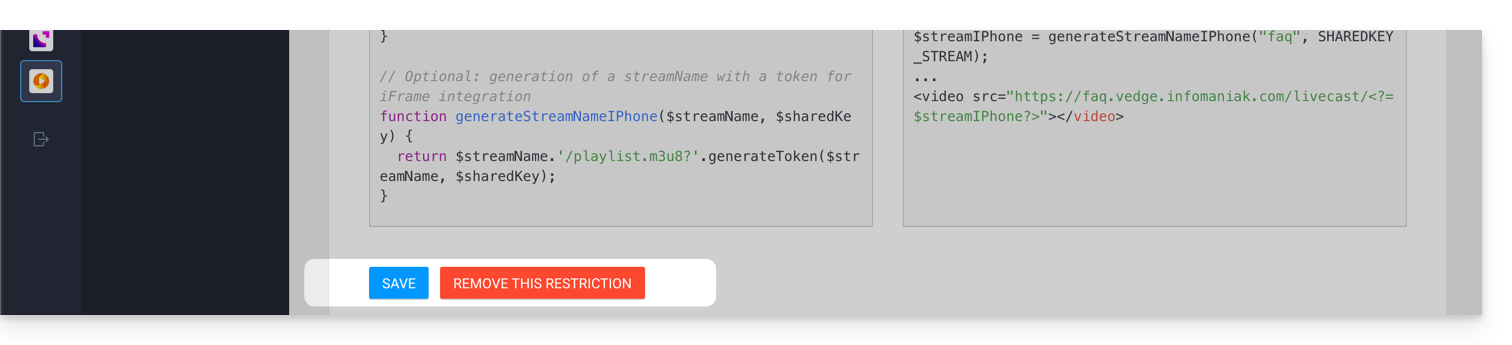
- Since the way to generate this code is specific to each site, it will be necessary to implement the required PHP functions and adapt the integration code of your player accordingly.
Restrict access to broadcasts by unique key (hash)
To do this:
- Click here to access the management of your product on the Infomaniak Manager (need help?).
- Click directly on the name assigned to the product in question.
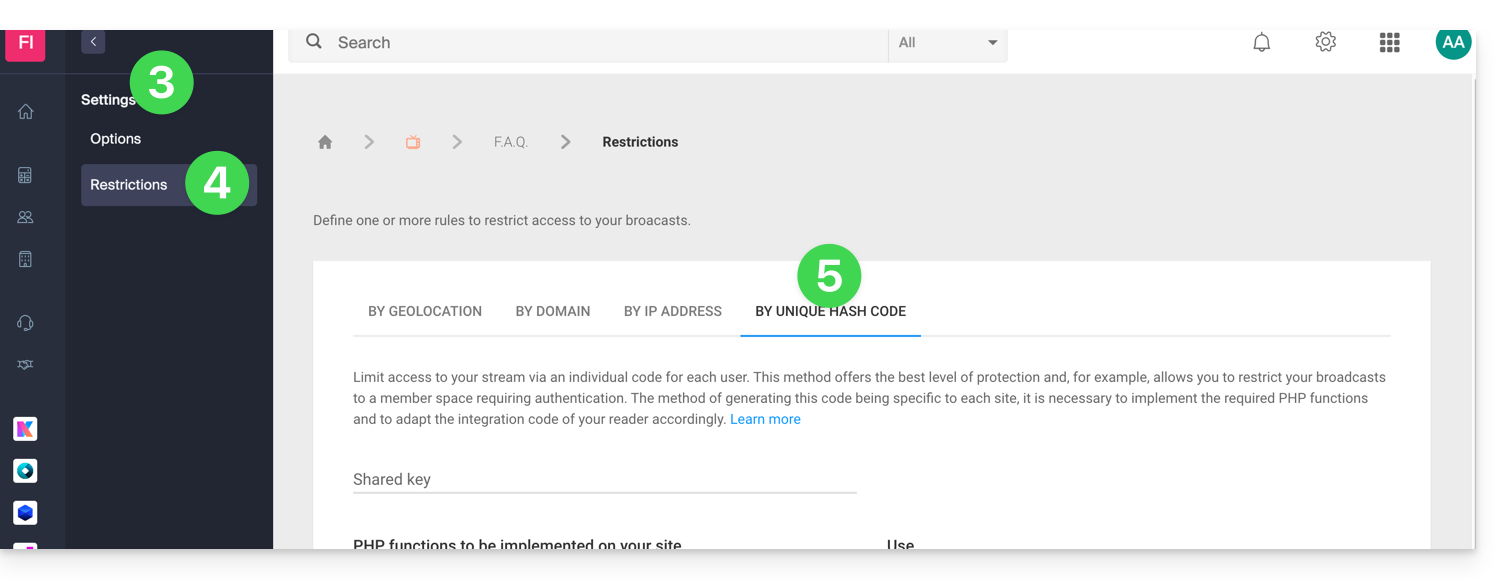
- Click on Settings in the left sidebar.
- Click on Restrictions in the left sidebar.
- Click on the tab (or dropdown menu item) Unique hash restriction:
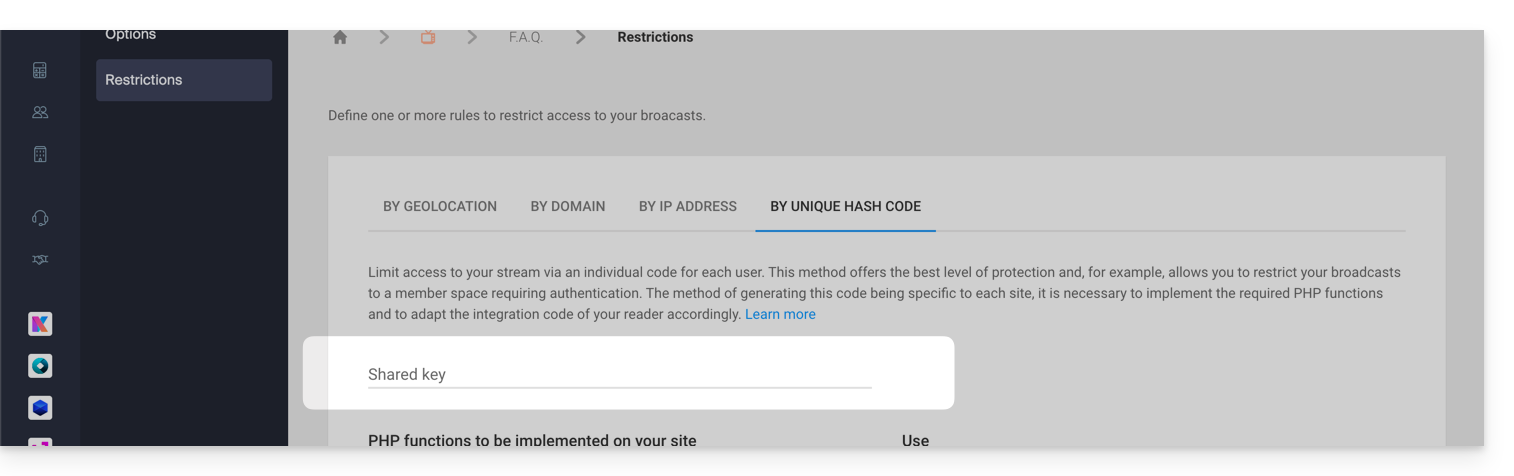
How restrictions work
This method requires retrieving information related to the configuration of your stream and the viewer who is connecting.
First, you need to create a password (a key) in the Infomaniak Manager. As soon as this key is added, connected viewers and those attempting to view your stream will be instantly blocked (refer to this other guide to customize the replacement image offered to blocked viewers).
Here is the principle to follow to authorize access to your stream:
- Designing an authentication system by yourself (e.g., a member area).
- Retrieve the password configured above in the Manager.
- Retrieve the IP addresses of users via
$_SERVER["REMOTE_ADDR"]for example. - Retrieve the identifier of the stream to target.
- Retrieve the current date and time (without minutes and seconds).
These elements will then be hashed by the code provided in the Manager to generate a unique token for each user, which will be transmitted to the stream at the time of its loading. The streaming platform will then check the validity of the hash to authorize or reject the connection.
Important notes
- To ensure the security of access to the stream, the validity of each token is time-limited.
- It is important to disable the cache on the pages that allow access to the stream; indeed, if the token generation is cached, other users will attempt to authenticate with someone else's hash, which will result in their rejection even if they are authorized to consume the stream.
Link to this FAQ:
Has this FAQ been helpful?
This guide explains the possible origins of any latency you might experience between the source of a video and its live broadcast via the Infomaniak Video Streaming service.
Availability in the case of...
...rendering on the Manager
Once your encoder is connected to Infomaniak's master-type servers, the stream may undergo several transformations, particularly in the case of transcoding or the addition of a watermark logo. In these scenarios, the video must be re-encoded in one or more formats, which requires processing time that inevitably affects the final rendering.
...single bitrate stream without reprocessing
In this case, the stream is available after just a few seconds.
...transcoded stream or with watermark
This processing takes approximately 25 seconds for the transformed stream to be visible in the different qualities.
...lag between the source and the rendering for viewers
To avoid micro-cuttings during the broadcast, the player (video player) buffers several seconds of the video. You can thus easily notice a 30 to 60 second lag between the original source and the stream rendered for viewers.
To minimize this lag, the only way is to have a single bitrate stream, without transcoding, without watermark, with a bitrate not too high, and to reduce the buffer as much as possible in the player configuration. Depending on your needs, it is therefore necessary to make a compromise between the instantaneity of the broadcast and the features you wish to use to enhance the experience of your viewers and personalize the branding of your live streams.
Link to this FAQ:
Has this FAQ been helpful?
This guide allows you to quickly use the essential functions of the Infomaniak Video Streaming.
Configure a stream
Transmitting a stream to Infomaniak servers can be done either…
- … via a video encoder (or a camera acting as an encoder) that will push the stream to Infomaniak servers; to offer multiple stream qualities and improve the experience of your users, you have the possibility to enable multi-bitrate
- … via an IP camera, or an external source from which Infomaniak servers will pull the stream
Specific guide
- Configure a broadcast from OBS Studio
Create a Player to offer the stream to viewers
The Player will allow you to obtain a URL to view the stream, integrate it on an HTML page, etc.:
- Click here to access the management of your product on the Infomaniak Manager (need help?).
- Click directly on the name assigned to the product in question.
- Click on Integration in the left sidebar menu.
- Click on Players in the left sidebar menu.
- Click the blue button to add a player.
Save your live streams in a scheduled or automatic way
Refer to this guide to learn how to archive or record your broadcasts.
Restrict the broadcast
A stream can be restricted to a single audience:
- Secure a video stream by IP restriction
- Secure a video stream by GeoIP restriction
- Secure a video stream with a unique key
- Secure a video stream by domain restriction
To go further...
Guides on various topics:
- Embed a watermark/logo on a live video stream
- Why is there a broadcast delay between the source and the availability of a stream?
- Which cameras are compatible with the Infomaniak platform?
A question or feedback?
- In case of a problem, please consult the knowledge base before contacting support.
- Click here to share feedback or a suggestion on an Infomaniak product.
Link to this FAQ:
Has this FAQ been helpful?