
Knowledge base
1000 FAQs, 500 tutorials and explanatory videos. Here, there are only solutions!
This guide explains how to add tags (codes and variables) into your text body to personalize your sends with Infomaniak Newsletter.
Preamble
- A subscriber exists as an email address, but not only that:
- You may have additional details about them, which should be included in the file you import so you can define a custom field associated with each of these additional pieces of information
- Many other pieces of information can be collected when a subscriber signs up through a form
- You can manually add many other pieces of information at any time
- The information associated with each subscriber can be used to segment your audience, send targeted messages, and improve engagement
- By leveraging these additional details, you increase the chances of conversion and retention, thereby creating a stronger and more personalized relationship with each subscriber
Utilizing Gathered Additional Details
Viewing Field Contents
Refer to this guide (under Edit Subscriber Record).
Viewing Field Names
Custom fields are managed under Subscribers:
- Login to Manager Infomaniak (manager.infomaniak.com) from a web browser like Brave or Firefox
- Click on the icon at the top right of the interface (or navigate through the left sidebar menu)
- Select Newsletter (Events & Marketing universe)
- If necessary, click on the domain name in the displayed table
- Click on Subscribers in the left sidebar menu
- Click on the Fields tab

Inserting Fields into the Newsletter
When creating a new Newsletter, insert custom fields:
- In the subject and preview text at the very first drafting step:

- In the body of your Newsletter according to the selected template/theme:

- For a pure HTML template, insert the variable name in uppercase surrounded by asterisks and separator lines:
*|VARIABLE-NAME|* - For other template types (blocks / wysiwyg), insert a text block, click on it to enter text, and click above the editing window to access variables:

- For a pure HTML template, insert the variable name in uppercase surrounded by asterisks and separator lines:
List of Basic Variables
*|FIRSTNAME|* | first name |
*|LASTNAME|* | last name: this variable can also be integrated into a link href e.g., https://domain.xyz?name=*|LASTNAME|* |
*|EMAIL|* | email address |
*|UNSUBSCRIBED|* | to place an unsubscribe link ("unsubscribe") at the desired location without your action, this link is automatically inserted at the bottom of your Newsletter |
*|ARCHIVE|* | to manually add a link to an online version of your Newsletter without your action, this link is automatically inserted at the top of your Newsletter |
*|DOMAIN_NAME|* | Newsletter domain name |
*|IP-REGISTER|* | user's IP address when they signed up |
This guide concerns UTM tags, or Urchin Tracking Module, which are tags added to URLs to track and analyze the performance of online marketing campaigns using the Infomaniak Newsletter tool.
Introduction
These optional UTM tags consist of specific parameters such as source, medium, campaign, term, and content, which help identify the traffic source of a link. By using UTM tags, marketers can understand which campaigns are driving traffic, which channels are most effective, and which ads or strategies are performing best, based on data collected by web analytics tools.
UTM tags thus allow for linking the links in your newsletters to tracking through tools like Google Analytics on your site.
Activate UTM Feature
Enable this option in step 1 of creating your newsletter. You will find 3 fields to enter utm_parameters keywords:
- campaign source (utm_source)
- campaign medium (utm_medium, e.g., email)
- campaign name (utm_campaign = your campaign name)

Therefore:
- Fill in the 3 UTM fields in step 1 of newsletter creation.
- Insert a link to your site's URL (which should be correctly configured and analyzed by Google Analytics, for example) in the body of the newsletter in step 3.
- When the reader clicks on it, they will arrive at the URL followed by "?utm_source=...&utm_medium=...&utm_campaign=..." with your keywords replacing "...".
If you enter multiple keywords in these fields, any spaces will be replaced with underscores _.
Later, it is planned to be able to enter dynamic formulas in these fields, such as today's date, for example.
Read also: https://news.infomaniak.com/comment-creer-un-objectif-google-analytics
This guide shows how to create / import / manage contacts within Infomaniak's Newsletter.
Prerequisites
- Have explicit consent from your recipients via the double opt-in model (sending spam and using purchased/rented address lists is prohibited).
Building a subscriber list
- Duplicates will be automatically removed.
- Importation does not send any messages to the added contacts (therefore, read and accept the above prerequisites).
To access the Newsletter subscriber management:
- Log in to Infomaniak Manager (manager.infomaniak.com) from a web browser like Brave or Firefox.
- Click on the icon in the top right of the interface (or navigate through the left side menu).
- Select Newsletter (Events & Marketing universe).
- If necessary, click on the domain name in the displayed table.
- Click on Subscribers in the left side menu.
- Click on the blue button Add contacts
- Read and accept the terms of service.
- Choose from the different methods to build a subscriber list:
A: Importing a CSV file (.csv format) or .txt file (predefined format)
The format must be respected (a downloadable template is available on the page). Maximum size: 300 MB
Once the spreadsheet document is prepared, export it to .csv, which will create a text document with separators between each piece of information in the different cells:
Select the .csv file from the import interface and click the blue Import button:
Assign the desired field to the desired information (information is grouped according to the original columns). It is possible to create fields that do not yet exist (field type can be forced to numbers or dates, boolean, etc.), as well as assign them to a group for the imported contacts:
Once done, whether under Groups or Subscribers, your import is visible:
B: Copy/paste the equivalent of a .csv or .txt file (predefined format)
The format must be respected, for example:
anna.a@domain.xyz,Anna,Alpha,1985-08-20
alfred.a@domain.xyz,Alfred,Alpha
contact@domain.xyz,Support
mail@domain.xyz
Once this information is pasted into the designated field, click the blue Continue button. The process is identical to point A above.
C: Filling out an individual contact form
Import contacts one by one using the provided form. Add free-form fields (field type can be forced to numbers or dates, boolean, etc.) and groups, which will all be available for subsequent additions (except in the example animation below as it loops on a single initial addition):
D: Automatic import from other Infomaniak tools
Import contacts from your Infomaniak address books and from the Infomaniak ticketing tool if available (with the option to import only users who specified they want to receive a Newsletter).
Edit a subscriber's details
To edit information related to your subscribers:
- Log in to Infomaniak Manager (manager.infomaniak.com) from a web browser like Brave or Firefox.
- Click on the icon in the top right of the interface (or navigate through the left side menu).
- Select Newsletter (Events & Marketing universe).
- If necessary, click on the domain name in the displayed table.
- Click on Subscribers in the left side menu.
- Click on the subscriber whose details you wish to edit

- Click on Edit

- Edit the information (only the email address cannot be modified)

- If you wish to add a new field, it must be added globally by returning to the Subscribers menu
- Click on the Fields tab
- Click on Create a field

- The subscriber's record can now be edited with this new field:

Delete subscribers
To remove subscribers from the Newsletter:
- Log in to Infomaniak Manager (manager.infomaniak.com) from a web browser like Brave or Firefox.
- Click on the icon in the top right of the interface (or navigate through the left side menu).
- Select Newsletter (Events & Marketing universe).
- If necessary, click on the domain name in the displayed table.
- Click on Subscribers in the left side menu.
- Search or filter for a type of subscriber if necessary.
- Click in the box to select one or more subscribers.
- Click on Delete
- Confirm deletion.
You can also click on Unsubscribe instead of Delete so that contacts remain on the list. To view them again, you will need to modify the default filtering on the table and choose Unsubscribed:
Forget a subscriber
On a subscriber's record (step 6 above, click on the subscriber whose details you wish to edit), you can:
- Forget
- The subscriber will be erased from all your lists.
- All information will be completely erased in 30 days.
- The data will not be recoverable.
- Delete
- The subscriber will be removed from all your lists; however, the information is retained in case they re-subscribe to a list
- The subscriber will be removed from all your lists; however, the information is retained in case they re-subscribe to a list
Export subscribers
To export the list of Newsletter subscribers, in .csv format and based on selected criteria:
- Log in to Infomaniak Manager (manager.infomaniak.com) from a web browser like Brave or Firefox.
- Click on the icon in the top right of the interface (or navigate through the left side menu).
- Select Newsletter (Events & Marketing universe).
- If necessary, click on the domain name in the displayed table.
- Click on Subscribers in the left side menu.
- Search or filter for a type of subscriber if necessary.
- Click in the box to select one or more subscribers.
- Click on Export
- Click the blue button once the export is prepared to download the data into a CSV file (.csv format).
The file includes these columns:
- Status
- Sent
- Opens
- Clicks
- Subscription Date
- firstname
- lastname
- ip register
- and any manually created free-form fields (text, number, date, etc.)
This guide presents the available conditions for segmenting and filtering your contact lists when sending an Infomaniak Newsletter.
Introduction
- Filtering subscribers based on specific criteria allows you to send Newsletters only to certain individuals among your subscribers.
- Criteria can include their registration date, custom fields, or actions performed or not during previous mailings.
- You can combine multiple conditions and add "OR" conditions to refine your filters.
Segmenting Contact Lists...
Access your Newsletter:
- Log in to Manager Infomaniak (manager.infomaniak.com) from a web browser like Brave or Edge.
- Click the icon at the top right of the interface (or navigate via the left sidebar menu, for example).
- Select Newsletter (under Events & Marketing).
- If necessary, click on the domain name in the displayed table.
- The Newsletter interface will appear.
...when sending to new subscribers (based on their specifics)
Here is an example of a Newsletter subscription form with an optional field to enter a location:

Once certain subscribers provide this information, you can find it in the details of their contact record:

This type of information can be used to segment your subscriber list and only write to a portion of it.
- Click on Campaigns in the left sidebar menu.
Specify any custom terms related to the target audience.

- Fill in the information and compose the Newsletter.
Click on Advanced mode to segment contacts and not send to your entire list.

- Enter information corresponding to the criteria you have defined based on the information collected during subscriber registration (custom fields or group membership or registration date).
- Add additional conditions using AND / OR to better filter your recipients.
Check the number of filtered subscribers who will receive the Newsletter.

- Click on the blue Continue button.
- Review and/or test send your Newsletter and then click Continue.
- Set the time when your Newsletter should be sent (immediately or scheduled for later).
...for future mailings (based on subscriber past actions)
- Follow the instructions above to point 4.
- Click not on custom field but on Actions to choose the criteria defining the people who will receive your next Newsletter mailing.
- Choose the actions the subscriber must have performed to receive your next mailing, then if necessary add additional conditions using AND / OR to further filter your recipients.
Check the number of filtered subscribers who will receive the Newsletter and then click on the blue Continue button.

- Review and/or test send your Newsletter and then click Continue.
- Set the time when your Newsletter should be sent (immediately or scheduled for later).
This guide explains how to create a token, or API key (also known as a token), for the API tool of Infomaniak Newsletter.
Obtaining a Token
To obtain a Newsletter API key:
- Log in to the Infomaniak Manager (manager.infomaniak.com) using a web browser such as Brave or Firefox.
- Click on the icon in the top right corner of the interface (or navigate using the left sidebar menu, for example).
- Select Newsletter (universe Events & Marketing).
- If necessary, click on the name of the relevant domain in the displayed table.
- Click on API Key in the left sidebar menu.
- Click on the blue Generate a Key button.
- Click the blue Create a Token button.
- Choose the appropriate product from the dropdown menu.
- Select a validity duration.
- Click the blue Create a Token button.
- Enter the Manager login password as prompted.
- Copy the token securely - it will no longer be accessible after this.
Refer to the Newsletter API documentation.
This guide details the rules to follow when sending emails from Infomaniak to multiple recipients without it being considered spam.
Obtaining Recipient Consent
Infomaniak is a Swiss host governed by Swiss laws. These federal laws and our terms of service stipulate that potential recipients must give their consent before being added to an email mailing list.
To have a user's registration for a newsletter considered voluntary, the user must:
- have entered their email address in a form dedicated to a specific topic
- have clicked on a validation link automatically sent after registration (point 1); this registration should only concern the topic specified at the time of registration
- be registered by the Newsletter system with their IP address and the date
This is called a double opt-in registration. The term "double opt-in" refers to a registration process in which a user takes two distinct actions to confirm their intention to receive communications, typically newsletters or marketing emails.
The owner of an email address can report any received message as spam at any time. Collecting subscriber registrations through double opt-in is the only way to protect against a potential spam complaint.
What to Do in Case of a Spam Complaint ?
As an email provider, Infomaniak must demonstrate its cooperation in the fight against spam and ensure that all of its customers are not blocked/blacklisted by potential complainants' email providers.
In the event of a spam complaint, Infomaniak may temporarily suspend deliveries and ask the message sender for proof of the complainant's registration; if provided, the complaint will become invalid.
However, the complaint will be justified if no registration proof is provided, and Infomaniak may be forced to take action: suspension of the email address, domain name, or contract termination in case of repeat offenses.
How to Stay Compliant?
If you wish to conduct email campaigns, make sure you have the information from point 3 above (IP address and registration date of each subscriber). This process ensures that the user has expressly confirmed their desire to receive communications, thereby strengthening the legitimacy of the subscriber list and reducing the risk of spam or unauthorized registration.
It is advisable to build your list by inserting a contact form on your website that will ensure the collection of your subscribers' email addresses via double opt-in.
An unsubscribe link must also be visible and included at the bottom of each of your newsletters.
This guide explains how to handle Soft Bounce and Hard Bounce errors that can occur during email sending, particularly when using Infomaniak Newsletter.
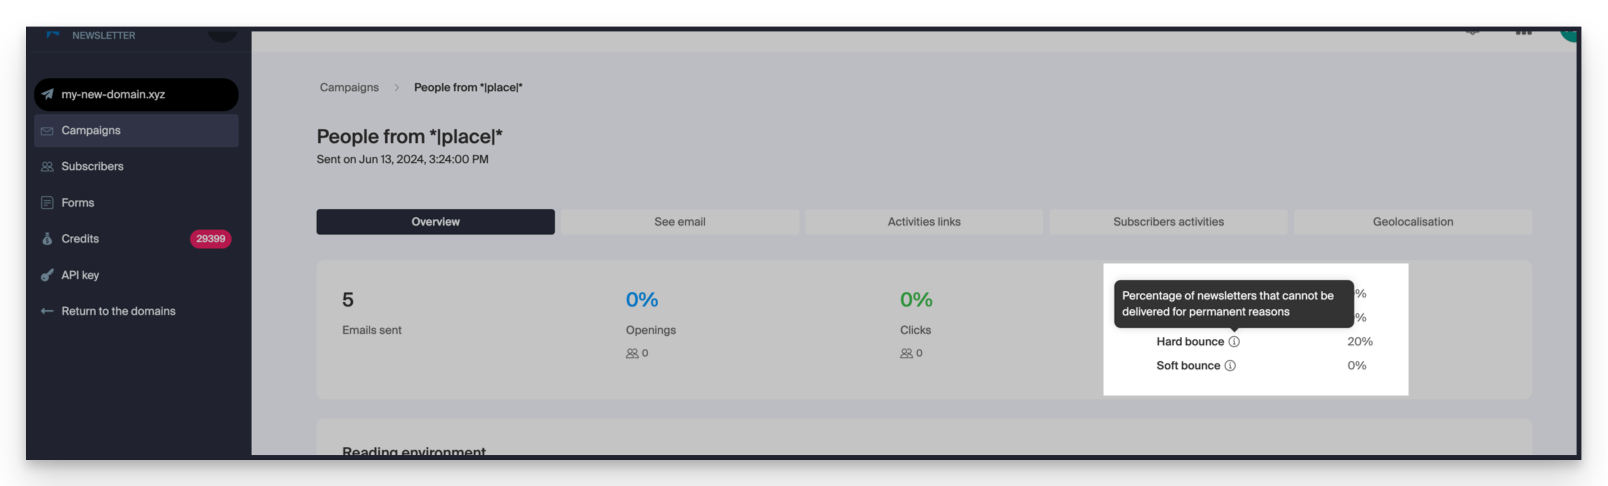
Hard Bounce
A hard bounce is an email that cannot be delivered due to permanent reasons.
- Email sent to a non-existent address
- Email domain of the recipient that is not a real domain
- Recipient's server that does not accept emails
- Etc.
Example from the Infomaniak Newsletter tool after sending with 20% Hard Bounce:
Soft Bounce
A soft bounce is an error message indicating that the email is not delivered to its recipient and is related to a temporary delivery issue: the email address is valid, and the sender can retry sending.
Several reasons can explain a soft bounce where the recipient's server temporarily refuses the email:
- The recipient's inbox is full: due to insufficient storage capacity, the recipient no longer receives messages
- An issue occurs with the recipient's mail server: the server is temporarily unavailable or down, or the user has inadvertently set up filters that prevent receiving certain messages
- When the email content, especially its attachments, is too large, the delivery issue occurs during sending
Unless the recipient has permanently abandoned their inbox without deleting their account, the soft bounce is a temporary issue.
This guide explains how to use the Infomaniak Newsletter tool with an external domain (not managed by Infomaniak).
Linking an External Domain
To access your Newsletter:
- Log in to the Infomaniak Manager (manager.infomaniak.com) using a web browser like Brave or Firefox
- Click on the icon in the top right corner of the interface (or navigate through the left sidebar menu, for example)
- Choose Newsletter (under Events & Marketing)
- Click on the Add a domain button (if necessary)
- Select Other domain from the dropdown menu (if necessary)
- Enter the domain name with which you want to send newsletters (the domain must belong to you)
- Click the blue Approve button
- Add the TXT / CNAME / DKIM records that you will receive by email and can be seen on the interface by clicking the button at your registrar:
This guide explains how to freely integrate emojis / emoticons / smileys into the title and content of an Infomaniak Newsletter.
Example of using emoji
in the title

in the body / content

Show emoticons
on macOS
Press the keys CTRL + CMD ⌘ + SPACE
on Windows
Press the keys WINDOWS LOGO + PERIOD (.)
Alternative method:
- Right-click on an empty area of the taskbar
- In the menu, click on Show touch keyboard button
- An icon of a keyboard will appear on the taskbar at the bottom right of your screen
- Click on this icon to bring up the virtual keyboard
- Click on the key with a smiley face at the bottom left of the keyboard
- Use the various emojis available in Windows
This guide concerns Infomaniak authentication tokens, or tokens, which are used to verify the identity of the application and grant specific permissions to interact securely with Infomaniak's API features and data.
Generate an Infomaniak API Token
Authentication tokens or tokens are used to verify the identity of the application and grant specific permissions to interact securely with API features and data.
To access the Infomaniak API, it is necessary to generate an access token. Its default duration is "unlimited," but you can set a custom duration upon creation.
Be aware that if no calls are made with the token for one year, it is automatically disabled. In this case, you will need to generate a new one. There is no limit to the number of tokens you can create.
During creation, you can choose the application and scope accessible by the token to match your current project needs.
Add / Retrieve a Token
API keys are managed on this page in the Manager:
To do this:
- Click the blue Create a token button
- Choose the appropriate product from the dropdown menu according to your current needs and project
- Choose a validity period
- Click the blue Create a token button
- Enter your Manager login password as requested
- Copy the token securely - it will no longer be accessible after this step
Example application: token for the Newsletter API