Knowledge base
1000 FAQs, 500 tutorials and explanatory videos. Here, there are only solutions!
This guide explains how to store the database of Joplin on your kDrive Infomaniak and connect your various devices via the WebDAV protocol. You thus keep your notes safe in a storage medium located in Switzerland.
⚠ Available with:
| kSuite | |
| Business | |
| Enterprise | |
| kDrive | Solo |
| Team | |
| Pro |
Preamble
- Joplin is a free and open-source note-taking tool that allows you to organize all your notes within folders and access them from any device (computer, mobile device, etc.)
- Joplin will store several of its configuration files, so to avoid cluttering your kDrive directories, it is recommended to create a dedicated folder in your personal directory on kDrive, with a simple folder name like "
joplin" for example, and then specify it at the end of the WebDAV link in step 7 below: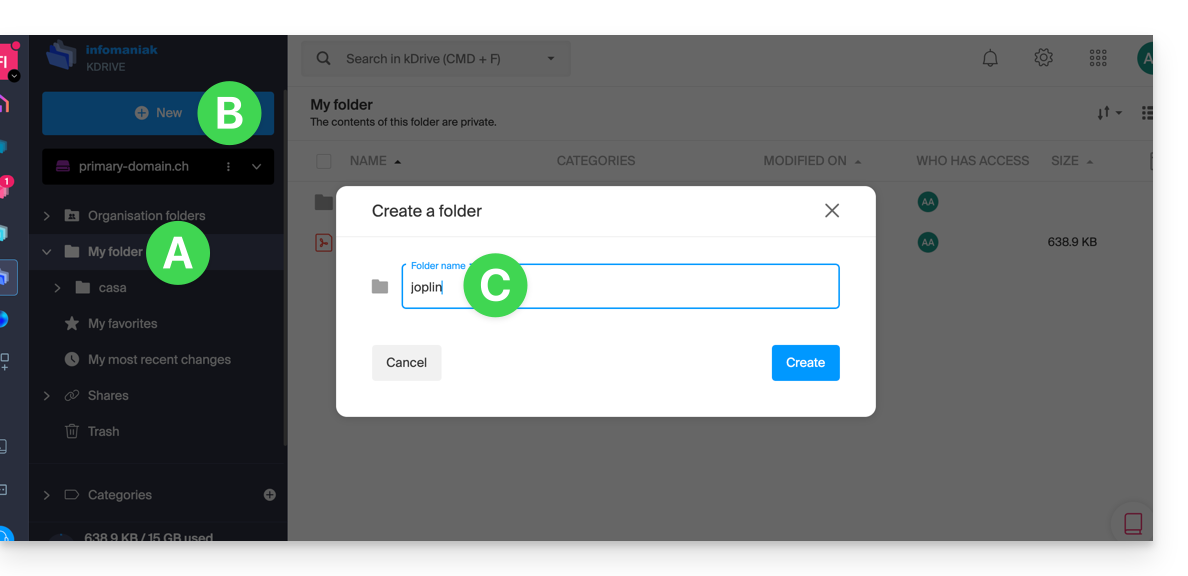
Configure Joplin to use kDrive via WebDAV
Prerequisites
- Download Joplin
- Know your kDrive identifier (kDrive ID).
The example below is substantially the same with all versions of Joplin:
- Open the Joplin application.
- Press the menu at the top left:
- Press Settings:
- Press Synchronization.
- Press the menu to select a target.
- Select the WebDAV mode:
- For the account parameters, use the following information:
- Server address:
https://IDkDrive.connect.kdrive.infomaniak.com/joplin(or /folder-name — read the preamble above) - Username: email address to log in to the Infomaniak user account
- Password: application password in case of double authentication activated or the one from your Infomaniak user account if you have not activated 2FA
- Server address:
- Press the synchronization test and wait for the connection confirmation below:
- Press the top left to return to the previous menu and press Synchronize to create the files on kDrive:
- Go back to the notes to start working.
⚠️ The various services offered by Infomaniak are all compatible with the corresponding standard protocols (notably IMAP/SMTP for email, WebDAV for sharing, S3/Swift for storage, etc.). Therefore, if you encounter a problem with third-party software, contact its publisher or a Partner and consult the support policy as well as article 11.9 of the Infomaniak Terms and Conditions.
This guide details the Lite Sync option of the desktop app kDrive (desktop application on macOS).
Preamble
- The Lite Sync feature saves space by virtually storing your kDrive files on your computer, only downloading them when necessary.
- The files are always accessible from the kDrive web app (online service ksuite.infomaniak.com/kdrive) but locally they are present in a "dehydrated" way, requiring a loading time to be fully accessible.
- This allows you to view, complete, and synchronize the content of kDrive without saturating the hard drive.
- The Lite Sync option always acts:
- on a specific kDrive (in the case where you synchronize several on the application).
- and on the entirety of the kDrive (or the entirety of an advanced synchronization).
- and via a specific kDrive app (another user of the same kDrive can make a different Lite Sync choice from yours).
- In case of a problem, consult this other guide on the subject.
Activate the Lite Sync option
Prerequisites & scope of use of Lite Sync
- macOS version ≥ 10.15 — not available with Linux
- File storage system under NTFS / APFS
The Lite Sync option can be activated during the installation of the application (this is offered to you) or subsequently:
- Perform a left-click on the app icon in the notification area of your computer (top right on macOS).
- Click on the action menu ⋮ to the right of the kDrive window.
- Select kDrive settings:
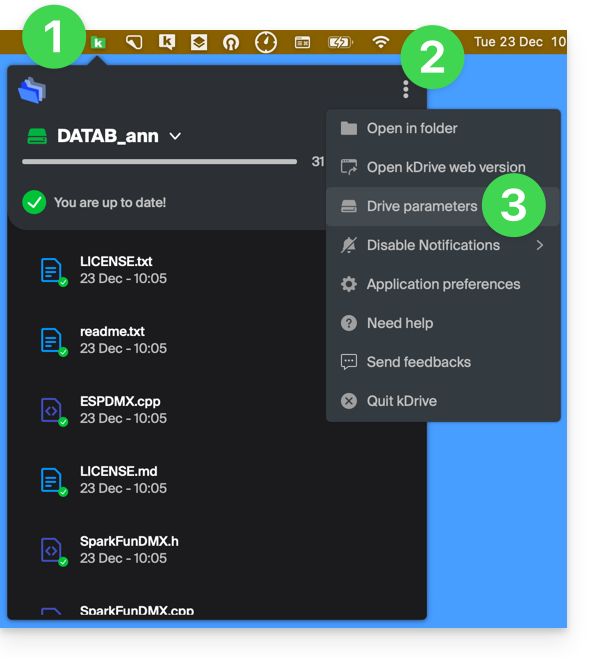
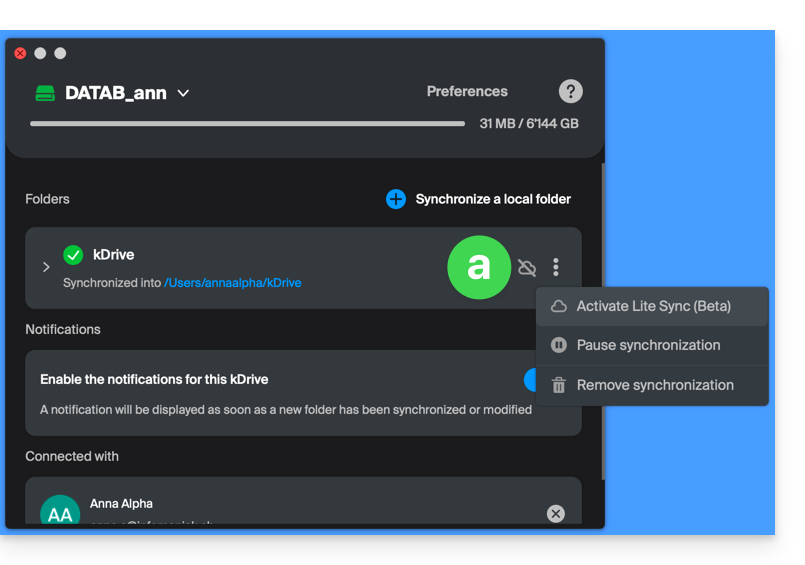
- Click on the action menu ⋮ to the right of the current synchronization and the cloud symbol:
- If the cloud is crossed out, you can activate Lite Sync as it was not yet active:
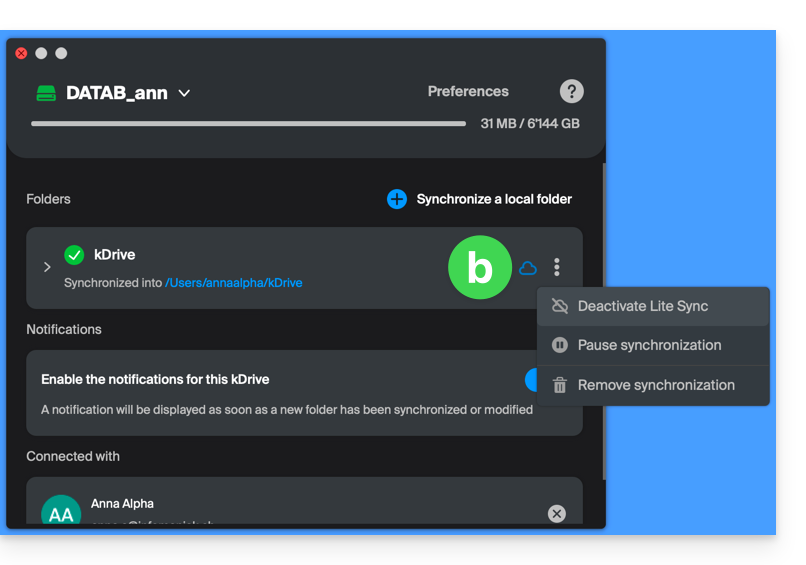
- In the same place, you can deactivate Lite Sync if the cloud was not crossed out (also read at the end of this guide):
- If the cloud is crossed out, you can activate Lite Sync as it was not yet active:
Actions on data synchronized on the disk
Always keep on this device
Once Lite Sync is activated (and therefore the data on the disk has become “virtual”), you can still make a folder and its subfolders or just one or more files locally available:
- From the macOS Finder, navigate to a folder synchronized with kDrive and right-click.
- Select the option Always keep locally available under kDrive:
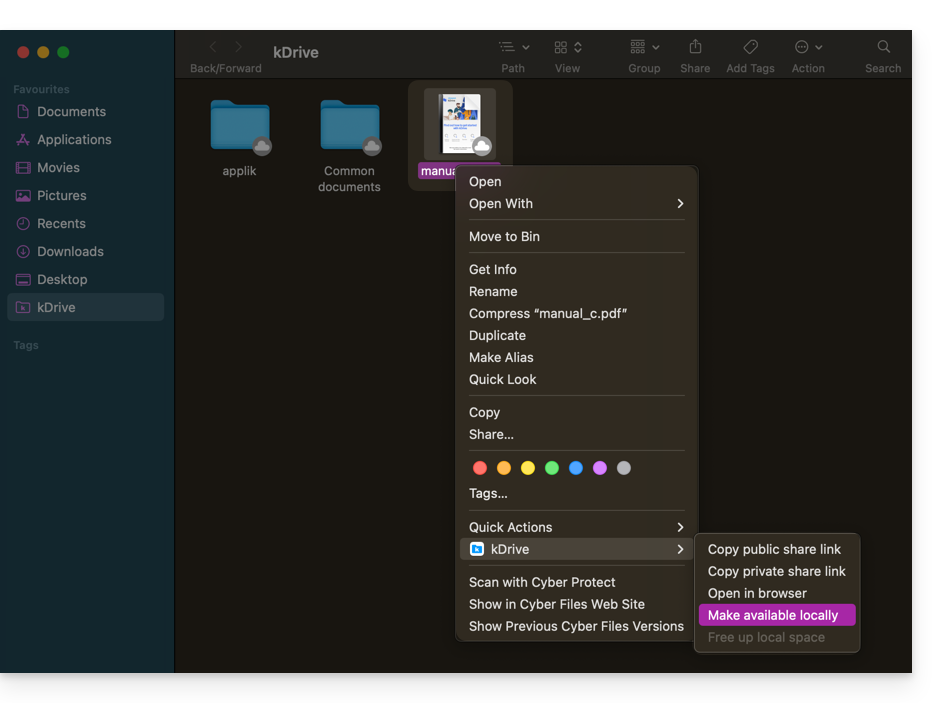
- The symbol visible on the icon of the affected files will change to indicate that the file is no longer "in the cloud" but fully present on your disk:

Free up space
Conversely, once Lite Sync is activated, you can free up space, file by file or in a folder and its subfolders.
Note: "free up space" is not applied by default to new files or folders added locally.
- From the macOS Finder, navigate to a folder synchronized with kDrive and right-click.
- Select the option free up local space under kDrive:
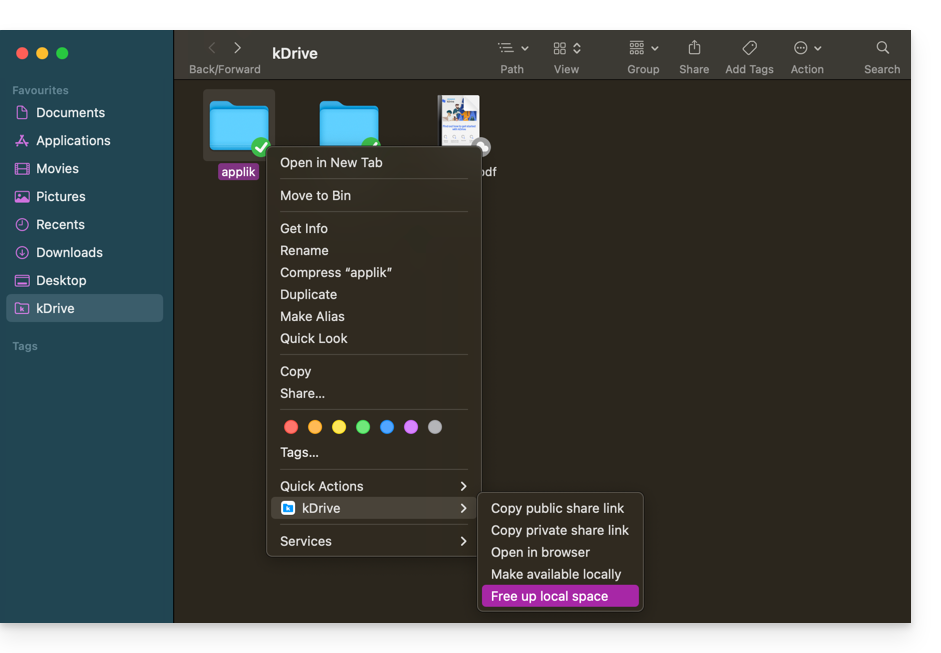
- The symbol visible on the icon of the affected files/folders will change to indicate that the data is “in the cloud” and no longer fully present on your disk:

- The action Free up space will free up storage space on your computer.
- The files will remain visible but will not be accessible without an internet connection.
Example of use (required storage space)
If you activate Lite Sync, the space occupied (900 GB for example) on the Infomaniak server will be freed up on your hard drive, but the opposite is also true (for example, 900 GB of free space required on your hard drive if the Lite Sync option is activated midway).
Therefore, it is recommended to keep the initial choice of whether or not to activate Lite Sync and not to change it midway.
File "dehydration"
As explained in the preamble, a dehydrated file is a kDrive file whose complete version is not present on the hard drive and instead a 1 KB "shortcut" is displayed, which is normal behavior when Lite Sync is activated.
In some cases (for example, if you copy the files from your hard drive while Lite Sync is activated, and then start a new synchronization to a new kDrive) the application will block the import of this type of file. To resolve these errors, you can download the complete file from the kDrive web app (online service ksuite.infomaniak.com/kdrive).
Here are the status icons that are used and their explanations:
| Status icons | Description |
|---|---|
| |
| |
| kDrive encounters a synchronization conflict with the file/folder. | |
| An error occurred during the transfer of the file/folder and it was interrupted. | |
| The progress circle indicates a download in progress. |
Disable the Lite Sync option
To do this, follow the steps at the top of this guide (point 4.b in particular). When disabling LiteSync, two scenarios may occur depending on the remaining space on your device's storage:
- If there is sufficient space on your computer, a message confirming the deactivation will appear; simply click Continue.
- If there is not enough space on your computer, a message will indicate the missing space to allow the deactivation of Lite Sync; the synchronization of your kDrive will be paused until you select the files to synchronize on your computer.
This guide provides instructions to connect to kDrive using the WebDAV connection protocol.
⚠ Available with:
| kSuite | |
| Business | |
| Enterprise | |
| kDrive | Solo |
| Team | |
| Pro |
Preamble
- Connecting via WebDAV allows you to:
- use the WebDAV application of your choice instead of the official kDrive application (only solution if this one is unavailable on your OS, for example macOS 10.14.6),
- use kDrive as a synchronization base for a tool that would allow this via WebDAV (Joplin for example),
- access kDrive from your operating system's file manager.
Obtain the identifier (kDrive ID)
To find out your kDriveID, kDrive client ID:
- Click here to access the Infomaniak kDrive web app (online service ksuite.infomaniak.com/kdrive).
- The kDrive directory structure is displayed in the left sidebar menu.
- The URL
https://ksuite.infomaniak.com/kdrive/app/drive/123456/displayed at the top of your browser contains a number: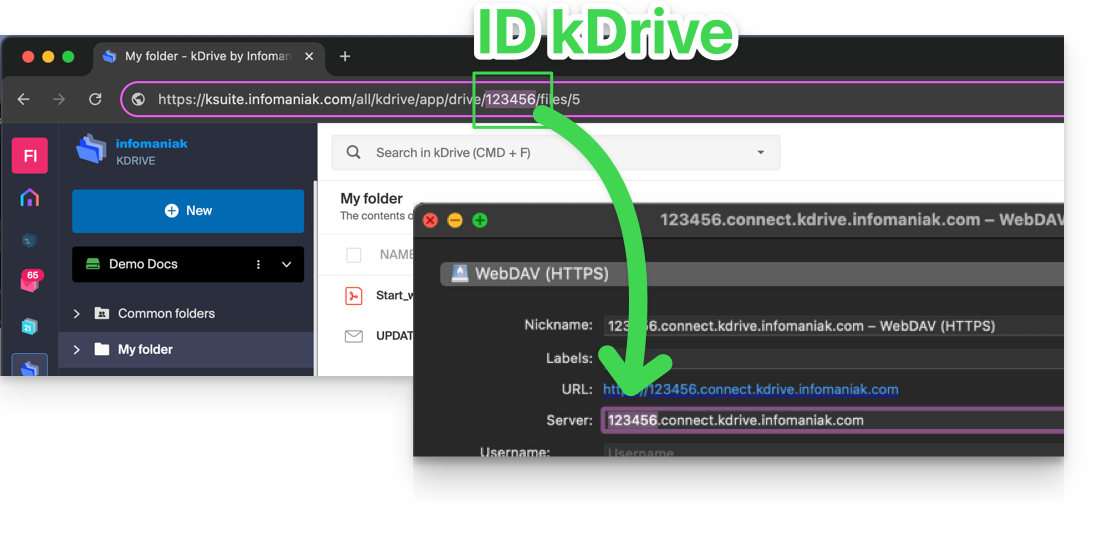
- In some cases, especially when the Organization ID is mentioned in the URL, there may be several series of numbers, but the principle remains the same, you need to take the number displayed after the term “
/drive/”: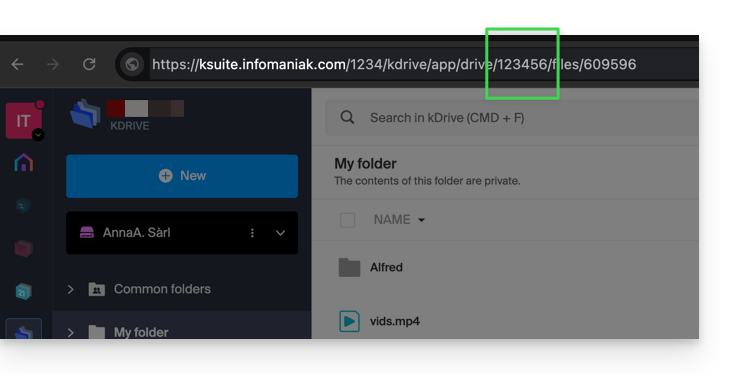
This number (in the example 123456) is your kDrive identifier (IDkDrive).
You will therefore need to write https://IDkDrive.connect.kdrive.infomaniak.com each time it is necessary (https://123456.connect.kdrive.infomaniak.com for example as a WebDAV web address).
Connect to kDrive via WebDAV…
Not all offers are WebDAV compatible. Please refer to the box at the top of the page.
… on Windows
To do this:
- Open the File Explorer from the taskbar or the Start menu.
- Select This PC in the left pane.
- In the Computer tab, select Add a network location:

- Click on Next.
- Click on Choose a custom network location:

- Click on Next.
- Enter the server address:
https://IDkDrive.connect.kdrive.infomaniak.com(see the ID kDrive chapter above). - Click on Next.
- For the account settings, use the following information:
- Server address:
https://IDkDrive.connect.kdrive.infomaniak.com(see the ID kDrive chapter above). - Username: email address to log in to your Infomaniak account
- Password: create an application password for this specific use.
- Server address:
- If desired, click the box to save the login information.
- Enter a name for this connection or leave the default indication.
- Click on Finish.
- Two folders will appear, one containing deleted files & folders, the other with the name of your kDrive and containing your data.
… on macOS
For a computer on macOS, follow the Apple instructions, which can result in this:
- Click on the Go menu from the Finder.
- Click on Connect to server:

- Enter the server address:
https://IDkDrive.connect.kdrive.infomaniak.com(see the ID kDrive chapter above). - Click on Connect:

- Confirm the connection by clicking on the blue button.
- Enter the following information:
- Username: email address to log in to your Infomaniak account
- Password: create an application password for this specific use.
- If desired, click the box to save the login information.
- Click on the blue button to connect:

- There you go, the kDrive content is displayed on the Finder:

... on Linux (Gnome)
To do this:
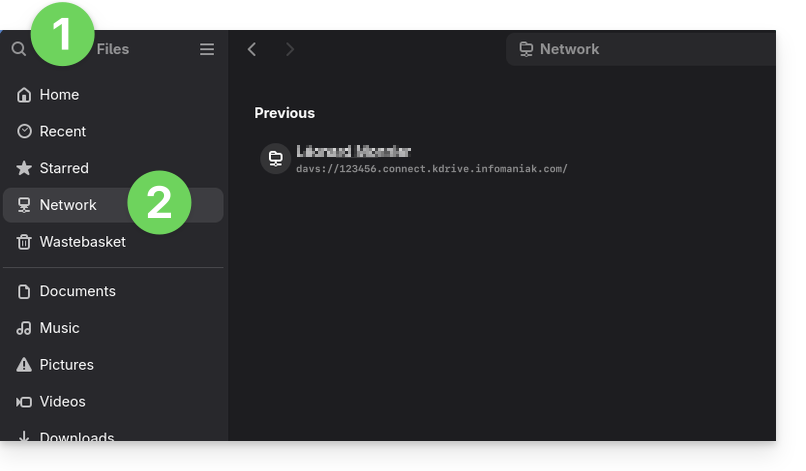
- Open Files.
- In the sidebar, click on Network:
- Enter the server address:
davs://IDkDrive.connect.kdrive.infomaniak.com(read the kDrive ID chapter above). - Click on Connect.
- For the account settings, use the following information:
- Username: email address to log in to your Infomaniak account
- Password: create an application password for this specific use.
- Click on Login.
... with a Windows software
Use the RaiDrive software for quick access to your hosted data. Complete the fields as in the image below:
... with a Windows / macOS software
Use the Cyberduck software for quick access to your hosted data:
- Open Cyberduck.
- In the software menu, go to Bookmark then to New bookmark.
- Select the WebDAV (https) protocol.
- Provide the following information:
- Server address:
https://IDkDrive.connect.kdrive.infomaniak.com(see the ID kDrive chapter above) - Username: email address to log in to your Infomaniak account
- Password: create an application password for this specific use.
- Download folder: the folder where downloaded files will be stored
- Server address:
Most recent software supporting the WebDAV protocol is compatible with kDrive offers among those also supporting WebDAV. Infomaniak cannot guarantee the compatibility of the service with external applications and does not provide support for this protocol. It is recommended to install the kDrive application to avoid any file loss.
Direct WebDAV connection URL to a specific folder
To facilitate a direct connection via WebDAV to a specific folder, you can use the following URL:
https://IDkDrive.connect.kdrive.infomaniak.com/Common documents/Nom du dossier
This simple method allows you to quickly access the desired folder without manually navigating the directory structure. Simply replace "Folder name" with the exact name of the target folder to establish a direct and secure connection via WebDAV. Also, refer to the last part of this other guide for other examples.
This guide explains how to remove one of the users from your Organization on the Manager Infomaniak (note, it is impossible to remove a Legal Representative if there is no other legal representative).
Prerequisites
- Be an Administrator or Legal Representative within the Organization.
- Know the password to log in to your Infomaniak account; it will be requested during the process.
- Switch beforehand to the desired Organization if you do not find the expected user list.
Remove a user from your Organization
If the user had access to kDrive or was invited to view a third-party email address, several intermediate steps will ask you to perform actions with their data and will inform you, if necessary, about what happens to calendars and address books. To remove one of the users from the Organization
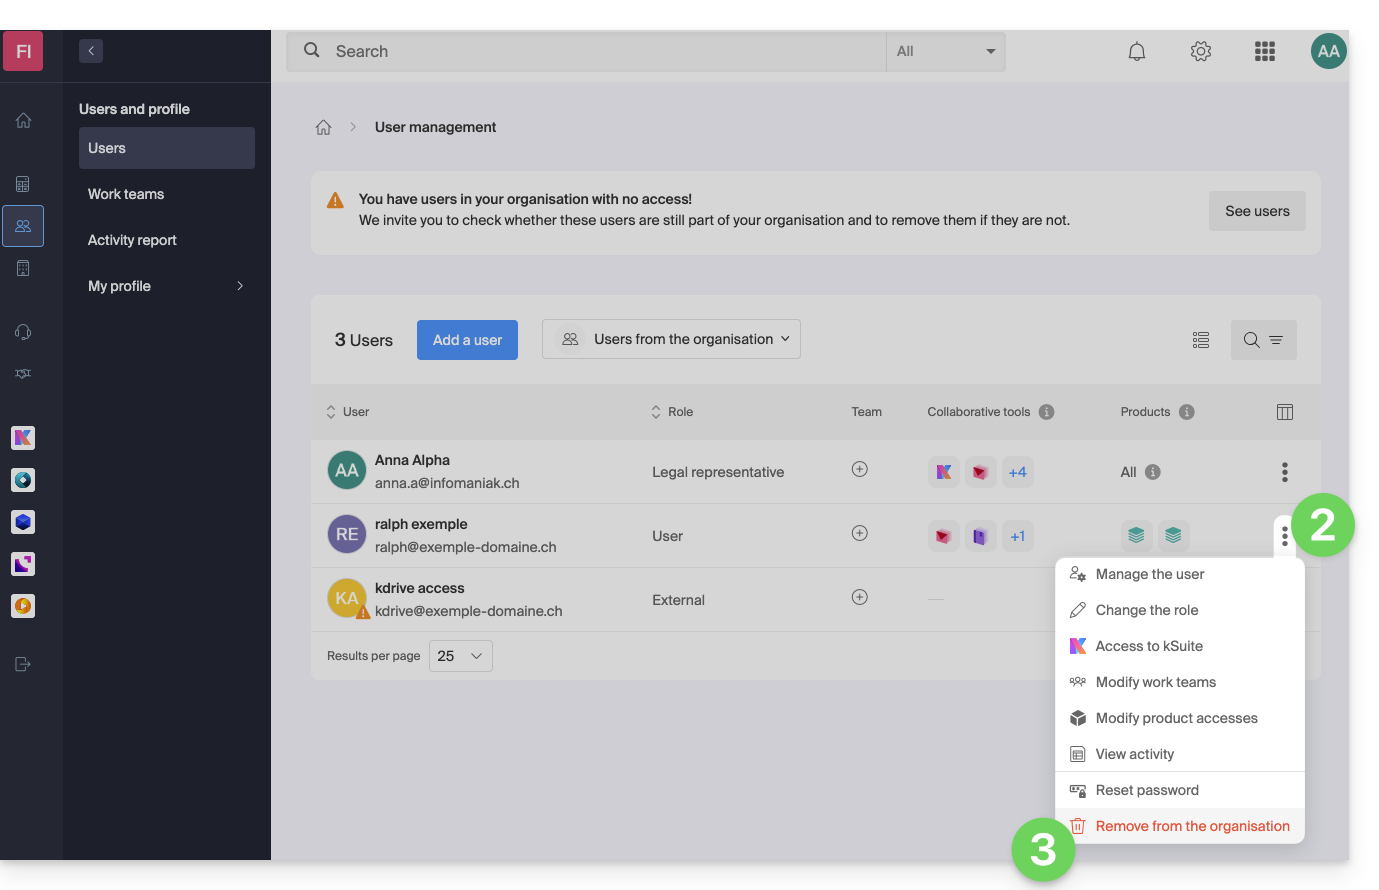
- Click here to access user management for the Organization on the Infomaniak Manager (need help?).
- Click on the action menu ⋮ to the right of the user concerned.
- Click on Remove from Organization:
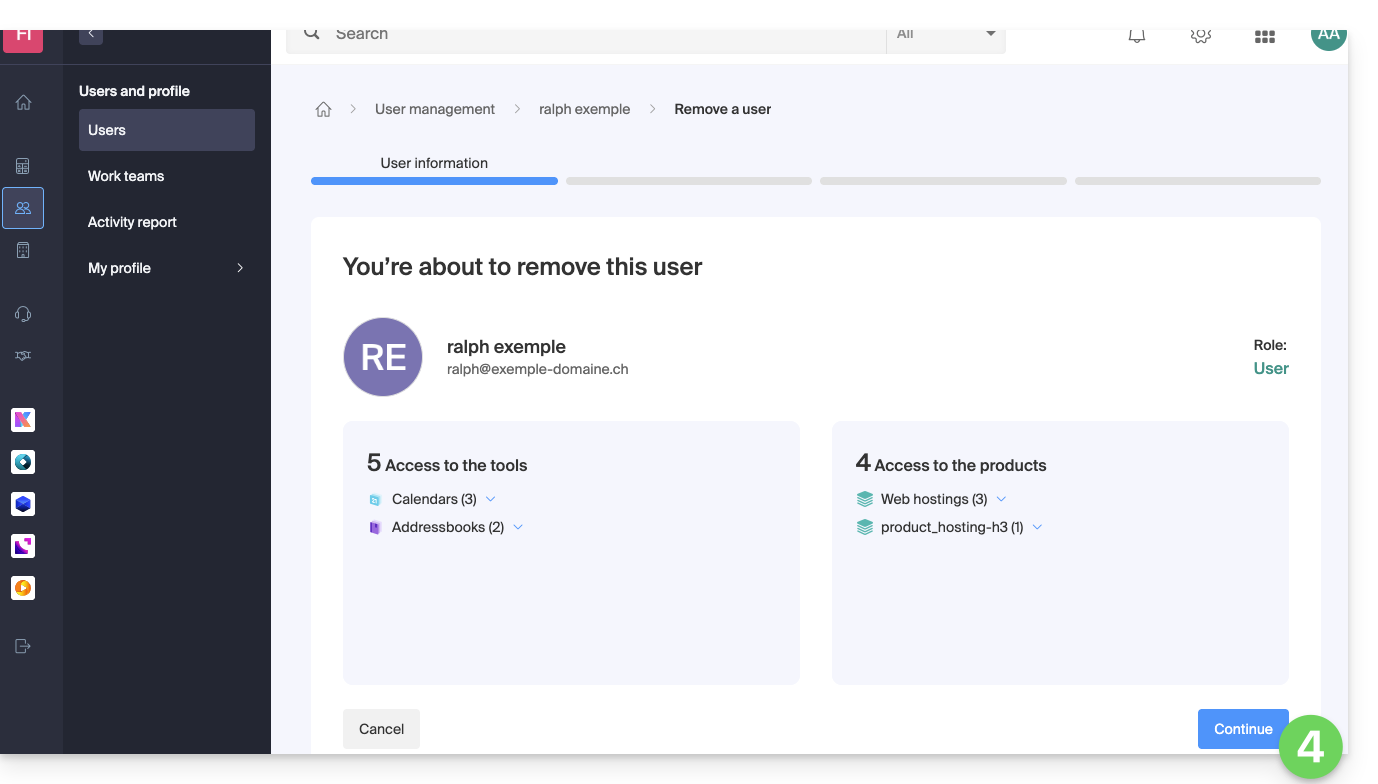
- Review the information (click if necessary on the chevrons to get the details of the deletions) then click on the blue button Continue:
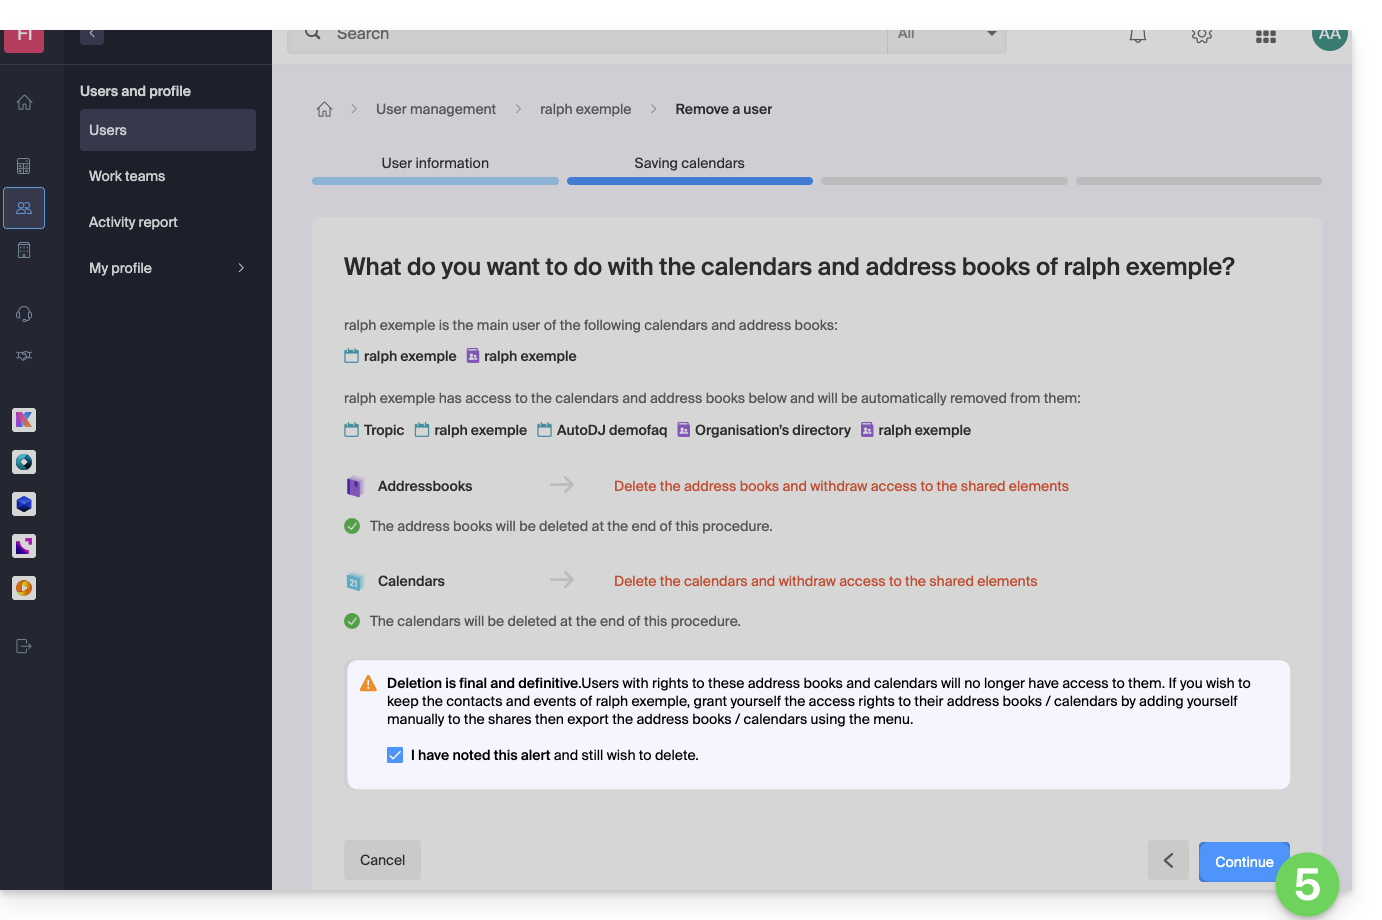
- Review the information, confirm the deletion by checking the checkbox, then click on the blue button Continue:
- Review the information (click if necessary on the chevrons to get the details of the deletions) then click on the red button Remove:
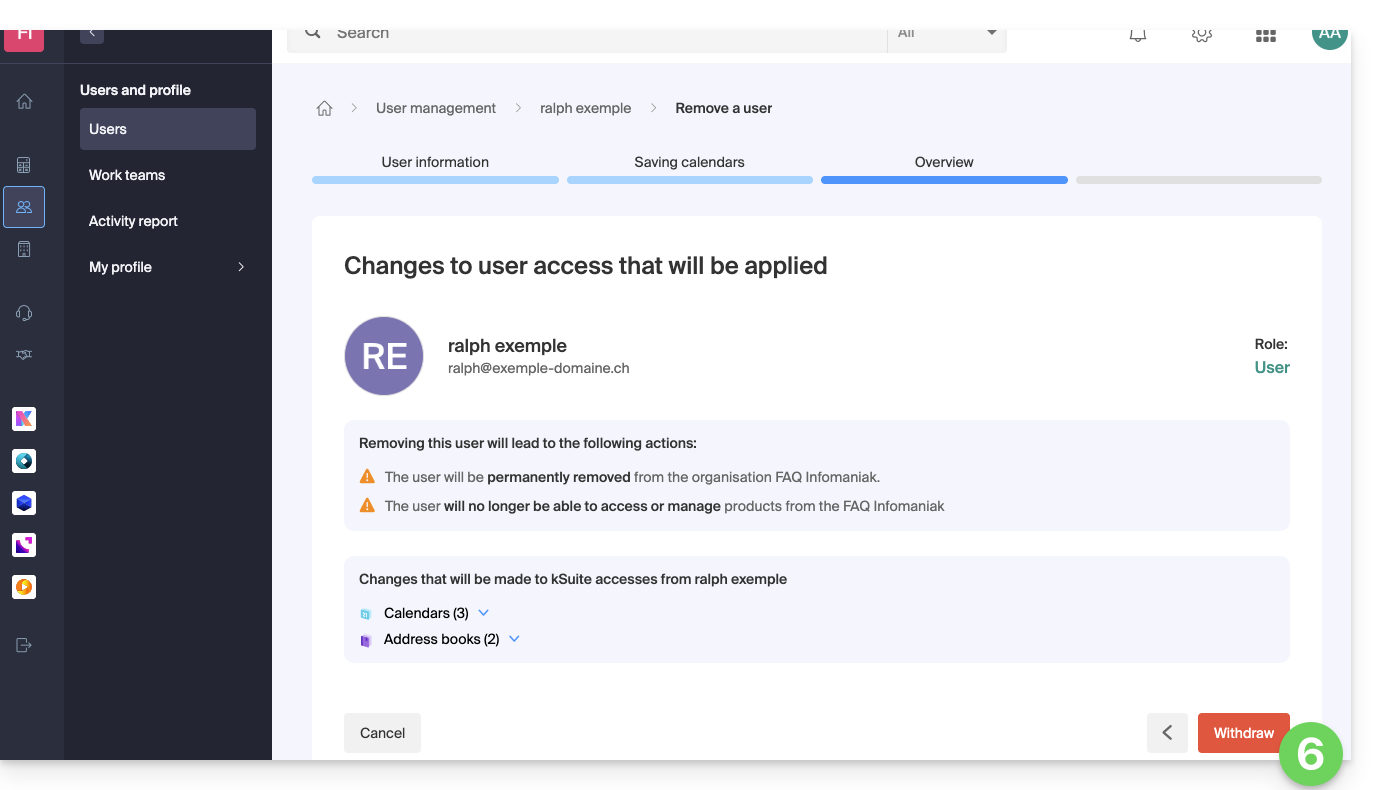
- Enter your email address (login identifier for the Manager), check the confirmation box, then click on the red button Remove this user to permanently remove the user without the possibility of undoing it.
This guide explains how to check and update the version of the desktop app kDrive (desktop application on macOS / Windows / Linux).
Access the installed version information…
… on macOS / Windows / Linux
To identify the version number of the kDrive application:
- Left-click on the desktop app icon in the notification area of your computer (top right on macOS, bottom right on Windows and a double left click in the taskbar on Linux).
- Click on the icon ⋮ at the top right of the application, then on Preferences:
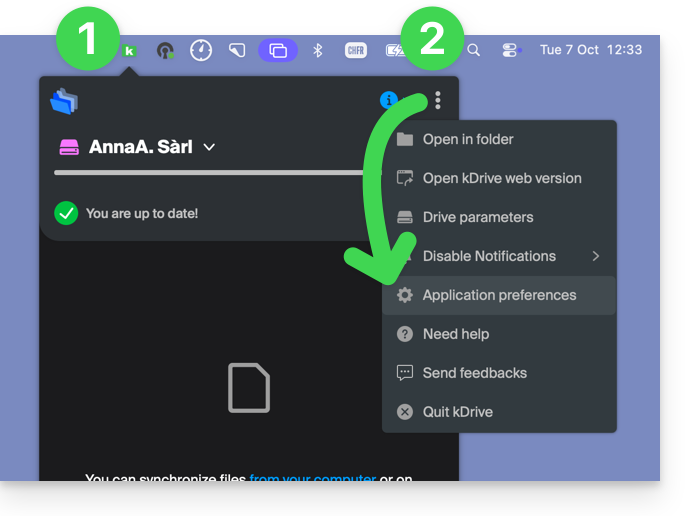
or directly on Preferences if the kDrive window is already open: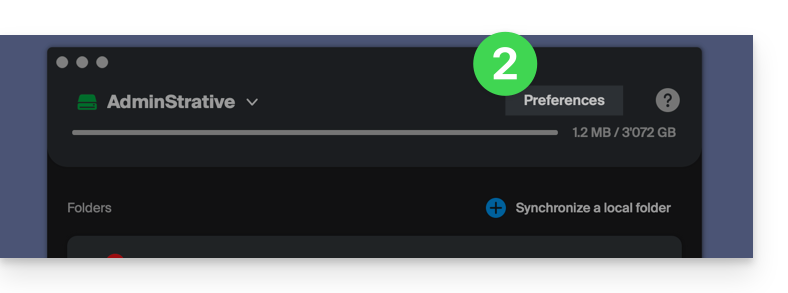
- Scroll all the way down and under the Version category, the version currently installed on your computer is indicated:
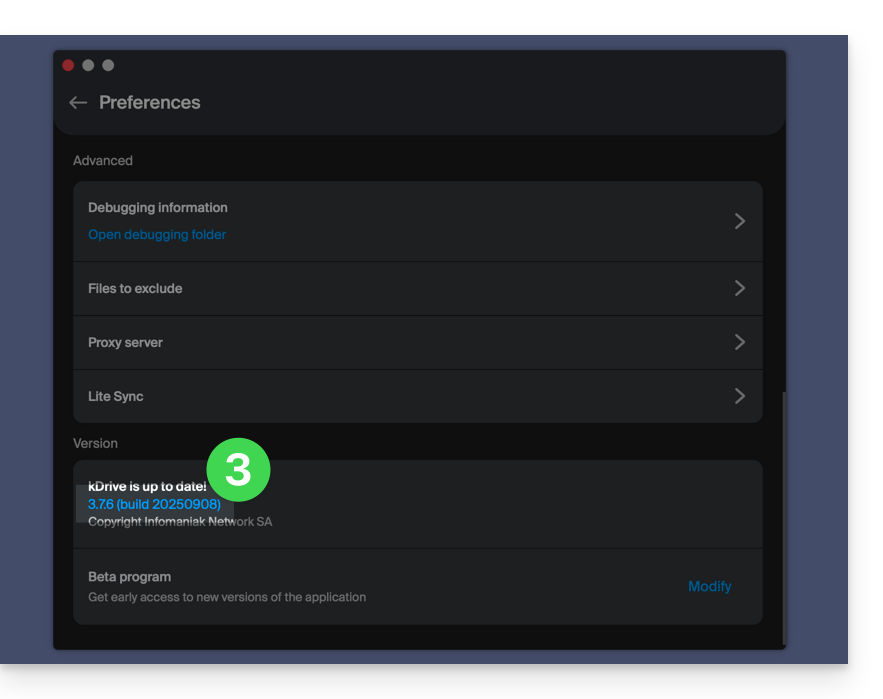
Update the installed version
… on macOS / Windows
With each new version of the kDrive application offered by Infomaniak, a message will appear when the software is first opened after a restart or a few minutes later if it is not restarted, offering the possibility to install the update automatically.
If this is not the case:
- Refer to the steps above and click on the displayed button offering the update:
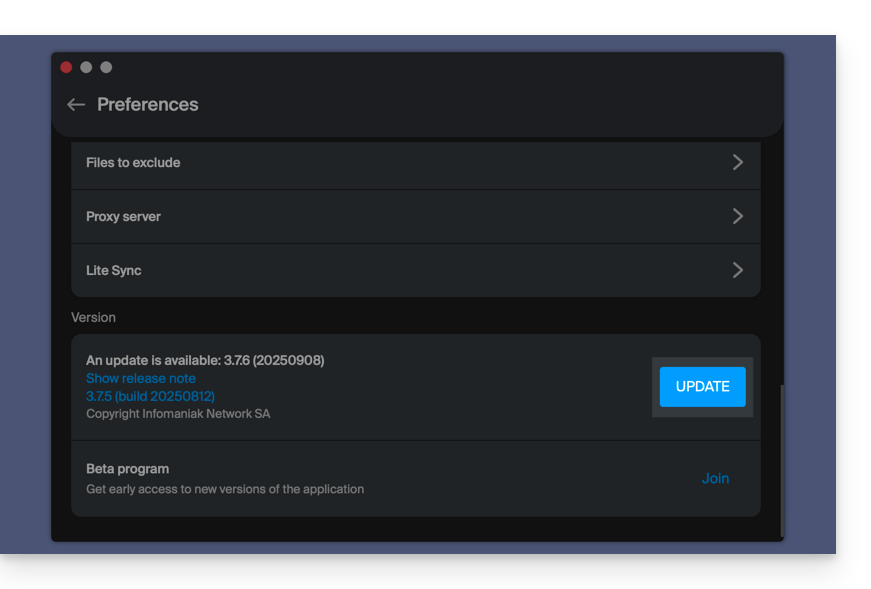
If the button is missing or the app version is too old:
- Download the latest version from the official page (the number of the most recent version is displayed in the file name):

- If this version number is more recent than your current version, let the download complete.
- In the meantime, uninstall your application without touching the folder containing your synchronized files and especially without moving it.
- Install the downloaded new version.
This guide explains how to scan or digitize documents (multi-page) with the mobile app kDrive (application for iOS / Android smartphone or tablet).
Prerequisites
- Have a kDrive or kSuite offer.
- Install the mobile app kDrive (application for iOS / Android smartphone or tablet).
Scan documents
To quickly digitize paper documents and store them on your kDrive:
- Launch the mobile app kDrive on your iOS or Android device.
- Press the icon at the bottom:
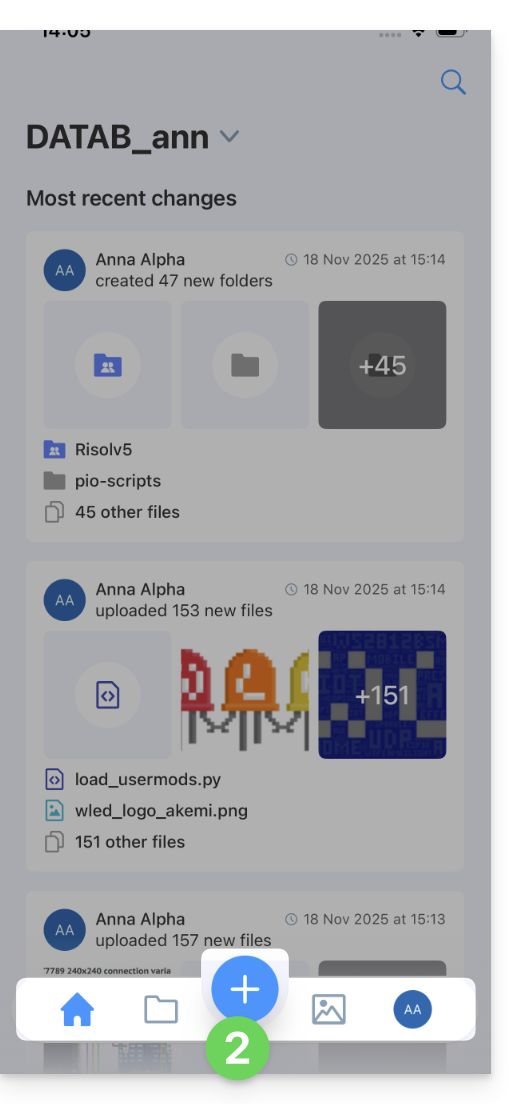
- Press Scan a document:
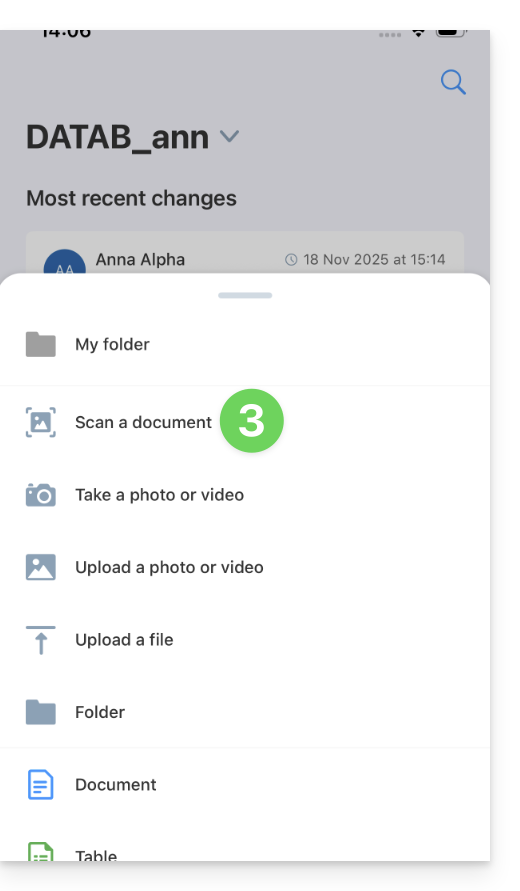
- If necessary, authorize the accesses requested by the app:
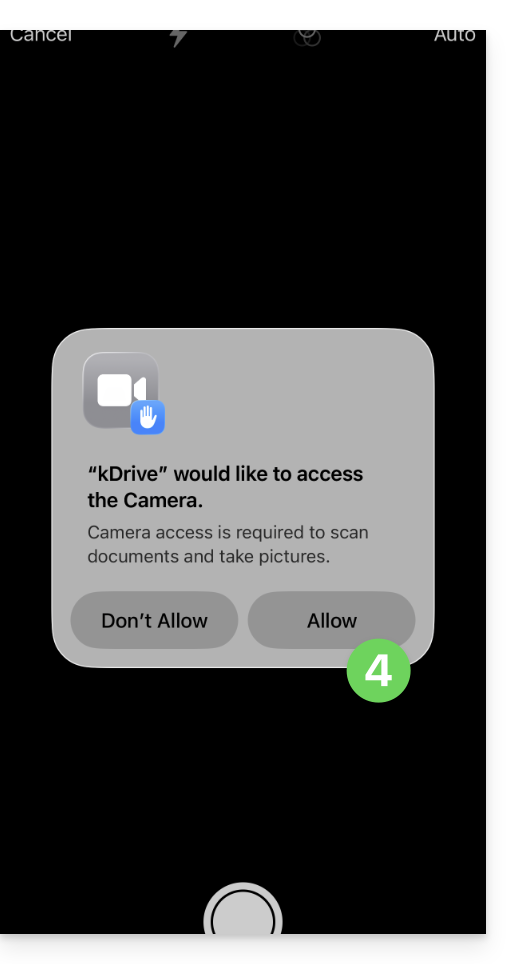
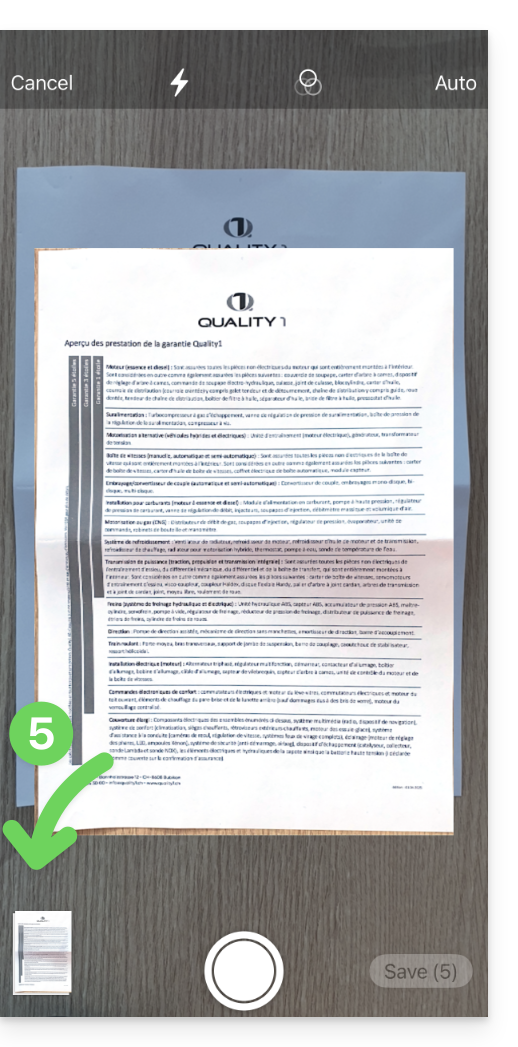
- Document search and detection is performed automatically as soon as the image is stable:
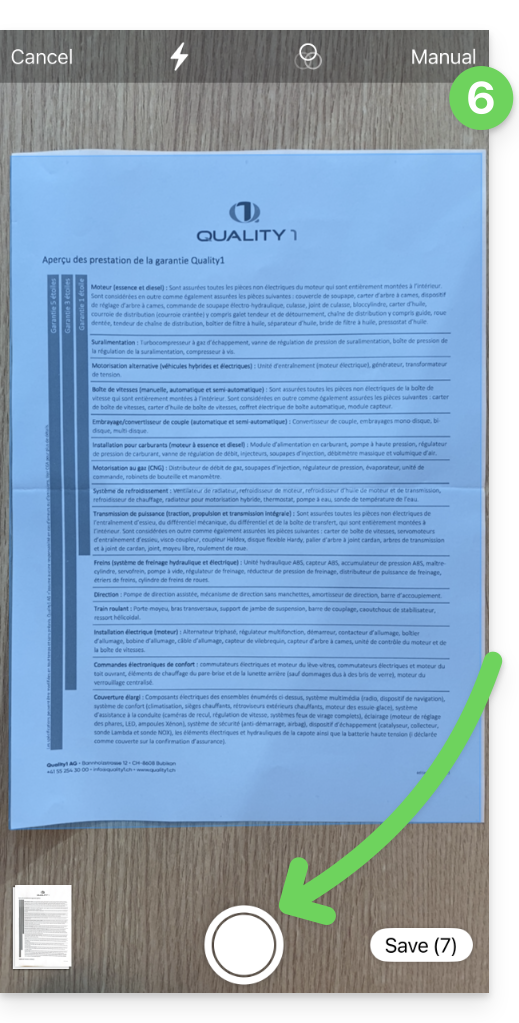
- You can switch to Manual mode at the top right and trigger the photo yourself when you are ready:
- If necessary, crop the document after manually taking the photo:
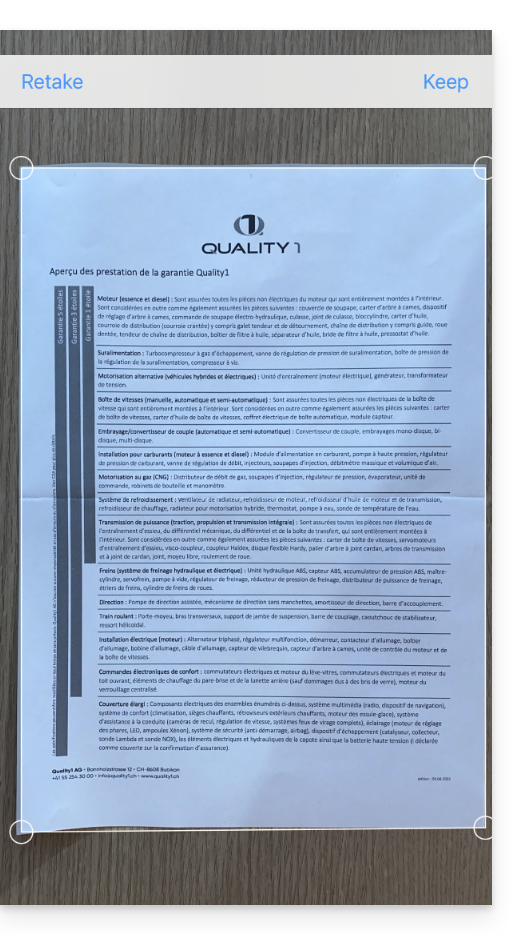
- Press KEEP at the top right.
- Press the thumbnail at the bottom left to access advanced editing (rotation, black and white...) or to delete a specific page.
- Press Finish at the top left.
- Repeat the steps to scan other pages or press Save at the bottom right:
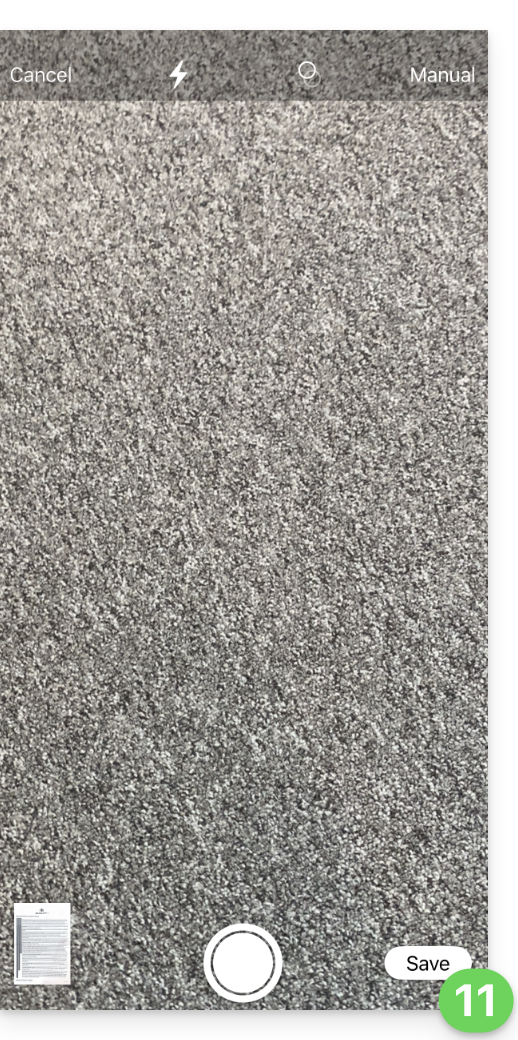
- If your scan contains multiple pages, it will be grouped into a PDF to be saved in the location of your choice on the kDrive. If there is only one image, you can choose to save it in .JPG format:
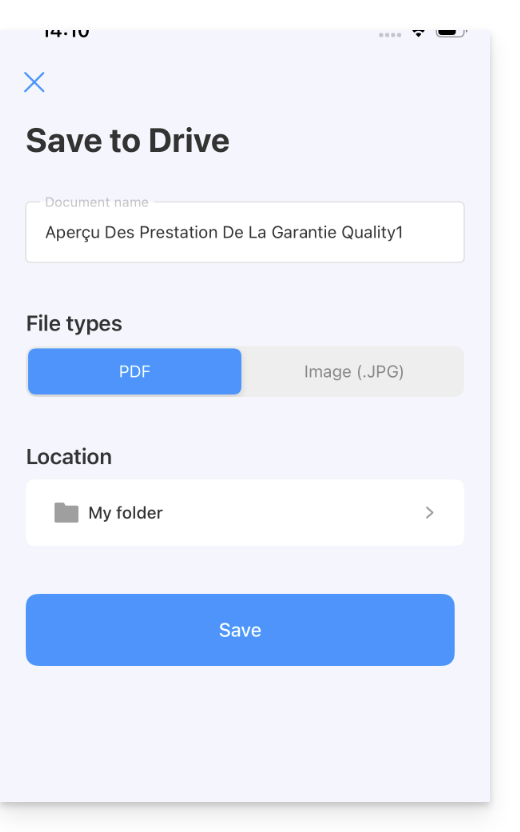
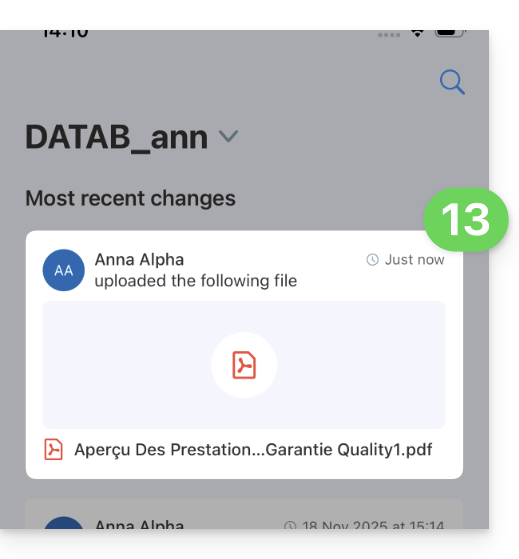
- The document is sent to the kDrive:
- You will find it on all your connected devices:
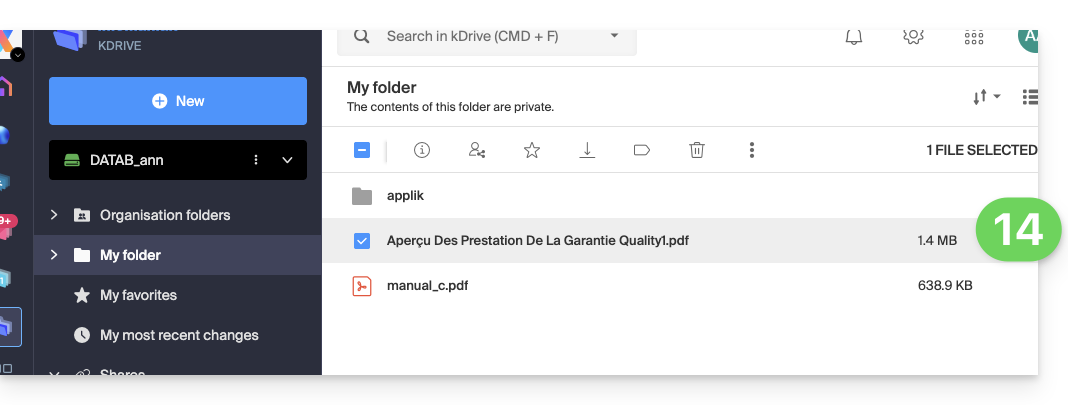
This guide explains how to connect and manage multiple kDrive on a computer (macOS / Windows). This feature allows you, for example, to access the files of a personal kDrive and a professional kDrive.
Prerequisites
- Have a kDrive or kSuite offer.
- Have the kDrive desktop app (desktop application on macOS / Windows / Linux).
Accessing different kDrives from the computer
A user connected to the kDrive application on a computer may already have access to multiple kDrives if they are already working with multiple kDrives outside the app, if they have been added to other kDrives, etc. They are all accessible as long as the user is logged in with the identifier corresponding to these kDrives.
Accessing and managing other kDrives…
To log in with a different account and thus access other kDrives:
… from the kDrive desktop app (desktop application on macOS / Windows / Linux)
- Left-click on the desktop app icon in the notification area of your computer (top right on macOS, bottom right on Windows and a double left-click in the taskbar on Linux).
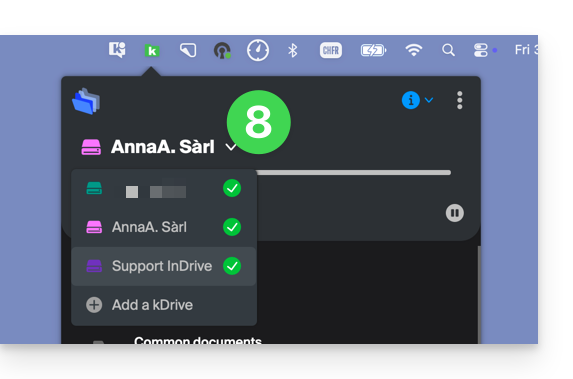
- Click on the chevron to the right of the kDrive name (the kDrives you already have access to with your user are displayed).
- Click on Add a kDrive:
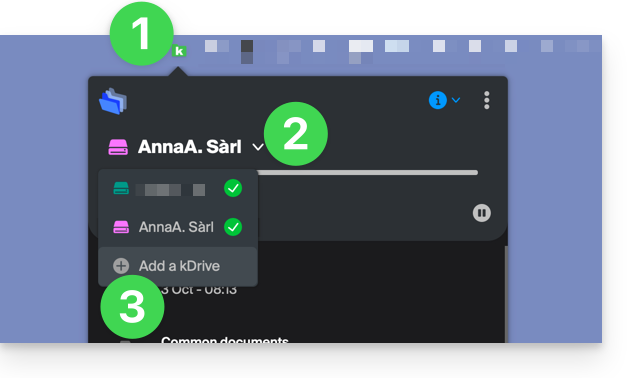
- Click on the badge with your initials or your avatar in the top right corner.
- Click on Add an account:
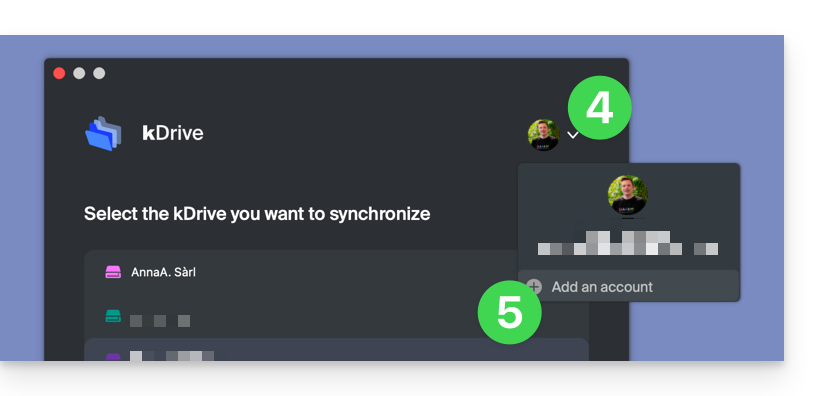
- Enter the credentials of your Infomaniak account — refer to this other guide if necessary.
- Choose and configure the kDrive to add (including the directory that should be used on the computer).
- It is now possible to switch from one kDrive to another when you click on the kDrive icon and then on the chevron in the window that opens:
… from the kDrive Web app (online service ksuite.infomaniak.com/kdrive)
- Click here to access the Infomaniak kDrive Web app (online service ksuite.infomaniak.com/kdrive).
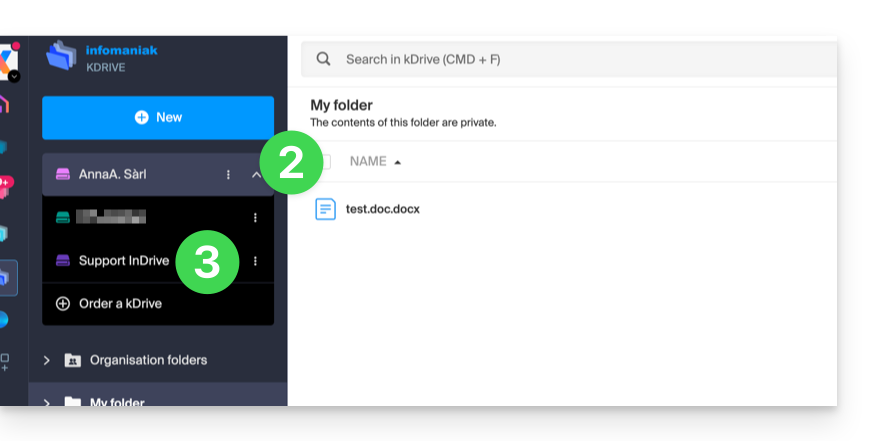
- Click on the chevron to expand the list in the top left of the kDrive interface
- Click on the kDrive you want to use
Disconnect a kDrive from the desktop app
To access the kDrive application settings on your device:
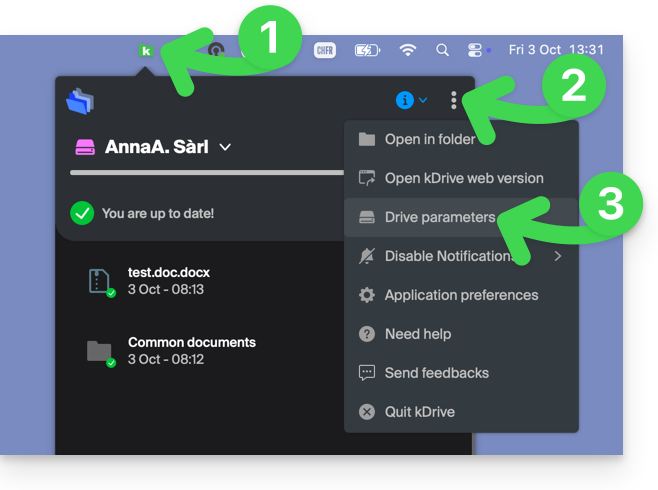
- Left-click on the desktop app icon in the notification area of your computer (top right on macOS, bottom right on Windows and a double left-click in the taskbar on Linux).
- Click on the ⋮ icon on the right in the application.
- Click on kDrive settings:
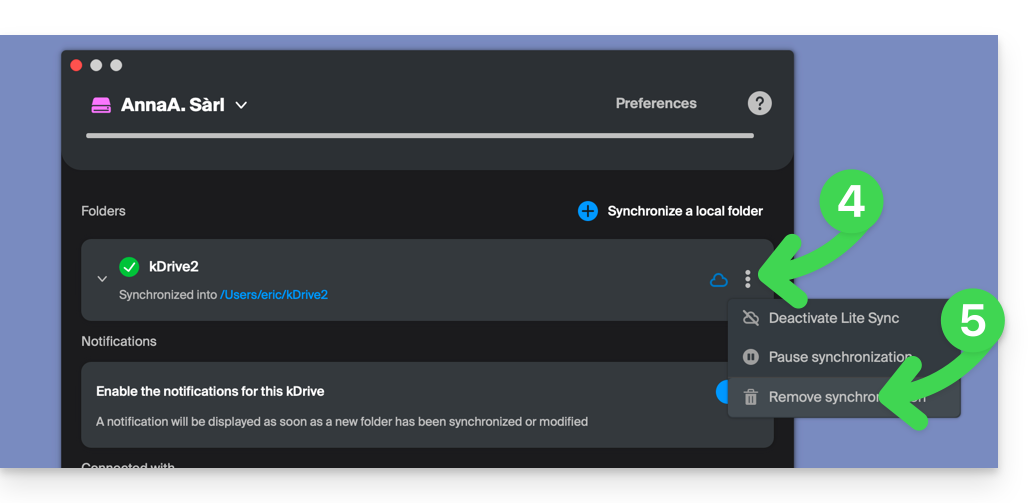
- Click on the ⋮ icon to the right of the synchronized kDrive, under Folders.
- Choose Remove synchronization (only from your device, with no impact on kDrive):
This guide explains how to use the file history or versioning on kDrive.
Preamble
- This feature is very useful for recovering information that has been deleted or modified by a third party within a collaborative file.
- Infomaniak keeps in the version history a backup of all changes made to files on kDrive.
- You can choose to keep certain versions indefinitely.
⚠ Number of versions / Number of days :
| kSuite | free | 30 / 30 |
| Standard | 100 / 120 | |
| Business | 200 / 180 | |
| Enterprise | 200 / 365 | |
| my kSuite | 30 / 30 | |
| my kSuite+ | 60 / 120 | |
| kDrive | Solo | 100 / 60 |
| Team | 100 / 60 | |
| Pro | 200 / 120 |
Manage previous file versions
To access kDrive:
- Click here to access the kDrive Infomaniak Web app (online service ksuite.infomaniak.com/kdrive).
- Navigate through the kDrive directory that appears.
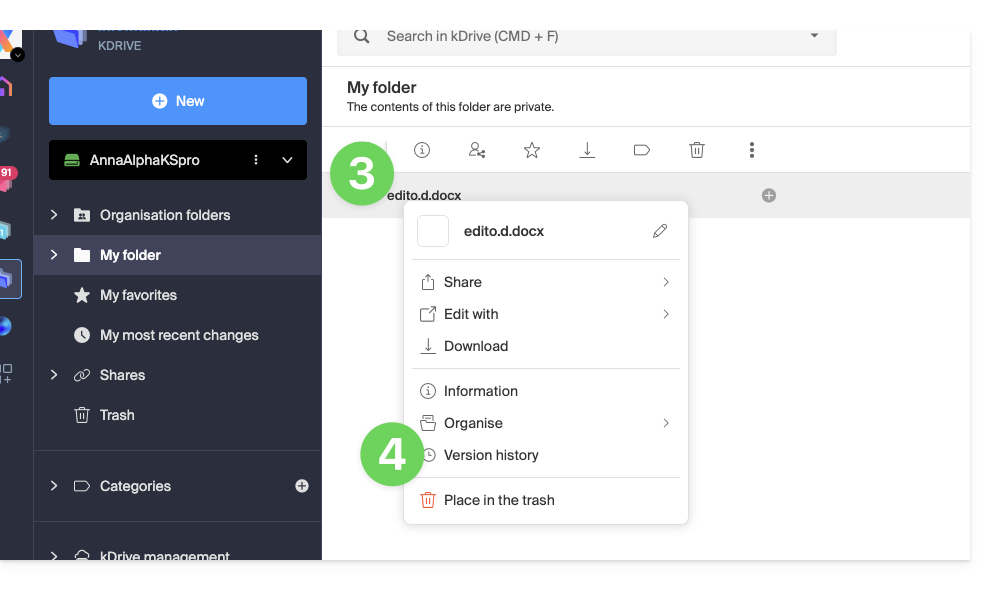
- Right-click on the desired file.
- Click on Version History:
The different versions of the file are listed in reverse chronological order.
You can delete all versions of this file using the button.
Otherwise, a menu on the right of each version allows you to: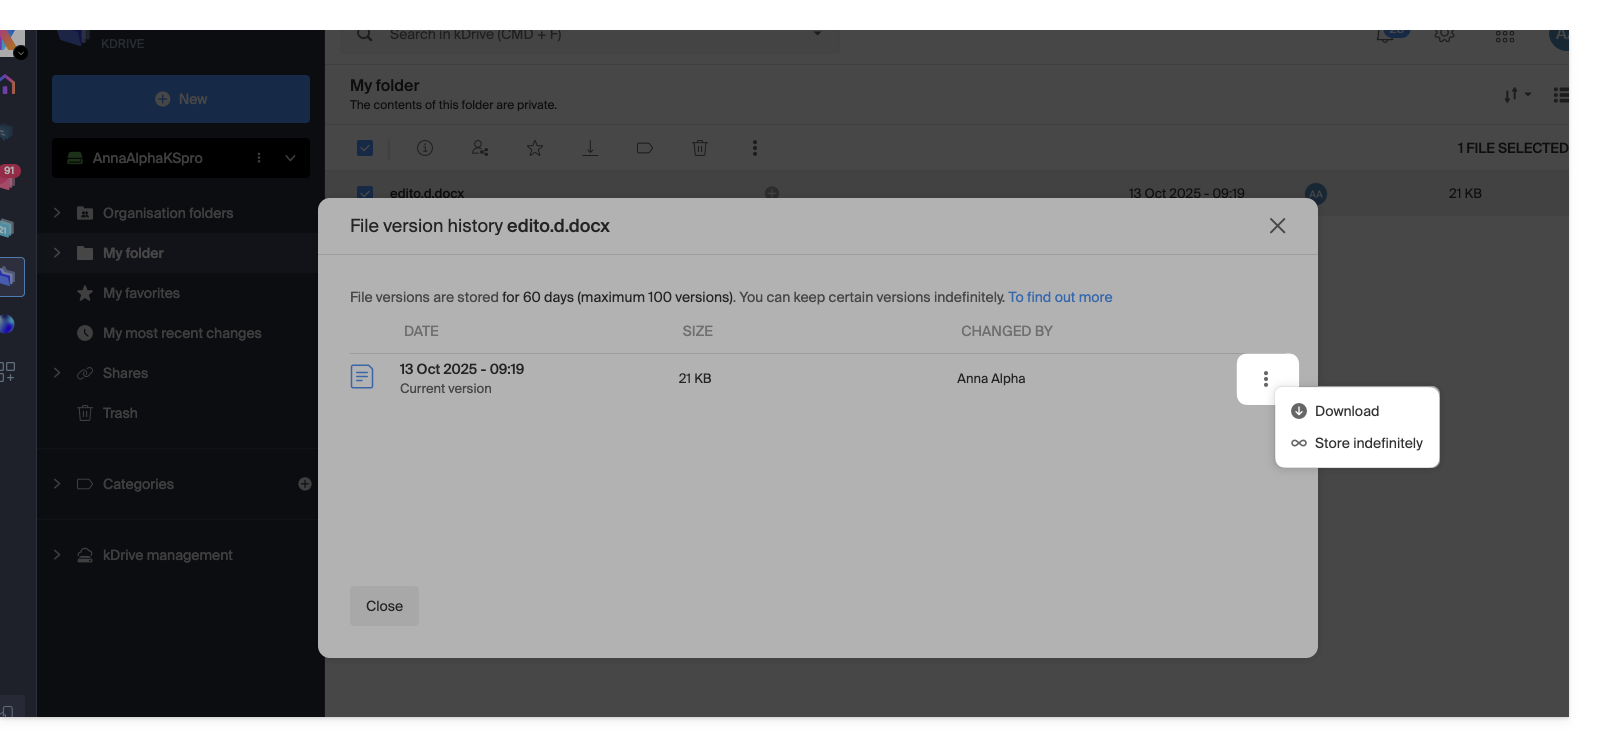
- ... download the file in its state at the date/time of the selected version,
- ... keep it indefinitely: the version will be kept after the standard retention period,
- ... create a new file on kDrive from this version,
- ... delete the version: allows you to erase this version only.
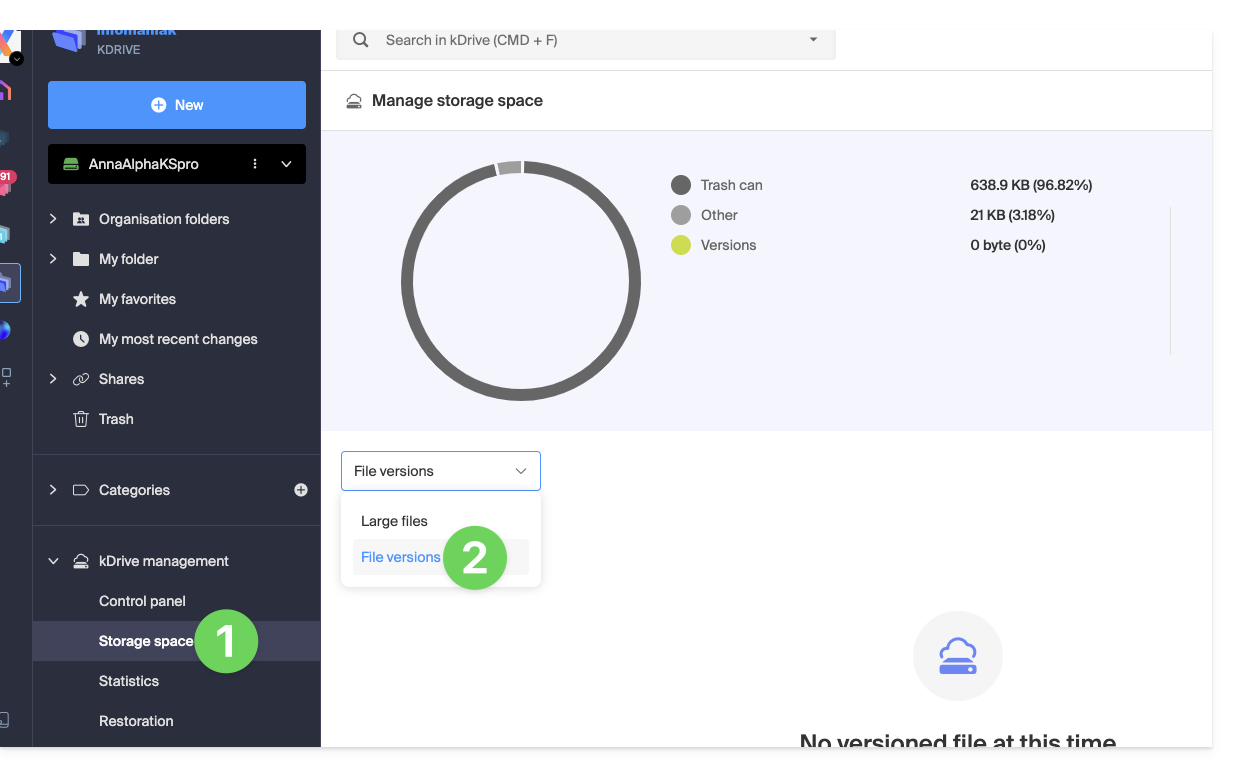
You can also access all versions of all your files...
- … from the left menu Manage storage space
- … open the dropdown menu to select File versions:
It is also possible to restore a previous version of the entire organization of your files on kDrive.
This guide explains how to save an email (as if you were downloading) but directly to your kDrive. You will thus be able to save in 1 click a message received on an address of your Infomaniak Mail Service, this in .eml format readable directly within your kDrive interface.
Add an email to kDrive…
… from the Infomaniak Mail Web App
To export the email message of your choice to your kDrive:
- Click here to access the Infomaniak Mail Web App (online service ksuite.infomaniak.com/mail).
- Open the email you wish to save.
- At the top right of the email in question:
- Click on the kDrive folder icon to Add to kDrive.
- If the icon is not visible, click on the action menu ⋮ and choose Add to kDrive:

- Choose the kDrive (from those to which you are attached by your Organization) and the desired location on it to save your file - if you rename it, keep the
.emlextension to be able to read it directly in the kDrive interface:
- Click on the Add button…
- A message at the bottom of the screen notifies you of the progress of the recording and allows you to go directly to the email save location.
- The saved email can be viewed in kDrive as if you were reading it in Mail directly:

… from the Infomaniak Mail mobile app
To do this:
- Open the email in question on the mobile app Infomaniak Mail (application for iOS / Android smartphone or tablet).
- Click on the action menu ⋮ located at the top right of the displayed email.
- Choose Save to kDrive and follow the same procedure as above in step 4.
Learn more
This guide details the different ways to access kDrive once the my kSuite offer is subscribed, in order to view, add and modify files on kDrive:
1. From a web browser
To access the kDrive web app (online service ksuite.infomaniak.com/kdrive):
- Click here to access the Infomaniak Manager.
- Click on the icon in the top right of the interface.
- Choose kDrive.
2. From the kDrive app
To access kDrive from a mobile or desktop app:
- Install kDrive for your device.
- Open the application.
- If it is the desktop app, left-click on the desktop app icon in the notification area of your computer (top right on macOS, bottom right on Windows and a double left click in the taskbar on Linux).
- Refer to this other guide on this subject.
3. Via WebDAV (when changing offers)
⚠ Available with:
| kSuite | |
| Business | |
| Enterprise | |
| kDrive | Solo |
| Team | |
| Pro |
This multiplies the possibilities of connecting to your data, in particular via the WebDAV application of your choice.
This guide explains how to create a (or multiple, depending on the kDrive offer you have) drop box with kDrive to invite contacts to deposit content (files or folders). The content uploaded by your contacts is thus directly sent and classified in the right place on your kDrive.
Create a drop box
To access kDrive and create a drop box:
- Click here to access the Infomaniak kDrive Web app (online service ksuite.infomaniak.com/kdrive).
- Navigate through the kDrive directory that appears in the left sidebar and go to the folder that will host the data collected in the drop box:
- Stay in the personal folder (My Folder) if the data is private and specific to your user.
- Go to the shared folder (Organization Folders) if you want other users of your kDrive to be able to directly view the data from the drop box.
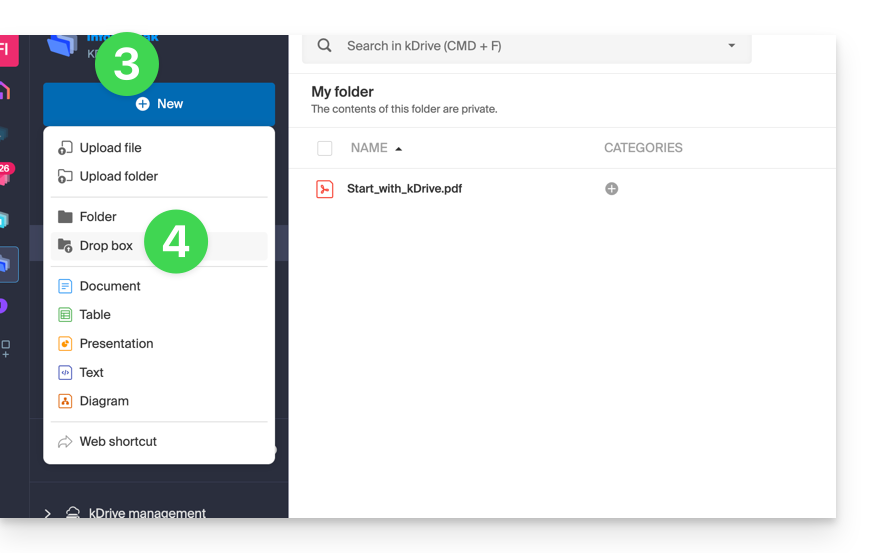
- Click on the blue New button when you are in the directory of your choice (the one that will host the data collected using the drop box).
- Click on Drop Box:
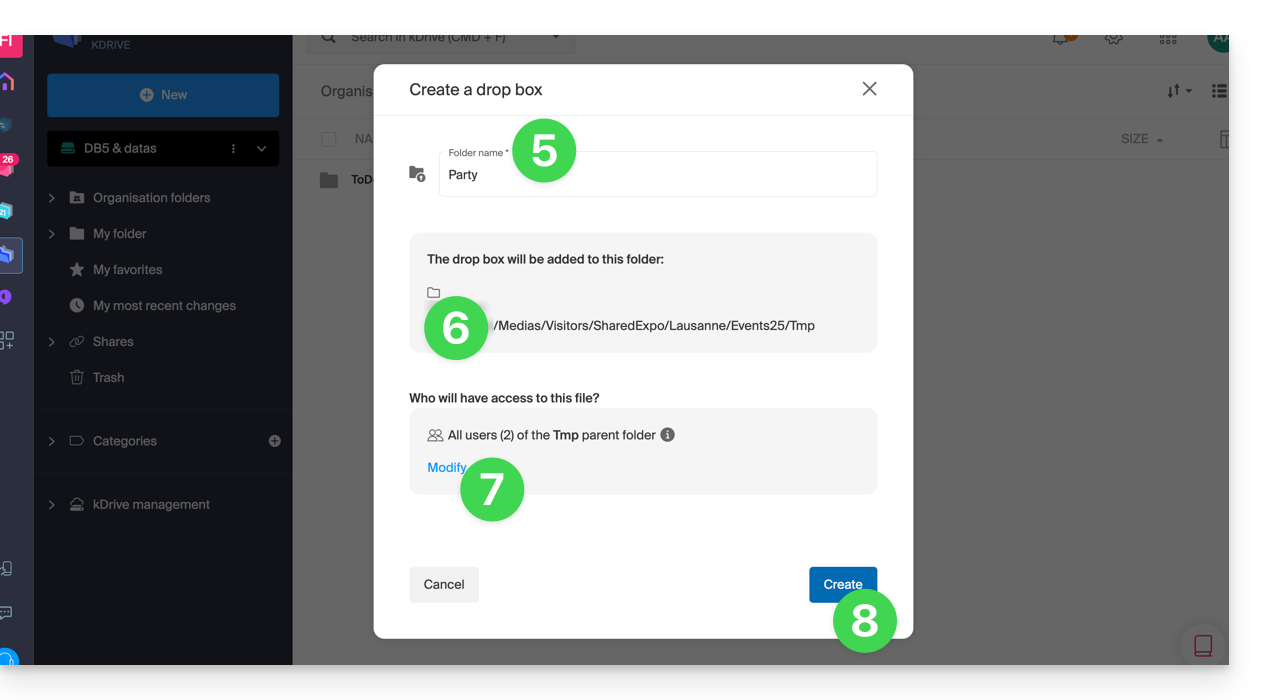
- Enter the name of the drop box.
- The full path (internal to your kDrive) to the location of this drop box is specified for your information.
- Depending on the kDrive offer and the choice in point 2 above, you can still decide whether, despite a location in an Organization Folder (shared folder), you want to restrict access to your user only.
- Click on the blue Create button:
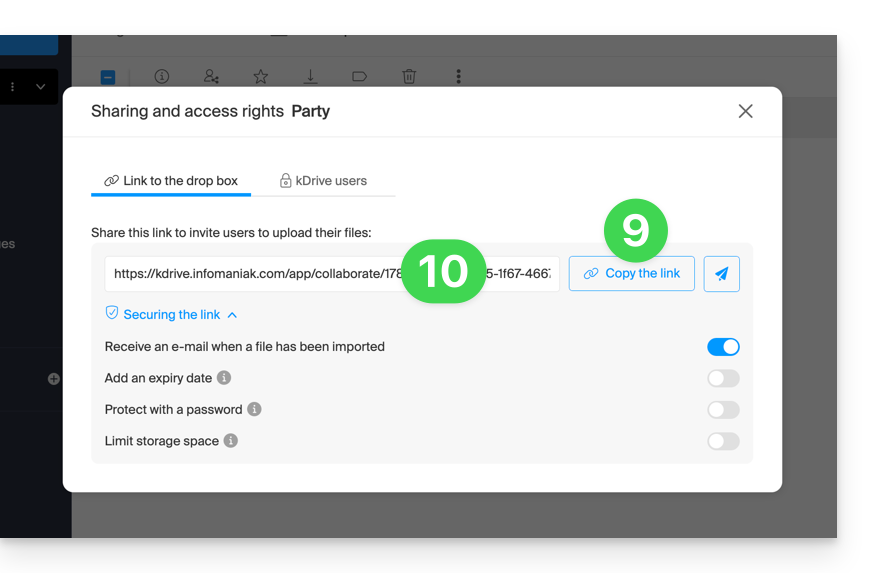
- Share the link to the drop box or click on Send by email to share with your contacts.
- The advanced options allow you to receive an email notification upon file deposit, protect the folder with a password, add an expiration date, and limit the storage space of the drop box:
- You can also customize the appearance.
⚠ Number of authorized drop boxes:
| kSuite | free | 1 |
| Standard | 10 | |
| Business | 100 | |
| Enterprise | 1000 | |
| my kSuite | 1 | |
| my kSuite+ | Unlimited | |
| kDrive | Solo | 100 |
| Team | 1000 | |
| Pro | 1000 |
Disable or modify a drop box
To access the drop boxes:
- Click here to access the Infomaniak kDrive Web app (online service ksuite.infomaniak.com/kdrive).
- Click on Shares in the left sidebar.
- Click on Drop boxes.
- Right-click or click on the action menu ⋮ to the right of the item concerned in the displayed table.
- Click on Disable to cancel the share link without deleting the already shared data (the box will become a simple folder).
or on Settings higher up in the dropdown menu to modify the advanced options (point 10 above):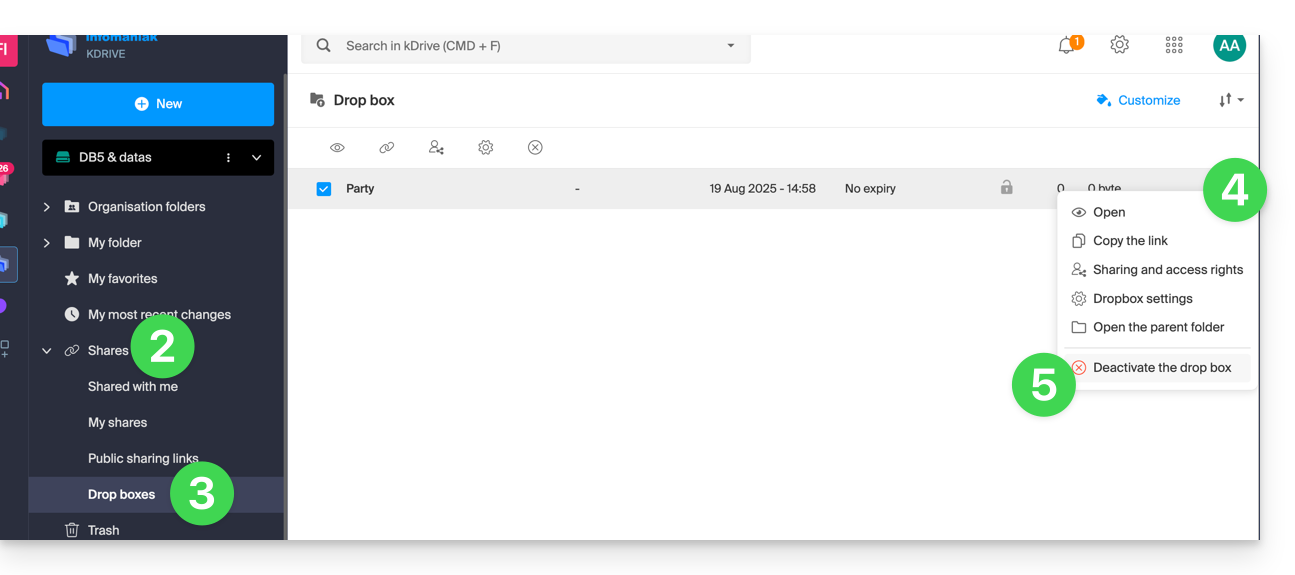
This guide explains how user permissions work on kDrive and how you can modify these access permissions.
How kDrive user permissions work
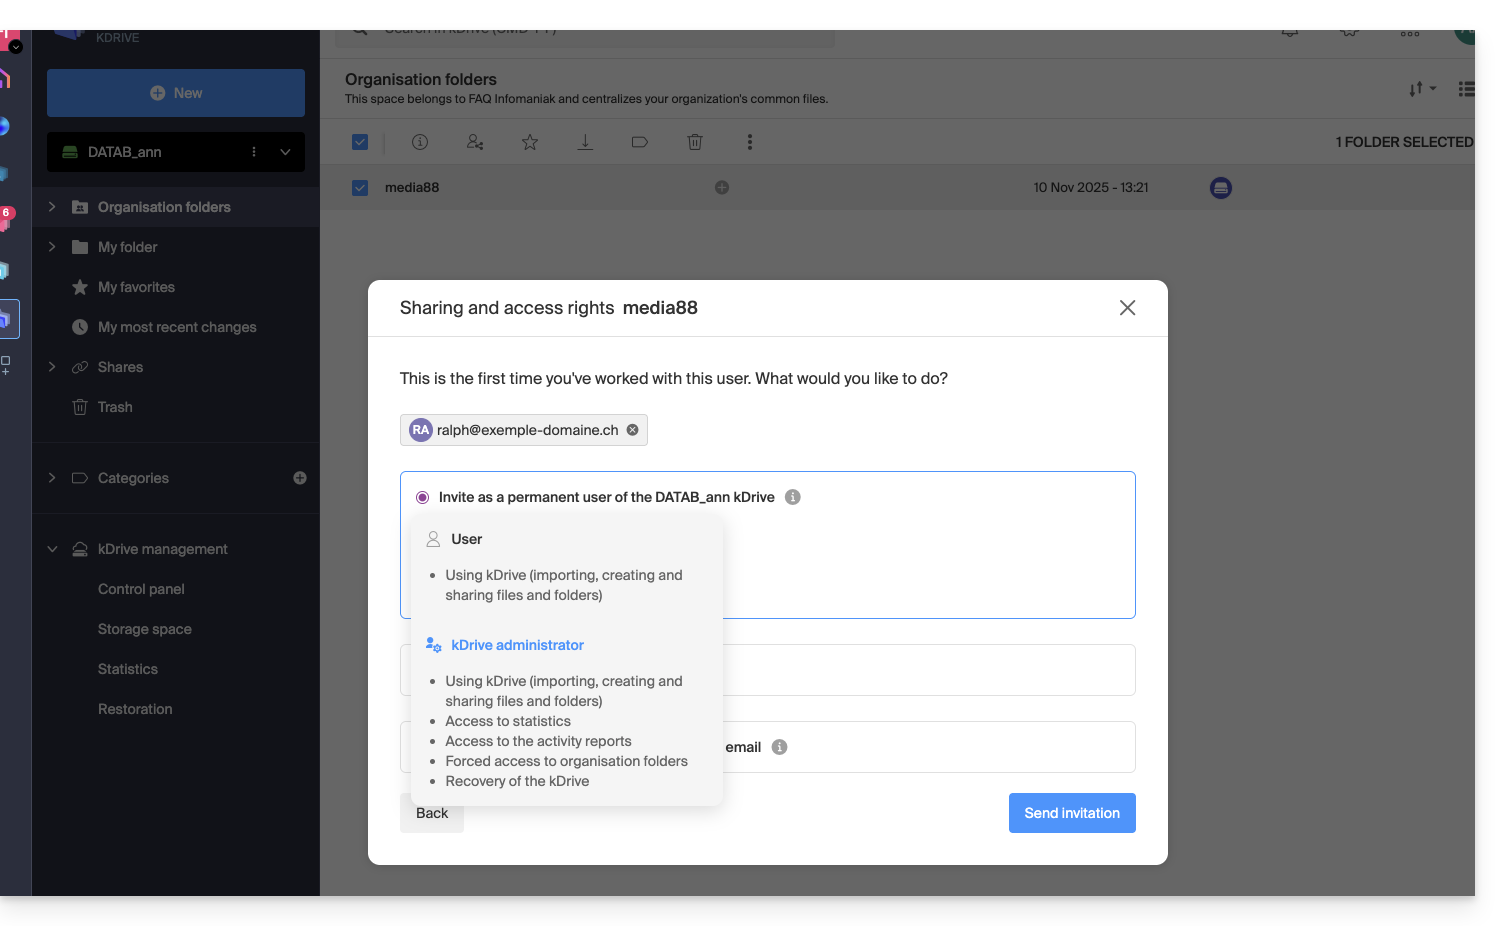
You can add a new user to kDrive (kDrive Pro for example, therefore outside kSuite), and define 2 levels of permissions, via folder sharing…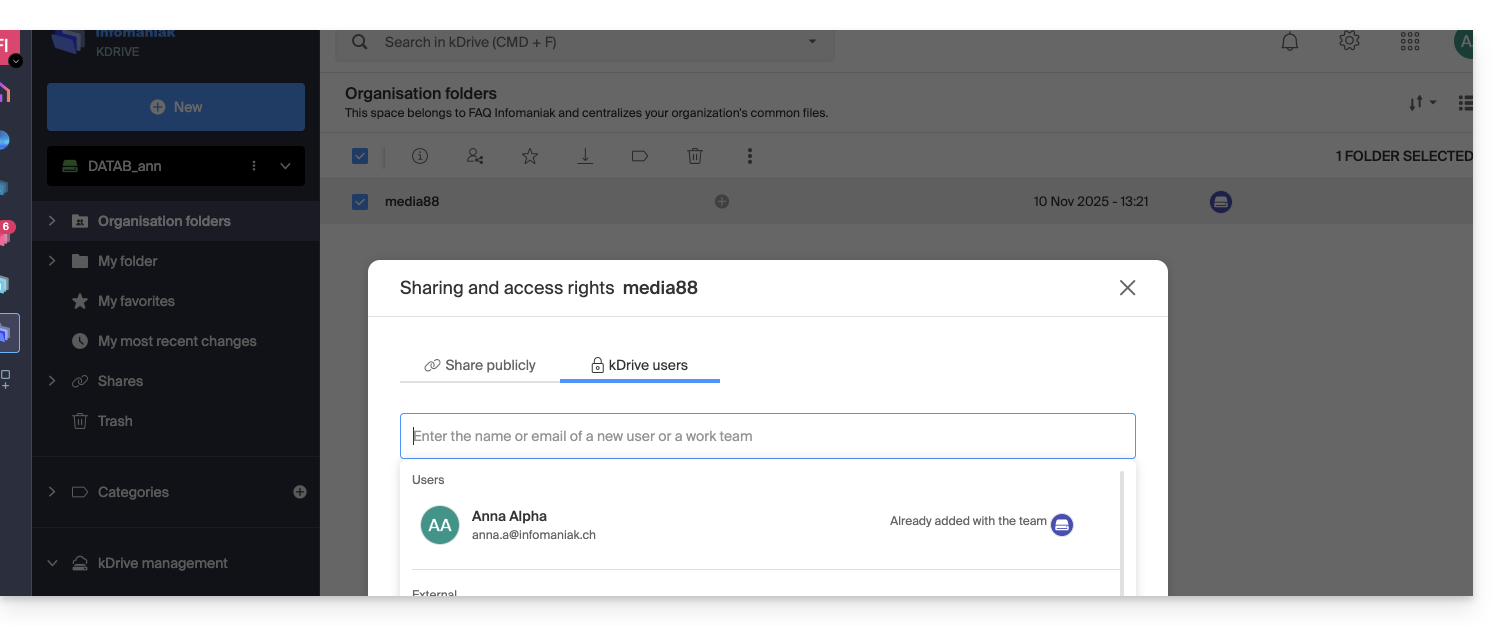
… or via kDrive user management: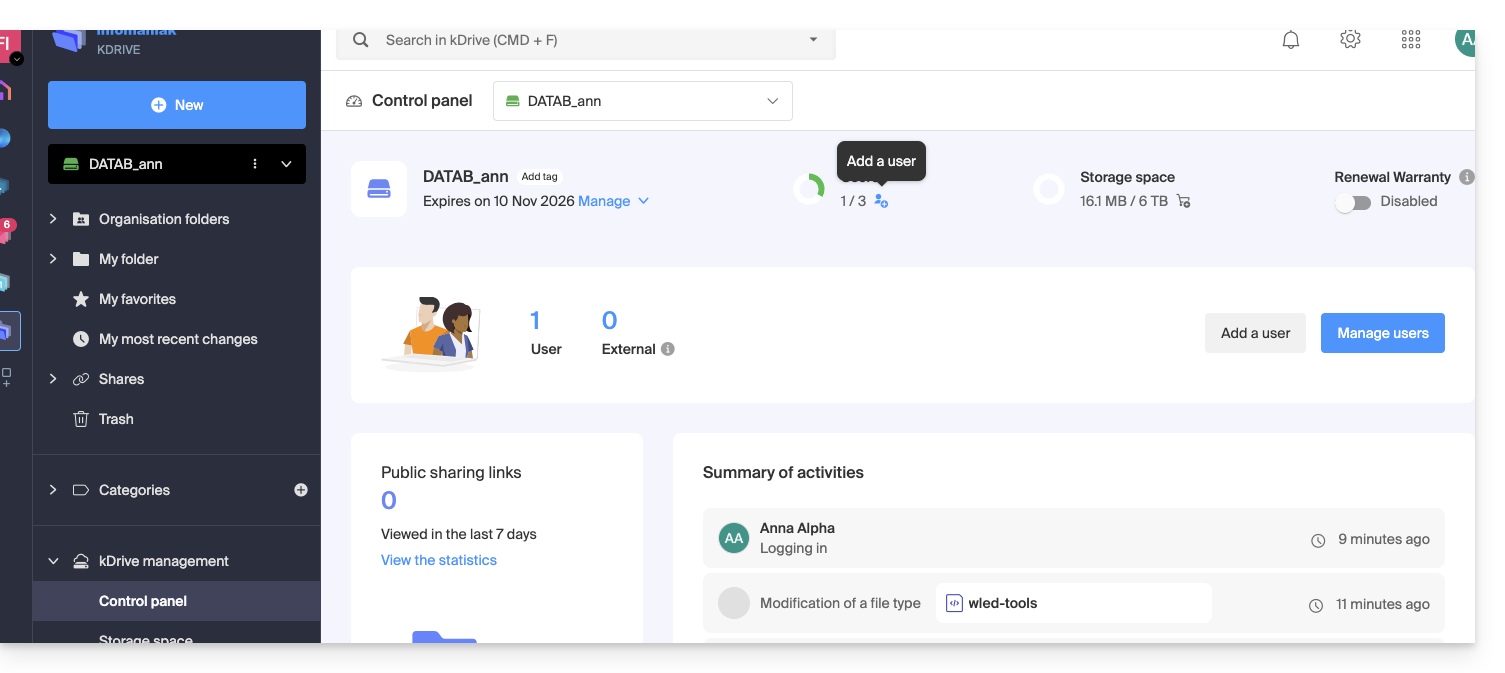
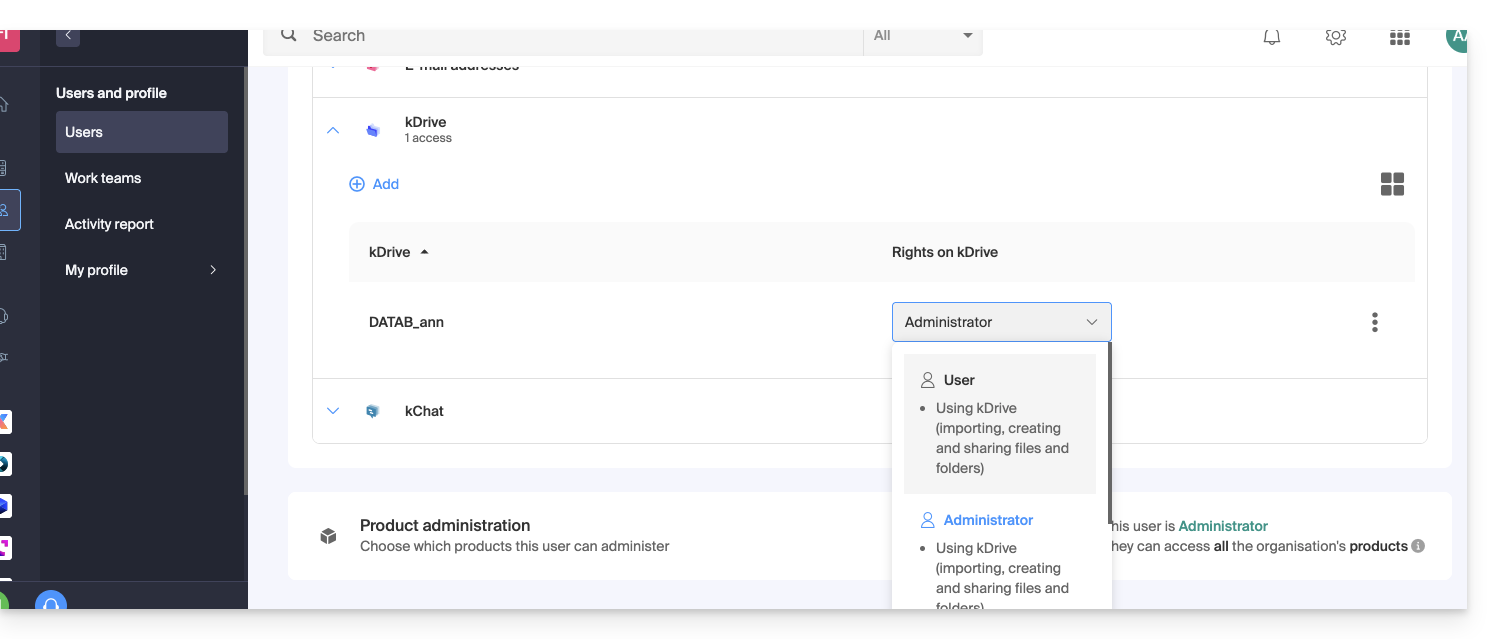
In both cases, 2 levels of permissions are offered:
- Administrator gives users the same rights as the kDrive owner:
- Sharing, statistics, activity reports, restoring and deleting folders, importing external data, etc. and accessing files and folders…
- User allows access to folders located at the root of the kDrive as well as managing and freely sharing their content:
- Access to shared files and folders, personal directory and file creation/sharing…
- However, users will not be able to access the administrative management of the product (manage users, view statistics, create or delete folders at the root of the kDrive, import data from an external service, etc.)…
In all cases:
- The content of the Organization Folders directory is common and visible to other kDrive users, but sharing can be restricted.
- Contents shared by other users from their private part of the kDrive are not listed in the Shares menu of other users.
- Any folder or file can be shared with other kDrive users and the contacts of your choice.
Modify a kDrive user's permissions
To access kDrive and manage user rights:
- Click here to access the Infomaniak kDrive Web app (online service ksuite.infomaniak.com/kdrive).
- Check or select the relevant kDrive in the dropdown menu of the left sidebar.
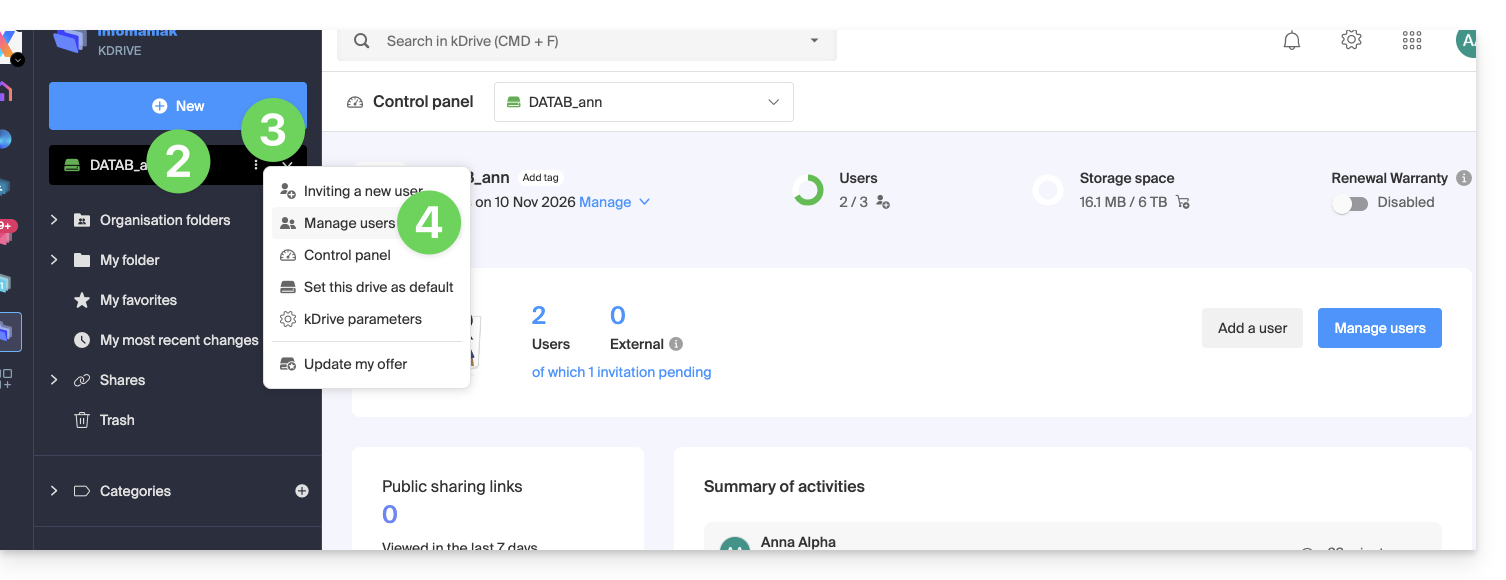
- Click on the action menu ⋮ located to the right of the relevant item.
- Click on Manage users:
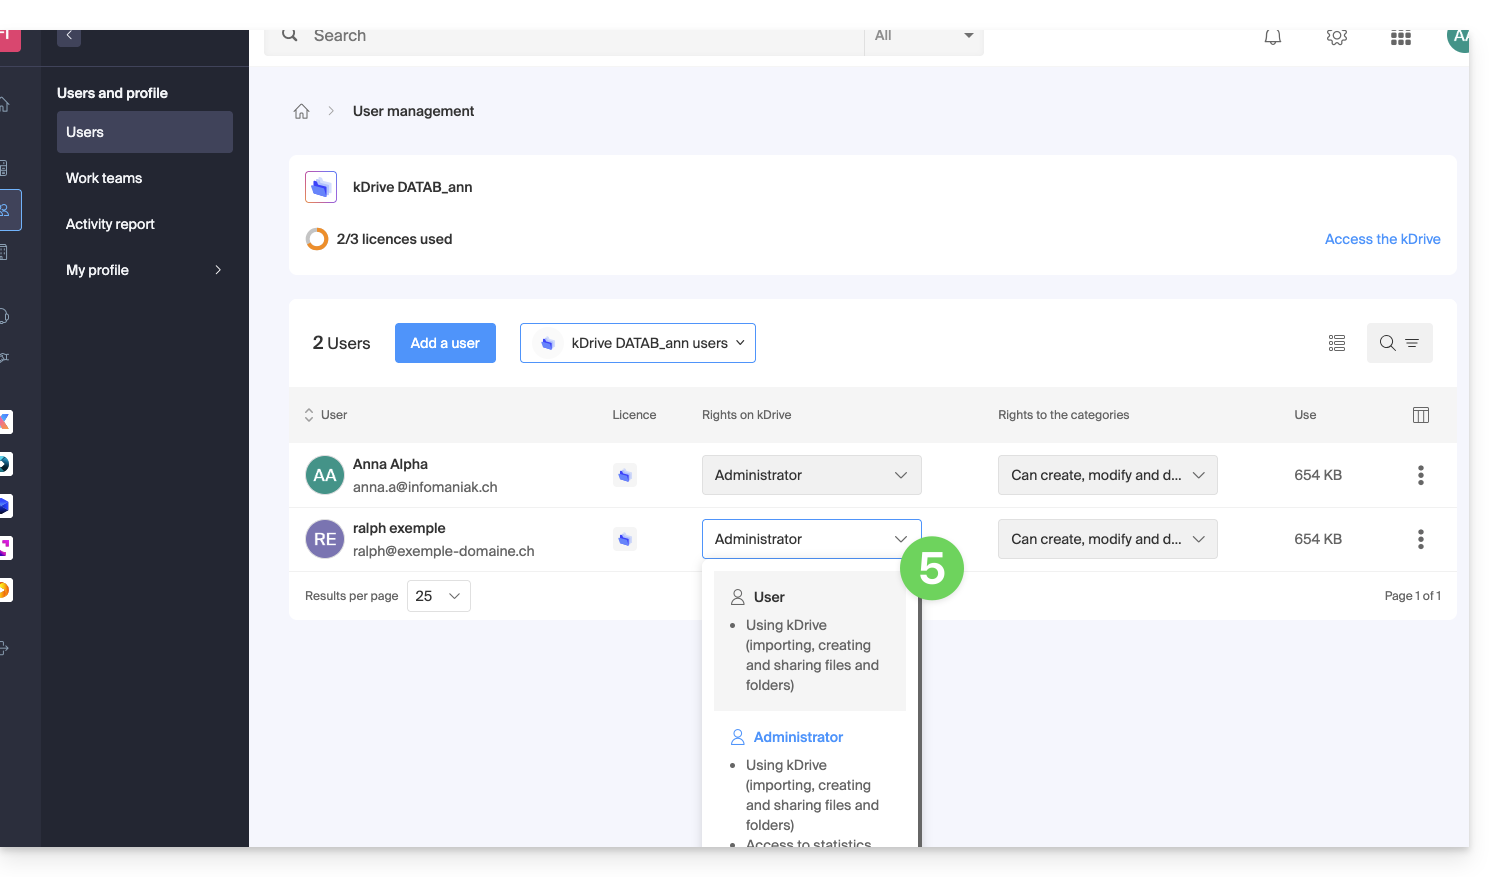
- Manage the desired user's rights, choose the desired access level:
In case of a problem
If a modification is not possible: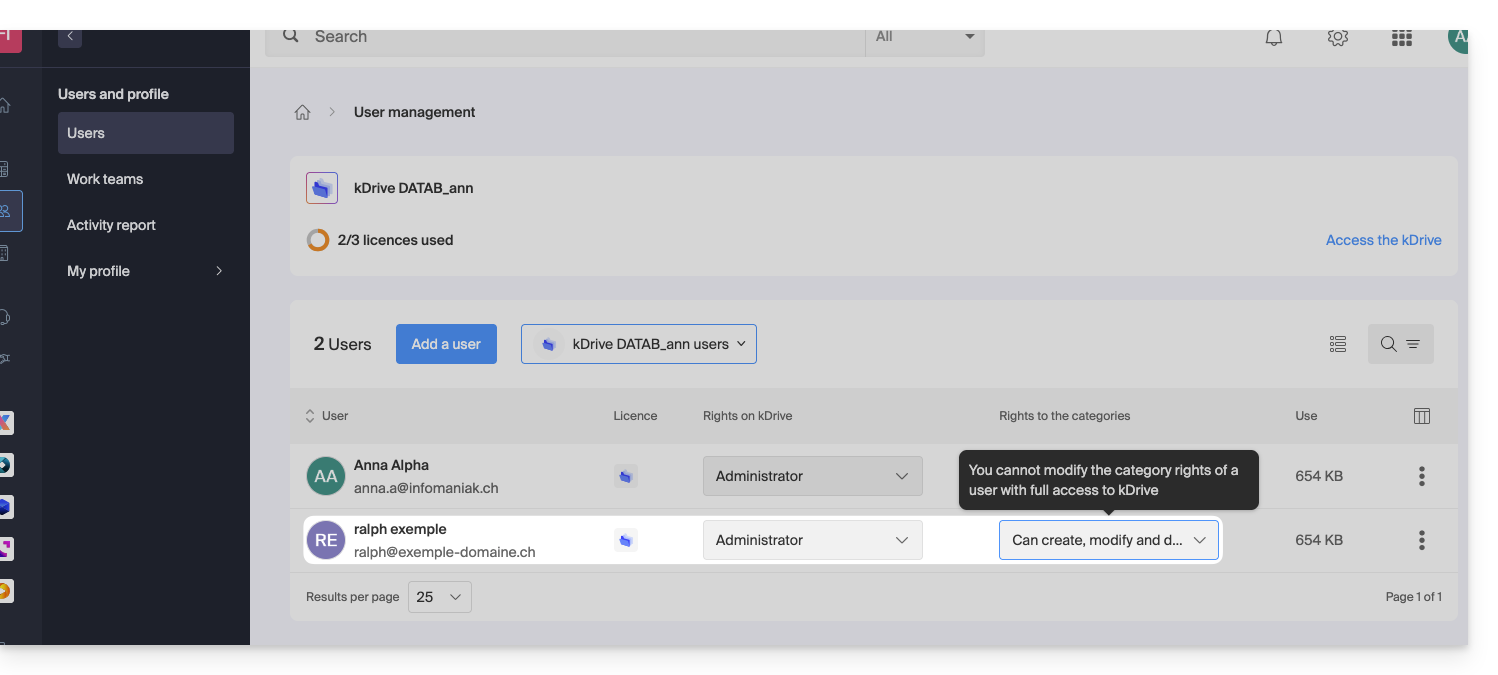
… then you need to act on the user's rights at the Organization level itself: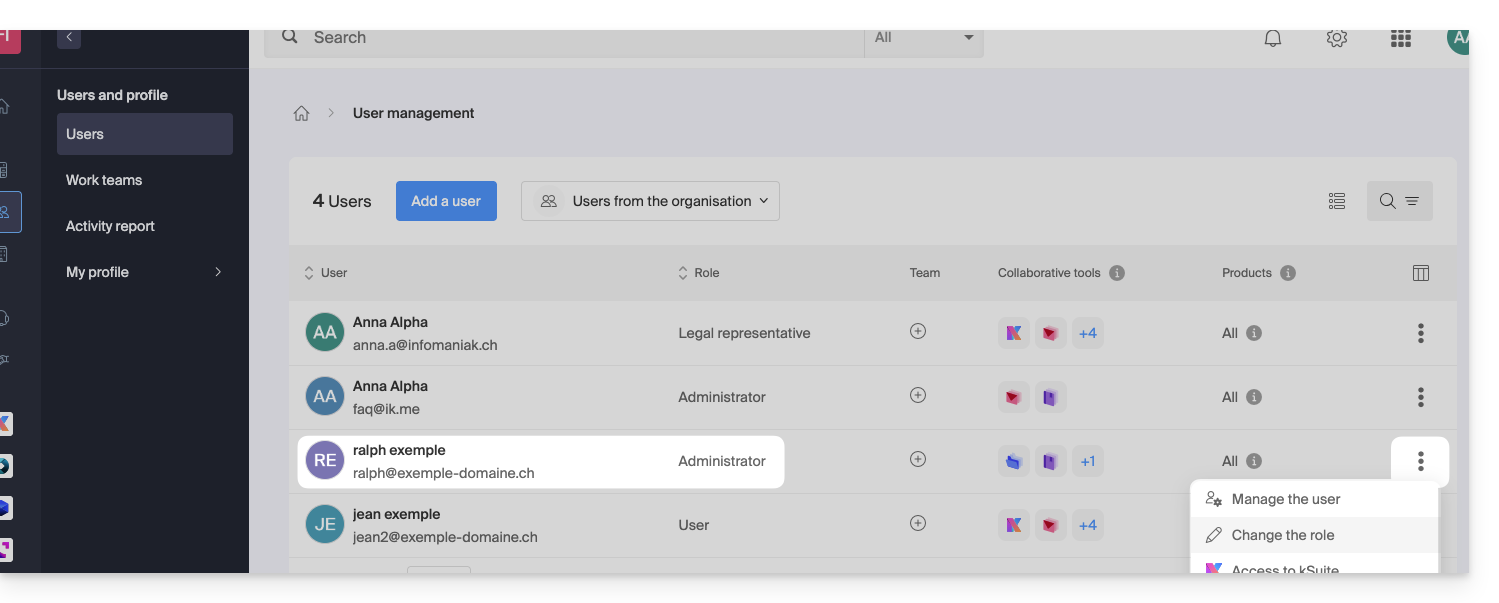
… and reduce their role as an administrator by giving them a user role: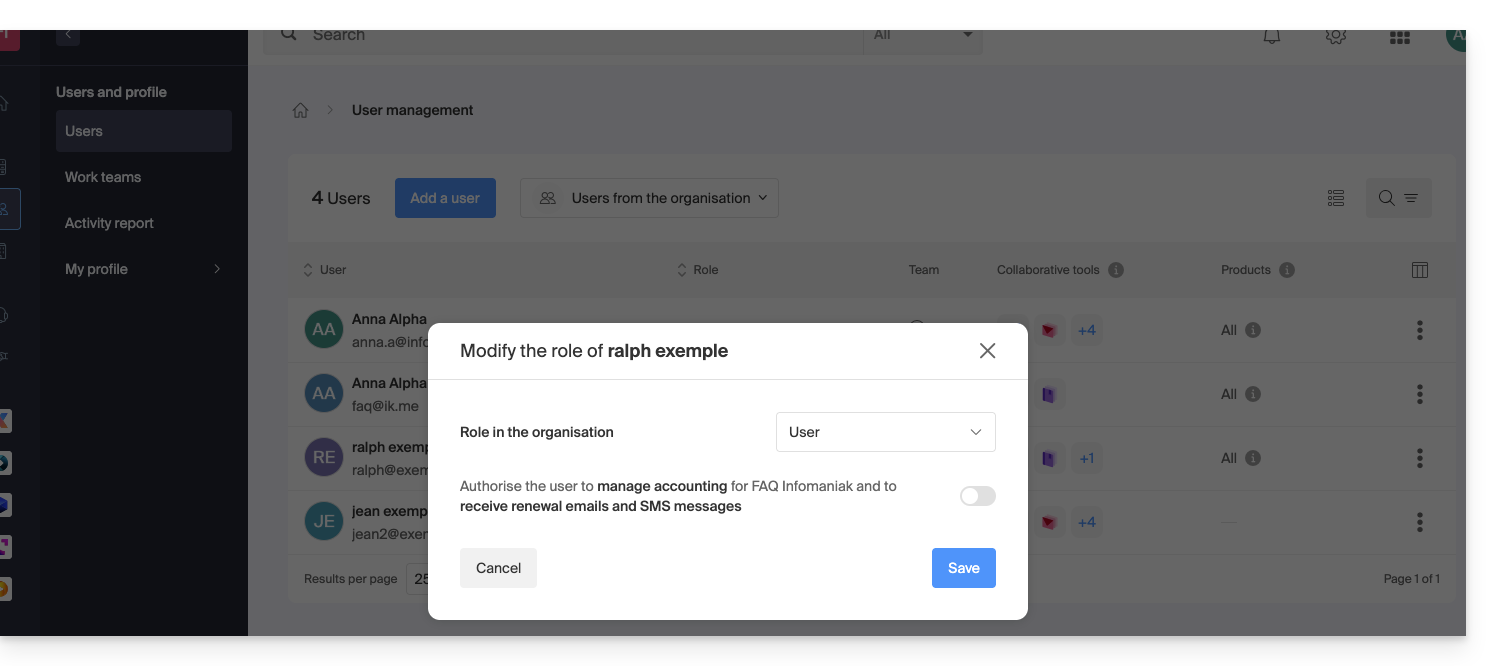
Thus, the proposed modification in point 5 above will now be accessible: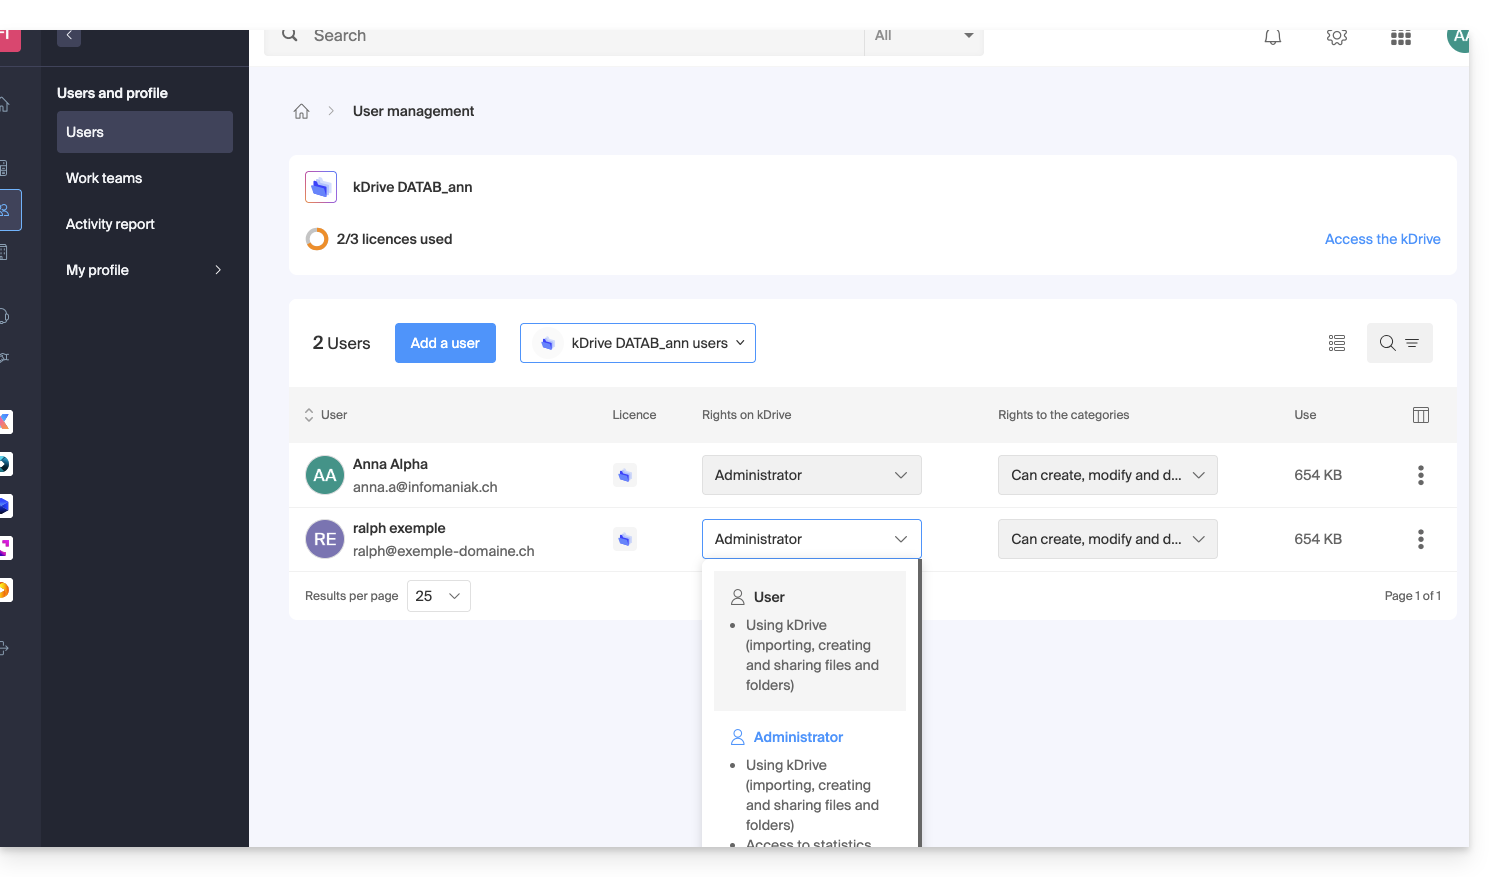
Other actions on the user
If necessary, open the action menu ⋮ of the desired user for advanced actions: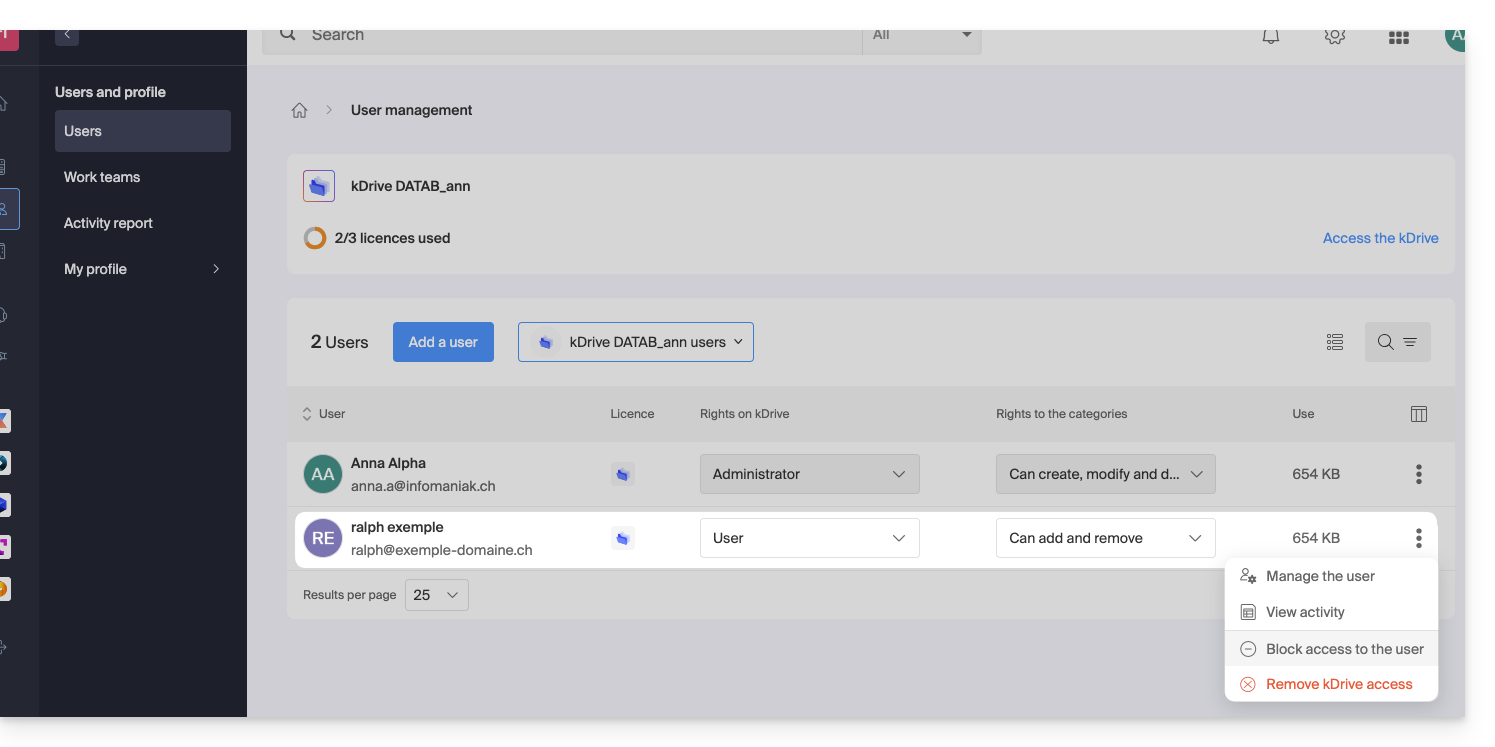
You can manage the user, view their activity, block their access, and completely remove them from kDrive.
If necessary, also manage the permissions related to actions on categories: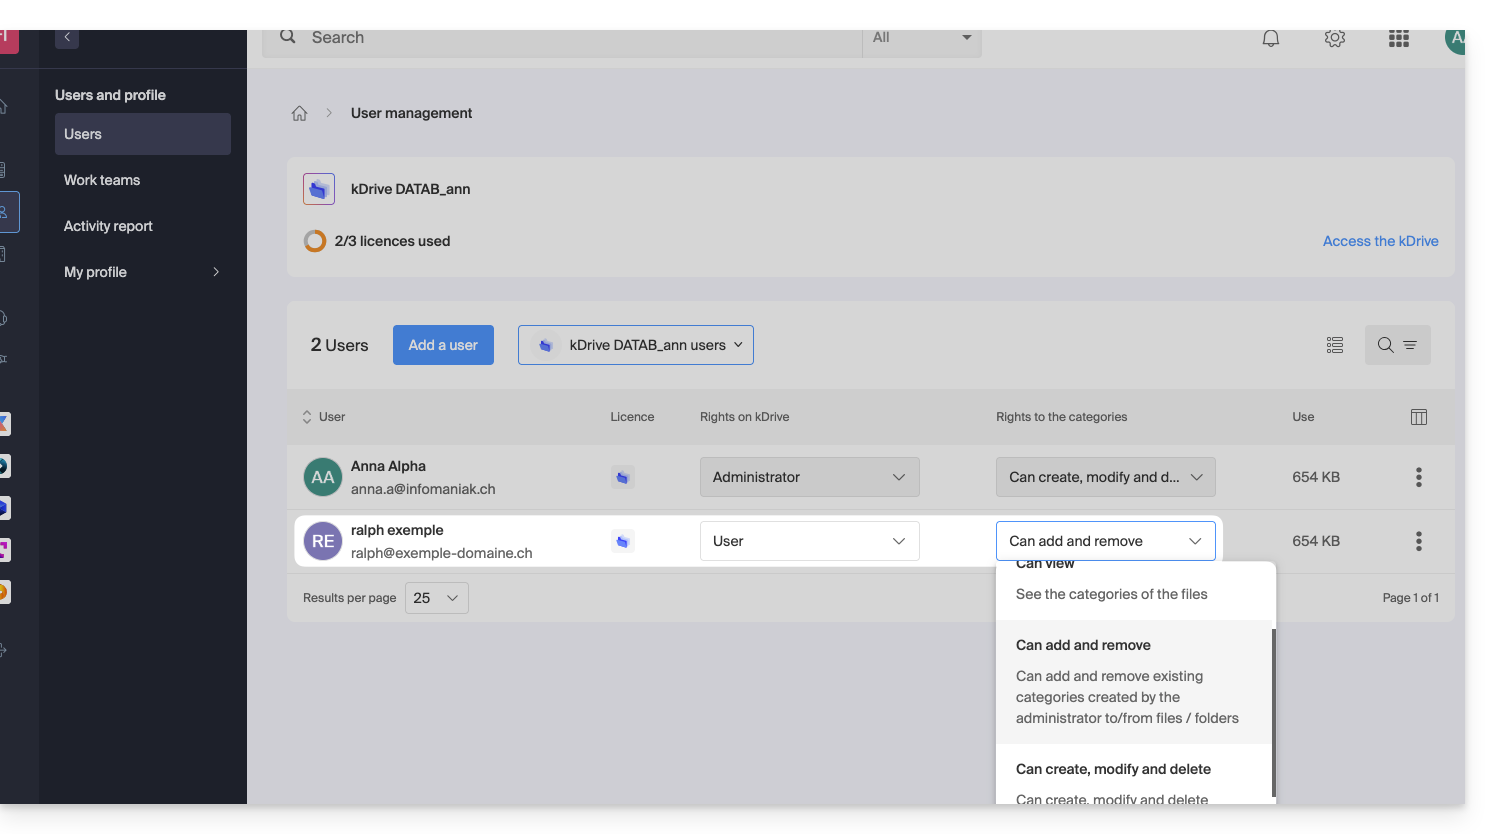
Rights in the Organization / Rights on kDrive
As seen above, do not confuse or mix:
- the rights granted for the management of the kDrive service on the Manager,
- and the rights granted to the user within kDrive.
Indeed, a user may have restricted or no rights on the kDrive product in the Manager (they will therefore not have the ability to manage the kDrive product themselves or have technical details - see below) but may have been defined as an administrator in kDrive and thus have access to all stored data.
Rights in the Organization: product management
In this example, you can manage the kDrive management rights of the user ralph from the product accesses: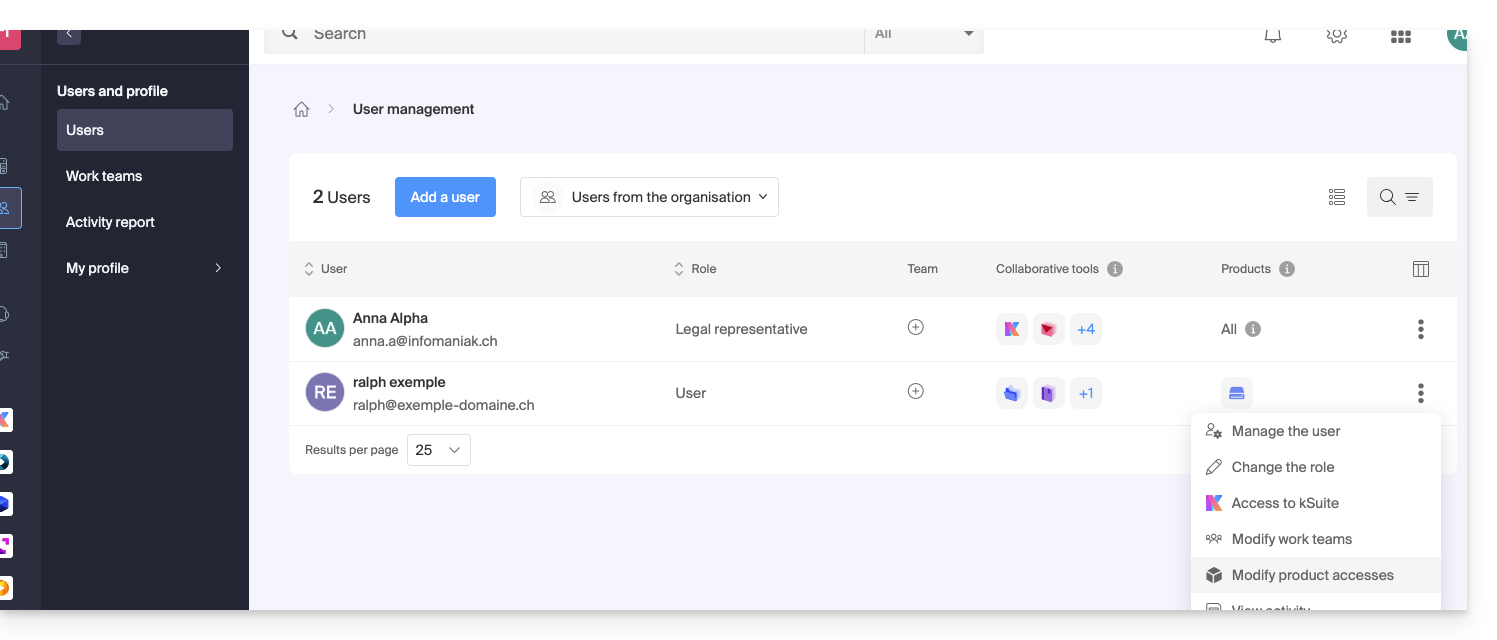
If necessary, specify which kDrive is concerned and especially which permissions (technical / statistics) they should have: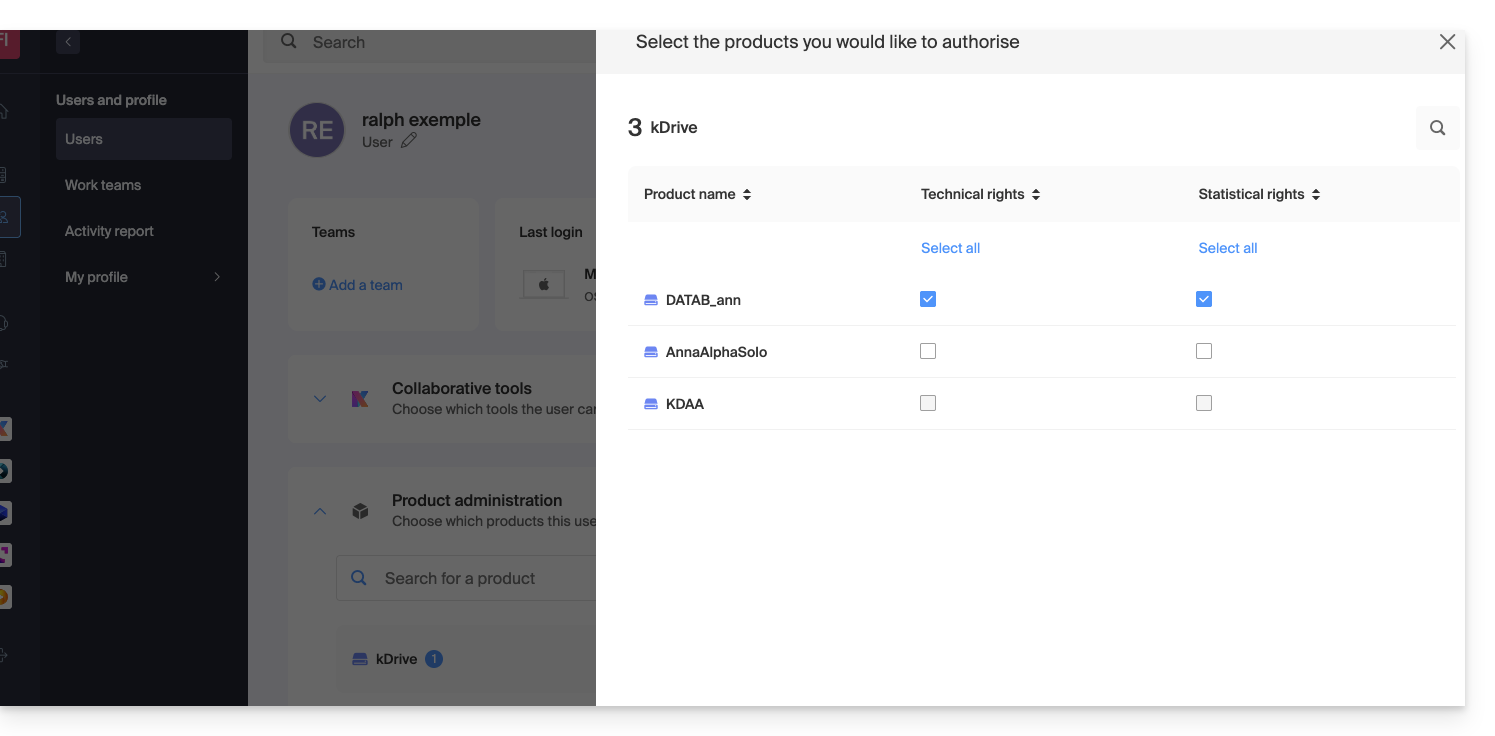
With only Technical rights, they will not see the Statistics element in the sidebar: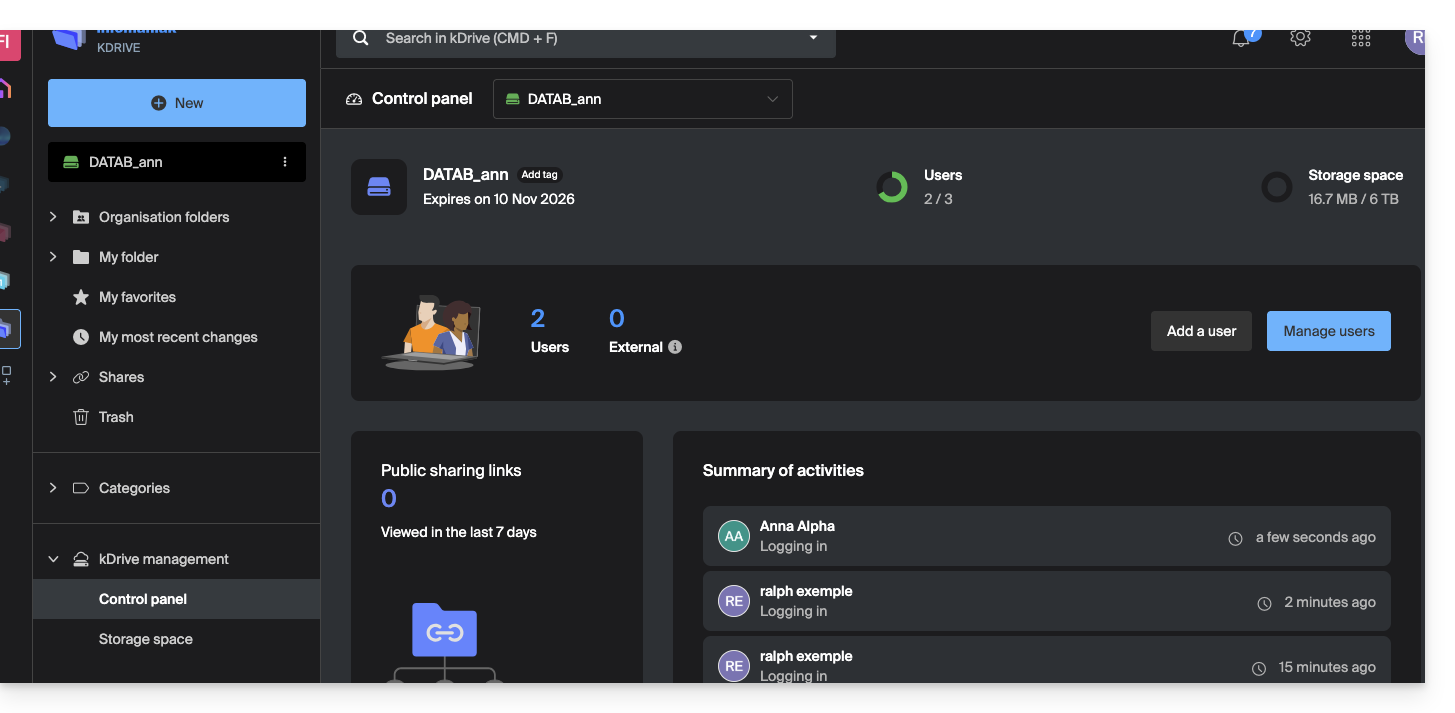
If, on the other hand, only the Statistics box is activated, then they will not access the dashboard: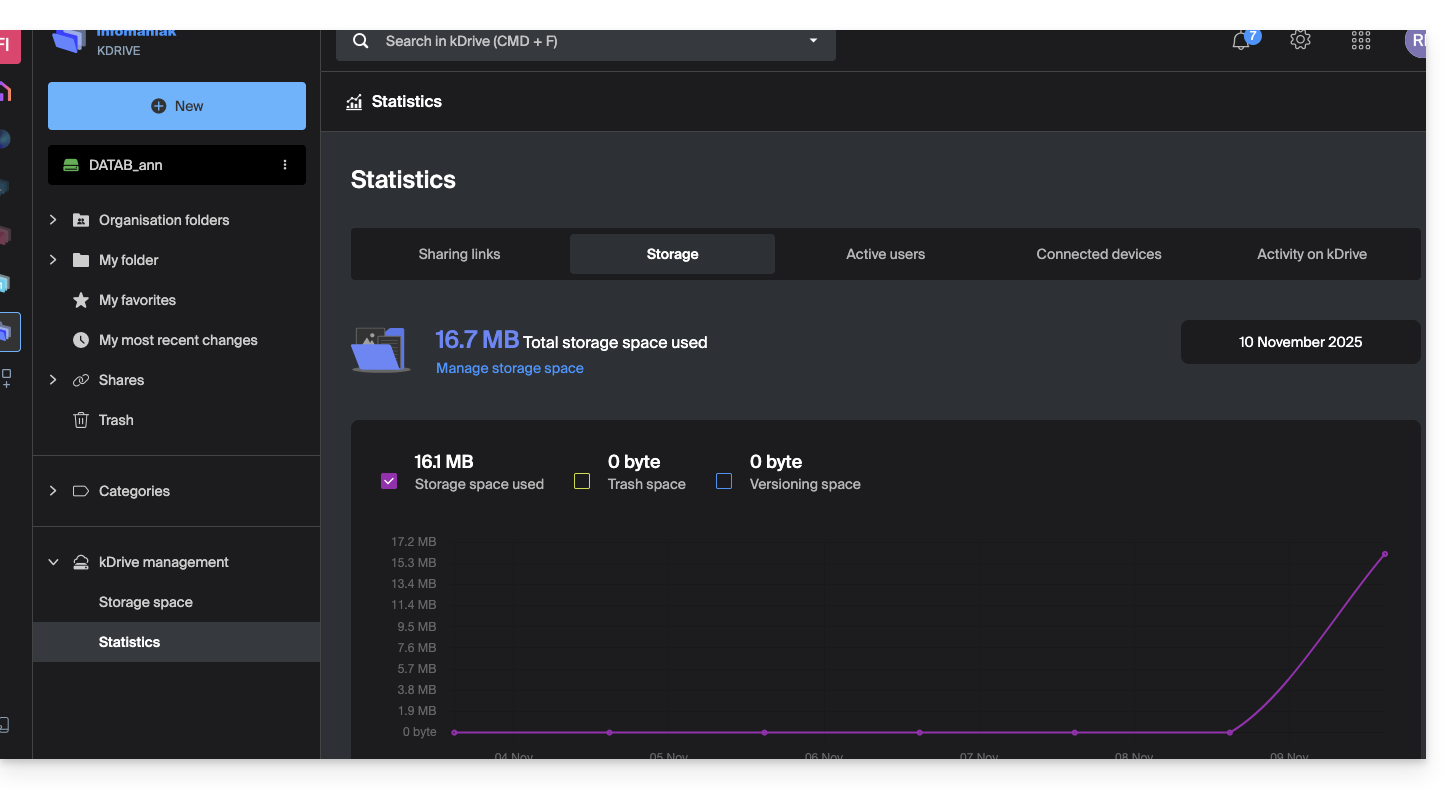
And if the administrator deactivates both Technical and Statistics boxes, only the storage information is accessible from the sidebar: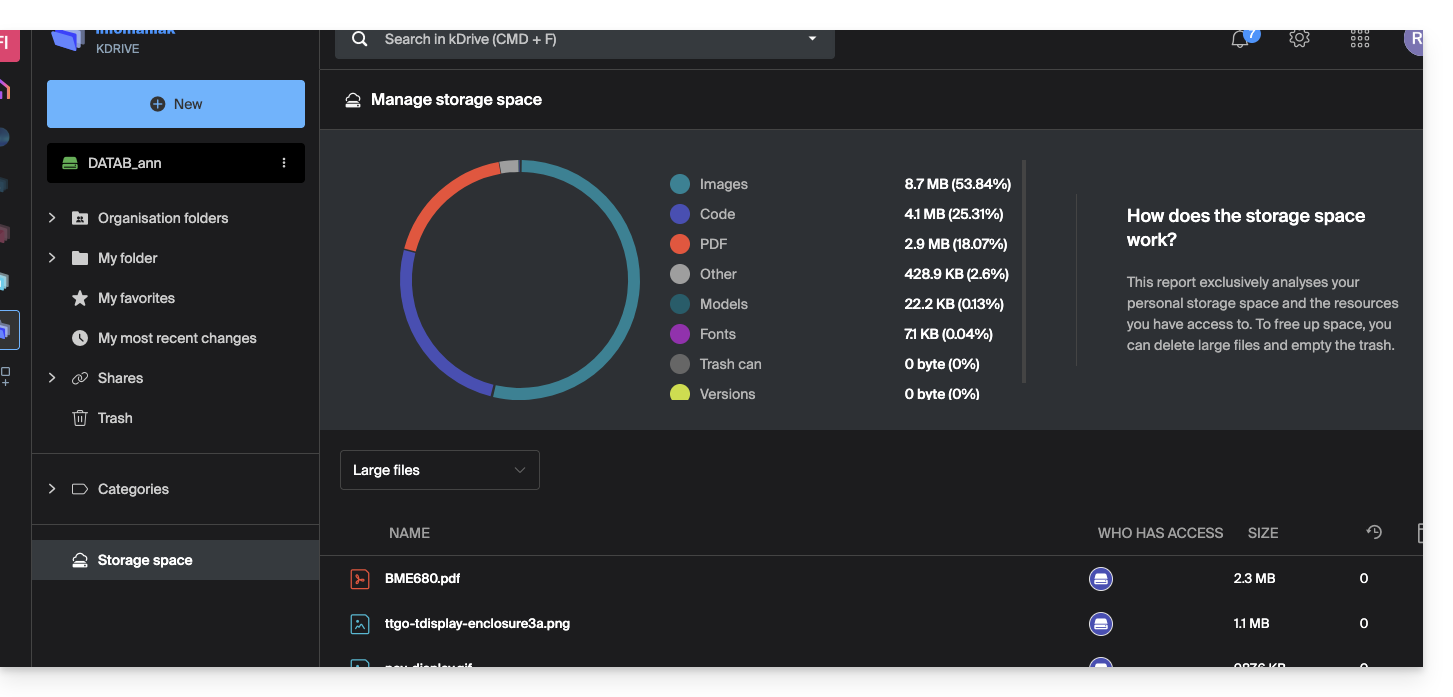
User rights on kDrive
Even with both Technical and Statistics boxes (mentioned above) activated, a user who only has User rights at the level of kDrive user management will not be able to, among other things, create a new folder at the root of the Organization Folders: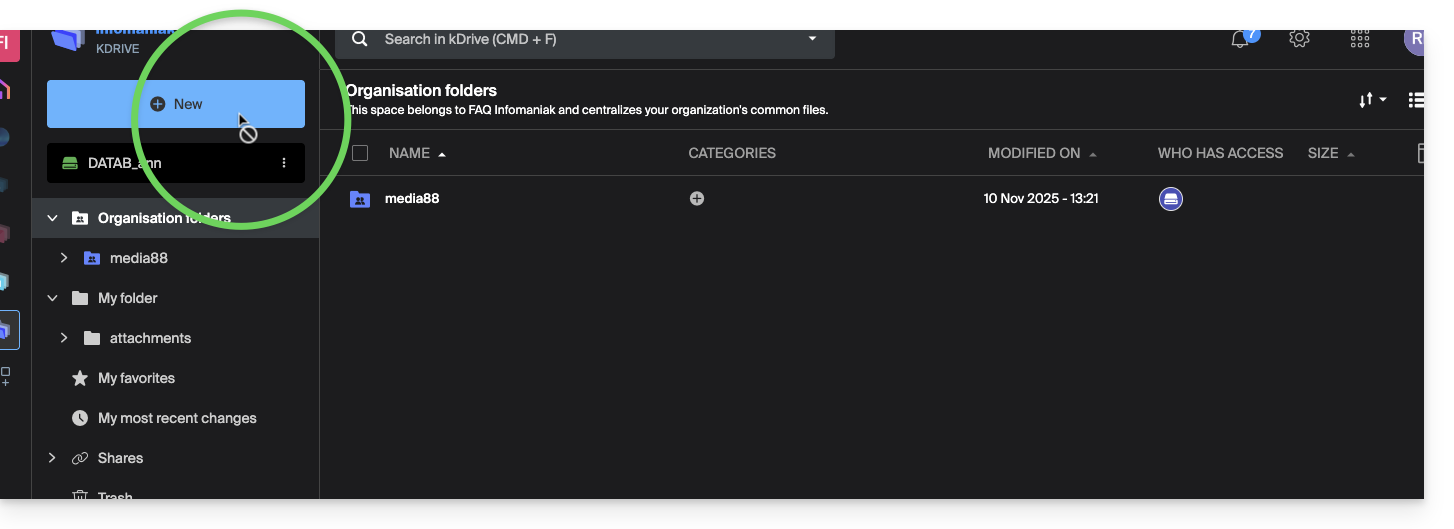
The user will need an Administrator role (see point 5 above) to access this window for creating a new Organization Folder at the root: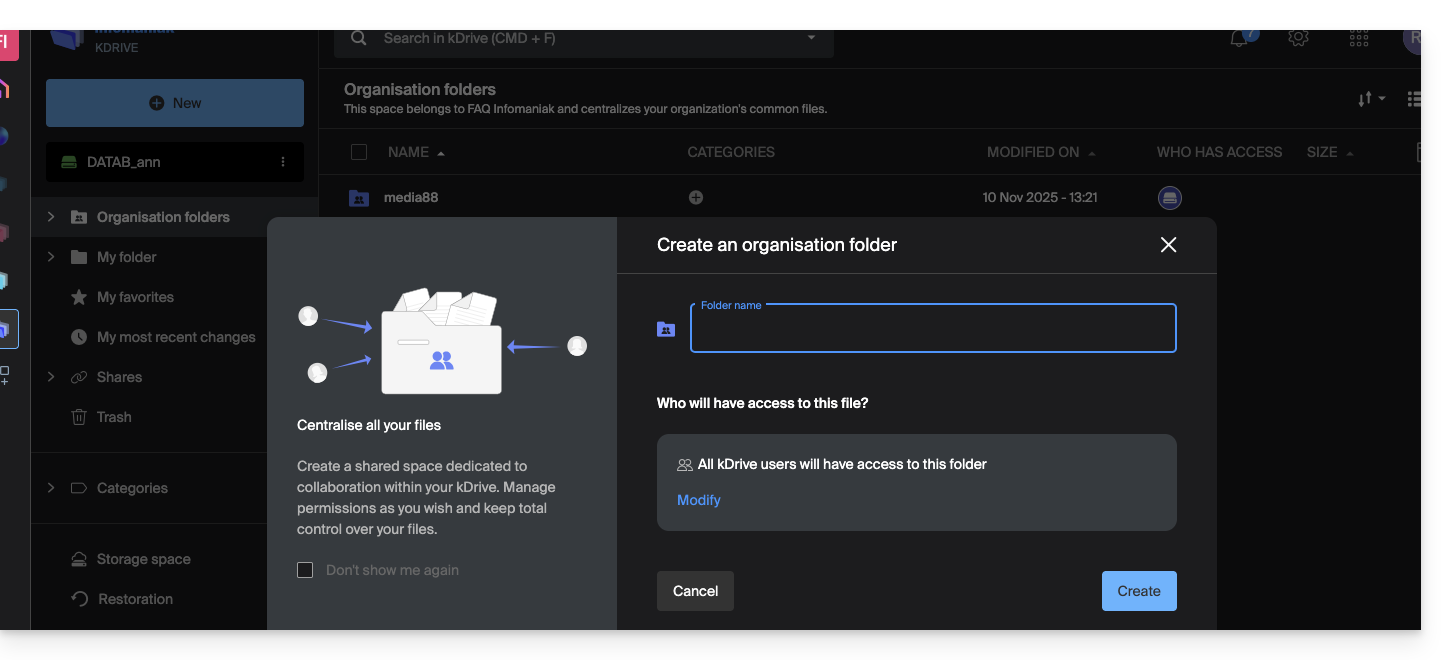
This guide explains how to start recording an online meeting organized with kMeet, the ethical free video conferencing solution by Infomaniak, to obtain a video of the presentation in .mp4 format stored on kDrive Infomaniak.
Preamble
- Video recording
- is done on the server side,
- does not generate any load for the participant's computer that launched it,
- is in .mp4 video format,
- has a maximum duration of 3 hours.
Record a kMeet meeting on kDrive
Prerequisites
- Have a kDrive (standalone/independent or as part of a kSuite, my kSuite, etc.).
- Be the moderator of the video conference to be recorded.
- Do not create an encrypted video conference with a custom key.
To record the meeting on kDrive:
- Start kMeet via kmeet.infomaniak.com or from one of the apps for computers and mobile devices.
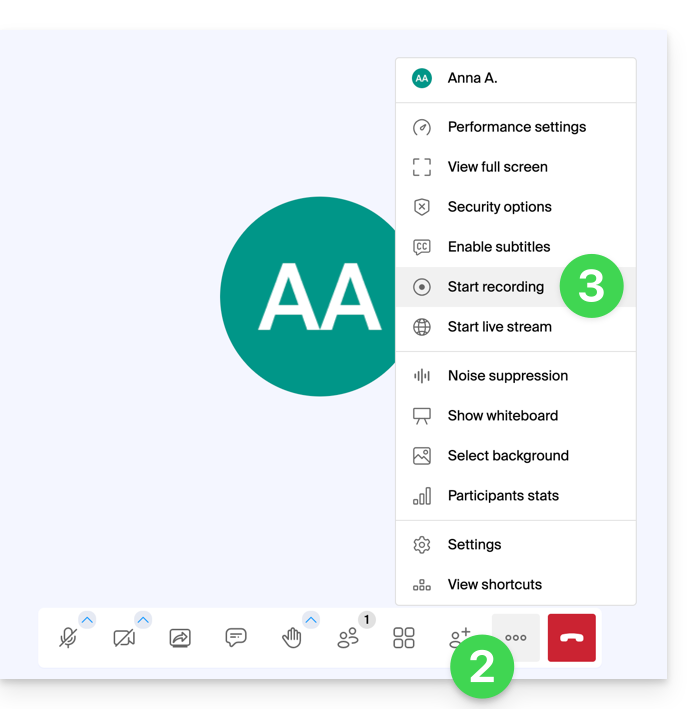
- Once in the meeting, click on the action menu ○○○ in the kMeet toolbar.
- Click on the icon ◉ Start recording:
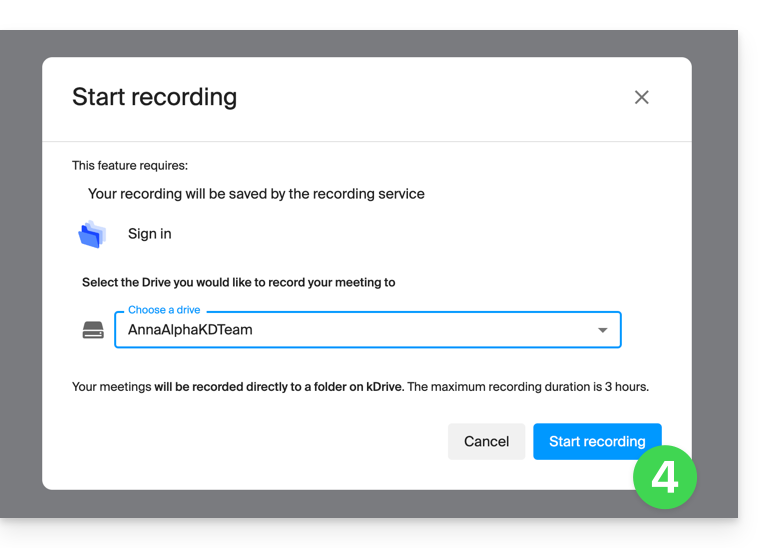
- Confirm the operation and if necessary, log in to your Infomaniak account, then select a kDrive to record the video conference on; then click the button to start:
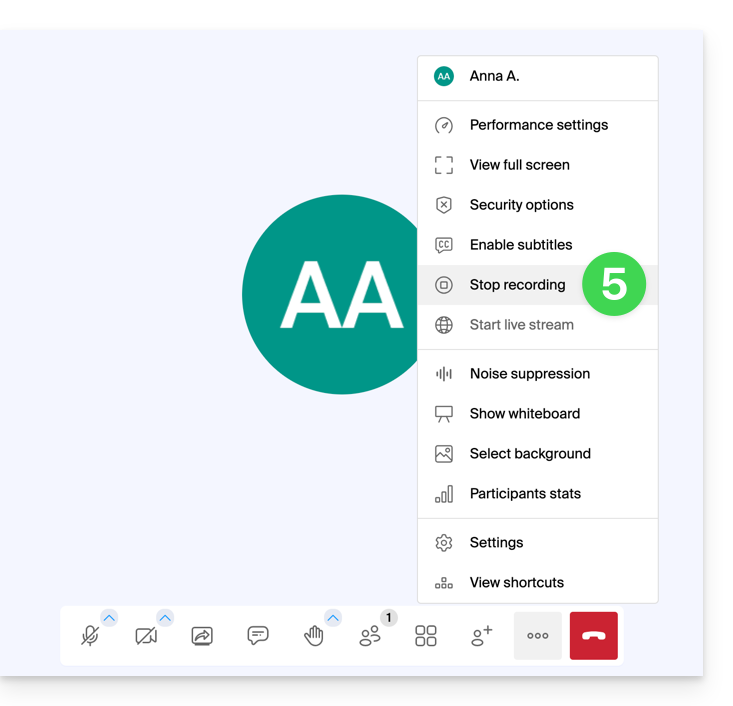
- To stop saving, click on the toolbar again, then choose Stop recording:
- Confirm, then choose whether you want to go to the recording location on kDrive.
- The recording is available at the root of the chosen kDrive as soon as the virtual room in which the meeting was held is closed (i.e., as soon as all participants have left the video conference).
This guide explains how to edit an image file on the Web app kDrive (online service ksuite.infomaniak.com/kdrive).
⚠ Available with:
| kSuite | Free |
| Standard | |
| Business | |
| Enterprise | |
| my kSuite | |
| my kSuite+ | |
| kDrive | Solo |
| Team | |
| Pro |
Preamble
- The Web app kDrive natively integrates an editor that allows you to modify an image online.
- Your files are never analyzed and are exclusively stored in Switzerland.
- Refer to this other guide if you are looking for information on editing other file formats.
Edit an image, a photo
To access kDrive and modify files:
- Click here to access the Web app kDrive (online service ksuite.infomaniak.com/kdrive).
- Open the image file in question.
- Click the Edit button at the top of the document to access the file editor:

- The editor allows you to…
- … rotate the image 90° to the right or left,
- … crop your image,
- … flip (mirror) / reverse the image horizontally or vertically:

- … modify the brightness and contrast of the image:

- … create a signature (paid kDrive offers only) and then apply it to the image (refer to this other guide on this topic).
- Once finished, save the changes and choose whether to create a copy of the modified document or overwrite the existing file.
This guide details the measures implemented by Infomaniak to secure all your data in kDrive, whether personal (medical data, identification or login information) or even sensitive (financial information, trade secrets, intellectual property information, research and development, etc.).
Data security and confidentiality
The kDrive infrastructure consists of several services and servers based on different technologies. The content and structure of each client's content are systematically encrypted and permanently saved in at least 3 locations in several data centers controlled by Infomaniak. Data is stored and processed exclusively in data centers located in Switzerland. Tier III+ data centers guarantee high availability and N+1 redundancy for its critical components.
Storage is performed via Swift, a distributed and highly available cloud data storage technology.
kDrive integrates several levels of protection to protect files:
- To protect data in transit, the use of the SSL/TLS encryption protocol.
- To protect saved data, AES 128-bit encryption (AES-128-CBC) with an individual and unique key per kDrive space.
Infomaniak regularly tests kDrive applications and infrastructure to identify potential security vulnerabilities they may have, thereby strengthening security and ensuring protection against attacks.
But also…
- kDrive offers a data access log and an action history can be viewed directly from the Manager; it is possible to access an activity report to monitor the action history of all your kDrive users; you can also track your data and changes made to each document, spreadsheet, or presentation.
- Only people with a link to public files can view them.
- Two-step verification provides an additional level of security when logging in; if you use two-step verification, you can choose, for example, authentication via the kAuth application.
- Refer to this other guide if you are looking for information on data analysis.
This guide explains how to manually upload data (upload files, folders, etc.) from your computer to your kDrive without installing the kDrive Infomaniak application (application for iOS / Android smartphone or tablet or desktop application on macOS / Windows / Linux).
Import to kDrive from the browser
To access kDrive:
- Click here to access the kDrive Infomaniak web app (online service kdrive.infomaniak.com).
- Check or select the relevant kDrive in the drop-down menu of the left sidebar.
Then as desired:
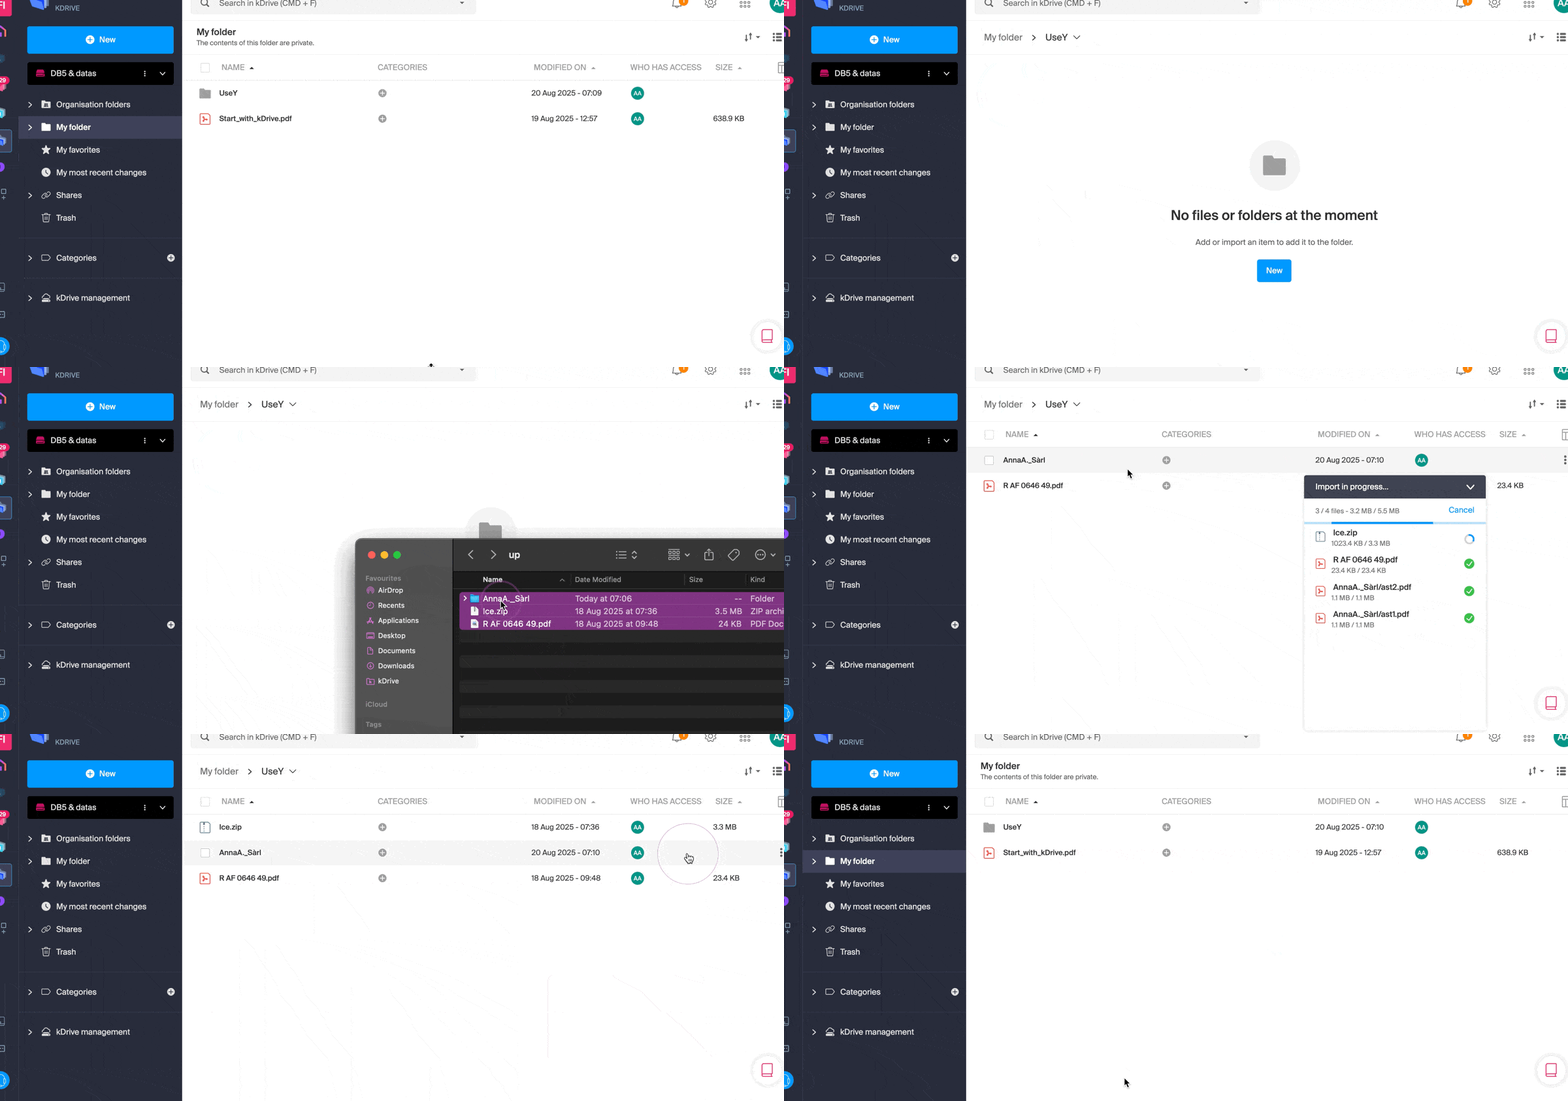
Drag & Drop
- Drag and drop the items to be sent to kDrive, from a window of your computer, to the window of your browser where the kDrive site is open:
“New” button
- Use the New button at the top left of your kDrive interface, then choose the desired import (either file or folder):
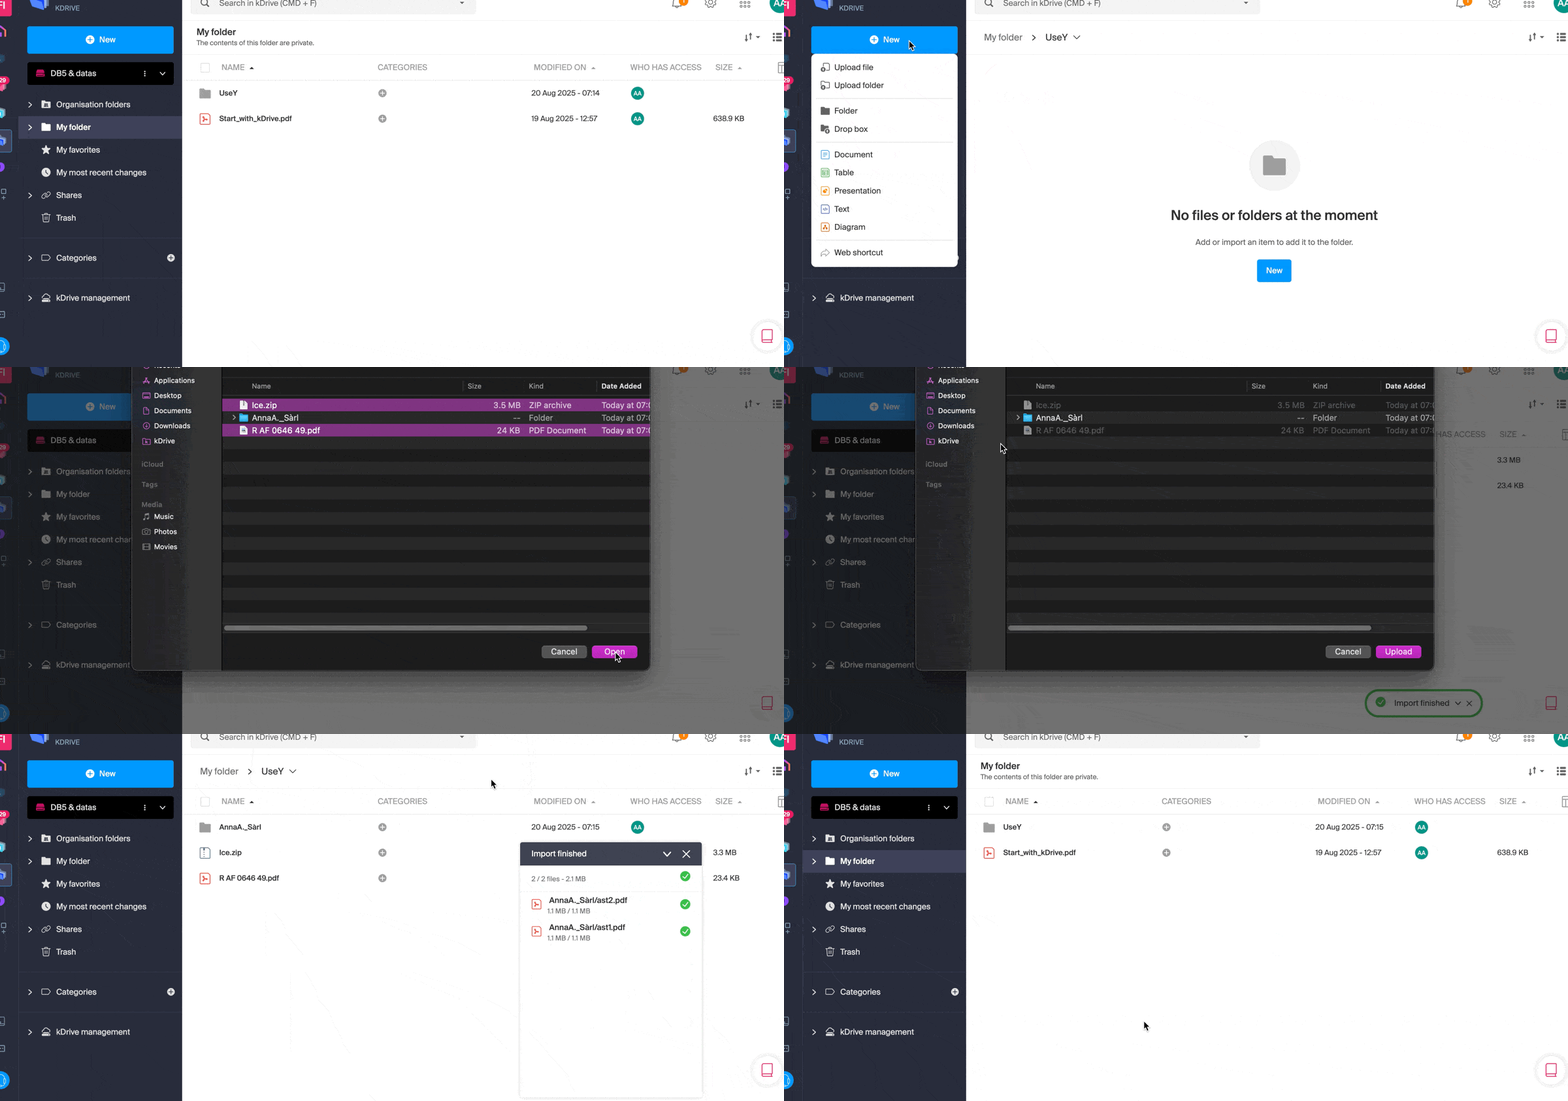
- The operating system (macOS for example) may ask for confirmation when uploading a folder.
Right-click
- Right-click where you want to import new content, then choose the desired import (either file or folder):
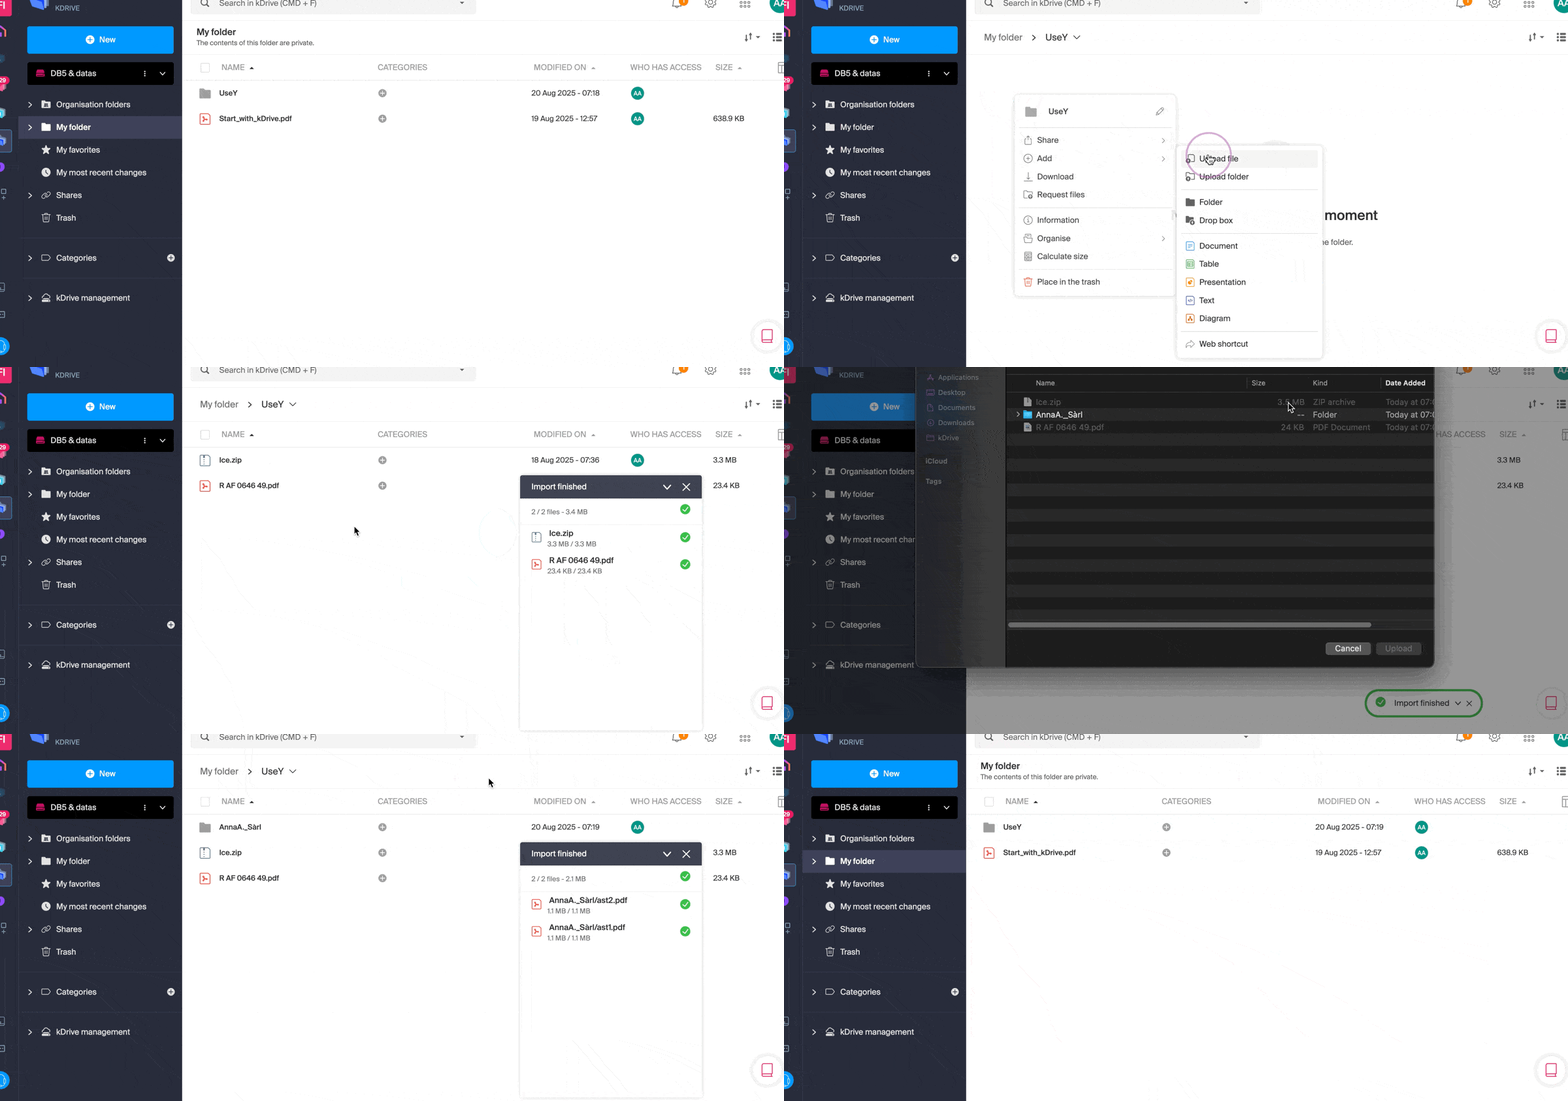
- The operating system (macOS for example) may ask for confirmation when uploading a folder.
Import external data
- Import specific content using the Import external data menu:
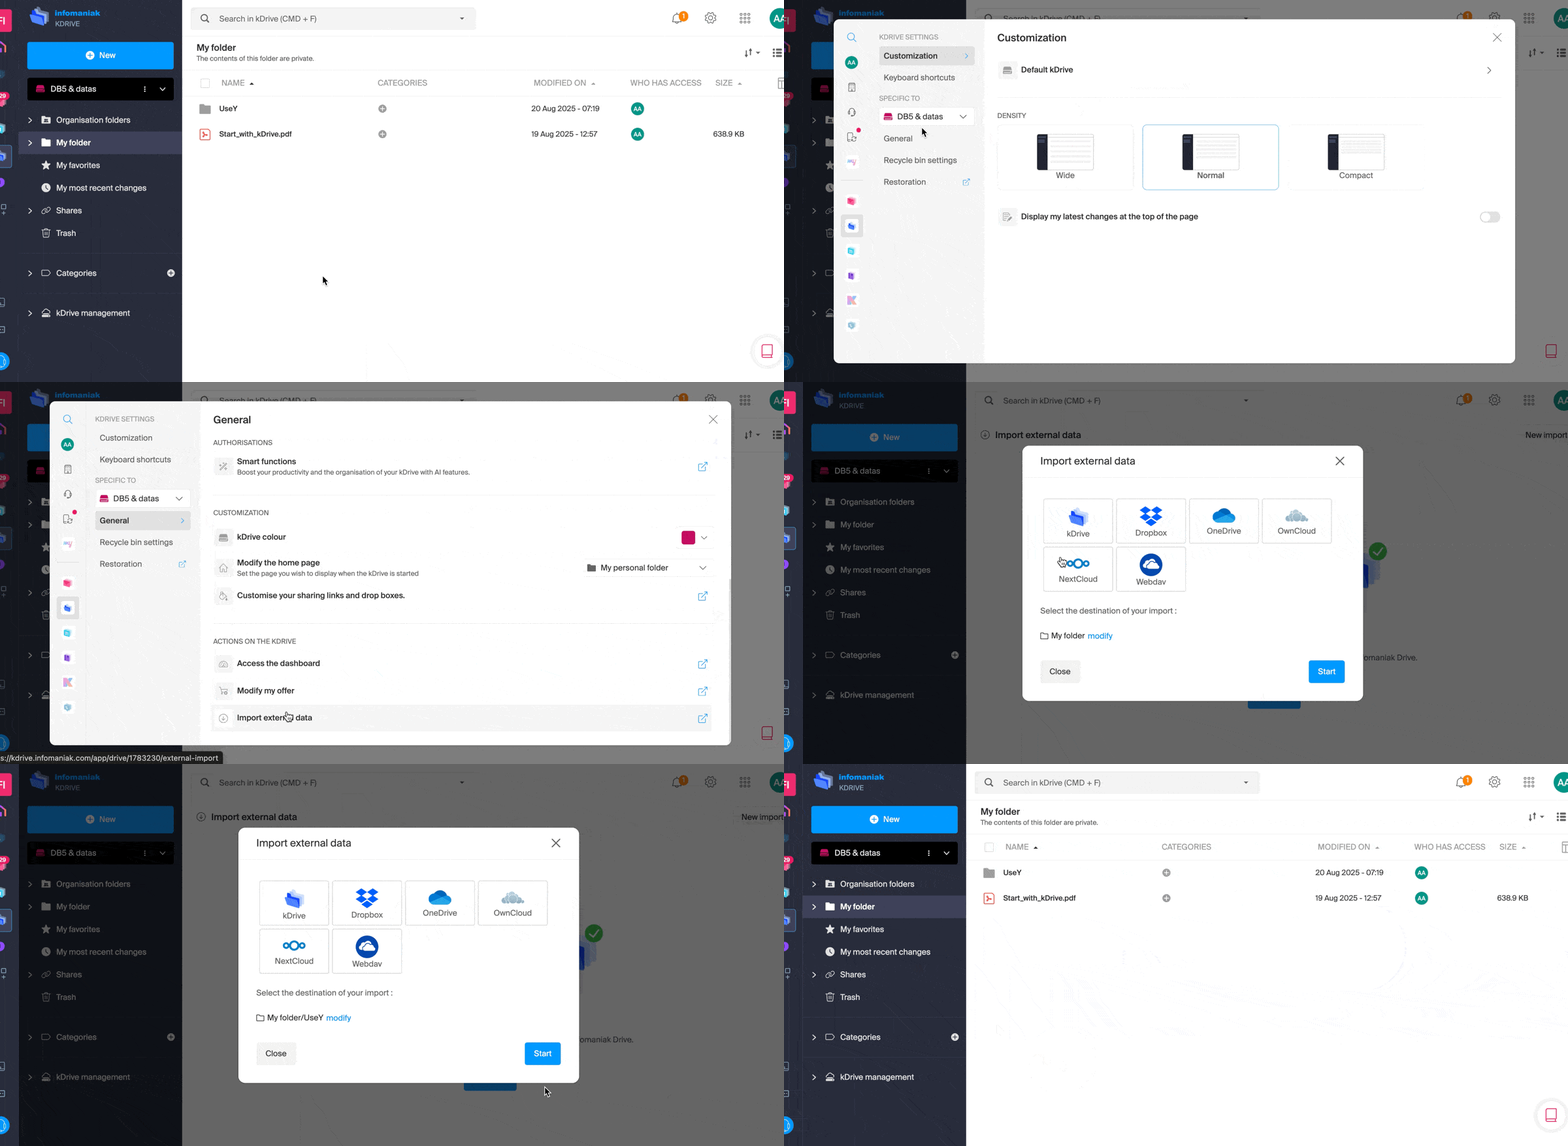
- Refer to this other guide if you are looking for information about importing data from outside.
Regardless of the method used, wait during the data transfer (the duration depends on the speed of your Internet connection).
File types
You can send any type of file, such as .pdf, .txt or other extensions, including in the field of 3D.
kDrive also allows you to open and convert iWork files designed from a Mac to edit them from any device. These files from the Apple Suite still have a few peculiarities with their extensions; example with the application Numbers:
- The
.numberscan be files or folders depending on the chosen recording (and the behavior during upload is not the same when it is a folder). - If there is already a file for example
calcul.numberson kDrive and if it is saved as a “package” on the desktop, then at the time of upload the file will be considered as a folder and kDrive will try to upload files inside, which is not possible so the upload will not be allowed.- To solve the problem, simply change the recording format in the Apple Numbers application on macOS to “Single file”:

- To solve the problem, simply change the recording format in the Apple Numbers application on macOS to “Single file”:
This guide explains how to view how the storage space of your kDrive is used and how to increase its capacity if needed.
Preamble
- The maximum number of files per kDrive is not a fixed limit, but if it is exceeded, the stability of the storage system and the kDrive application cannot be guaranteed by Infomaniak.
- Only the specific conditions Backup and Storage that you can find in your Manager are binding.
Current limits
⚠ Max. number of files / subfolders:
| per kDrive | per folder | |
| All offers | 300000 / 1000 | 50000 |
⚠ Bandwidth (in GB) allowed per day and per user (these limits, provided for informational and preventive purposes, may apply if excessive use degrades the service, in order to guarantee its stability and availability for all users) :
| kSuite | free | 200 |
| Standard | 1000 | |
| Business | 1000 | |
| Enterprise | 1000 | |
| my kSuite | 200 | |
| my kSuite+ | 200 | |
| kDrive | Solo | 1000 |
| Team | 1000 | |
| Pro | 1000 |
⚠ Max. number of daily downloads of a file per user:
| kSuite | free | 50000 |
| Standard | 100000 | |
| Business | 100000 | |
| Enterprise | 100000 | |
| my kSuite | 50000 | |
| my kSuite+ | 50000 | |
| kDrive | Solo | 50000 |
| Team | 50000 | |
| Pro | 50000 |
⚠ Max. size of a file (in GB) sent via:
| Desktop app | Web app | API | |
| All offers | 50 | 50 | 50 |
View kDrive storage space
To access kDrive:
- Click here to access the Infomaniak kDrive web app (online service ksuite.infomaniak.com/kdrive).
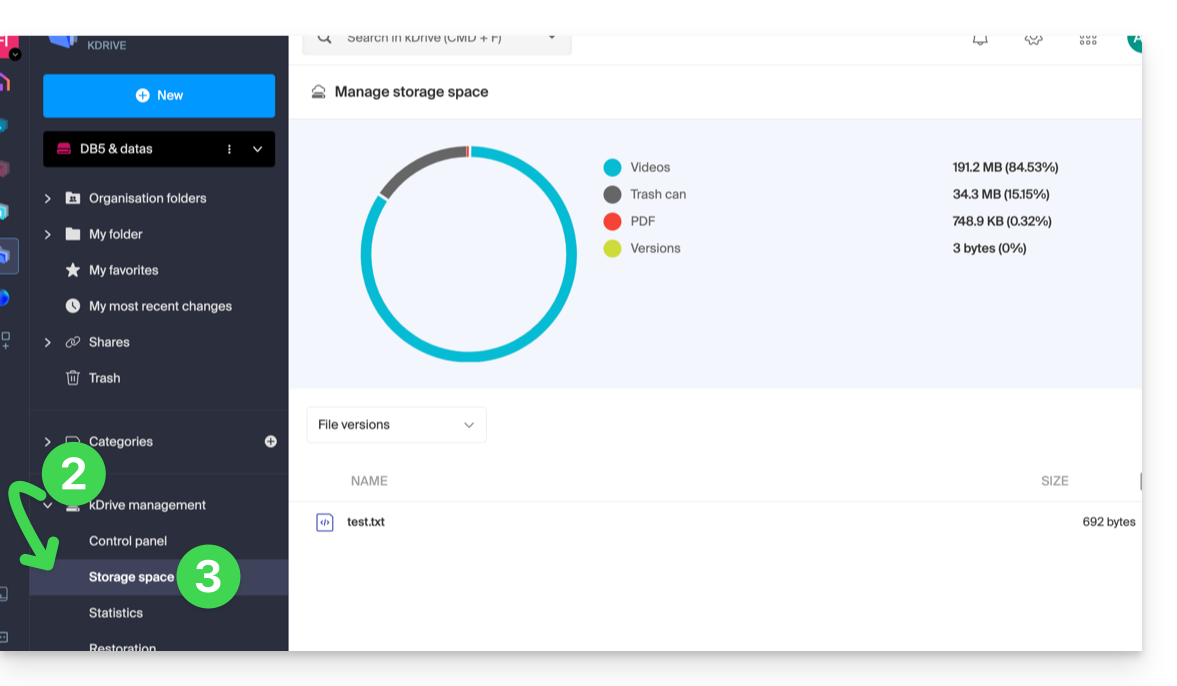
- Click on the chevron to expand the kDrive Management section in the left sidebar.
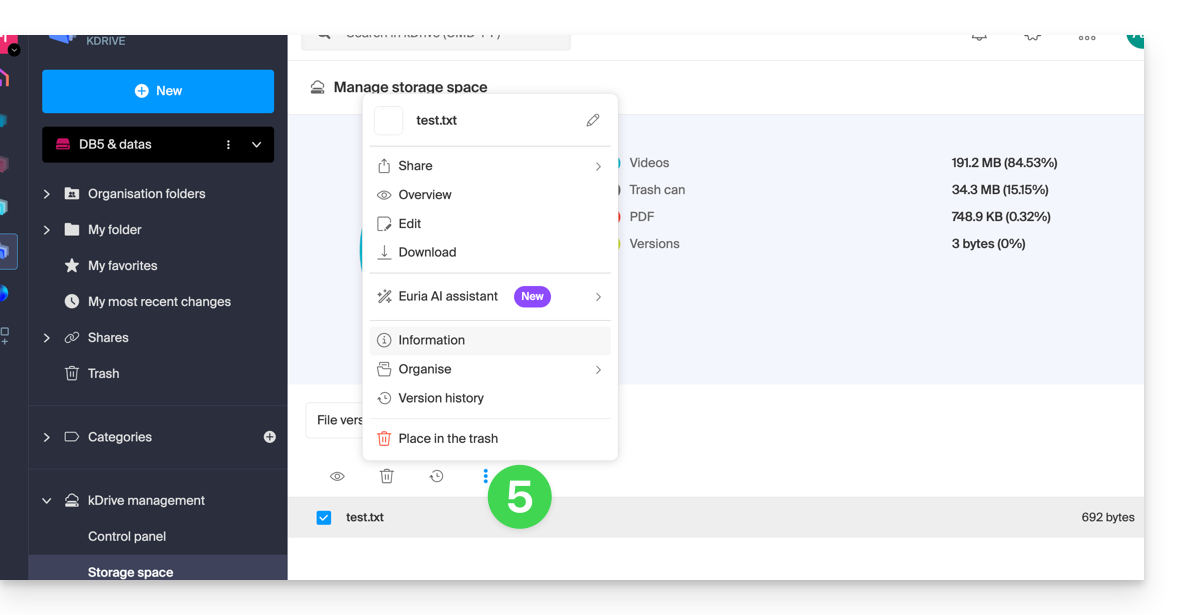
- Click on Storage space in the left sidebar:
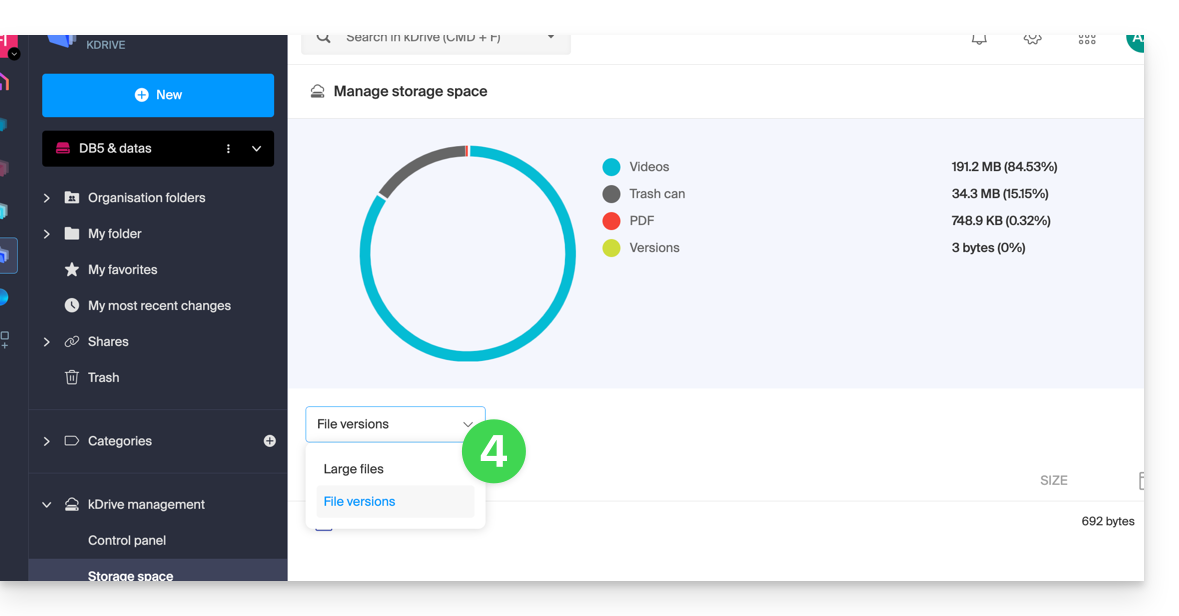
- Select large files (or file versions that are also counted in the storage space) using the dropdown menu:
- Click on the action menu ⋮ located above your selection to perform an action (deletion, for example):
Increase kDrive storage
Prerequisites
- Have sufficient permissions within the Organization.
To modify kDrive storage:
- Click here to access the Infomaniak kDrive web app (online service ksuite.infomaniak.com/kdrive).
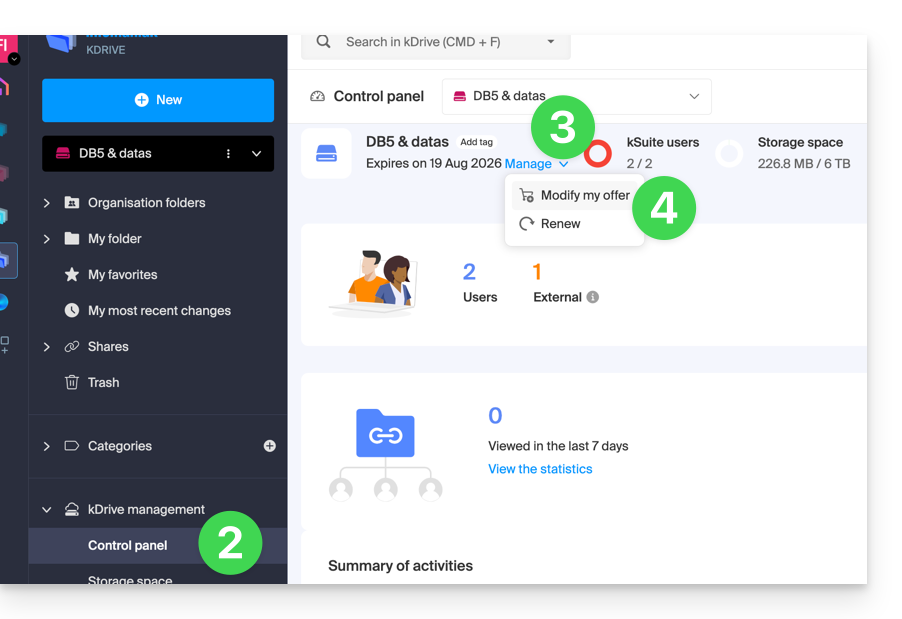
- Click on Dashboard in the left sidebar under kDrive Management.
- Click on Manage.
- Click on Change Offer:
- You will be offered the choice to change the offer or to modify the maximum storage space of your kDrive.
- Once the offer is modified, click on Next and proceed to payment.
This guide explains how to save email attachments from the Web app Mail Infomaniak (online service ksuite.infomaniak.com/mail). You can then save all files attached to a message in a .zip archive on your computer, or in your kDrive etc.
Export attachments from the Web Mail app
To export files received by email:
- Click here to access the Web app Mail Infomaniak (online service ksuite.infomaniak.com/mail).
- View the email message containing the attachments you want to save.
- Click on the paperclip icon…
- … or directly above the attached files:

- Select Download all to create a
ziparchive to download to your device. - Select Save all to kDrive to choose the kDrive (from those you are attached to by your Organization) and the desired location on it to save the files.
- Select Download all to create a
Learn more
This guide provides instructions to synchronize kDrive with a Qnap NAS (or vice versa) via the WebDAV protocol found in the HBS 3 Hybrid Backup Sync application.
⚠ Available with:
| kSuite | |
| Business | |
| Enterprise | |
| kDrive | Solo |
| Team | |
| Pro |
Prerequisites
- Have a Qnap NAS accessible from the Internet.
- Know your kDrive identifier (kDrive ID).
Synchronize kDrive and Qnap via HBS 3
To do this:
- Log in to the Qnap NAS administration interface (QTS).
- If necessary, download and install the app HBS 3 Hybrid Backup Sync.
- Open HBS 3.
- Go to Sync from the left menu.
- Create a synchronization task (Two-way Sync Job).
- Select WebDAV from the list of Cloud providers:

- For the account parameters, use the following information:
- Server address:
https://IDkDrive.connect.kdrive.infomaniak.com(see prerequisites above) - Username: email address to log in to the Infomaniak account
- Password: create an application password for this specific use.
- Server address:
- Select the local and destination folders:

- Customize the task frequency.
- Complete the wizard.
This guide details the priority actions to take if you do not see any difference between your website after a change you have made to it, and its previous version. These tips are also valid if you encounter issues while using the Infomaniak product interface.
Preamble
- During your browsing, a web browser saves the data consulted in a reserved space, in order to avoid requesting the data already consulted from the server again, to save time and resources.
- Your cache may contain a lot of data and sometimes the browser gets confused. Sites may then display incorrectly or display an outdated version.
- Clearing the cache ensures that you have the very latest version of the page or folder consulted.
Clear the web browser cache …
… on Safari
Choose your macOS version to view the corresponding Apple help.
… on Google tools (Chrome, Android, etc.)
View the Google help.
… on Firefox
View the Mozilla help.
… on Edge / Internet Explorer
View the Microsoft help.

