Knowledge base
1000 FAQs, 500 tutorials and explanatory videos. Here, there are only solutions!
Thank you for choosing kDrive, the independent and privacy-respecting solution for collaborating, sharing, and accessing your data from all your devices. Your data is encrypted, continuously backed up, and exclusively hosted in Switzerland.
Collaborative storage on a 100% Swiss Made cloud
- Discover kDrive in video (the interface has evolved since)
Getting Started
- Sync kDrive across different devices
- Manage kDrive Lite Sync option (macOS)
- Manage kDrive Lite Sync option (Windows)
- Install kDrive on Linux
- kDrive folders (personal, shared, common)
- Choose the kDrive folders to sync
- Edit an Office-type file on kDrive (Word, Excel, PowerPoint)
- kDrive subscription via Apple iOS
- Manage kDrive storage space
- Search for data on kDrive
Share your data
- Manage kDrive drop boxes
- Customize kDrive shares and deposits
- Share data from kDrive (web interface)
- Example of internal/external shares
- Share data by email from kDrive (web interface)
Fill your kDrive
- Import external data to kDrive
- Import data to kDrive (iOS) or just automatically import iPhone photos
- Import photos to kDrive (Android)
- Import data to kDrive without the kDrive app
- Import data to kDrive via WebDAV
- Connect to kDrive via WebDAV
- Access kDrive files locally and online
- Scan documents with kDrive (iOS / Android)
With multiple users
- Manage a kDrive user's rights
- Manage access permissions to folders and subfolders
- Manage kDrive users
- Manage multiple kDrive (iOS / Android)
- Manage multiple kDrive (macOS / Windows)
- Copy certain data between kDrive you have access to
Go further with kDrive
- Modify an existing kDrive offer
- Manage kDrive categories to classify data
- Synchronize Joplin notes via WebDAV with kDrive
- Synchronize Qnap with kDrive
- Synchronize Synology with kDrive
- Save a kMeet meeting on kDrive
- Export email attachments from Mail
- Export an email to kDrive
- Add an attachment to an event in Calendar
For advanced users
In case of a problem
- Resolve a kDrive blockage (antivirus, firewall, etc.)
- Resolve a kDrive sync conflict
- Resolve a kDrive synchronization issue
- Resolve a kDrive issue on Android device (don't kill my app)
- Resolve a Lite Sync plugin error on macOS
- Clear the browser cache
- Clear the mobile app kDrive cache
- kDrive application version (macOS / Windows / Linux)
- Restore a kDrive file to a previous version
- Restore a deleted kDrive file
- Force kDrive to synchronize hidden and excluded files
- Authorize access to your products / Complete a support request
- Display kDrive debugging information
Learn more about kDrive
A question or feedback?
- Contact Infomaniak support
- Click here to share feedback or a suggestion on an Infomaniak product
This guide explains how to authorize Infomaniak Support to access your online products and more specifically their content, and provide useful details when requesting assistance.
Preamble
- Infomaniak Support may ask you to grant temporary access to part of your content.
- This access is strictly limited to the analysis context and is used solely to identify the source of the problem encountered.
- It saves time in diagnosis by avoiding unnecessary back and forth.
- In accordance with Infomaniak's privacy policy, your data will never be used for other purposes.
Authorize Support to access a type of content
To authorize Infomaniak to access a specific part of your services (authorizing access to content never opens access to others; each authorization is specific and independent):
- Click here to access access management on the Infomaniak Manager.
- Click the toggle switch to authorize access to the content of…
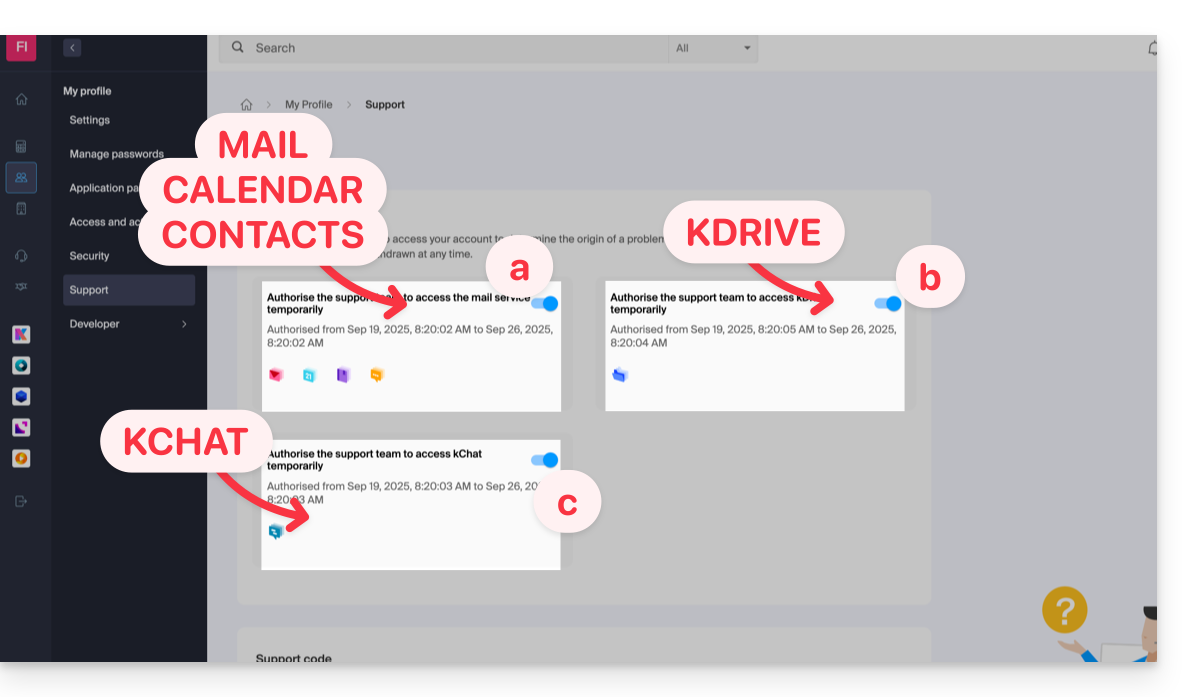
- … email addresses linked to the Web Mail app Infomaniak (online service ksuite.infomaniak.com/mail).
- … folders among the existing kDrive(s) in the Organizations of which the current user is a member.
- … discussions among the existing kChat product(s) in the Organizations of which the current user is a member.
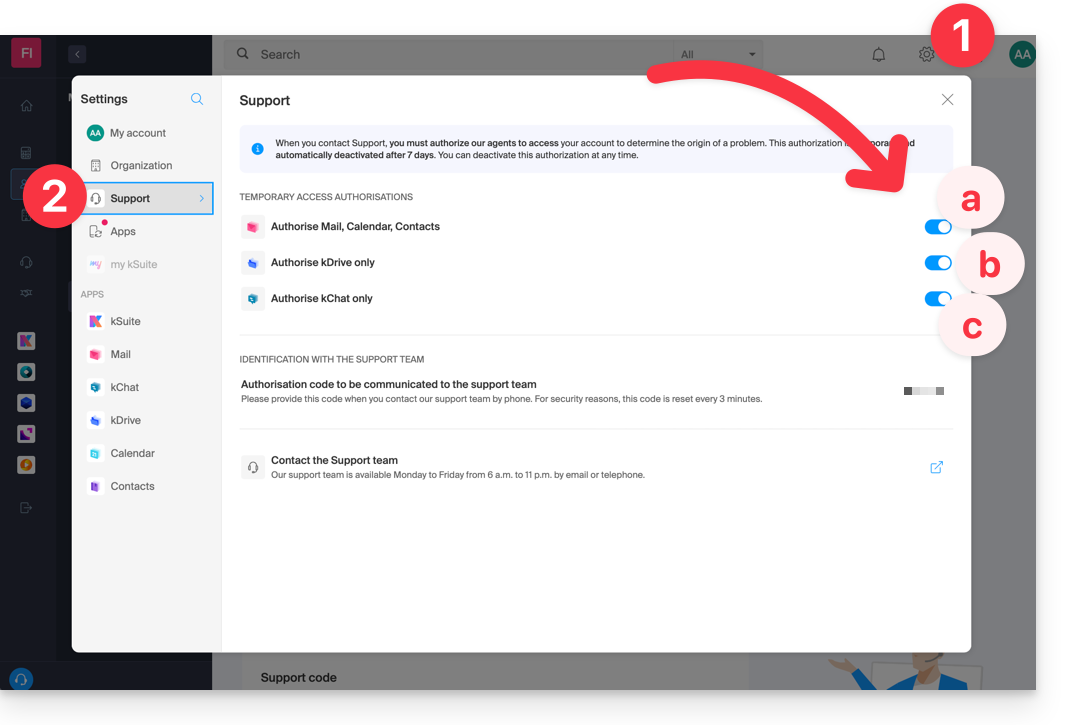
With kSuite, you can also do this by clicking here or proceed as follows to get there:
- Click on the Settings icon at the top right of your kSuite window.
- Click on Support in the left sidebar:
Who can access it?
- Only Infomaniak employees directly handling your support request.
- Access is only from Infomaniak's controlled facilities.
Duration and control of access
- You can revoke this access at any time.
- Otherwise, it expires automatically after 7 days.
You can also share a single specific email very easily.
Taking screenshots…
… on Windows
Microsoft provides a pre-installed software dedicated to screenshots. But to do it manually:
- Display what you want/need to transmit on the screen.
- Press the PRINTSCREEN key on your keyboard (or
PRTSCR,IMPR. ECRAN, etc.) once. - In Microsoft Word (or similar), do "Edit" -> "Paste" to place your image on the page.
- Save your file.
- Repeat the operation from step 1 to step 5 as many times as the number of desired captures.
… on macOS
- Press the "
CMD" + "shift" (the hollow arrow up — caps lock) + the "3" keys simultaneously. - Each press on these keys creates an image file on your computer's desktop.
… on iOS (iPhone, iPad...)
- Press the "
Power" + "Home" (the two only physical buttons) buttons simultaneously. - Retrieve the screenshots in the "Photos" app of your device.
… on Android (e.g. Samsung, LG or Huawei)
- Press the “Volume Down” (on the side) and the lock button simultaneously.
- The captured image is automatically saved in a Screenshots folder in the gallery.
Windows Popup
To copy-paste an error message present in a Windows popup as text, a simple press on the CTRL + C key on your keyboard is enough to copy the message to the clipboard. You will then be able to paste (CTRL + V) it in the body of the message you send to us.
Browser Javascript console…
… on Windows
Chrome, Firefox and Safari: enter the key combination CTRL + SHIFT + i
Internet Explorer and Edge: press the F12 key
… on macOS
Chrome: enter the key combination ⌘ + ⌥ + J
Safari: enter the key combination ⌘ + ⌥ + C
- Then, click on the crossed-out circle icon or similar to reset the log.
- Display the page of your site affected by the issue.
- The console tab displays JavaScript errors and missing online resources.
This guide details the structure of kDrive by Infomaniak: online interface, menus for managing and finding your shares, utility and meaning of default folders, etc.
Preamble
- This guide applies to the Web app kDrive (online service ksuite.infomaniak.com/kdrive).
- The desktop app kDrive (desktop application on macOS / Windows / Linux) is not directly concerned (and will not display certain elements).
- The mobile app (application for iOS / Android smartphone or tablet) is similar in terms of menu organization (with a few singularities such as offline files, for example).
- The Shared folders and the Shares menu are only visible with certain multi-user offers.
- Do not rename and/or move the default-created folders either on the Web version and even less locally, as this causes synchronization issues.
- To quickly access the different functionalities/operations, right-click on your files.
3 main elements
The kDrive interface offers a left-side menu that guides you to the kDrive data, including these 3 main elements:
1. Organization folders: common to the collaborators of your Organization
This folder displays the folder tree shared automatically with certain or all users of the same kDrive; if they contain documents, they will be displayed in the center of the interface: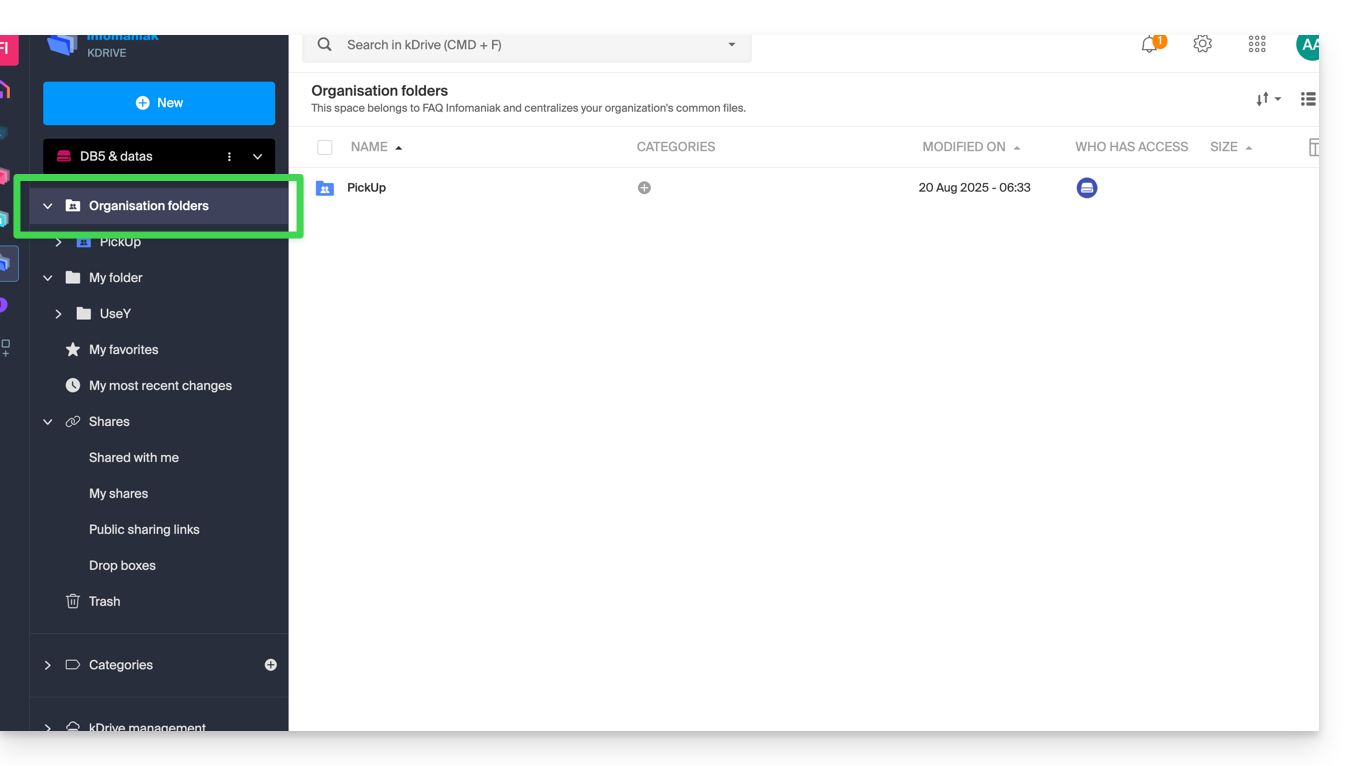
If you create a new folder here, you can choose to share it with the entire Organization (all kDrive users) or only a few users / work teams who will then need to request access if necessary: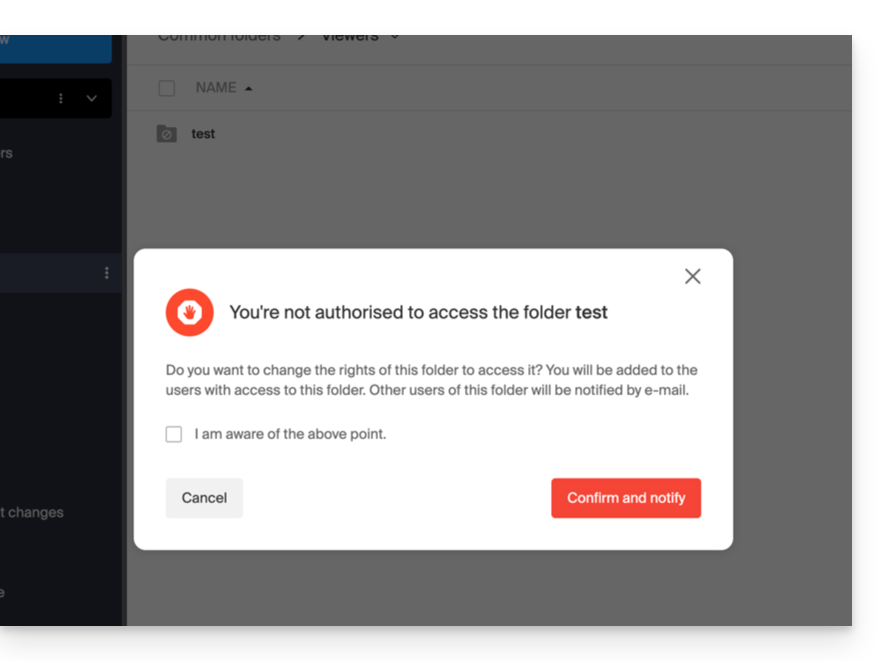
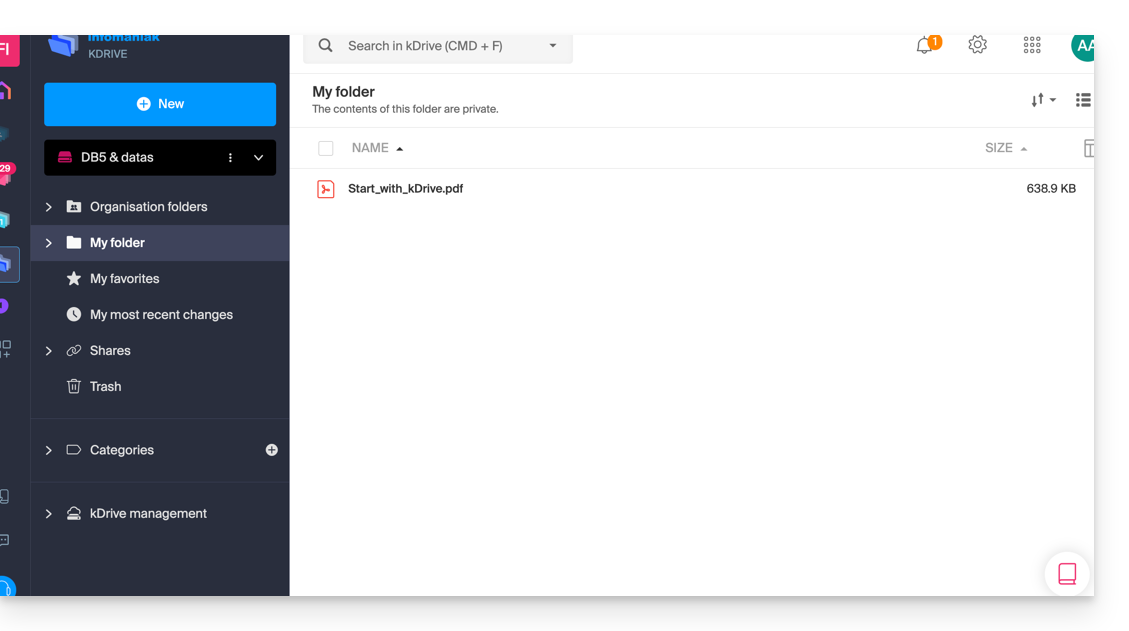
2. My folder: default personal & private folder
This folder displays the folder tree specific to the user themselves: indeed, each kDrive user has their own personal space that will not be automatically shared with other users of the same kDrive: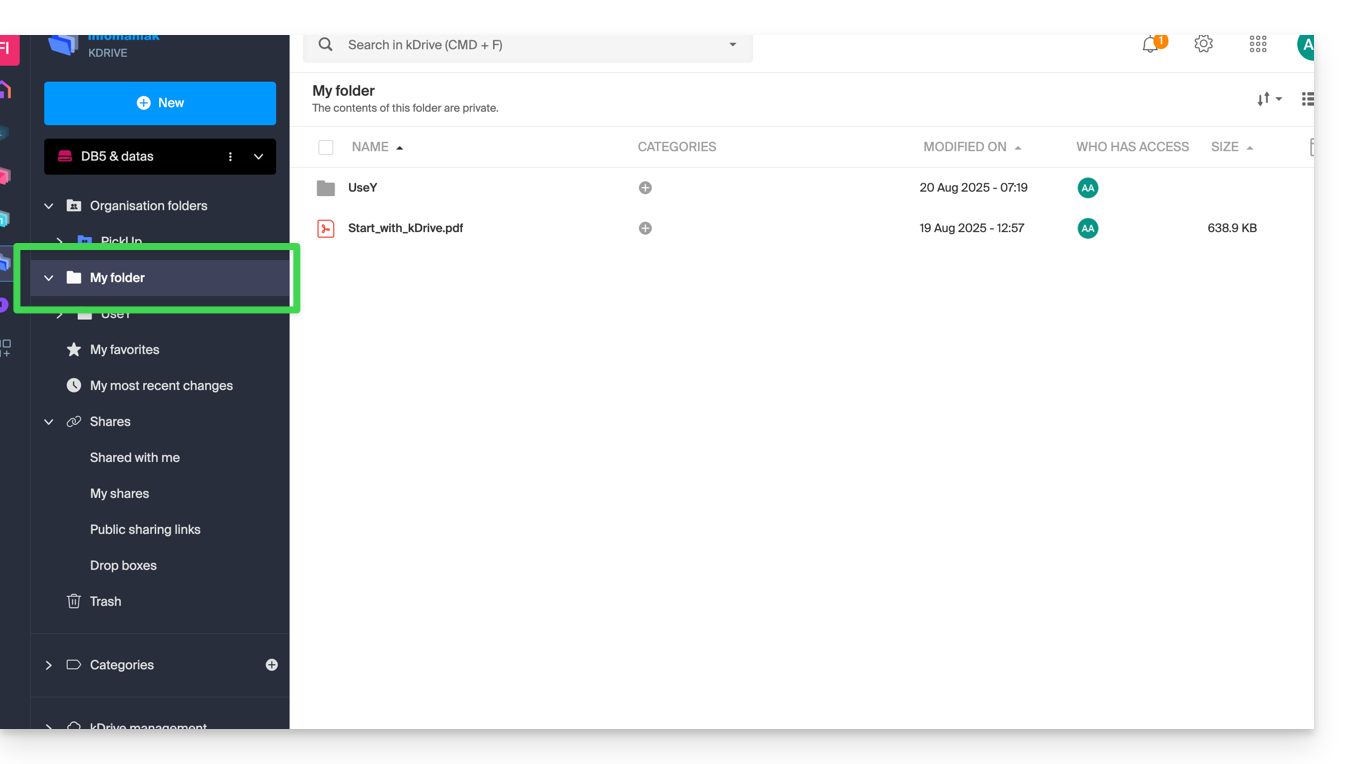
Any documents will be displayed in the center of the interface.
3. Shares
The Shares menu leads to 4 sub-menus displayed in the left-side menu:
- The elements shared with you by other kDrive users, among the kDrives you have access to with your login identifier
- The elements that you share with other users
- The elements that you have shared by creating a public share link
- The drop boxes
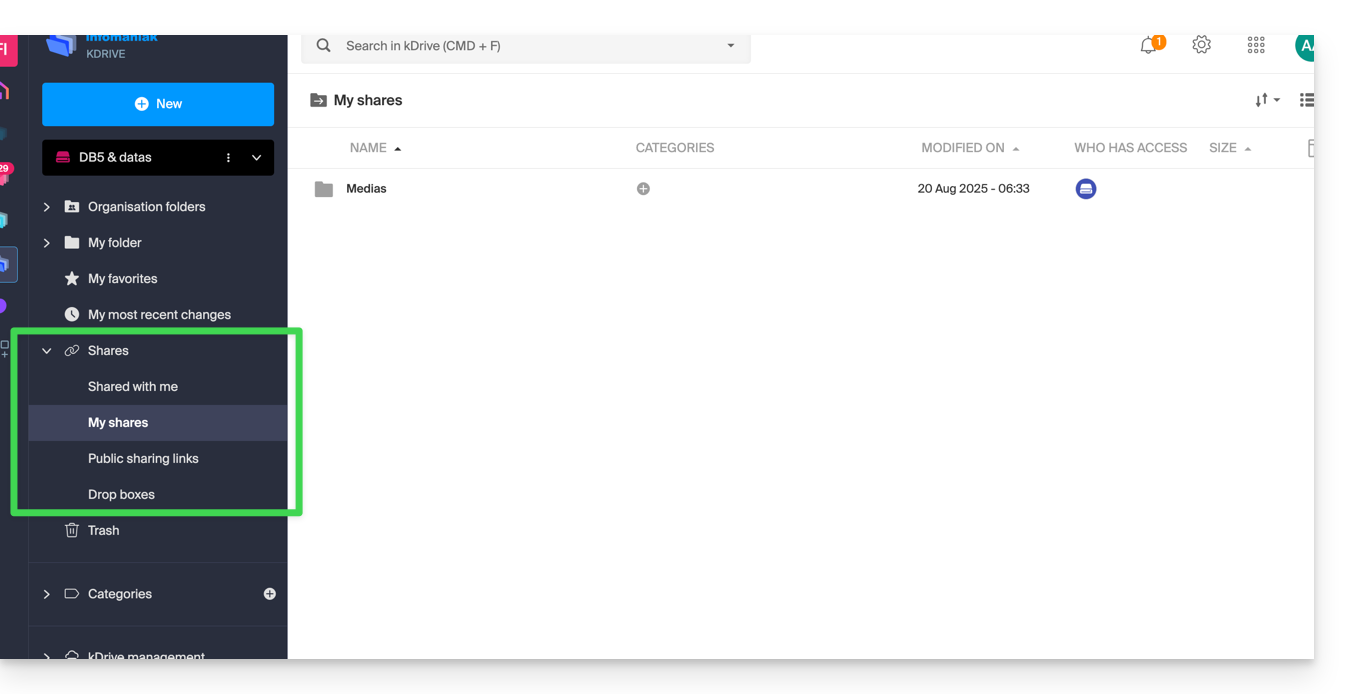
Any additional elements will be displayed in the center of the interface and can be modified / deleted.
Refer to this other guide regarding the behavior of these shared folders on the Desktop app.
Secondary elements
My favorites
This menu groups your files and folders defined as favorites on kDrive, which you can then find on the Web app…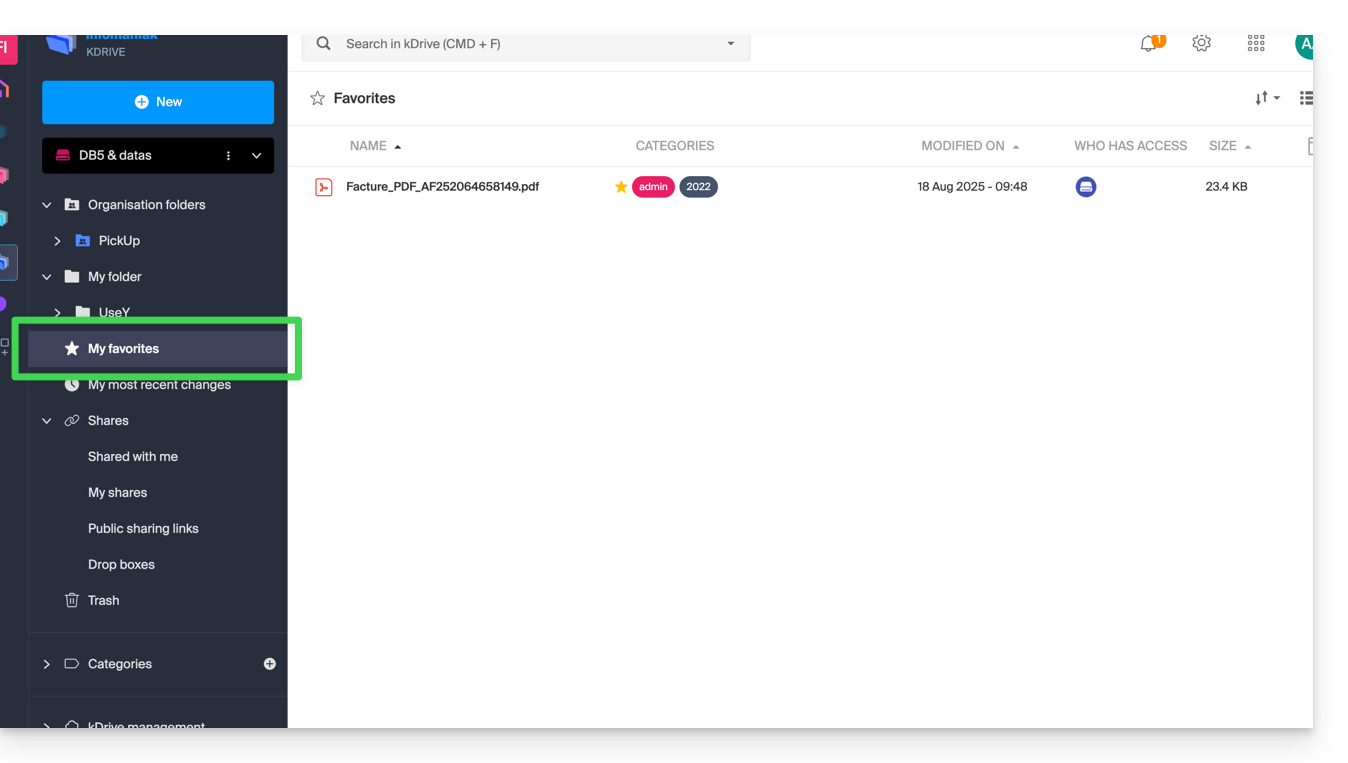
… and the mobile app:
My latest modifications
This menu displays the latest operations performed by your user: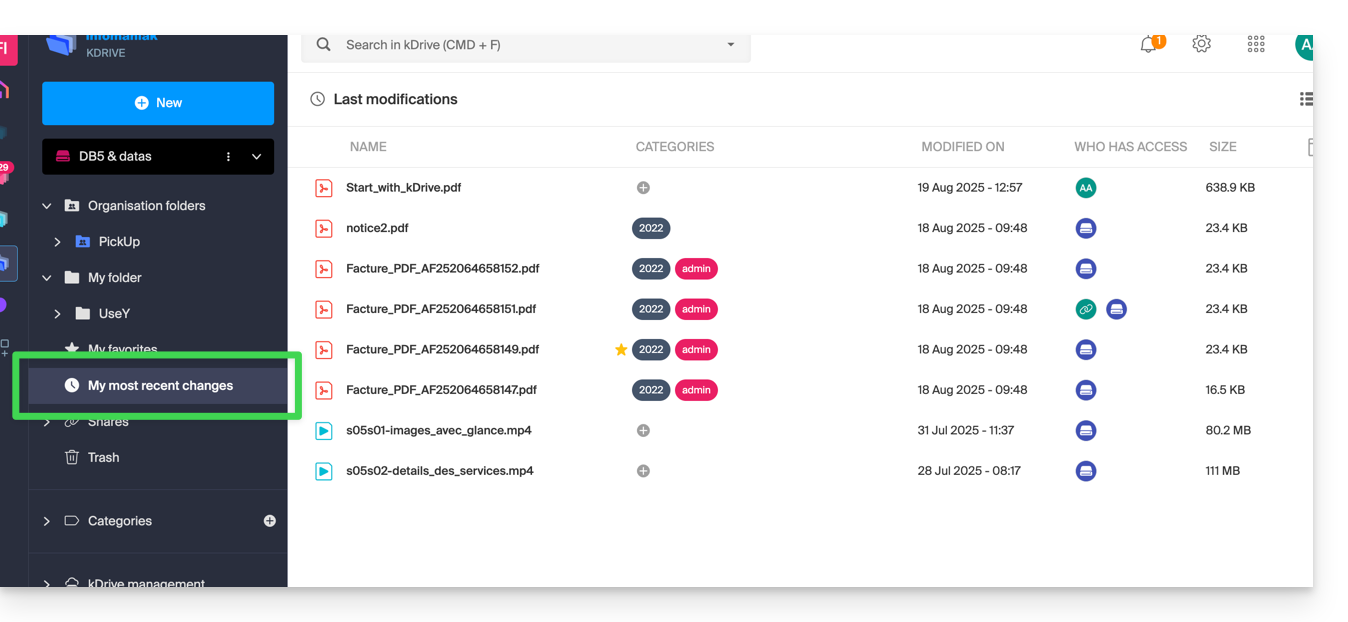
You can quickly return to recently modified files, even if their location is scattered across different subfolders in your kDrive. You can also select these files to move or delete them in bulk.
Trash
This menu leads to your deleted data, which can still be restored: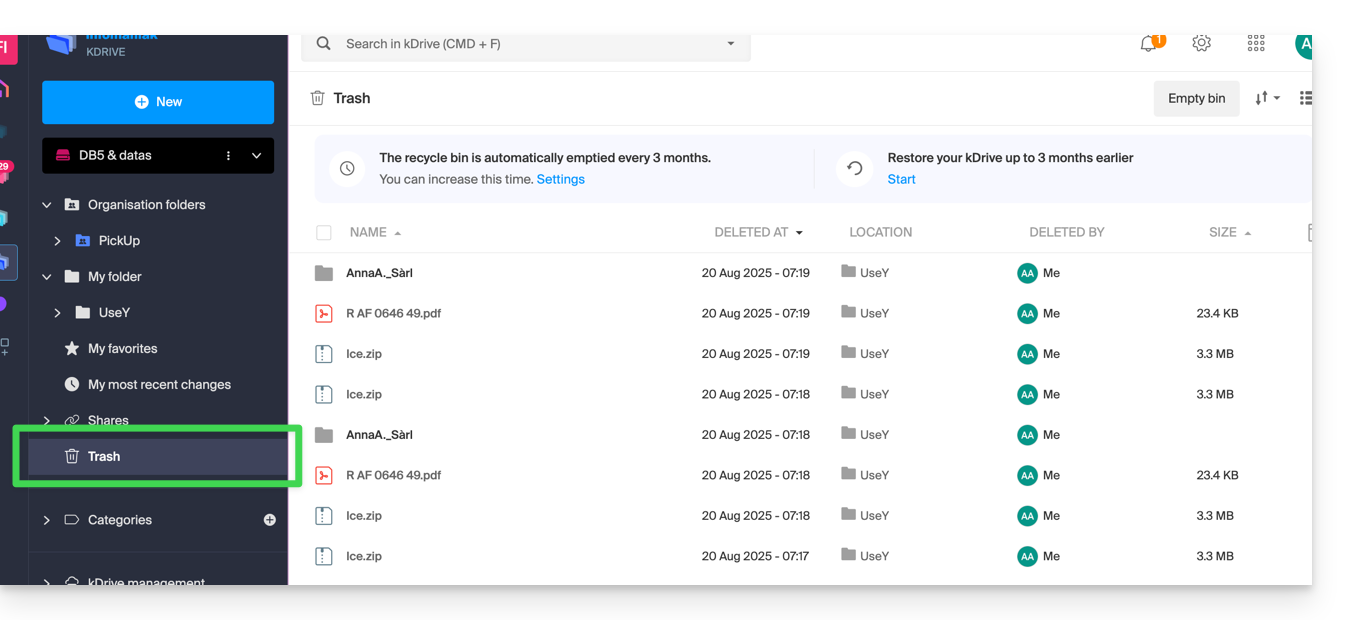
Categories
You can also quickly access your files if they are categorized using the Categories menu by clicking on the different categories listed there: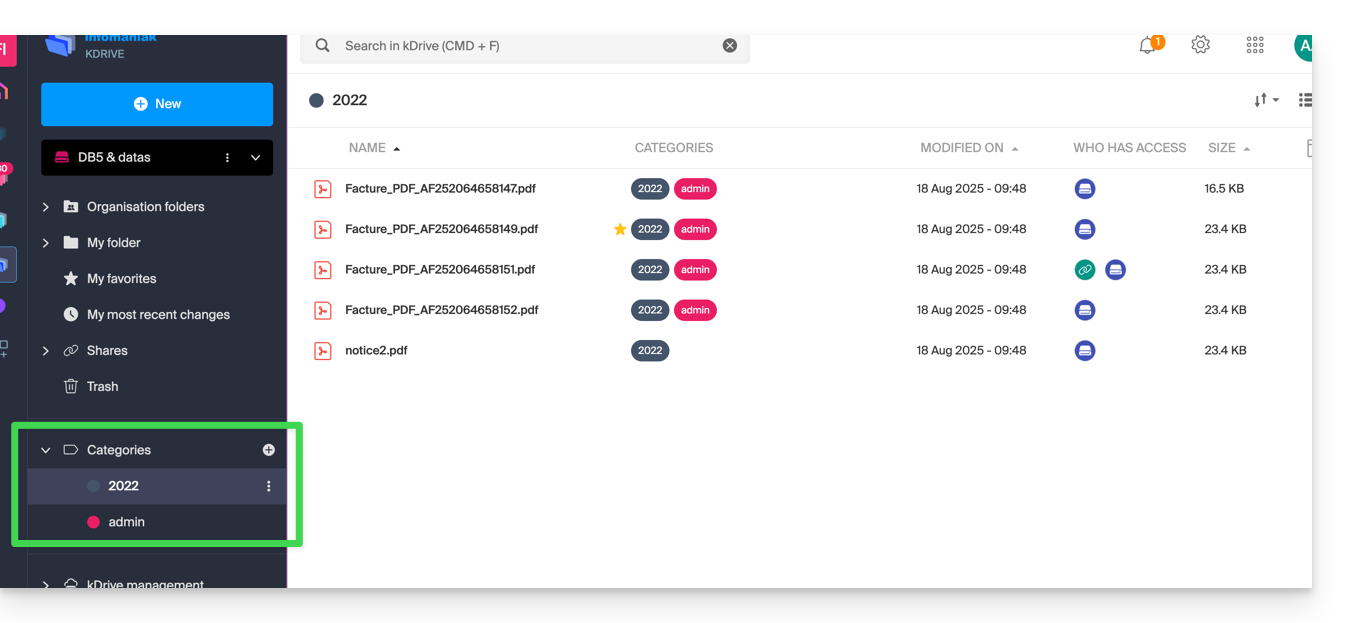
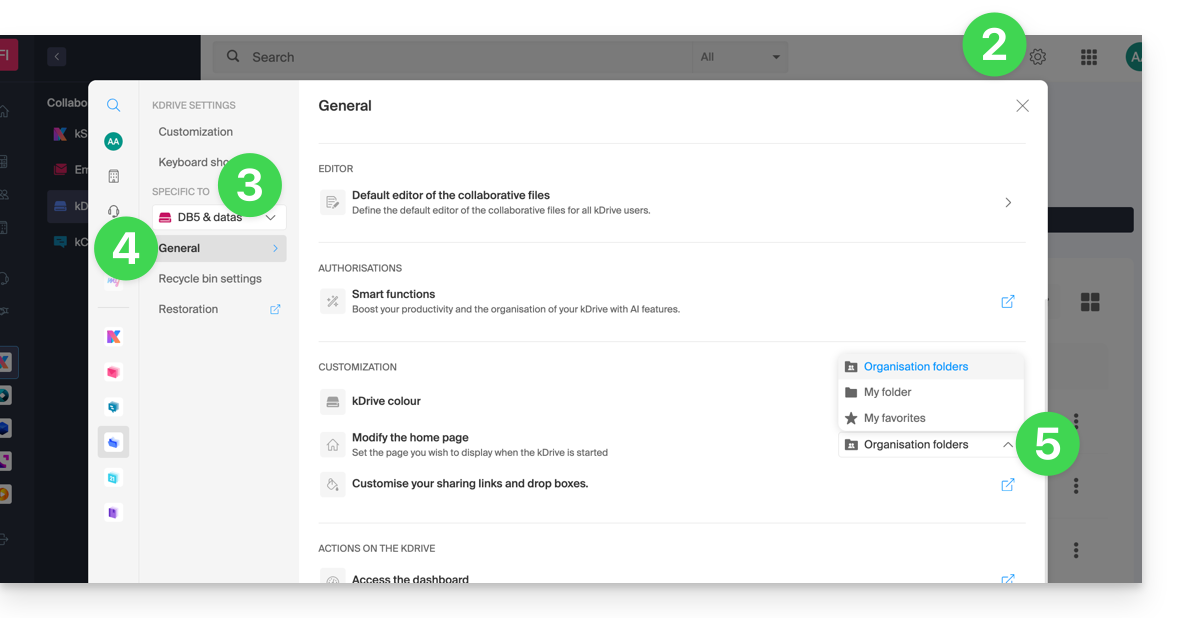
Set the default display when starting up
You can choose which homepage to start navigating within kDrive online, from the following 3 options:
- your personal folder
- the shared documents folder
- favorites (which groups the documents added as favorites by your user)
To access kDrive and modify the homepage:
- Click here to access the management of your product on the Infomaniak Manager (need help?).
- Click on the Settings icon in the top right corner.
- Check or select the relevant kDrive from the dropdown menu in the left sidebar.
- Click on General in the left sidebar.
- Choose the page that should be displayed by default when arriving at the homepage:
This guide explains how to transfer an Infomaniak product from one Organization to another.
Preamble
- You can move almost all products subscribed with Infomaniak to a different Infomaniak Manager interface than the one on which the product is currently located; this is therefore an internal transfer.
- If your user has access to multiple Organizations it is even easier to send to one of them the product of your choice.
- This operation does not cause any interruption.
- The users currently having access to the selected products will not be transferred (and therefore may no longer have access to the products).
- The invoices of the selected products will not be transferred.
- my kSuite cannot be transferred.
Generate a transfer link
Prerequisites
- Be Administrator or Legal Representative within the Organization.
To transfer a product:
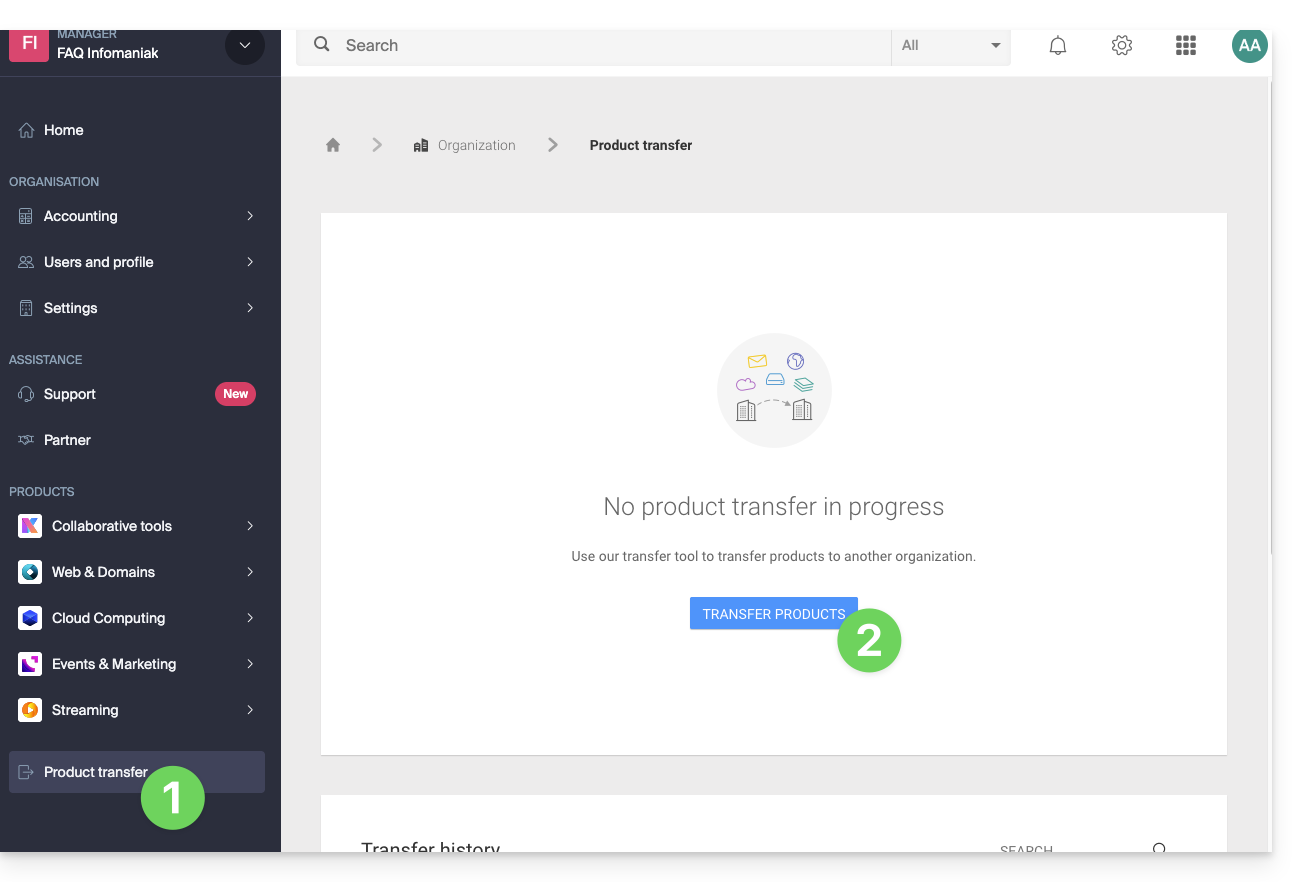
- Click here to access the product transfer management on the Infomaniak Manager (need help?).
- Click on the Transfer products button:
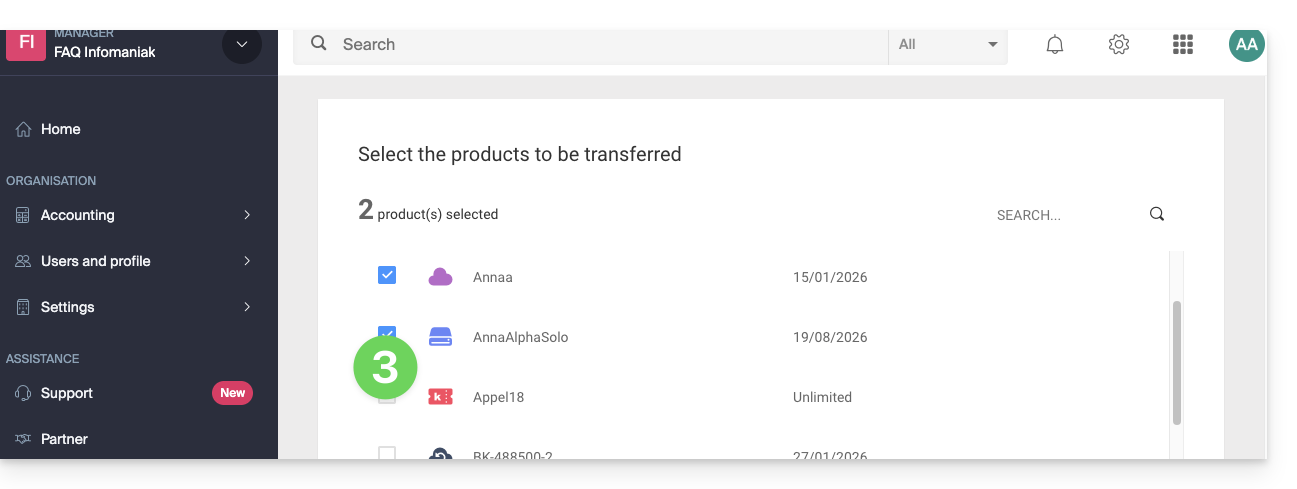
- Check the product(s) to be moved:
- Read and accept the general conditions.
- Click on the Transfer button:

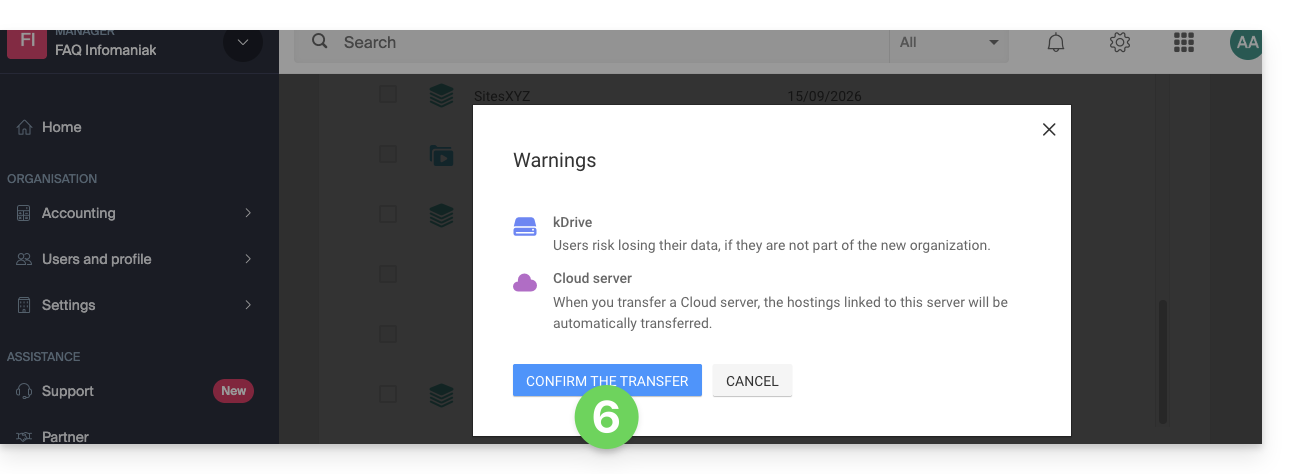
- Read and validate any warnings:
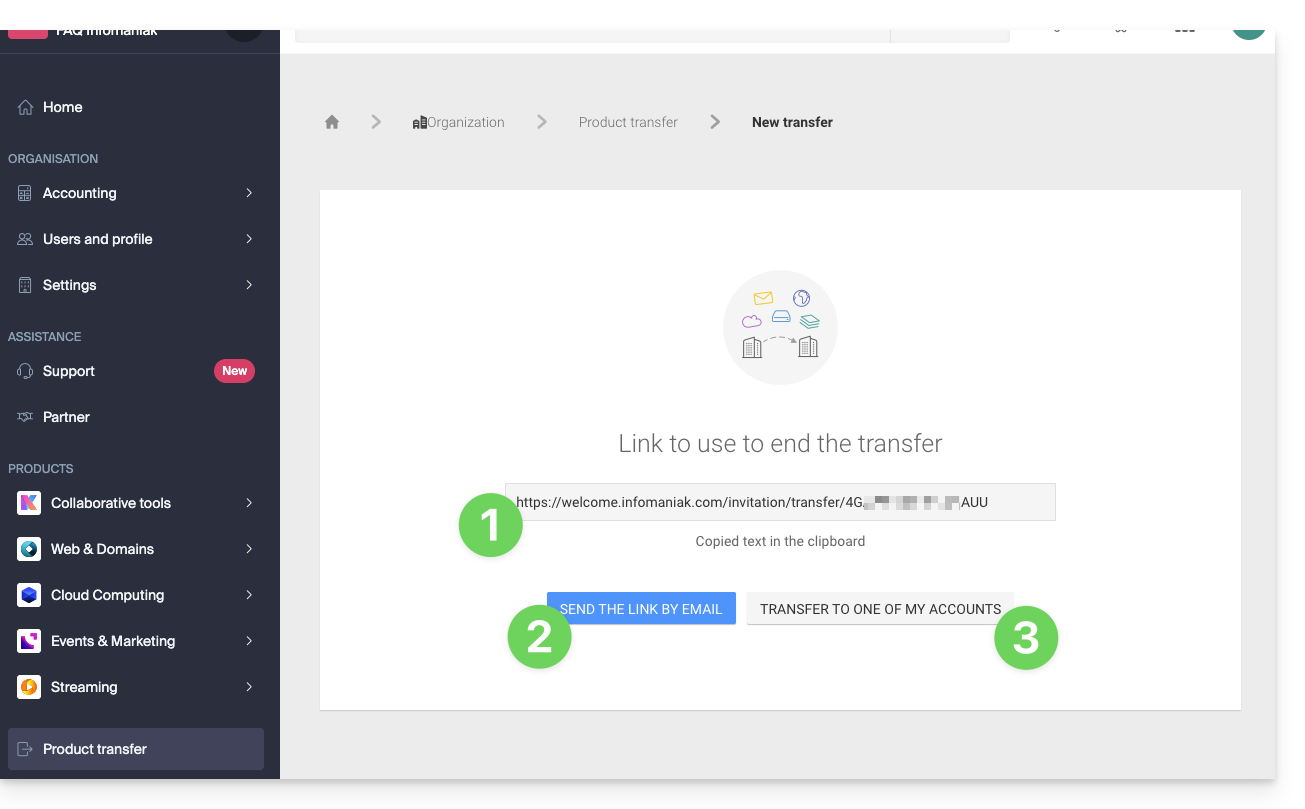
The transfer has started. Now, at your choice, you can:
- Copy the transfer link…
- or send it to the email address of your choice…
- or select directly one of the Organizations to which your user is attached, and the selected product will be transferred there:
At any time, you can return to the product transfer page to find the possibilities listed above:
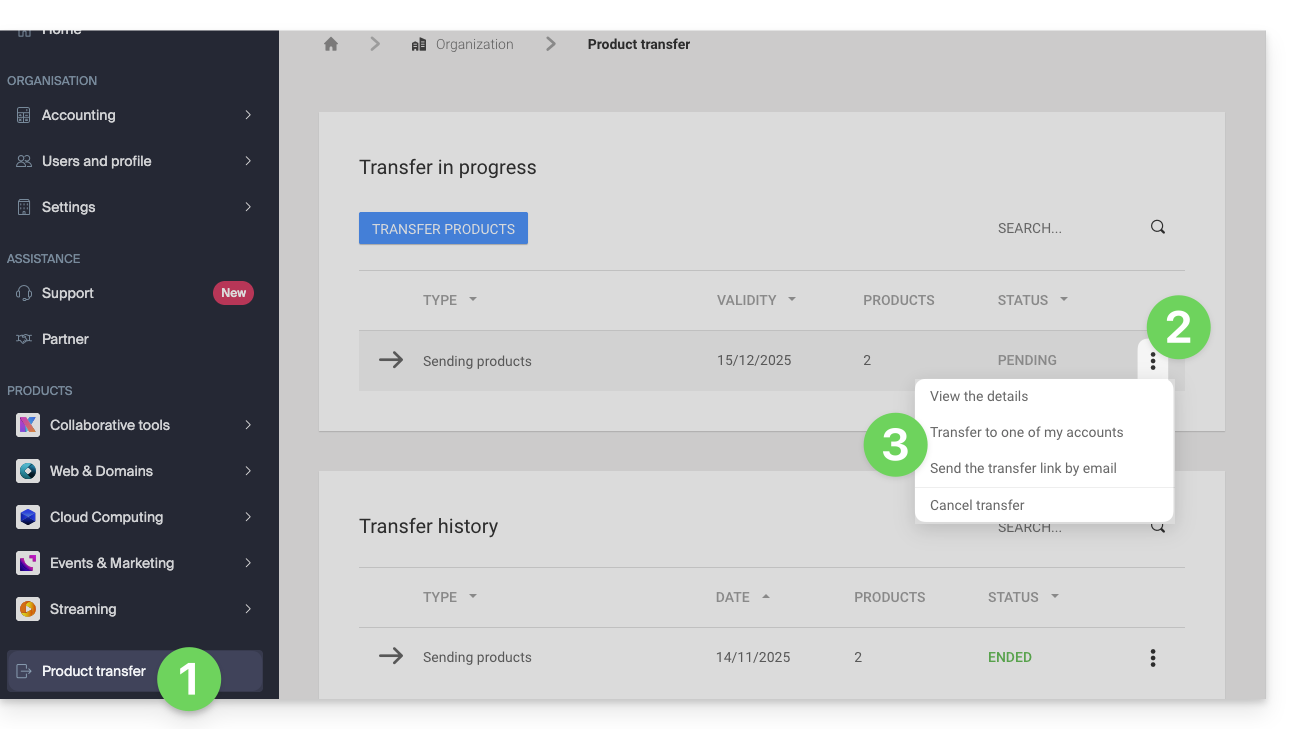
Alternative method
In the case of one-time transfer, you can also go directly to the dashboard of the product concerned and click on Manage (example in the image below) however, since this menu is not always present, it is better to prioritize the first method above, which also allows bulk transfer: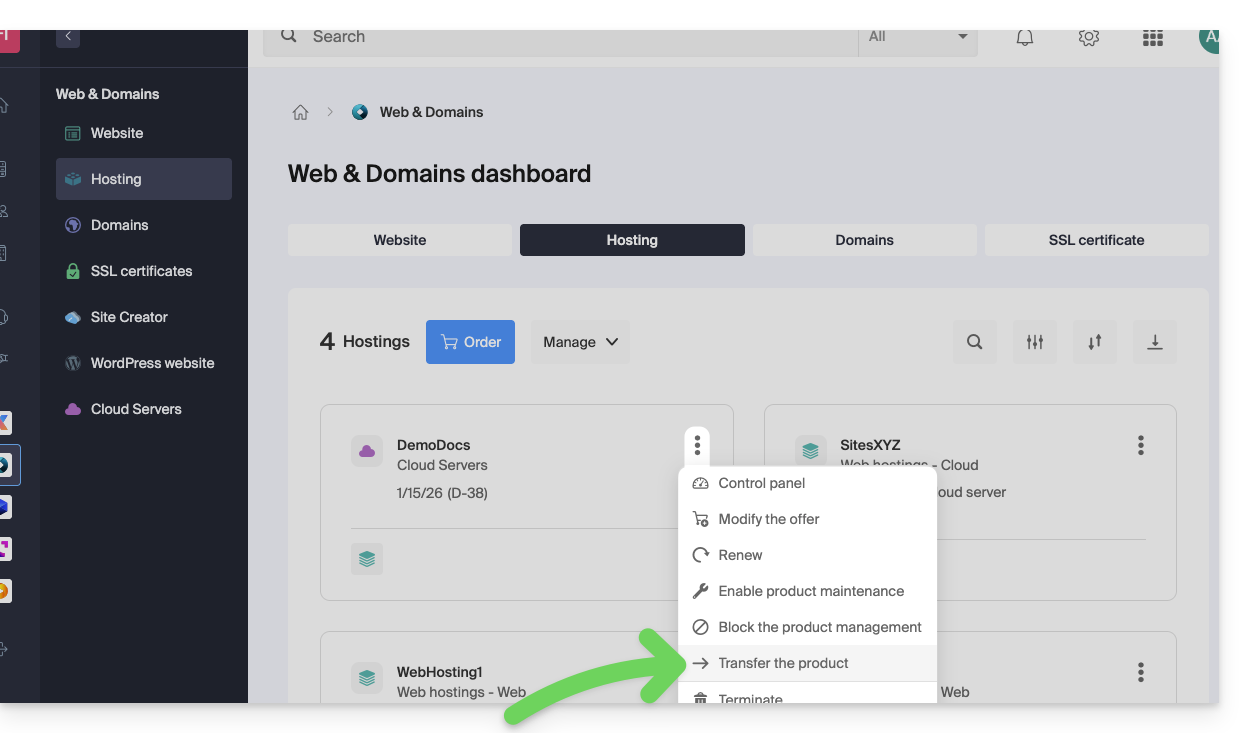
Refer to this other guide regarding Jelastic Cloud.
Receive the product
Once a product transfer is initiated by a user…
1. Be on the Organization that should receive the product
- Click here to log in to the Manager on the Organization that should receive the product(s).
- The user specified when logging in to the Infomaniak account must have administrative rights.
- If necessary, you can create a new Organization to receive products.
2. Execute the obtained link
- Click on the link obtained in the first step above.
- You can also simply paste it into a browser while logged in to the appropriate Infomaniak account.
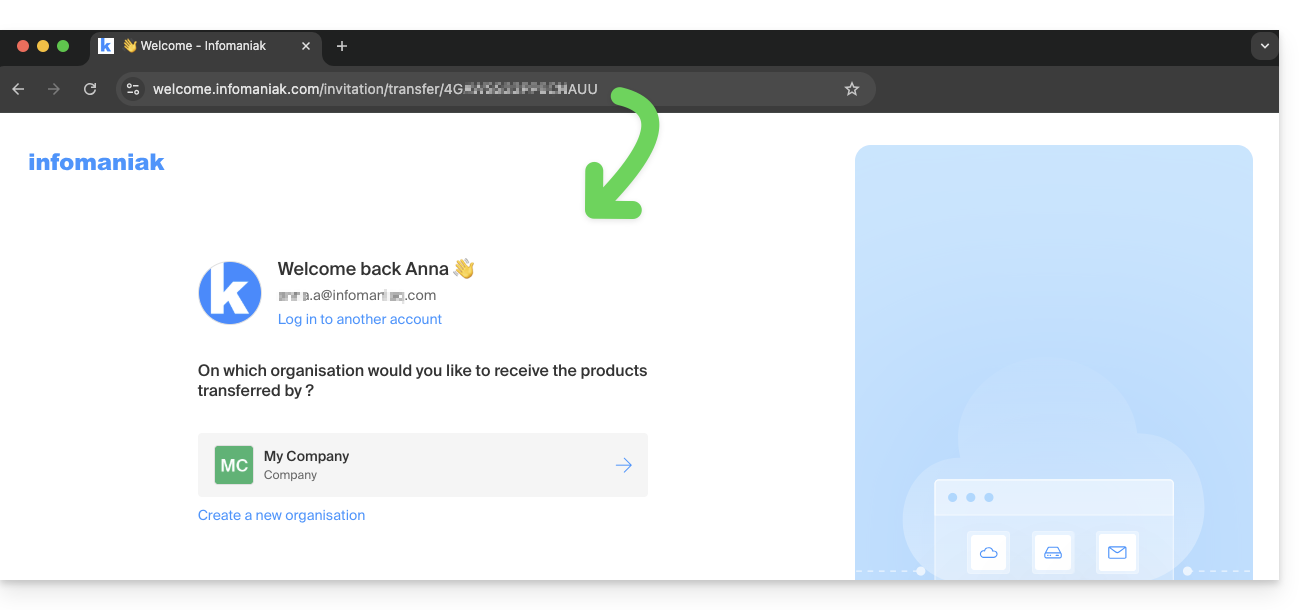
3. Validate the product transfer
- If necessary, choose the destination Organization using the drop-down menu.
- Read and accept the general conditions.
- Click the Receive the product button (if the button is not clickable, make sure you have selected the Organization).
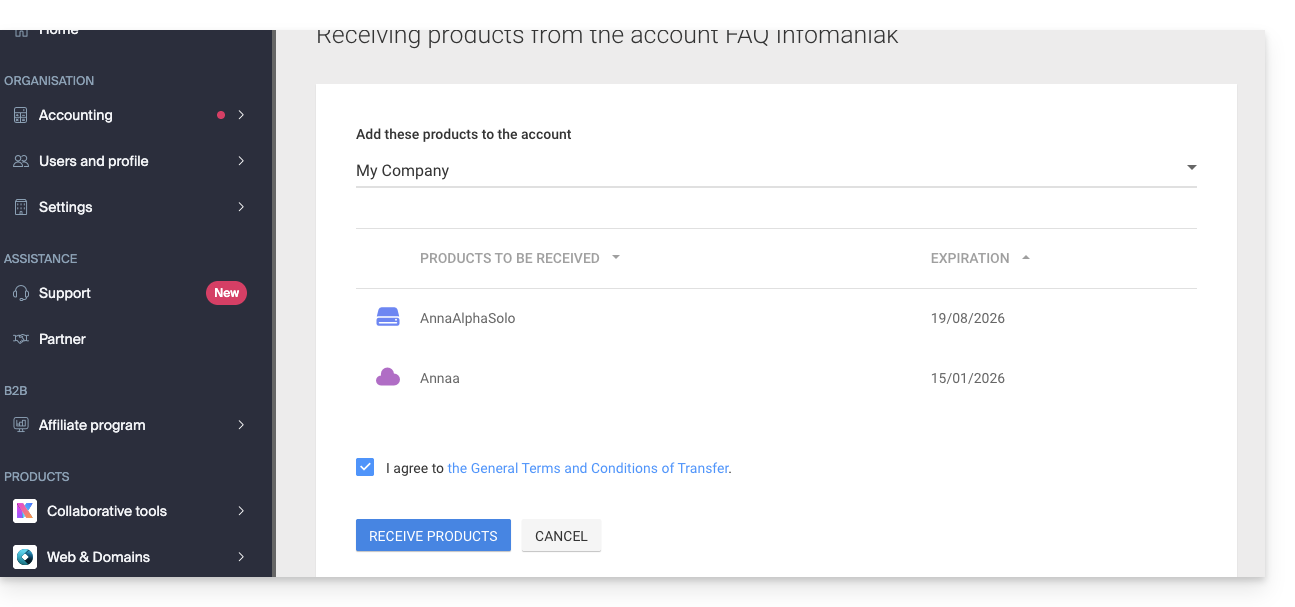
Find the ongoing or completed transfers at any time from the bottom icon on the left sidebar of the Infomaniak Manager: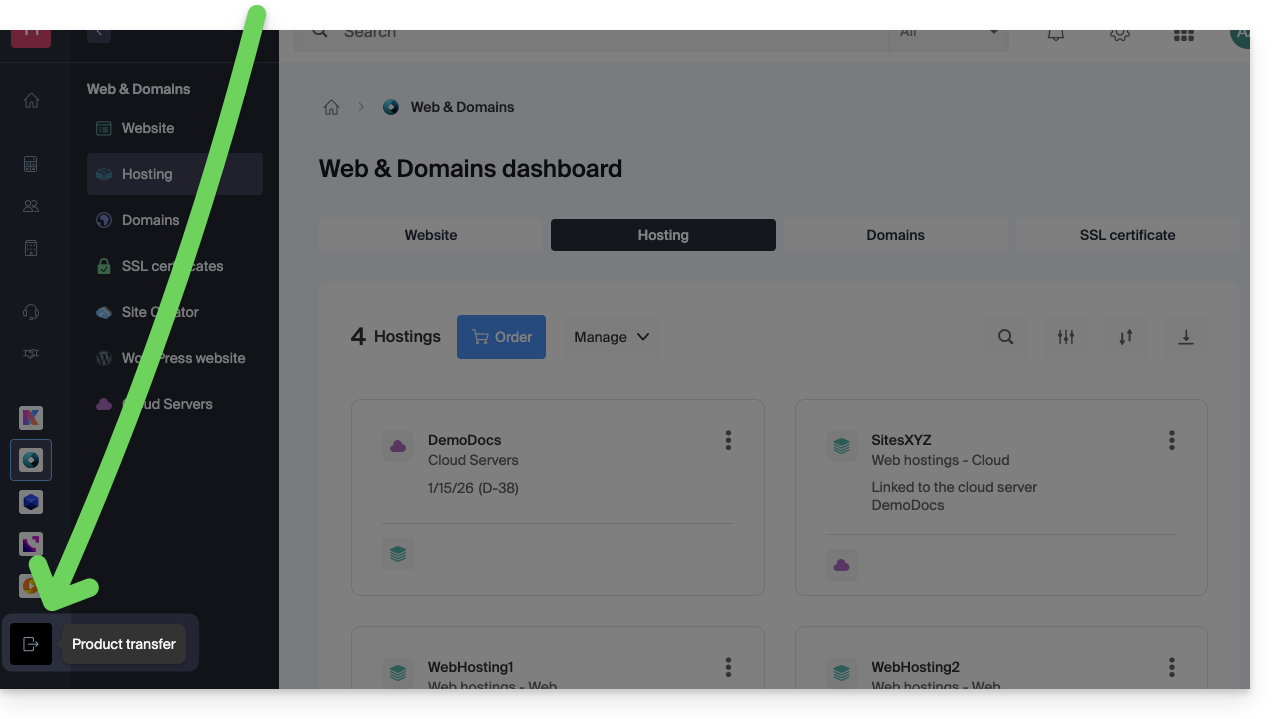
This guide explains how to import (one time only) to kDrive data (files, folders, etc.) from an external cloud, such as your previous provider's, for example Dropbox or Microsoft.
Prerequisites
- Have a kDrive or kSuite offer (WebDAV not required)
- Have sufficient permissions within kDrive or kSuite.
- Do not change your passwords until the import is complete!
Specific guides
Click on the link corresponding to your current host:
- Apple iCloud: complete guide to migrate iCloud data to Infomaniak
- Google Drive: complete guide to migrate Google Drive data to Infomaniak
- Google Photos: complete guide to migrate photos from Google Photos to Infomaniak
Guides for any other external cloud provider
For example:
- Dropbox
- OneDrive
- OwnCloud
- NextCloud
- Any device with a WebDAV service including external kDrive (refer to this other guide)
- Another kDrive to which your user account has access (except for "external" type access)
Data not imported
- Data that has been shared with you is not imported.
- Only data that truly belongs to you will be imported.
- Google documents such as Gdocs, Sheets, Slides, etc. …
- … are not imported during a Dropbox import.
- … are converted by Google when these files are downloaded from Google Drive on macOS/Windows.
- … are not converted when they are copied from the local Google Drive directory to the local kDrive directory. Therefore, it is imperative to download the files from the Web version of Google Drive.
- Dropbox Paper documents.
- Dropbox share links, visible here.
- Dropbox files shared individually, visible here (however, shared folders and common documents will be imported).
To proceed with the data import:
- Click here to access the Infomaniak kDrive Web app (online service ksuite.infomaniak.com/kdrive).
- Click on the Settings icon in the top right corner.
- Check or select the relevant kDrive in the dropdown menu of the left sidebar.
- Click on Import external data under General:

- Click on Start.
- Choose the relevant service (refer to the last chapter at the bottom of this guide).
- Choose the location where the imported files will be stored.
- Enter any required information if prompted and click the blue Start button:

- Enter any required information if prompted and click the blue Continue button.
- Complete the wizard.
- Wait while the data is being imported.
Manage the ongoing import
To monitor ongoing imports, return to the page mentioned in point 5 above at any time.
To stop an ongoing import, click on the action menu to the right of the import listed on the page and choose to cancel (in case of voluntary interruption, a report is sent by email to the administrator).
A second consecutive import would re-import all the data (to another kDrive directory), it is not differential synchronization and there is no duplicate management.
Check your imported data immediately after the operation.
This guide helps resolve certain cases where you notice that kDrive data is not synchronized between your devices.
Running kDrive in the background
For kDrive synchronization to work when there is an update to your kDrive data (new file, edited document, etc.), it is obviously necessary for the kDrive app to be open (and for you to be logged in with the correct user account, etc.).
On Windows: Access the kDrive icon for verification
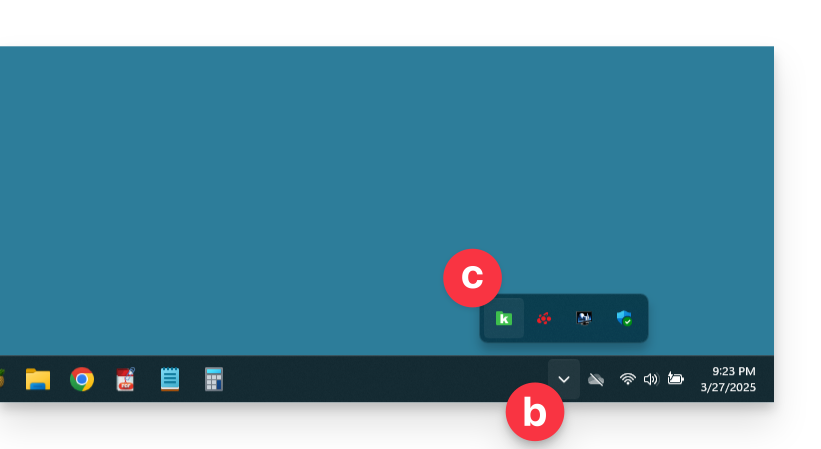
To check if the kDrive app is running on a Windows computer, you need to locate the folder icon  in the notification area.
- If necessary, open the kDrive software installed on your computer:
- Click on the Start menu to open it.
- Search for
kdrive. - The search result should display the kDrive app (otherwise reinstall the application).
- Open the kDrive app by clicking on Open or Run as administrator:

- The app icon should be visible in the notification area of your computer at the bottom right on Windows.
- If it is not there:
- Locate the small arrow (or chevron) that indicates hidden icons:

- Click on this arrow to expand the notification area.
- The hidden icons will then appear, allowing you to view the desired application:
- You can also check the notification area customization settings in Windows system settings.
- Locate the small arrow (or chevron) that indicates hidden icons:
- Click on the icon to access your kDrive synchronization settings and information:

On Android: kDrive and background operation
When you import large files or multiple files into kDrive, this can take several minutes. To ensure data import, the mobile kDrive app needs to be able to continue this task when you close the application or open another one. The automatic photo backup function in kDrive may also be disrupted if the app cannot run in the background.
Due to the power management policy on some devices of certain manufacturers (especially Chinese ones), applications not on their whitelist may be automatically stopped, preventing certain tasks from functioning properly.
You can work around this issue by following the instructions available in English on the site don't kill my app at the address dontkillmyapp.com:
Don't see your phone's brand? Then your phone is probably not causing any issues.
Missing folders on the computer
If everything seems fine…
- … no synchronization interrupted
- … no error messages
- … you have the necessary access rights when you view them in their online version (ksuite.infomaniak.com/kdrive)
but you notice that…
- … folders like the Organization folders (shared folders) or other directories are not visible on your computer…
then check on the desktop app kDrive installed on your computer the setting that allows you to limit the synchronization of large folders (500 Mo by default):
- Left-click on the desktop app icon in the notification area of your computer (top right on macOS, bottom right on Windows and a double left-click in the taskbar on Linux).
- Click on the action menu ⋮ on the right of the window that appears.
- Click on App preferences.
- Disable the toggle switch to have no limits on the size of synchronized folders:
Then check on the desktop app kDrive installed on your computer which folders you want to synchronize:
- Left-click on the desktop app icon in the notification area of your computer (top right on macOS, bottom right on Windows and a double left-click in the taskbar on Linux).
- Click on the action menu ⋮ on the right of the window that appears.
- Click on kDrive settings.
- Click to the left of the name of your synchronization to expand the folder tree of the folders contained.
- Activate the boxes corresponding to the folders that are not yet synchronized as you wish.
- Validate with the blue button:
The result will be that your local folder representing kDrive (named kDrive, or kDrive2, or other) on the computer, will finally display all the desired folders (after the necessary time for synchronization).
Synchronization in progress (0/10) then on pause
Check that the Windows Search service is not stopped. Proceed through the Run window (Win + R):
- Enter
services.msc. - Click OK:

- Locate Windows Search in the list of the Services window and activate it if it is not already:

Continuous synchronization (files .eml)
A problem related to Windows indexing may occur during the synchronization of kDrive files with the .eml extension (a file type corresponding to email export/save). It is therefore necessary to remove the eml type from the indexing options to resolve this issue:
- Open the Start menu and search for indexing options.
- Click on Indexing Options (Control Panel):

- Click on the Advanced button.
- Uncheck the box for the
emltype:
- Validate and close the windows.
Adobe file synchronization
Adobe applications such as Illustrator, Photoshop, Lightroom, etc. encounter issues when saving files (Adobe software error messages, file duplication, etc.) on kDrive. Therefore, it is best to avoid including Adobe files in a synchronization.
Adobe explicitly states that it does not support cloud synchronizations, external drives, and network drives.
This guide explains how to access kDrive files locally on your hard drive via the desktop app kDrive (desktop application on macOS / Windows / Linux), as well as the files from the kDrive Web app (online service ksuite.infomaniak.com/kdrive).
Prerequisites
- Install the kDrive desktop app on your device.
View kDrive files
When the kDrive application is installed and launched:
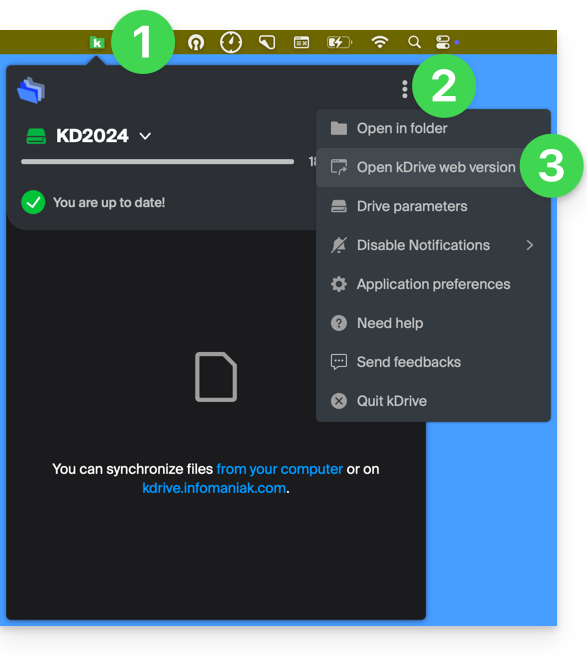
- Perform a left-click on the app icon in the notification area of your computer (top right on macOS, bottom right on Windows and a double left-click in the taskbar on Linux).
- Click on the action menu ⋮ at the top right.
- Click on Open kDrive Web to access the files stored on the kDrive server:
- Click on the item above to open the folder on your computer containing your kDrive files, physically present or virtually present (depending on whether Lite Sync is enabled).
If your files are not all present / synchronized, refer to this other guide.
This guide explains how to modify the role and permissions of a user so that the latter has only a restricted legal role or access to only certain features of your Organization present in the Infomaniak Manager.
Preamble
- Since you opened your account with Infomaniak, you are part of at least one Organization.
- If you were alone and it was not an invitation, an Organization was created in your name and you automatically become the legal representative.
- Otherwise, you belong to the Organization that invited you (to join its kSuite, to manage a product, etc.).
- You can define if a user…
- … is part of your Organization and if he must have the role of:
- Legal representative
- Administrator
- Collaborator
- … is external to your Organization (limited rights):
- External users are not included in the sharing of calendars and address books for the entire Organization.
- … is part of your Organization and if he must have the role of:
Modify the rights/permissions of a user
Prerequisites
- Be Administrator or Legal representative within the Organization.
- Note, it is only possible to assign the role of legal representative if you yourself have this role in the Organization.
- Be aware of the different permissions (access rights to products for example) and administrative contact preferences of a user within an Organization.
To modify the role of a user:
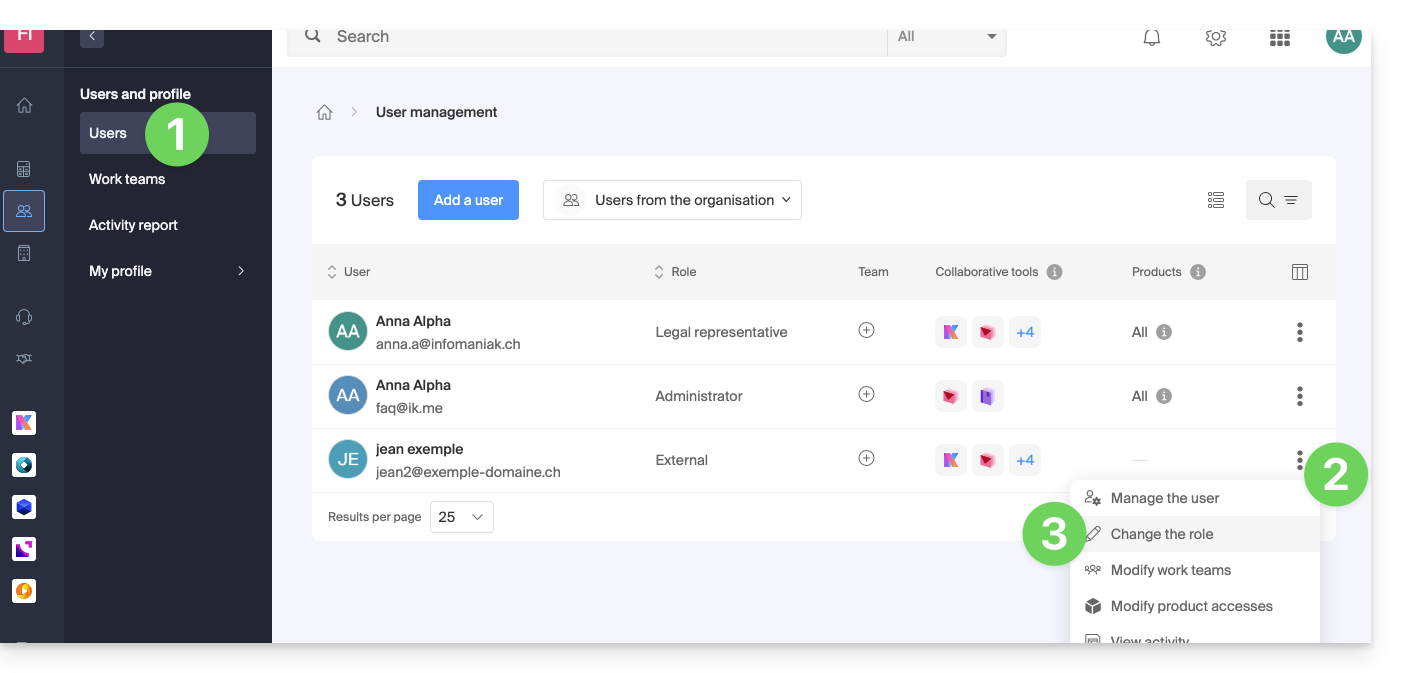
- Click here to access user management on the Infomaniak Manager (need help?).
- Click on the action menu ⋮ located to the right of the user concerned.
- Click on Modify the role:
- Modify the desired role:
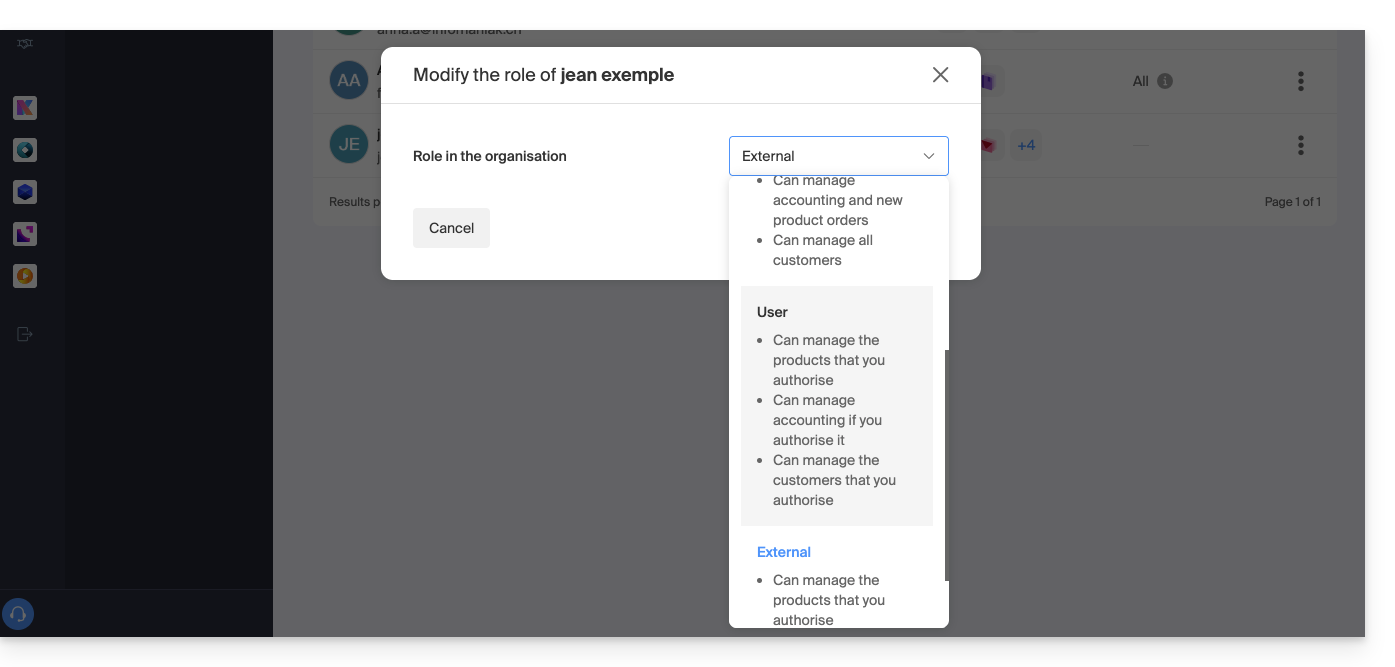
- Click on the Save button.
A summary email is sent to the user whose role is modified.
If you assign the user a simple collaborator role…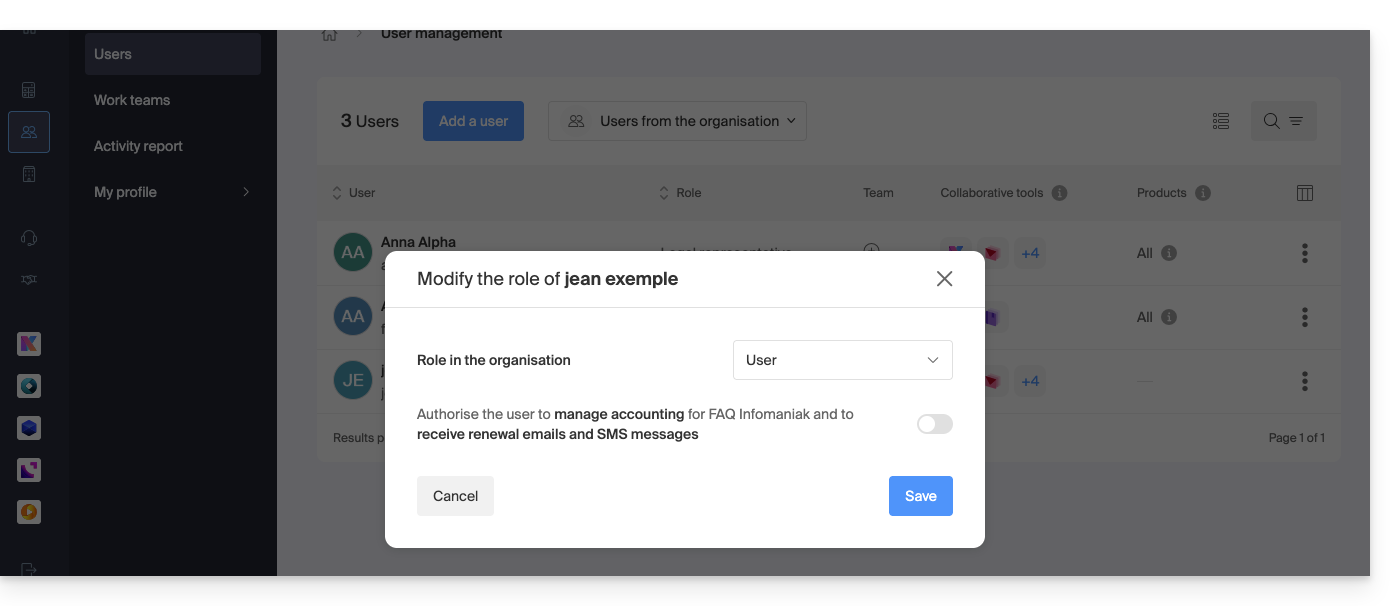
… you will be able to modify the services to which he can access; refer to this other guide:
This guide explains how to resolve an access or usage issue with kDrive on Windows and macOS when third-party software can interfere with your synchronization.
If you notice a synchronization issue and missing folders, refer to this other guide.
Preamble
- The kDrive application may sometimes encounter interaction issues with Windows or macOS firewalls, as well as with software solutions for antivirus, VPN, or cleaning.
- This can result in the inability to synchronize files correctly or to use kDrive.
- In case of a problem, you must therefore manage to authorize kDrive within these applications and whitelist at least two essential components:
- kDrive.exe
- kDrive_client.exe
Authorize kDrive on…
… macOS
- Open System Preferences
- Click on Security or Security and Privacy
- Select the firewall
- Click the lock icon in the preferences pane and then enter an administrator name and password
- Click the Firewall Options button
- Click Add an application (+)
- Select the applications (read the preamble) for which to authorize incoming connection privileges
- Click Add
- Click on OK
... Windows 10
- Open the Start menu
- Click on Settings
- In the search field Find a setting type Firewall
- Click on Windows Firewall
- On the left click on Allow an app or feature through Windows Firewall
- Now the windows Allowed apps will appear
- Click on the button Change settings
- Check the boxes next to the apps you want to allow through Windows Firewall (read the preamble)
- Do not forget to also check the boxes under the network type that will allow this communication (private or public)
- Click on OK to save your new settings
... Windows Defender
- Open Windows Defender from the notification area
- Select Virus and threat protection
- Open virus and threat protection settings
- Scroll down and select Add or remove exclusions in the Exclusions section
- Click on Add an exclusion
- Add the files (read the preamble)
- Confirm the selection
... Avast
- Open the Avast user interface from the notification area
- Open Settings
- Choose General
- Open Exclusions
- Click on File Paths then on Browse
- Add the files (read the preamble)
- Confirm the changes and enable real-time protection
... AVG
- Refer to this other guide by selecting the files (read the preamble) in step 5 to exclude kDrive
… Avira
- Right-click the Avira icon in the notification area and disable real-time protection
- Expand Avira from the notification area
- Click on Add-ons
- Select Settings from the context menu
- Open PC protection then Scan
- Select Exceptions then Add
- Add the files (read the preamble)
- Go back to PC protection and expand real-time protection
- Click on Exceptions then Add
- Add the files (read the preamble)
- Confirm the changes and enable real-time protection
… Bitdefender
- Refer to this other guide by selecting the files (read the preamble) in step 5 to exclude kDrive
… CCleaner
- In CCleaner, click on the Options icon
- Click the Exclude
- Click Add
- Add the files (read the preamble)
... CleanMyMac
- Click View details in the module analysis summary screen
- Review the items displayed in the detailed results screen
- Click the items to hide while holding down the Ctrl key
- In the context menu, select Add to exclusion list
- Add the files (read the preamble)
... ESET
- Open ESET from the notification area
- Press F5 to open the advanced configuration
- Open Antivirus and antispyware
- Select Exclusions
- Click Add… in the right pane
- Add the files (read the preamble)
- Confirm changes and reactivate real-time protection
... Kaspersky
To reduce problems related to the use of kDrive files when Kaspersky is installed, you can exclude kdrive.infomaniak.com from the analysis:

If the problem persists, uncheck the box (3) below:

... Malwarebytes
- Open Malwarebytes
- Select Settings
- Choose Malware Exclusions
- Click on Add a file to exclude a file
- Add the files (read the preamble)
- Confirm the selection and run the program
... McAfee
- Refer to this other guide by selecting the files (read the preamble) to exclude kDrive.
... Norton
- Refer to this other guide by selecting the files (read the preamble) to exclude kDrive.
... NordVPN
Check within NordVPN and more specifically in Anti-menaces Pro (Threat Protection) the list of recent files supposed to be malicious in order to authorize the kDrive files.
⚠️ For additional help contact a partner or launch a free call for tenders — also discover the role of the host.
This guide is for you if you are looking for a complete messaging & collaborative data storage offer. Its goal is to help you better understand the different Infomaniak product suites when you are hesitant or do not know which one to choose…
If you are looking to host a website, check out this other guide.
The different offers in summary
Here is a summary of the different formulas (excluding web hosting offers):
| Free (or domain name to pay for) | Paid |
|---|---|
my kSuite
| my kSuite+
|
Mail Starter Service
| Mail Premium Service
|
Free kSuite
| Standard kSuite / Business kSuite / Enterprise kSuite
|
Free or paid suites
Infomaniak offers several messaging solutions with or without additional collaborative tools:
- A Mail Service is the name given to the messaging service created by Infomaniak in Switzerland. You can order a Mail Service independently of kSuite.
- kSuite is a collection of Infomaniak services that includes, among other things, a Mail Service and revolves around a personal domain name.
- my kSuite and my kSuite+ are limited versions of kSuite, do not require a domain name, and can also perfectly meet your email needs.
Cost of simple email offers
This email can be…
- … free if you are content with an address with a generic domain name (what comes after the at sign
@), imagined by Infomaniak (etik.com,ik.me,ikmail.com) by taking my kSuite (my kSuite+ unlocks some limitations of my kSuite) - … at very low cost if you are content with one or two free email addresses on a domain name that you pay for (there are domain names for less than 5 CHF/€ per year, these will be your only expenses and it allows you to personalize your email addresses) by ordering:
- either the Starter offer (1 email address only)
- or the kSuite offer
Need a large number of email addresses?
If you need multiple email addresses on the same domain, then it is possible to order a Mail Service only (5 email addresses minimum) or kSuite which exists in 3 different versions:
- Standard
- Business
- Enterprise
The common point of all Mail offers is that you must have a user account with Infomaniak (a login identifier in the form of an email address, as well as a password) which will lead you to your Organization where your email will be found.
Additional tools (kDrive…)
If you choose a Suite (kSuite or my kSuite / my kSuite+), this user account will lead you to your Organization where the suite of tools will be found, therefore your email but also kDrive, kChat etc.
Click on the links to obtain the comparison tables detailed all the functionalities available according to the formula:
- kDrive can be obtained by creating a my kSuite or my kSuite+ account.
- kDrive can be obtained independently in 3 different versions:
- Solo
- Team
- Pro
- kDrive can be obtained if you subscribe (free or by a paid subscription) to kSuite which exists in 3 different versions:
- Standard
- Business
- Enterprise
Do you want to join Infomaniak?
Refer to this other guide.
This guide explains how to modify product access rights for a user in your Organization on the Infomaniak Manager.
Preamble
- Since you opened your account with Infomaniak, you are part of at least one Organization.
- If you were alone and it was not an invitation, an Organization was created in your name and you automatically become the legal representative.
- Otherwise, you belong to the Organization that invited you (to join its kSuite, to manage a product, etc.).
- It is possible to modify a user's role within your Organization.
- You can then define whether a user…
- … is part of your Organization and should become:
- Legal representative
- Administrator
- Collaborator (this is the part that is detailed below…)
- … is external to your Organization (limited rights):
- External users are not included in the sharing of calendars and address books for the entire Organization.
- … is part of your Organization and should become:
Who can access what…
Prerequisites
- Be Administrator or Legal representative within the Organization.
- Switch to the desired Organization first if you do not find the expected user list.
- Have added a user as a collaborator.
The guide below allows you to manage product access for collaborators and external users. Indeed, a legal representative or an Administrator already has access to all existing products within the Organization and visible on the Infomaniak Manager.
To modify the product access of an Organization user:
- Click here to access user management on the Infomaniak Manager (need help?).
- Click on the action menu ⋮ located to the right of the user concerned.
- Click on Modify product access:
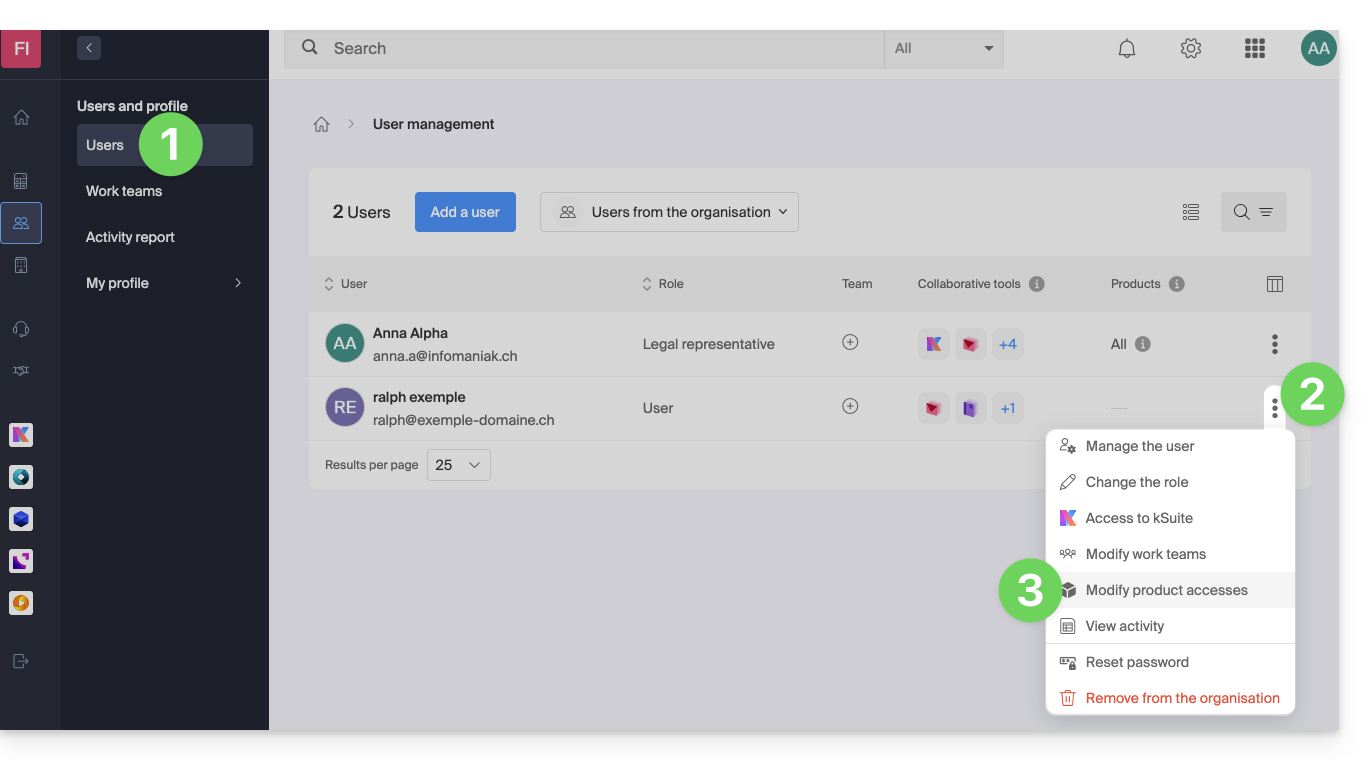
- You can grant access to everything with maximum permissions in 1 click.
- Otherwise, click on the product category to which you want to grant access.
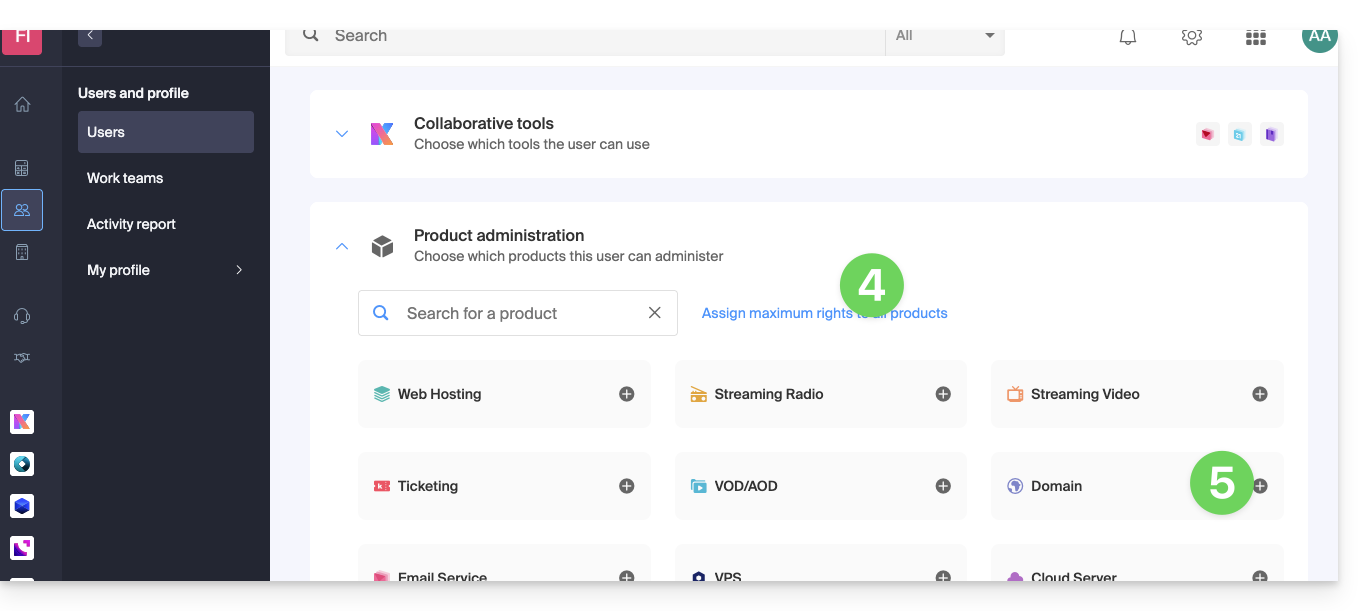
- Select the necessary product(s).
- If you have selected multiple products, decide whether a future additional product should automatically be visible to the user (and with what type of permissions).
- Click on the Save button:
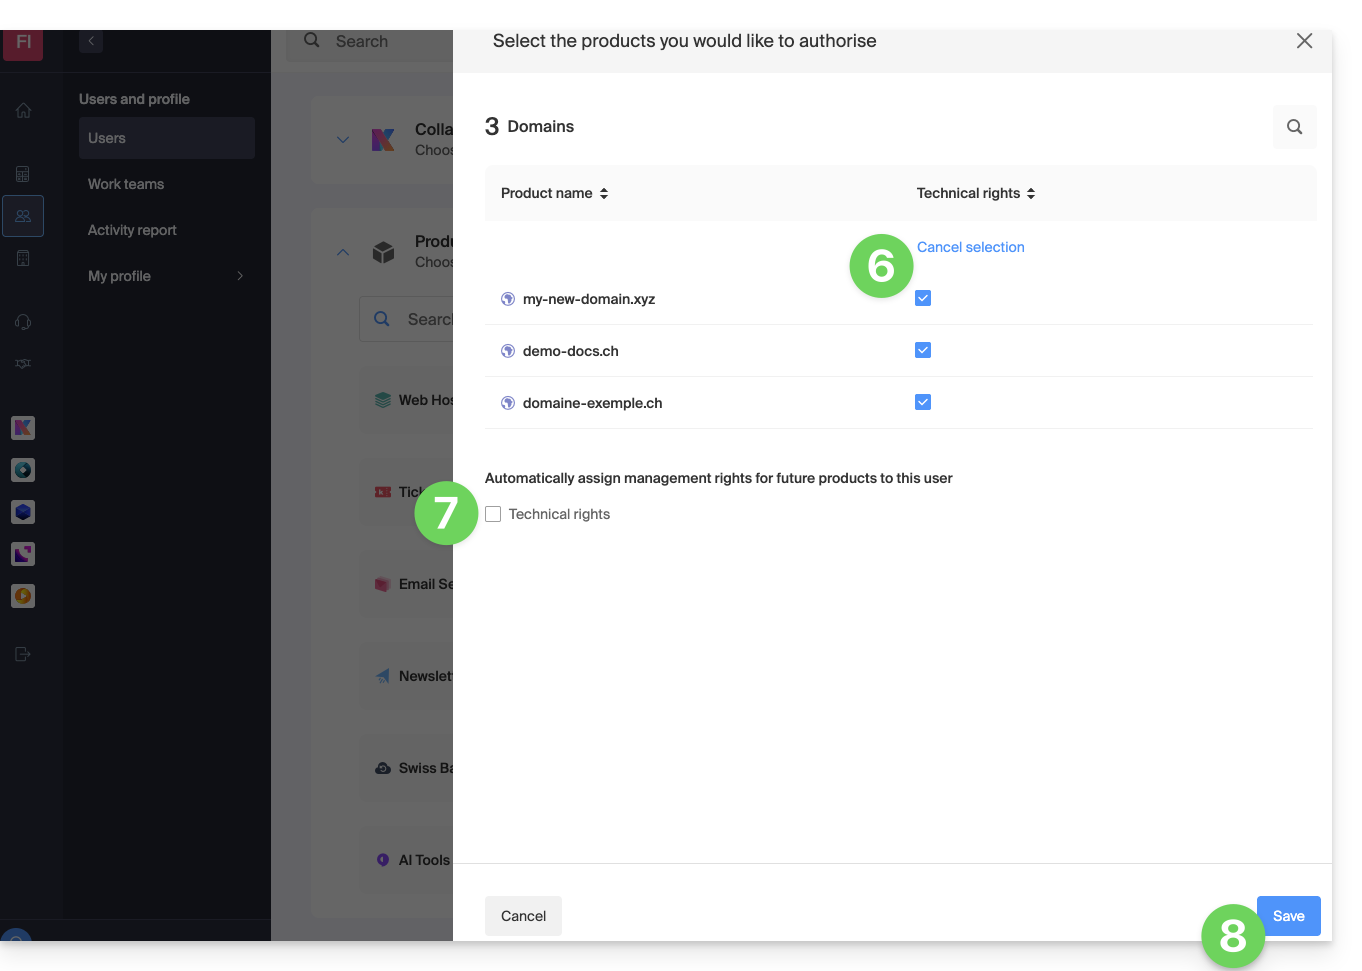
- Rights are granted immediately.
- Click on the pencil icon ✎ to modify permissions:
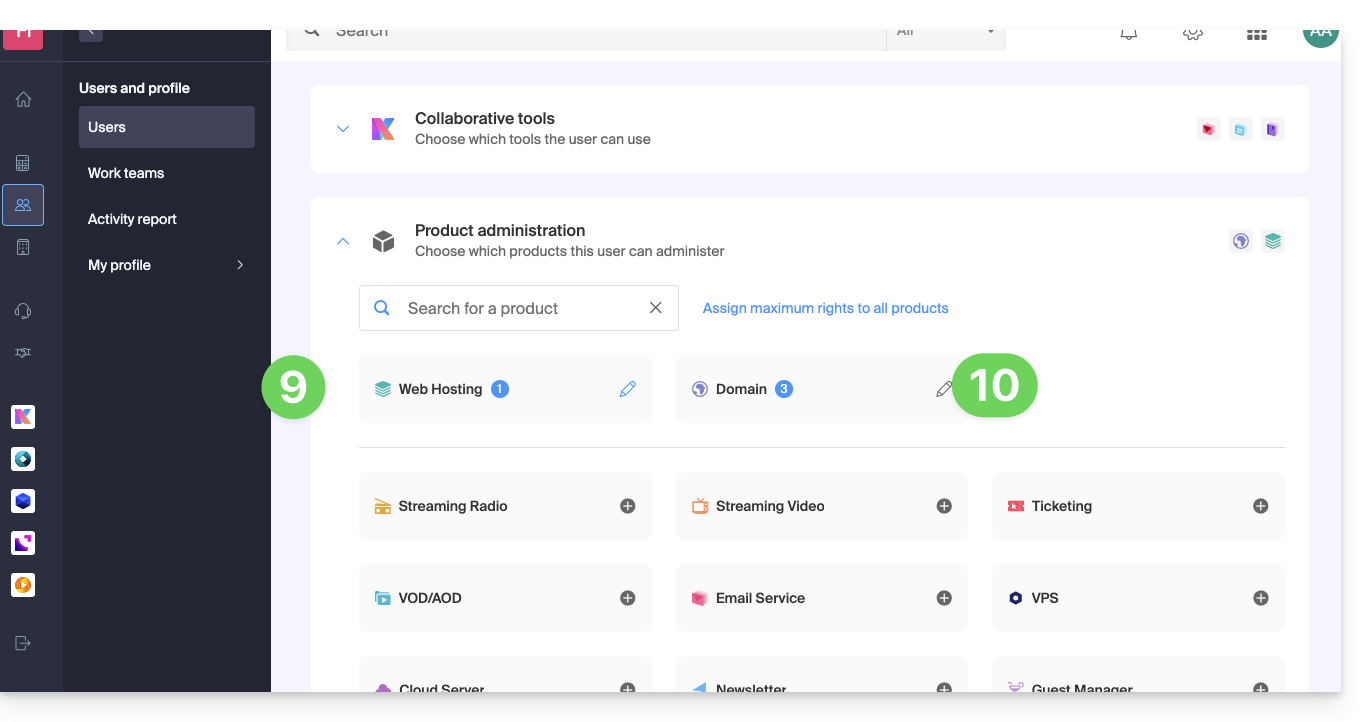
- Restart at step 5 if you need to grant access to multiple products.
Service usage / Service management
Be careful, on your product table, it is important to distinguish between access to products (type kDrive for example, within the kSuite) and access to product management: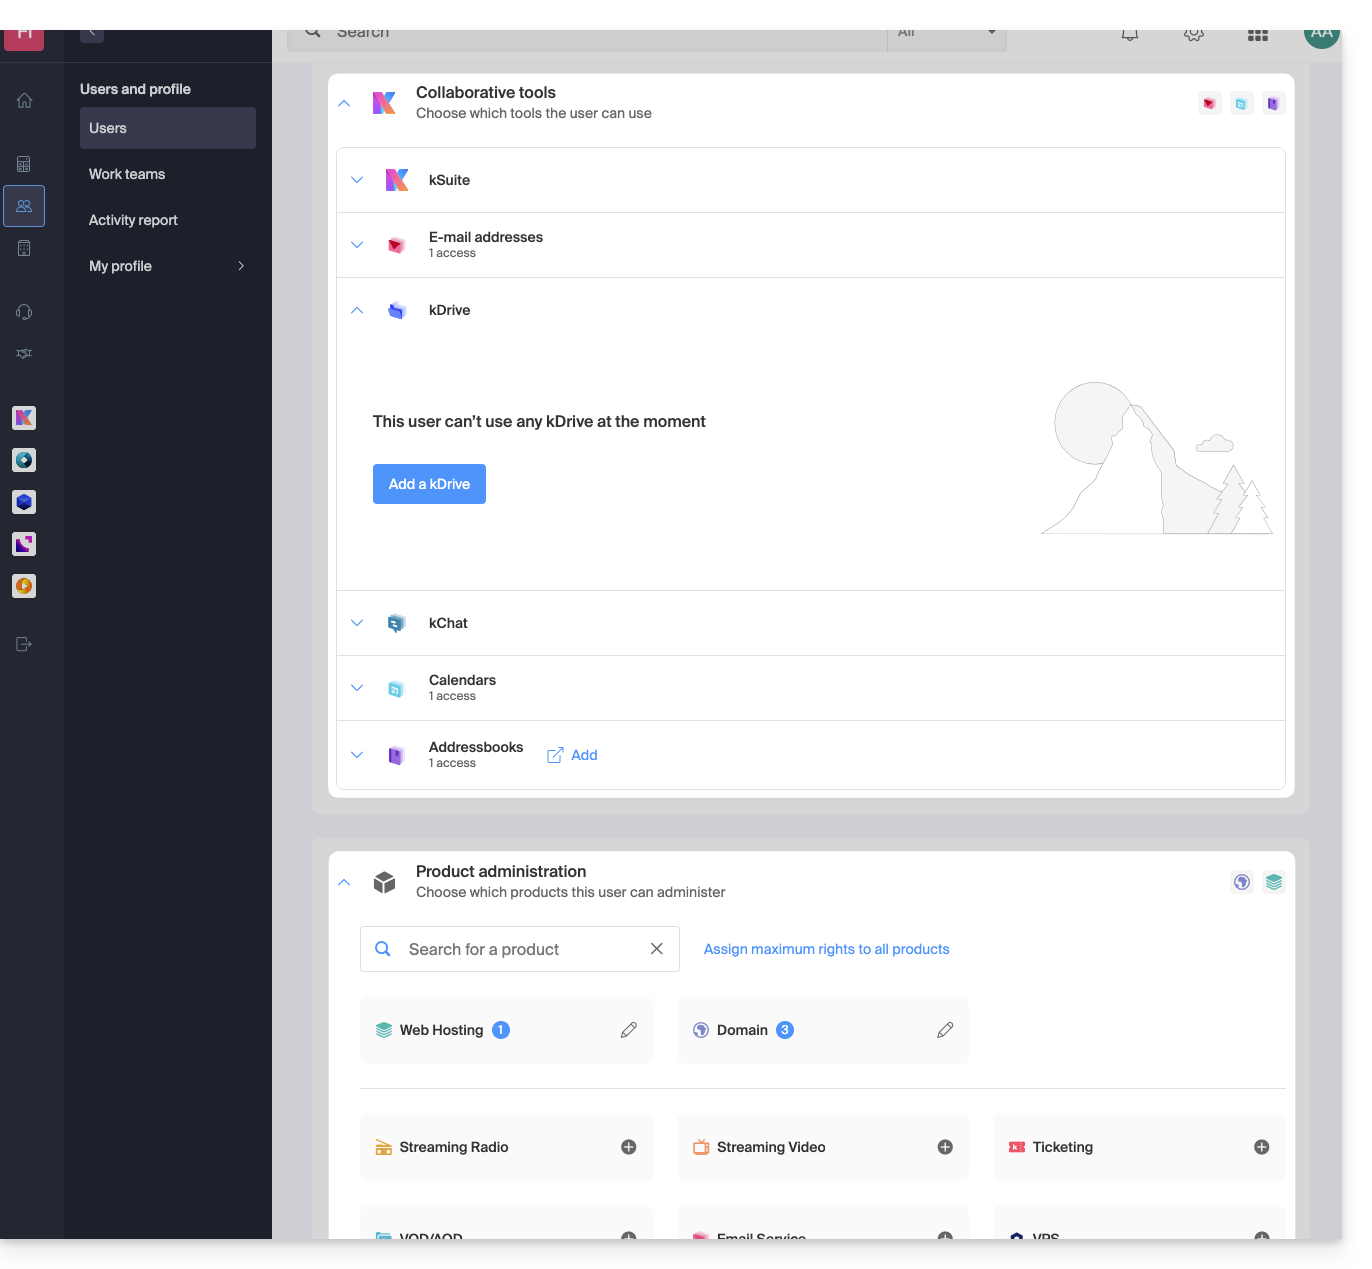
It is possible to authorize a user to use kDrive (they will be able to create a PDF for example) without granting them a service management right for kDrive (they will not be able to change the offer, invite a new user, terminate, etc.).
Technical rights / Statistical rights
With certain services like kDrive, it is possible to give a collaborator TECHNICAL and/or STATISTICAL rights (adds access to the dashboard, share links, storage statistics, active users, connected devices, activity on kDrive):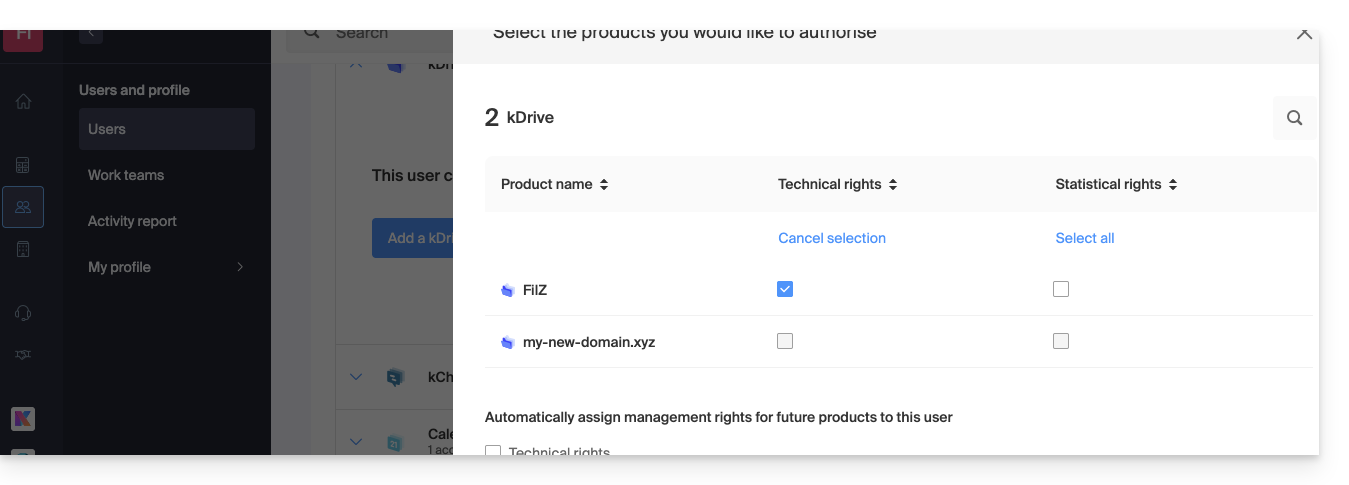
Other services like domain names do not have a STATISTICAL section:
Certain specific services like ticketing allow for even more detailed rights to be granted:
Easier access: Work Teams
To facilitate the addition of access rights to a product that is on your Organization, there are Work Teams. These allow you to create groups that are linked to Infomaniak products with the desired rights, very practical for giving a new collaborator in your Organization access to the products they will need in their daily activities.
This guide explains how to synchronize files stored in kDrive to access them easily on all your macOS, Windows, Linux, iOS and Android devices.
Preamble
- For any modification made to your files & folders on your workstation (Finder / Explorer) to be automatically synchronized…
- on the kDrive Web app Infomaniak (online service ksuite.infomaniak.com/kdrive),
- on the kDrive mobile app (application for iOS / Android smartphone or tablet),
- this for all collaborators who access the data,
- and this in all directions,
- … you need to install the kDrive desktop app (desktop application on macOS / Windows / Linux).
- You have the option to customize the kDrive folders that need to be synchronized on your computer.
- You can also automatically back up photos from your mobile:
- Refer to this other guide for iOS and for Android.
- Note, there is no automatic synchronization between the rest of the content of your mobile device and kDrive; this functionality is identical to competing apps that do not offer it either, as the restrictions of mobile OSs are too significant to allow it (alternative solutions generally paid for exist via third-party apps using the WebDAV protocol).
Download the kDrive desktop app…
… on macOS
Requires macOS 10.15 minimum, ARM OK.
Open the kDrive download page to download kDrive (other versions and apps can be downloaded from the unified kSuite settings).
… on Windows
Requires Windows 10 minimum (Windows 10 1709 to benefit from Lite Sync).
Open the kDrive download page to download kDrive (other versions and apps can be downloaded from the unified kSuite settings).
… on Linux
Requires Ubuntu 20.04 minimum, ARM OK. Unfortunately, neither Lite Sync nor the kDrive context menu on right-click are available on Linux.
The kDrive application is officially supported by Infomaniak only on the following systems:
- Ubuntu 22.04 LTS
- Desktop environments: GNOME or KDE
Refer to this other guide for installing kDrive on Linux.
… on mobile
Minimum and supported iOS version: v16.4
The download page offers the mobile versions of kDrive, including an iOS version optimized for iPad, adapted to the screens of these tablets, and the version for Android.
Install the kDrive app
To do this:
- Open the downloaded application to start the installation on your device.
- At the end of the installation, the application should open and a form will ask you to log in to your Infomaniak account (need help?):
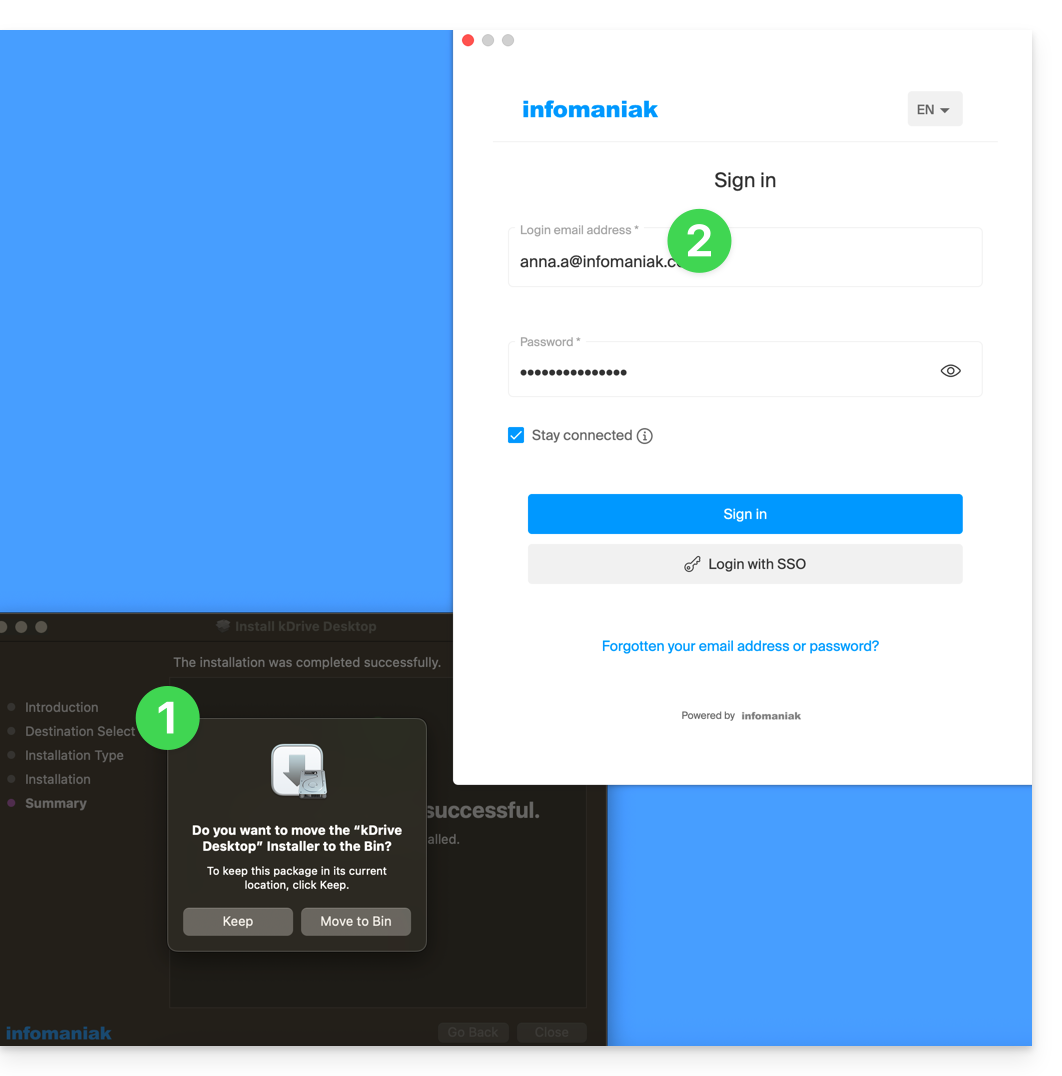
- Then, choose from the list the kDrive you want to synchronize (if your account allows access to multiple kDrives — you can link others later if necessary):
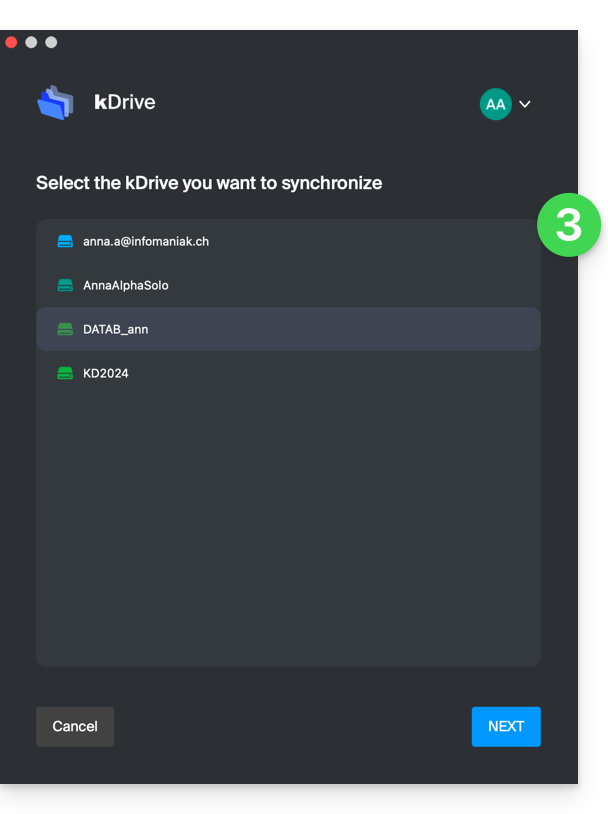
- Enable or disable the Lite Sync option (feature of the Windows and macOS app that saves space by virtually storing your kDrive files on your computer, only downloading them when necessary):
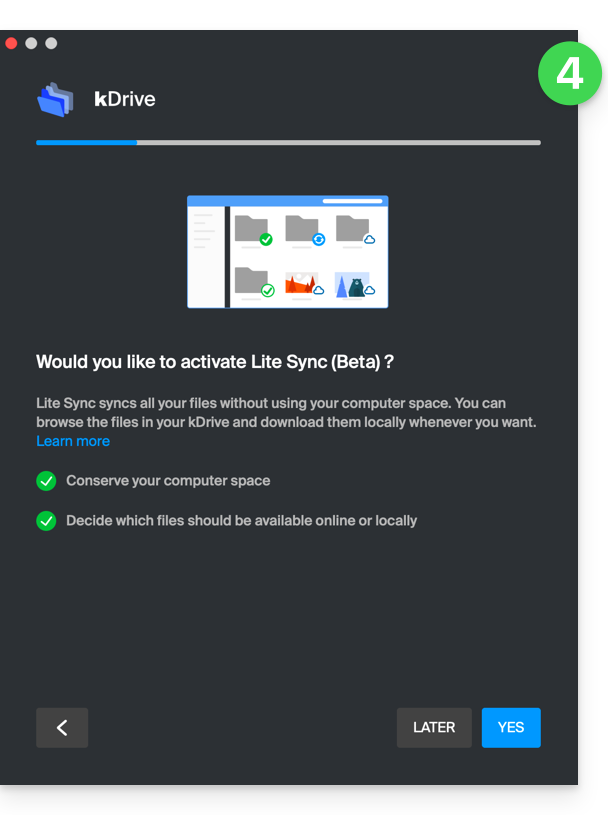
- A kDrive folder is created on your hard drive at the indicated location (a location that is recommended not to be modified, but if necessary you can do so by clicking on the pencil icon ✎):
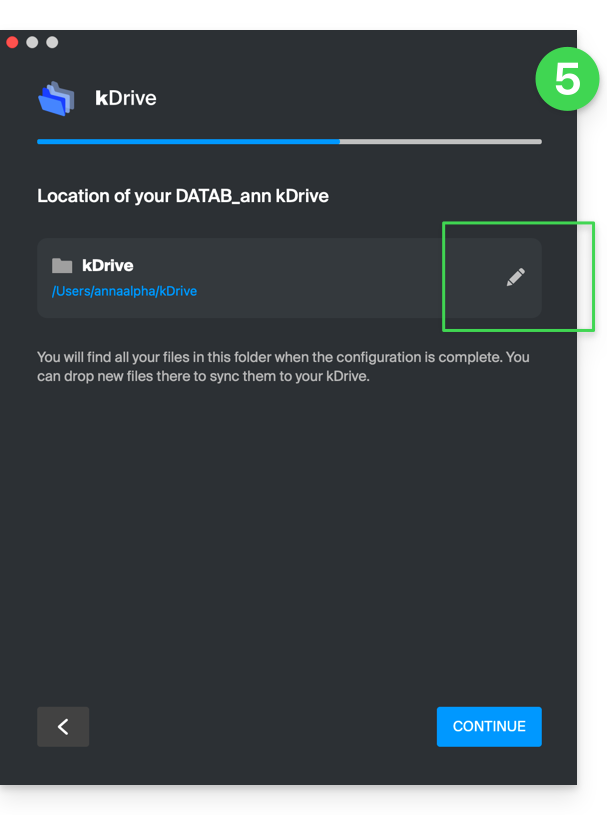
- It will contain the files that may already exist on your kDrive (some folders may be ignored - read below) and will send to the kDrive server all the files you place there in the future.
- During installation, pay attention to the permissions that may be requested (especially on macOS) and that must be granted for the proper functioning of the application:
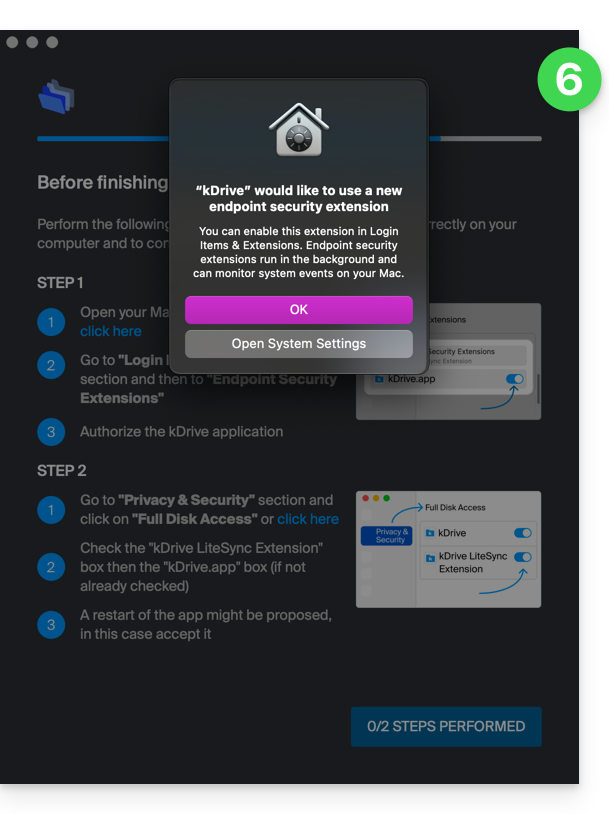
- You need to enable this on macOS:
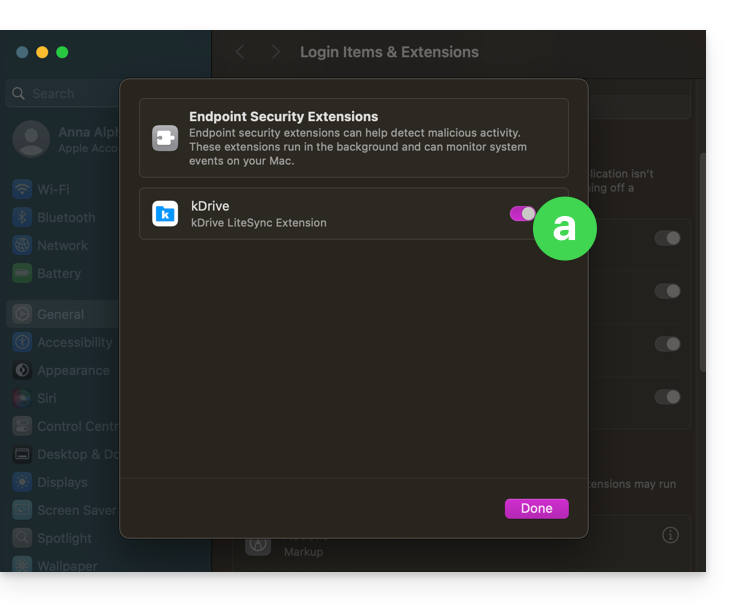
- but also this:
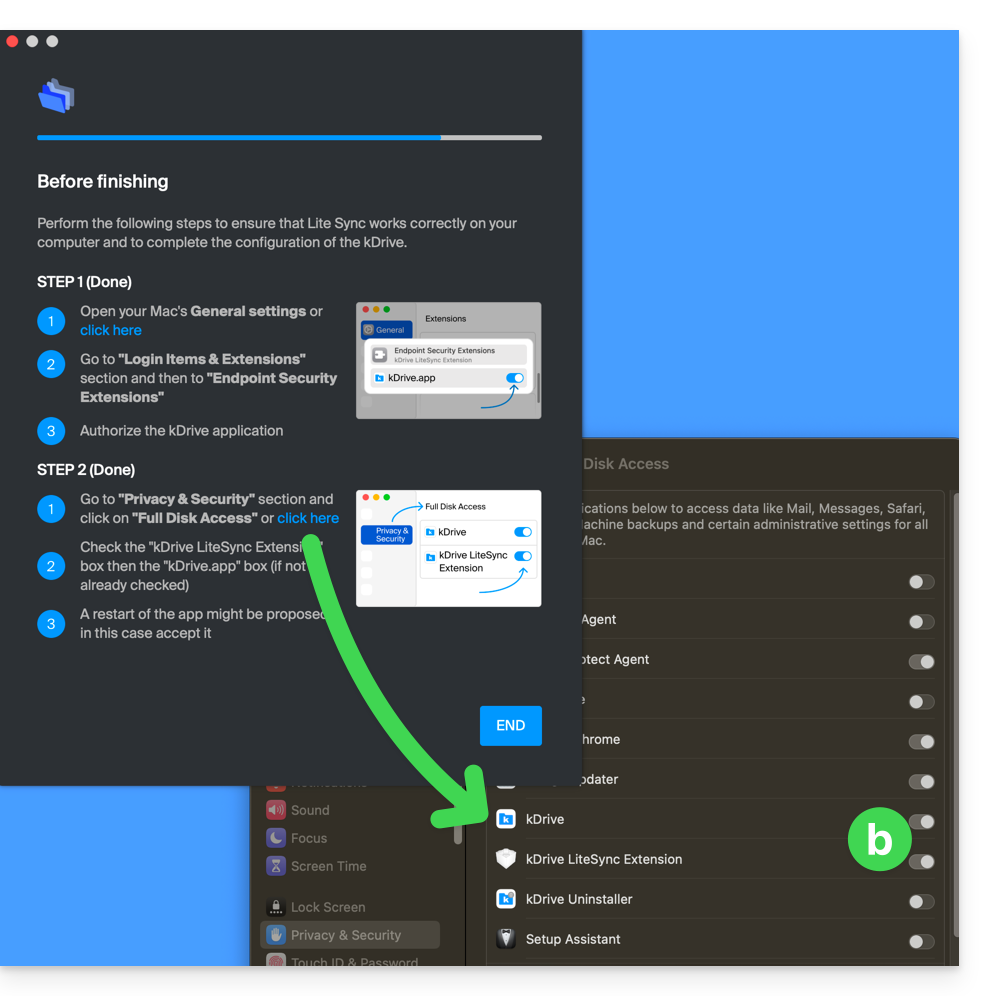
- You need to enable this on macOS:
- Once the installation is complete, you can choose to open the location of the kDrive files on your hard drive:
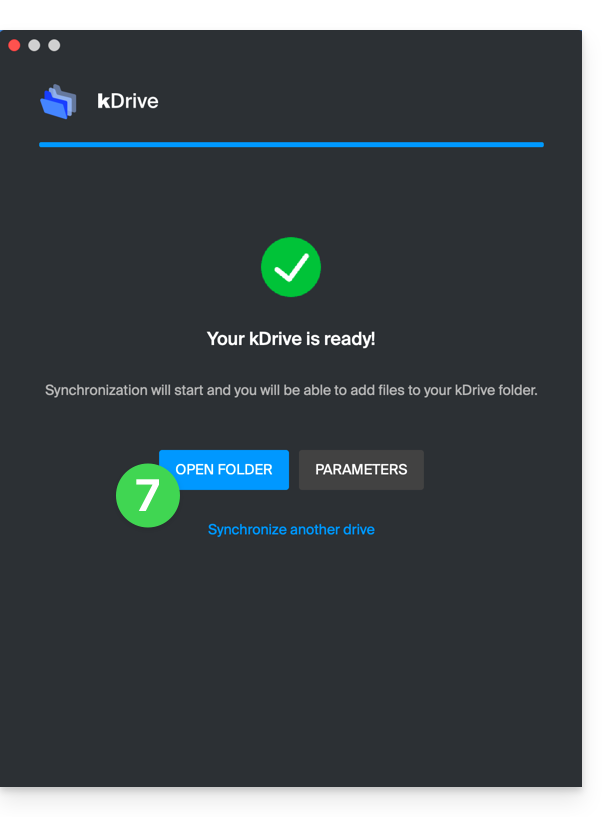
- On a macOS device, for example, it looks like this:
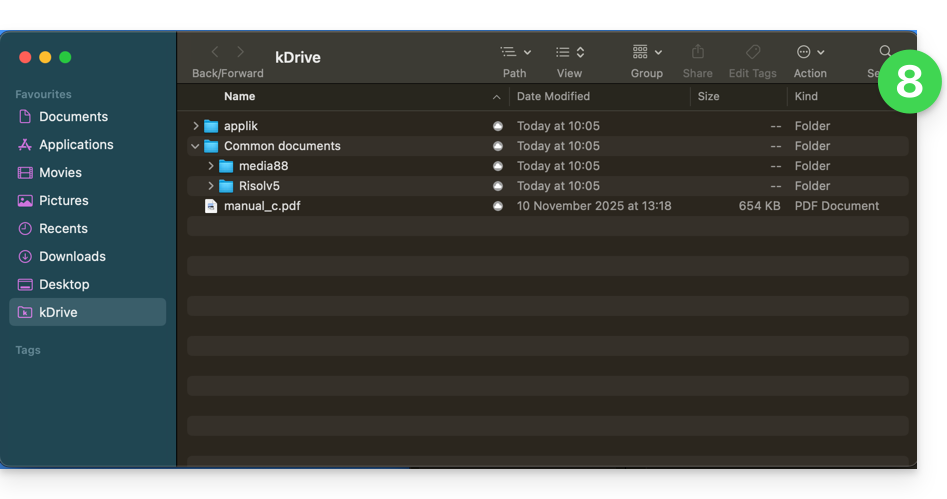
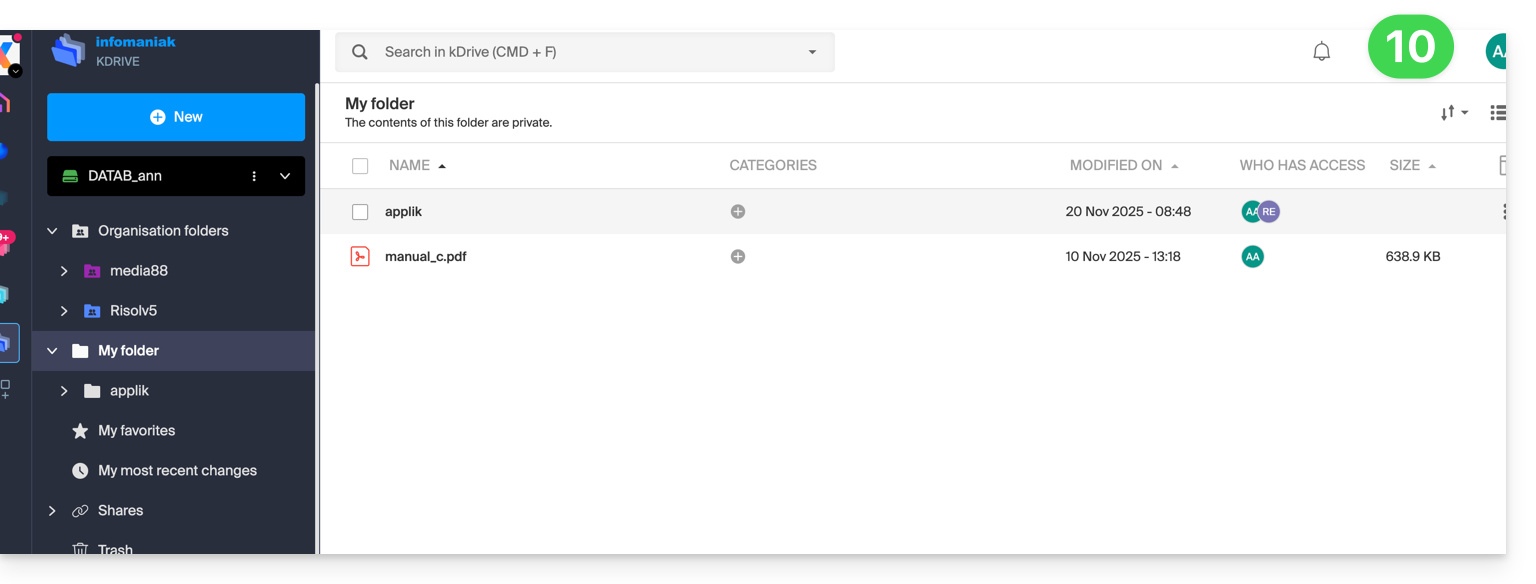
- And you can compare the data present on your hard drive with the data from the kDrive Web app Infomaniak (online service ksuite.infomaniak.com/kdrive):
- Click on the action menu ⋮ to the right of the kDrive window.
- Click to open the web version:
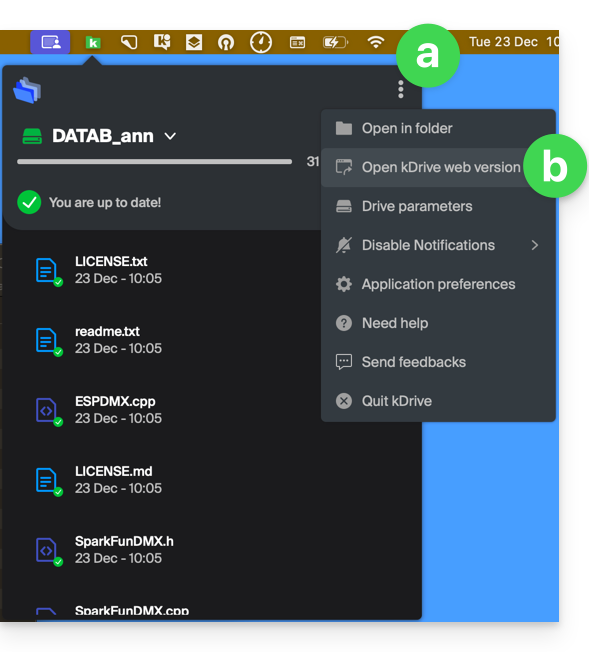
- The data appears, you can compare it with point 8 above:
Synchronize files with kDrive
Once the application is installed and connected to your account, you have the kDrive app on your device:
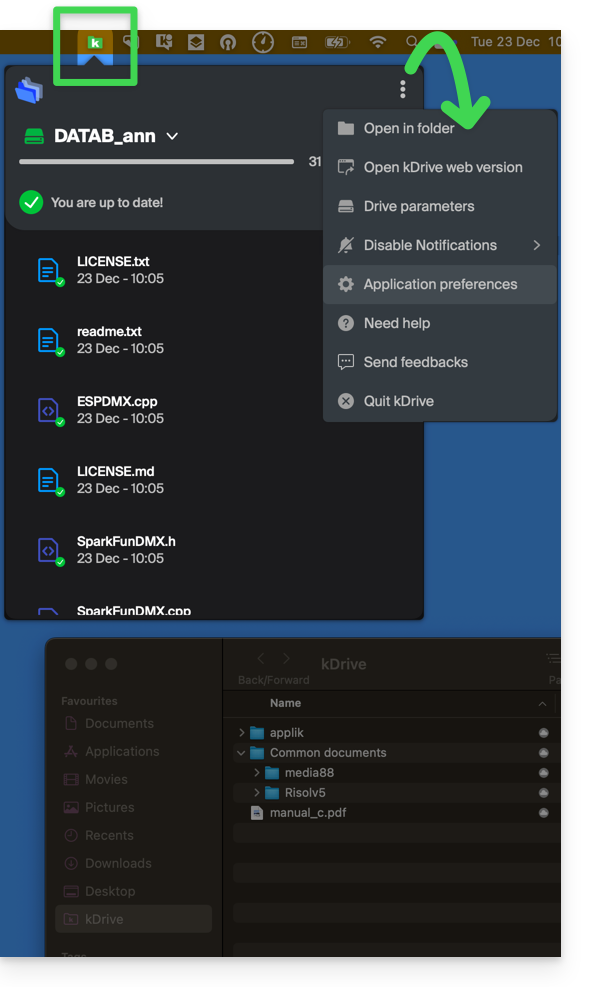
- On a computer, the app icon appears in the notification area of your computer (top right on macOS, bottom right on Windows and a double left click in the taskbar on Linux).
- Take the opportunity to browse the application preferences and the Drive preferences, from the action menu ⋮ on the right of the kDrive window.
This guide explains how to automatically transfer photos from your mobile device (iOS) to kDrive Infomaniak.
Preamble
- Once this feature is activated, the photos from the mobile device will be saved in a folder of your choice on kDrive.
- Foreground mode: synchronization works optimally when the kDrive app is active and in the foreground!
- Limited background mode: background synchronization is subject to the following constraints:
- After leaving the app, kDrive continues to run for about 30 seconds to complete ongoing uploads.
- The app can be automatically reactivated by iOS every 15 minutes or so, for sessions of 30 seconds maximum.
- At night, if your device is charging, not in use, and connected to the Internet, the app can benefit from several hours to perform background uploads.
Activate sending to kDrive on iOS (iPhone, iPad)
Prerequisites
- Have a kDrive or kSuite subscription.
- Install the mobile app kDrive (app for iOS smartphone or tablet).
To send photos to kDrive:
- Open the kDrive mobile app (iOS).
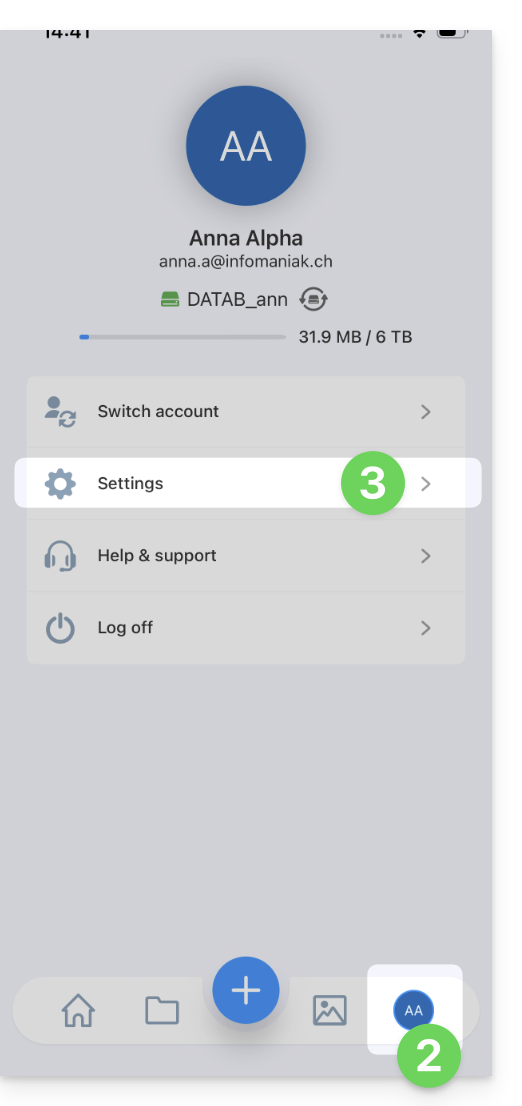
- Tap the badge with your initials or avatar at the bottom right.
- Tap Settings:
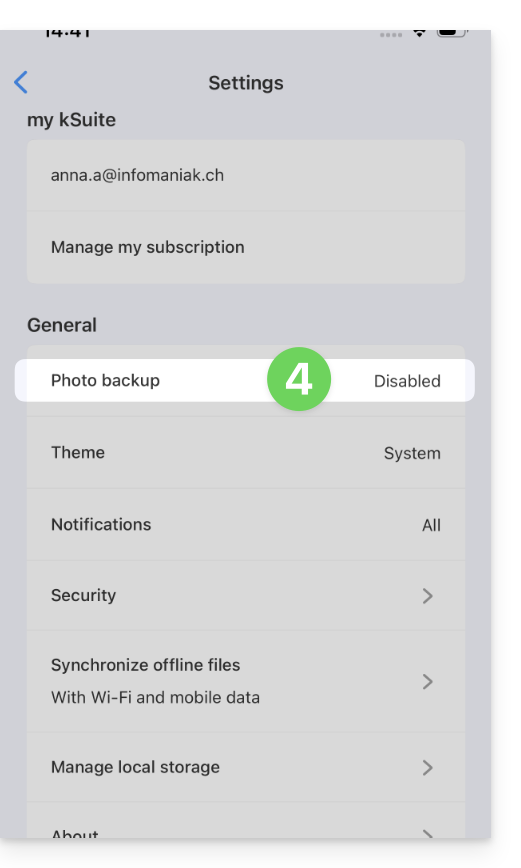
- Tap Photo Backup to activate it
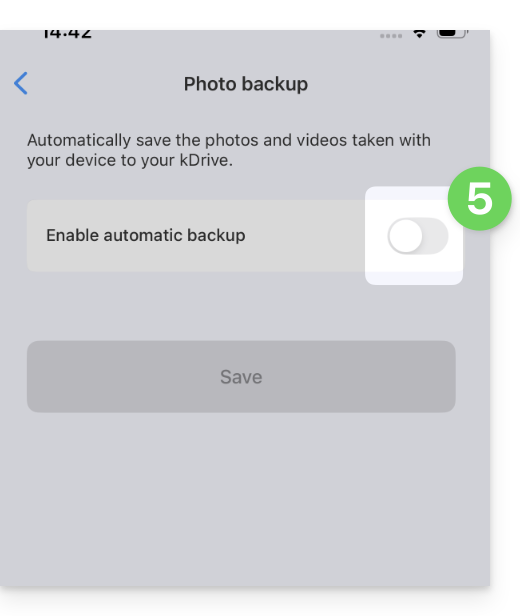
- Activate Automatic Backup:
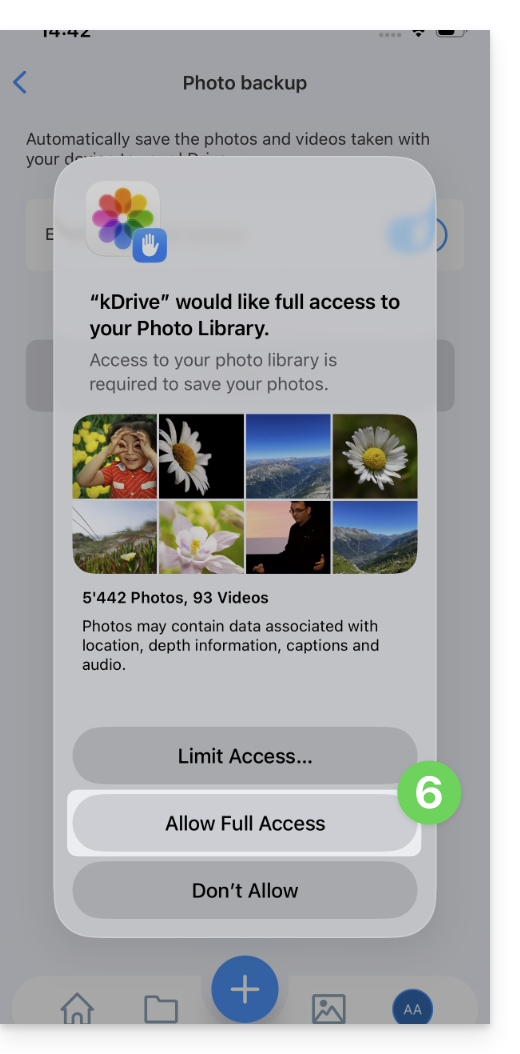
- Authorize kDrive to access the photo location of your choice:
- Choose the kDrive to use as well as the kDrive folder that should host your content:
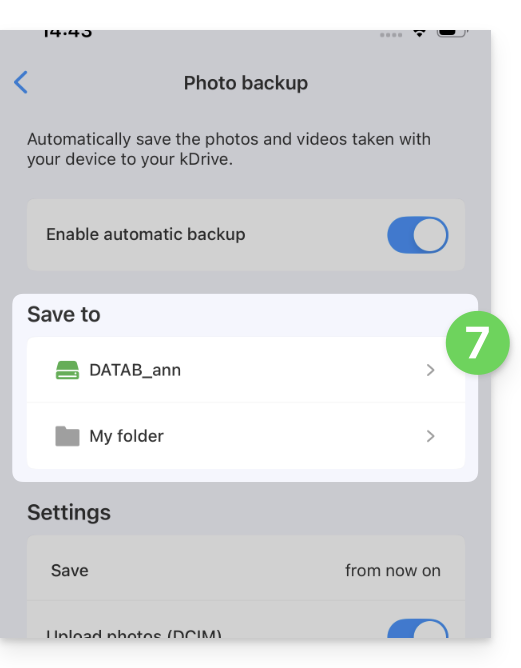
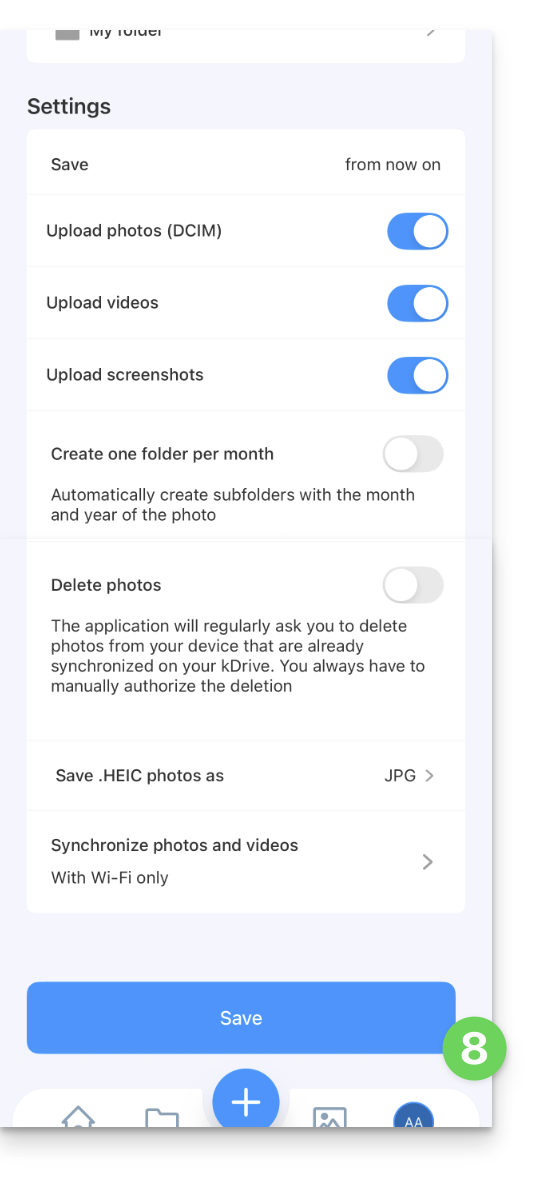
- Configure the rest (sending including videos and screenshots, monthly sorting, request to delete content remaining on the device, etc.) then tap Save:
This guide details the installation of the desktop app kDrive Infomaniak on a computer with a Linux operating system. It will then allow you to synchronize your files with kDrive.
Preamble
- On this OS, some kDrive features are not available, such as the Lite Sync option or the right-click context menu.
- The kDrive app is officially supported by Infomaniak only on the following systems:
- Ubuntu 22.04 LTS (and later)
- Desktop environments: GNOME or KDE
- The application may work on other Linux distributions or with other desktop environments; however, Infomaniak provides no support for installing or running the application outside of the configurations mentioned above.
Installing kDrive on Linux
Prerequisites
- Download the desktop app kDrive for Linux (file of type .AppImage)
- Fuse2 (required to run a appimage):
- Since version 23.04 (and later) of Ubuntu, after double-clicking on the AppImage file, nothing will happen.
- The latest versions of Ubuntu use a "too" recent version of FUSE (the "Filesystem in User Space" interface on which AppImages rely to work) for which AppImages are not designed.
- AppImages need FUSE v2 to work:
sudo apt install libfuse2
- D-Bus
- Gnome-keyring or kwallet (in principle already present on your machine except with some light distributions)
Then:
- Place the file in a folder named for example "Applications".
- Right-click on the file and select Permissions.
- Check the box "Allow executing file as a program"
Additional possible operations
With Ubuntu, to have kDrive run at startup, add the file in “Startup Application Preferences”
With Gnome, if the icon is missing, install AppIndicator.
This guide explains how to select the folders that need to be synchronized between the desktop app kDrive (desktop application on macOS / Windows / Linux) and kDrive Infomaniak.
Prerequisites
- Have a kDrive / kSuite offer.
- Have the kDrive application on the device to be synchronized.
- Check the parameter regarding the limitation of synchronization of large folders.
Choose the kDrive folders to synchronize
To access the kDrive application settings on your computer:
- Left-click on the desktop app icon in the notification area of your computer (top right on macOS, bottom right on Windows and a double left-click in the taskbar on Linux).
- Click on the action menu ⋮ on the right of the window that appears.
- Click on kDrive Settings:
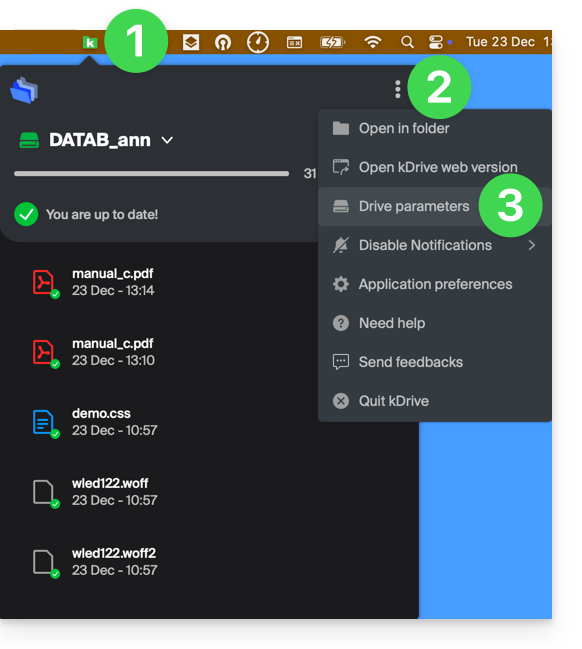
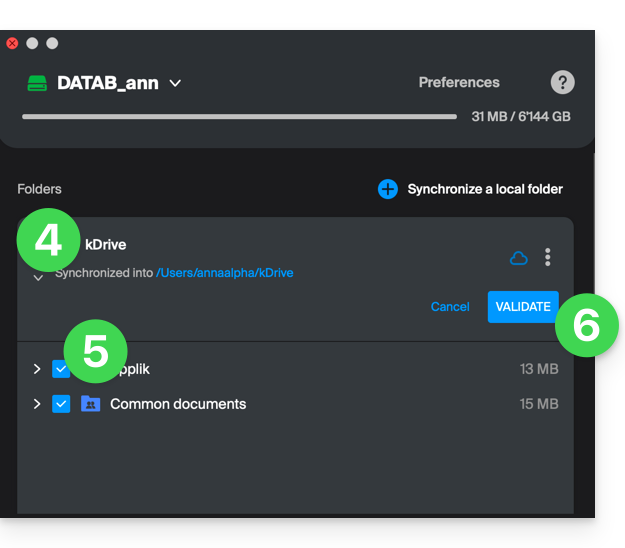
- Click on the chevron to the left of your synchronization name to expand the list of folders.
- Expand the contents of the listed folders if necessary and check/uncheck the folders to synchronize with your computer.
- Click on the blue Validate button:
Warning
- When deselecting a folder from the list, a message next to the button (point 6 above) warns you that this folder will be moved to your computer's recycle bin.
- This is the folder that was in your kDrive hierarchy on your computer.
- The kDrive folders on the online version accessible via a web browser will not be affected, but you must ensure, before the operation, that the folder in question was indeed synchronized and fully present on this online version (especially if you had just placed it within your synchronized directory).
- In case of doubt, also make sure that your computer does not instantly delete items that are too large when they are placed in the recycle bin, due to the size of the Windows recycle bin for example:

Add a local folder for advanced synchronization
- In the same place accessible according to the procedure above, click on Synchronize a local folder :
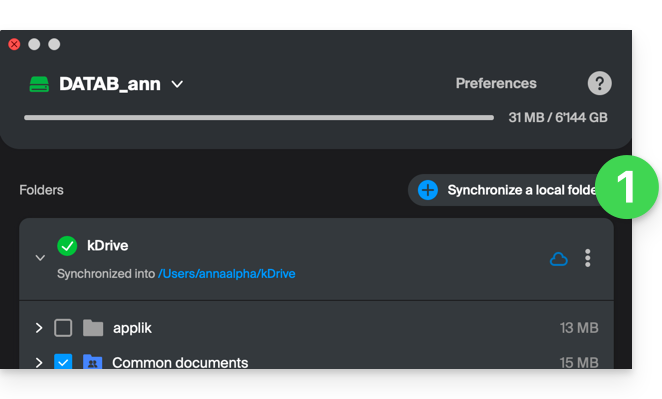
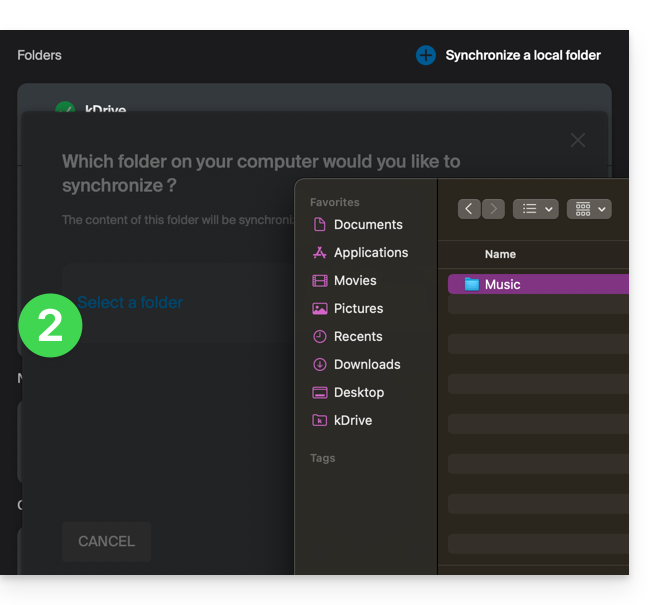
- ... which will allow you to synchronize one or more new folder(s) from your hard drive with the location of your choice on kDrive:
Stop and remove a synchronization
- In the same place accessible according to the procedure above, click on the icon ⋮ all the way to the right:
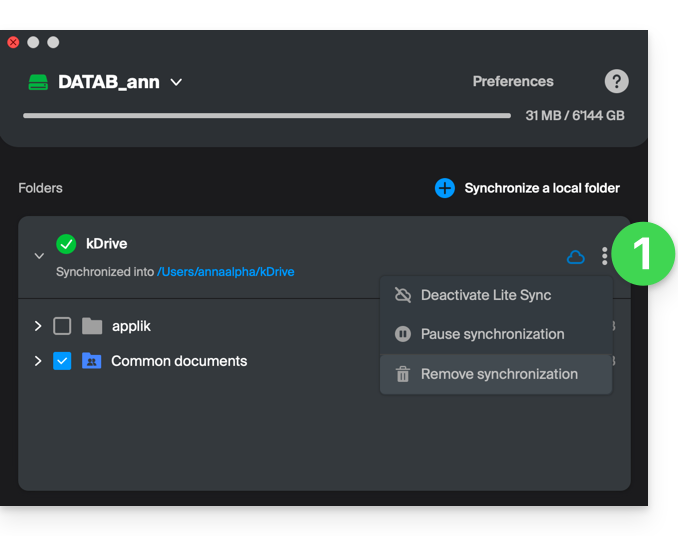
- ... which will allow you to:
- Pause the synchronization
- Delete the synchronization (only from your device, with no impact on your kDrive) - refer to this other guide.
This guide addresses connection issues with Infomaniak on certain mobile apps like Euria or kDrive when the error “your device is not recognized as safe” occurs.
Android security standards (Google Play Integrity)
Some users are currently encountering an error message “Your device is not recognized as safe” when connecting to mobile apps (kDrive, Euria, SwissTransfer) on Android…
This blockage is related to Android security standards (Google Play Integrity) and usually occurs on devices using an unofficial operating system, rooted, or certain specific models.
Immediate workaround
To connect despite this message, please follow these steps on the login screen:
- Click on the down arrow/chevron icon (next to your account).
- Select “Log in with another account”.
- Enter your credentials manually (email address of your Infomaniak account and its password).
This guide details the Lite Sync option of the kDrive desktop app (desktop application on Windows).
Preamble
- The Lite Sync feature saves space by virtually storing your kDrive files on your computer, only downloading them when necessary.
- The files are always accessible from the kDrive web app (online service kdrive.infomaniak.com) but locally they are present in a "dehydrated" way, requiring a loading time to be fully accessible.
- This allows you to view, complete, and synchronize the content of kDrive without saturating the hard drive.
- The Lite Sync option always acts:
- on a specific kDrive (in the case where you synchronize several on the application).
- and on the entirety of the kDrive (or the entirety of an advanced synchronization).
- and via a specific kDrive app (another user of the same kDrive can make a different Lite Sync choice than yours).
Enable the Lite Sync option
Prerequisites & scope of use of Lite Sync
- OS Windows version ≥ 10 (21h2)
- not available with Linux
- 64-bit processor (ARM64 compatible)
- File storage system under NTFS / APFS
The Lite Sync option can be enabled during the installation of the application (this is offered to you) or subsequently:
- Left-click the app icon in the notification area of your computer (bottom right on Windows).
- Click the action menu ⋮ to the right of the kDrive window.
- Select kDrive Settings.
- Click the button in the Synchronization section to enable Lite Sync.
The cloud icon will appear to the far right of a sync name on the application, indicating that Lite Sync is enabled. If the crossed-out cloud icon
is displayed, this means that Lite Sync is not enabled:

Keep on this device
Once Lite Sync is enabled, you can still make a folder and its subfolders or only one or more subfolders available locally:
- From the Windows Explorer, navigate to a folder synchronized with kDrive and right-click.
- Select the Keep on this device option under kDrive:

Free up space
Conversely, once Lite Sync is enabled, you can free up space in a folder and its subfolders or only in one or more subfolders.
Warning: "free up space" is not applied by default to new files or folders added locally.
- From the Windows Explorer, navigate to a folder synchronized with kDrive and right-click
- Select the Free up space option under kDrive:

The action Free up space will free up storage space on your computer. Files will remain visible but will no longer be accessible without an internet connection.
Usage example #1 (required storage space)
If you enable Lite Sync, the space occupied (e.g. 900 GB) on the Infomaniak server will be freed up on your hard drive, but the reverse is also true (e.g. 900 GB of free space required on your hard drive if the Lite Sync option is activated along the way).
Therefore, it is recommended to keep the initial choice of activating or not activating Lite Sync, and not to change it along the way.
File "dehydration"
As explained in the preamble, a dehydrated file is a kDrive file whose complete version is not present on the hard drive and instead a 1 KB "shortcut" is displayed, which is normal behavior when Lite Sync is activated.
In some cases (e.g. if you copy the files from your hard drive while Lite Sync is activated, and then start a new synchronization to a new kDrive) the application will block the import of this type of file. To resolve these errors, you can download the complete file from the kDrive web app (online service kdrive.infomaniak.com).
Usage example #2 (icon summary)
Files on the hard drive synchronized with the Lite Sync option, everything is in the cloud (on your remote online kDrive):
Deactivation of the LiteSync option, the "physical" synchronization starts:
Synchronization complete, the files have been downloaded to your computer and then have the appropriate icon:
To summarize, here are the status icons used in your Windows Explorer:
| Status icons | Files | Folders |
|---|---|---|
| The file exists on online kDrive and is only virtually on your hard drive; to view it locally, you will need to download it | The folder contains at least one file or subfolder not physically present | |
| Lite Sync is not working properly (contact Infomaniak support) | Lite Sync is not working properly (contact Infomaniak support) | |
| The file exists on kDrive online and is also physically on your hard drive | The folder contains only files and subfolders without Lite Sync | |
| The file exists on kDrive online and is only virtually on your hard drive for reasons decided by Windows (for example lack of space) | The folder contains local and temporary files and subfolders | |
| Synchronization is in progress or pending | Synchronization is in progress or pending | |
| The progress bar indicates an ongoing download | The progress bar indicates an ongoing download |
Disable the Lite Sync option
To do this:
- Left-click on the app icon in the notification area of your computer (bottom right on Windows).
- Click on the action menu ⋮ to the right of the kDrive window.
- Select kDrive Settings.
- Click on the button in the Synchronization section to disable Lite Sync.
- Two scenarios may occur:
- If there is enough space on your computer, a message confirming the deactivation is displayed; simply click on Continue.
- If there is not enough space on your computer, a message will indicate the missing space to allow the deactivation of Lite Sync; the synchronization of your kDrive will be paused until you select the files to synchronize on your computer.
This guide details the possible solutions when the desktop app icon kDrive (desktop application on macOS / Windows / Linux) turns orange, which means there has been a synchronization conflict.
Preamble
- kDrive does not indicate if a file is open or being modified on another local device (no alert is displayed in this case):
- It is therefore quite possible to view (read) a file while it is being modified on another device without this causing a conflict.
- The conflict only appears in case of simultaneous modification.
kDrive synchronization conflict cases

When do files conflict ?
- When you modify a file locally while it is also being modified on kDrive Web (the two versions become different).
- When you create or move a file while a similar operation is taking place simultaneously on kDrive Web.
- When you modify a file whose parent folder has been deleted on kDrive Web.
- When a file move cannot be synchronized correctly.
In all these cases
- The kDrive Web version is kept as is.
- Your local version is saved as "[file name]_conflict".
- The conflicting file is not synchronized with kDrive Web.
What to do with these files conflict ?
- Either keep both versions (but only the original file will synchronize).
- Either delete the
_conflictfile if it is the least recent version. - Either delete the original version (not
_conflict) if it is obsolete, then rename the_conflictto synchronize it. - Either manually merge the two versions before deleting the
_conflict.
During a reinstallation of the kDrive application
These conflicts can also occur if you uninstall and then reinstall the application without deleting the configuration, while changes have been made on kDrive Web. To avoid this, it is recommended to:
- Either do not keep the configuration during uninstallation.
- Or fully synchronize before any uninstallation.
- Refer to the best practices further down in this guide.
Managing synchronization conflicts
When simultaneous modifications are made to the same file (locally and on kDrive Web, or while the application is closed), kDrive automatically manages these conflicts according to specific rules.
For versions of the kDrive app prior to 3.6.11
- In case of simultaneous creation, concurrent modification, or conflicting movement, the kDrive Web version is always prioritized. The local version is renamed with “
_conflict”. - For conflicts involving deletion on the kDrive Web side, the local file is usually kept and resynchronized.
- Conflicting movements are canceled and recalculated based on the state of kDrive Web.
From version 3.6.11 onwards
For files “placeholder” (files dehydrated via Lite Sync):
- They are automatically deleted locally.
- If the file still exists on kDrive Web, it is correctly resynchronized.
For other cases:
- The kDrive Web version remains prioritized in most situations.
- The conflicting local files are renamed with “
_conflict”. - Important exception: when a locally modified file should be deleted according to the state of kDrive Web…
- … it is moved to a folder named “
kDrive Rescue Folder” (instead of being deleted); this protects your local modifications from accidental deletion.
- … it is moved to a folder named “
Special cases:
- If a parent folder is deleted, locally modified files are preserved.
- Move cycles (mutually moved folders) are resolved in favor of the kDrive Web state.
- Rename conflicts prioritize the kDrive Web version.
How to display conflicts?
To display conflicting files:
- Perform a left-click on the desktop app icon kDrive in your computer's notification area (top right on macOS, bottom right on Windows and a double left-click in the taskbar on Linux).
- Click on the information button at the top.
- Click on the listed event to view its details:

- Conflicts and errors are displayed in 2 distinct tabs allowing you to become aware of unsynchronized data:
- The first tab allows you to resolve conflicts:

- You will then need to choose how to resolve the conflict by deciding to send the local version
- to the server (= synchronize)
- or to the computer's recycle bin

Avoid synchronization conflicts
Recommendations:
- Do not work on the same file with multiple people (unless you are working online on a Word, Excel, or PowerPoint document).
- Synchronize your offline modifications before modifying the same files online.
- Avoid creating folders that have the same name as folders you do not synchronize on a device.
If necessary, to manually resolve certain synchronization conflicts that have not been resolved automatically:
- Open both files.
- Compare the differences.
- Retrieve the information from the conflict file (the one with the exclamation mark) in the base file.
- Delete the conflict file that is not synchronized (the one with the exclamation mark and the note
conflicted copy):
Don't see conflict files on all your devices? That's normal; the conflict file (the one with the exclamation mark and the note conflicted copy in its name) is not synchronized. The idea is that you, the author of the changes, are the best person to resolve the conflict.
Refer to this other guide if you encounter a problem even though the kDrive desktop app icon is green.
This guide details how to share files and folders in kDrive with whomever you want, without installing the desktop app kDrive (desktop application on macOS / Windows / Linux), and even if the recipient does not have an Infomaniak account or is not yet using kDrive.
Preamble
- The Web app kDrive allows you to share content in several ways, notably by a right-click on the elements or as an email attachment to quickly propose viewing or modifying a file.
- A drop box can also be shared.
- The appearance of the sharing windows can be customized.
- To quickly access the different functionalities/operations, right-click on your files.
⚠ Number of authorized external sharing links:
| kSuite | free | 100 |
| Standard | 1000 | |
| Business | 2500 | |
| Enterprise | 5000 | |
| my kSuite | 25 | |
| my kSuite+ | 1000 | |
| kDrive | Solo | 1000 |
| Team | 1000 | |
| Pro | 1000 |
⚠ Number of possible clicks per hour on a public link:
| kSuite | free | 150 |
| Standard | 200 | |
| Business | unlimited | |
| Enterprise | unlimited | |
| my kSuite | 150 | |
| my kSuite+ | unlimited | |
| kDrive | Solo | unlimited |
| Team | unlimited | |
| Pro | unlimited |
Share a file/folder on kDrive
For users to be able to view, modify, download your content, you need to designate who to share a file/folder in kDrive with:
- Click here to access the Web app kDrive Infomaniak (online service ksuite.infomaniak.com/kdrive).
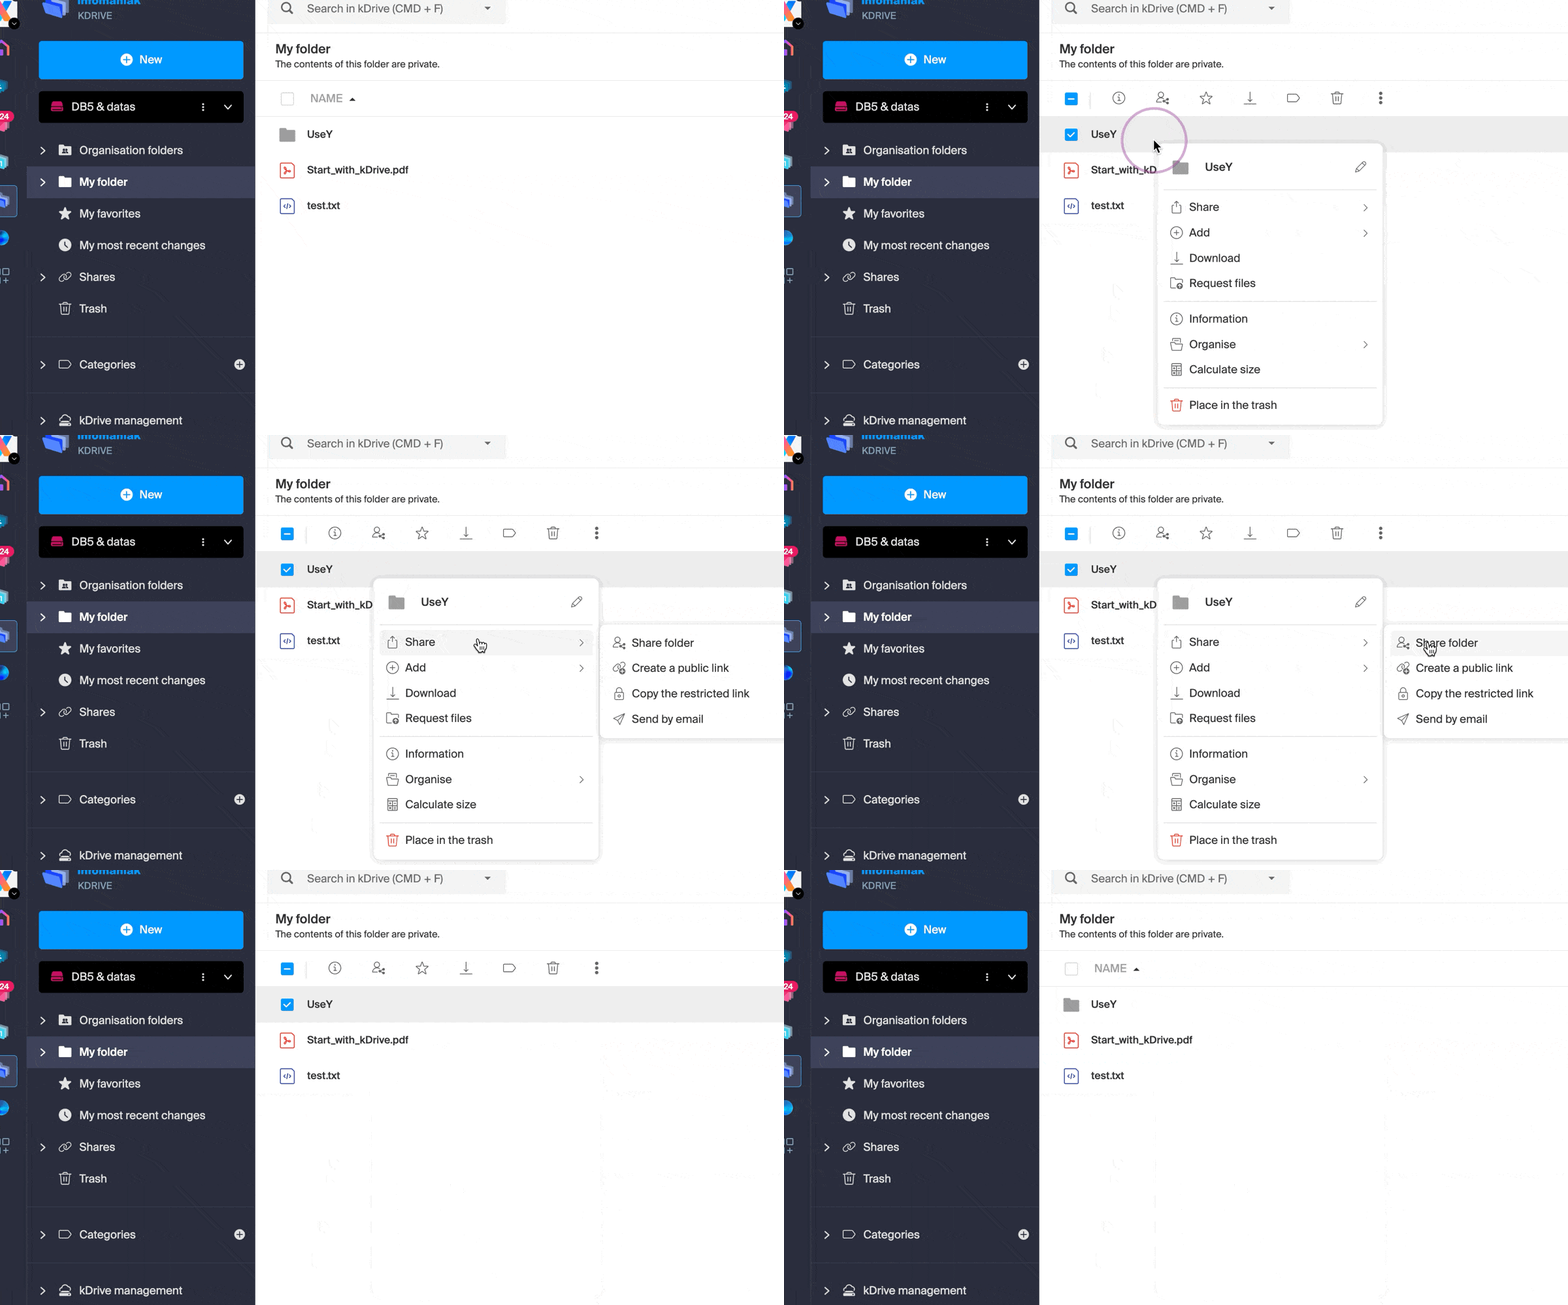
- Right-click on the file/folder in question.
- Click on Share... at the top of the dropdown menu:
From there, it is possible to…
- … either activate a public share link with various possible options:
- authorization to modify the document if it is part of the collaborative formats
- expiration date
- password
- download authorization
- access authorization so that the user with access to the share link can request full access - refer to the dedicated chapter below
so that anyone with the link displayed on this modal can access the shared file: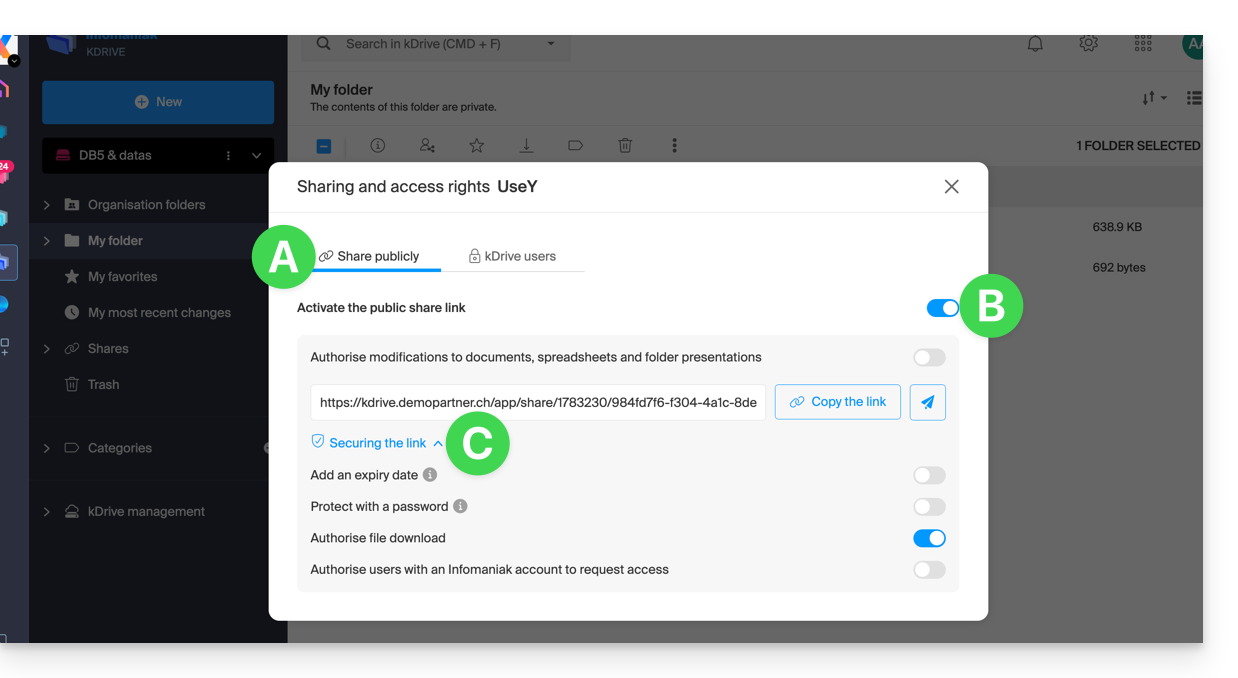
Warning: simply deactivating/reactivating the public share link changes the URL and invalidates the previous one!
- … or enter a kDrive user, a contact from your address book, the email address of a new contact (or a work team if the sharing is done within the “common folders”):
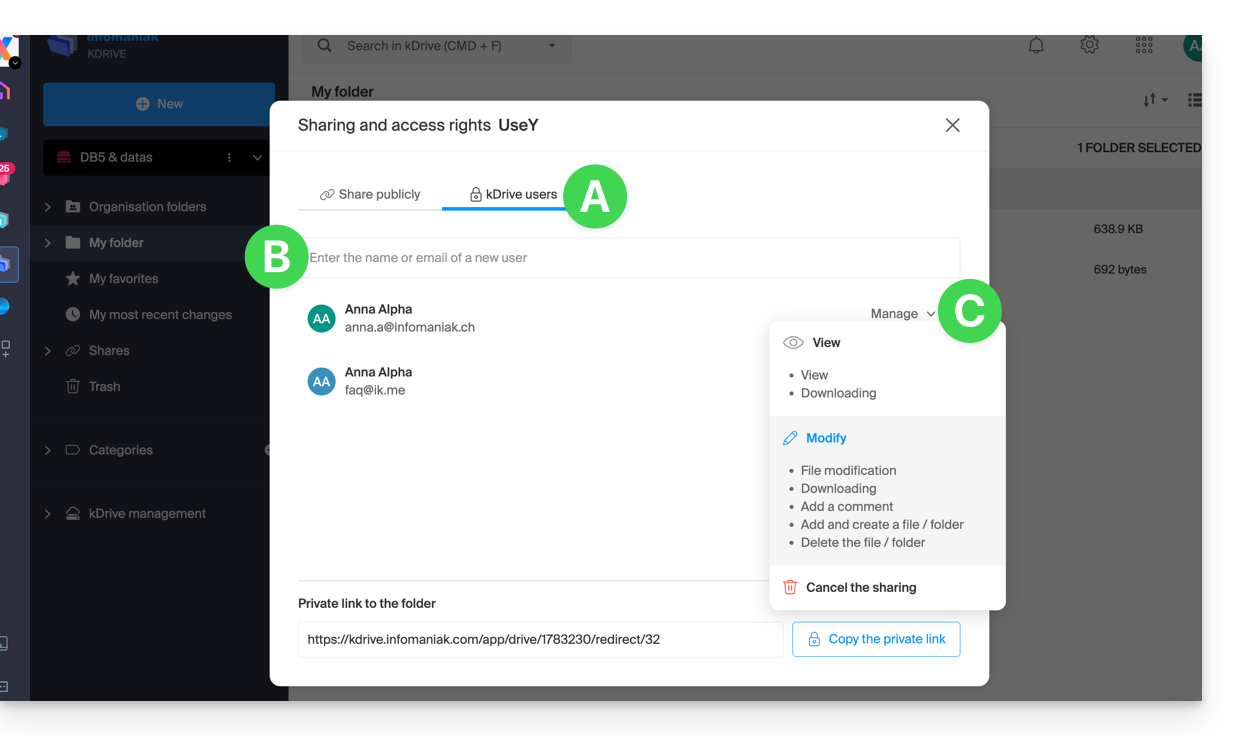
A wizard allows you to define the rights of each person you add: “viewing” / “modification” / “management” (refer to this other guide if you are looking for information about file, folder, and subfolder access permissions in kDrive):
- The person whose email address you specify will receive an email with the necessary information to access your shared content.
- If they do not have an Infomaniak account, they can create one for free to access, modify, and synchronize the shared items.
- In the meantime, you will see the pending invitation and can revoke it at any time from the same place.
- The private link appears every time you go to the sharing sidebar, which allows you to easily copy and resend the link to authorized users.
With a Solo or free kDrive offer, it is only possible to specify this type of external user when you want to share a file/folder.
Click on the close cross at the top right of the modal if you have finished.
Create a public + editable share link
When you activate a share link on a Word, Excel, or PowerPoint type file, it is possible to authorize online editing of the latter: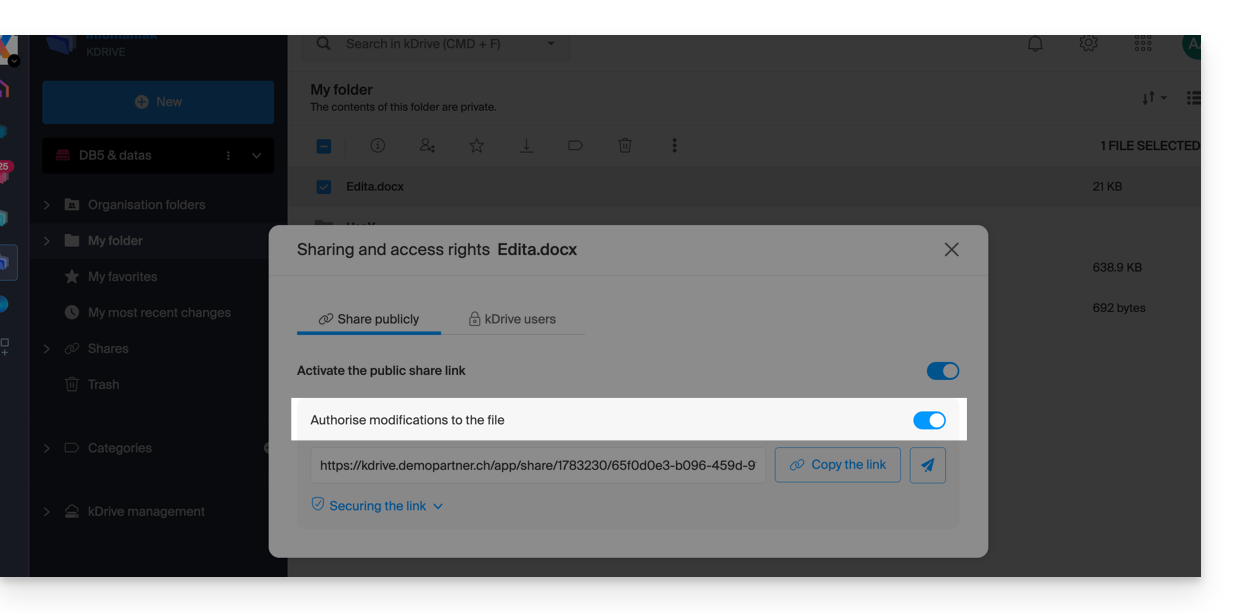
All persons with access to this share link will then be able to immediately modify the file without having an Infomaniak account (just test the obtained URL in a private navigation to verify the result).
You can also obtain a precise share link from the document.
Request access from the shared file page
The user who shares a folder can activate a button in the advanced sharing settings: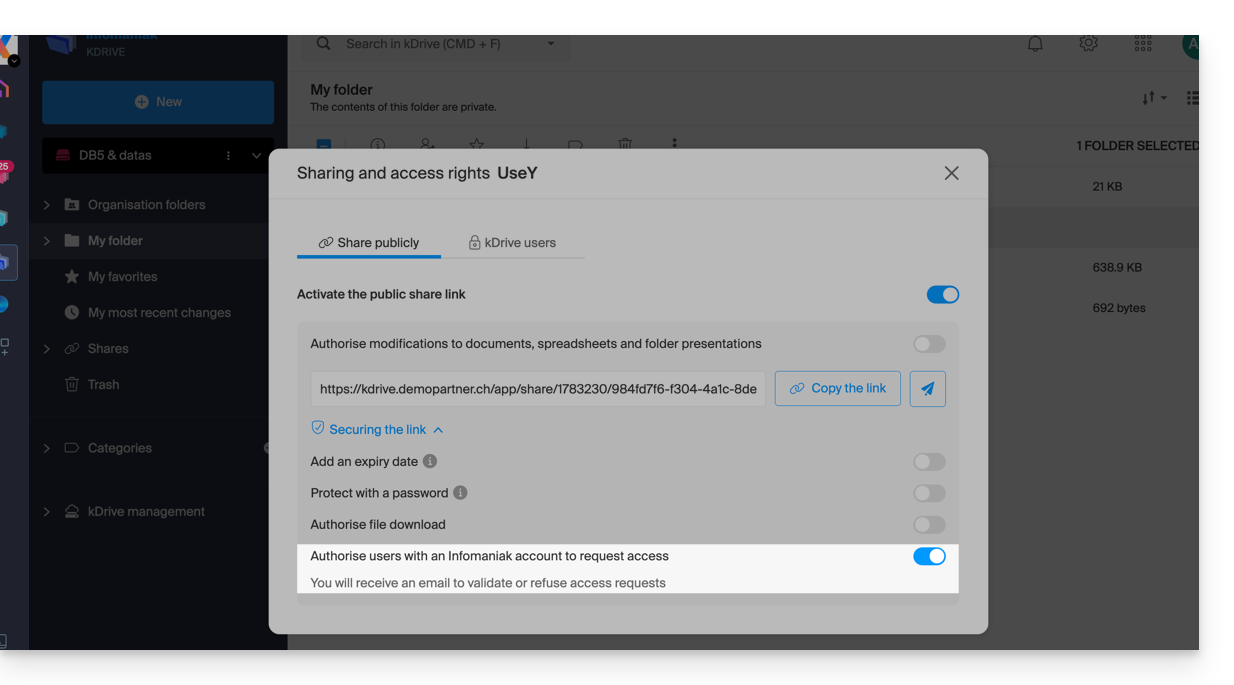
This “Add files” button will be displayed on the sharing page (A) so that the user who accesses the share link can request to become an external user (if they have an Infomaniak account or create one (B):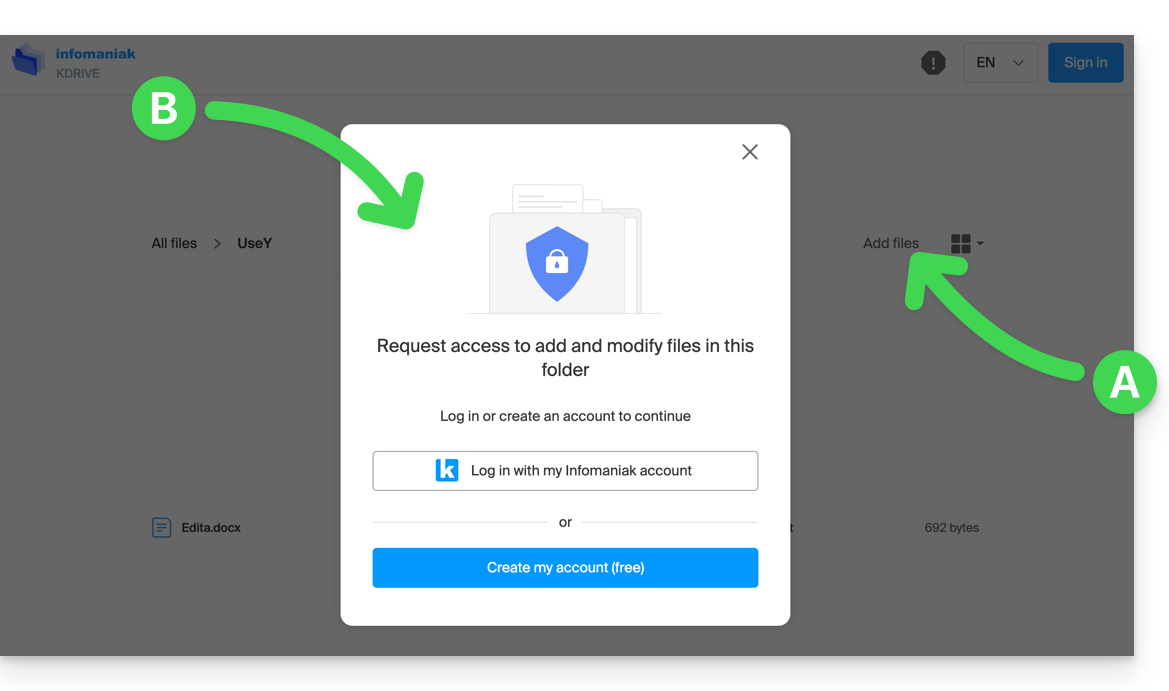
The request will then be sent by email to the user who initiated the sharing and they can decide whether to accept or not.
Common folders
Refer to this other guide to fully understand the differences between the different sections of kDrive.
These shared folders are available with certain paid offers and allow you to share your data with all kDrive users. Any new folder created inside with a choice of maximum sharing will be indicated as such on the right in the list of folders.
However, a folder can also be created with restricted sharing (this is offered to you when creating a new folder or when you return to the sharing of said folder) and in this case only authorized persons will be able to see the content directly; users who have access are visible on the right in the list of folders:
Other users with access to shared folders will also be able to access a subfolder by force either by clicking on it and accepting the warning message, or via the action menu on the right of the directory by choosing "Force Access"; this will notify other users by email of the access taken:
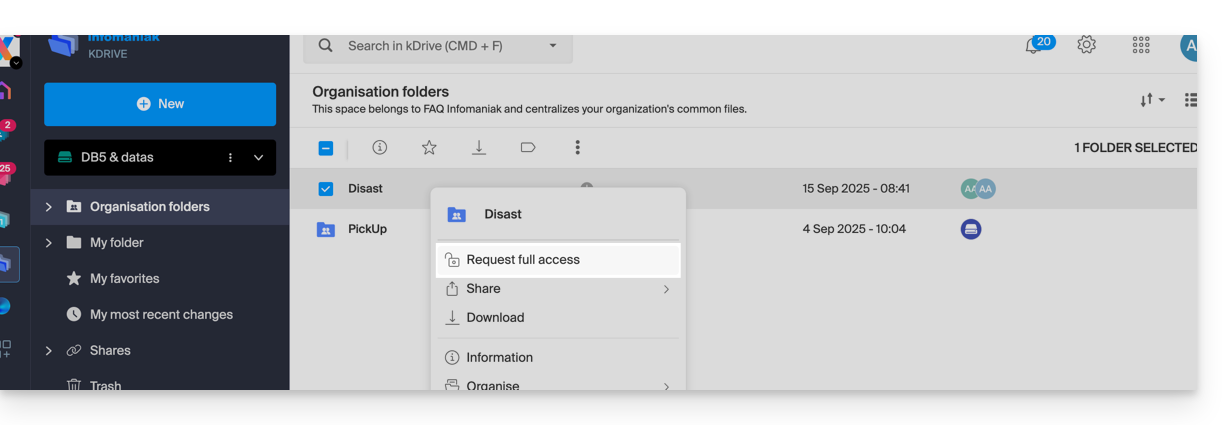
Refer to this other guide if you are looking for information on sharing and shared folders.
This guide provides instructions to synchronize kDrive with a Synology NAS (or vice versa) via the WebDAV protocol found in the Cloud Sync application.
⚠ Available with:
| kSuite | |
| Business | |
| Enterprise | |
| kDrive | Solo |
| Team | |
| Pro |
Prerequisites
- Have a Synology NAS accessible from the Internet.
- Know your kDrive identifier (kDrive ID).
Synchronize kDrive and Synology via Cloud Sync
To do this:
- Log in to the Synology DiskStation Manager (DSM).
- If necessary, download and install the Cloud Sync app from the Package Center.
- Open Cloud Sync.
- Click on the + at the bottom left to add a Cloud.
- Choose WebDAV at the bottom of the list of available Clouds:

- For the account parameters, use the following information:
- Server address:
https://IDkDrive.connect.kdrive.infomaniak.com(see the prerequisites above) - Username: email address to log in to the Infomaniak account
- Password: create an application password for this specific use.
- Server address:
- Select the local folder, destination, and desired synchronization type:

- Bidirectional: changes made will be reflected in both directions.
- Download only remote changes: ideal for saving a kDrive to your NAS.
- Download only local changes: ideal for saving data from your NAS to a kDrive.


