Knowledge base
1000 FAQs, 500 tutorials and explanatory videos. Here, there are only solutions!
The hosting platform for your sites *.perso.ch, *.users.ch, *.geneva-link.ch is evolving and this guide presents the procedure to follow to connect to your FTP space.
Modification of login credentials
The current hosting platform relies on the use of a prefix at the level of your FTP username. This is in the following form: persoch_
Thus, if your username was infomaniak, you will now need to use the following user to connect via FTP: persoch_infomaniak.
This guide explains how to perform a bulk action (deletion, activation of the anti-spam filter, etc.) on multiple email addresses within a Service Mail.
Bulk actions
To perform these "batch" actions, in bulk:
- Click here to access the management of your product on the Infomaniak Manager (need help?).
- Click directly on the name assigned to the product concerned.
- Check the box to the left of Email address to select all addresses, or select the desired addresses one by one.
- The list of available actions will then appear at the bottom of the page, including in the action menu ⋮ :
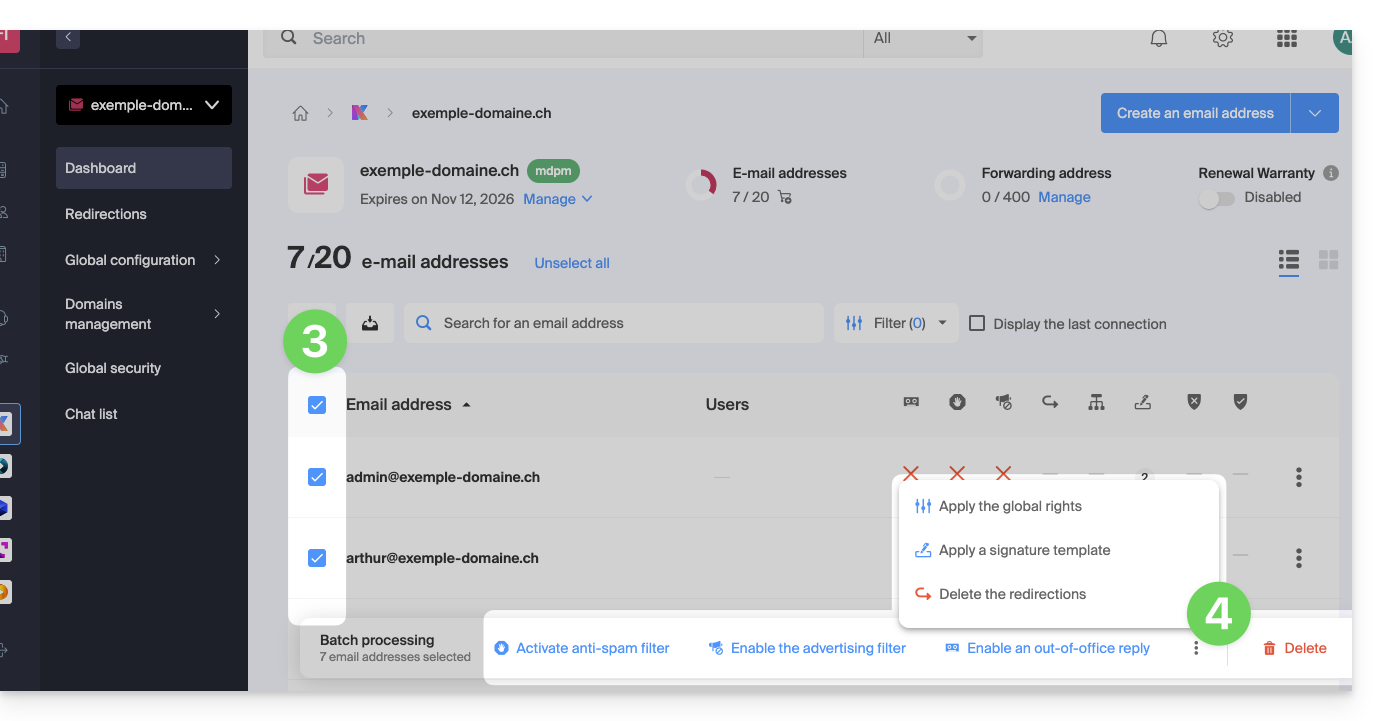
The possible bulk actions are as follows:
- activate the anti-spam filter
- activate the advertising filters
- apply general rights
- activate an automatic reply
- apply a signature template
- delete the redirections
- delete the email addresses
This guide explains how to enable or disable the Infomaniak ad filter that automatically sorts emails detected as Newsletters or activity notifications into specific folders.
Preamble
- The filter…
- … is automatically enabled when creating an email address within an Infomaniak Mail Service or when subscribing to a my kSuite / my kSuite+ offer.
- … allows you to focus on relevant and important emails, which improves your productivity by reducing distractions from ads and spam.
- … helps keep your inbox cleaner and better organized by separating advertising emails, which facilitates the management of important emails.
Enable the option from the Infomaniak Web Mail app
Prerequisites
- Have permission to manage filters: it is possible that the Mail Service manager has removed this right from their admin account.
To access your Infomaniak mailbox settings:
- Click here to access the Infomaniak Web Mail app (online service ksuite.infomaniak.com/mail).
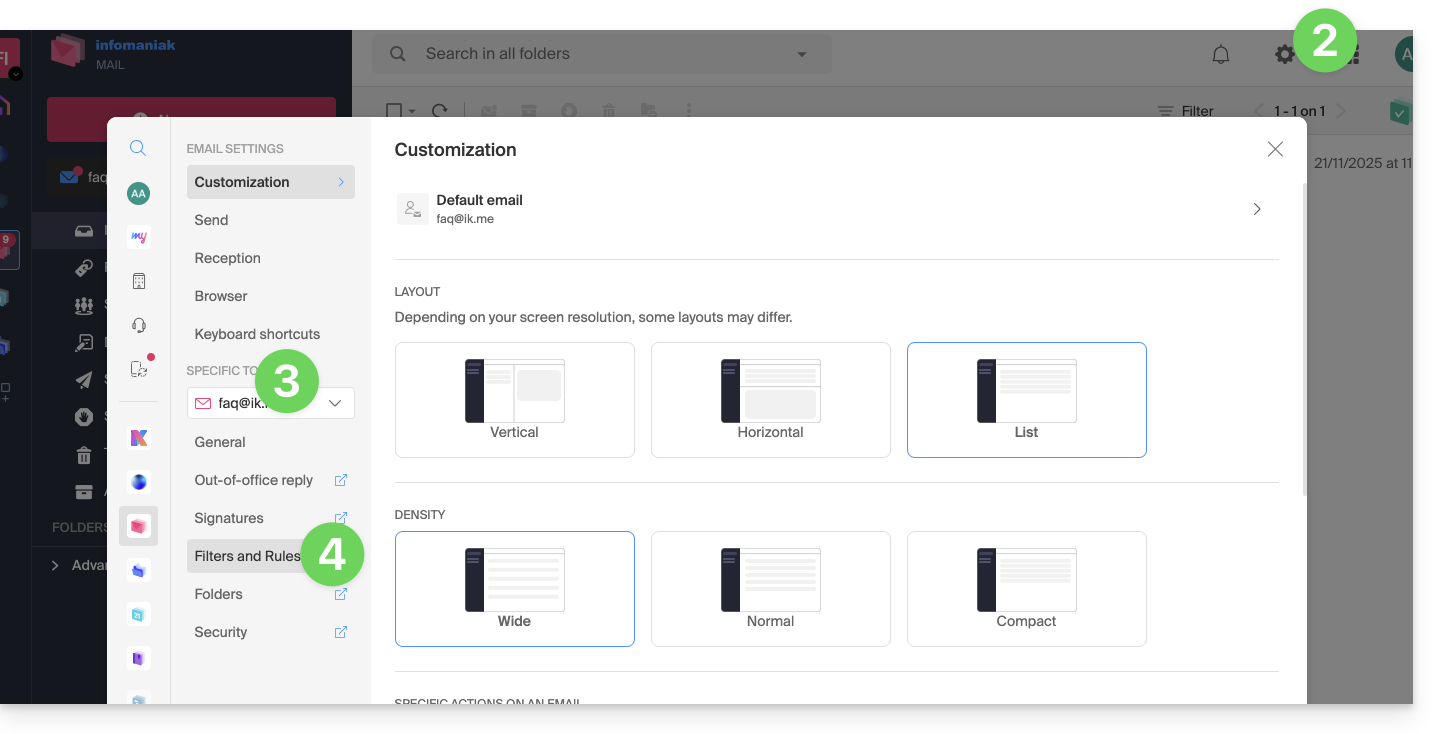
- Click on the Settings icon in the top right corner.
- Check or select the email address concerned in the dropdown menu of the left sidebar.
- Click on Filters and rules:
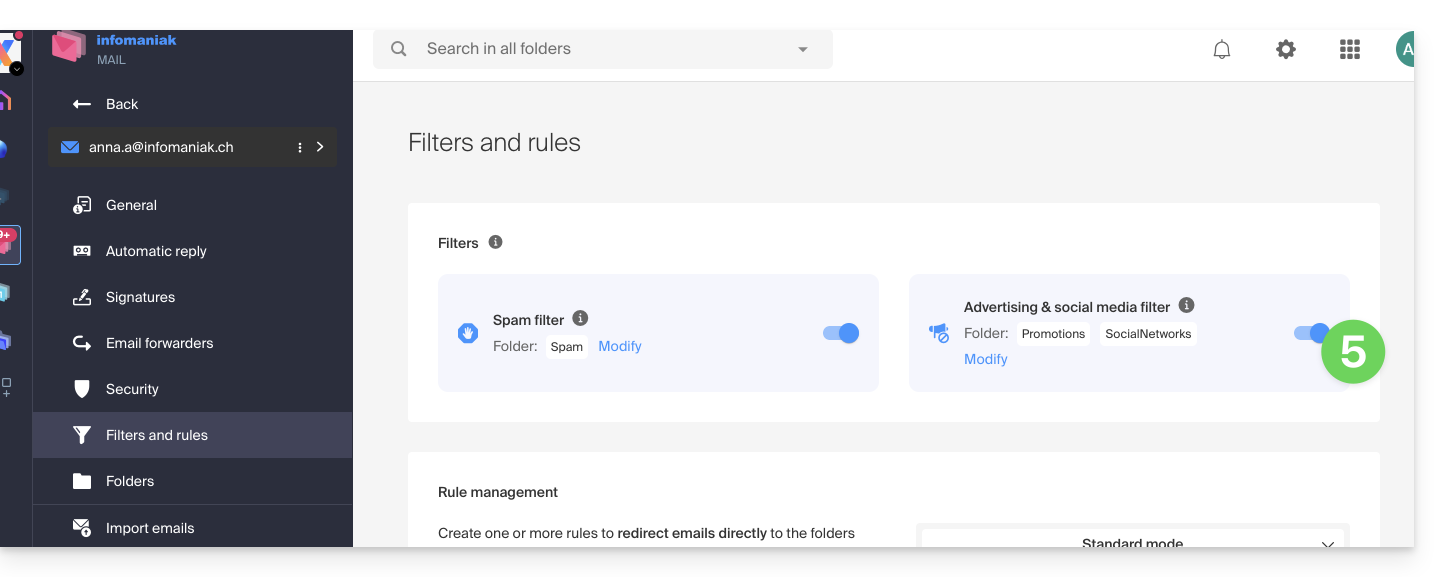
- Enable the ad filter option, the effect is immediate:
- To disable the filter, simply click the toggle switch again; in this case, all future received messages will go to the inbox.
Enable the option from a Mail Service
To access your Infomaniak mailbox settings:
- Click here to access the management of your product on the Infomaniak Manager (need help?).
- Click directly on the name assigned to the product concerned.
- Click on the email address concerned in the table that appears
- Click on Filters and rules in the left sidebar menu
- Enable the ad filter option, the effect is immediate:
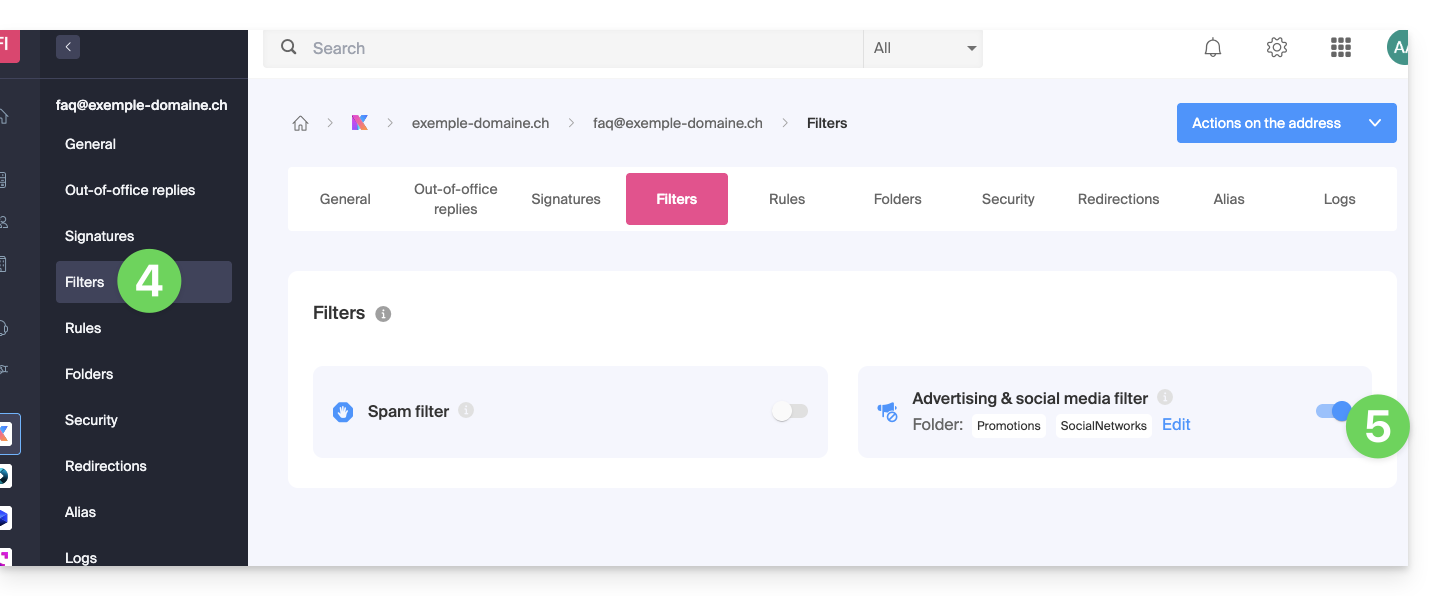
- To disable the filter, simply click the toggle switch again; in this case, all future received messages will go to the inbox.
Note that you can activate it in bulk on multiple addresses at the same time.
Customize the advertising filter
Email location
In the same place (point 5 in the images above), by clicking on Modify, you can choose the default location of the 2 folders in which the messages will be automatically placed (similar to the special IMAP folders).
This guide explains how to create sorting rules in Advanced mode, scripts in Sieve language, to automatically classify your incoming emails on Infomaniak according to certain conditions.
⚠ Available with:
| kSuite | |
| Standard | |
| Business | |
| Enterprise | |
| my kSuite+ | |
| Mail Service | |
| Premium 5 min. addresses |
Preamble
- If you do not have a compatible offer or if you prefer a simplified configuration, refer to this other guide.
- ⚠️ No support is provided regarding the Sieve language (refer to this documentation — also discover the role of the host).
- Unlike the sorting rules offered within email software/clients (Microsoft Outlook, Mozilla Thunderbird, Apple Mail...), these rules will act directly on your mailbox server before even the IMAP connection.
- It is possible to import Sieve files via a button.
- By activating this mode, the existing standard rules will be kept but deactivated.
- The
redirectcommand (allowing to forward an email to another address) is not allowed in scripts.- If you import a Sieve script from another host, make sure to remove this command.
- To forward emails, use the assistant in Standard mode or the Redirections section of your Mail Service.
Access rules from the Infomaniak Web Mail app
Prerequisites
- Having permission to manage rules: if you had been invited to the Infomaniak Web app Mail (online service ksuite.infomaniak.com/mail) to manage your address, it is possible that the Mail Service manager has removed this right from their admin account.removed this right.
To access the sorting filters for your Infomaniak mailbox:
- Click here to access the Infomaniak Web app Mail (online service ksuite.infomaniak.com/mail).
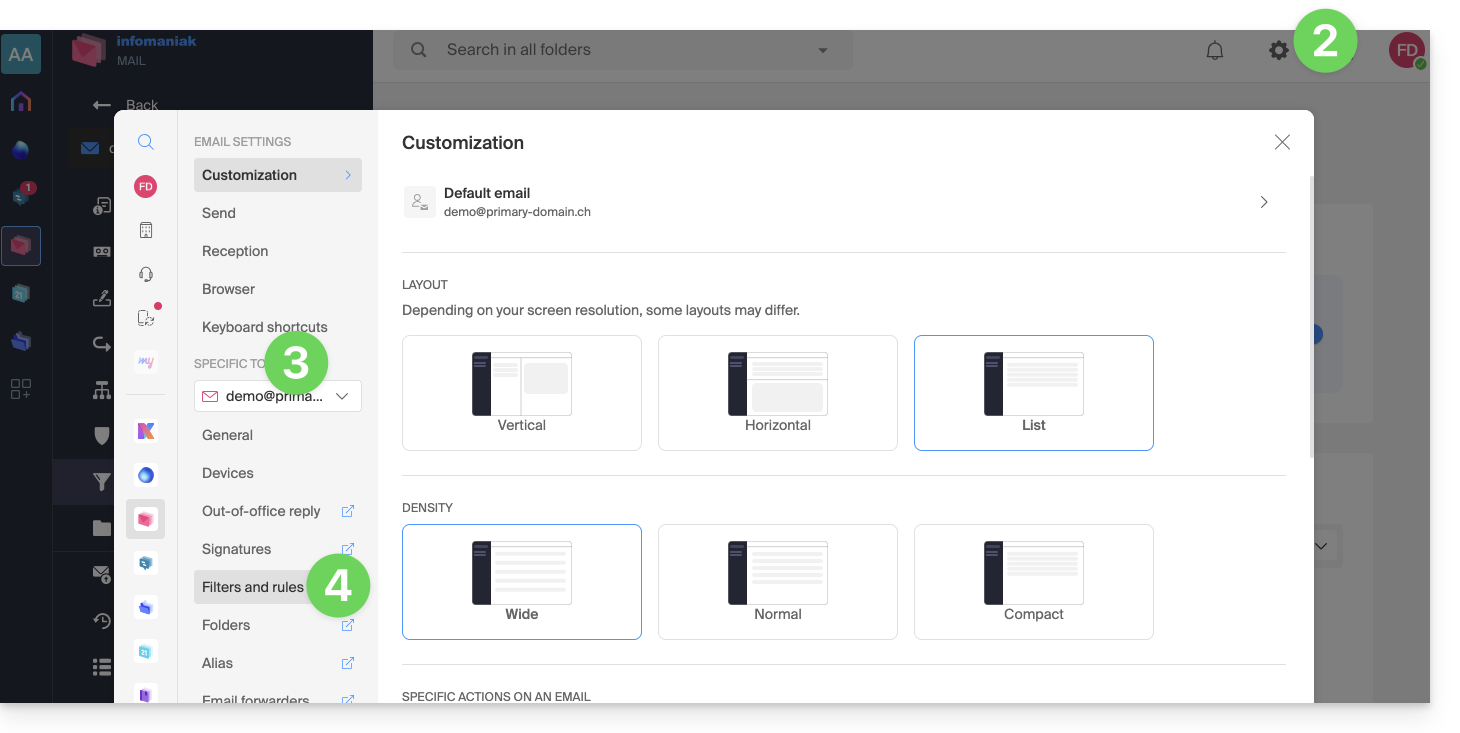
- Click on the Settings icon in the top right corner.
- Check or select the email address concerned in the dropdown menu.
- Click on Filters and rules:
Access rules from a Mail Service
To access the sorting filters for your Infomaniak mailbox:
- Click here to access the management of your product on the Infomaniak Manager (need help?).
- Click directly on the name assigned to the product concerned.
- Click on the email address concerned in the table that appears.
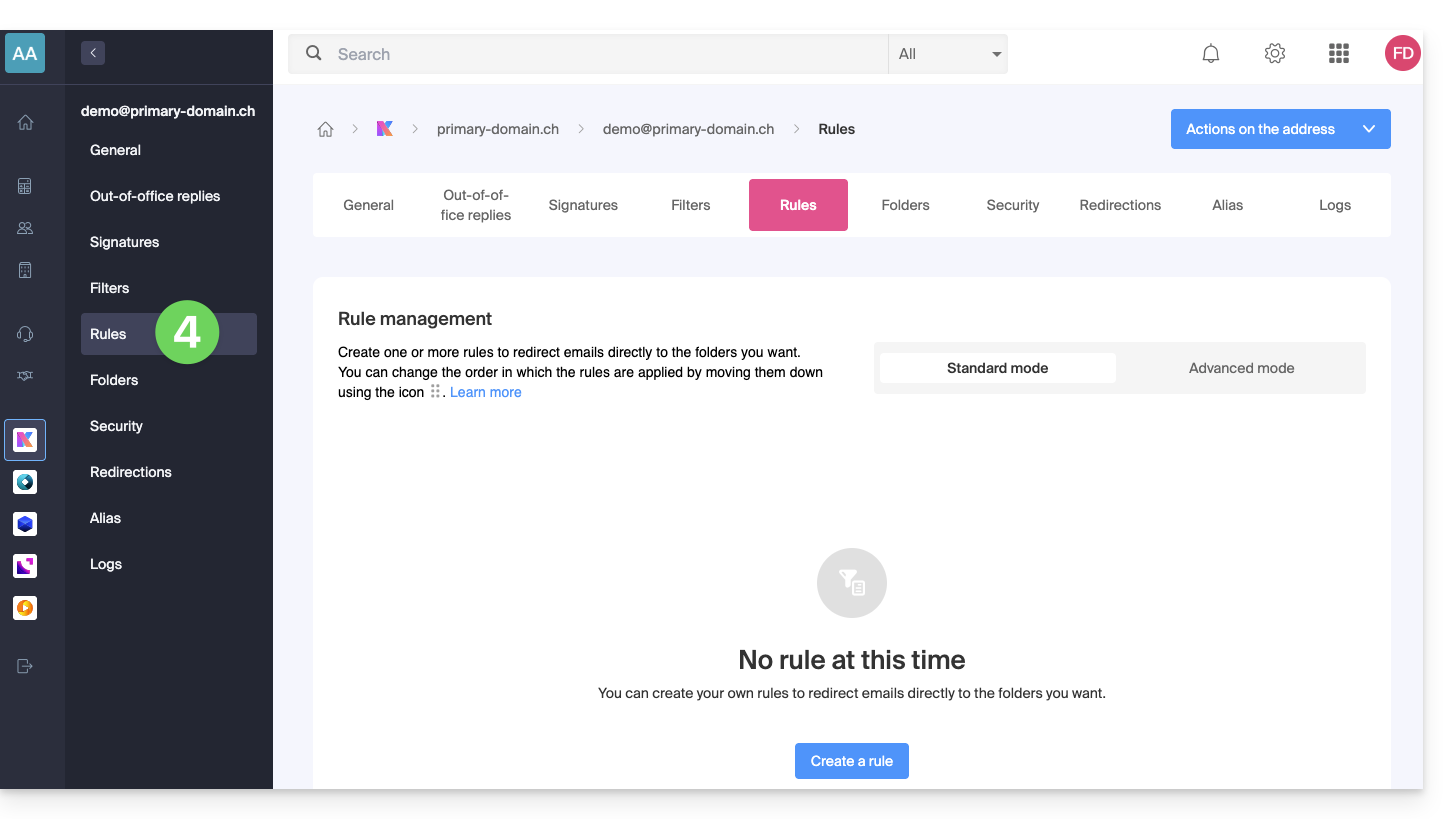
- Click on the Rules tab from the left sidebar (or top bar):
Create a new rule in Advanced (expert) mode
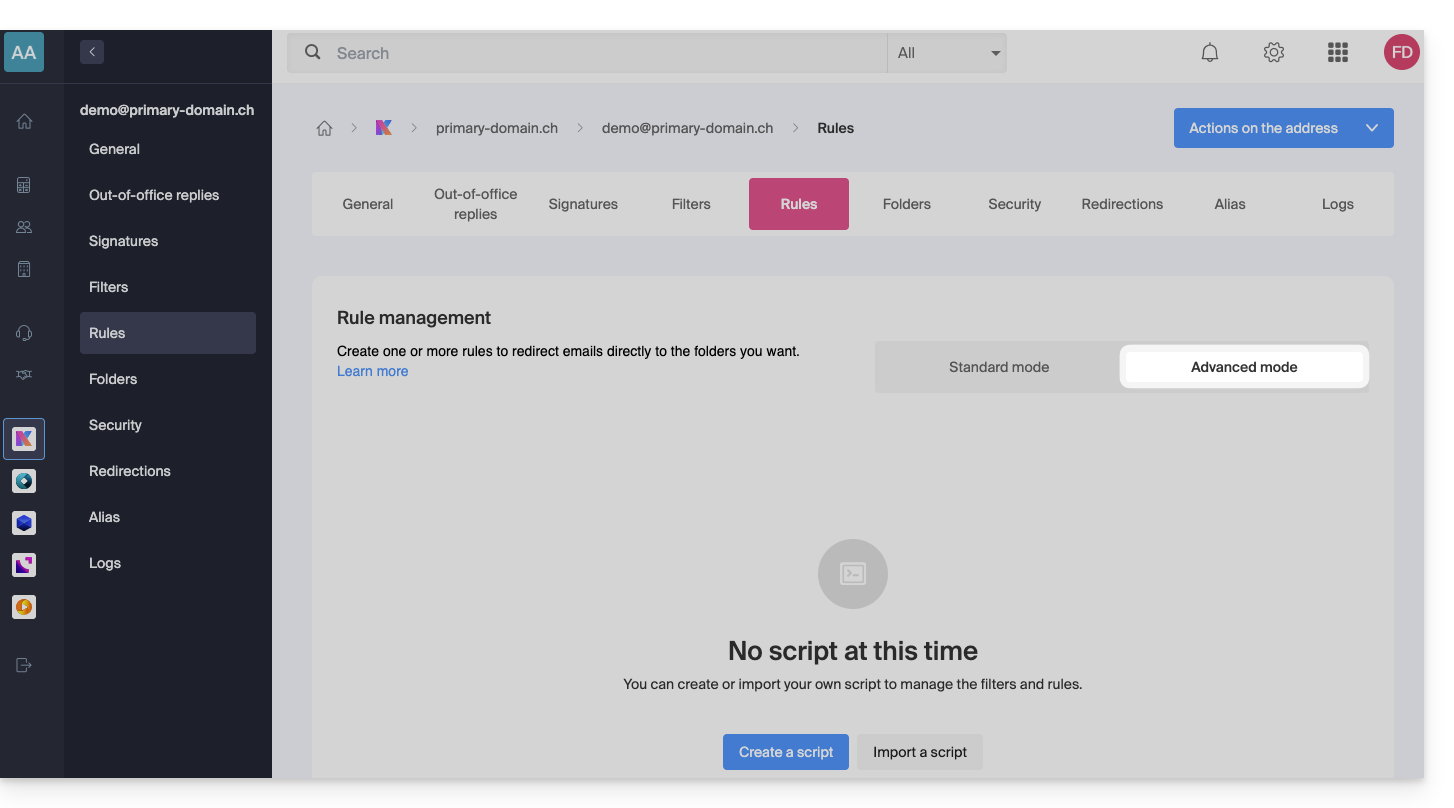
- Make sure to click on Advanced mode:
First example of advanced sorting
Here is a simple example of a command using this language:
require ["fileinto"];
if address :contains "from" "facebook.com" {
    fileinto "fb";
} elsif header :matches "List-Unsubscribe" "*" {
    fileinto "nl";
} else {
    keep;
}
Explanations:
- Loading required extensions: use
require ["fileinto"];to indicate that you will use thefileintofunction. - Filtering Facebook messages: use
if address :contains "from" "facebook.com"to check if the sender's address contains "facebook.com"; if so, the message is filed in the "fb" folder withfileinto "fb";. - Filtering messages with an unsubscribe link: use
elsif header :matches "List-Unsubscribe" "*"to check if the "List-Unsubscribe" header is present in the message; if so, the message is filed in the "nl" folder withfileinto "nl";. - Keeping other messages: use
else { keep; }to keep all other messages that do not match the previous criteria.
Attention :
- If you need to mention a subfolder, use the separator
/(as in the second example), but it is not necessary to specifyINBOXin your codes - Make sure that the folders
fbandnlalready exist in your inbox; otherwise, the messages may not be sorted correctly - The filter
address :contains "from" "facebook.com"works correctly for addresses that contain "facebook.com" in the "from" field - The filter
header :matches "List-Unsubscribe" "*"checks only for the presence of the "List-Unsubscribe" header, not its content
Second example of advanced sorting
This code modifies the subject based on thesender (adds a prefix to the subject when an email passes the filter, for example):
require ["fileinto", "editheader", "variables", "regex"];
if address "sender" "owner-scientific-linux-devel at LISTSERV.FNAL.GOV" {
    if header :regex "subject" "((Re|Fwd): *)\\[SCIENTIFIC-LINUX-DEVEL\\] *(.*)" {
        deleteheader "Subject";
        addheader "Subject" "${1}${3}";
    } else {
        # Ajouter un préfixe si l'objet ne correspond pas déjà au modèle
        deleteheader "Subject";
        addheader "Subject" "[SL-Devel] ${1}";
    }
    fileinto "Mail List/SL-Devel";
}
Explanations:
- Required extensions:
fileinto: to classify messages into folders.editheader: to modify email headers.variables: to use variables in expressions.regex: for regular expressions.
- Condition on the sender:
if address "sender" "owner-scientific-linux-devel at LISTSERV.FNAL.GOV": checks if the sender matches.
- Condition on the subject:
if header :regex "subject" "((Re|Fwd): *)\\[SCIENTIFIC-LINUX-DEVEL\\] *(.*)": checks if the subject matches the specified pattern.deleteheader "Subject";andaddheader "Subject" "${1}${3}";: deletes the existing subject and adds a new subject with the captured parts.
- Adding a prefix if the subject does not already match the pattern:
addheader "Subject" "[SL-Devel] ${1}";: adds a prefix "[SL-Devel]" to the subject if it is not already present.
- Classifying the message:
fileinto "Mail List/SL-Devel";: classifies messages into the "Mail List/SL-Devel" folder.
Attention :
- Make sure that the folder
Mail List/SL-Develalready exists in your inbox. - Check that the script correctly modifies the subject of the emails to add or adjust the prefix if necessary.
This guide explains how to modify an offer for Service Mail Infomaniak, the powerful and secure solution for hosting your email addresses, in order to increase or reduce the quota of email addresses available within it.
Preamble
- Refer to this other guide if you simply want to create or delete an email address on your existing Service Mail, without changing the number of email addresses available within it.
- If your Service Mail is not yet part of a kSuite, refer to this other guide to consider a possible change of offer along the way.
Modify the email address quota on a Service Mail
Prerequisites
- Have a Service Mail on your Infomaniak Manager.
To view the number of email addresses currently available on your Service Mail, and then order more if necessary (or remove some):
- Click here to access the management of your product on the Infomaniak Manager (need help?).
- Click directly on the name assigned to the product in question.
- The number of email addresses created (A) and the total number of email addresses available (B) on the Service are displayed at the top of the page:
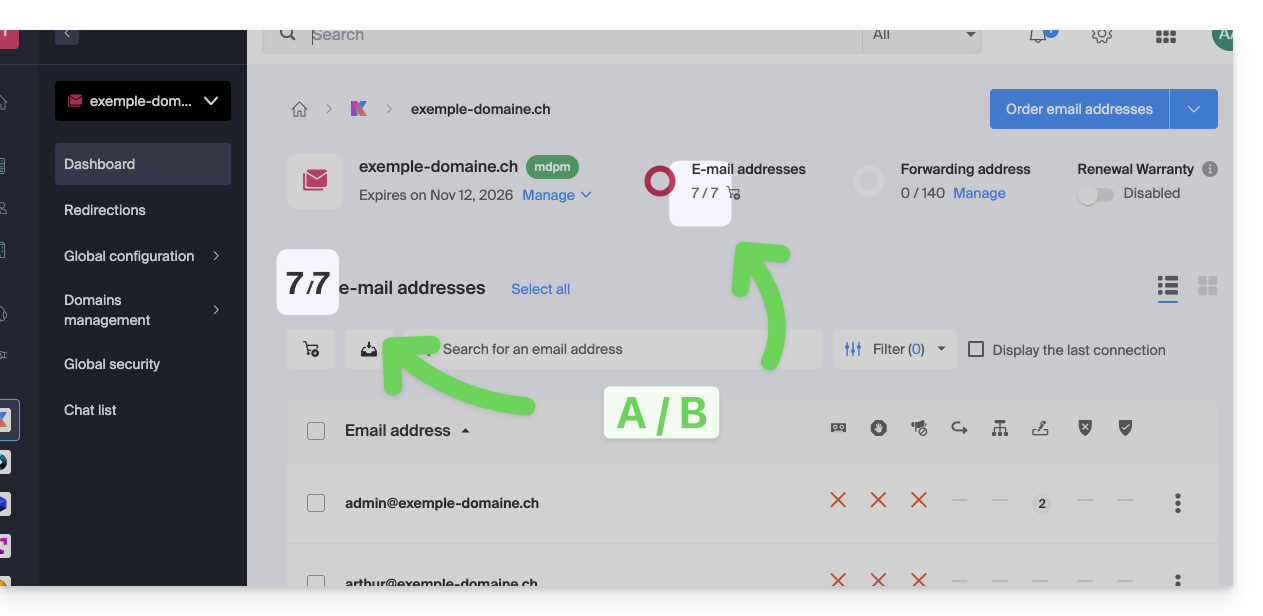
- Note that you can also view the quota directly at point 1, when you are on the page listing your Service Mail:
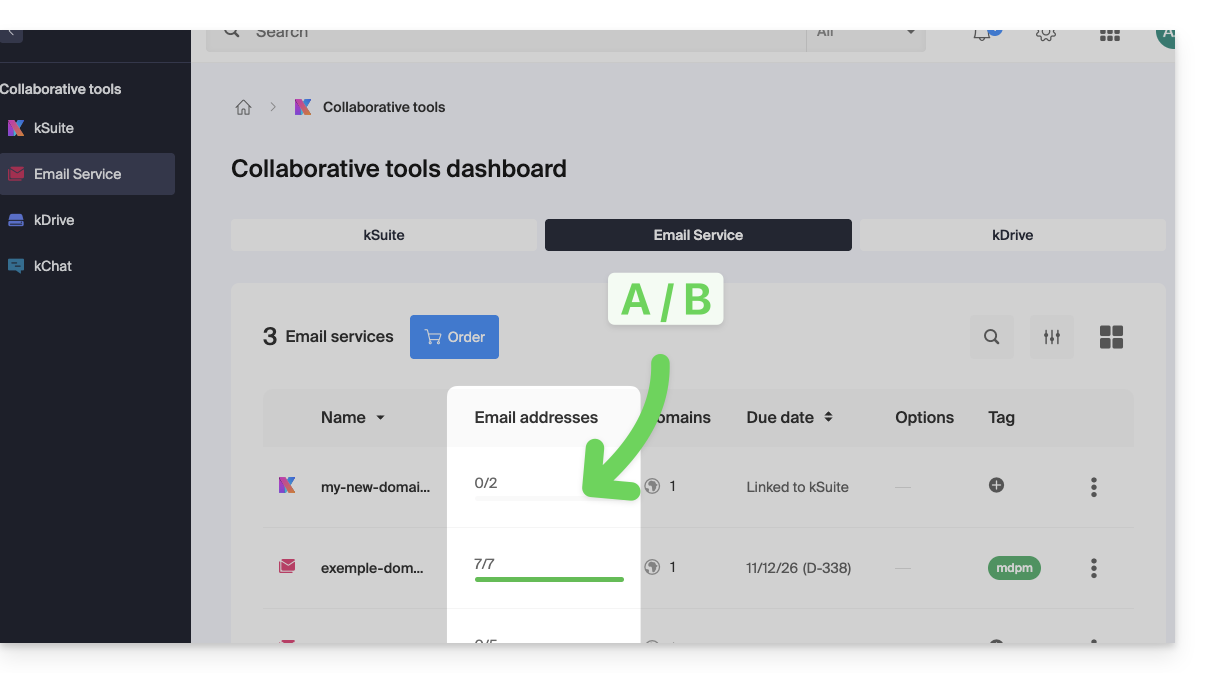
- Note that you can also view the quota directly at point 1, when you are on the page listing your Service Mail:
Increase the number of email addresses available
To increase the number of email addresses available to you on your Service Mail, thus allowing you to create new email addresses for yourself or your entourage:
- Click here to access the management of your product on the Infomaniak Manager (need help?).
- Click directly on the name assigned to the product in question.
- Click at the top on the shopping cart icon:
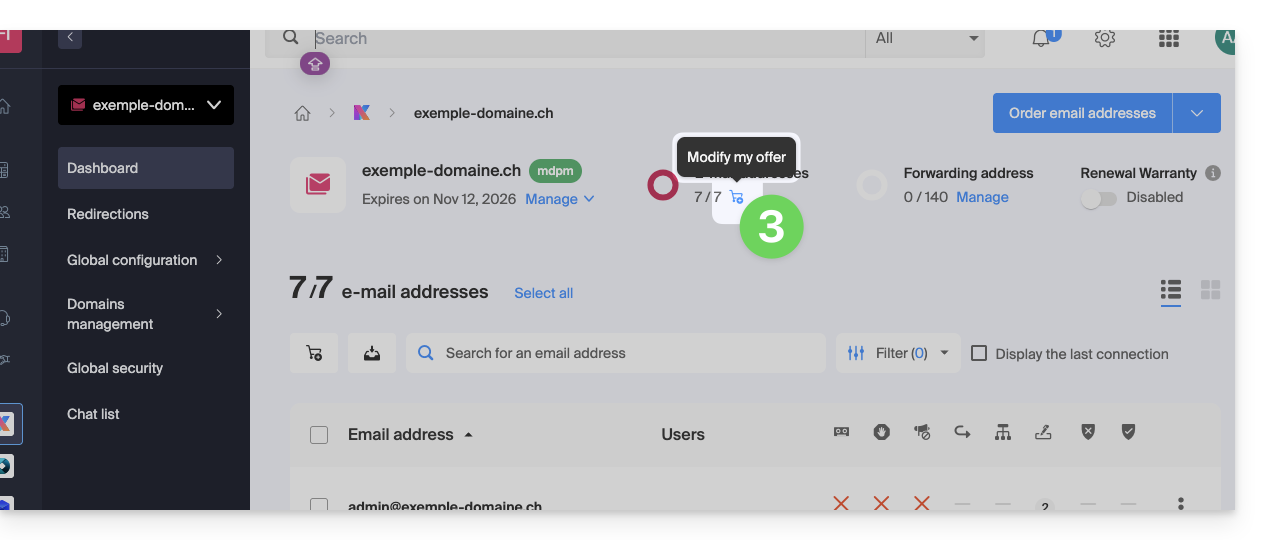
- Adjust the desired quota and proceed with the order of the additional email addresses on the Service Mail domain.
- Complete the payment procedure; you can now create your additional email addresses:
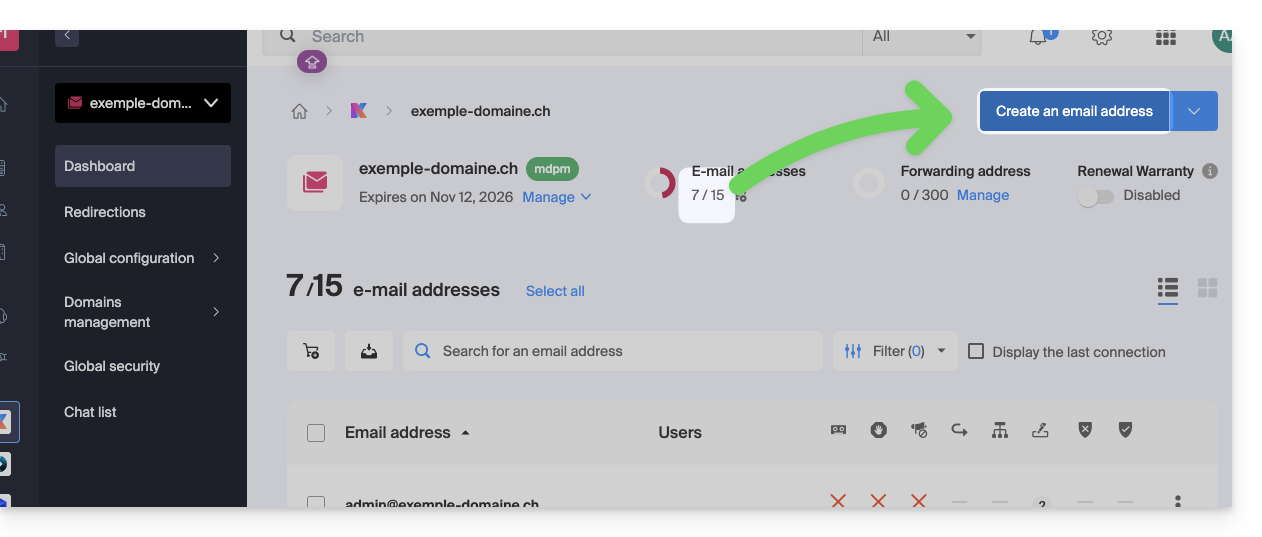
Reduce the number of email addresses available
To reduce the number of email addresses available to you on your Service Mail, thus allowing you to pay only for the number of addresses actually desired and used at the next renewal (minimum of 5 addresses for any Service Mail, except for Service Mail Starter), you must, if necessary, have deleted the extra email addresses and then:
- Click here to access the management of your product on the Infomaniak Manager (need help?).
- Click directly on the name assigned to the product in question.
- Click at the top on the shopping cart icon:
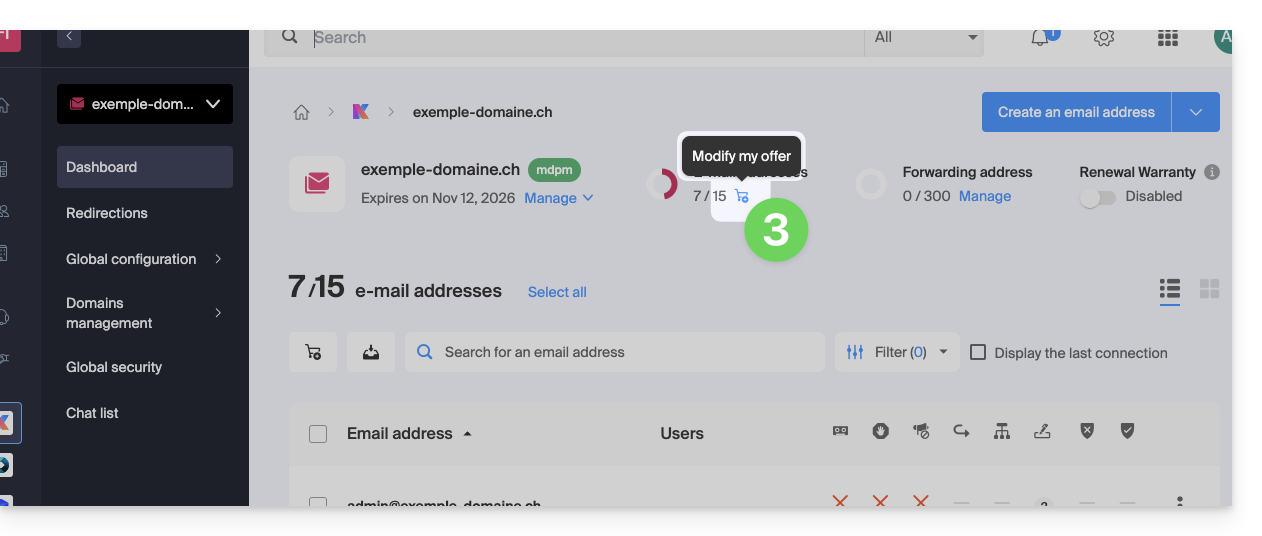
- Adjust the desired quota and complete the procedure by taking note of the important information displayed on the screen.
This guide is intended for users who have chosen Infomaniak, a hosting provider committed to the planet: you will find below the details of the calculation method used to display CO2 on invoices, as well as tips to reduce your own digital footprint.
Preamble
- For Web hosting and Mail services, Infomaniak displays the amount of CO2 emitted annually, a figure based on a rigorous Life Cycle Analysis (LCA) method that adds two key factors:
- Material impact (Full life cycle)
- Thanks to the emission factors of the ResilioDB database, the calculation includes the emissions generated during the manufacturing (BLD), transport (DIS) and end-of-life/recycling (EOL) of each piece of equipment (servers, RAM, disks, etc.).
- Energy impact (Actual consumption)
- The actual electrical consumption of the servers is measured via the IPMI probes.
- This energy is then converted into CO2 equivalent according to Infomaniak's specific energy mix, which is very low in carbon (11.77g CO2eq/kWh).
- Material impact (Full life cycle)
- The total impact is then distributed according to the unit of use of the clients (per hosted website or per mailbox).
How can you act at your level?
If the hosting provider optimizes its infrastructures upstream, the end user also plays a key role. Here's how to reduce the footprint of your services.
For websites
The goal is to minimize the energy consumption of the servers and the visitors' terminals:
- Technical optimization: Compress images, minify scripts, and use modern formats (WebP).
- Clean design: Limit autoplay videos, ads, and heavy scripts that consume bandwidth.
- Best practices: For WordPress, it is recommended to consult the GreenIT sheets.
For email
Email communication can also be optimized:
- Sobriety: Prefer plain text emails over HTML and limit heavy graphical signatures.
- Attachments: Prefer sending download links (via kDrive or SwissTransfer) to large attachments, or use the compressed PDF format.
- Cleanup: Unsubscribe from unnecessary newsletters and use tracking tools to avoid sending unopened emails.
It is recommended to regularly monitor statistics to improve ecological performance. In the meantime, while waiting for Infomaniak's future integrated tools, it is possible to audit the impact of web pages via GreenFrame.io.
This guide is for you if you wish to change your current email provider and host your emails with Infomaniak.
Preamble
- To help you identify the offer best suited to your needs, refer to this other guide.
Moving your email to Infomaniak
To avoid losing any messages and experiencing any interruptions:
- Follow the links in order as they will open in a new tab in your browser, and return to this main guide after each completed step.
- If necessary, you can also migrate your:
You order a Mail Service only
Below are the different steps to migrate your mail service to Infomaniak securely.
Step 1: It is necessary to order the mail service by following this guide.
At the time of ordering, you can choose to transfer the domain name at the same time or to order the mail service alone.
You can then import the content of your old addresses to Infomaniak by following this guide.
Step 2: Once the addresses are configured and your old content imported, you will be able to link your external domain name to your Infomaniak Mail Service to start receiving emails at Infomaniak. You will need to follow the chapter "Link the external domain to your Mail Service" of this guide.
You will find here the MX / SPF to add in the DNS zone of your domain name:
SPF
Type: TXT
Host: Leave blank
Target: v=spf1 include:spf.infomaniak.ch -all
MX
Priority: 5
Host: Leave blank
Target: mta-gw.infomaniak.ch (for Gandi, it is necessary to add a point at the end "mta-gw.infomaniak.ch." )
Step 3 (optional): When everything is working correctly and if it has not already been done, you can transfer your domain name by following this guide.
Once the transfer is initiated, you should have access to the DNS zone of your domain name on the Infomaniak Manager. You can therefore check…
1. … in the DNS diagnostic if there are any corrections to be made and, if necessary, add the DNS entries that may be required for other services used with your domain name (newsletter or other).
2. … in the global security tab of your mail service if DKIM is properly activated.
If emails arrived during the migration with your previous provider, you can re-import the contents of your old addresses with Infomaniak by following this guide (duplicates are managed).
You order a kSuite
Below are the different steps to migrate your external mail service to an Infomaniak kSuite securely.
Step 1: Order kSuite from this page.
Once the order is completed, access your kSuite and add your domain name to it.
You can then create your email addresses and even import the content of your old addresses by following this guide.
Step 2: Once the addresses are configured and your old content imported, you will be able to link your external domain name to your Infomaniak Mail Service to start receiving emails at Infomaniak. You will need to follow the chapter "Link the external domain to your Mail Service" of this guide.
You will find here the MX / SPF to add in the DNS zone of your domain name:
SPF
Type: TXT
Host: Leave blank
Target: v=spf1 include:spf.infomaniak.ch -all
MX
Priority: 5
Host: Leave blank
Target: mta-gw.infomaniak.ch (for Gandi, it is necessary to add a point at the end "mta-gw.infomaniak.ch." )
Step 3 (optional): When everything is working correctly and if it has not already been done, you can transfer your domain name by following this guide.
Once the transfer is initiated, you should have access to the DNS zone of your domain name on the Infomaniak Manager. You can therefore check…
1. … in the DNS diagnostic if there are any corrections to be made and, if necessary, add the DNS entries that may be required for other services used with your domain name (newsletter or other).
2. … in the global security tab of your mail service if DKIM is properly activated.
If emails arrived during the migration with your previous provider, you can re-import the contents of your old addresses with Infomaniak by following this guide (duplicates are managed).
This guide explains how to sort emails currently present in your Infomaniak inbox or in subfolders, for example to quickly delete specific messages with the same structure, classify messages by subject or sender, etc.
Preamble
- Unlike the guide Sort incoming emails based on certain criteria which details how to set up, from the Infomaniak interface, filters that will apply to all future incoming messages, it is possible with the free software Thunderbird to apply sorting rules to already received and already present messages in an email account.
Quickly sort an IMAP mailbox
To do this:
- Install and then open Thunderbird.
- Configure your Infomaniak mail within the application.
- Open the Tools menu and click on Filters:

- Check the selected address and click on New...

- Configure the filter according to your preferences (in this case the rule is that all messages with the subject containing ER will be moved to the trash):

- Click on OK to return to the list of your filters and then click on Run now:

- The result is immediately visible as the messages are moved to the trash and disappear from the window.
This guide explains how to report spam or declare a false positive if spam-type messages slip through the cracks within an Infomaniak Mail Service, or conversely if a valid email has been incorrectly classified as spam; you can intervene in a few clicks.
Report spam
Prerequisites
- Check that the spam filter is active.
Next, to automatically move an email from your inbox that has evaded the anti-spam filter to the Spam folder:
- Click here to access the Infomaniak Mail Web app (online service ksuite.infomaniak.com/mail).
- Select the message in the inbox and then click on the Spam icon in the toolbar:
- You can also open it and declare it as Spam later:
- Another option: open it and click on the action menu ⋮ on the right:
Once you have clicked on Report as spam:
- The email is moved to the Spam folder (or to the manually defined folder)
- The sender's address is added to the blocked users list
- The filter is refined for better handling over time
Declare a false positive
Conversely, if you act on an email incorrectly considered as spam (false positive) by clicking on the "This is not spam" icon:
- The email is moved to the inbox...
- The sender's address is added to the list of authorized users...
- This also affects the filter and its criteria.
This guide details the principle of an email address created within an Infomaniak Mail Service and the concept of an Infomaniak account user, when the latter uses an Infomaniak email address and consequently some features may be restricted.
1. Create an address on a Mail Service
The administrator of a Mail Service creates a new email address (refer to this other guide if necessary) and must select the creation mode suitable for their situation:
- An address for themselves (and directly visible on their Mail interface)
- An address for multiple users (sending invitations)
- An address without invitation (not linked to their Mail interface)
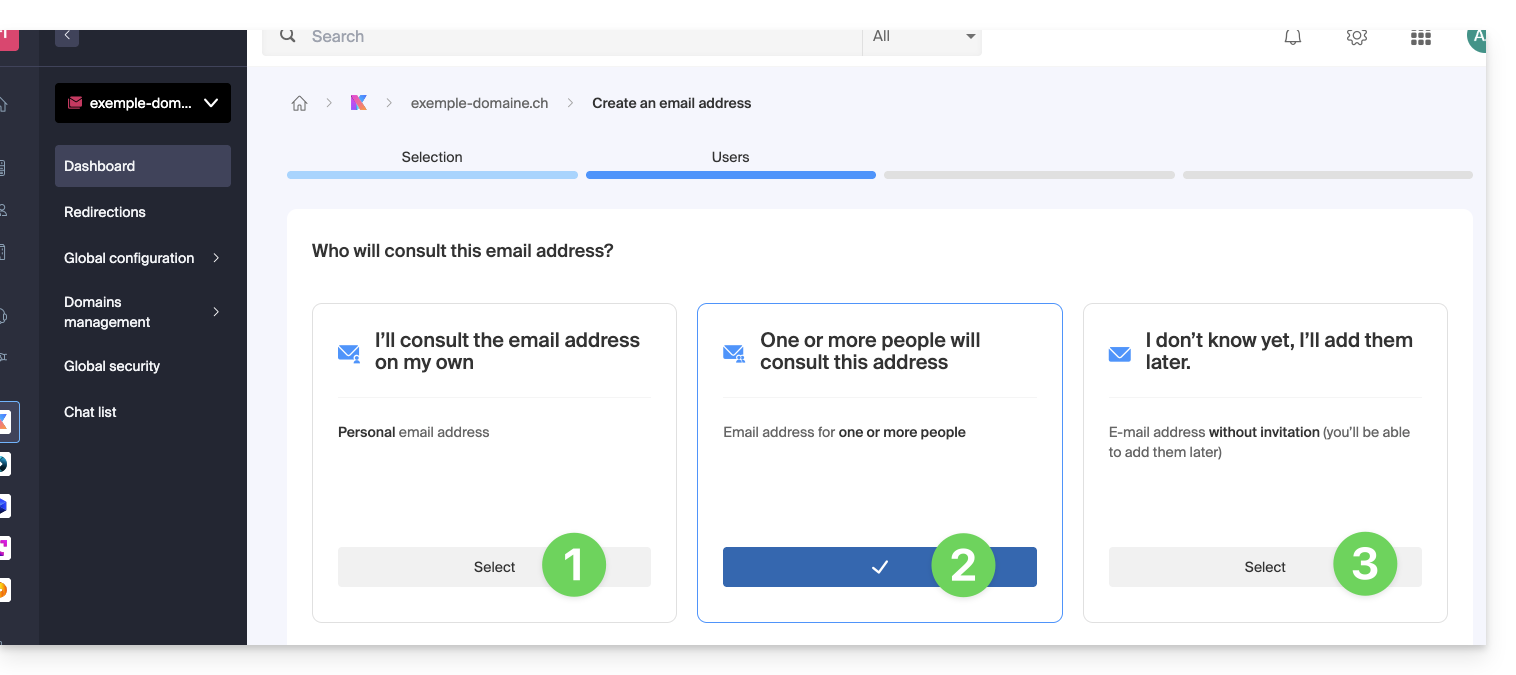
Option 2: address for multiple users
If the choice is made to create the email address for other users, it is still necessary to choose who will be able to access the address among:
- existing users in your Organization
- an external email address to which you send an invitation link to the email address that you must specify in the field
- a new user to whom you will send an invitation link by your own means
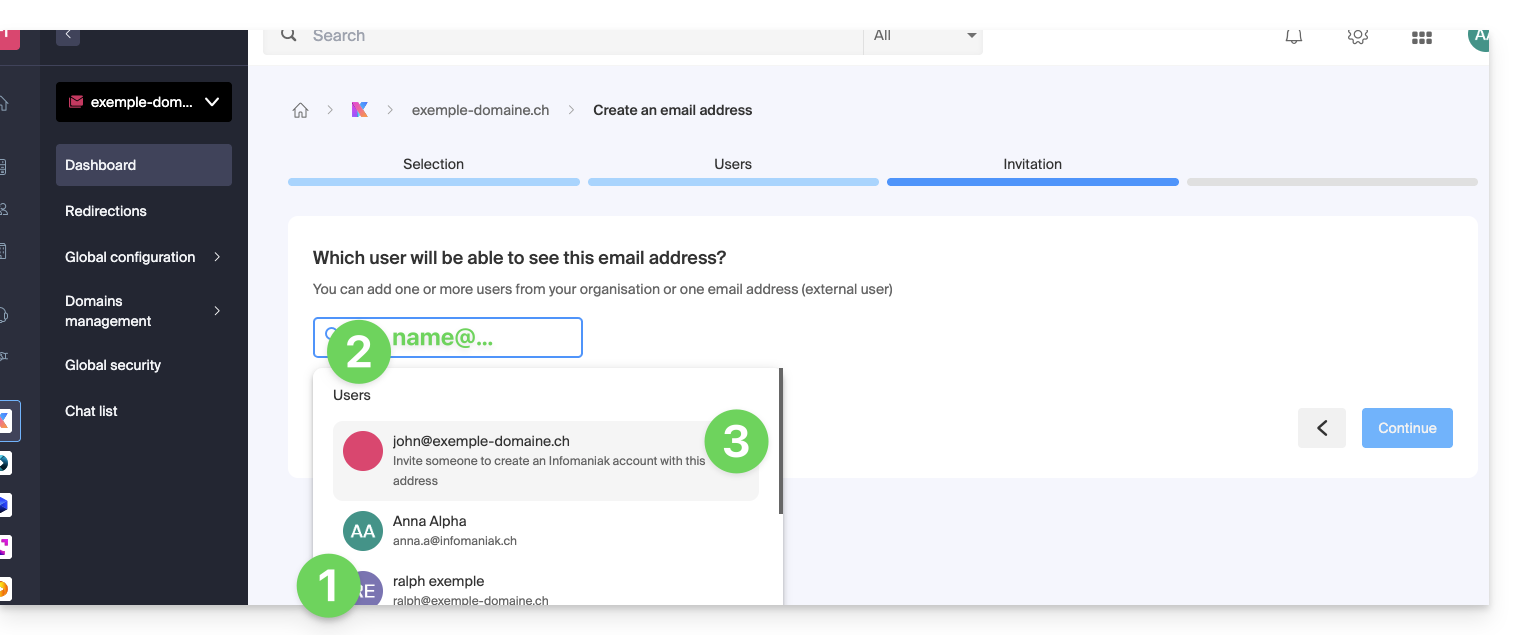
2. Create an Infomaniak account with the created email address
If the user needs to create an Infomaniak account to use the new email address, and if this same email address is specified as the login identifier…
- … this is mainly the case for choices 2 & 3 above, when this box is selected in the next step:
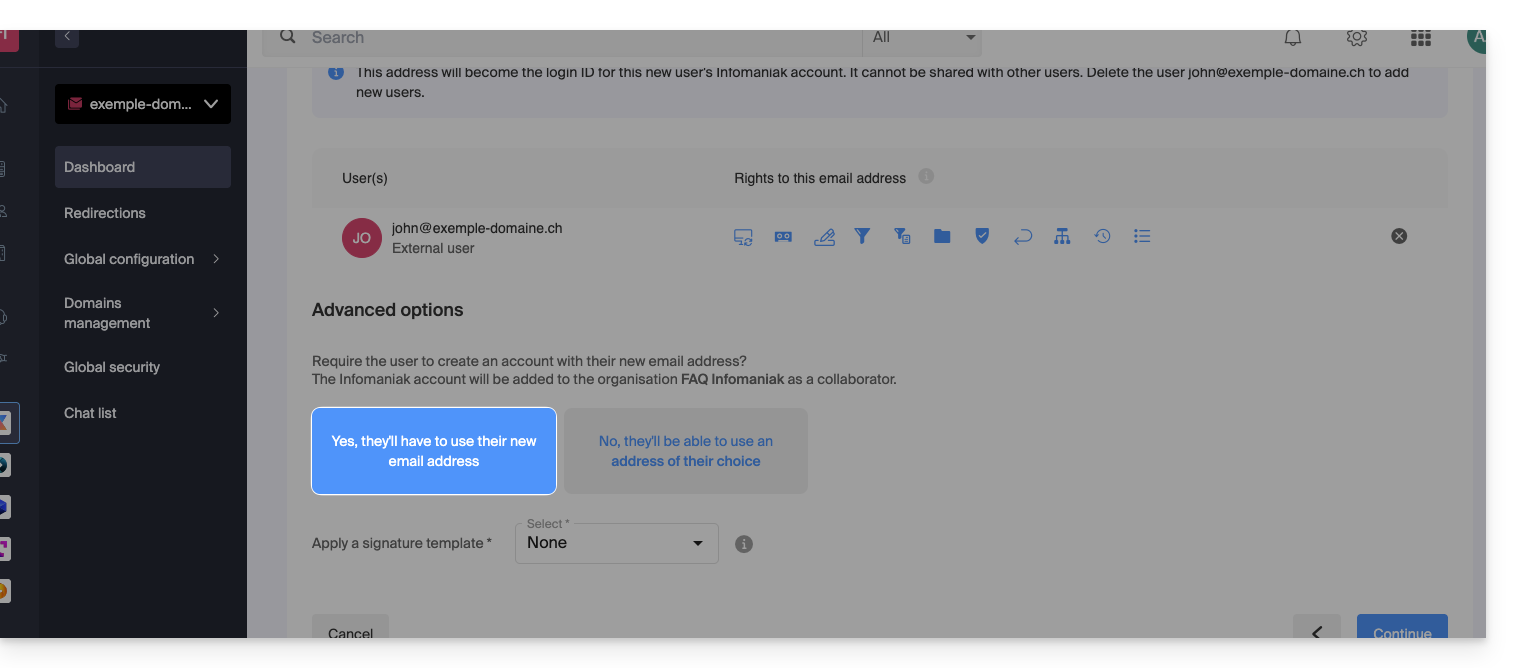
… some restrictions may then exist:
- This email address can no longer be shared with other users:
- It exists and works for the user who logs in with it, but it can no longer be shared:
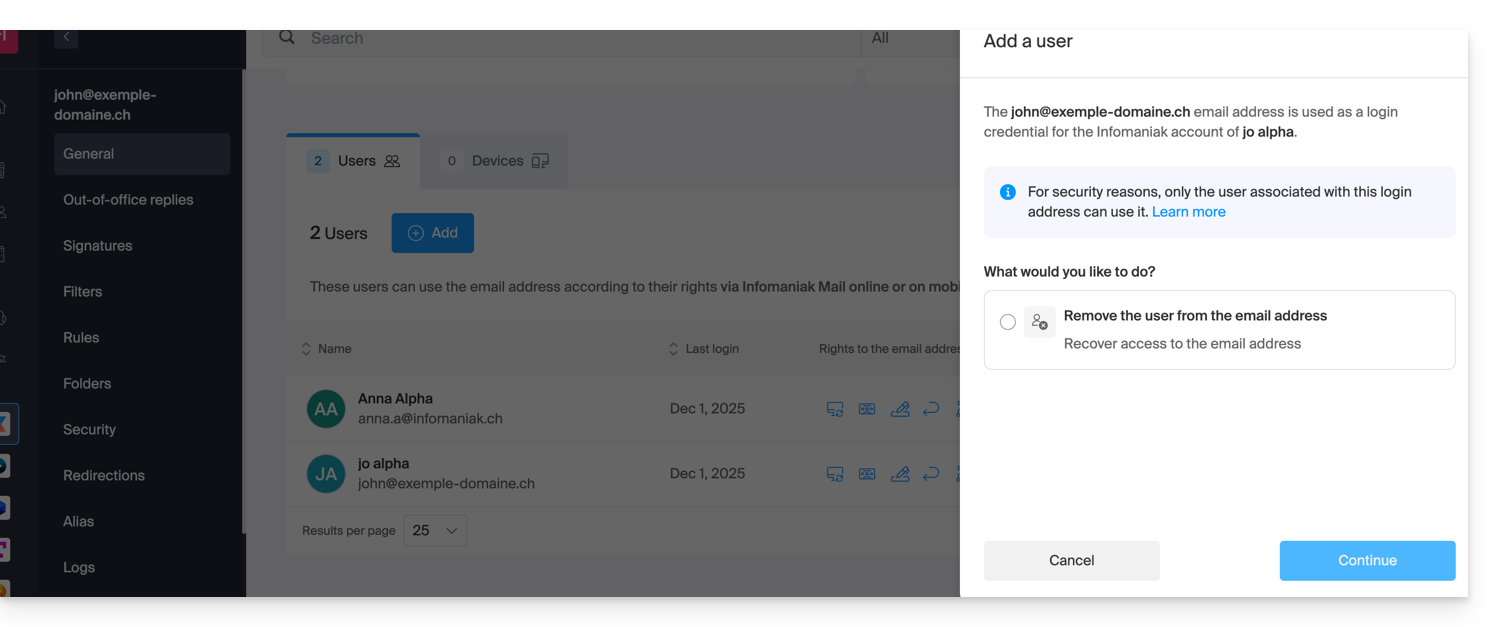
To be able to share it again, you must detach the Infomaniak account from its identifier from the Mail Service (refer to this other guide on this subject).
- It exists and works for the user who logs in with it, but it can no longer be shared:
- Additional passwords (for configuring a device, for example) will have to be managed by the user…
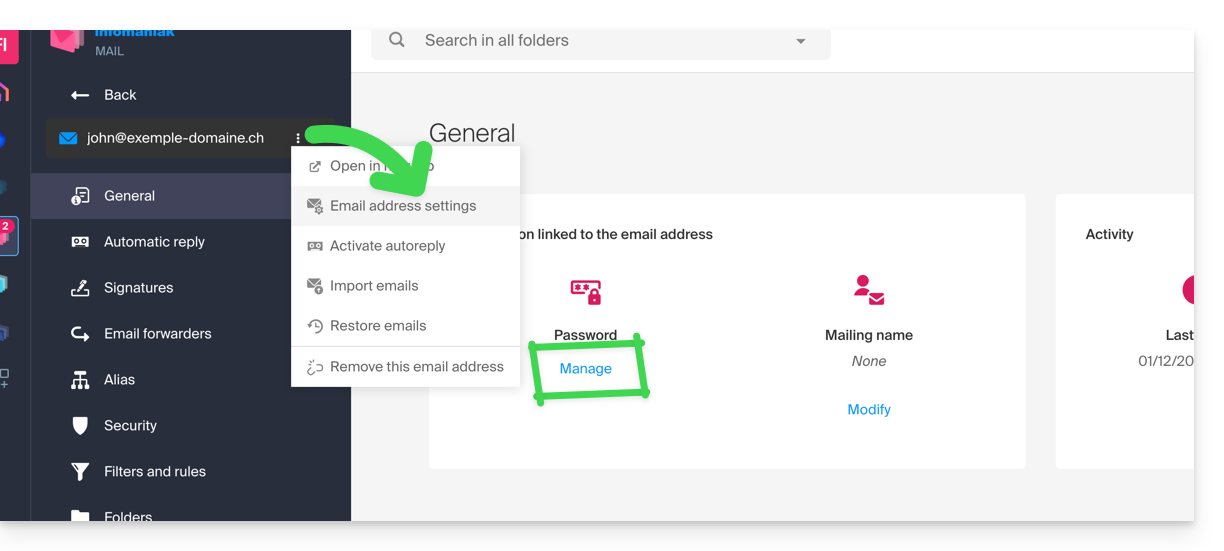
… and no longer from the corresponding Mail Service, which however allows you to contact the user to ask them to do it themselves: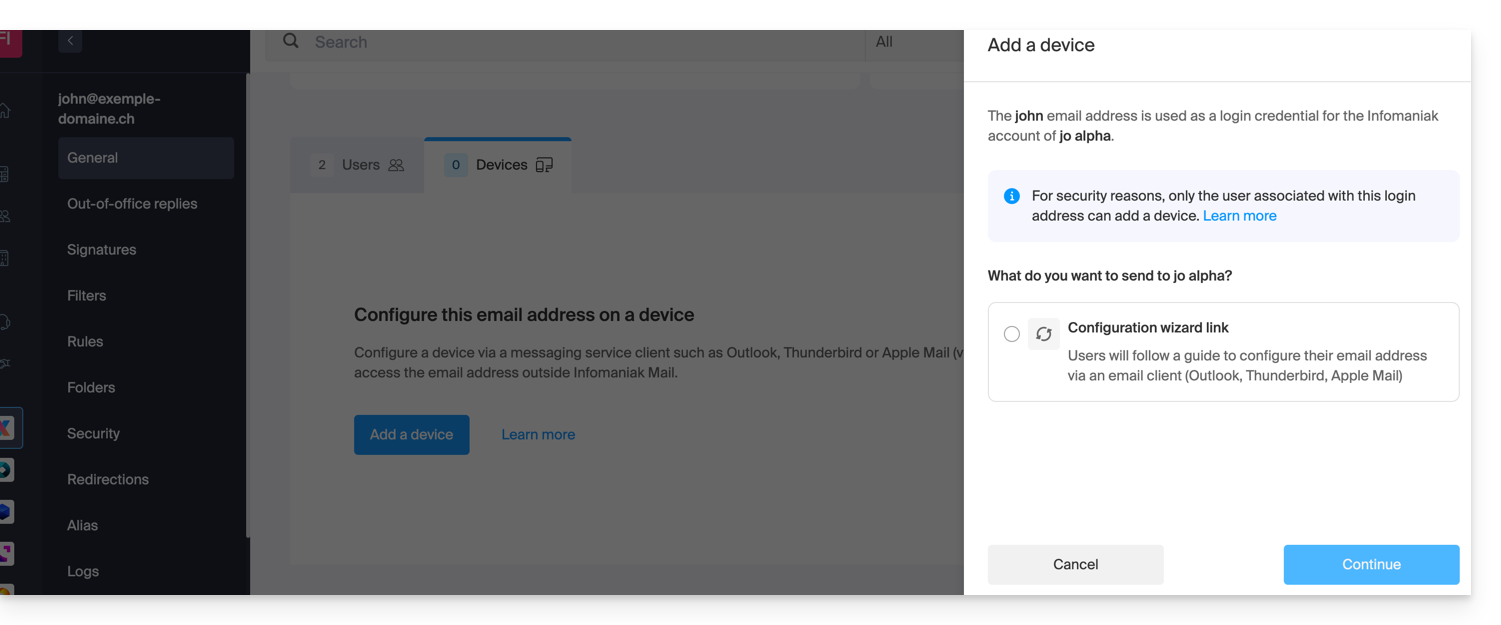
- A possible previous sharing will continue to work, but this will not be able to trigger new sharings from Mail:
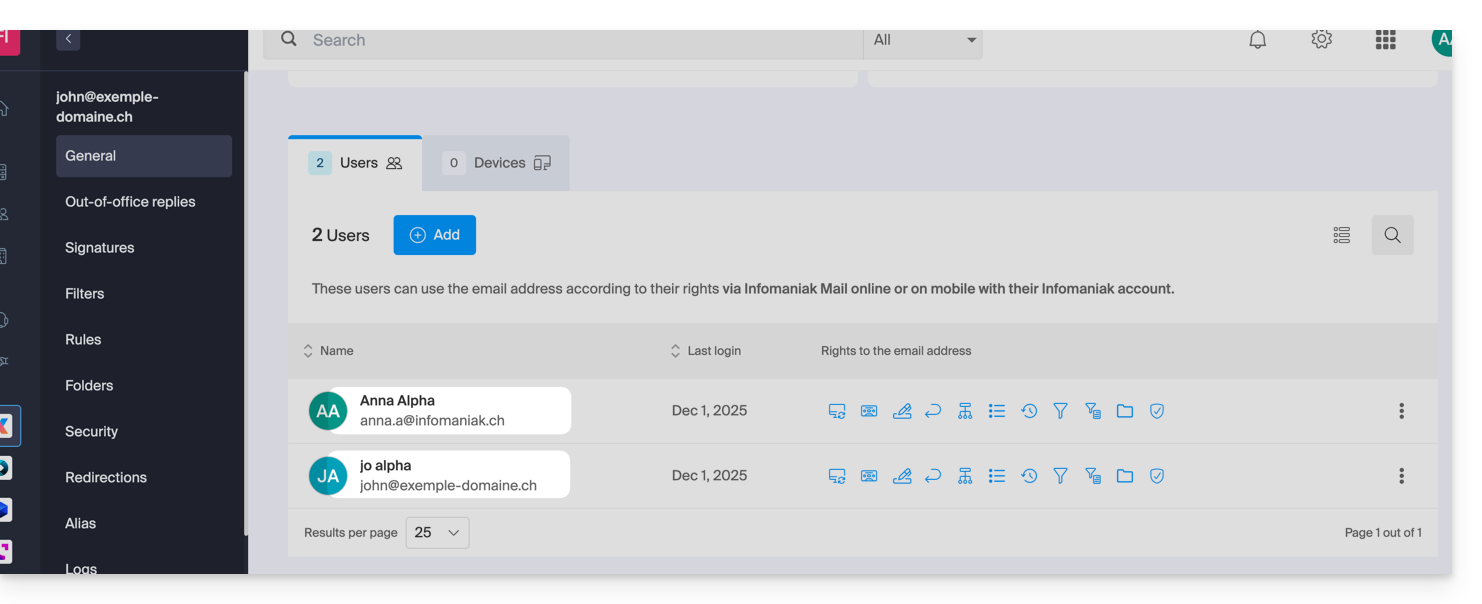
This guide concerns the Discussion List service, which is only offered to Infomaniak users who have activated it in the past and for whom a tool migration was performed in early 2025.
Preamble
- The discussion list service differs from classic messaging or a newsletter service by unique features:
- Allow users to subscribe to a “subscription” via a simple registration form, the code for which is provided.
- Allow one or more designated moderator users to accept or reject registrations, send messages to subscribers, and then moderate member responses before publication.
- Allow users to contribute to the discussion by replying to a single address that automatically redistributes the mail to other members.
- Provide a simple and GDPR-compliant unsubscription option.
- Refer to this other guide regarding the service limits.
The registration forms (html code) that may have been previously integrated on different pages must be regenerated and reintegrated to work (refer to the Forms chapter below).
Access the discussion list
If the discussion list service has been activated in the past, it is accessible within your Mail Service:
- Click here to access the management of your Mail Service on the Infomaniak Manager (need help?).
- Click directly on the domain name assigned to the product in question.
- Click on Discussion List in the left sidebar:

Creation and configuration of the discussion list
To create a new discussion list:
- Click the Start button…

- … or click the button above your existing lists:

Otherwise:
- Edit an existing list by clicking on its name:

- Click on its tab Configuration:

The parameters necessary for the proper functioning of the system are as follows:
- A discussion list revolves around an email address that should not yet exist on the Mail Service of the domain concerned (and which cannot be created on it, nor modified thereafter).
- You can give a name to the list to identify it more easily if you have several or if the email address is not sufficiently explicit.
- You can also add an additional description.
- You need to determine the email address(es) that will be moderators (= highest permission on the list).
- You can set a language for your mailing list.
- The configuration of “who can subscribe to the list” is important:
- It is possible to specify that the user will have to confirm their subscription themselves (in addition to a moderator).
- The configuration of “who can write to the list” is just as important:
- You can use the service as a one-way tool, such as information dissemination, or as a multi-way tool, information exchange, discussion including with non-members (with moderation)...
Click on Advanced Options.

- It is possible to configure whether responses should be addressed…
- … to the sender with the source email address visible
- … to the list (everyone receives) with the source email address visible
- … to the list as coming from the list's email address itself
- Allows you to limit the size of emails sent via the discussion list (especially in case of attachment).
- Allows you to customize a message that will be automatically sent to an email address when subscribing to the list.
- Allows you to customize a message that will be automatically sent to an email address upon unsubscribing from the list.
- Click the button to save.
Subscription (depending on the settings of point 6 above)
- Subscribers can sign up by sending a message to the email address in the form
nom-de-la-liste-join@domaine-de-la-liste. - They can also be manually subscribed by the moderator via the interface, and in this case, they receive a notification email whose content can be customized.
- If the subscription made by a subscriber must be validated by a moderator, the latter receives an email:
- The moderator approves the request by clicking on the “
mailto:” type link, which generates a new message that can be sent to the email address in the formnom-de-la-liste-request@domaine-de-la-listewith the subjectaccept email-address-subscriberand in the body of the message the lineApproved: list-password, possibly adding a linestopto avoid the execution of other scripts, e.g. in the case where there is a signature.
- The moderator approves the request by clicking on the “
- If the subscription made by a subscriber must be validated by the subscriber himself, the latter receives an email to which he must reply (by clicking on the link to create a new reply email and pre-filled):

- And in this case, the moderator receives the request in a second step, after validation by the subscriber, and must respond to it to validate the subscription (the simplest is always to click on the link):

- And in this case, the moderator receives the request in a second step, after validation by the subscriber, and must respond to it to validate the subscription (the simplest is always to click on the link):
Unsubscription
- Subscribers can unsubscribe by sending a message to the email address in the form
nom-de-la-liste-leave@domaine-de-la-liste. - Upon unsubscribing, a confirmation request message is sent to the user.
- The user approves the request (always by clicking on the “
mailto:” type link, which generates a new message that can be sent to the email address in the formnom-de-la-liste-request@domaine-de-la-listewith the subject the command specified in the confirmation email and an empty message body).
- The user approves the request (always by clicking on the “
Sending/receiving messages
- Each subscriber can create a Mail signature and choose their name when sending the email.
- A footer is automatically added to each message sent via the mailing list:

- See also the
reply-toandfromparameters at point 9 above.
Message moderation
- To reject a message, the moderator must click on the “
mailto:” type link, which generates a new message that can be sent to the email address in the formnom-de-la-liste-request@domaine-de-la-liste. - When a moderator is also a member of the list, they do not receive the messages they send themselves, but obviously receive those sent by other moderators.
Forms (subscription/unsubscription)
To offer a website visitor the option to subscribe to your list, you can generate a code that you simply need to insert on your chosen site; example with Site Creator:
The Form tab allows you to specify the URL to which the user will be redirected after subscribing or unsubscribing:
- In case of an error when using the form, an error page may display the email address
moderation-owner@list-domainallowing you to contact the moderators. - A user already subscribed to the list can subscribe multiple times without any specific message being displayed.
Error Management
The system indicates the number of errors encountered by an address and the date:

