Knowledge base
1000 FAQs, 500 tutorials and instructional videos. Here, there are only solutions!
This guide explains how to configure ddclient, a tool available on most Linux distributions, to use it with the Infomaniak DynDNS service.
Prerequisites
- Have installed the
ddclientpackage for your distribution (e.g.:sudo apt install ddclient). - Have a DynDNS record already created on the domain or subdomain to update.
- Check that the SSL module for Perl is installed:
sudo apt install libio-socket-ssl-perl.
ddclient Configuration
The configuration file /etc/ddclient.conf must contain the following information:
protocol=dyndns2
ssl=yes
use=web
server=infomaniak.com
login=enter_your_login
password=enter_your_password
yourdomain.xyz- ssl=yes : allows a secure connection. This parameter is mandatory for the update to work correctly.
- use=web : tells ddclient to use an external service to automatically detect your public IP address.
- login / password : DynDNS credentials defined in the Infomaniak Manager when adding the Dynamic DNS (help).
- yourdomain.xyz : replace with your DynDNS domain or subdomain.
Test and Verification
Before launching ddclient as a service, you can test the configuration with:
sudo ddclient -daemon=0 -verbose -debugIf the configuration is correct, you will see a message of type SUCCESS: updating yourdomain.xyz.
Service Startup
Once the configuration is validated, restart and activate ddclient:
sudo systemctl restart ddclient
sudo systemctl enable ddclient
You can check its status with:
sudo systemctl status ddclient
But also:
- Protect the configuration file with:
sudo chmod 600 /etc/ddclient.conf. - Regularly check that the IP address is correctly updated via a DNS lookup (
dig yourdomain.xyzornslookup). - If your IP does not change often, keep a reasonable update interval to avoid unnecessary requests.
Link to this FAQ: https://faq.infomaniak.com/40
Has this FAQ been helpful?
This guide explains how to redirect a domain name directly to another or how to automatically send visitors to your website to another page address (internal or external URL).
Preamble
- To redirect traffic, you will need to act…
- … either on the domain name itself (it must be hosted by Infomaniak and its DNS must also be those of Infomaniak),
- … or on the code present in your pages (page .htaccess, homepage, etc.) if you have a website.
Act on the domain name
via Web Redirection Tool
The tool available on the Manager allows you to act simply on the domain name (or subdomain) in order to redirect it to the Internet address of your choice.
via DNS modifications or A record
Change the DNS of the domain name or modify its A/AAAA records allows you to direct web traffic to another provider.
Act on the code of the pages…
… via HTML code to insert
Insert this line of code between the <head> and </head> tags of your homepage (usually named index.html):
<meta http-equiv="refresh" content="5;url=INSERT-HERE-NEW-URL">Replace 5 with the desired wait time in seconds (0 for it to happen immediately).
The search engine Google indicates that it is preferable to use a 301 server-side redirect (read below). The W3C also advises against using it.
… via PHP code to insert
If the site page has a .php extension, insert this header function call at the very top of the file:
header("refresh: 5; url=INSERT-HERE-NEW-PAGE-URL");… via .htaccess file
To redirect all traffic targeting your site (regardless of the page called) to another address, insert this in the .htaccess file at the root of your site:
RewriteEngine On
RewriteRule ^(.*)$ INSERT-HERE-NEW-URL/$1 [R=301]
To target the page that needs to be redirected:
Redirect permanent /ancienne_page.html insérer ici adresse URL de destinationRedirectpermanent, Redirect permanent and Redirect 301 are equivalent commands.
Here is another example of redirecting a sub-section to the home page (this directive has the advantage of working with "deep links" unlike a permanent redirect):
RewriteEngine on
RewriteRule "old/path/url "/" [L]
Refer to this other guide on this subject.
Link to this FAQ: https://faq.infomaniak.com/79
Has this FAQ been helpful?
This guide concerns domain names with the .se extension.
Preamble
- The
.sedomains are managed by Internetstiftelsen i Sverige (IIS), the official body that governs domain names in Sweden. - They were introduced in 1986 and it was during the 2000s that they gained popularity as their suffix could be used for words like "clo.se", "sen.se", etc.
Change the owner of a .se domain
To change the owner (or owner) of a .se domain, the procedure defined by the IIS involves filling out a specific form.
In the form, the IIS IDNO (ID Number) field is a key requirement:
- For Swedish citizens: enter the social security number (Personnummer),
800101-1234for example, - For Swedish companies: use the company registration number (Organisationsnummer)
556123-4567for example, - For foreign citizens or non-Swedish companies: enter an identification number such as a passport number, an identity card, or an equivalent for your country.
This is to authenticate the owner and prevent disputes or fraudulent use of the domain. The change may take a few days, depending on how quickly the documents are verified.
Link to this FAQ: https://faq.infomaniak.com/87
Has this FAQ been helpful?
This guide explains how to add or modify one or more SRV type records in the DNS zone (of a domain name) managed on the Manager Infomaniak.
Preamble
- This type of record allows you to indicate which services are available for a domain.
- They are often used for XMPP, LDAP protocols or to configure Microsoft Office 365.
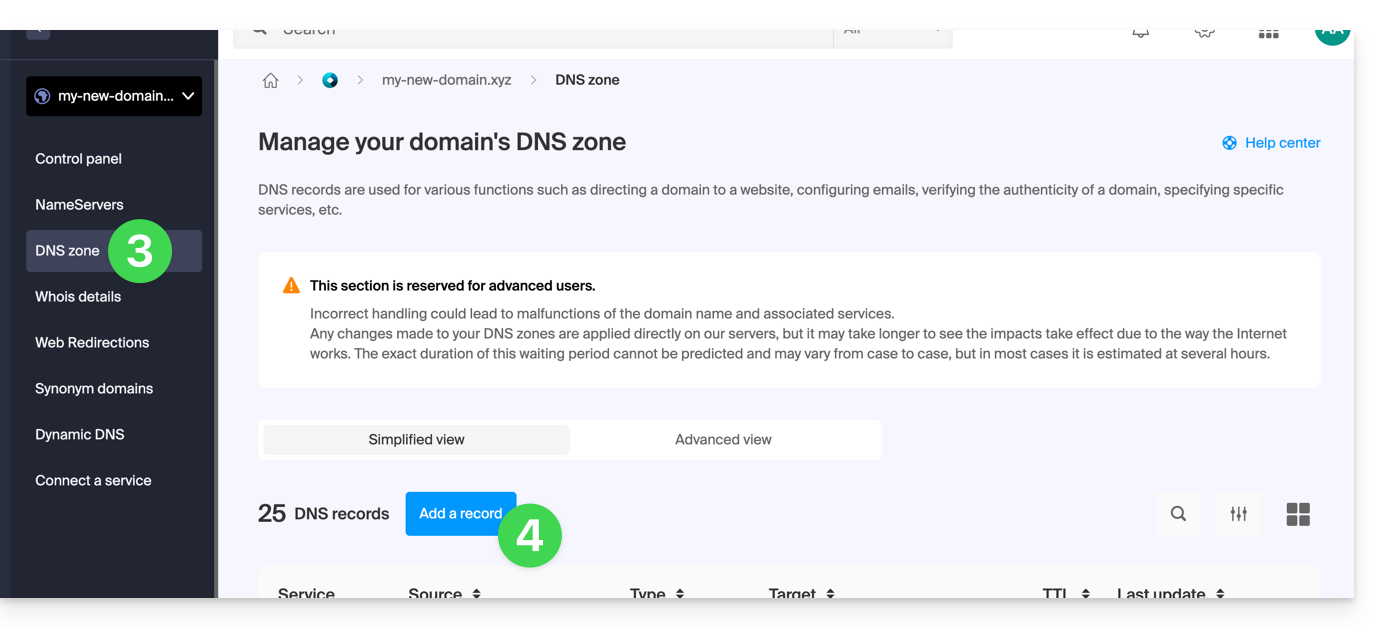
Modify the DNS zone
To manage this type of record in a DNS zone:
- Click here to access the management of your domain on the Infomaniak Manager (need help?).
- Click directly on the name assigned to the domain in question.
- Click on DNS zone in the left sidebar.
- Click the button to add a record:
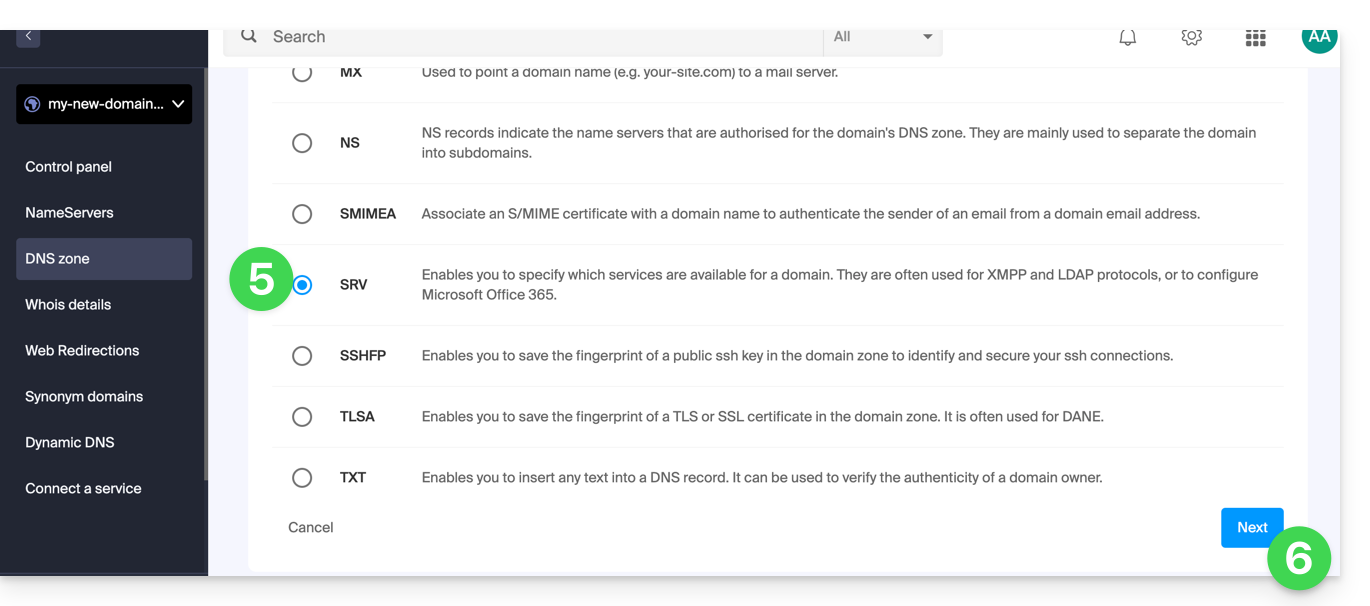
- Click on the radio button SRV to add a record.
- Click on the Next button:
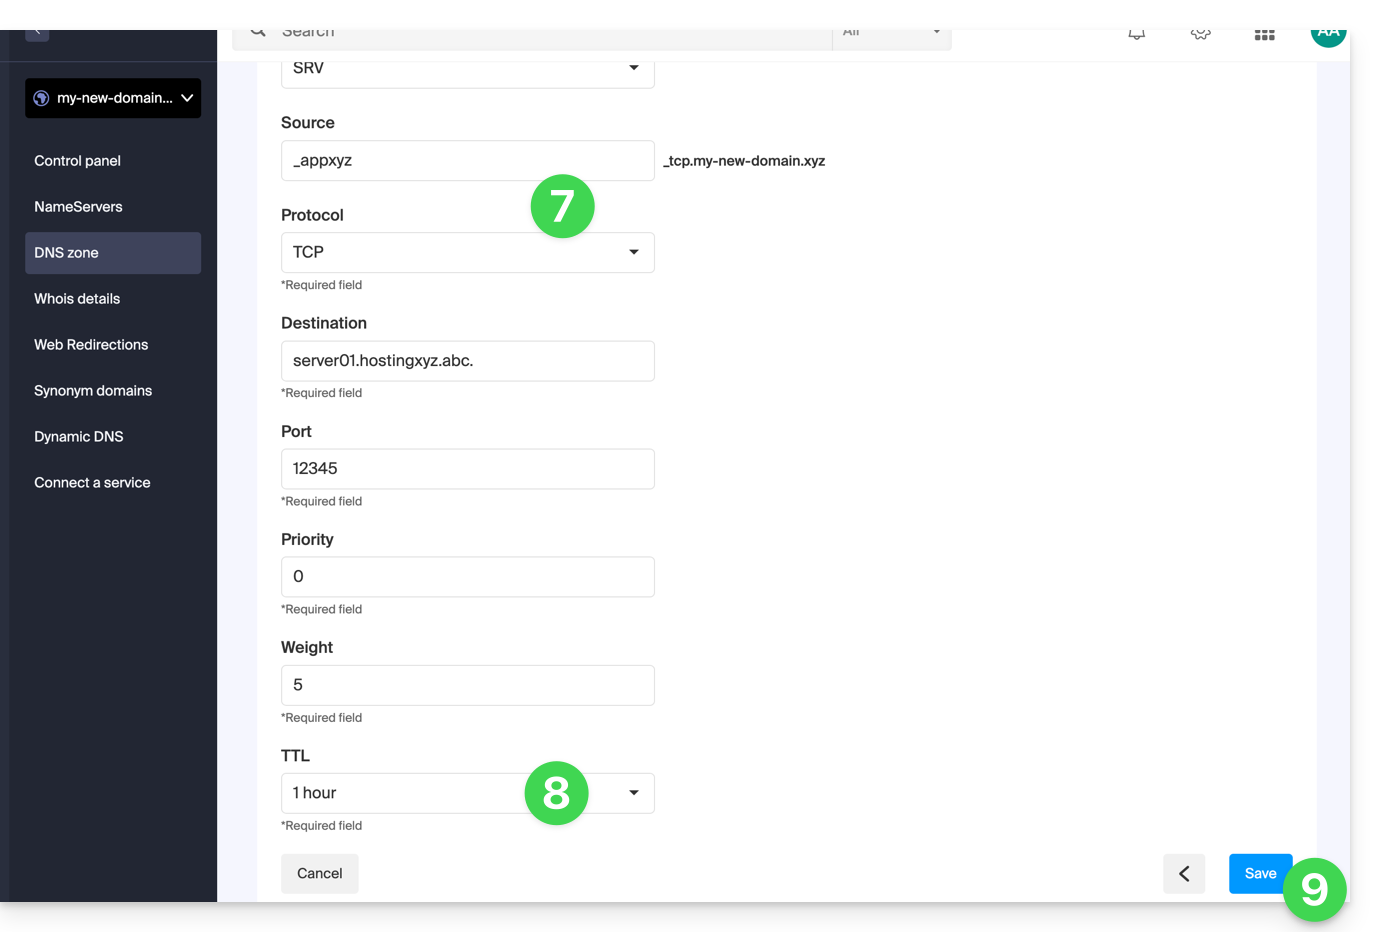
- Enter the values of the SRV required for your DNS zone (the
._tcp.domain…is already entered). - Leave the default value for the TTL.
- Click on the Save button:
Check the correct addition of the complete SRV in the records table: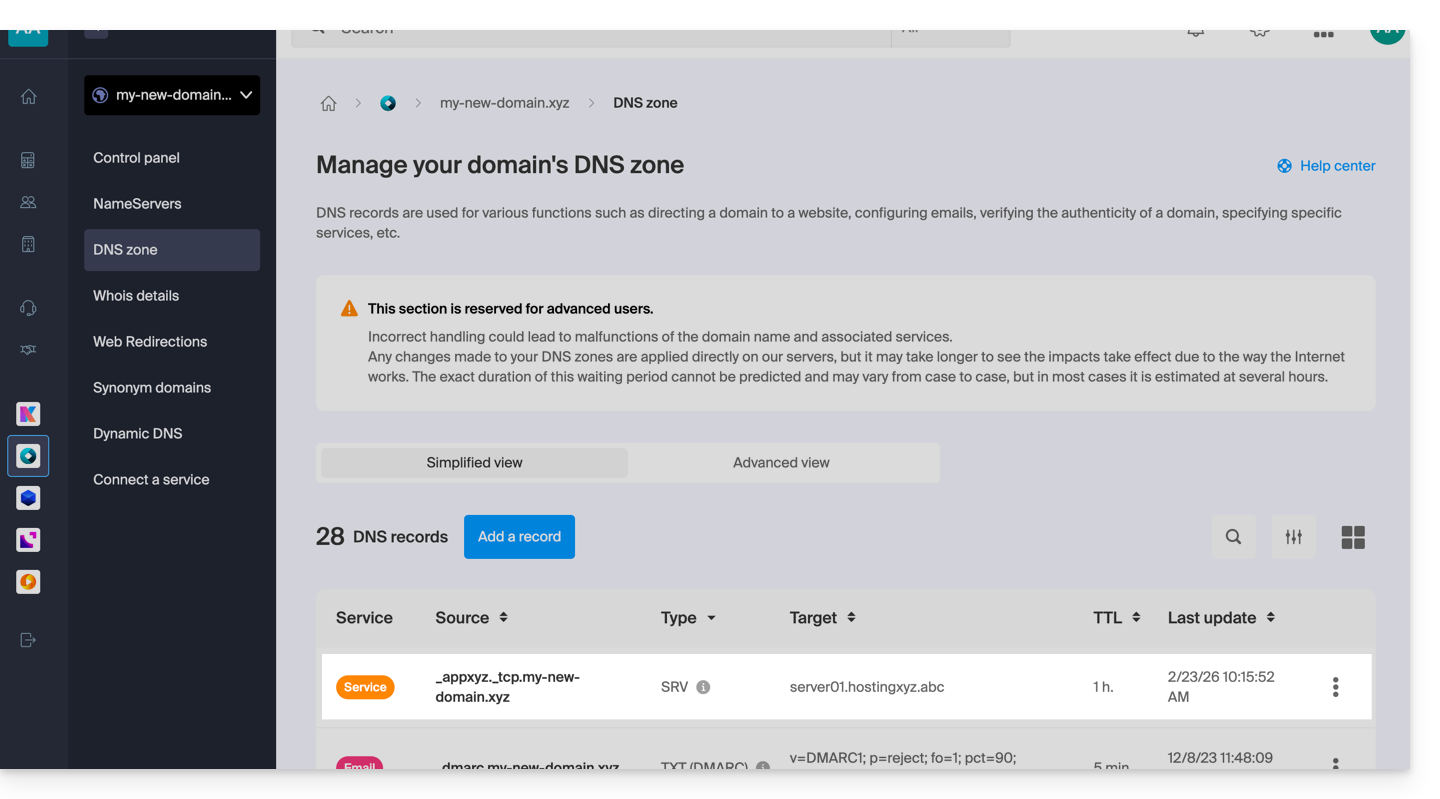
Link to this FAQ: https://faq.infomaniak.com/110
Has this FAQ been helpful?
This guide explains how to find and display DNS type information for any domain name registered with Infomaniak (or elsewhere).
Domain with Infomaniak
To access your domain names and view the DNS servers entered:
- Click here to access the management of your domain on the Infomaniak Manager (need help?).
- Click directly on the name assigned to the domain concerned:
- Click on DNS Servers in the left sidebar:

WHOIS Search
To display the DNS information of another domain name, use a WHOIS service such as https://whois.infomaniak.com/ for example or https://who.is (be careful with ads on all these third-party services).
You will thus get a clear answer to the DNS situation of a domain name at a given time.
Often, DNS entries are displayed in pairs and start with ns... followed by numbers and the name of the registrar or host.
Note, the DNS records displayed are not necessarily those chosen recently by the domain manager. Indeed, there is a propagation time that may need to be taken into account if changes are being made to the domain.
Link to this FAQ: https://faq.infomaniak.com/189
Has this FAQ been helpful?
This guide covers the registration of domain names in .ngo or .ong with Infomaniak.
Registration validation
To order a .ngo or .ong, you must be a non-governmental organization; this means that the registration of a .ngo or .ong is subject to verification after the domain is registered.
You will receive an email (at the email address indicated in the WHOIS) containing a link to perform this verification. It is important to follow this process within 360 days of registration, otherwise your domain name will be rejected and deleted by the registry.
Note that the domain will only become active once this registration process is complete.
Link to this FAQ: https://faq.infomaniak.com/230
Has this FAQ been helpful?
This guide helps you if you receive error mails that mention SPF when you write to gmail, microsoft, or similar addresses.
Are all your services with Infomaniak?
The Global Security tool informs you of any configuration inconsistency regarding your Infomaniak Mail Service.
Are some of your services elsewhere?
To resolve an email sending issue when your email is managed by Infomaniak and your website is with another provider (like Wix for example) and in this situation the DNS zone of the domain name is managed elsewhere, refer to this other guide.
Link to this FAQ: https://faq.infomaniak.com/237
Has this FAQ been helpful?
This guide details the allowed and prohibited characters when creating a domain name (up to 63 characters) with Infomaniak.
Preamble
- The allowed characters in a domain name are determined by the technical standards established by the Internet Corporation for Assigned Names and Numbers (ICANN) and, where applicable, by national or regional regulatory bodies, such as AFNIC for
.frdomains. - To understand the possibilities offered at the level of an email address (part before the at sign
@), refer to this other guide.
Allowed characters in a domain name
The allowed characters in standard domain names include:
| Allowed characters | Remarks |
|---|---|
| Letters | a à z |
| Numbers | 0 à 9 |
| Hyphen | - (not allowed at the beginning or end of a label) |
| Accented / special characters | Read below |
Special characters, accents (punnycode)
There are also domain extensions that allow the use of accented characters or other special characters. These rules may vary depending on the specific domain extension (such as .fr, .com, .net, etc.) and the policies established by the relevant regulatory bodies.
It is possible to purchase a domain name containing an accent on a letter (é for example) from Infomaniak. This coding method, which allows the inclusion of non-Latin characters, such as accented, Cyrillic, Chinese, etc., in domain names is called Punnycode. It converts Unicode characters into an ASCII form readable by computer systems. This means that a domain name containing non-ASCII characters is transformed into an ASCII character string starting with xn--.
This transformation is reversible with some software/email clients that can in this case interpret and correctly display the original domain name. But in general, Infomaniak does not recommend the use of email on domain names with accents:
Indeed, not all browsers, operating systems, and applications necessarily support domain names with accents in the same way, which can lead to compatibility issues in some cases.
Prohibited characters in a domain name
The following characters (dot, space, exclamation mark, hash, dollar, percent, caret, ampersand, asterisk, parenthesis, equal sign, bracket, chevron, comma, quotes, slash, semicolon, question mark) are not allowed in Infomaniak domain names:
| Forbidden characters | Remarks |
|---|---|
| Dot | Reserved to separate labels; forbidden at the beginning or end of a label and as a standalone character within a label |
| Space | |
| Special characters | !, #, $, %, ^, &, *, (, ), =, [, ], <, >, ,, ;, ", /, ? |
| Non-ASCII characters | Except via Punnycode for some extensions |
| Control characters | ASCII codes below 32 (non-printable) |
Link to this FAQ: https://faq.infomaniak.com/246
Has this FAQ been helpful?
This guide explains how to restore backups of previous versions of your files and other web data from your Infomaniak hostings, and how to set up an effective backup policy if the automatically and freely provided backups no longer meet your availability or security needs.
Web Hostings (Starter, Shared, Cloud Server)
Refer to these guides to restore automatic backups:
- of an entire hosting (FTP + MySQL),
- of specific files on the hosting,
- of specific databases,
- of a Web Application (Wordpress & Apps),
- of Cloud Server SSH crons.
Refer to these guides to backup and restore:
- a hosting with Swiss Backup and Restic (advanced),
- WordPress with Swiss Backup,
- WordPress with an extension.
Also refer to https://faq.infomaniak.com/snapshot.
Messaging
- Restore messages from Infomaniak automatic backups.
- Restore contacts or calendar events.
- Backup the current content of an email account:
- by downloading the current content locally,
- by duplicating all current content to a backup box,
- by copying future emails as they arrive to a backup box.
Domains / DNS Zones
- Restore deleted DNS records from Infomaniak automatic backups.
- Restore an expired domain in redemption period.
Link to this FAQ: https://faq.infomaniak.com/250
Has this FAQ been helpful?
This guide details the allowed and prohibited characters when creating an email address (up to 64 characters) in an Infomaniak Mail Service.
Introduction
- The allowed characters differ depending on whether they appear before or after the at symbol
@. For example, innom-utilisateur.mail@nom-domaine.xyz:- Before the at symbol: the
nom-utilisateur.mailpart corresponds to the username. - After the at symbol: the
nom-domaine.xyzpart corresponds to the domain name.
- Before the at symbol: the
- To learn about the possibilities offered at the domain name level (the part after the at symbol
@), see this other guide.
Part before the at symbol: nom-utilisateur.mail
The RFC 5321 and RFC 5322 standards define the general syntax of email addresses. However, email providers – including Infomaniak – apply additional restrictions to ensure security, consistency, and compatibility with most software/email clients.
For example, an address such as -@exemple.com is syntactically valid according to RFC 5322, but is not accepted when created on Infomaniak servers.
These additional rules help to:
- prevent abuse (spam, malicious automation, etc.);
- comply with naming conventions (an identifier consisting only of
-does not make sense); - to ensure compatibility with email software/clients that handle certain address formats poorly.
In summary: RFC 5322 defines what is syntactically possible, but each server determines what is actually usable in practice.
Allowed characters before the at sign
The following characters can be used in the part before the at sign of an Infomaniak email address:
| Allowed characters | Examples / Notes |
|---|---|
| Letters | a to z and A to Z |
| Numbers | 0 à 9 |
| Hyphen | - (not allowed as the first or last character) |
| Underscore | _ |
| Period | . (allowed as long as it is not placed at the beginning, at the end, or consecutively) |
Forbidden characters before the at sign
The following characters (at sign, exclamation mark, hash, dollar, percent, caret, ampersand, asterisk, parenthesis, equals sign, bracket, chevron, comma, quotation marks, semicolon, question mark…) cannot be used to create an Infomaniak email address:
| Forbidden characters | Notes |
|---|---|
@ | reserved for separating the username and the domain |
| (space) | |
!, #, $, %, ^, &, * | not supported |
(, ), =, [, ] | not supported |
<, >, ,, ;, ", /, ? | not supported |
| Non-ASCII characters | e.g. accents or non-Latin letters |
| Control characters (ASCII codes < 32) | non-printable, prohibited |
Link to this FAQ: https://faq.infomaniak.com/438
Has this FAQ been helpful?
This guide explains what to do if you have received a message, by email, mail, or fax, coming from an unknown company or pretending to be Infomaniak (or a competitor) and mentioning the domain names you own, and asking you to pay fees related to these products.
Preamble
- Several organizations are known for "slamming" a domain name, with the aim of appropriating it or simply making money at your expense.
- Among them: Brandon Gray Internet Services, NameJuice.com or even Global Netsource. In addition, Asian companies are listed here.
- The company called Domain Registrar of America (DROA) also aims to scam domain name holders by sending a fax or email to renew one or more domain names 2 to 3 months before their expiration date. This offer seems official and professional and offers very competitive prices.
- The catch: by signing with these unscrupulous companies, you agree to transfer your domain names to these "registrars", with all the risks of inactivating your websites and mailboxes. Of course, you are encouraged to pay by credit card! Some companies have been the subject of legal proceedings in the USA, Great Britain, and Canada but remain very active in Europe.
Some recommendations
To avoid being scammed:
- Determine who is sending you such a message... Is it a company you know, writing to you from Switzerland or France, in French, etc. or on the contrary a message coming from abroad (USA, United Kingdom, Jamaica, Asia, etc.), in English, etc.?
- Determine the status of your domain name and where it is currently located; to do this, start by doing a WHOIS on infomaniak.com/whois for example.
- Do not respond to these messages... Destroy them or you risk paying astronomical amounts unnecessarily.
- Consult the AFNIC Guide on slamming and other fraudulent practices.
- Activate Domain Privacy for more peace of mind.
- Report these messages.
Link to this FAQ: https://faq.infomaniak.com/443
Has this FAQ been helpful?
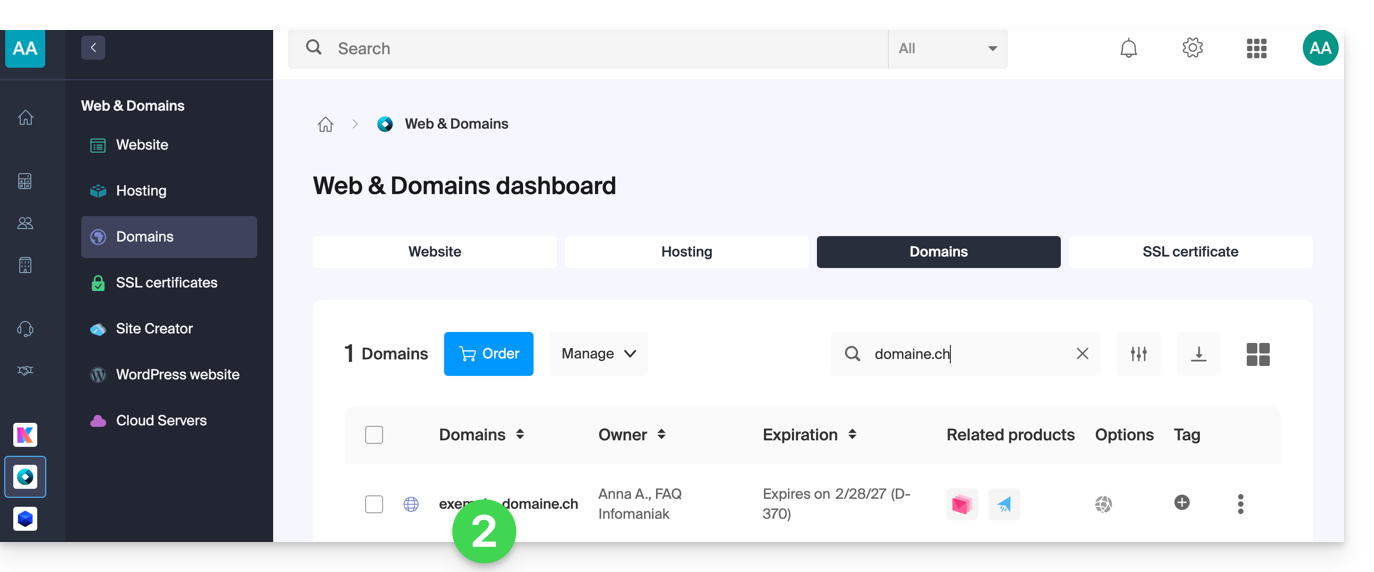
This guide explains how to transfer a domain name you own from another company to Infomaniak.
Introduction
- In general, during a transfer, no already paid period is lost; the domain's expiration date will be extended by one year.
- A bulk transfer is also possible.
- The terms "
EPP", "AuthCode", "AuthInfo", "transfer code", and "authorization code" all refer to alphanumeric sequences specific to the domain, the main purpose of which is to verify the owner's authorization before a transfer between Registrars.
1. Obtain the authorization code
Obtain it from your customer account with your current provider (refer to these other specific guides), or request it from them!
It may be necessary to unlock any transfer protection.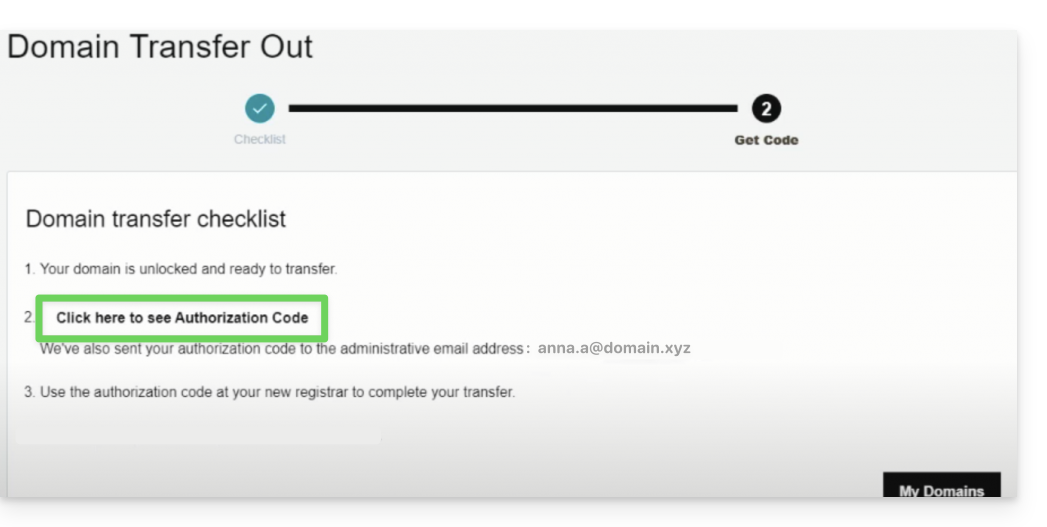
2. Transfer the domain name
Search for the domain name in question on this Infomaniak page.
Click the button to start the transfer!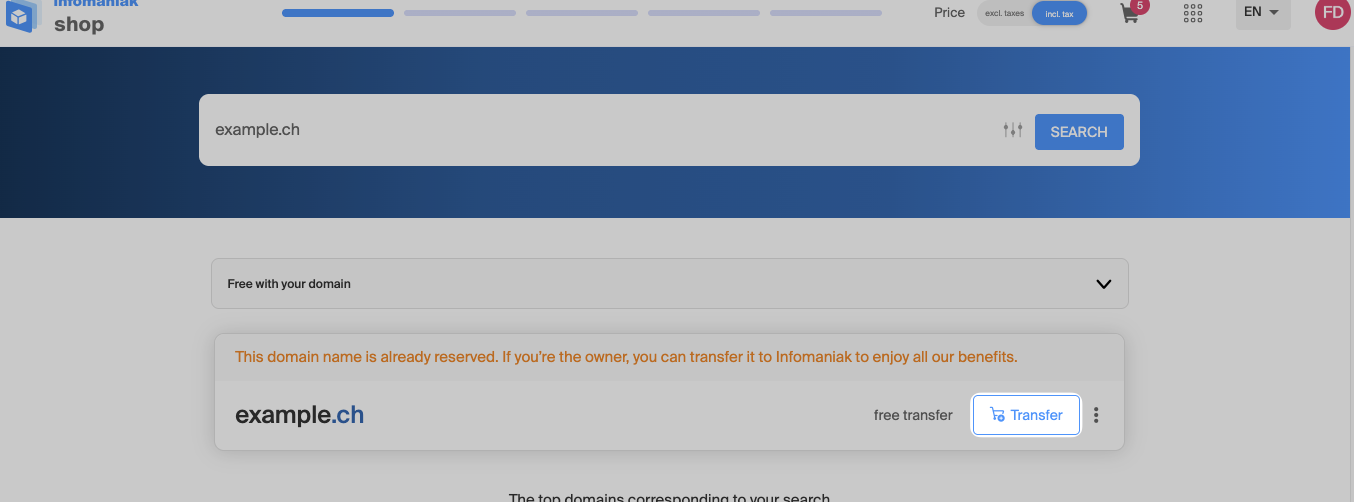
3. Configure the options
Follow the wizard by adding or removing the desired options.
After entering the domain name holder's contact information, this step is the most important: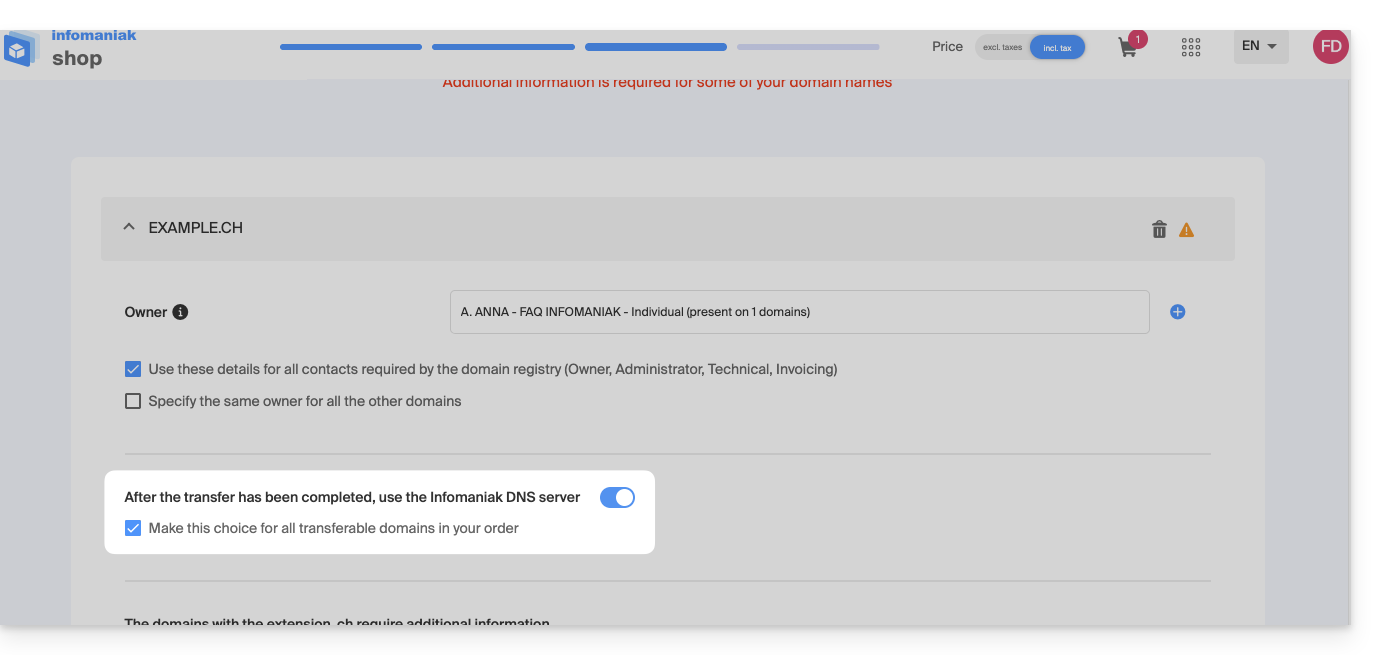
Leave the toggle switch activated as shown above if…
- … all products or services related to this domain name are already with Infomaniak.
- … no products or services are linked to your domain name.
or deactivate the toggle switch if…
- … some products or services related to this domain name are located elsewhere than with Infomaniak.
4. Enter the authorization code
Below, paste the authorization code copied in step 1, then validate the transfer by clicking the button: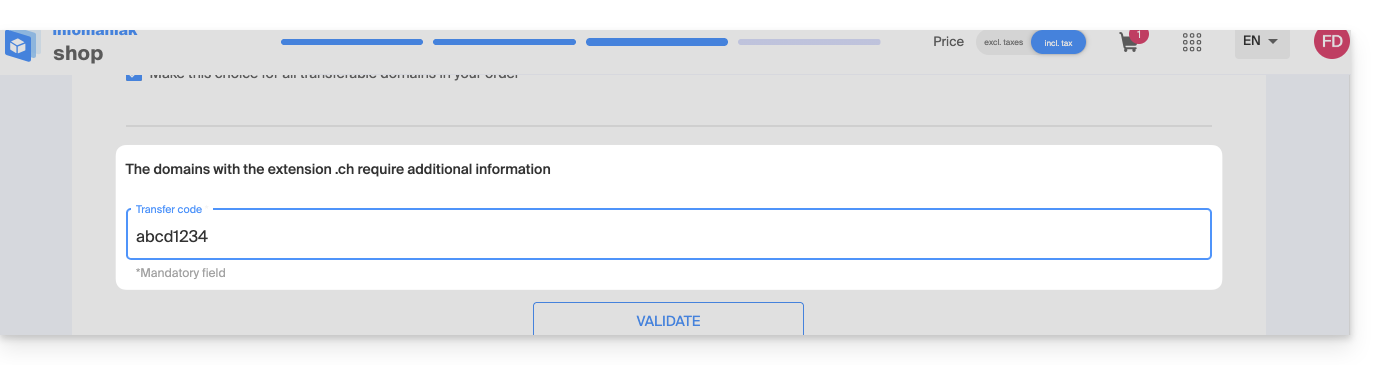
Then click the Next button in the bottom right corner to proceed to the last step.
5. The last step
The last step allows you to pay any applicable fees (depending on the domain extension being transferred) and set the renewal method.
Read and accept the terms and conditions, then click Next to complete the order: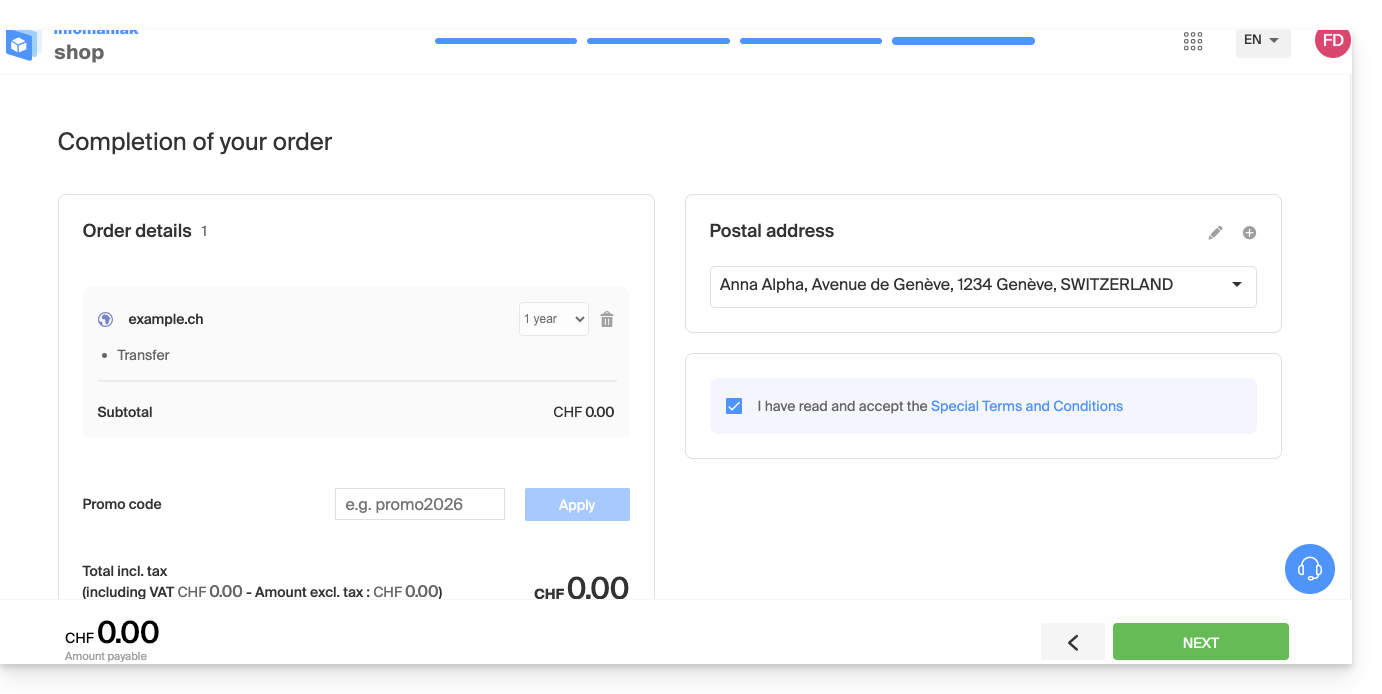
6. Manage your domain names
Find your domain names in the Infomaniak Manager and monitor their transfer, configuration, expiration, etc.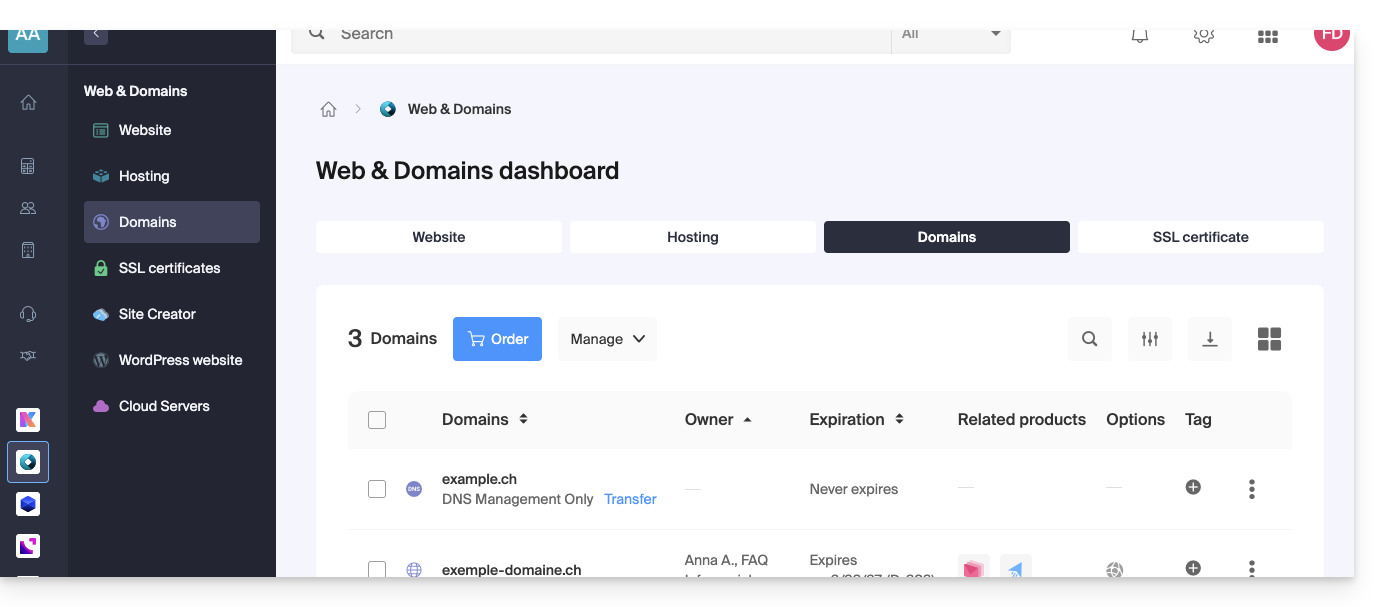
If a problem occurs with the transfer, an email will be sent to you containing the reason for the failure and the procedure for resuming the transfer.
Also, do you want to transfer your services such as websites or email addresses? See this other guide. Discover also the Infomaniak migration service.
Link to this FAQ: https://faq.infomaniak.com/447
Has this FAQ been helpful?
This guide explains how to force the display of the web hosting name in the browser address bar to one of the domain names installed as an alias/synonym or how to display the main domain in the address bar instead of the alias.
Limit the 'duplicate content' or duplicate content
Imagine you have the hosting your-domain.com at Infomaniak and as a synonym domain name you have installed www.synodomain.xyz.
By default, when you type one or the other of the domain names (your-domain.com or synodomain.xyz) in the address bar of your browser, it is the one you typed that will be displayed in the address bar.
You therefore have the possibility to force the display of a different address than the one that was typed. Thus, if someone types synodomain.xyz, then it is your-domain.com that will automatically be displayed in the address bar.
A code must be entered in a file called .htaccess which must be located at the root of your hosting (in the /web folder of your FTP). If this file does not exist yet, you must create it on the server.
Insert these directives into the file:
RewriteEngine on
RewriteCond %{HTTP:X-Forwarded-Proto} !https
RewriteRule (.*) https://votre-domaine.com/$1 [R=301,L]
Adapt the code above according to these indications:
- Replace
your-domain.comwith your domain name with the appropriate extension (.com, .fr, .ch, etc.) that you want to see displayed in the visitor's browser address bar. Addwww.before your-domain.com if necessary. - Replace the second line of the code above with "
RewriteCond %{HTTPS} off" if a loop error occurs, this means that HTTP/2 is active for this site
Also refer to the automatic redirections to httpS.
Link to this FAQ: https://faq.infomaniak.com/482
Has this FAQ been helpful?
This guide details the specifics of the .pt domain extension (for Portugal), including administrative procedures during registration or transfer, and rules established by the entity responsible for managing Portuguese domain names (DNS.PT).
New registration of a .pt domain
If you are registering a new domain name with the .pt extension for the first time (anywhere, regardless of the Registrar) from your Manager, Infomaniak requires an identifier for the owner and the technical contact.
This identifier, which is mandatory, represents for companies:
- their tax identifier (VAT number without the country letters)
and for individuals:
- the passport number or identity card number.
Once the order is placed, the domain will then have the status 'registered' but will only be active 5 days after its creation date.
It is possible to order additional .pt domains from Infomaniak, but if you wish to order them elsewhere with the same contact details, this will no longer be possible (see below).
If you have already registered a .pt domain
DNS.PT accepts only one active contact per ID, regardless of the Registrar.
In concrete terms, this means that if you have already registered a .pt domain elsewhere, Infomaniak will not be able to create your contact record with the same ID and register the ordered domains. The only solution is that you transfer all your .pt domains to Infomaniak.
As indicated previously, it is quite possible to order other .pt domain names from Infomaniak.
Link to this FAQ: https://faq.infomaniak.com/568
Has this FAQ been helpful?
This guide explains how to connect an domain name managed with Infomaniak to an external service.
Specific guides
Click on the link corresponding to the external service you wish to connect to your domain name registered with Infomaniak:
- Wix
- Shopify
- Google Sites
- dynamic devices such as a NAS, an Internet box, or smart home devices, etc.
Guide for any other external service
To connect your domain name to any other external service such as Odoo, Microsoft 365, Squarespace, follow the procedures below:
- Click here to access the management of your product on the Infomaniak Manager (need help?)
- Click directly on the name assigned to the product concerned.
- Click on Connect a service in the left sidebar menu.
- Click on the blue Connect button on the tile corresponding to your external service and follow the procedure:
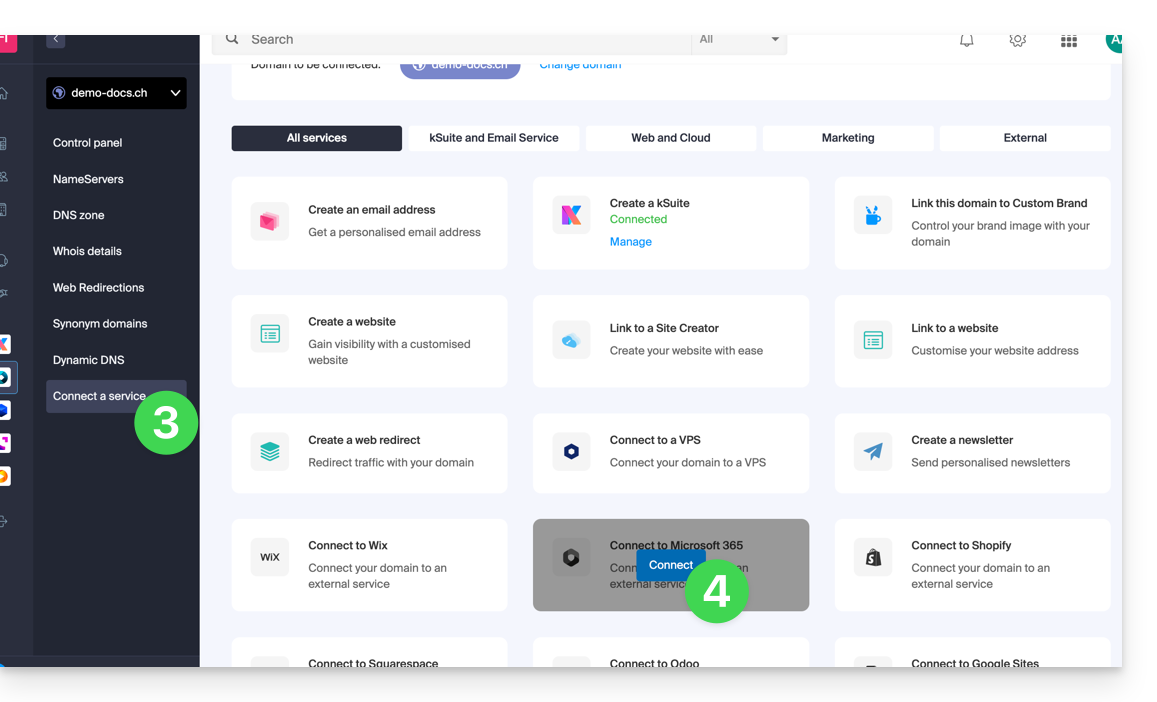
If the external service you wish to connect is not in the list, you will need to manually modify some technical information about your domain name:
- Refer to this other guide to modify all DNS records if this is what you have been asked to do…
- … or this other guide if you only need to modify specific DNS records (for example, the MX record type if you need to link your domain to an external mail service).
Link to this FAQ: https://faq.infomaniak.com/718
Has this FAQ been helpful?
This guide presents commands that can be executed to test a connection or a network and thus specify the source of a potential error.
Perform a Telnet...
TELNET allows you to test the connection to a server without considering all the additional settings of a mail or FTP application in order to determine the origin of a problem. If the connection does not go through on an SMTP server, for example, you will need to check if your firewall is not blocking port 587 or 465.
... on macOS
- Search for Network Utility.
- Go to the
Ping,Lookup, orTraceroutetab depending on what you want to test. - You can also use a
Terminaltype application (command line interface,CLI / Command Line Interface) on your device and, depending on what you want to test, enter:traceroute [server]nc [server] [port]
Replace[server]with the server name or its IP address, same for[port]...
... on Windows
Enable Telnet if necessary.
- Use a
Terminaltype application (command line interface,CLI / Command Line Interface) on your device, for example by typing Run thencmd. - In the window that opens, depending on what you want to test, type:
tracert [server]telnet [server] [port]
Example:telnet mail.infomaniak.com 587(allows you to test the SMTP port if your software/email client does not allow sending emails)...
... on Android
- Use the application Simple Telnet Client which allows you to test very simply via 2 fields to fill in (for example
mail.infomaniak.comand port143or993)...
Perform a PING
PING allows you to know if a machine is accessible via the Internet. You can also check with this tool if you are addressing the correct machine, for example during a DNS change, by looking at the IP address obtained. It is possible to perform a ping on a domain name, a hostname or an IP address.
PING is definitely blocked on shared hostings.
Link to this FAQ: https://faq.infomaniak.com/727
Has this FAQ been helpful?
This guide details the priority actions to take if you do not see any difference between your website after a change you made to it, and its previous version before the change. These tips are also valid if you encounter issues while using the Infomaniak product interface.
Preamble
- During your browsing, a web browser saves the data consulted in a reserved space, in order to avoid requesting the data already consulted from the server again, to save time and resources.
- Your cache can contain a lot of data and sometimes the browser gets confused. Sites can then display incorrectly or display an outdated version.
- Clearing the cache ensures that you have the very latest version of the page or folder consulted.
Clearing the web browser cache …
… on Safari
Choose your macOS version to view the corresponding Apple help.
… on Google tools (Chrome, Android, etc.)
View the Google help.
… on Firefox
View the Mozilla help.
… on Edge / Internet Explorer
View the Microsoft help.
Link to this FAQ: https://faq.infomaniak.com/793
Has this FAQ been helpful?
This guide explains how to add or modify a DKIM record in a DNS zone (domain/subdomain) managed on the Infomaniak Manager.
Preamble
- The DKIM (Domain Keys Identified Mail) protocol authenticates your emails with a unique digital signature.
- It ensures that your messages have not been modified during transit and certifies the sender's identity, thus preventing spoofing by spammers.
- DKIM is enabled by default for all Mail Services whose DNS zone is managed at Infomaniak.
- All your emails are automatically signed, whether they are sent from the Infomaniak Mail app or the email software/client of your choice.
Check the DKIM record
If you have a Mail Service with Infomaniak, the simplest way is to go to the Global Security tool to easily verify and correct certain problematic records.
And when your domain name is managed elsewhere, you will find the DKIM record to add in the DNS zone: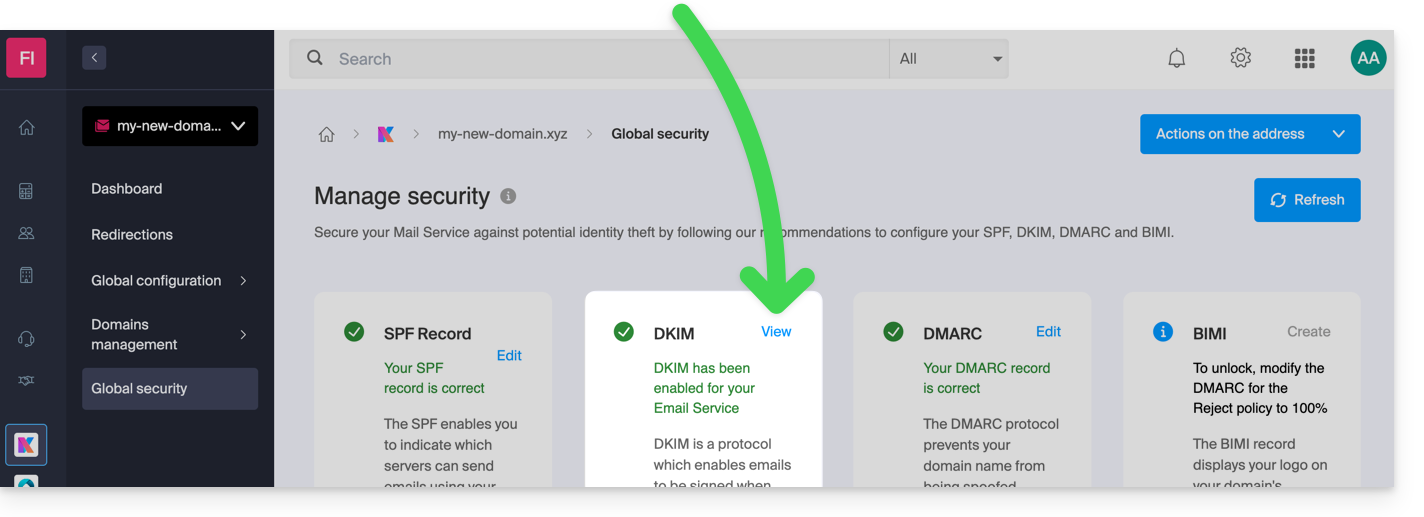
Manually modify the DNS zone (not recommended)
To manage this type of record in a DNS zone:
- Click here to access the management of your domain on the Infomaniak Manager (need help?).
- Click directly on the name assigned to the domain in question.
- Click on DNS Zone in the left sidebar.
- Click the button to add a record:
- Click the radio button DKIM to add a record.
- Click the Next button:
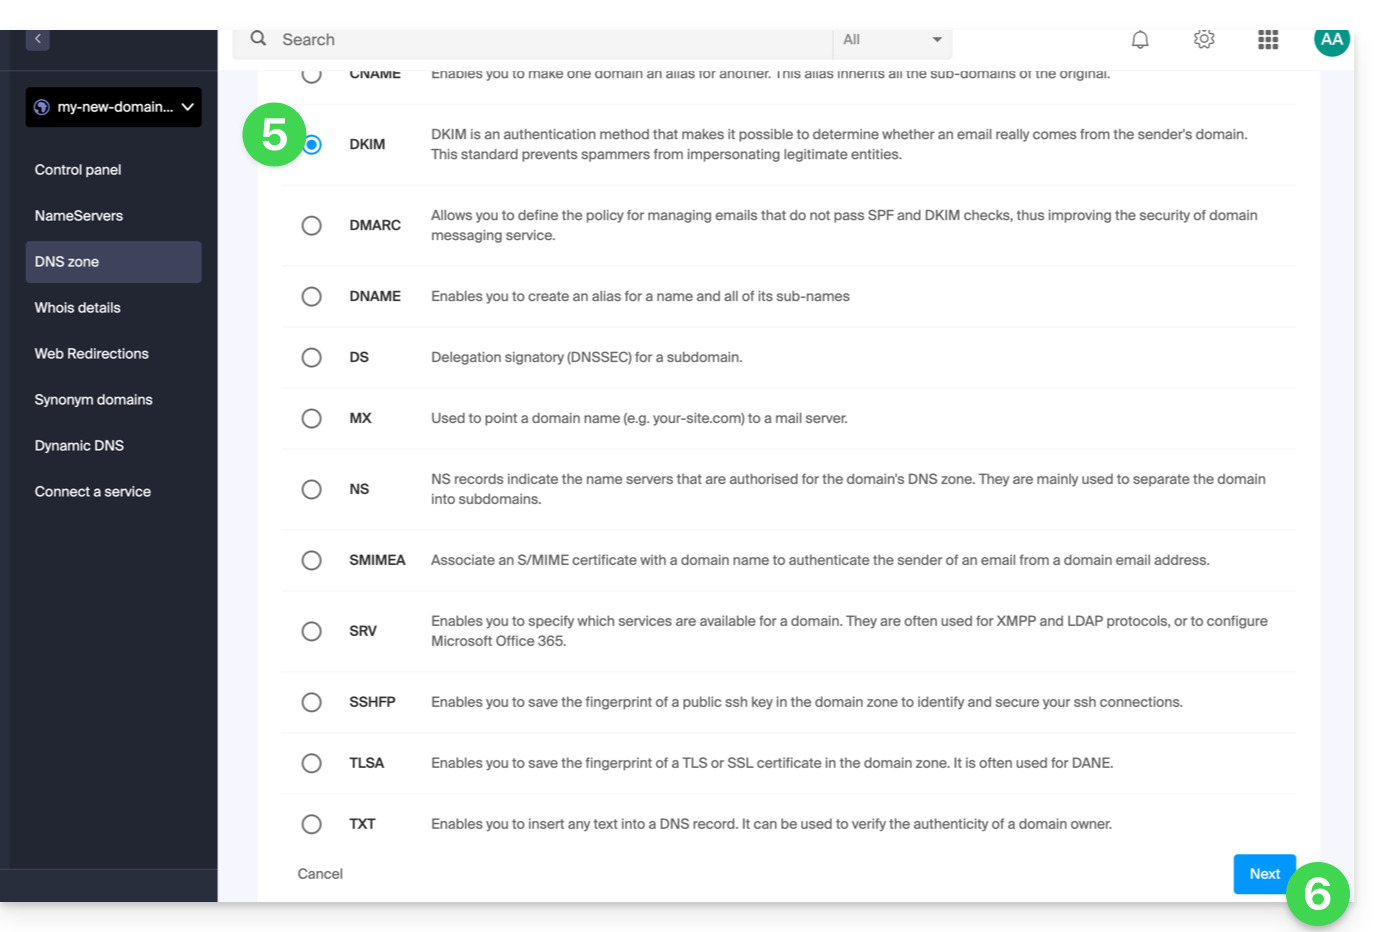
- Enter the DKIM values required for your DNS zone.
- Leave the default value for TTL.
- Click the Save button:

Add multiple DKIM
You can have multiple DKIM records on your domain/subdomain without limit, unlike DMARC or SPF, as long as your DNS host allows it.
If you use multiple third-party email providers, for example the ERP Odoo, it is necessary to add a DKIM for Odoo in addition to Infomaniak's.
Use unique DKIM selectors to avoid conflicts with existing records.
Link to this FAQ: https://faq.infomaniak.com/841
Has this FAQ been helpful?
This guide details the specifics of the .swiss domain extension, which is subject to special conditions.
Preamble
- Previously reserved for companies, registration to obtain a
.swissis now open to individuals and sole proprietorships not registered in the commercial register. - You can now submit your registration request to increase your chances and secure your surname or brand.
- By submitting your request now, Infomaniak will immediately submit your request to the Federal Office of Communications for review.
- As for company registrations, they are not immediate, and the waiting period of several weeks is independent of Infomaniak. Your requests will be denied if they do not meet certain conditions.
Reserve your .swiss domain
Beyond a unique opportunity to reserve your surname or brand:
- Unlike the
.chwhich is accessible to everyone, the.swissextension is subject to validation by the Federal Office of Communications (OFCOM). - The
.swisscertifies your presence in the Swiss market and sends a strong and credible signal to your Swiss and international partners. - Get 1 email address with your
.swissdomain for free by ordering a standard kSuite user which includes all kDrive productivity/storage applications. - Infomaniak offers the best rate for the
.swiss, including after the first-year promotion.
The complete conditions for individuals and sole proprietorships are specified during the order, however:
- You must be a natural person residing in Switzerland or a Swiss national.
- Swiss nationals living abroad can also apply for a
.swissfor private, charitable, or associative purposes. - The desired
.swissdomain must contain one of the following elements related to the person submitting the registration request:- one of the official names or other names listed in the civil registry
- one of the first names
- a surname
- a registered partnership name
- a name received in a religious order
- a stage name under which the person is known
- a name related to a distinctive sign (e.g., a registered trademark) on which the applicant has rights
The AHV and UPI (Universal Person Identification) numbers are not visible in the WHOIS.
Link to this FAQ: https://faq.infomaniak.com/1010
Has this FAQ been helpful?
This guide explains how to resolve access errors to your Web Hosting following an IP address change (e.g., server migration).
Preamble
- To save time, your system maintains a lookup table between domain names and IP addresses.
- If the site changes "home" (IP), your computer tries to knock on the old door.
- Clearing the cache forces it to request the new address from the DNS servers.
If your computer retains the old address in memory, clearing the DNS cache allows you to restore the connection.
Clear the DNS cache…
… on Windows
Use the command prompt to refresh your network settings:
- Open the Start menu.
- Type cmd and validate.
- In the black window that opens, type the following command and press Enter:
ipconfig /flushdns
… on macOS
On recent versions of macOS, the procedure is done via the Terminal:
- Open the Terminal (via Spotlight or Applications > Utilities).
- Copy and paste the following command:
sudo dscacheutil -flushcache; sudo killall -HUP mDNSResponder - Enter your session password (it will not be displayed during entry) and validate.
… on Linux
Most modern distributions use systemd-resolved. Open your terminal and run:
sudo resolvectl flush-caches
Note: If you are using an older service, the command sudo systemctl restart nscd is still valid.
Link to this FAQ: https://faq.infomaniak.com/1041
Has this FAQ been helpful?