Knowledge base
1000 FAQs, 500 tutorials and explanatory videos. Here, there are only solutions!
This guide explains how to transfer to Infomaniak data (Web, Mail, Domain, and even Cloud) currently hosted elsewhere. You remain the obvious owner of your data, without loss or interruption!
Don't have time to migrate your services? Launch a free tender to find an Infomaniak partner who will take care of everything.
Specific guides
Click on the link corresponding to your current host:
- Swisscom: complete guide to migrate Web, Mail and domain name data
Guides for any other hoster
To retrieve any other data, follow the procedures below:
- Import Web data (all PHP, HTML, etc. sites.)
- For WordPress specifically, refer to this other guide…
- For WordPress specifically, refer to this other guide…
- Copy the Mail data (addresses and mailbox content, etc.) to kSuite or a simple Mail Service
- Transfer the domain name (domain management, DNS zone, etc.)
To avoid interrupting your website and emails and to avoid losing content while importing your existing data, migrate your services in the specified order.
You can also bring other types of data to the Infomaniak servers:
- Dropbox, Google Drive, etc. content: refer to this other guide
- Data on NAS Synology or QNAP: refer to this other guide
Why join Infomaniak?
By consolidating your domain names, websites, and email addresses with Infomaniak, you simplify the management of your invoices and services. Moreover, your domains will automatically link with your website and email address. You will therefore not need to manually configure the DNS of your domains with another registrar.
Learn more about Infomaniak
Thank you for entrusting the management of your domain names to Infomaniak.
This guide allows you to quickly use the essential functions of your new product.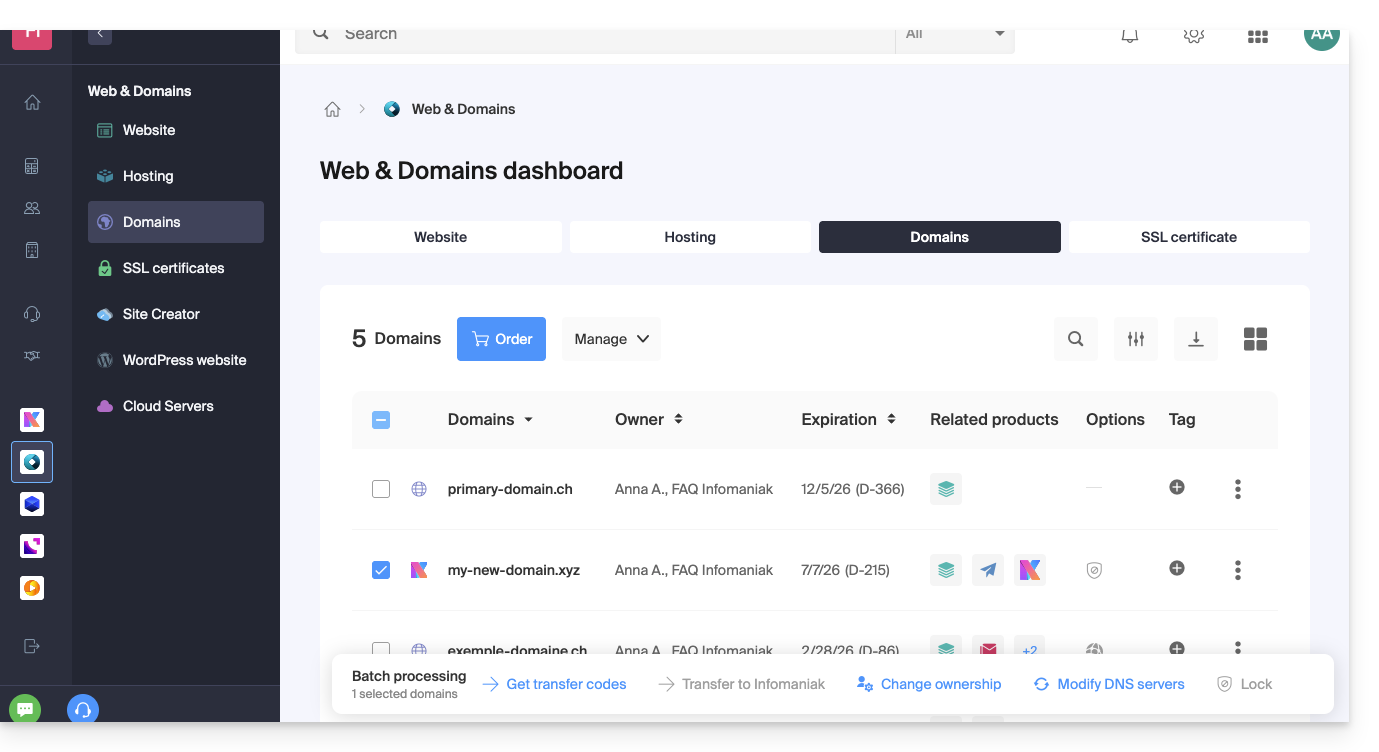
Some important guides
Administrative
- Protect your personal information in the WHOIS
- Protect your domain from theft and loss
- Modify the domain name details
- Who owns a domain name?
- Use the free services (mail and Web 10 Mo) linked to a domain managed by Infomaniak
- Transfer another domain name to Infomaniak
Technical
- Edit the records (A, MX, Web, Mail, etc.) of a domain registered with Infomaniak to join, for example, a hosting service not managed by Infomaniak
- Modify the DNS servers
- Redirect traffic
- Configure DynDNS
- Link a domain name to the Mail Service
- Link an additional domain name to the Mail Service
- Unlink a domain linked to the Mail Service
- Link a domain name to an Infomaniak Web Hosting
- Link an additional domain name to a website
- Unlink a domain linked to the website
- Link a domain name to the Infomaniak Synology NAS
- Link a domain name to Wix
- Link a domain name to Site Creator
- Link a domain name to the Newsletter
- Link an Infomaniak domain name to an external service
Otherwise, find the desired topic among the rest of the FAQs.
Click here to share feedback or a suggestion about an Infomaniak product.
This guide explains how to transfer a domain name you own with another company to Infomaniak.
Preamble
- In general, during a transfer, no already paid period is lost; the domain's expiration date will be extended by one year.
- A bulk transfer is also possible.
- The terms "
EPP", "AuthCode", "AuthInfo", "transfer code" and "authorization code" all refer to alphanumeric sequences specific to the domain whose main purpose is to verify the owner's authorization before a transfer between Registrars.
1. Obtain the authorization code
Obtain it in your customer account with the current provider (refer to these other specific guides), otherwise ask for it!
It is sometimes necessary to unlock the possible transfer lock.
2. Transfer the domain name
Search for the domain name in question on this Infomaniak page.
Click the button to start the transfer!
3. Configure the options
Follow the assistant by adding or removing the desired options.
After entering the domain name holder's details, this step is the most important:
Leave the toggle switch activated as above if…
- … all the products or services corresponding to this domain name are already with Infomaniak.
- … no product or service is linked to your domain name.
or disable the toggle switch if…
- … certain products or services corresponding to this domain name are elsewhere than at Infomaniak.
4. Enter the authorization code
Below, paste the authorization code copied in step 1, then validate the transfer by clicking on the button:
Then click on the Next button at the bottom right to proceed to the final step.
5. The final step
The final step allows you to settle any fees (depending on the extension of the domains to be transferred) and renewal methods.
Read and accept the general conditions then click on Next to complete the order:
6. Manage your domain names
Find your domain names on the Manager Infomaniak and monitor their transfer, configuration, expiration…
If a problem occurs with the transfer, an email is sent to you containing the reason for the failure as well as the procedure to resume the transfer.
Transfer your services such as sites or email addresses as well? Learn about this other guide. Also discover the migration service from Infomaniak.
This guide explains how a domain name and a DNS zone work.
Preamble
- When you browse a website
https://www.abc123.xyzfor example,abc123.xyzis the domain name. - Each domain name has DNS (Domain Name System), which indicate where (with which provider, for example) the DNS zone is located.
- The DNS zone then allows the management of various services related to the domain name to be entrusted to different providers.
- For a unique domain name, it is possible, for example, to entrust:
- web hosting to provider X (via the "
A" type record) - and the Mail Service to provider Y (via the "
MX" type record)
- web hosting to provider X (via the "
- For a unique domain name, it is possible, for example, to entrust:
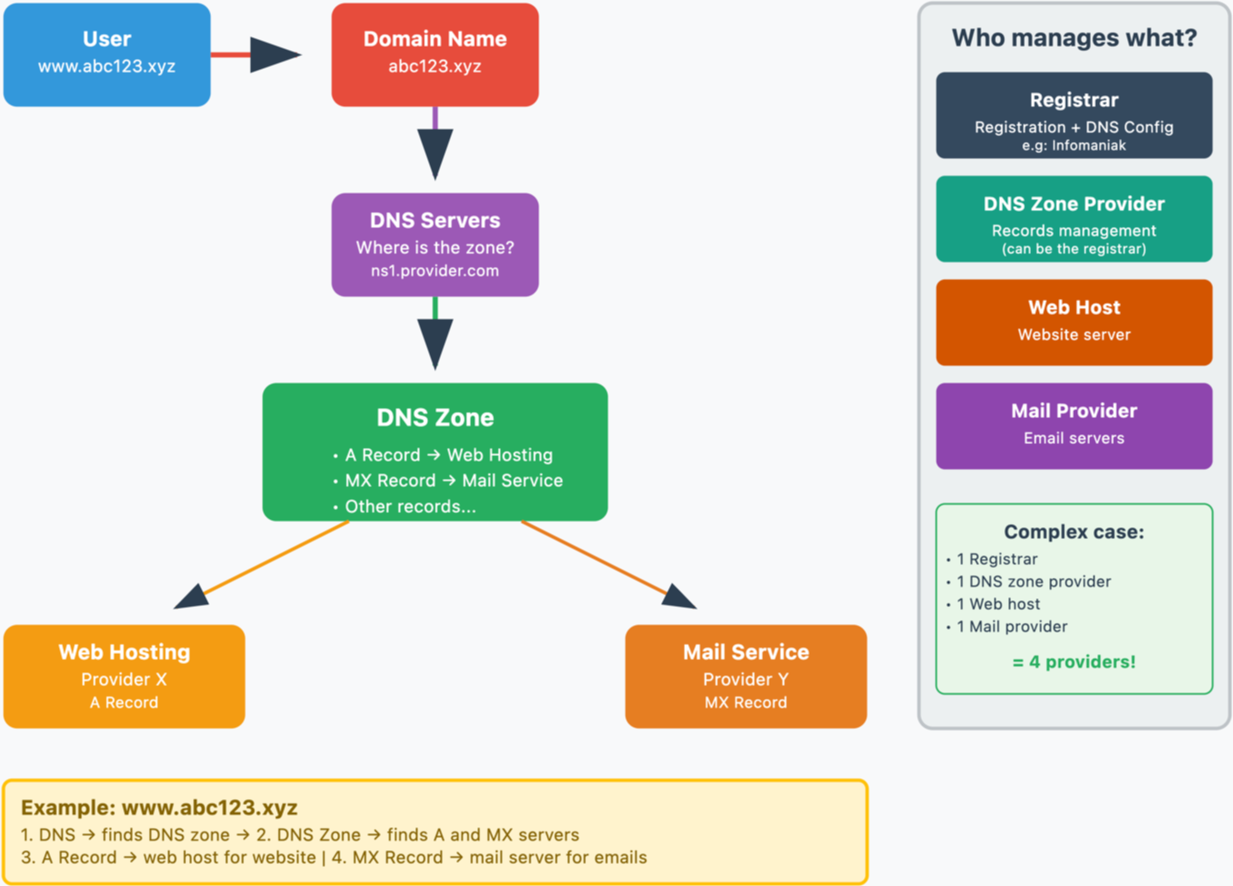
Domain name, DNS and DNS zone, then services
Who manages what?
- Each domain name is reserved and managed by a registrar (registration office). For example, Infomaniak is a registrar, one of the cheapest in Switzerland.
- The DNS of a domain name are configured with the registrar managing the domain name.
- The DNS zone can be handled by the registrar or another provider.
- Web hosting and the Mail Service can be handled by any host.
In the most complex case, it is therefore possible to have 1 different provider for the following services: domain name reservation and DNS management, DNS zone management, web hosting, Mail Service.
The following diagram summarizes these different possibilities with the involvement of different providers:
Infomaniak
As a registrar and host, Infomaniak can manage all these services. It's the simplest solution.
- In the case of Infomaniak, the DNS are generally of the form nsXX.infomaniak.com and nsXX.infomaniak.com (XX like 11 or 12 for example).
- You can modify the DNS of your domain name, as well as modify the "inside" of these DNS i.e. modify the DNS zone of a domain name.
And in these DNS zones, to redirect traffic to services, we distinguish:
- an MX record that allows you to point a domain name (
domain.xyzfor example) to a mail server. - an A record that allows you to point a domain name (
domain.xyzfor example) or a subdomain (example.domain.xyzfor example) to a web server that has a static IP address (otherwise you would have to constantly edit the A record to provide the new IP address - see this other guide on this subject)
Some possible situations
Examples and fictitious names
| All services are with Infomaniak | |||
|---|---|---|---|
| domain name | domain.xyz | registered with -> | Infomaniak |
| DNS of the domain name | ns1.infomaniak.com… | so DNS zone must exist at -> | Infomaniak |
| site hosted by -> | Infomaniak | so DNS zone must contain A record | 123.45.67.8 for example |
| mail hosted by -> | Infomaniak | so DNS zone must contain MX record | mx-mail.maniak for example |
| All services are with Infomaniak except mail | |||
|---|---|---|---|
| domain name | domain.xyz | registered with -> | Infomaniak |
| Domain name DNS | ns1.infomaniak.com… | so the DNS zone must exist at -> | Infomaniak |
| website hosted by -> | Infomaniak | so the DNS zone must contain A record | 123.45.67.8 for example |
| mail hosted by -> | Medical Service | so the DNS zone must contain MX record | med-mx.net for example |
| All services are with Infomaniak except the website | |||
|---|---|---|---|
| domain name | domain.xyz | registered with -> | Infomaniak |
| Domain DNS | ns1.infomaniak.com… | so DNS zone must exist with -> | Infomaniak |
| site hosted by -> | Clinic | so DNS zone must contain A record | 9.87.65.4 for example |
| mail hosted by -> | Infomaniak | so DNS zone must contain MX record | mx-mail.maniak for example |
| All services are with Infomaniak except the domain name | |||
|---|---|---|---|
| domain name | domain.xyz | registered with -> | GoMamie |
| DNS of the domain name | ns1.infomaniak.com… | so the DNS zone must exist with -> | Infomaniak |
| site hosted by -> | Infomaniak | so the DNS zone must contain A record | 123.45.67.8 for example |
| mail hosted by -> | Infomaniak | thus the DNS zone must contain MX records | mx-mail.maniak for example |
| All services are with Infomaniak except the DNS zone | |||
|---|---|---|---|
| domain name | domain.xyz | registered with -> | Infomaniak |
| DNS of the domain name | ns.privateDNS.org... | thus the DNS zone must exist with -> | Private DNS |
| site hosted by -> | Infomaniak | so DNS zone must contain A record | 123.45.67.8 for example |
| mail hosted by -> | Infomaniak | so DNS zone must contain MX record | mx-mail.maniak for example |
| No service exists with Infomaniak except the domain name | |||
|---|---|---|---|
| domain name | domain.xyz | registered with -> | Infomaniak |
| DNS of the domain name | ns.privateDNS.org… | so DNS zone must exist with -> | Private DNS |
| hosted by -> | Clinic | so the DNS zone must contain A record | 9.87.65.4 for example |
| hosted by -> | Medical Service | so the DNS zone must contain MX record | med-mx.net for example |
| No service exists with Infomaniak except the DNS zone | |||
|---|---|---|---|
| domain name | domain.xyz | registered with -> | GoMamie |
| Domain name DNS | ns1.infomaniak.com… | so the DNS zone must exist at -> | Infomaniak |
| site hosted by -> | Clinic | so the DNS zone must contain A record | 9.87.65.4 for example |
| mail hosted by -> | Medical Service | so the DNS zone must contain MX record | med-mx.net for example |
| No service exists with Infomaniak except mail | |||
|---|---|---|---|
| domain name | domain.xyz | registered with -> | GoMamie |
| domain name DNS | ns.privateDNS.org... | so DNS zone must exist with -> | Private DNS |
| site hosted by -> | Clinic | so DNS zone must contain A record | 9.87.65.4 for example |
| mail hosted by -> | Infomaniak | so DNS zone must contain MX record | mx-mail.maniak for example |
etc.
This guide explains the difference between the terms synonym and alias in the context of the Domain Name service offered by Infomaniak.
Synonym domain / alias domain
So-called synonym domain names (i.e., domains that are entirely dependent on the main domain, without their own DNS configuration) and alias (independent domains, with their own DNS configuration) can both serve as secondary domains associated with a main domain.
For example, the domains pomme.xyz (alias) and banane.xyz (synonym) can redirect to a common main domain such as fruits.xyz.
Here is the technical distinction to remember:
- The synonym (also called "linked domain" or "DNS mirror") directly uses the DNS servers of the main domain. It has no DNS zone of its own.
- The alias (also called "redirected independent domain" or "DNS alias") has its own DNS records (independent DNS zone), although it points to the same hosting or services.
| pomme.xyz (domain alias – with custom DNS) ns1.personnalisable.ch ns2.personnalisable.ch | ⇢ | Own DNS zone A records, MX, etc. | Web Hosting Email Service |
| fruits.xyz (domain main) ns1.infomaniak.ch ns2.infomaniak.ch | } | Own DNS zone A records, MX, etc. | |
| banane.xyz (domain synonym – without own DNS) Automatically retrieves the DNS of the main domain (fruits.xyz) |
Learn more
- How to add a domain as a synonym
- How to dissociate a synonym domain
- Understanding the difference between domains and DNS zones
This guide explains how to replace the main domain name associated with a Website (excluding Starter hosting) hosted on Infomaniak in case you want to change the name of your activity or modify the spelling.
Preamble
- It is not possible to simply modify the spelling of the domain name in question.
- You must own the new domain name and install it in place of the current one by performing a reversal (see below).
- You can also rename your Web Hosting product in the Infomaniak Manager, but changing the name of a hosting has strictly no impact on the URLs of the sites.
- You need to act on the domain name and, if necessary, adapt the content of the site.
Change the domain name of the website
Prerequisites
- Prepare the new domain name (if necessary you need to buy it).
- Install a valid SSL certificate, otherwise the reversal will not be offered.
- If the modification sought is rather of the type "subdomain" to "main domain" (
dev.domain.xyz→domain.xyzfor example) then refer to this other guide.
Then, to replace the domain name assigned to the site with another domain name:
- Click here to access the management of your product on the Infomaniak Manager (need help?).
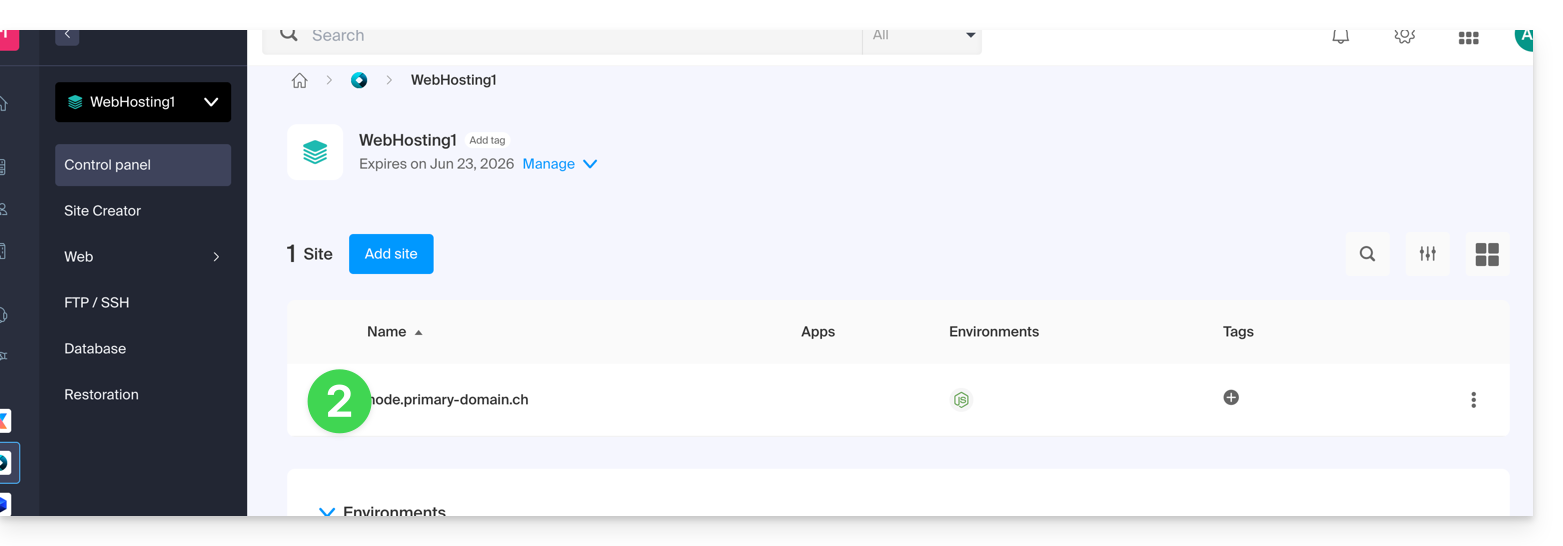
- Click directly on the name assigned to the product in question:
- Click on the chevron to expand the Domains section of this site:

- Refer to this other guide to link the new domain name to your site (read the prerequisites carefully):
- It is this new linked domain that will replace the current main domain name after the reversal you will perform below.
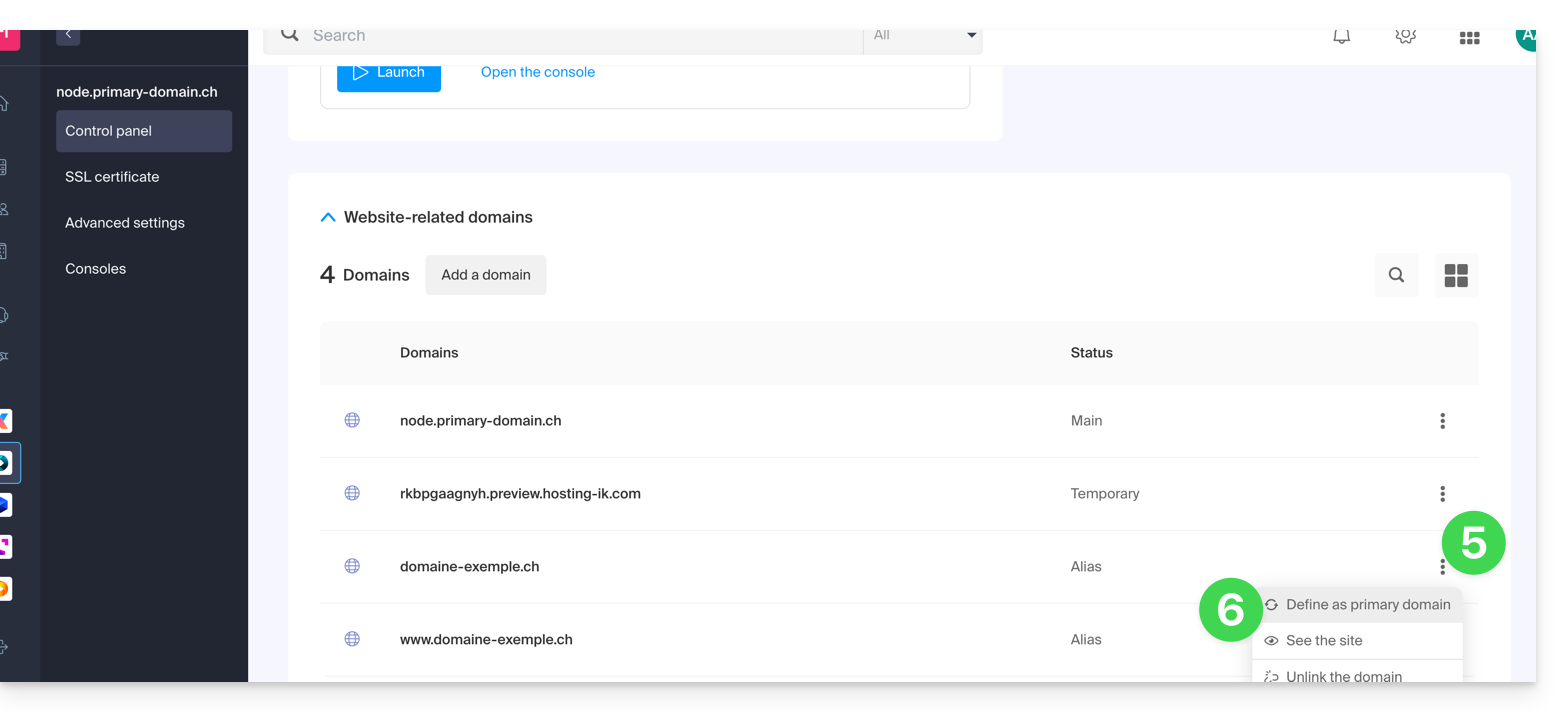
- Once the new domain name is linked to your site, click on the action menu ⋮ to the right of it.
- Choose Set as main domain:
- If necessary, delete the old domain name and its variants that have become alias domains alias (and no longer primary domains).
If you are using an SSL certificate, you will need to update it to include the added aliases.
If you are using the dedicated IP option, you need to uninstall it, and reinstall it after the reversal you are going to perform.
Adapt the site content to the new name
In some cases, the web application used for site development needs to be adjusted to work with the new domain name. Click on the link corresponding to the development of your site to adapt the content:
This guide explains how to restore backups of previous versions of your files and other web data from your Infomaniak hosting, and how to set up an effective backup policy if the automatically and freely provided backups no longer meet your availability or security needs.
Web Hosting (Starter, Shared, Cloud Server)
Refer to these guides to restore automatic backups:
- of an entire hosting (FTP + MySQL),
- specific files on the hosting,
- specific databases,
- of a Web Application (Wordpress & Apps),
- Cloud Server SSH crons.
Refer to these guides to backup and restore:
- hosting with Swiss Backup and Restic (advanced),
- WordPress with Swiss Backup,
- WordPress with an extension.
Also refer to https://faq.infomaniak.com/snapshot.
Hosting v1 (old 60 Go offer)
- View and/or download the automatic backup (versioning) of your data on your FTP space under
/backupsand/backup_mysqlat the root of the domain (above/web). - Restore this data.
- Restore messages from Infomaniak automatic backups.
- Restore contacts or calendar events.
- Backup the current content of an email account:
- by downloading the current content locally,
- by duplicating all current content to a backup box,
- by copying future emails as they arrive to a backup box.
Domains / DNS Zones
- Restore deleted DNS records from Infomaniak automatic backups.
- Restore an expired domain in the redemption period.
This guide details the allowed and disallowed characters when creating an email address (up to 64 characters) in an Infomaniak Mail Service.
Preamble
- The allowed characters differ depending on whether they appear before or after the at sign
@. For example, inusername.mail@domain-name.xyz:- Before the at sign: the part
username.mailcorresponds to the username. - After the at sign: the part
domain-name.xyzcorresponds to the domain name.
- Before the at sign: the part
- To learn about the possibilities offered at the domain name level (part after the at sign
@), consult this other guide.
Part before the at sign: username.mail
The RFC 5321 and RFC 5322 standards define the general syntax of email addresses. However, email providers — including Infomaniak — apply additional restrictions to ensure security, consistency, and compatibility with the majority of email clients.
For example, an address such as -@example.com is syntactically valid according to RFC 5322, but is not accepted when created on Infomaniak servers.
These additional rules allow, in particular:
- to avoid abuse (spam, malicious automation, etc.);
- to respect naming conventions (an identifier composed solely of
-makes no sense); - to ensure compatibility with email clients that poorly handle certain address formats.
In summary: RFC 5322 defines what is syntactically possible, but each server determines what is actually usable in practice.
Allowed characters before the at sign
The following characters can be used in the part before the at sign of an Infomaniak email address:
| Allowed characters | Examples / Notes |
|---|---|
| Letters | a à z and A à Z |
| Numbers | 0 à 9 |
| Hyphen | - (not allowed as the first or last character) |
| Underscore | _ |
| Dot | . (allowed provided it is not placed at the beginning, end, or consecutively) |
Forbidden characters before the at sign
The following characters (at sign, exclamation mark, hash, dollar, percent, caret, ampersand, asterisk, parenthesis, equal sign, bracket, chevron, comma, quotation marks, semicolon, question mark...) cannot be used to create an Infomaniak email address:
| Forbidden characters | Notes |
|---|---|
@ | reserved for separation between the username and the domain |
| (space) | |
!, #, $, %, ^, &, * | not supported |
(, ), =, [, ] | not supported |
<, >, ,, ;, ", /, ? | not supported |
| Non-ASCII characters | for example, accents or non-Latin letters |
| Control characters (ASCII codes < 32) | non-printable, forbidden |
This guide explains how to easily set up a redirection for your domain name managed with Infomaniak.
Introduction
- A web redirection allows you to redirect a domain name or subdomain to the Internet address of your choice.
- This procedure is only valid if the domain's DNS are managed by Infomaniak and if Custom Brand is not activated.
- Any addition/modification may take up to 48 hours to propagate.
- If necessary, create a redirection for your domain with and without the www (
domain.xyzandwww.domain.xyz).
Redirect a domain to the URL of your choice
To do this:
- Click here to access the management of your product on the Infomaniak Manager (need help?).
- Click directly on the name assigned to the product in question.
- Click on Web Redirections in the left sidebar.
- Click on the button Add a redirection.
- Enter the destination address (under To).
- Click on Validate.
With Domain Privacy, Infomaniak allows you to preserve the confidentiality of your personal information (name, email address, postal address, and phone number) and effectively protect you against SPAM.
Preamble
- ICANN-accredited registrars are required to publish the owner's contact information of a domain in the public WHOIS directory, which lists all registered domains and primarily serves to:
- check the availability of domain names
- verify trademark infringements
- contact the owner of a domain in case of a legal issue
- For customers concerned about the confidentiality of their personal data and who do not wish to publicly display their email address, phone number, and postal address in the WHOIS directory, Domain Privacy allows you to mask these real coordinates
- Thanks to this protection, WHOIS searches for your domain do not return your personal information, but the information of the partner Domain Privacy Trustee SA:
- You are protected against SPAM: marketing companies and individuals cannot use your personal data.
- You remain the full owner of your domain.
- It remains possible to contact you via a secure form that protects your identity.
- Discover the domain name extensions supported by Domain Privacy
Activate Domain Privacy on an existing domain
Domain Privacy is activated in a few seconds:
- Click here to access the management of your product on the Infomaniak Manager (need help?).
- Click directly on the name assigned to the product concerned.
- Activate Domain Privacy from the dashboard:
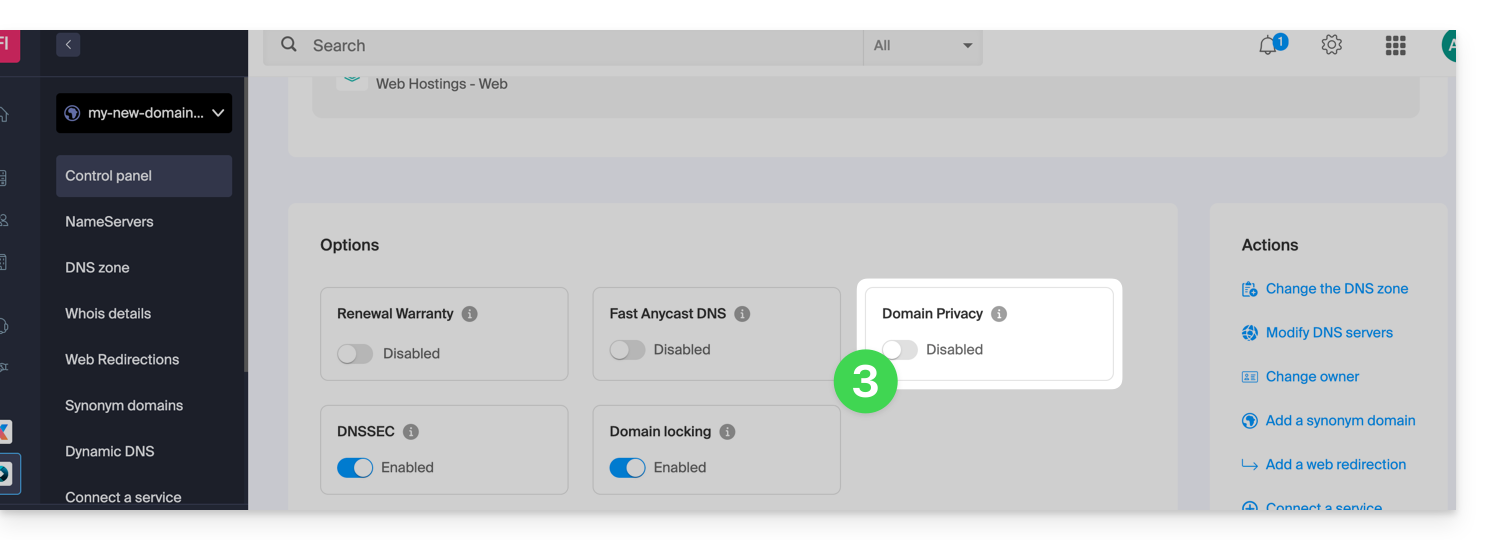
Infomaniak also offers the possibility to guarantee the renewal of your domains with Renewal Warranty: this guarantee is intended to ensure that you do not lose domains that are important for the smooth running of your activities.
This guide explains how to transfer an Infomaniak product from one Organization to another.
Preamble
- You can move almost all products subscribed with Infomaniak to a different Infomaniak Manager interface than the one on which the product is currently located; this is therefore an internal transfer.
- If your user has access to multiple Organizations it is even easier to send to one of them the product of your choice.
- This operation does not cause any interruption.
- The users currently having access to the selected products will not be transferred (and therefore may no longer have access to the products).
- The invoices of the selected products will not be transferred.
- my kSuite cannot be transferred.
Generate a transfer link
Prerequisites
- Be Administrator or Legal Representative within the Organization.
To transfer a product:
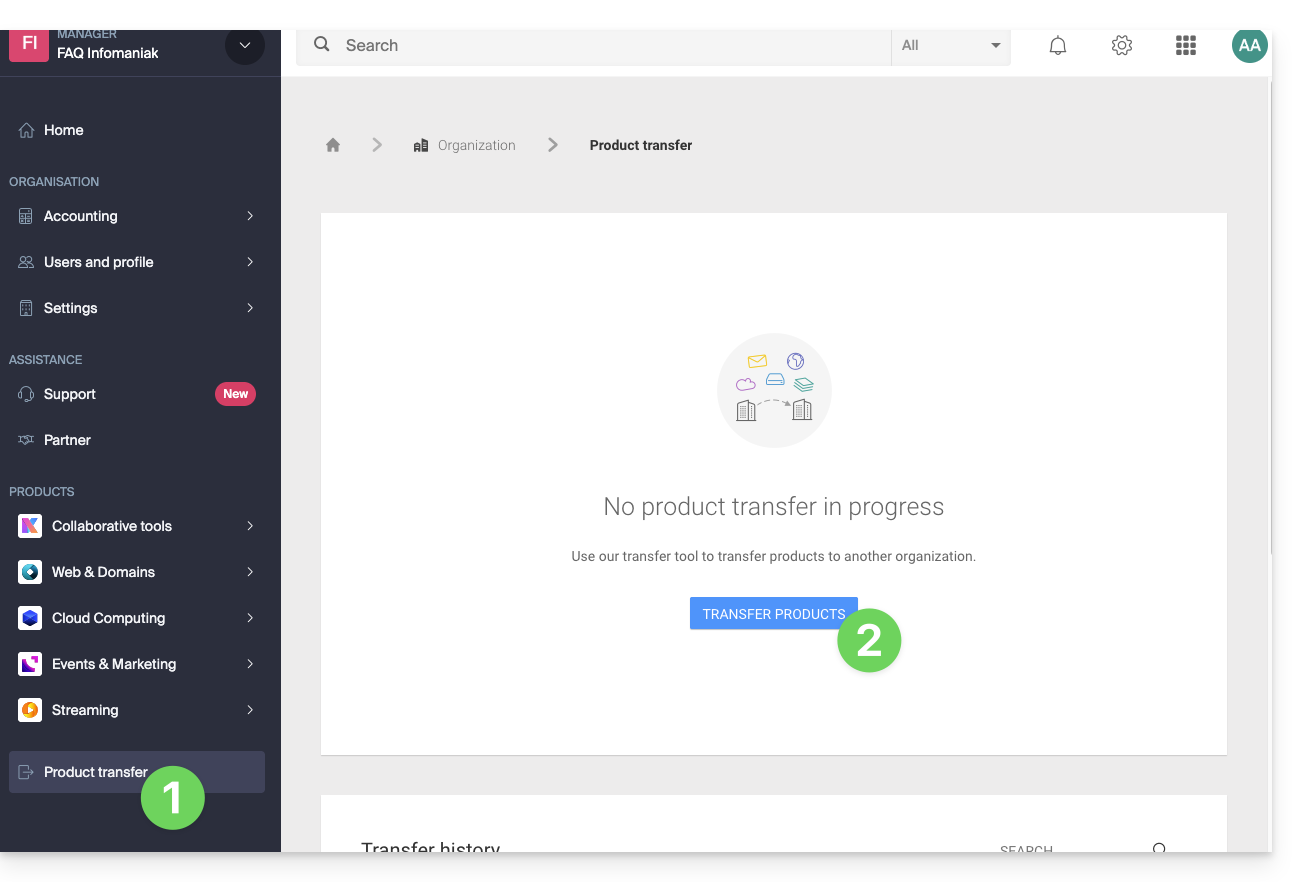
- Click here to access the product transfer management on the Infomaniak Manager (need help?).
- Click on the Transfer products button:
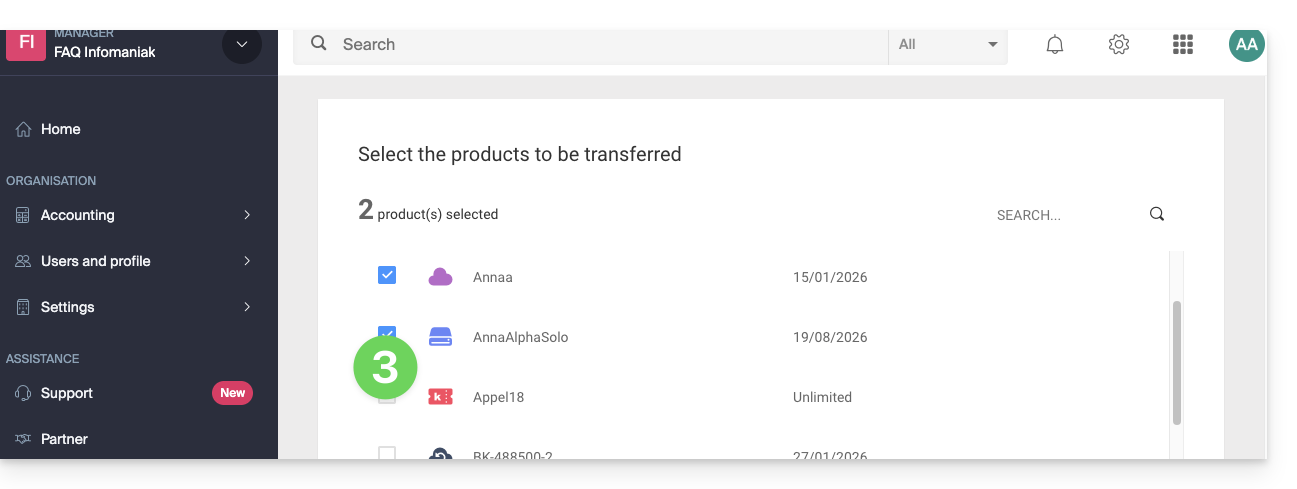
- Check the product(s) to be moved:
- Read and accept the general conditions.
- Click on the Transfer button:

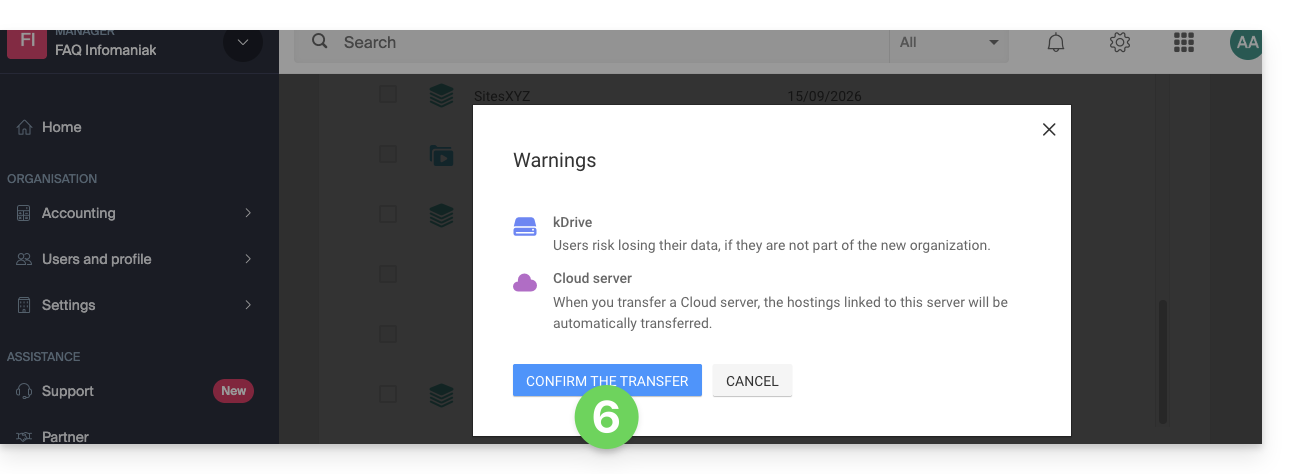
- Read and validate any warnings:
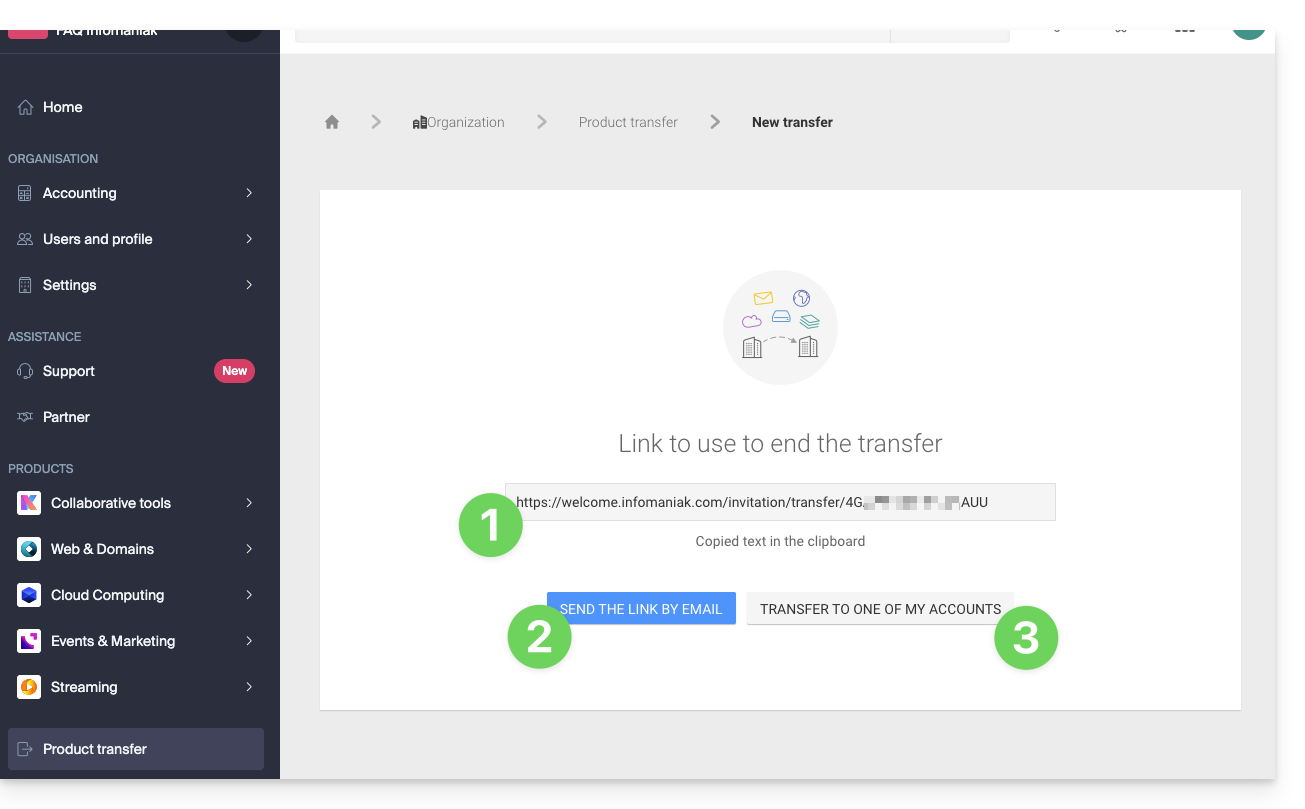
The transfer has started. Now, at your choice, you can:
- Copy the transfer link…
- or send it to the email address of your choice…
- or select directly one of the Organizations to which your user is attached, and the selected product will be transferred there:
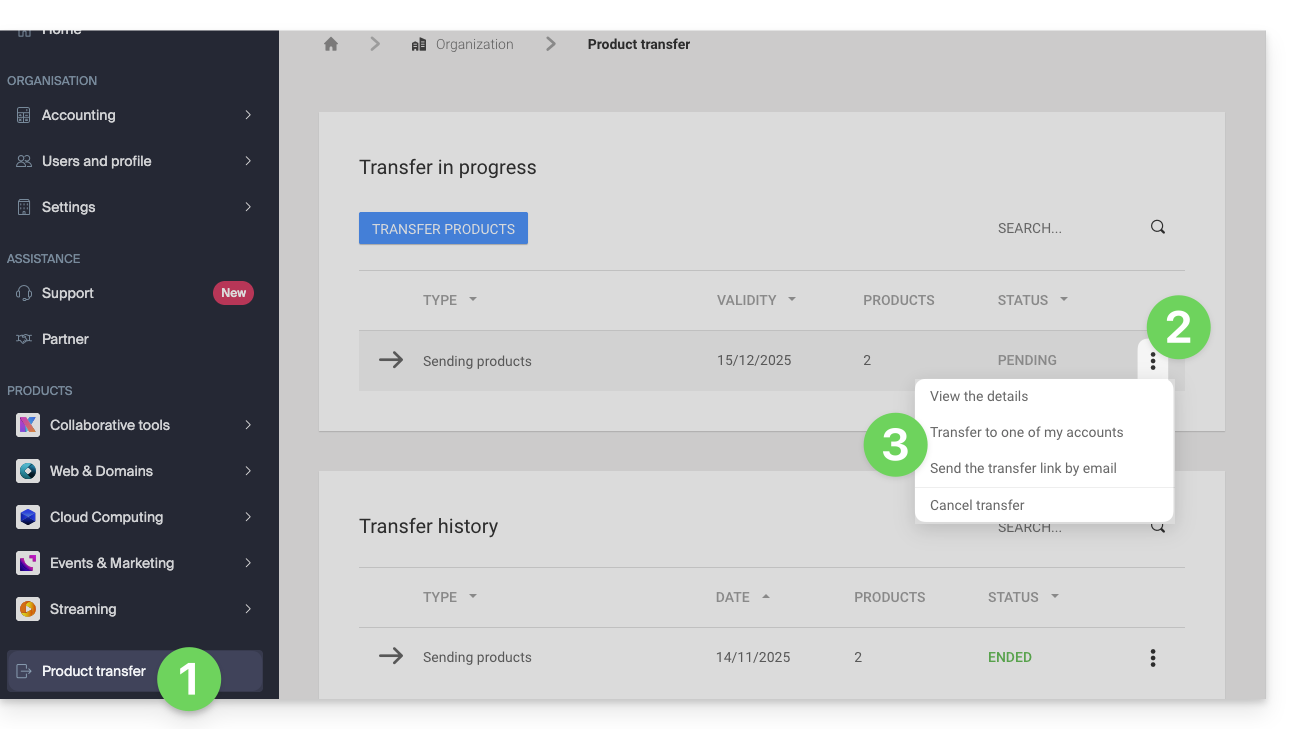
At any time, you can return to the product transfer page to find the possibilities listed above:
Alternative method
In the case of one-time transfer, you can also go directly to the dashboard of the product concerned and click on Manage (example in the image below) however, since this menu is not always present, it is better to prioritize the first method above, which also allows bulk transfer: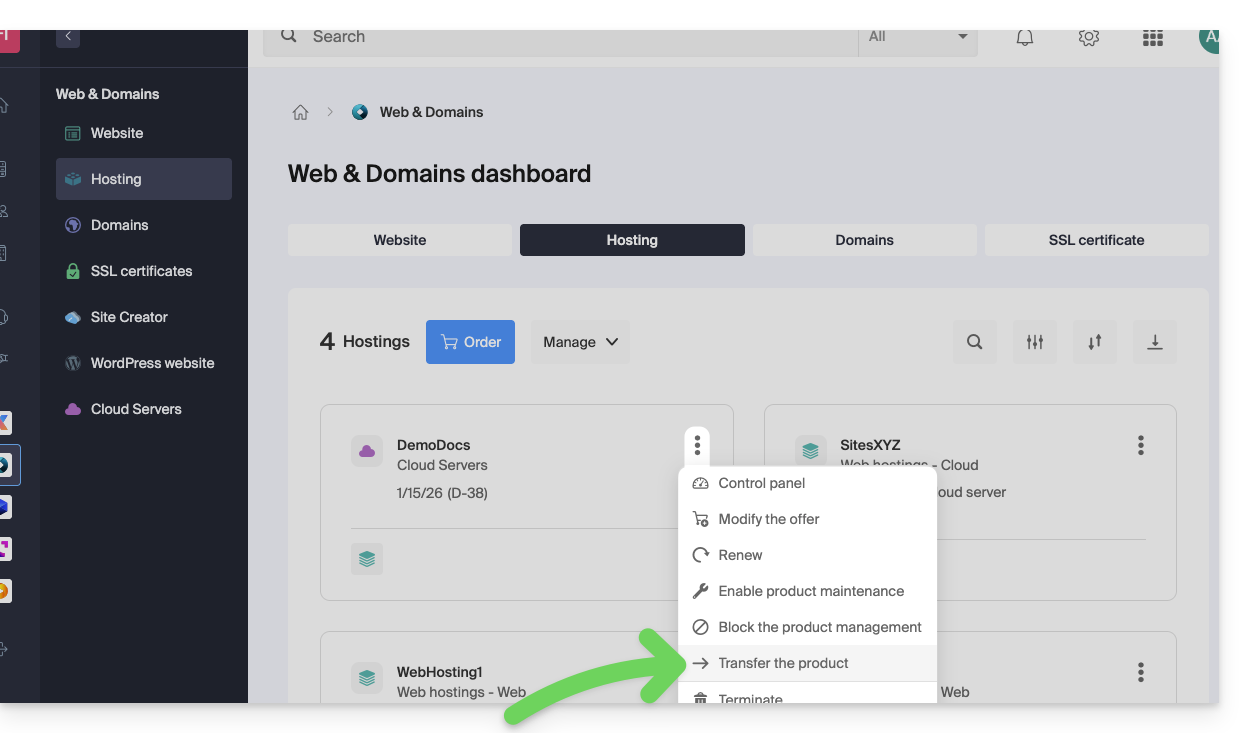
Refer to this other guide regarding Jelastic Cloud.
Receive the product
Once a product transfer is initiated by a user…
1. Be on the Organization that should receive the product
- Click here to log in to the Manager on the Organization that should receive the product(s).
- The user specified when logging in to the Infomaniak account must have administrative rights.
- If necessary, you can create a new Organization to receive products.
2. Execute the obtained link
- Click on the link obtained in the first step above.
- You can also simply paste it into a browser while logged in to the appropriate Infomaniak account.
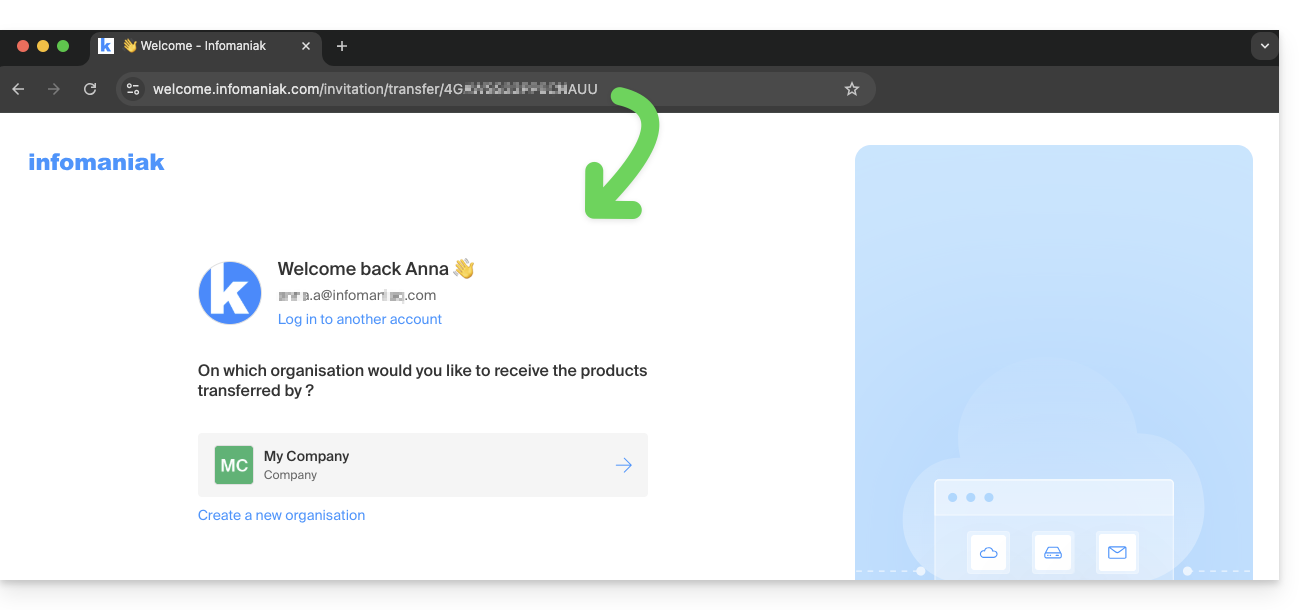
3. Validate the product transfer
- If necessary, choose the destination Organization using the drop-down menu.
- Read and accept the general conditions.
- Click the Receive the product button (if the button is not clickable, make sure you have selected the Organization).
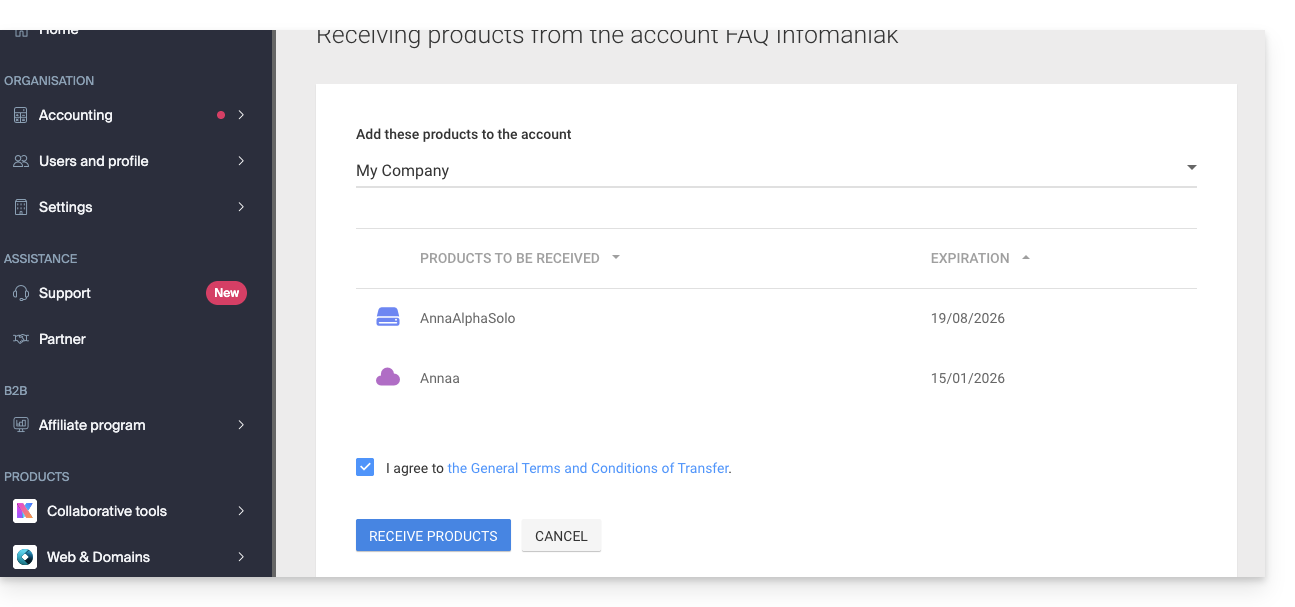
Find the ongoing or completed transfers at any time from the bottom icon on the left sidebar of the Infomaniak Manager: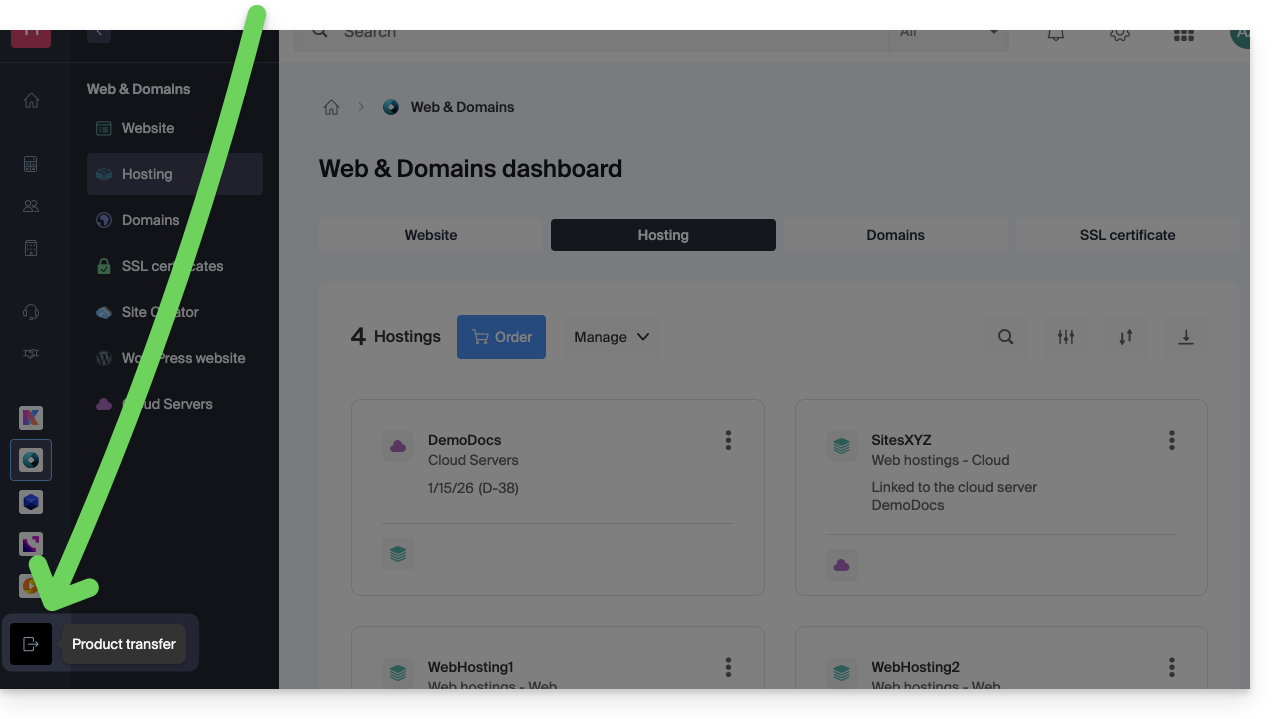
DNS Fast Anycast replicates the DNS of your domain around the world to reduce latency and increase the availability of your websites.
Preamble
- Thanks to DNS Fast Anycast, the DNS of your domain are replicated within several Points of Presence (POP) around the world (list below).
- No matter where your visitors are, they are redirected to the nearest DNS server to them, which on average speeds up by 34% (DNS resolution) the access speed to your site.
- Moreover, if one of your DNS servers were to be unavailable, the nearest server naturally takes over and your visitors can continue to access your site.
- The replication of your domain's DNS is automatic and no modification of your code is required.
Manage DNS Fast Anycast
Prerequisites
- DNS Fast Anycast is compatible with all websites, regardless of your host.
- All you need is a domain name managed at Infomaniak.
- Transfer the management of your domain to Infomaniak if necessary
- Refer to this other guide to manage external domains.
To access the DNS Fast Anycast option:
- Click here to access the management of your product on the Infomaniak Manager (need help?).
- Click directly on the name assigned to the product in question.
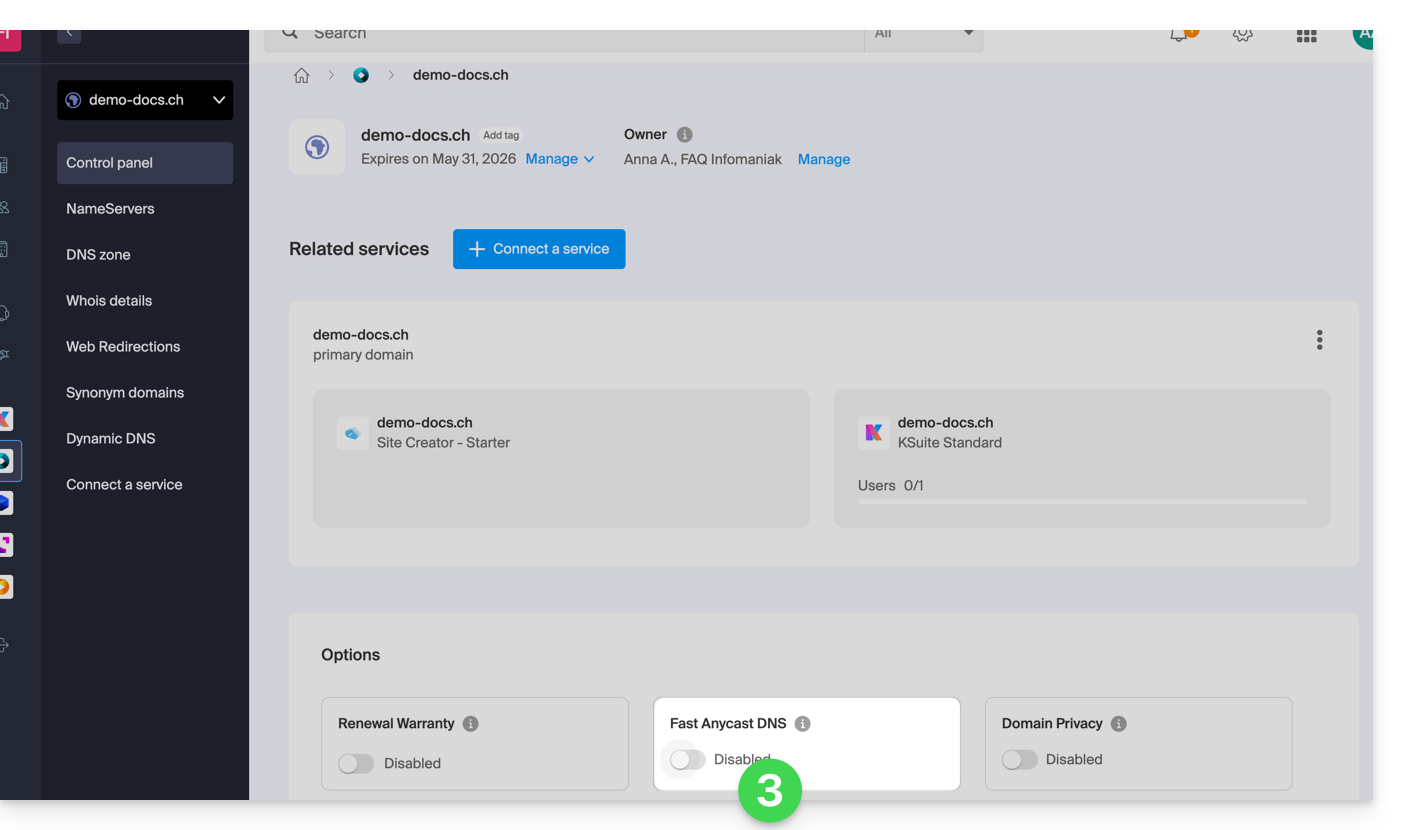
- Enable or disable the DNS Fast Anycast toggle switch on the dashboard:
POP - 'Point of Presence'
By activating DNS Fast Anycast on your domain, your DNS will be automatically replicated in the following points of presence:
Network 1
New York, USA (2x)
Paris, France (2x)
Varsovie , Pologne (2x)
Dublin, Irlande (2x)
Singapour (2x)
Johannesburg, Afrique du Sud
Stockholm, Suède
Vienne , Autriche (2x)
Francfort, Allemagne (2x)
Londres, Royaume-Uni
Dallas, USA
Los Angeles, USA (3x)
Amsterdam, Pays-Bas
Sydney, Australie
Sāo Paulo, Brésil
Miami, USA (2x)
Network 2
Hong Kong, Chine
San José, USA
Dallas, USA
Reston, USA
Chicago, USA
Seattle, USA
Londres, Royaume-Uni
Francfort, Allemagne
Amsterdam, Pays-Bas
Vienne, Autriche
Toronto, Canada
Sydney, Australie
Sāo Paulo, Brésil
Johannesburg, Afrique du Sud
Miami, USA
The points of presence are distributed across two networks that are used randomly when one of your visitors accesses your website.
This guide explains what a web host like Infomaniak is and specifies its role and limits of intervention.
Infomaniak, web host since 1996
According to Wikipedia, a web host is a company that provides Internet hosting for computer systems to individuals or entities who do not wish to do so by their own means.
Infomaniak is also…
- … decades of experience in hosting and online solutions
- … more than a million users in Switzerland and Europe (CHF 36.5 million in revenue in 2022)
- … company certified ISO 27001, ISO 9001, ISO 14001, ISO 50001 and committed to sustainable development
- … 100% of "Swiss made" technological know-how with data hosted in Switzerland
- … a rich knowledge base and a customer support available
Responsibilities and limits of intervention
As a host, Infomaniak installs, secures, and keeps servers up to date, updates its web interfaces (Manager) and assists its customers in using the services.
On the other hand, Infomaniak does not intervene on the content of the servers or the development of websites.
Limits of technical support
The technical support cannot help you to…
- … solve problems related to site development or its updates
- … implement solutions (migrations, complete installations)
- … manually install WordPress
- … take remote control of your computer
but can assist you for…
- … solve problems related to the infrastructure or the Manager
- … clarify certain processes
A Premium assistance and a migration service are available for more demanding needs.
Find external help
For help with the content of your site or the organization of your mailboxes, use the Infomaniak tender platform which lists over 1000 verified professionals, or consult the directory.
This guide explains how to register a domain name with Infomaniak.
Preamble
- With a new domain name or additional domain name, many possibilities open up to you, including access to free services, such as:
- You will also be able to:
- use your existing Mail Service or Website but with a different spelling,
- host a website here or with a third-party host,
- etc.
Order a first domain name
To do this:
- If necessary, create an Infomaniak account.
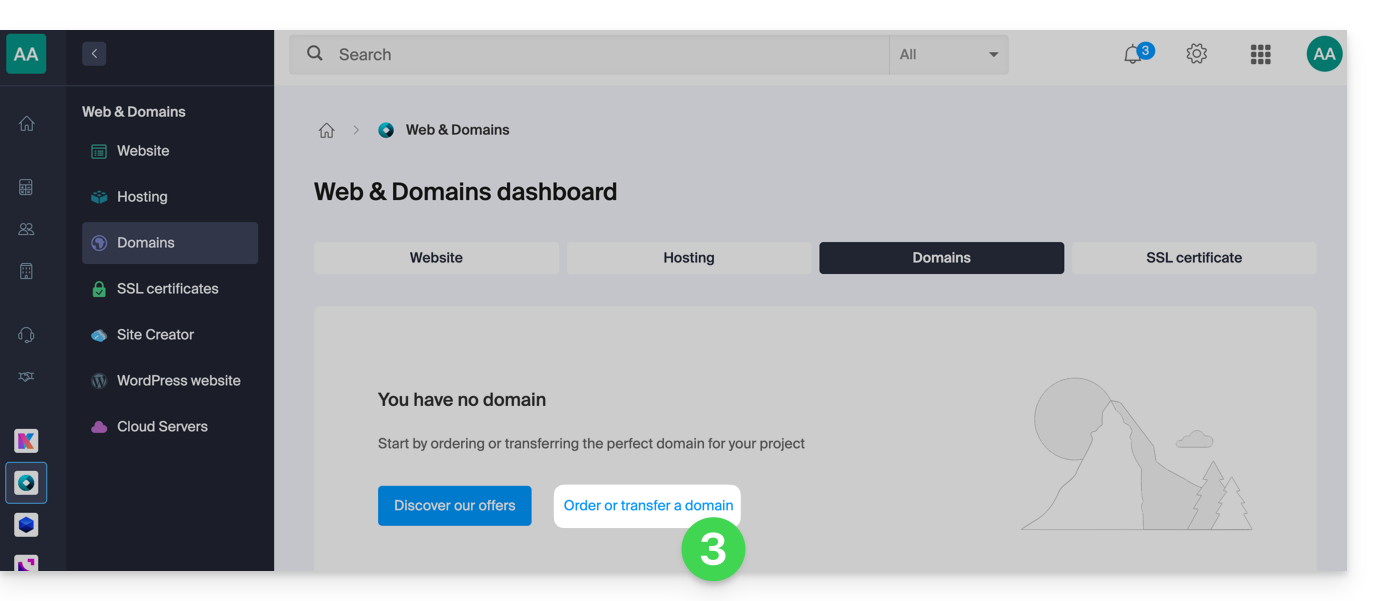
- Click here to access domain management on the Infomaniak Manager.
- Click to open the Shop:
- If necessary, select the Organization in which to order your domain:
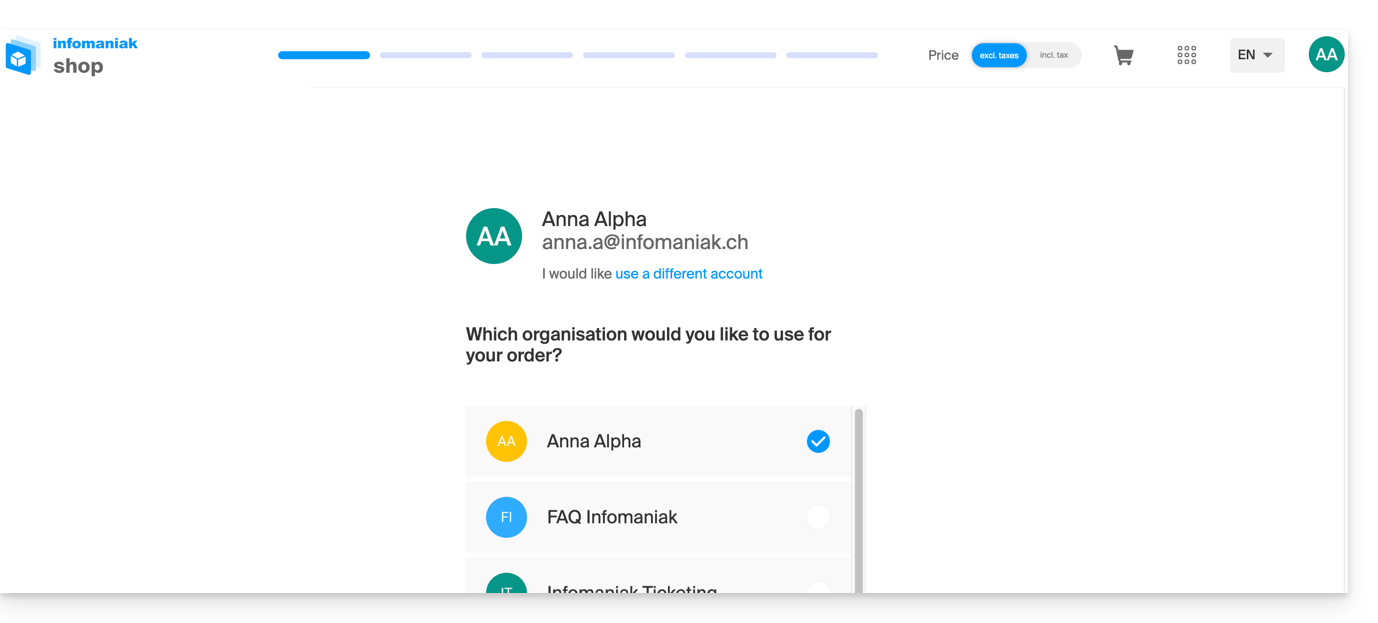
- If necessary, select the Organization in which to order your domain:
- Once in the Shop, enter the domain name to register and search for it:
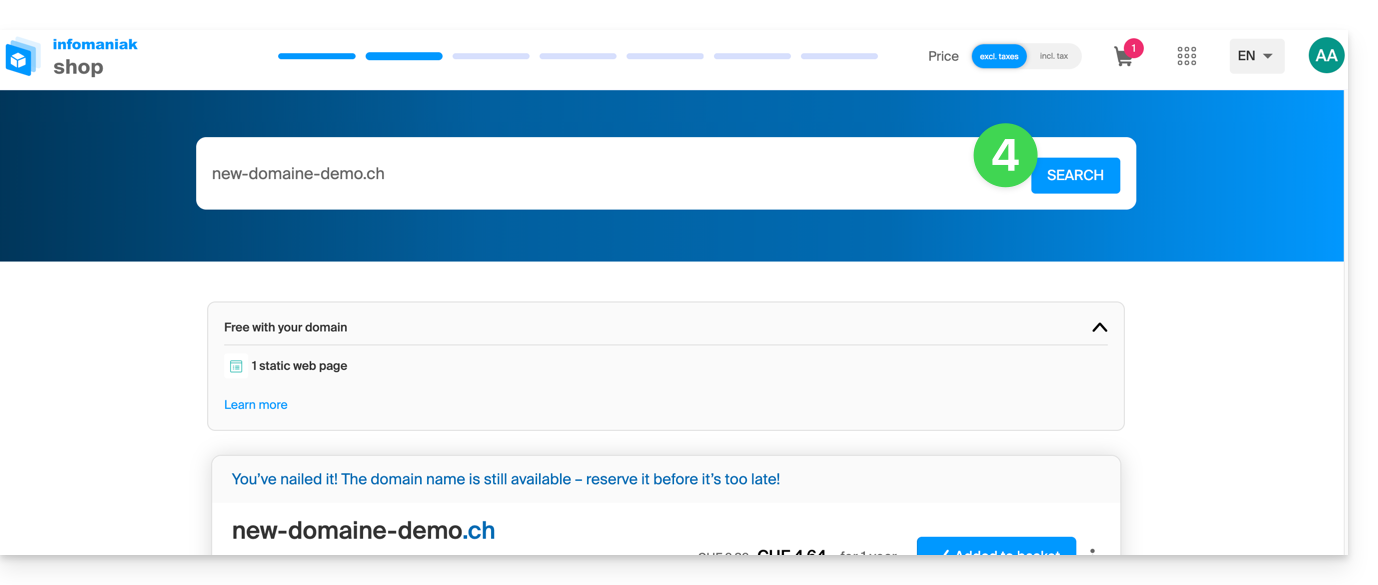
- Check or uncheck the additional options and extensions offered and click Next to proceed.
- Choose the desired options as you go through the pages, such as the possible Mail Service associated with the domain name:
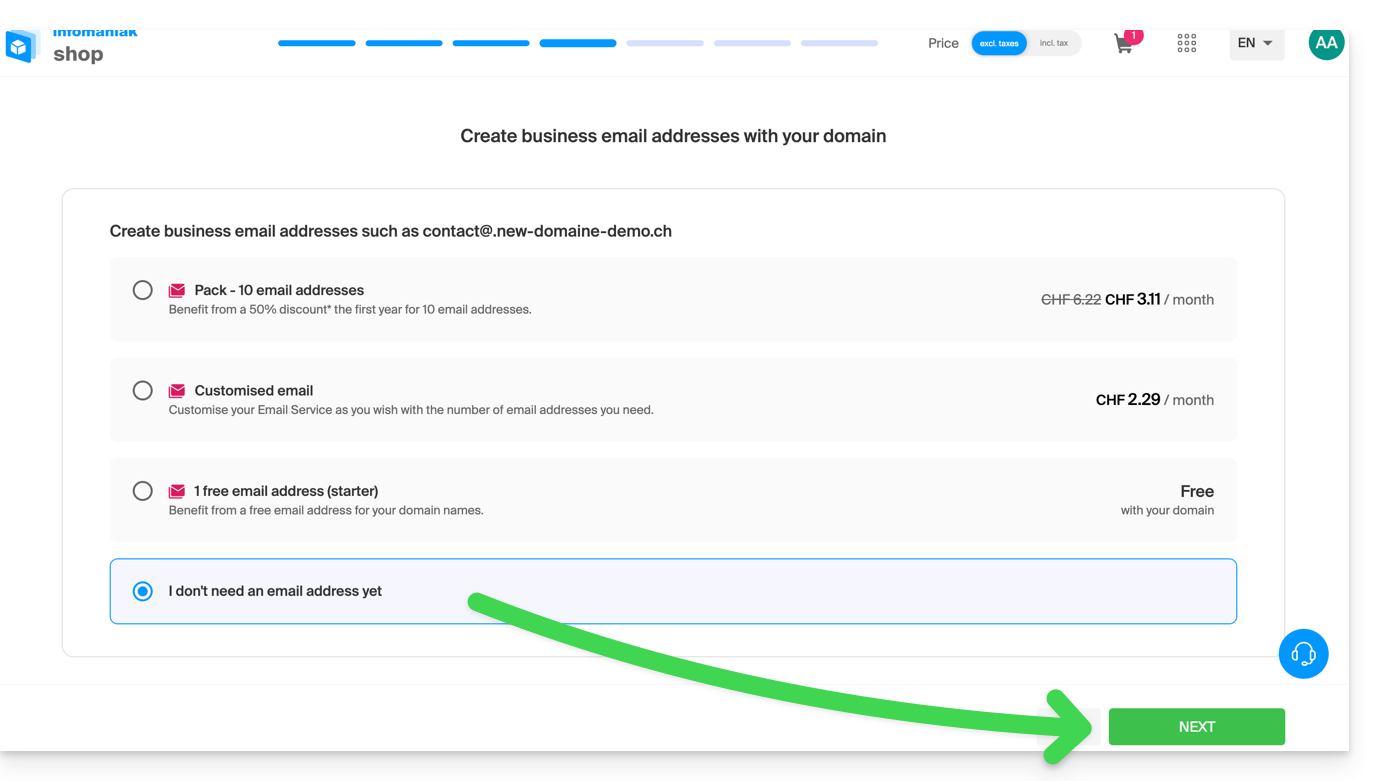
- Choose the desired options as you go through the pages, such as the possible Web hosting associated with the domain name:
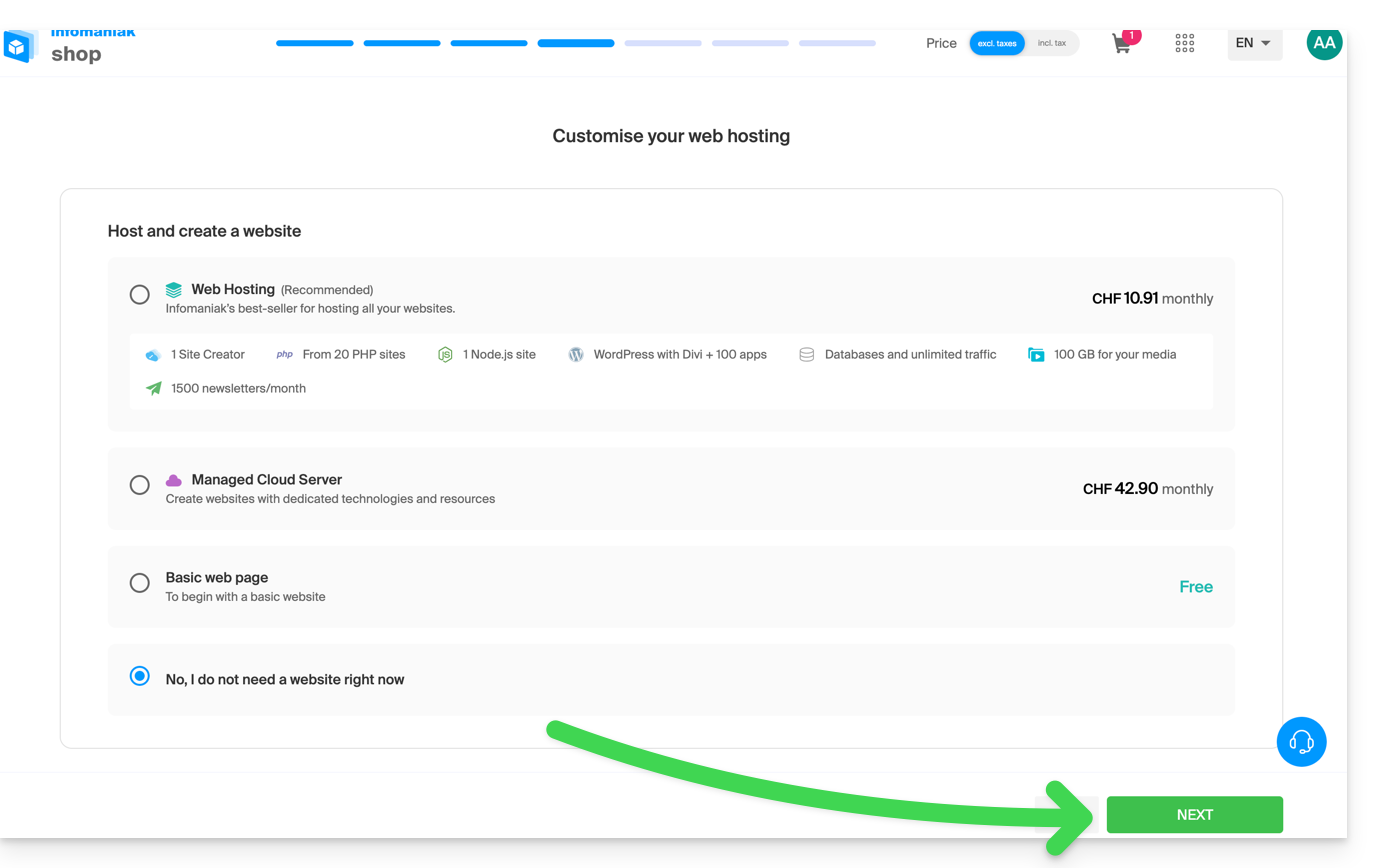
- Enter the details related to the domain name.
- Complete the purchase without forgetting to read and accept the Terms (the box may require scrolling down the page first):
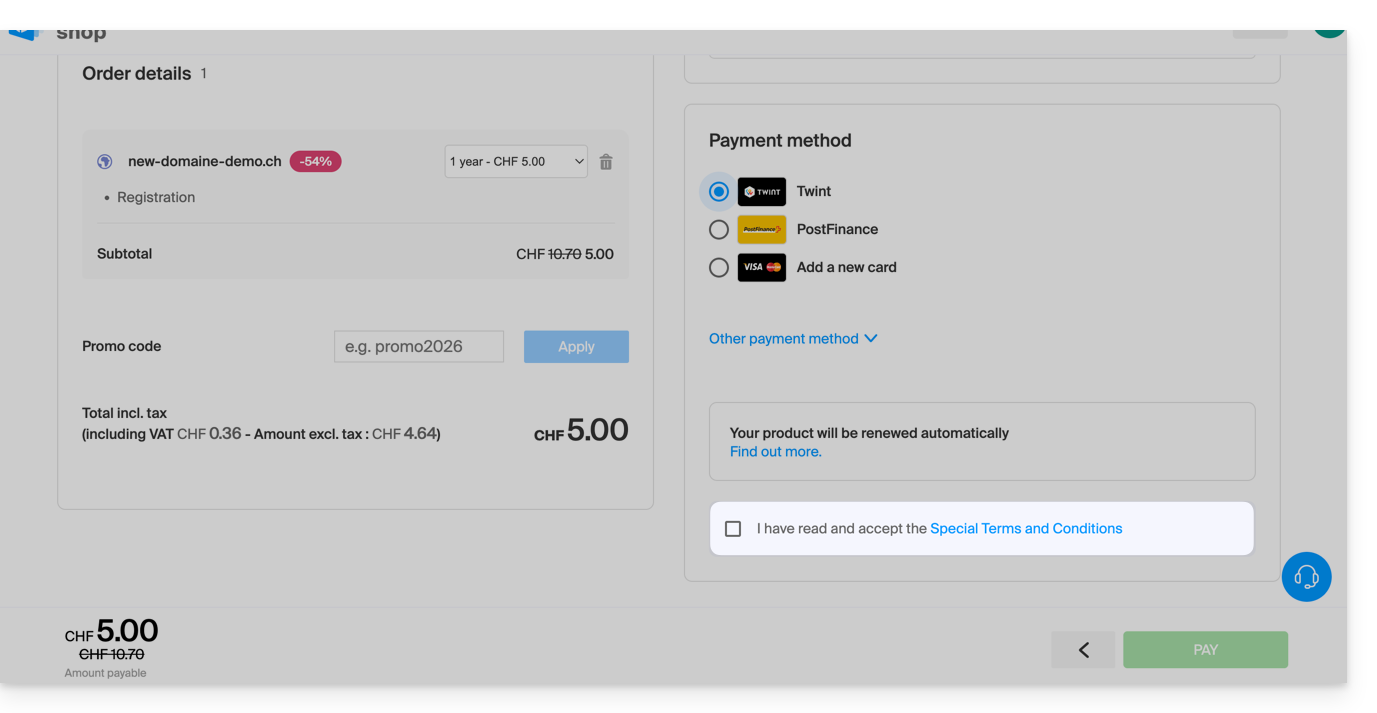
Once ordered, wait a few hours for the setup (and schematically the propagation of your domain name with Internet Service Providers (ISPs) around the world).
Order an additional domain name
To do this:
- Click here to access the management of your product on the Infomaniak Manager (need help?).
- Click on the button to Order an additional domain:
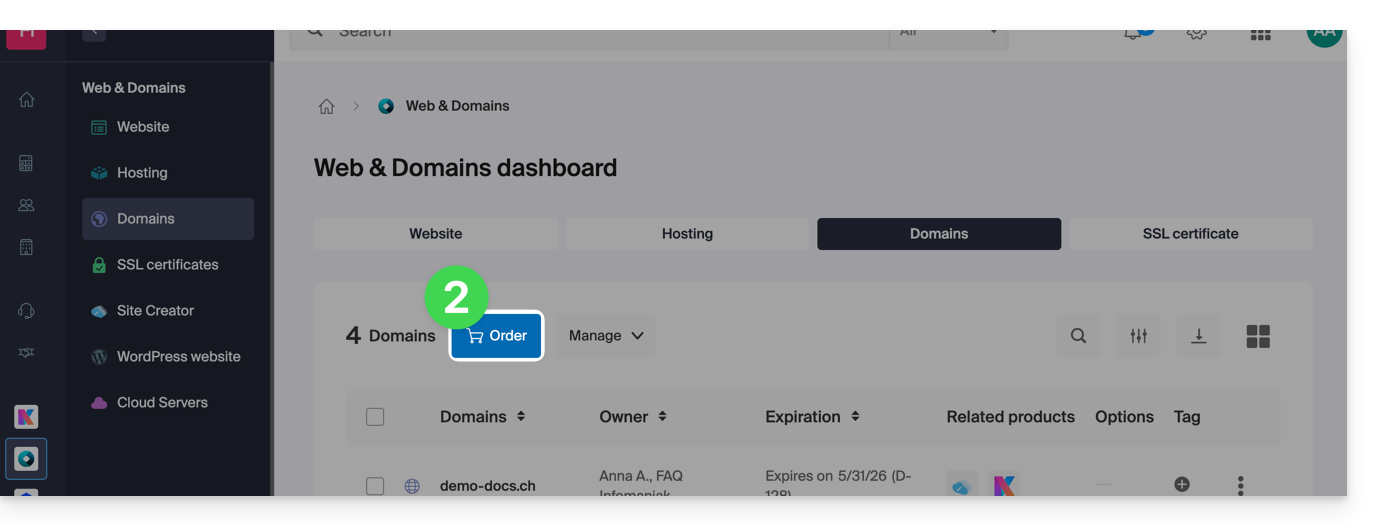
- Follow the first guide above from step 4.
Check the availability of a domain name
Refer to this other page which allows you to quickly check if a domain is available for registration or not.
There are at least 3 main indications:
- Available — in this case, it's good, you can reserve it.
- Transferable — you must own it with another provider to transfer it to Infomaniak.
- Unavailable — it will unfortunately not be possible to order it as long as it is not abandoned by its current owner.
This guide explains how to redirect a domain name directly to another or how to automatically send visitors to your website to another page address (internal or external URL).
Preamble
- To redirect traffic, you will need to act…
- … either on the domain name itself (it must be hosted by Infomaniak and its DNS must also be those of Infomaniak),
- … or on the code present in your pages (page .htaccess, homepage, etc.) if you have a website.
- Make your life easier! If needed, local partners referenced by Infomaniak can handle these procedures. Launch a free call for tenders. They handle everything, freeing you from technical details.
Act on the domain name
via Web Redirection Tool
The tool available on the Manager allows you to act simply on the domain name (or subdomain) to redirect it to the Internet address of your choice.
via DNS modifications or A record
Change the DNS of the domain name or modify its A/AAAA records to direct web traffic to another provider.
Act on the page code…
… via HTML code to insert
Insert this line of code between the <head> and </head> tags of your homepage (usually named index.html):
<meta http-equiv="refresh" content="5;url=INSERT-HERE-NEW-URL">Replace 5 with the desired wait time in seconds (0 for immediate).
The search engine Google indicates that it is preferable to use a 301 type redirection on the server side (see below). The W3C also advises not to use it.
… via PHP code to insert
If the site page has a .php extension, insert this header function call at the very top of the file:
header("refresh: 5; url=INSERT-HERE-NEW-PAGE-URL");… via .htaccess file
To redirect all traffic targeting your site (regardless of the page called) to another address, insert this in the .htaccess file at the root of your site:
RewriteEngine On
RewriteRule ^(.*)$ INSERT-HERE-NEW-URL/$1 [R=301]
To target the page that needs to be redirected:
Redirect permanent /ancienne_page.html insérer ici adresse URL de destinationRedirectpermanent, Redirect permanent and Redirect 301 are equivalent commands.
Here is another example of redirecting a sub-section to the homepage (this directive has the advantage of working with "deep links" unlike a permanent redirect):
RewriteEngine on
RewriteRule "old/path/url "/" [L]
Refer to this other guide on this topic.
This guide is for you if you encounter the error The web host does not exist when visiting the address of a site on an Infomaniak Web Hosting.
Preamble
- This type of error usually occurs because your domain name is not correctly linked to your site (your domain name is probably pointing to the wrong IP address or is misconfigured).
- Example: a domain
abc.xyzthat is misconfigured and would point to an IPv4 Starter hosting and to a shared hosting in IPv6...
- Example: a domain
Resolve a Domain - Website Linking Issue
To be able to put your site back online:
- Check the DNS zone of your domain name, especially its A records.
- Correct them if necessary by indicating the IP address of your hosting.
- Any DNS addition/modification can take up to 48 hours to propagate.
To do this, the simplest way is to use the Infomaniak DNS Diagnostic Tool to automatically correct the pointing, by previously grouping the products in the same Organization if necessary.
This guide explains how to set up a dynamic DNS record (Dynamic DNS, DDNS) for a domain name whose DNS zone is managed at Infomaniak.
This free alternative to Dyn and DynHost is very useful if you want to access devices connected to the Internet from the outside, whose IP address is dynamic (for example a NAS, a surveillance camera, an Internet router/box/home automation, etc.).
Prerequisites
- The DNS zone of the domain name must be managed at Infomaniak. If necessary, transfer your domains to Infomaniak.
- Your device or application must support dynamic DNS records.
Specific guides
The configuration of dynamic DNS varies from one device to another. The following guides are provided for information and allow you to link a domain name with:
- … a Synology NAS
- … a Qnap NAS
- … Zyxel / Sunrise Internet Box / TP-Link solutions
- … a UniFI device
- … Swisscom Internet Box
- … Fritzbox
- … Jeedom
- … Linux via ddclient
- … potentially anything thanks to the API…
Guides for any other device
To create a dynamic DNS on your domain:
- Click here to access the management of your product on the Infomaniak Manager (need help?).
- Click directly on the name assigned to the product concerned.
- Click on Dynamic DNS in the left sidebar menu.
- Click on the blue Add a Dynamic DNS button.
- Enter the necessary information:

- Choose the desired subdomain or leave the Dynamic DNS Name field empty to use the main domain.
- Enter an IP address; this will then be dynamically updated by your device / app.
- Define a username / password pair (uppercase, lowercase + numbers, no special characters); the latter will need to be entered in the configuration of your device / app.
This guide details the possible solutions to recover an expired or stolen domain name, a complex process that depends on the specific circumstances of each case.
First, make sure it is not simply in a redemption period.
Contact the current holder
If the domain name is (re)registered in the name of another person or entity, you can try to contact them directly to discuss a possible return of the domain name. This may involve negotiating with the current holder and reaching an amicable agreement. However, this can be difficult if the current holder is not willing to cooperate or if you cannot contact them.
Use the ICANN mediation or arbitration services
The ICANN (Internet Corporation for Assigned Names and Numbers) offers mediation and arbitration services to resolve domain name disputes. You can file a complaint with the ICANN if you believe you have legitimate rights to the domain name in question. The ICANN will review the evidence presented by the parties and make a decision based on ICANN policies. However, note that this can be a lengthy and costly process.
The rules and procedures for recovering an expired or stolen domain name may vary depending on the jurisdiction and ICANN policies. It is recommended to consult the specific policies of the ICANN as well as local laws and regulations to understand the options available in your particular situation. It may also be helpful to consult a lawyer specializing in domain name law to obtain appropriate legal advice.
Resort to judicial procedures
If you believe the domain name has been stolen or your rights have been violated, you can consider suing the current holder in the competent courts. This may involve filing a complaint and presenting evidence in court to obtain a judicial decision. Judicial procedures can also be costly and time-consuming.
Monitor expired domain name auctions
If the domain name has completely expired and is up for auction, you can try to buy it at these auctions. Some expired domain names are put up for auction on specialized platforms, and you can participate in these auctions to try to recover the domain name.
And to avoid finding yourself in such a situation, read this Infomaniak article on the subject.
This guide helps you in case you receive error emails that mention SPF when you write to gmail or similar addresses.
Are all your services with Infomaniak?
The Global Security tool informs you of any configuration inconsistency regarding your Infomaniak Mail Service.
Are some of your services elsewhere?
To resolve an email sending issue when your email is managed by Infomaniak and your website is with another provider (like Wix for example) and in this situation the DNS zone of the domain name is managed elsewhere, refer to this other guide.
This guide details the allowed and prohibited characters when creating a domain name (up to 63 characters) with Infomaniak.
Preamble
- The allowed characters in a domain name are determined by the technical standards established by the Internet Corporation for Assigned Names and Numbers (ICANN) and, where applicable, by national or regional regulatory bodies, such as AFNIC for
.frdomains. - To understand the possibilities offered at the level of an email address (part before the at sign
@), consult this other guide.
Allowed characters in a domain name
The allowed characters in standard domain names include:
| Allowed characters | Notes |
|---|---|
| Letters | a à z |
| Numbers | 0 à 9 |
| Hyphen | - (not allowed at the beginning or end of a label) |
| Accented / special characters | Read below |
Special characters, accents (punnycode)
There are also domain extensions that allow the use of accented characters or other special characters. These rules may vary depending on the specific domain extension (such as .fr, .com, .net, etc.) and the policies established by the relevant regulatory bodies.
It is possible to purchase a domain name containing an accent on a letter (é for example) from Infomaniak. This coding method, which allows the inclusion of non-Latin characters, such as accented, Cyrillic, Chinese, etc., in domain names, is called Punnycode. It converts Unicode characters into an ASCII form readable by computer systems. This means that a domain name containing non-ASCII characters is transformed into an ASCII character string starting with xn--.
This transformation is reversible with some software/email clients that can in this case interpret and correctly display the original domain name. But in general, Infomaniak does not recommend the use of email on domain names with accents:
Indeed, not all browsers, operating systems, and applications necessarily support domain names with accents in the same way, which can lead to compatibility issues in some cases.
Prohibited characters in a domain name
The following characters (dot, space, exclamation mark, hash, dollar, percent, caret, ampersand, asterisk, parenthesis, equal sign, bracket, chevron, comma, quotation marks, slash, semicolon, question mark) are not allowed in Infomaniak domain names:
| Forbidden characters | Notes |
|---|---|
| Dot | Reserved to separate labels; forbidden at the beginning or end of a label and as a standalone character within a label |
| Space | |
| Special characters | !, #, $, %, ^, &, *, (, ), =, [, ], <, >, ,, ;, ", /, ? |
| Non-ASCII characters | Except via Punnycode for some extensions |
| Control characters | ASCII codes below 32 (non-printable) |

