Knowledge base
1000 FAQs, 500 tutorials and explanatory videos. Here, there are only solutions!
This guide concerns the task scheduler, a feature that allows you to run scripts on Web Hosting at the time and frequency of your choice to automate repetitive tasks.
Also refer to this other guide if you are looking for information about crontab (crons via SSH) on Cloud Server.
Access the task scheduler (webcron)
To access the task scheduling tool:
- Click here to access the management of your product on the Infomaniak Manager (need help?).
- Click directly on the name assigned to the product concerned.
- Click on Web in the left sidebar.
- Click on Task Scheduler in the left sidebar:
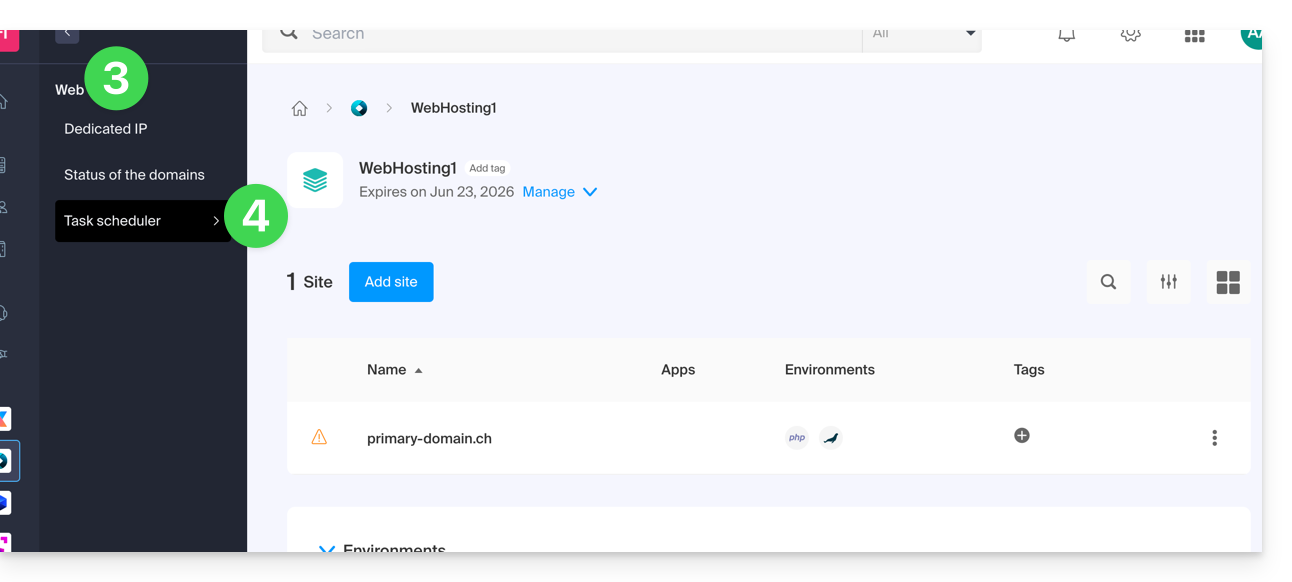
- Click on Tasks in the left sidebar.
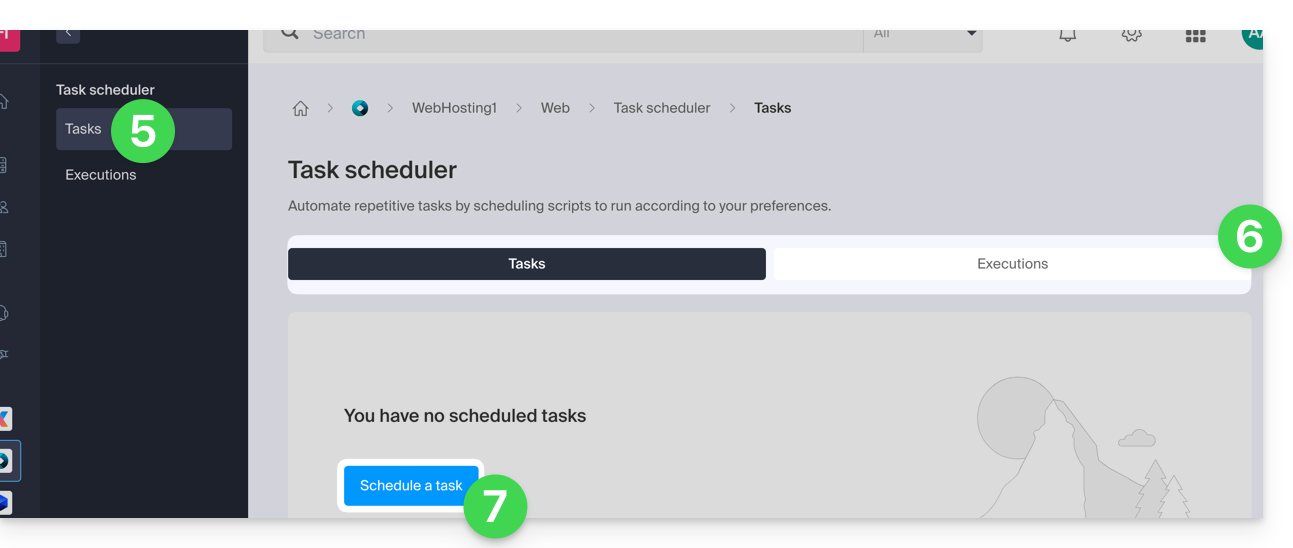
- Existing crons and running tasks are displayed under the 2 tabs of the page.
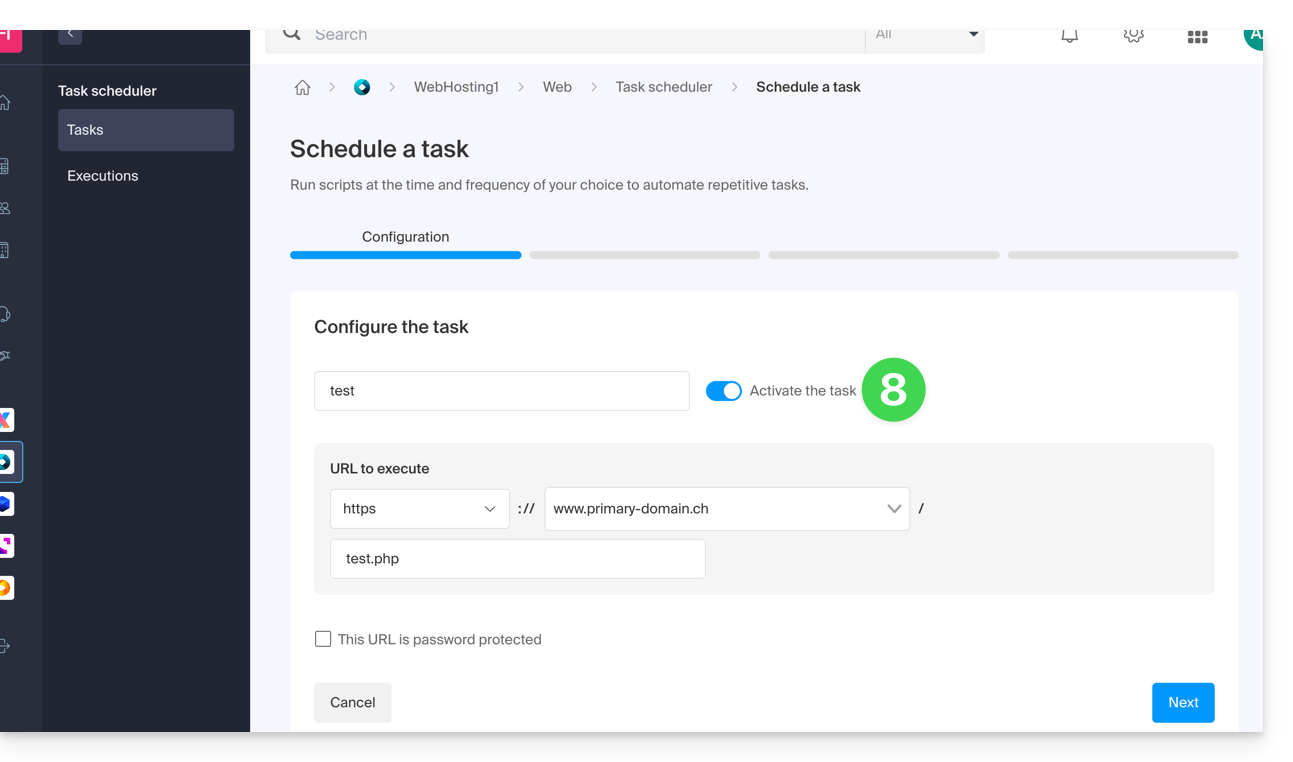
- Click the Schedule a Task button to create a scheduled task by specifying, among other things, whether the URL of the script to be executed is password-protected, whether you want to receive notifications, and of course the desired interval (see below), etc.:
- Do not forget to activate the task with the toggle switch:
Minimum intervals
In the next step, you can schedule the cron according to…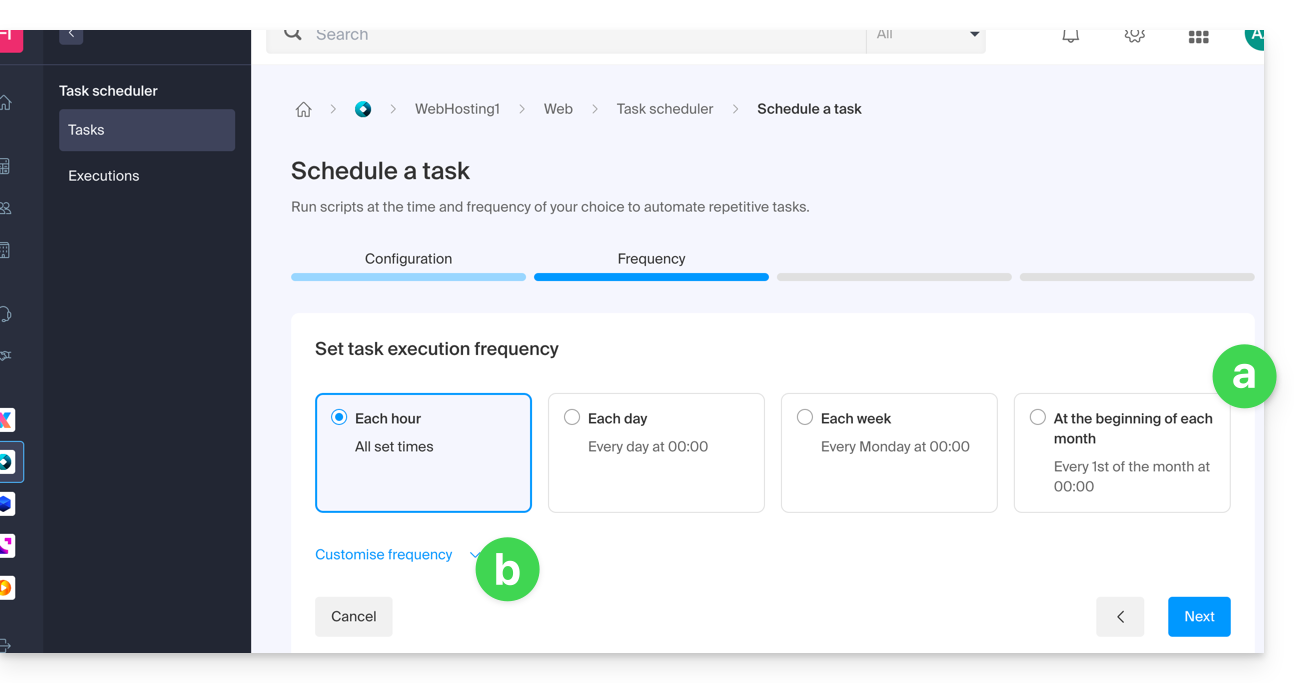
- [ a ]… predefined intervals such as once a week…
- [ b ]… or customization to a minimum interval of:
- 15 minutes with a shared hosting
- 1 minute on Cloud Server
Notifications & analysis
In the next step, you can activate notification emails: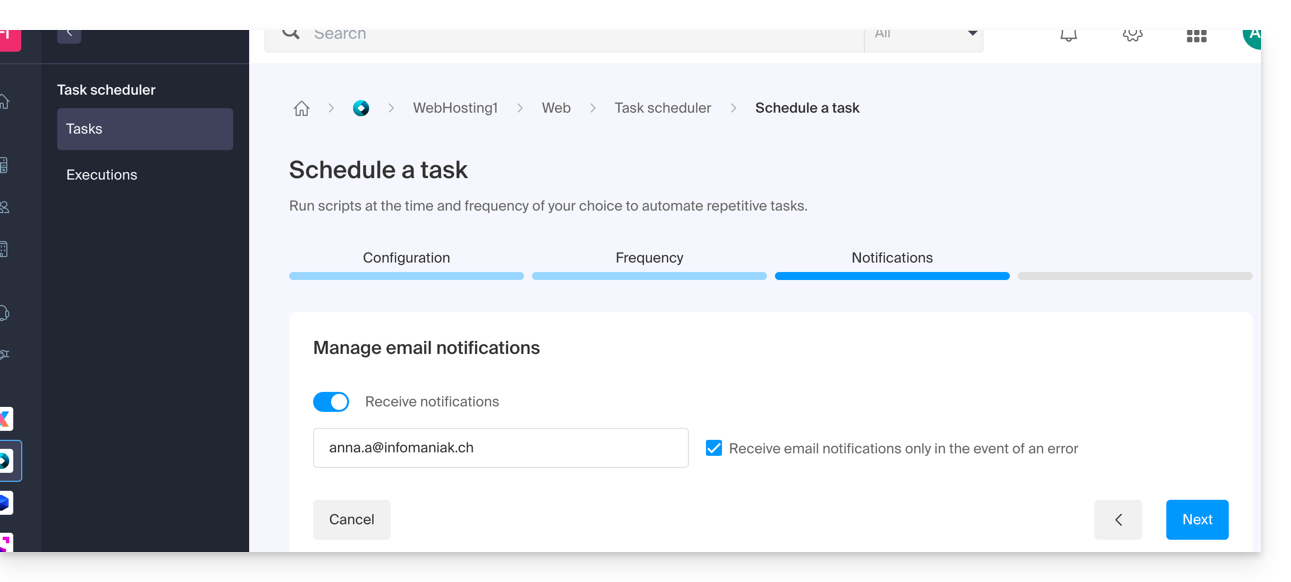
The next step allows you to activate an analysis of the task: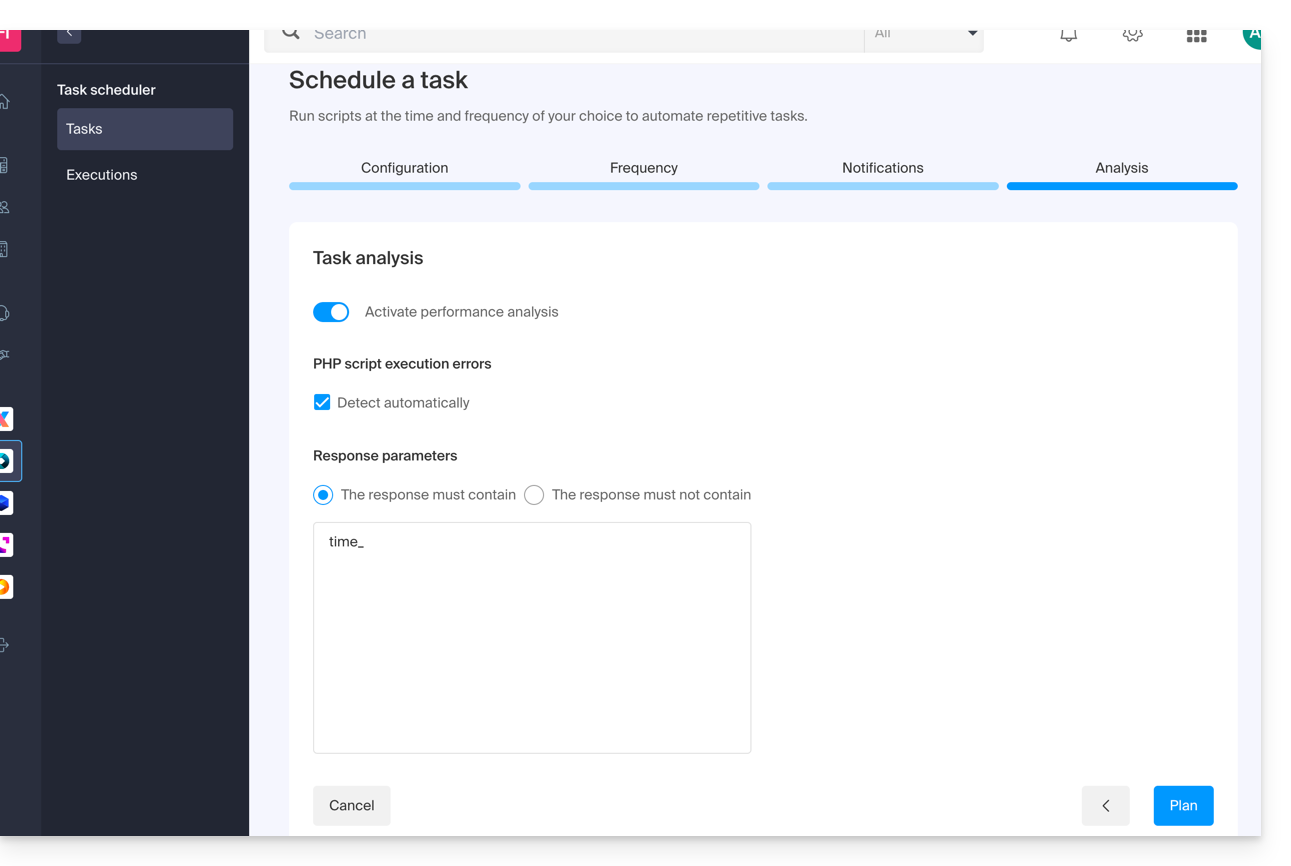
Run the task manually 1 time
Once the task is created, click on the action menu ⋮ located to the right of the item concerned to access the quick management of your task and its execution log: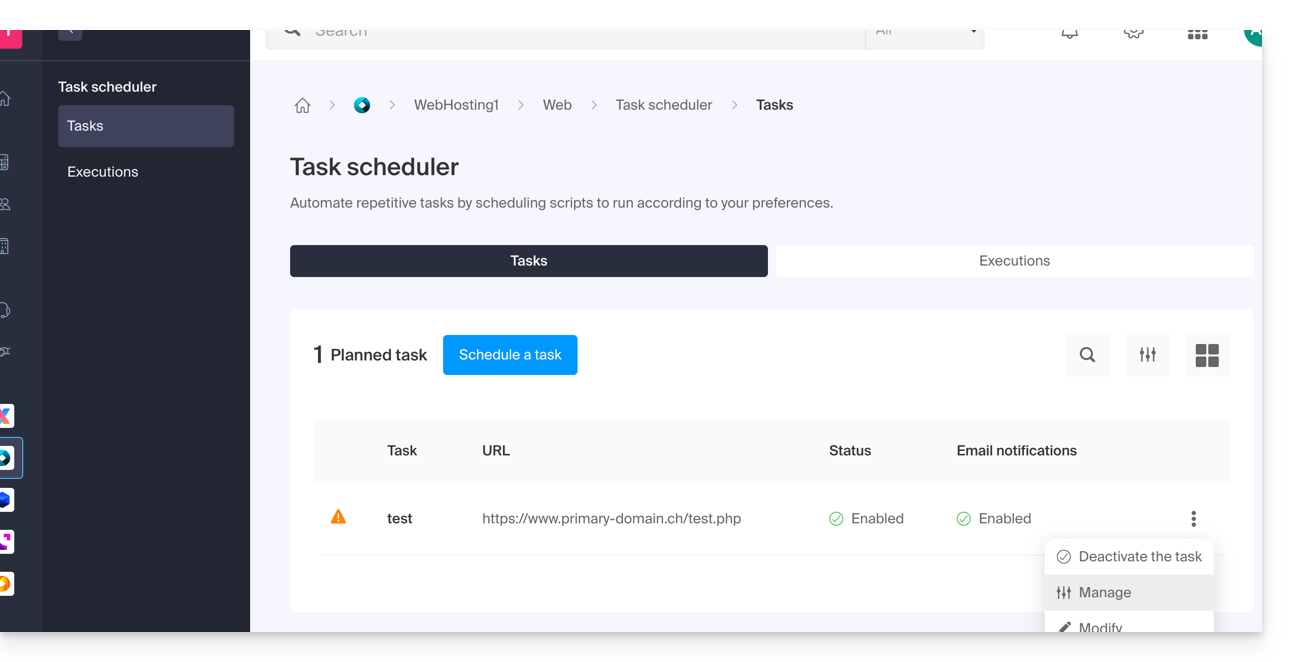
At the top of the page, you can click the button to manually run the task 1 time: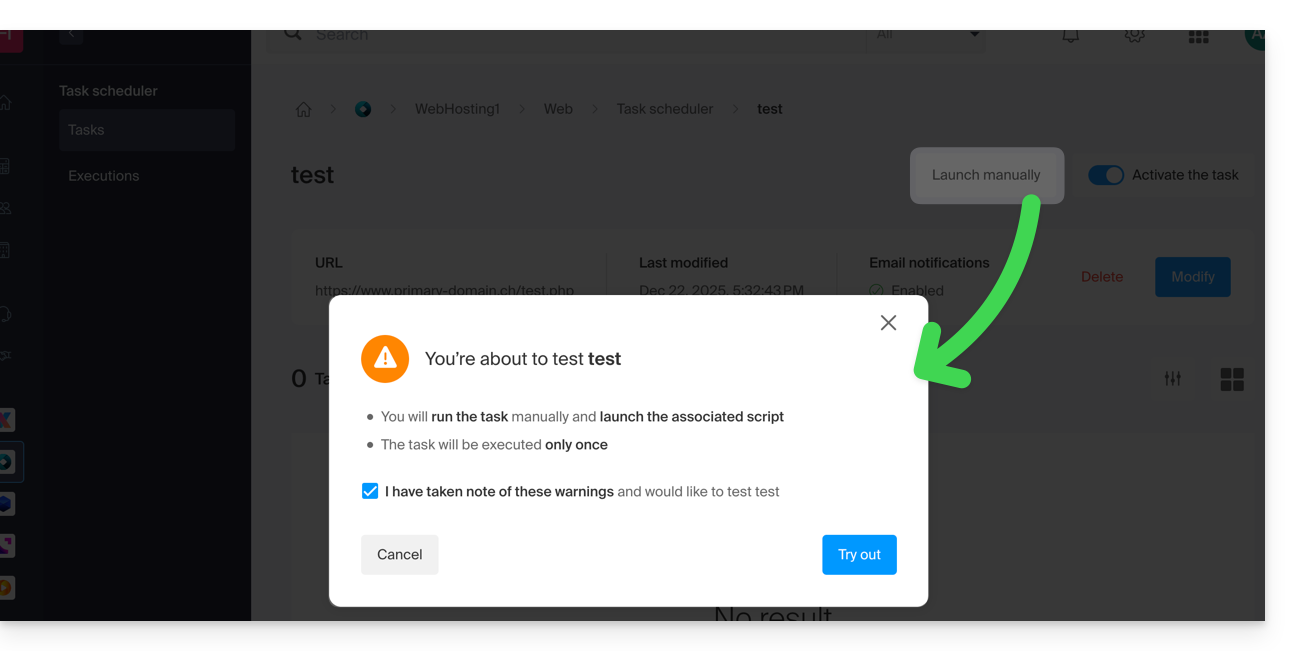
This guide explains how to access phpMyAdmin with a Web Hosting.
Access phpMyAdmin
To access the Web Hosting in the Databases section:
- Click here to access the management of your product on the Infomaniak Manager (need help?).
- Click directly on the name assigned to the product concerned.
- Click on Databases in the left sidebar menu.
- Click on Connect to phpMyAdmin:

- The correct server and a temporary user are automatically filled in.
You can also click on the action menu ⋮ located to the right of a database user:
- The correct server is automatically filled in.
- The password to enter corresponds to the database user (the one you chose when creating the MySQL user to redefine if you have forgotten it).
This guide explains how to manage Memcached and, in particular, how to check if this in-memory caching system is working correctly on your Managed Cloud Server.
Prerequisites
- Install Memcached on Managed Cloud Server.
Check Memcached execution
To verify that Memcached is working correctly:
Copy the following code into a PHP file:
// connexion au serveur memcache local $fp = fsockopen("localhost", 11211); if ($fp) { // on demande les stats fwrite($fp, "stats\n"); while (!feof($fp)) { $buf = rtrim(fgets($fp)); if (preg_match('/^STAT curr_items ([0-9]+)$/', $buf, $matches)) { // le nombre d'items stockes print $matches[1] . PHP_EOL; } elseif (preg_match('/(END|ERROR)/', $buf)) { // fin des stats break; } } fclose($fp); } else { print "Error: cannot connect to local memcached server: $!" . PHP_EOL; }- Upload the PHP file to your hosting.
- Run the PHP file.
The script returns the number of elements cached in the server's memory.
Activate Memcached on…
… Prestashop
The native integration of Memcached in the Prestashop application simplifies its configuration. To activate it:
- Access your Prestashop admin space.
- Go to the Advanced Settings tab.
- Select Performance.
- Choose Yes from the dropdown menu under Use cache in the Caching section.
- Select CacheMemcached.
- Add a server by providing the required information such as
- the IP address:
127.0.0.1 - the port:
11211 - the weight:
1
- the IP address:
You can check the information by clicking the "Test server" button before saving it at the bottom of the "Caching" section.
Once this step is completed, your PrestaShop application is ready to use Memcached to cache certain API calls, database calls, and objects.
This guide is about IP addresses, those…
- …assigned to sites/housing/servers, dynamic or static, shared or dedicated,
- …assigned by your Internet Service Provider (ISP) when establishing an Internet connection to your Infomaniak product.
Preamble
- A dedicated or static IP address for a website is a permanent IP address specifically assigned to it.
- Unlike a shared IP address, which is used by multiple websites, a dedicated IP address ensures that only this platform is associated with this address.
- Dedicated IP addresses for websites are often used in cases where stability, customization, and security are important, such as server hosting, firewall configuration, or activating SSL certificates (although it is possible to proceed without a dedicated IP address to install an SSL certificate).
- Here are the main advantages:
- Configuring a PTR entry or reverse DNS on dedicated IPs is useful, especially for installing a mail server, as some email providers check the PTR record before accepting emails sent from a server.
- Better connection stability.
- Reduced risk of a bad reputation linked to websites sharing the same IP address.
- Ease of configuring certain technical aspects.
- A dedicated IP can improve a website's referencing (although there are differing opinions among SEO specialists).
- Attention: Infomaniak does not allow access to websites via HTTP(S) by IPs (dedicated) on managed servers; you must use a domain name that points to the IP (or use the preview URL).
Add a dedicated IP to the website
To add a dedicated IP to your website, refer to this guide.
If you encounter issues directing web traffic to a defined port, refer to this other guide.
Blocking the IP address (Internet connection)
If you can no longer access…
- … all your email addresses that you own with Infomaniak (which usually work well) and this with a software/email client from the same Internet network (i.e., from the same IP address provided by your ISP)…
… or if you unfortunately performed this type of operation:
- repeated unsuccessful connection attempts via FTP, SSH, or access points such as the WordPress login…
- requests returning too many errors such as mass 403 errors…
… your access to Infomaniak servers may be blocked following the banning of the IP address (banip / ipban) of your Internet connection.
To unblock the situation, contact Infomaniak support by email and specify the domain concerned and especially your public IP address concerned.
Permanent Unblocking (IP on Whitelist)
With a Cloud Server, you can request to permanently authorize the IP address in question so that the blocking never happens again, regardless of the situation. To do this, you must:
- Have a dedicated IP associated with your Cloud Server.
- Be aware that Infomaniak will no longer block any potential attacks from this IP; attacks or malicious access attempts from this address will no longer be automatically blocked by the security systems.
- Confirm by email and from a contact address associated with the account (owner or administrator) that you understand and accept full responsibility in case of an attack from this IP.
This guide explains what the “MySQL Prefix” option in a site’s settings is for and what its implications are for the operation of your Web applications (CMS) and PHP scripts.
Preamble
- When the “MySQL Prefix” option is enabled for a site, it is no longer necessary to add the prefix “
wxyz_” before the name and users of your MySQL databases. - A PHP script can thus connect to MySQL with the user “monuser” and a database “mabase” and access will be automatically made with the user “wxyz_monuser” and the database “wxyz_mabase”.
- ⚠ If you are migrating from an old Infomaniak offer:
- After migrating a site from the old console, the “MySQL Prefix” option is enabled by default in order to automatically maintain the connection of your Web applications (WordPress, Joomla, Drupal, etc.) and PHP scripts with your MySQL databases.
- To ensure the proper functioning of your sites in case of migration of your hosting to another server, it is strongly recommended to disable this function and make the necessary adjustments.
Manage the MySQL Prefix option
Go further with environment variables
It is possible to configure environment variables directly from the Manager for your entire website:
- Click here to access the management of your product on the Infomaniak Manager (need help?).
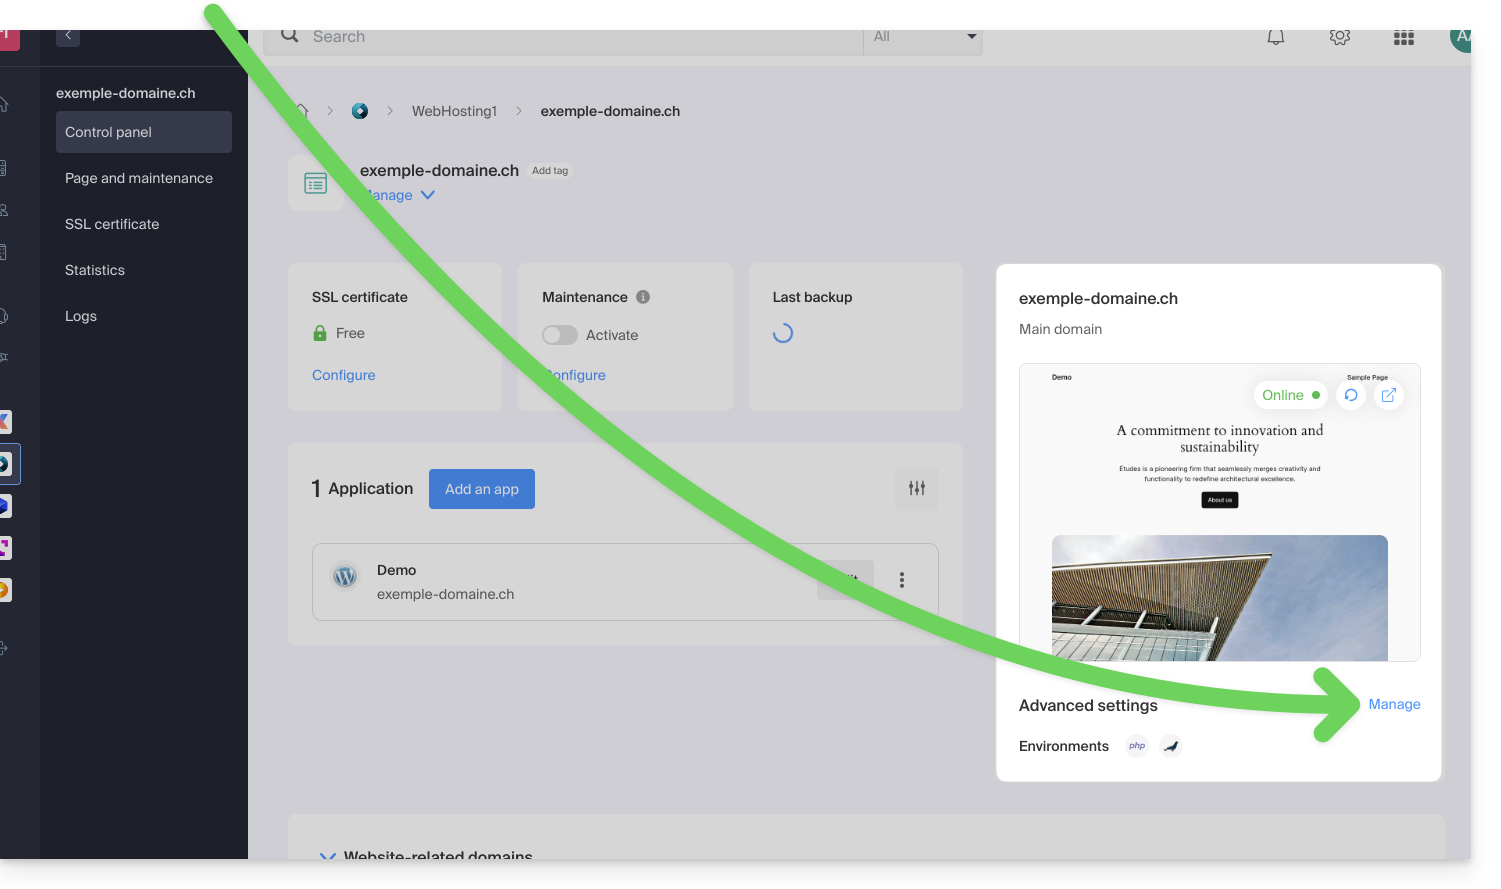
- Click directly on the name assigned to the product concerned:
- Click on Manage under Advanced Settings:
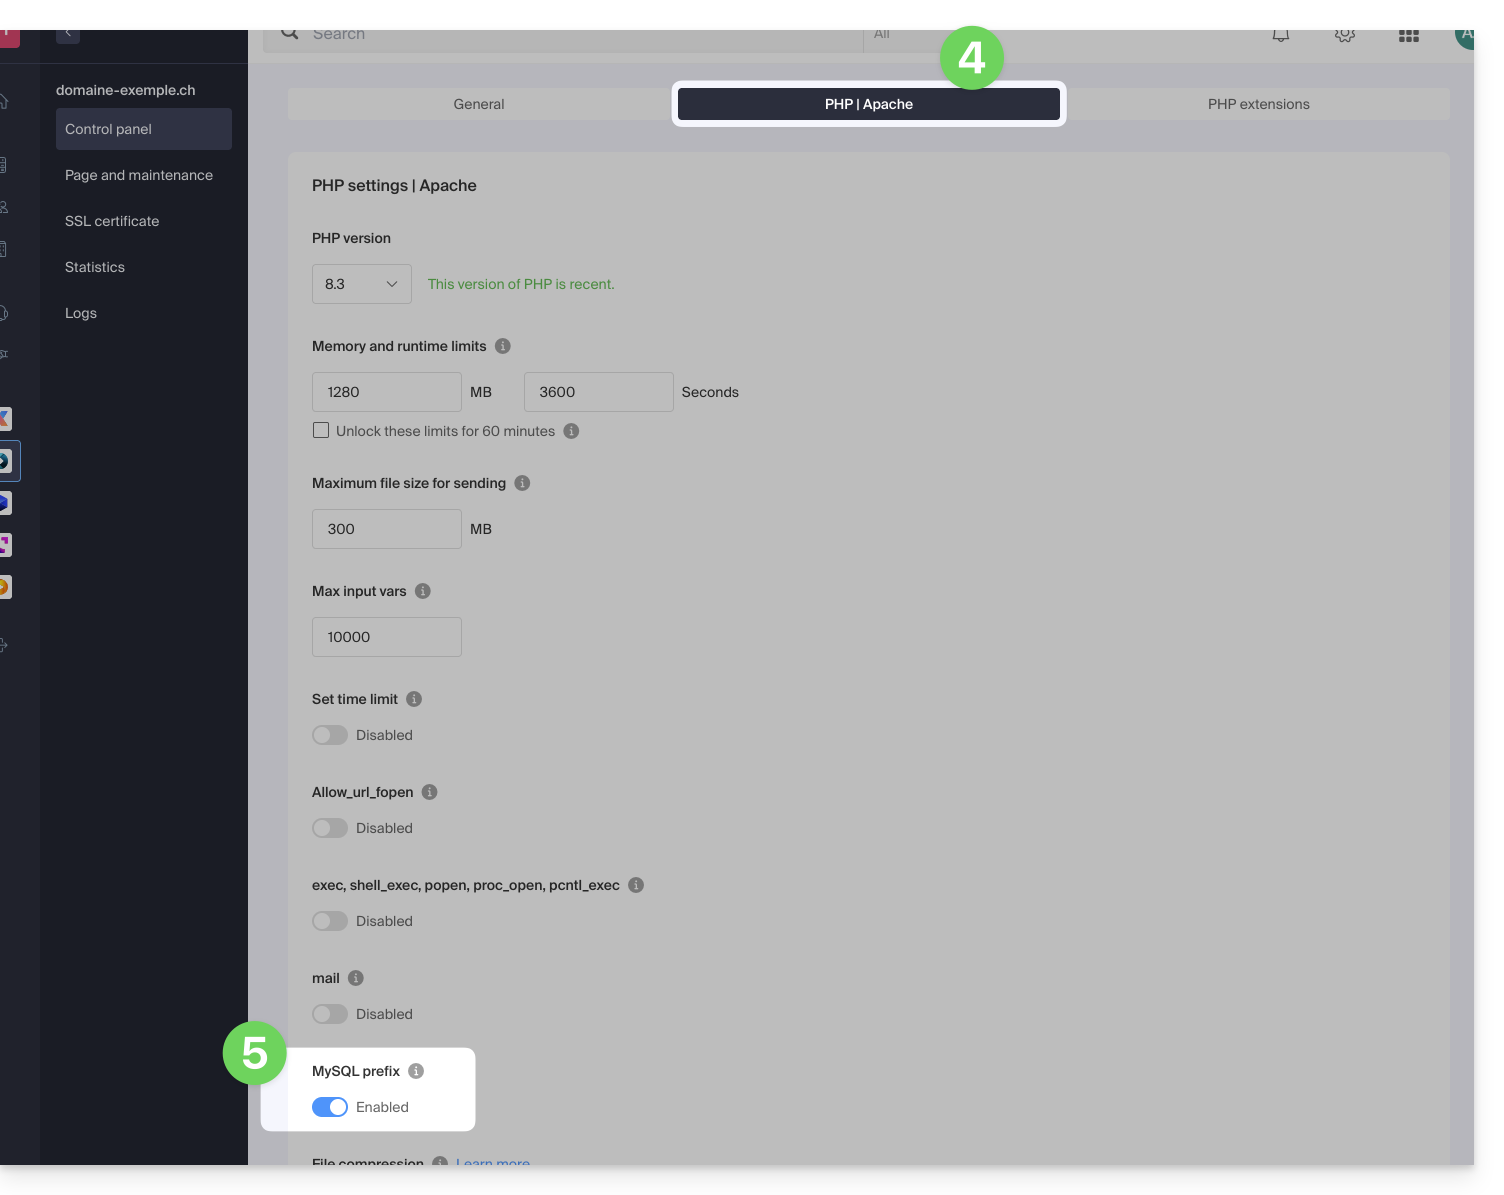
- Click on the PHP / Apache tab.
- Enable or disable the toggle switch MySQL Prefix:
- Click on the Save button at the bottom of the page.
- Make the necessary adjustments in the configuration files of your Web applications and PHP scripts…
Implications and adjustments to be made
After disabling the MySQL Prefix option for a site, some PHP scripts or CMS may no longer work. To restore the connection to your databases, you must update the following information in the configuration file(s) of the scripts concerned:
- The name of the MySQL database: you will need to add the prefix of your server
- before:
mabase - after:
wxyz_mabase
- before:
- The user of the MySQL database: you will need to add the prefix of your server
- before:
monuser - after:
wxyz_monuser
- before:
This guide concerns MySQL/MariaDB and more specifically index analyses and queries with Web Hosting.
Slowlog for long queries
The MySQL slowlog is enabled on all MySQL servers and groups queries that take more than 5 seconds* to execute. If your queries are well constructed, you will never see these files. Otherwise, check regularly to correct any potential issues and ensure the proper functioning of your site.
Contact Infomaniak support in writing to obtain them (except for old v1 hosting directly viewable from the FTP Manager file manager one level above /web in the /logs directory).
And the logs?
No MySQL log is created (except for slowlogs) as MySQL servers would not support the load of millions of simultaneous logs to record. If necessary, Infomaniak can enable this MySQL log for 5 minutes to allow you to analyze them with EXPLAIN and determine useful indexes, for example. To do this, contact Infomaniak support in writing.
* elapsed time. And regarding locks, the documentation provides the following clarification: "The time to acquire the initial locks is not counted as execution time"
This guide explains how to change the password of an FTP or FTP/SSH account for an Infomaniak Web Hosting site.
Change the password of an existing FTP user
To access the site on Web Hosting to modify its FTP access:
- Click here to access the management of your product on the Infomaniak Manager (need help?).
- Click directly on the name assigned to the product concerned.
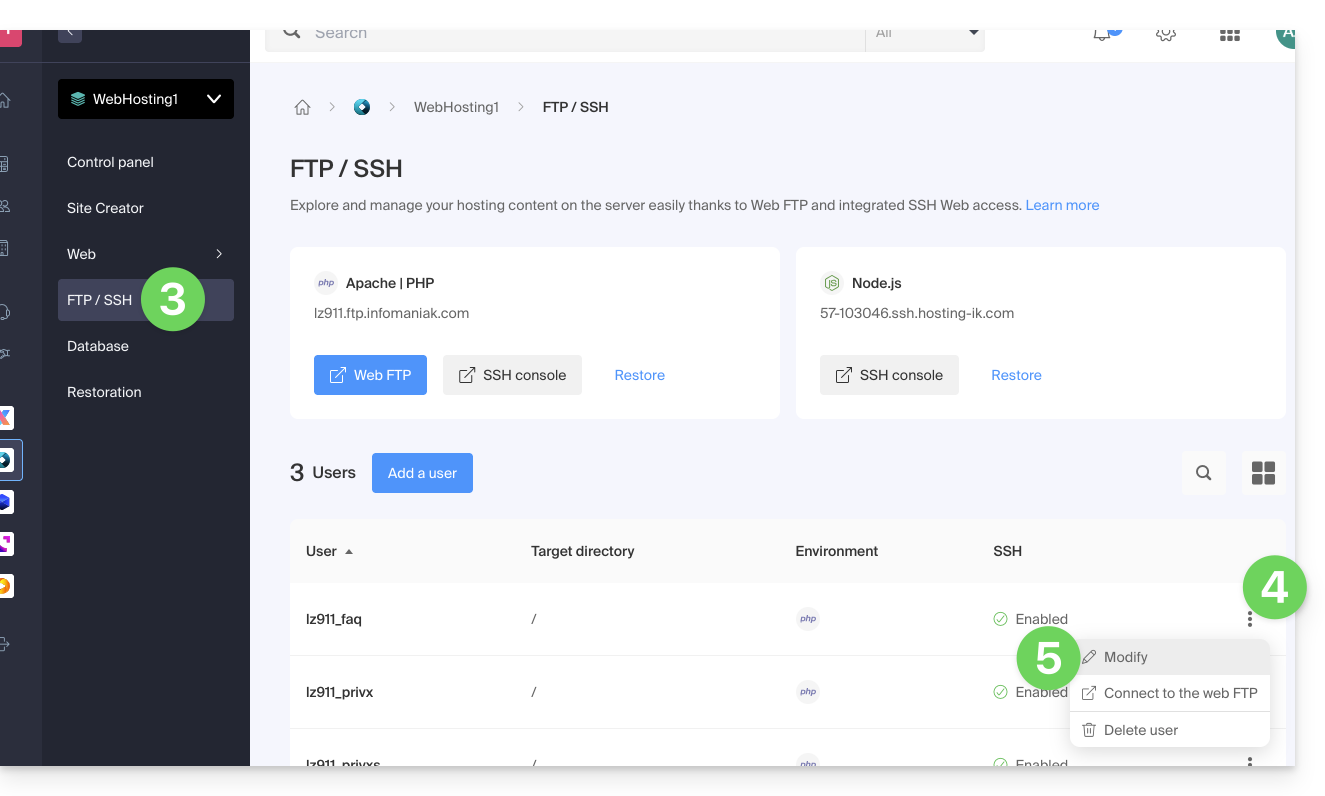
- Click on FTP/SSH in the left sidebar menu.
- Click on the action menu ⋮ to the right of the user concerned in the table that appears.
- Click on Modify:
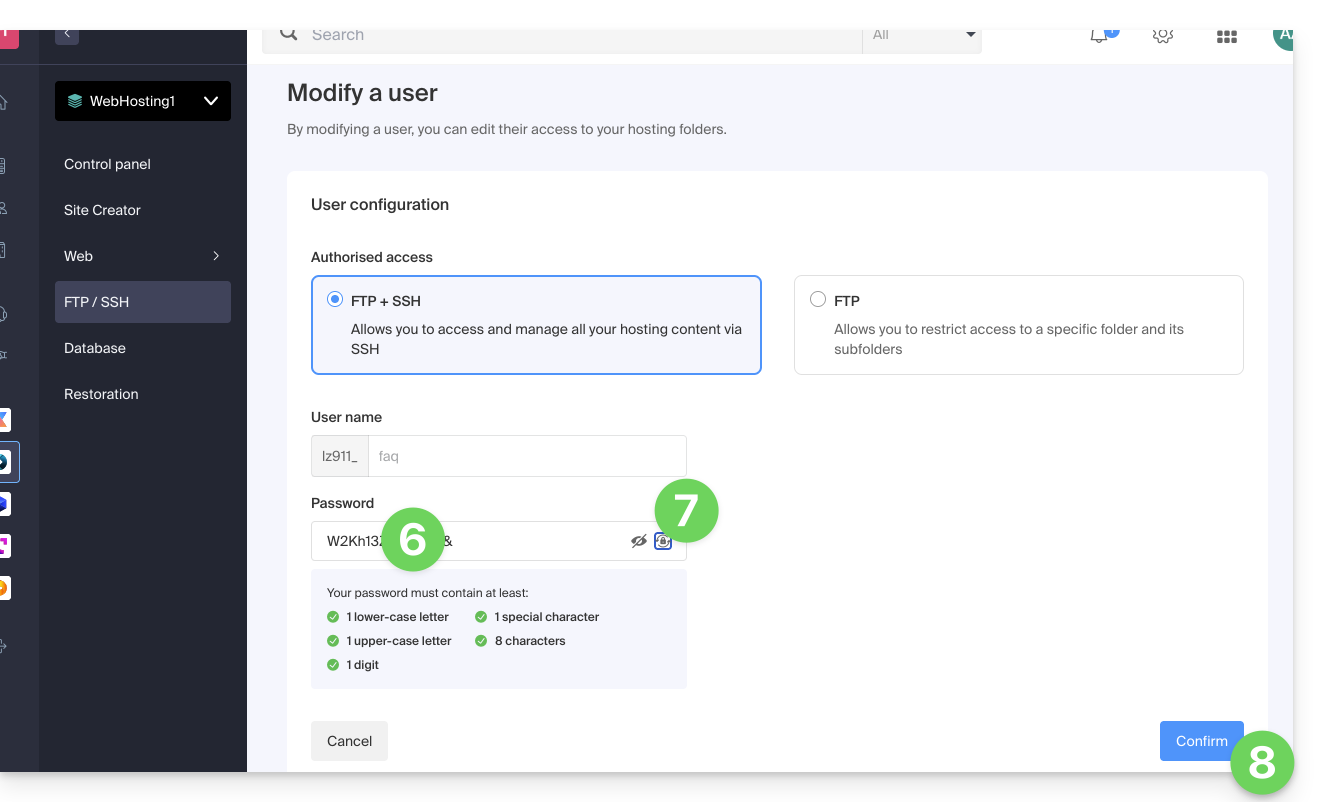
- Enter the new password that will be used for your FTP or SSH access directly.
- If necessary, you can generate a strong password.
- Confirm the changes:
This guide helps to resolve a potential 530 error by reducing the number of simultaneous FTP connections to Web Hostings.
Resolve a 530 error
The number of simultaneous FTP connections that can be established to the FTP space of a hosting is limited to 25.
The error message 530 Sorry, the maximum number of clients (25) for this user are already connected generally appears following multiple and simultaneous connections with an FTP software/client that poorly manages disconnections or attempts to open multiple connections at the same time in an attempt to speed up the download.
Once you have received this error, you need to close the FTP program then wait 30 minutes so that the server disconnects the active connections and you can reconnect.
You can also create a new FTP user and connect with it.
To avoid this situation with FileZilla, go to the menu Edit -> Settings then under the Transfers tab and set the number of simultaneous transfers to 2.
It is recommended to use the FTP Manager file manager.
This guide explains how to remove an alias domain from an Infomaniak Web Hosting. The main domain name of the site will then no longer be linked to any other domain name.
This allows you to create a new Web Hosting or distinct site for the domain name thus unlinked.
Prerequisites
- Have dissociated the synonym domain name from the main domain name if there was an association before.
Remove the alias domain
To remove an alias domain from your site:
- Click here to access the management of your site on the Infomaniak Manager (need help?).
- Click directly on the name assigned to the site concerned:
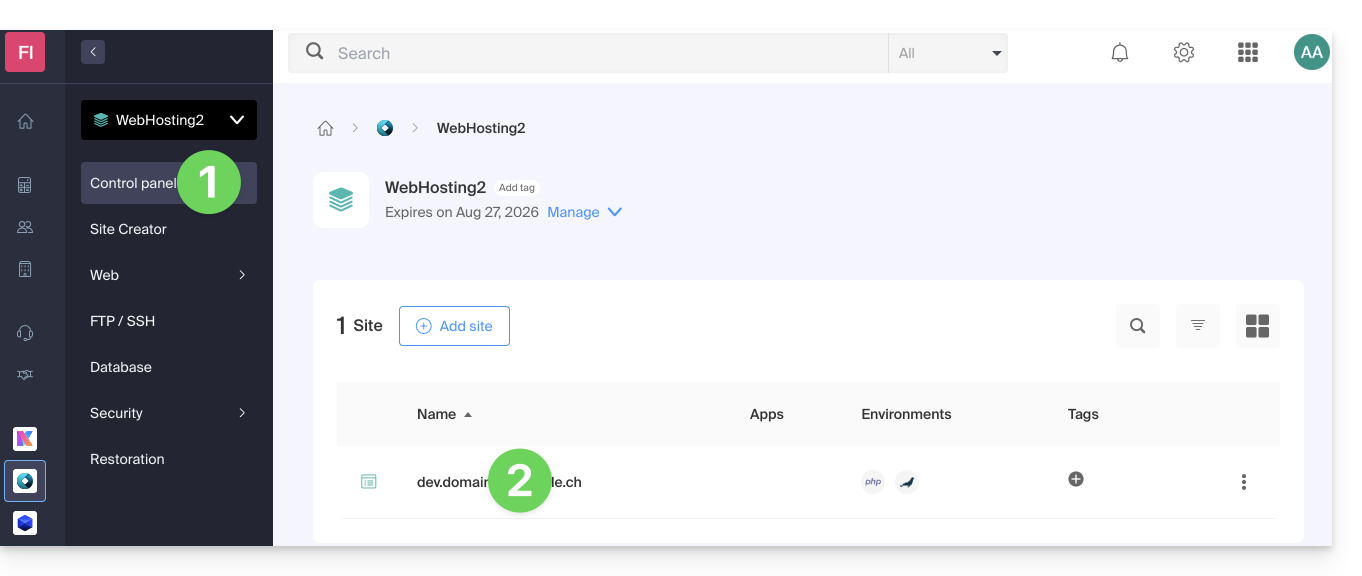
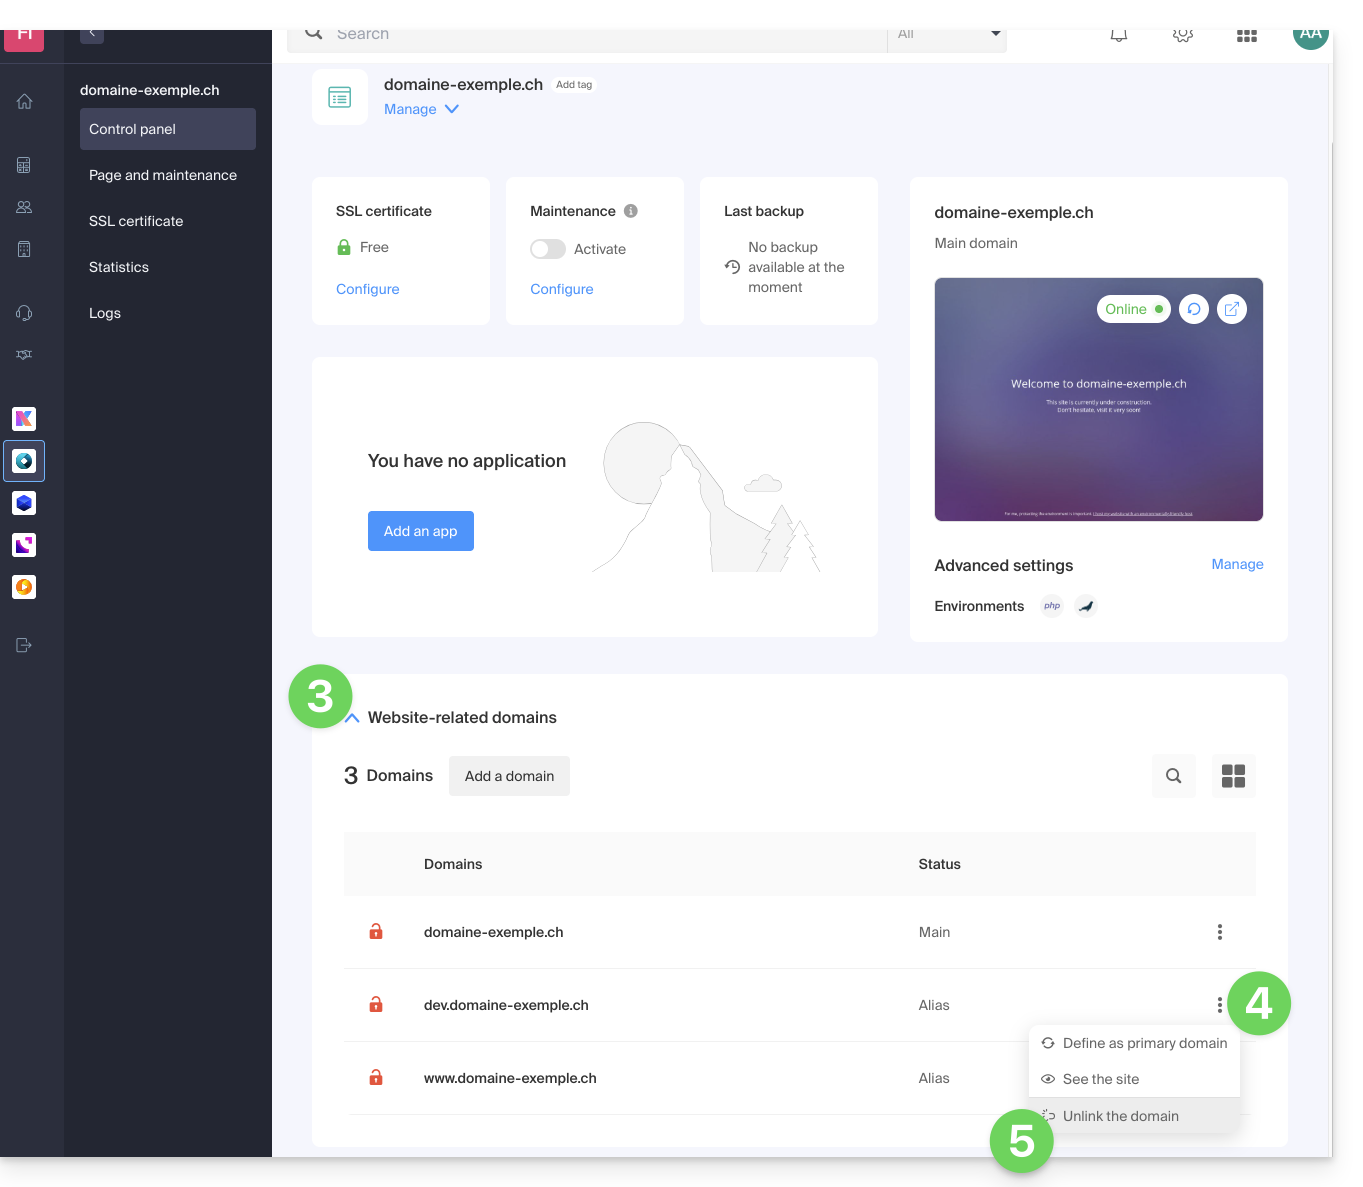
- Click on the chevron to expand the Domains section of this site.
- Click on the action menu ⋮ to the right of the domain to be removed.
- Choose Unlink:
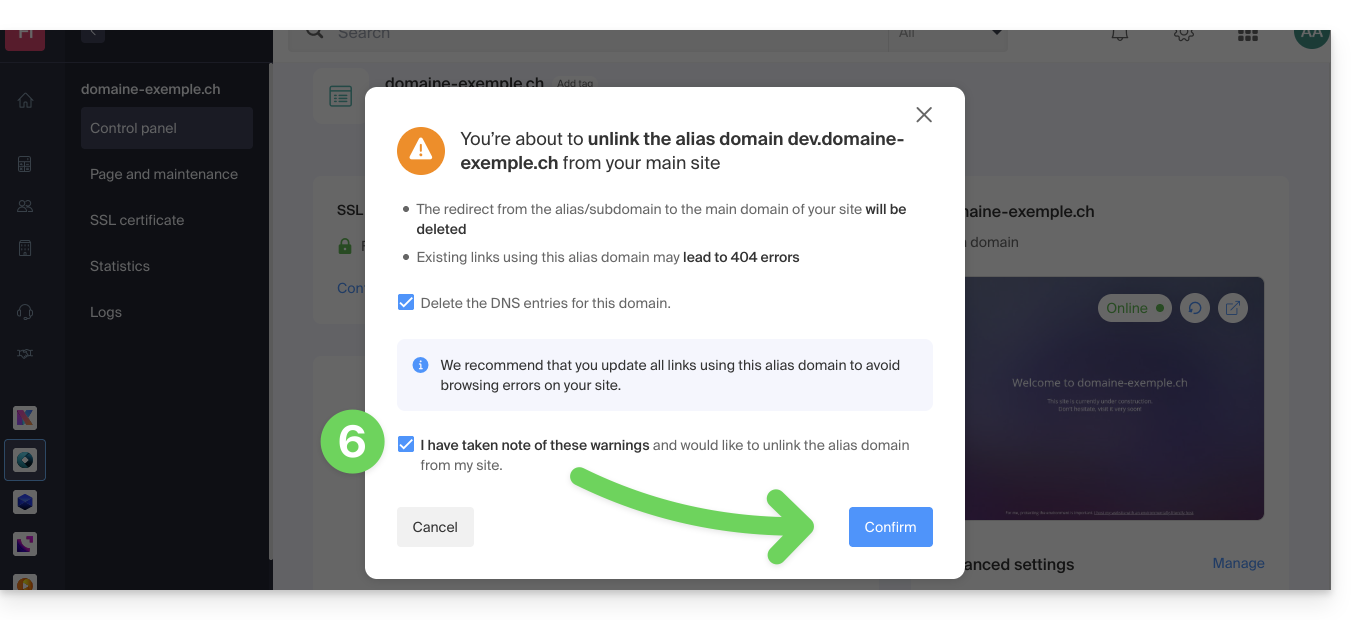
Confirm the deletion of the alias:
- If necessary, you can choose to delete the DNS records related to the domain…
This guide explains how to migrate a Web Hosting from MySQL to MariaDB.
Preamble
- MariaDB is an enhanced version of MySQL, featuring numerous powerful built-in features and many improvements in terms of usage, security, and performance:
- MariaDB has a larger connection pool supporting up to 200,000 connections, whereas MySQL has a smaller connection pool.
- When comparing the performance of MariaDB and MySQL, it is evident that replication is faster in MariaDB and slower in MySQL; MariaDB is generally faster than MySQL.
- MariaDB is Open Source, whereas MySQL uses proprietary code in its Enterprise edition.
Using MariaDB as a replacement for MySQL
The update to MariaDB is irreversible and all sites on your hosting will subsequently run with this version of MariaDB. Check the compatibility of your scripts before proceeding.
To migrate a Web Hosting to MariaDB:
- Click here to access the management of your product on the Infomaniak Manager (need help?).
- Click directly on the name assigned to the product in question.
- Click on Databases in the left sidebar.
- Click on the link Migrate to MariaDB.
To migrate a Cloud Server, refer to this other guide regarding the migration to a new generation of Cloud Server.
Connecting to a remote Oracle database is not available with shared hosting and servers.
For example, you can install OCI8 for PHP on VPS Cloud / VPS Lite.
This guide concerns Django, an open-source web development framework in Python.
Installing Django
It is possible to install Django on web offers such as VPS Cloud / VPS Lite: discover the different web hostings from Infomaniak.
This guide explains how to move a shared web hosting to a Cloud Server while retrieving all its data, websites, databases, etc.
Preamble
- If you already have a Cloud Server, go directly to step 2 of this guide.
- To move a web hosting from one Cloud Server to another Cloud Server, refer to this other guide.
- To move a web hosting from a Cloud Server to a shared web hosting, refer to this other guide; note that this is a manual operation you will have to perform.
- Note:
- Database names and database user names are preserved.
- FTP accounts are preserved with the same names, but the host server changes to an address of type
xxxx.ftp.infomaniak.com. - The IP addresses of the sites will change except for dedicated IPs.
1. Order a Cloud Server
To do this:
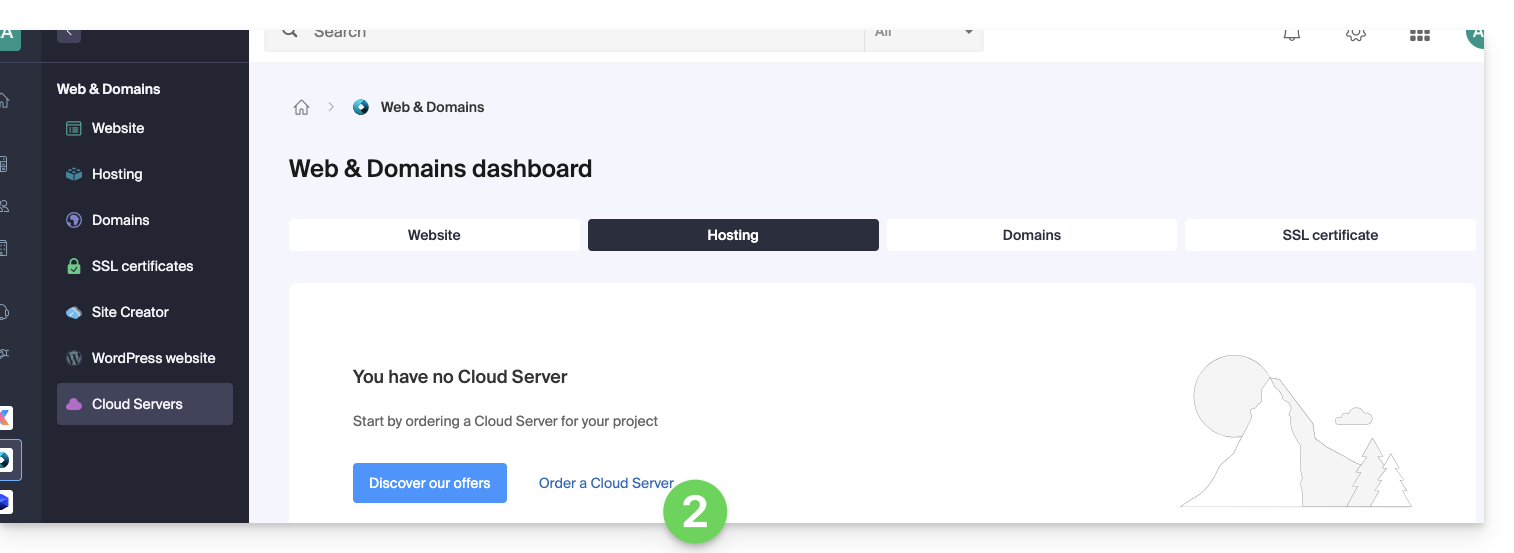
- Click here to access the management of Cloud Servers on the Infomaniak Manager (need help?).
- Click on Order, choose a managed Cloud Server and follow the wizard to complete the order:
2. Migrate the hosting to the Cloud Server
Once the Cloud Server is in service:
- Click here to access the management of your product on the Infomaniak Manager (need help?).
- Click on the action menu ⋮ located to the right of the item concerned.
- Click on Modify the offer:
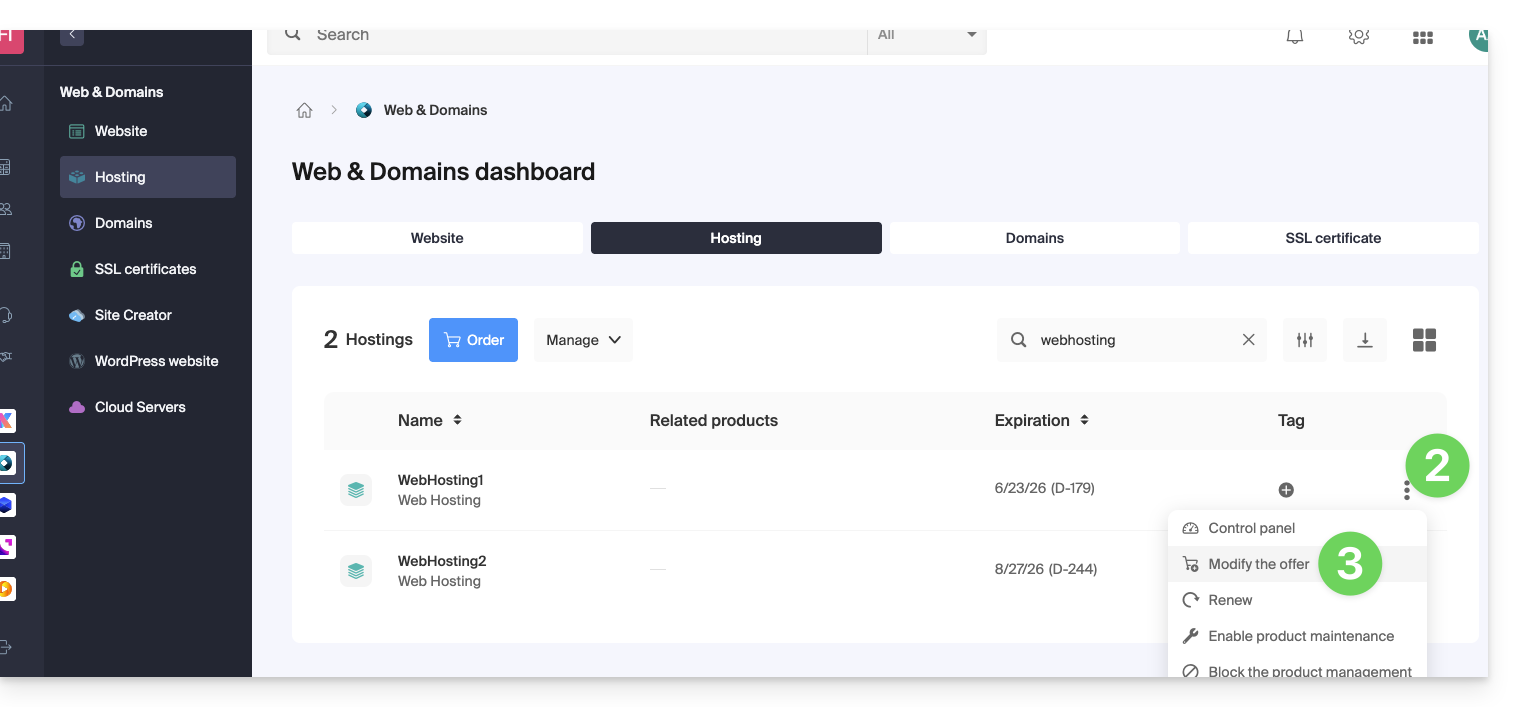
- Select the free transfer offer.
- Select the Cloud Server to which to migrate your hosting:
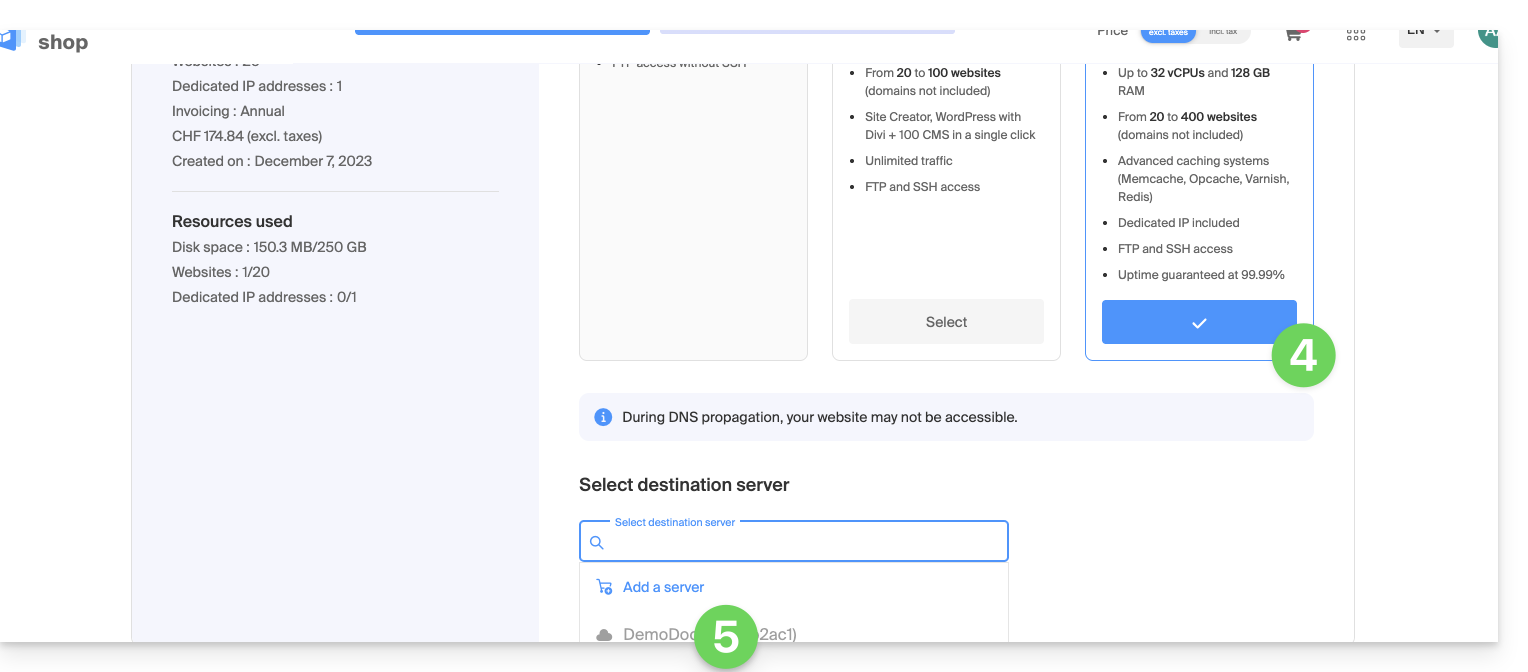
- Click on the Next button at the bottom of the page and complete the procedure entirely.
- Wait for the hosting migration to complete, a service interruption will be felt during the process.
This guide explains how to view and download Apache logs from Web Hosting, which are useful for analyzing PHP errors or diagnosing certain application behaviors.
Preamble
- The access and error logs are kept for at least 7 days.
- Once the retention period has expired, older entries cannot be restored, even upon request.
- You can also find these files directly on the server via SSH/FTP in the
ik-logsfolder at the root of your hosting.
Accessing access and error logs
To display these logs:
- Click here to access your site management on the Infomaniak Manager (need help?).
- Click directly on the name assigned to the site concerned:
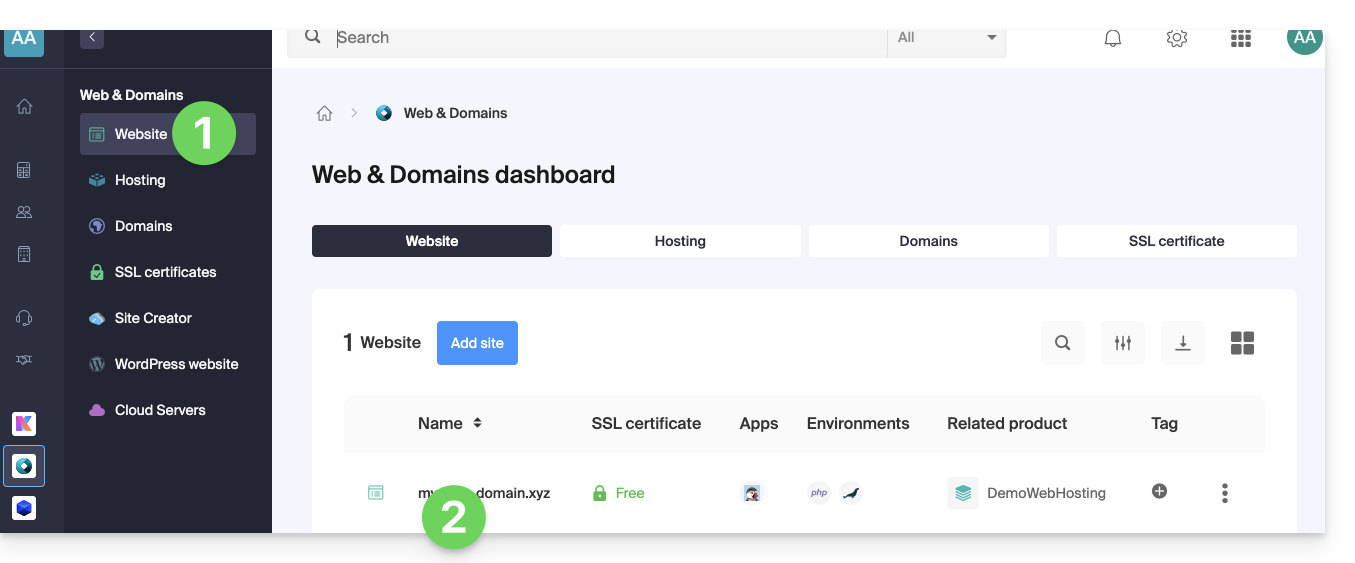
- Click on Advanced in the left sidebar.
- Click on Logs in the left sidebar.
- Click on Errors or Access to display the error log or access log.
- Choose a period if necessary.
- Click on the icon to view the details.
- Click on Send by email to receive all entries immediately by email to your user address.
- Click to export the data in
.logformat: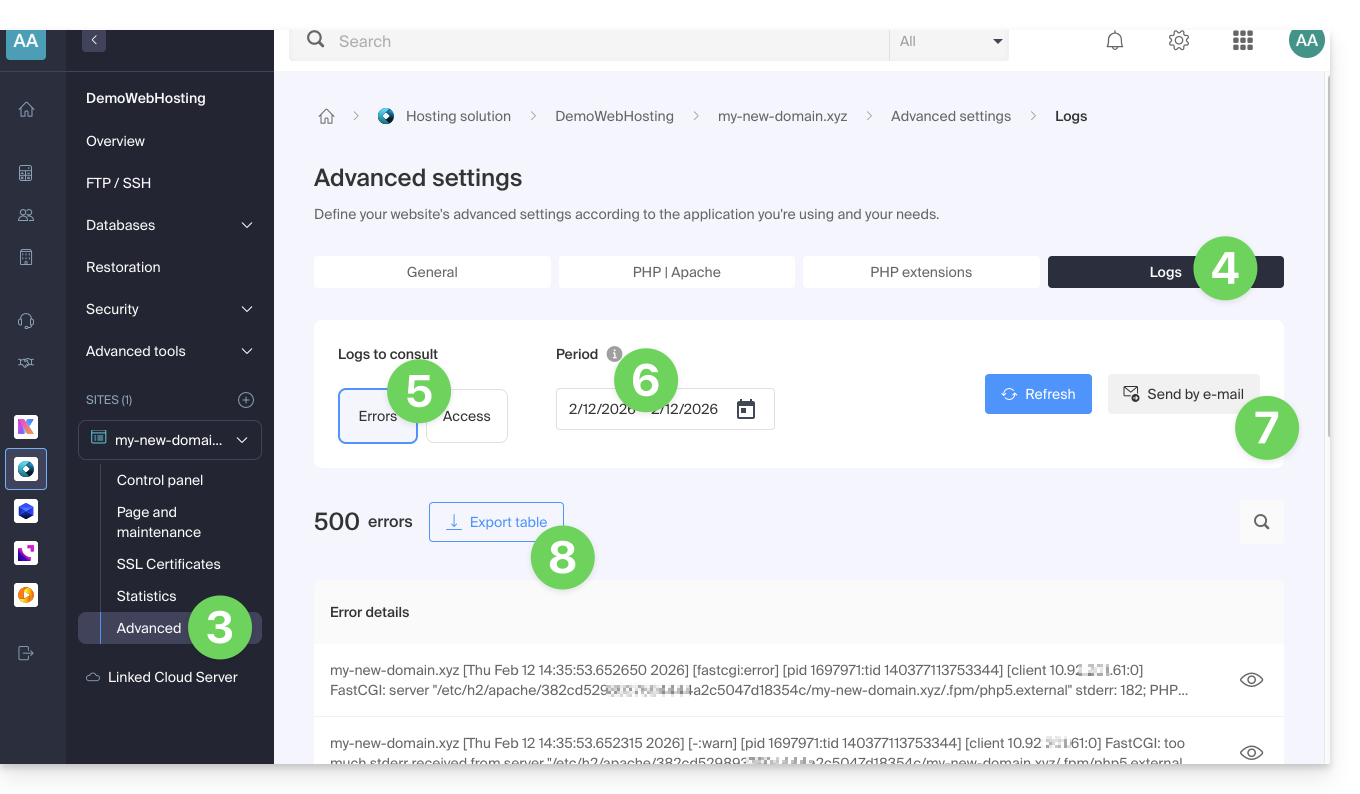
Identify the most active IP addresses in the access logs
To do this, connect to the server via SSH (need help?).
The line to execute in SSH is as follows:
cat ik-logs/access.log | awk '{ print $2}' | sort -n | uniq -c | sort -n | tail -n 20This guide explains how to order, link or remove a dedicated IP from a website.
Manage dedicated IPs on a hosting plan
Order one or several first dedicated IP addresses
To do this:
- Click here to access the management of your product on the Infomaniak Manager (need help?).
- Click directly on the name assigned to the relevant product.
- Click on Web in the left sidebar.
- Click on Dedicated IPs in the left sidebar.
- Click on the button to order one or more IP addresses:

Order one or several additional dedicated IP addresses
To do this:
- Click here to access the management of your product on the Infomaniak Manager (need help?).
- Click directly on the name assigned to the relevant product.
- Click on Web in the left sidebar.
- Click on Dedicated IPs in the left sidebar.
- Click on Order :

Associate a dedicated IP address with a website on a hosting plan
Once the IP has been ordered and paid for, familiarize yourself with the prerequisites below, as switching to a dedicated IP address for a website may cause a temporary interruption, especially in the presence of a certificat SSL Let’s Encrypt. To limit the impact:
- Start by reducing the TTL of the DNS records
AandAAAA(for@andwww) to 5 minutes. - Wait for the previous TTL duration before making any changes.
- The change below should be made during a period of low traffic to limit the inconvenience caused by the inevitable interruption.
- At the end of the procedure, you will need to wait for the new TTL to propagate the new configuration and for the SSL certificate to be regenerated, then check the accessibility of the site in HTTPS to ensure that everything is working correctly.
To switch to a dedicated IP address:
- Click here to access the management of your product on the Infomaniak Manager (need help?).
- Click directly on the name assigned to the relevant product.
- Click on Web in the left sidebar.
- Click on Dedicated IPs in the left sidebar.
- Click on the button to dedicate the IP to a site on your hosting:

- Select the site to assign the new IP address to.
- Check the box after reviewing the warnings.
- Click on the Associate button:

Remove a dedicated IP address from a website
Once the IP is installed, to uninstall it:
- Click here to access the management of your product on the Infomaniak Manager (need help?).
- Click directly on the name assigned to the relevant product.
- Click on Web in the left sidebar.
- Click on Dedicated IPs in the left sidebar.
- Click on the action menu ⋮ located to the right of the relevant item.
- Choose Unbind:

- Take note of the warnings and confirm the deletion to complete the IP uninstallation procedure.
Refer to this other guide if you are looking for information on potential issues related to your IP.
This guide provides basic instructions for creating and using a .htaccess and .user.ini file with an Infomaniak Web Hosting.
Preamble
- A
.htaccessfile is placed at the root of a website and allows you to configure the Apache HTTP server.- As a decentralized configuration file, it offers significant flexibility to adjust the server's behavior according to the specific needs of the site.
- This file allows you to define URL rewrite rules, impose access restrictions, manage HTTP errors, and even customize security aspects such as disabling the display of files/folders.
- It also facilitates the setup of redirects and aliases, thus providing precise control over the organization and accessibility of the site.
- A
.user.inifile allows you to customize the PHP directives of the folder (and its subfolders) in which it is located.- By acting at the PHP interpreter level, this file allows you to define specific configurations for a given folder and its subdirectories.
- Thanks to its clear syntax, it offers the possibility to modify various parameters such as memory limit, script execution time, error handling, and other PHP-related directives.
- This granular approach allows developers to finely customize the behavior of PHP according to the specific requirements of each section of the site.
Create a file…
… .htaccess
- Connect to your hosting via FTP or SSH.
- At the root of the concerned website, create a new file and name it:
.htaccess. - Write the desired directives in the file, refer to this other guide for example.
… .user.ini
- Connect to your hosting via FTP or SSH.
- At the desired location, create a new file and name it:
.user.ini. - Write the desired PHP configuration parameters in the file.
Modifying the .user.ini file takes several minutes to take effect,
This guide covers the database management features available with Infomaniak hosting.
Discover also the high-availability managed database solution (DBaaS) hosted in Switzerland, allowing you to easily deploy performant and secure clusters (MySQL, MariaDB, PostgreSQL) without having to manage the underlying infrastructure.
MySQL, SQLite, MariaDB, PostgreSQL…
At the Database Management System, the hosting supports…
- … MySQL databases via PHP MySQL access or via Perl DBI+DBD::mysql
- You can use MySQL as a database management system (DBMS) on Infomaniak servers.
- You can access it either via PHP using the built-in MySQL database functions, or via Perl using the DBI and DBD::mysql modules
- … MySQLI, the native MySQL access interface (PHP5)
- MySQLI is a PHP extension that allows access to a MySQL database.
- It is an improved and more recent version of the old MySQL extension of PHP, offering improved features and performance.
- … SQLite 3.x
- SQLite is a lightweight, standalone, and serverless SQL database engine.
- Infomaniak servers support SQLite version 3.x, which means you can use SQLite to store data on these servers.
- … MariaDB
- MariaDB is a fork of MySQL and is often used as an alternative to MySQL
- You can therefore use MariaDB as a database management system on Infomaniak servers
- … the PGSQL module
- PGSQL is a PHP module that allows you to connect to a PostgreSQL database
- This specific feature allows you to connect to a REMOTE PostgreSQL database via PHP; this requires opening the appropriate port to the specific IP of the PostgreSQL database from the Infomaniak manager.
Dba, dbm, db2, sqlite are not supported, SQL Server either (it is a database server that requires a Microsoft architecture).
This guide explains how to deploy Node.js with a Cloud Server to always have the necessary environment to compile or build modern frontends (React, Vue, etc.).
Preamble
- Node.js is a free software platform in JavaScript oriented towards network applications that need to scale, a simple and effective solution to integrate frontend tools into any server stack.
Node.js= official name of the language/environment.NodeJS= "technical" or simplified name in certain contexts (often for practical reasons, no real technical difference).
- For additional help contact a partner or launch a free call for tenders — also discover the role of the host.
Install Node.js
Prerequisites
- Install NVM on your Cloud Server.
- Warning, version 18 of Node.js is not compatible with old Cloud Servers; perform a migration beforehand!
Install the stable version of Node.js
nvm install stableInstall the latest version
nvm install nodeInstall an older version (not recommended)
nvm install 17List available versions
nvm ls-remoteInstall a specific version
nvm install <version>Switch Node.js versions and set version 6.3.1 (or another version) as default
nvm alias default 6.3.1Use a specific version of Node.js in the current shell
nvm use <version>Check the currently used version of Node.js
node -vSource
To set up NVM, go to the WebSSH console of your Cloud Server.
Source the .profile file
source ~/.profileRun the following command to check the NVM installation
nvmConfigure Node as a service
To configure Node as a service, using a "systemd-user service" is recommended.
Redirect traffic to a specific port
Refer to this other guide regarding traffic redirection to a specific port and dedicated IPs.
This guide explains how to update Web Applications installed via Infomaniak tools.
Preamble
- If an application is manually updated via FTP, it is then impossible to update it via the Manager and benefit from automatic updates.
- When installing your Web Application, automatic updates (at least security updates) are usually enabled by default:

Updating an application installed via Infomaniak
To access the Infomaniak Web Application and update it:
- Click here to access the management of your product on the Infomaniak Manager (need help?).
- Click directly on the name assigned to the relevant product:

- Click on the action menu ⋮ located to the right of the relevant Web Application.
- Click on Settings for the application:

- Click on Edit in the Information block:

- Click on the dropdown menu to select a newer version.
- Click on the Save button:

This guide explains how to enable or disable the PHP function set_time_limit of a Web Hosting.
Preamble
set_time_limitis a PHP function that sets the time limit for a script, in seconds; if this limit is reached, the script stops and returns a fatal error.set_time_limitcannot be used to set values beyond the script execution time limit (max_execution_time) defined in the Manager.
Enable or disable the PHP set_time_limit function
To access website management:
- Click here to access the management of your product on the Infomaniak Manager (need help?).
- Click directly on the name assigned to the product concerned:
- Click on Manage under Advanced settings:

- Click on the PHP / Apache tab.
- Click on the toggle switch On/Off as desired:
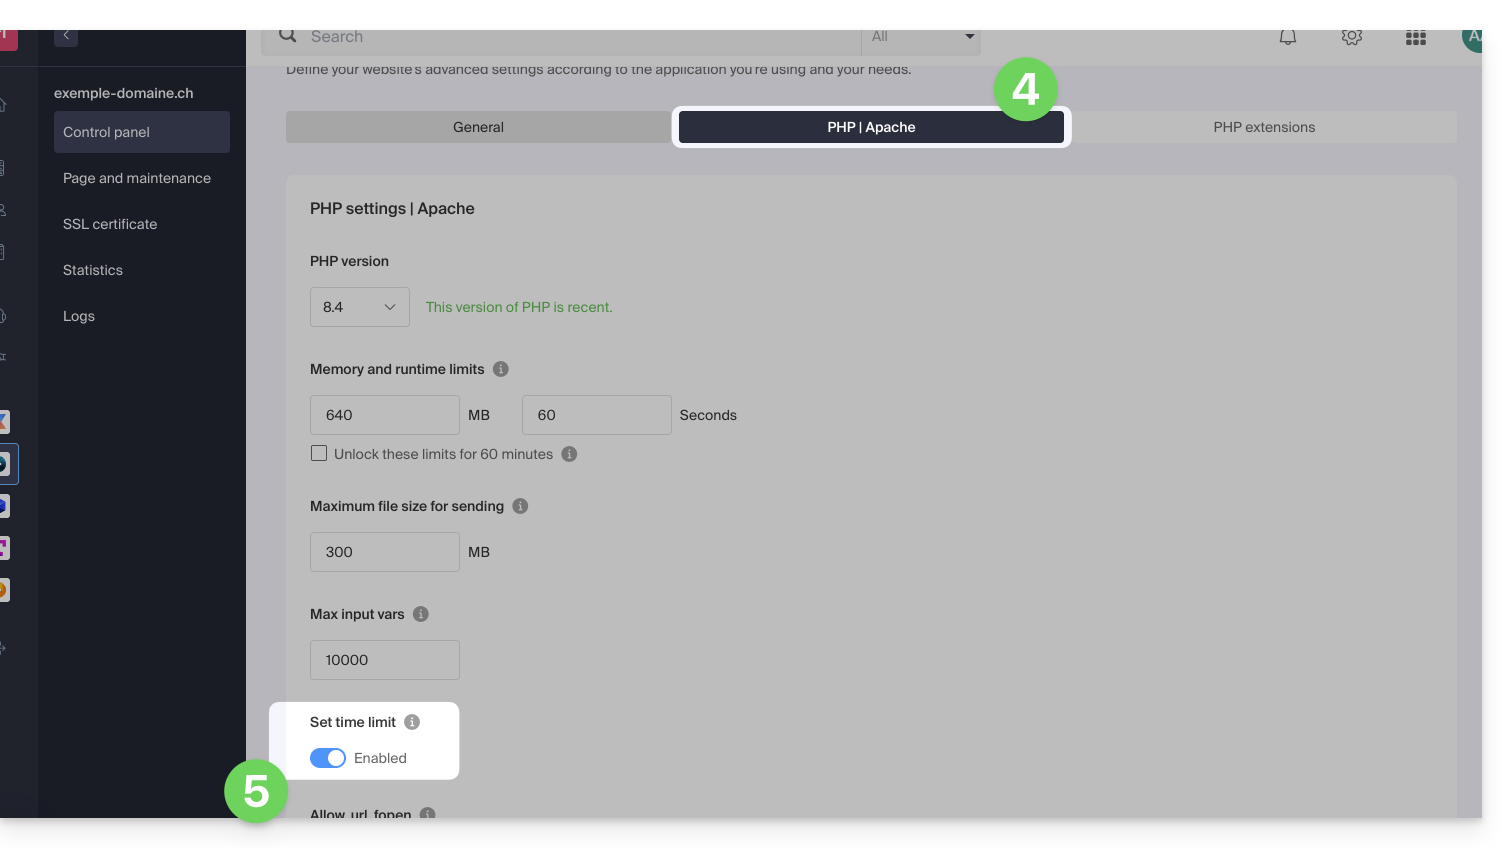
- Click on the Save button to validate the changes.

