Knowledge base
1000 FAQs, 500 tutorials and explanatory videos. Here, there are only solutions!
This guide explains how to move a Web Hosting (and all the sites it contains) from a Cloud Server to another managed Cloud Server.
If you wish to update the current Cloud Server to a next-generation server, refer to this other guide.
Preamble
- FTP & MySQL
- When moving a hosting from one Cloud Server to another:
- FTP access and databases do not change.
- Only the supported versions of PHP and MariaDB, as well as the server's IPv4 and IPv6 addresses, change at the hosting level.
- Hostnames do not change and are automatically updated to point to the new IP addresses.
- When moving a hosting from one Cloud Server to another:
- Temporary interruption:
- The hosting sites will be unavailable during the data migration.
- This process can take several minutes depending on the number of files to be transferred to the new Cloud Server.
- Possible switch to HTTP/2:
- HTTP/2 is active on the new servers.
- Some directives that may be present in your server's .htaccess file will require adaptation.
- Traffic redirection:
- A proxy is set up for 7 days to redirect traffic from the old server to the new one.
- It is therefore advisable to consider this during this period, especially for crons (see below).
- Crons not migrated:
- SSH crons are not migrated.
- Files and crons are generally not deleted immediately, which can result in duplicates.
- Managing crons is your responsibility; depending on the progress of your migration, you must:
- disable and enable crons via SSH if you have access, to avoid any execution conflicts,
- check your crons,
- ensure they are properly configured on your new Cloud Server.
Move hosting
Prerequisites
- Both servers must be in the same Organization and accessible to the user performing the operation.
Once the second Cloud Server is in service:
- Click here to access the management of your Web Hosting on the Infomaniak Manager (need help?).
- Click directly on the name assigned to the product concerned.
- Click on the Manage button.
- Click on Move to another server in the menu that appears:

- Choose the desired destination server.
- Click on Confirm.
Adjust the DNS zone and finish
If your domain names are not managed by Infomaniak or in the same Organization as the Cloud Server:
- Adjust the A record of the domains concerned.
- Any DNS addition/modification can take up to 48 hours to propagate.
- It is therefore recommended not to cancel the old Cloud Server before this deadline.
- Cancel the old Cloud Server if necessary.
This guide explains how to migrate from a VPS Lite to a VPS Cloud while keeping all your data and without having to reconfigure your installation.
It is not possible to cancel this change or to revert. Switching from a VPS Cloud to a VPS Lite is not possible.
Perform a migration from VPS Lite to VPS Cloud
To start the operation, access your VPS Lite:
- Click here to access the management of your product on the Infomaniak Manager (need help?).
- Click directly on the name assigned to the product in question.
- Click on Upgrade my offer:
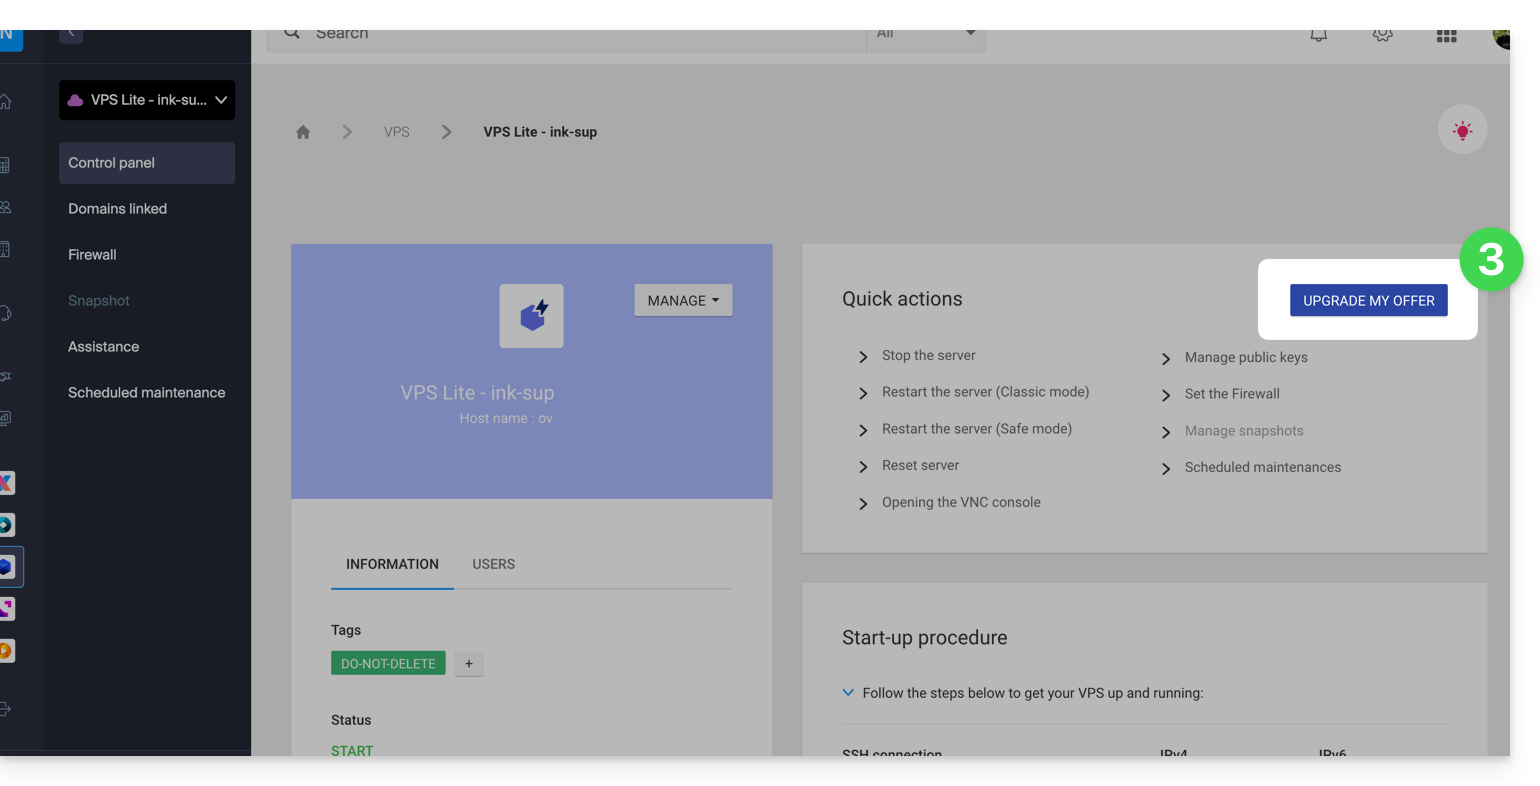
- Click on the Upgrade button on the modal that appears.
- Complete the order to upgrade your VPS Lite.
- Wait during the migration, a service interruption will be felt during the process.
This guide explains how to display the IP address of a site on your Web Hosting.
Preamble
- The IPv4 address is generally the same for each of the sites on the hosting (unless you have acquired a dedicated IP).
Display the IP address of your site
The IP address is specified on the hosting management page (Starter or containing multiple sites):
- Click here to access the management of your site on the Infomaniak Manager (need help?).
- Click directly on the name assigned to the product concerned.
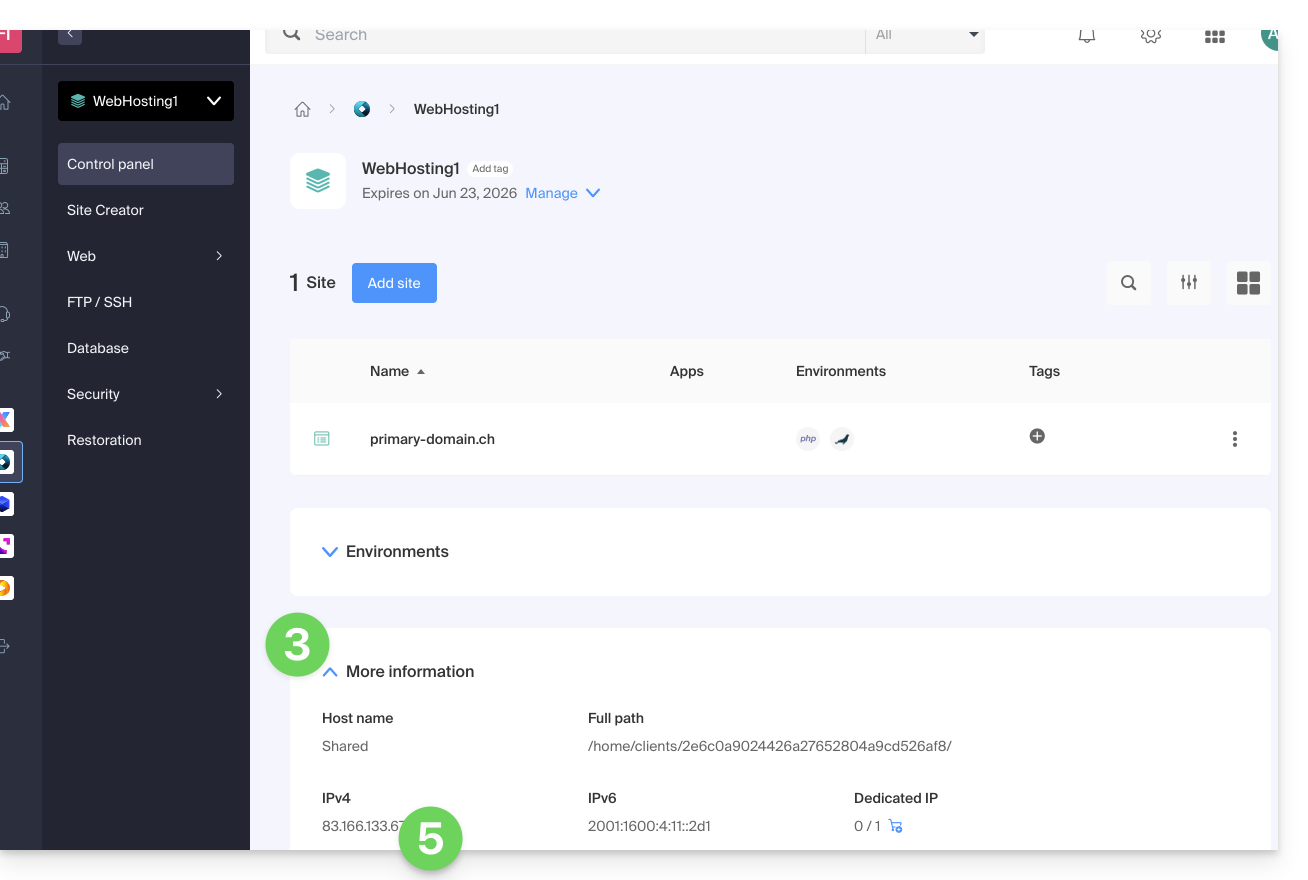
- Then click on the chevron to expand the Information section of this hosting.
- The IPv4 address is displayed on the page:
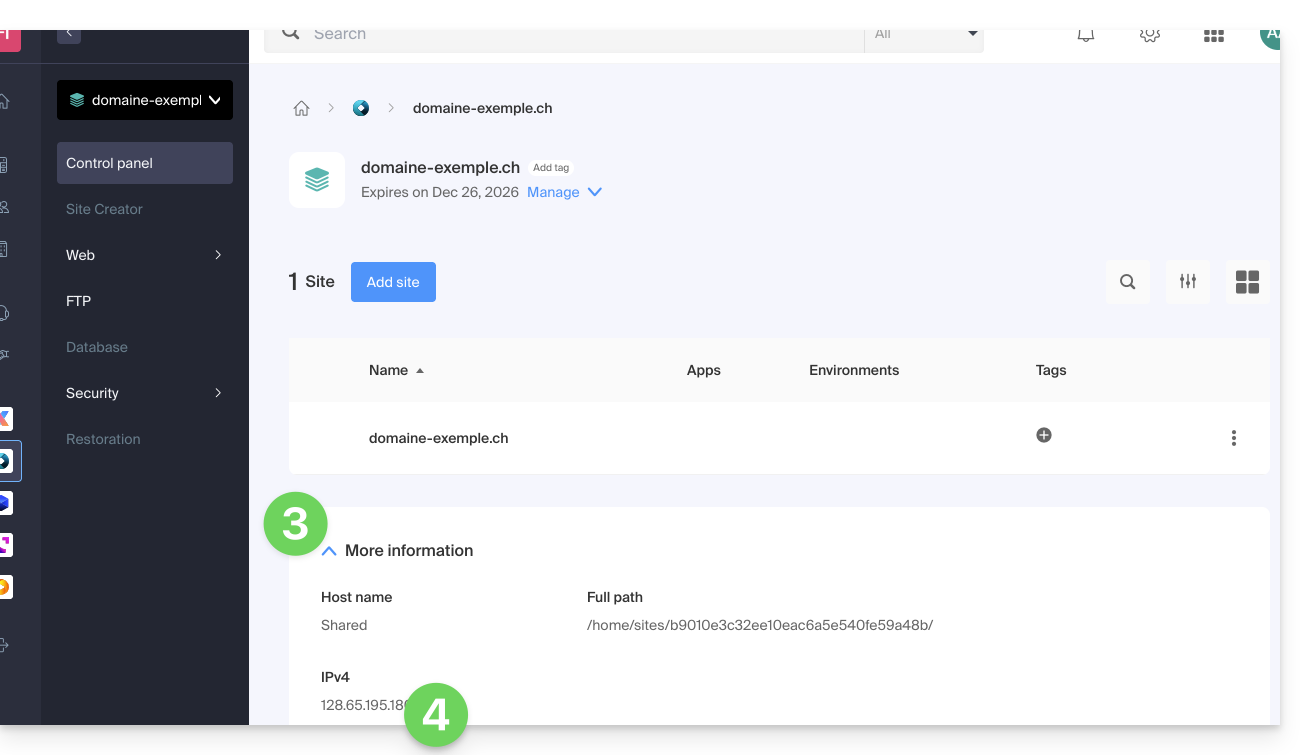
- The IPv6 address is also displayed in the case of paid hosting:
This guide explains how to move an existing website within an Web Hosting Infomaniak to another Infomaniak Web Hosting.
Preamble
- There are not many turnkey solutions for moving a website.
- Generally, few hosts offer the export or import of a complete site with its databases; this is largely due to the fact that there are many ways to build a site and just as many languages that are largely incompatible with each other.
- If the site to be transferred is built with WordPress, refer to this other guide illustrating a simplified solution.
- It is also possible to move a complete Web Hosting (read below).
- Make your life easier! If needed, **local partners recommended by Infomaniak can handle these procedures**. Launch a **free tender**. They take care of everything, freeing you from the technical details.
Manual solution: example of site transfer
To do this manually, it is necessary to:
- retrieve the web data as well as the associated databases,
- re-publish this on a site created on the destination web hosting,
- and if the associated domain name is the same, the first site will need to be deleted or renamed.
For the rest, here is an example of how to proceed:
- Order the other Web Hosting / Cloud Server if you haven't already.
- Create a «fake site» on this new hosting (for example dev.domain.xyz - read more below).
- Manually copy your data via FTP and MySQL (export / import).
- Adjust your site if necessary (database address, etc.).
- Once you are satisfied with the «new site», delete the old one.
- Change the name of the new site to give it its true name.
An alternative, at point 2 above, is to work with the alias www. which you can detach beforehand from your current site. Indeed, the alias www(.domain.xyz) is often installed as an alias for your site, and it is enough to detach it, which allows the creation of a site on the other hosting with the name www.domain.xyz (do not forget, at point 6, to add your alias of type "domain.xyz" without the www to this new site).
Moving entire Web Hostings
There is an automated way to move a Infomaniak Web Hosting to:
- an Infomaniak Cloud Server (if the hosting is currently shared or if the hosting is already on Cloud Server)
- another Infomaniak Organization
A Starter hosting cannot be moved but it can be converted.
This guide details the use of Perl or Python scripts on Infomaniak hosting and the management of their modules.
Preamble
- Shared Web Hosting: the CGI module is no longer available; the execution of Perl and Python scripts is therefore not supported.
- It is necessary to migrate to a Cloud Server.
- Managed Cloud Servers: to benefit from the latest technologies, it is possible to upgrade your Cloud Server.
Web Configuration (Apache/CGI)
To run Python or Perl scripts via Apache on a Cloud Server, the interpretation of files with the extensions .py and .pl is not active by default.
Using your FTP software/client or the FTP Manager, add and adapt the following directive in the .htaccess file located in the folder containing your scripts:
AddHandler cgi-script .pl .cgi .py
Options +ExecCGI
Installation of additional modules
On a Cloud Server, you have the possibility to install third-party libraries that are not present by default.
Python
- The installation is done via
PIP, which is a package manager used to install and manage packages written in Python. - Infomaniak offers
PIPandPIP3via the Fast Installer tool. - Once PIP is installed, you will be able to install Python modules by specifying
--userduring the command. For example: pip3 install mysql-connector-python --user
Perl
- The addition of Perl modules is also done via SSH (console). It is necessary to install them in the user directory and to define the full path within the scripts.
Important technical information
- Path of the interpreter (Path):
/usr/bin/python - Extensions: Scripts must have the extension
.pl,.cgior.py. - Limitations: The
mod_pythonmodule is not supported.
Error Resolution (CGIWrap)
If you encounter the following error when loading an image:
CGIWrap Error: Execution of this script not permitted
Request Data:Extra Path Info: /dossier/.../image.PL.12.34.gif
The server interprets the file as a script because it contains ".PL" (or .PY) in its name.
Solution: Simply rename the file to remove this mention (example: image-12-34.gif).
This document explains how to manage incoming and outgoing connections between multiple hosting environments, particularly for accessing databases.
Database connections between hostings
From a shared hosting
If you are using shared hosting (excluding the old v1 formula - 60 GB), you have the possibility to access databases located on:
- another shared hosting,
- a hosting based on a Cloud Server.
It is therefore possible to share a database, establish a remote connection, or even configure cross-access between hostings.
From a Cloud Server
With a Cloud Server, it is also possible to connect to databases hosted on another Cloud Server.
- In this case, make sure that port
3306(TCP protocol) is open for incoming traffic in the firewall.
Note: Connections to databases hosted on a shared hosting are not possible from a Cloud Server.
From another hosting provider
To learn about the access modalities to MySQL databases from a service provider external to Infomaniak, refer to this other guide.
This guide explains how to display absolute paths Infomaniak for certain web applications that need to know them.
Get the absolute path...
... of a web hosting
To do this:
- Click here to access the management of your product on the Infomaniak Manager (need help?).
- Click directly on the name assigned to the product concerned.
- Then click on the chevron to expand the Information section of this hosting.
- The highlighted indication below is the location of the example site:

... of a website
To do this:
- Click here to access the management of your product on the Infomaniak Manager (need help?).
- Click directly on the name assigned to the product concerned.
- Then click on the chevron to expand the Information section of this site.
- The highlighted indication below is the location of the example site:

This guide shows you how to modify the error_reporting() directive on your website.
Enable error reporting
Enter the following 2 pieces of information in your .user.ini file:
display_errors=on
error_reporting=E_ALL & ~E_NOTICE & ~E_STRICT
If your browser does not display any errors or warnings, then there are none.
Disable PHP error display
For WordPress, edit the wp-config.php file and replace the line:
define('WP_DEBUG', false);with:
ini_set('display_errors','Off');
ini_set('error_reporting', E_ALL );
define('WP_DEBUG', false);
define('WP_DEBUG_DISPLAY', false);Otherwise, you can add the following code to the .user.ini file:
display_errors=offThis guide provides information about the robots.txt file created by default for web hosting where this file is missing.
Preamble
- The
robots.txtfile acts as a guide for search engine crawler robots - It is placed at the root of a website and contains specific instructions for these robots, indicating which directories or pages they are allowed to explore and which they should ignore
- However, note that robots may choose to ignore these directives, making the
robots.txta voluntary guide rather than a strict rule
File Content
If the robots.txt file is missing from an Infomaniak site, a file of the same name is automatically generated with the following directives:
User-agent: *
Crawl-delay: 10
These directives tell the robots to space out their requests by 10 seconds, which prevents unnecessarily overloading the servers.
Bypassing the Default robots.txt
It is possible to bypass the robots.txt by following these steps:
- Create an empty
robots.txtfile (it will only serve as a placeholder so that the rules do not apply). - Manage the redirection of the URI (Uniform Resource Identifier)
robots.txtto the file of your choice using a.htaccessfile.
Example
<IfModule mod_rewrite.c>
RewriteEngine On
RewriteCond %{REQUEST_URI} /robots.txt$
RewriteRule ^robots\.txt$ index.php [QSA,L]
</IfModule>
Explanations
- The
mod_rewritemodule of Apache is enabled to allow redirections. - The condition
RewriteCond %{REQUEST_URI} /robots.txt$checks if the request concerns therobots.txtfile. - The rule
RewriteRule ^robots\.txt$ index.php [QSA,L]redirects all requests torobots.txttoindex.php, with the[QSA]option that preserves the query parameters.
It is recommended to place these instructions at the beginning of the .htaccess file.
This guide details the "X-Frame-Options" header, which can be used to protect against clickjacking. Note that the "X-Frame-Options" header may not be supported by all web browsers. It is therefore recommended to combine it with other methods to enhance the security of your website.
Possible values for the header
The "X-Frame-Options" header can be set to prevent a website from being loaded in a frame or iframe. There are three possible values for this header:
- "DENY": the website cannot be loaded in a frame or iframe
- "SAMEORIGIN": the website can be loaded in a frame or iframe only if the source of the frame or iframe belongs to the same domain as the website
- "ALLOW-FROM uri": the website can be loaded in a frame or iframe only from the specified URI
You can set this header by adding the following lines to your .htaccess file:
Header set X-Frame-Options "DENY"
or by using the PHP header() function, as it is executed in FPM, in the same way as when disabling HSTS, for example:
header('X-Frame-Options: DENY');
Replace "DENY" with the desired value for this header.
This guide concerns IonCube Loader, a PHP module that allows decoding of PHP scripts that have been encoded with IonCube Encoder.
Preamble
- IonCube encoding is used to protect the source code of an application and prevent its modification or illegal distribution.
- By using IonCube Loader, website owners can ensure the security of their code and content while allowing secure and easy distribution of their applications.
Using ionCube Loader
With shared hosting it is no longer offered. You can check this from the dashboard:
- Click here to access the management of your product on the Infomaniak Manager (need help?).
- Click directly on the name assigned to the product concerned:
- Click on Manage under Advanced settings:
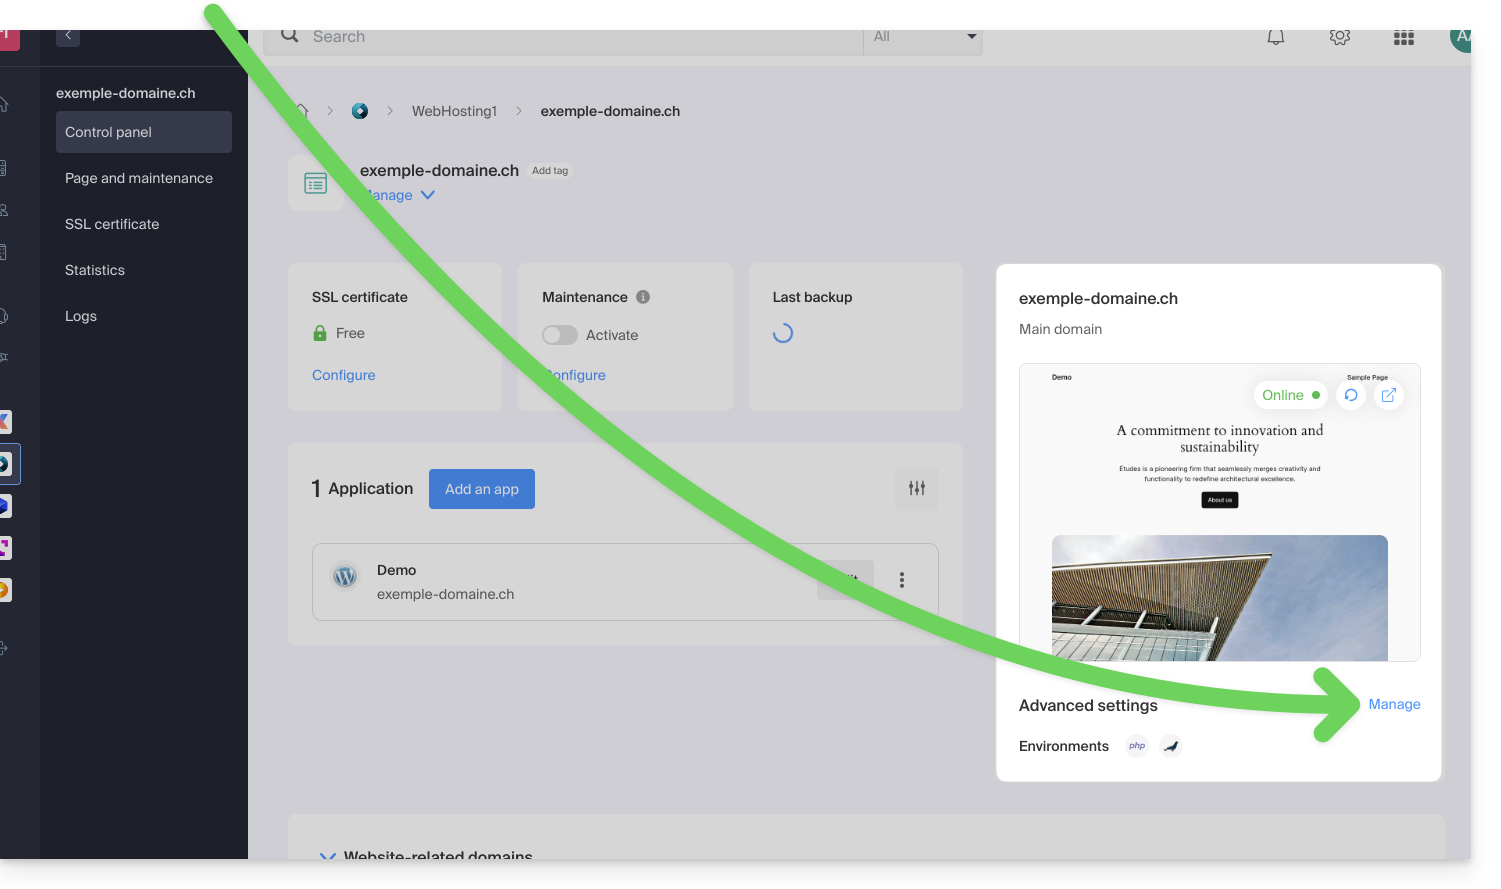
- Click on the PHP Extensions tab.
- Click on ionCube Loader (if present in the list) to view the details:

- Here, you will need to consider a Cloud Server.
This guide covers the configuration and management of ModSecurity on Infomaniak servers. By understanding its limitations, restrictions, and effectively managing errors, you can optimize the security of your site while maintaining its functionality.
Default configuration
ModSecurity (mod_secure) is available and enabled by default on Infomaniak servers. This means that all HTTP requests will be subject to the security rules defined by ModSecurity.
It is not possible to disable ModSecurity on Infomaniak servers. The setting is global to the server where your site is hosted, which means that all defined security rules will be applied to your site.
Error management
If the error message ModSecurity: Access denied with code 403 (phase 2). Operator EQ matched 0 at REQUEST_HEADERS. (...) appears regarding ModSecurity, you should check that a default language is correctly configured in your web browser. This error can sometimes be caused by incorrectly configured language settings in the browser.
The PHP extension uploadprogress is not available on Infomaniak servers, as PHP is used in its FPM version.
This guide details the features available for managing relational databases on Infomaniak hosting.
Use of Views, Triggers, Stored Procedures, and Routines
Regarding the management of relational databases, the view functionality ("views") is available by default, allowing users to create views to simplify data management and presentation.
However, some advanced features that allow for more precise and complex data manipulation, such as…
- “triggers (triggers)
- stored procedures ("stored procedures")
- routines
- and the creation of functions
… are only available on Managed Cloud Servers.
They are not allowed on shared servers.
This restriction is mainly due to potential risks to the stability of the infrastructure. Poor configuration or excessive use of these features could create infinite loops or significant overloads, affecting not only the performance of the affected server but also the experience of all clients hosted on the same infrastructure.
Resolving a MySQL/MariaDB dump import issue
When exporting and then re-importing a MySQL or MariaDB database via the Infomaniak hosting interface, it may happen that the operation fails due to errors related to the DEFINER of triggers or views. This occurs when the database objects were created with a specific user (called definer) who no longer exists at the time of import.
Concretely, the export and import process uses a temporary user, used only during these operations. After this user is deleted, the views or triggers defined with this account as DEFINER become invalid, causing errors of the type:
General error: 1449 The user specified as a definer ('xxxx_temp_1'@'%') does not existTo avoid this problem, it is possible to correct the backup file (dump.sql or dump.sql.gz) before importing it by replacing the definer definitions with CURRENT_USER. This automatically attaches the triggers and views to the current user at the time of import.
Here is an example of a command to modify the dump before import:
sed -E 's/DEFINER=`[^`][^`]*`@`[^`][^`][^`]*`/DEFINER=CURRENT_USER/g' dump.sql > dump-corrected.sqlOnce this replacement is done, the corrected file can be imported normally via the Infomaniak Manager. This behavior is known and related to the operation of temporary users during dump/restore. No changes to the export/import process are planned in the short term, but the subject remains under evaluation on the infrastructure side.
For more information about the CURRENT_USER variable, refer to the official documentation of:
This guide explains how to initialize your Cloud VPS / VPS Lite with Windows when first connecting.
Initializing a Cloud Server with Windows
You need to change the password of your Windows user before you can connect via RDP (Remote Desktop Protocol) to your server; otherwise, an error is returned (indicating that the password must be changed).
To do this, you need to connect using the VNC console the very first time.
Once the user password has been changed (via VNC), it will be possible to connect without any issues via RDP. This protocol is already activated on the Infomaniak Windows images.
Login credentials
- Username:
- for Windows 11 Professional =
Infomaniak - for Windows 10 Professional =
Infomaniak - for Windows Server =
Administrator
- for Windows 11 Professional =
- Password: the one you chose when ordering the server; if you forget it, please reset the server.
- IP address: the one indicated in your server's dashboard.
Connect via RDP…
- … on Windows: Remote Desktop is a built-in feature.
- … on macOS: install the free desktop app Windows App (formerly Microsoft Remote Desktop).
- … on Linux: install the app Remmina.
This guide explains how to enable the following functions on Web Hosting (in italics, Cloud Server only):
proc_openpopenexec()shell_exec()set_time_limitpassthrusystem
These functions are disabled by default as they pose a significant security risk in case of a website hack. Only enable them if there is a real need (for a script or CMS ImageMagick, Typo3, CraftCMS, etc.).
Enable PHP functions
To access website management:
- Click here to access the management of your product on the Infomaniak Manager (need help?).
- Click directly on the name assigned to the product concerned:
- Click on Manage under Advanced Settings:

- Click on the PHP / Apache tab.
- Click on the toggle switches On/Off as desired:
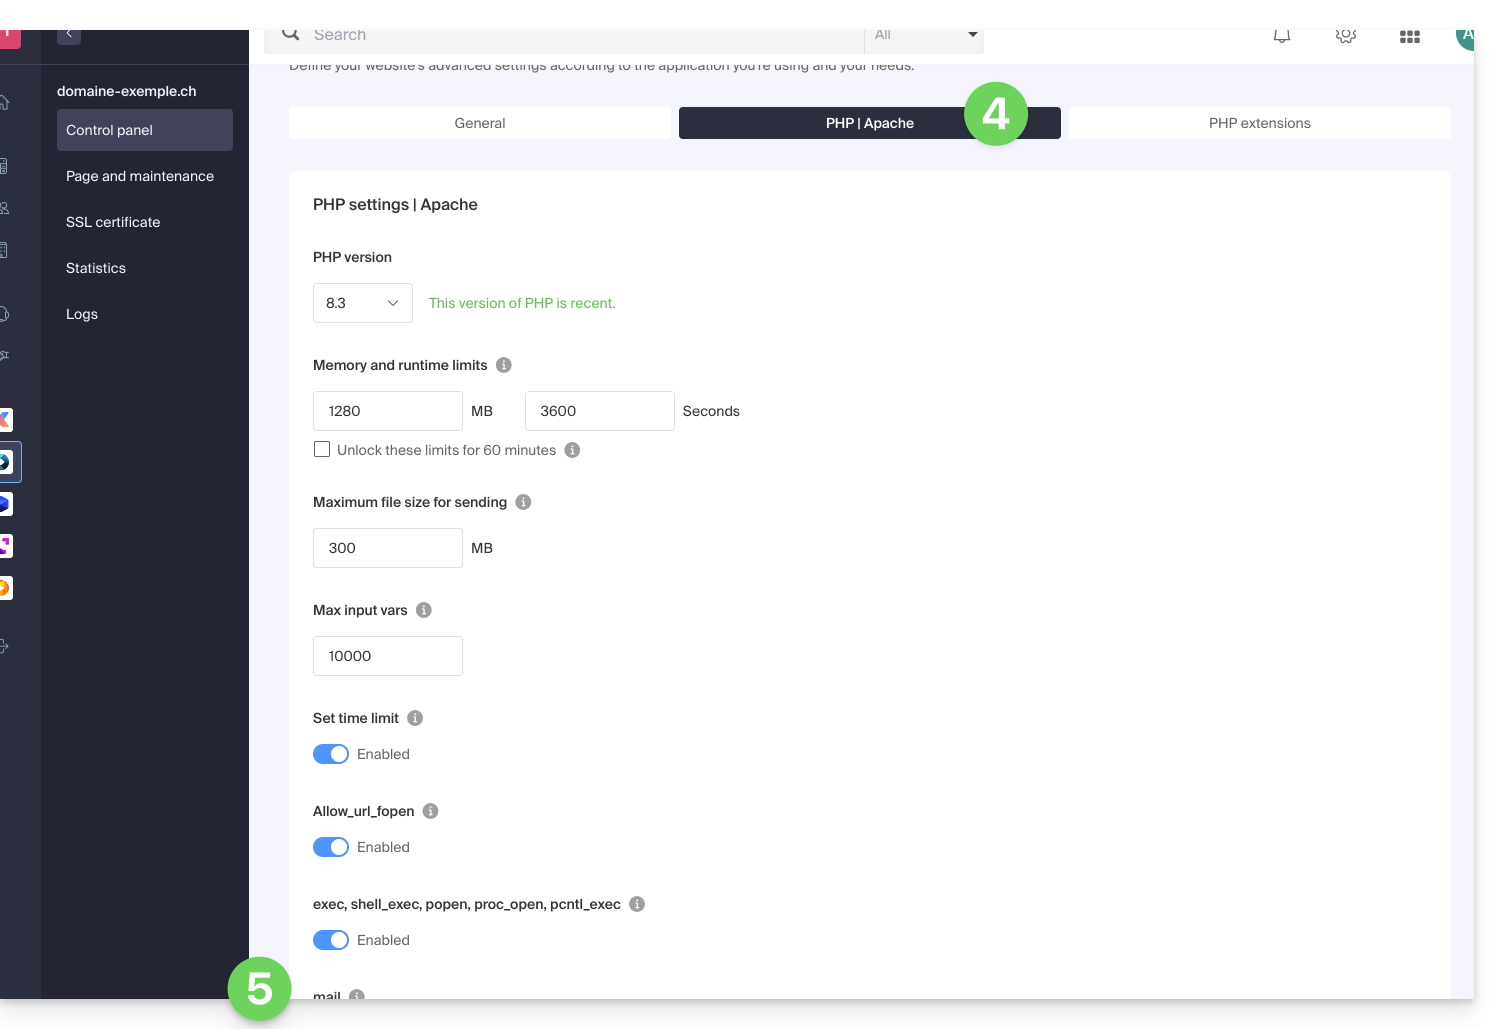
- Click on the Save button at the bottom of the page to validate the changes.
This guide details the use of DELIMITER to create MySQL functions on Infomaniak Cloud Server.
Preamble
- When creating functions or stored procedures in MySQL, it is crucial to understand the role of delimiters.
- The correct use of delimiters is essential to avoid syntax errors that can occur due to the presence of multiple SQL statements in a single function or procedure definition.
Understanding the Delimiter
A delimiter is a character or sequence of characters used to separate SQL statements in a script. By default, MySQL uses the semicolon (;) as a delimiter. However, when creating functions, stored procedures, or triggers that contain multiple SQL statements, it is necessary to temporarily change the delimiter to avoid syntax errors.
When you create a function, procedure, or trigger, you often need to use multiple SQL statements within the BEGIN...END block. Since the semicolon (;) is also used to terminate these internal statements, MySQL might interpret the first semicolon as the end of the function definition, resulting in a syntax error. To work around this issue, you must change the delimiter during the function definition.
Creating a Simple Function Using Custom Delimiters
Before defining the function, you must tell MySQL that you will be using a different delimiter. In the example below, $$ is used as the new delimiter:
DELIMITER $$With the new delimiter in place, you can now define your function. The CREATE FUNCTION includes the function body, where you can use internal SQL statements separated by semicolons without any issues:
CREATE FUNCTION hello_world()
RETURNS TEXT
LANGUAGE SQL
BEGIN
RETURN 'Hello World';
END;
$$
In this example:
CREATE FUNCTION hello_world(): declares the start of the definition of the functionhello_world.RETURNS TEXT: specifies the data type that the function returns.LANGUAGE SQL: indicates that the language used for the function is SQL.BEGIN ... END: encapsulates the function code. Inside, the semicolon is used to separate SQL statements.RETURN 'Hello World';: SQL statement that returns the stringHello World.
After defining the function, reset the delimiter to its default state (the semicolon). This allows you to continue executing regular SQL statements in your subsequent scripts:
DELIMITER ;This guide explains how to securely and easily transfer files between Web Hosting and/or Cloud Server.
Preamble
- The FXP (File eXchange Protocol) is a method for transferring files directly between two FTP servers without the data passing through the local client.
- Using the FTP PORT and PASV commands, it allows establishing a connection between the two servers for faster and more efficient file transfer, thus saving bandwidth.
- However, this method can present security risks if the connections are not secured by FTPS, and it requires a more complex configuration compared to traditional FTP transfers.
Transferring data between servers
FXP is enabled by default on Cloud Servers and Web Hosting (excluding Starter).
For example, you can use CrossFTP, a multi-platform software that allows FXP (as well as FTP, SFTP, WebDav, S3, OpenStack Swift).
This guide explains how to change the WordPress management password or any other Web application (Joomla, Drupal, Typo3, PrestaShop, ownCloud, etc.) installed via Infomaniak tools included in the offersWeb hosting paid.
Preamble
- Some applications also allow a change of user password directly from their dedicated interface:
- Example: WordPress (manage users, names, passwords, roles, etc.).
Change the password of a Web app
To change the password to the administration panel of your web application, perform the following actions:
- Click here in order to access the management of your product on the Manager Infomaniak (Need help?).
- Click directly on the nameallocated to the product concerned:

- Click on the action menu ⋮ located to the right of the relevant Web Application.
- Click on Parameters of the application:

- Click on Edit to the right of the Application:

- Under Password Enter the new password (for connection to the identifier indicated above):

- Click on the button Save at the bottom of the page.
This guide explains how to access the VNC console with Infomaniak VPS Cloud / VPS Lite.
Preamble
- Initial access to the server is via SSH key; it is therefore necessary to assign a password to the
rootaccount or to create another user before you can authenticate with the VNC console. - Warning: you must use the US keyboard layout to use VNC normally!
Open the VNC console
To do this:
- Click here to access the management of your product on the Infomaniak Manager (need help?).
- Click directly on the name assigned to the product in question.
- Click on Open the VNC console under Quick Actions.
If a console display issue occurs, then from the VM:
In /etc/default/grub modify GRUB_CMDLINE_LINUX_DEFAULT, GRUB_GFXMODE and GRUB_GFXPAYLOAD_LINUX (the latter variable is probably missing and needs to be added):
GRUB_CMDLINE_LINUX_DEFAULT="biosdevname=0 net.ifnames=0 console=tty0 console=ttyS0,115200
earlyprintk=ttyS0,115200 consoleblank=0 systemd.show_status=true video=VGA-1:1280x1024"
GRUB_GFXMODE=1280x1024x16
GRUB_GFXPAYLOAD_LINUX=keep
Then update grub and restart:
grub-mkconfig -o /boot/grub/grub.cfgThe resolution can be changed (1000x400 instead of 1280x1024 for example) to allow the VNC console to be displayed in the administration interface without opening a new tab.
This guide provides precise information on supporting the ASP (Active Server Pages, aspx) development environment within the Infomaniak infrastructure.
ASP support
Web hosting services and Cloud Servers are based on a Apache server architecture that does not natively support the Apache::ASP module.
However, it is possible to install and configure this ASP environment on Infomaniak VPS Cloud.

