Knowledge base
1000 FAQs, 500 tutorials and instructional videos. Here, there are only solutions!
Infomaniak is an independent technology company based in Switzerland. It was founded in 1994 in Geneva and develops digital services for individuals, organizations, and businesses. The company is majority-owned by its employees and operates from Geneva and Zurich.
The infrastructure
Infomaniak designs, develops, and fully manages its own infrastructure, which includes data centers in Switzerland and all the servers installed there. The data entrusted to it is hosted and processed exclusively in Switzerland, ensuring the sovereignty, confidentiality, and security of the information.
The company offers a wide range of services, including website hosting, domain name registration and management, cloud solutions, collaborative suites, messaging services, and audio/video broadcasting and streaming tools. These services are designed to be high-performing, scalable, and suitable for both beginners and professional users.
Infomaniak's data centers are recognized for their energy efficiency and ecological design. Infomaniak has notably inaugurated a data center capable of recycling 100% of the energy it consumes to heat local housing, demonstrating a concrete commitment to ecology and sustainability.
Infomaniak emphasizes data protection and privacy. The services are designed and operated without advertising, without data analysis for commercial purposes, and in strict compliance with Swiss data protection laws and European standards such as the GDPR.
The services offered by Infomaniak include:
- web hosting and online stores with CMS support and automated backups
- domain name registration and management
- high-performance cloud solutions for hosting applications, servers, and data
- the collaborative suite kSuite including email, storage, calendar, video conferencing, AI assistant, and communication tools
- audio and video streaming solutions for media, radio, and events.
Infomaniak offers local and multilingual customer support, available with a comprehensive knowledge base, guides, tutorials, and direct assistance to help users with the use and configuration of their services.
By choosing Infomaniak, users benefit from a sovereign, reliable infrastructure, compliant with international standards, respectful of privacy, and committed to a responsible environmental and social approach.
Certifications
Infomaniak is certified according to several international standards that attest to the quality, security, energy management, and environmental impact of its activities. These certifications are regularly renewed and improved to ensure high performance standards.
The certification ISO 27001:2022 attests to the implementation of an information security management system covering data protection and defense against intrusions and information loss. The certification ISO 9001:2015 focuses on quality management, ensuring that the products and services provided meet customer needs and strict quality requirements. The certification ISO 14001:2015 concerns environmental management, with criteria for measuring and reducing the impact of activities on the environment. The certification ISO 50001:2018 aims to measure and continuously improve the energy efficiency of facilities and operations.
Infomaniak also compensates 200% of its CO₂ emissions through certified projects with high environmental and social value, demonstrating a proactive approach to reducing its ecological footprint.
Several Swiss labels reinforce this approach: the Swiss Made Software label, which certifies that the majority of software developments are carried out in Switzerland, the Swiss Hosting label, which confirms that customer data and online services are physically hosted in Switzerland, and the Swiss Made label, which emphasizes the Swiss origin of the services and the maintenance of all jobs in the country, particularly in Geneva and Zurich.
In 2025, Infomaniak also obtained the B Corp™ certification, an international label that recognizes companies meeting high standards in terms of social and environmental impact, governance, and transparency. This certification attests to a sustainable and ethical commitment that takes into account the needs of employees, customers, the community, and the planet.
Measures are being taken to obtain other certifications, required, among other things, for the PCI-DSS certification planned for the future. However, it is not planned to be certified as a Health Data Host (HDS).
Link to this FAQ:
Has this FAQ been helpful?
This guide explains why you might receive an automatic security email regarding your Infomaniak account (i.e., your user account).
Introduction
- Warning: Fake messages are circulating and imitate the Infomaniak security email.
- If you are unsure about the authenticity of the warning, access the Infomaniak Manager and view recent activity instead of clicking on any potentially malicious links that may be present in the fake message.
Automatic Prevention Messages
1. Login from a new location
A security email is automatically sent when a new login to your Infomaniak account occurs from a new location: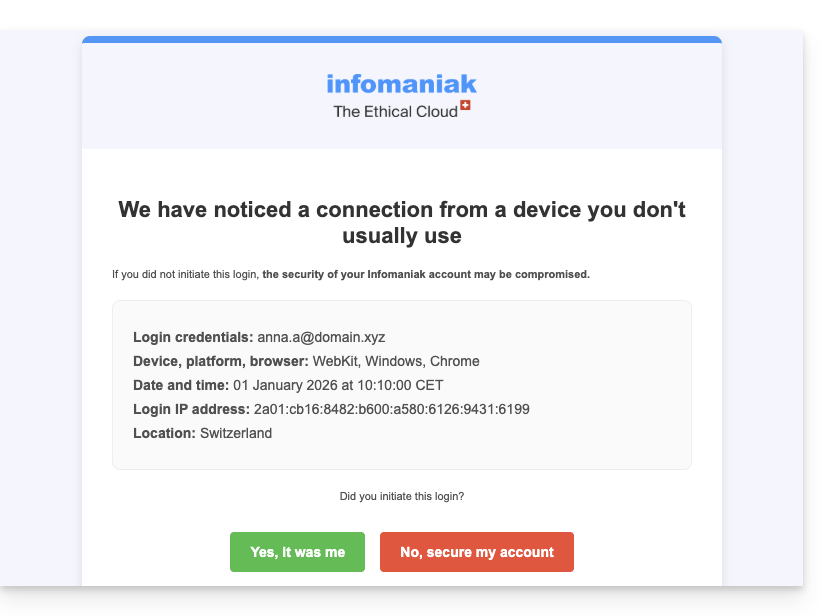
This may occur, for example, if you are using your browser's private browsing mode or if you are accessing your account from a new computer.
If you receive this email immediately after logging into your Infomaniak account yourself, you can safely ignore the login warning!
2. Login attempt (incorrect password)
A security email is automatically sent when someone enters an incorrect password after entering the login email address in the Manager: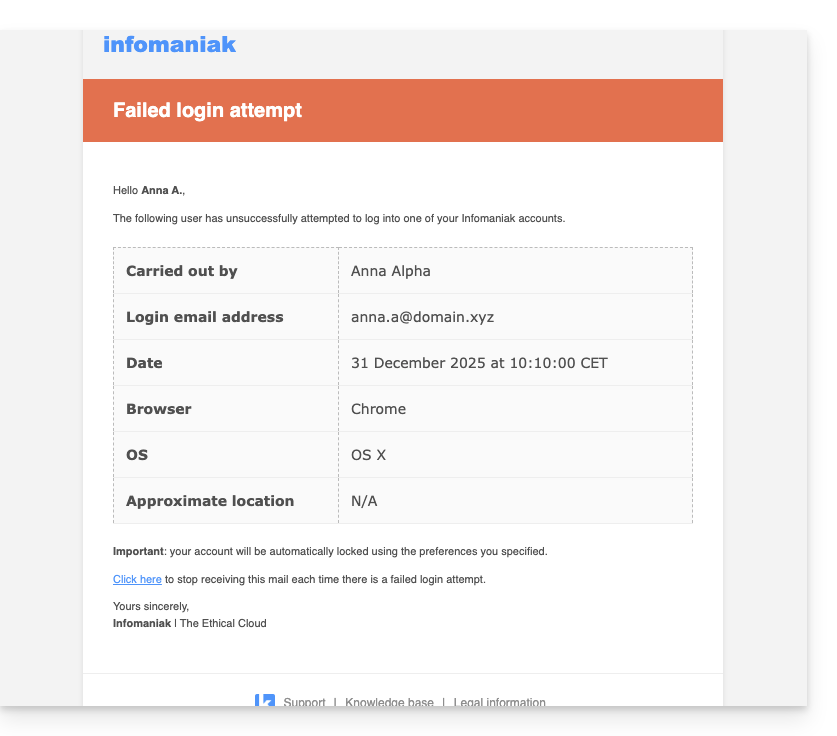
View Recent Activity in the Manager
You can find the recent activities of your Infomaniak account here and those of your Infomaniak Organization here:
If you notice any illegitimate actions that you don't believe you performed, and/or if you suspect an intrusion:
- Refer to this other guide to quickly secure your tools.
- Enable two-factor authentication on your account to improve its protection and ensure that only you receive a unique code authorizing the login.
- Change the Manager password.
- Change the passwords for the email addresses associated with Mail Infomaniak.
Link to this FAQ:
Has this FAQ been helpful?
This guide explains how to change the first name and last name that Infomaniak displays when you are logged into your Infomaniak account (user account) within an Organization in the Manager, as well as your account avatar.
Introduction
- To change your login ID, please refer to this other guide.
- To change your phone number, please refer to this other guide.
- To manage the details of the Organization you belong to, please refer to this other guide.
Change Infomaniak Account Details
To edit your personal details:
- Click here (or on the badge with your initials / avatar in the top right corner of the Infomaniak Manager) to "Manage my account":
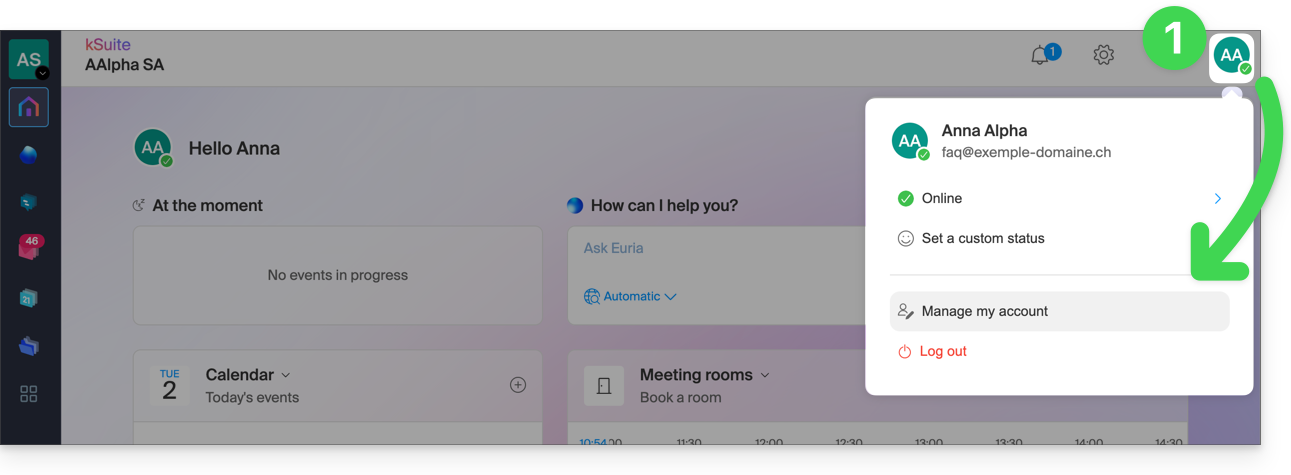
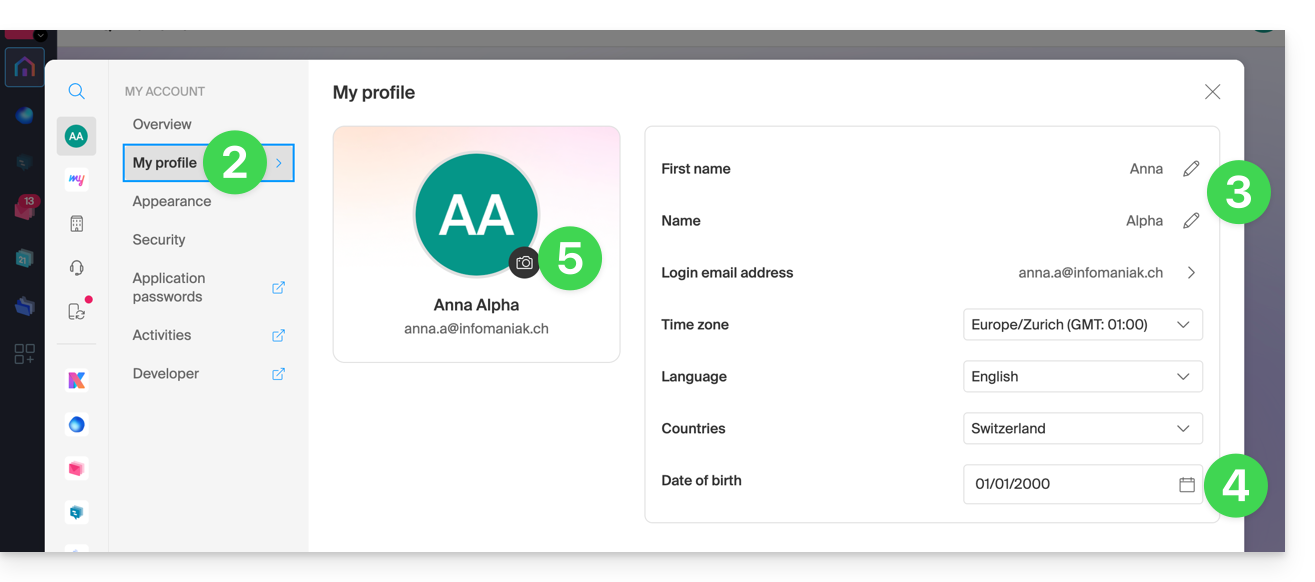
- Click on My profile in the left-hand menu.
- Change your first name and last name on the right-hand side.
- You can also specify your date of birth.
- You can add a profile picture to your Infomaniak account, which will be displayed in place of your initials; it is recommended to import an image of at least 210 pixels on each side:
Link to this FAQ:
Has this FAQ been helpful?
This guide explains how to quickly secure your Infomaniak user account in case you suspect hacking, identity theft, password theft, etc.
Change all passwords
To follow the security assistant allowing a quick change of user password and the deactivation of device connections, application passwords, and tokens (API):
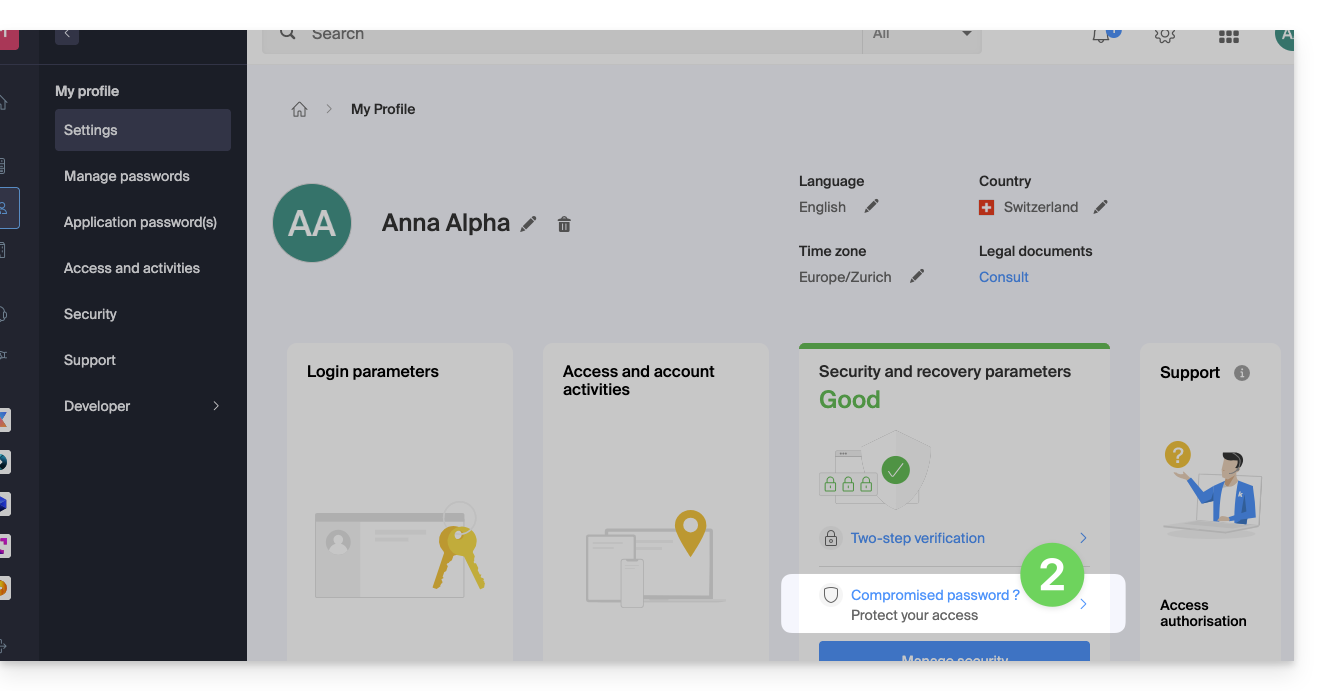
- Click here to access the management of security information on the Infomaniak Manager.
- Click on "Compromised password?" in the Security box:
- Enter the current login password.
- Enter the new password and confirm it below.
- Click the blue button to apply the password change:
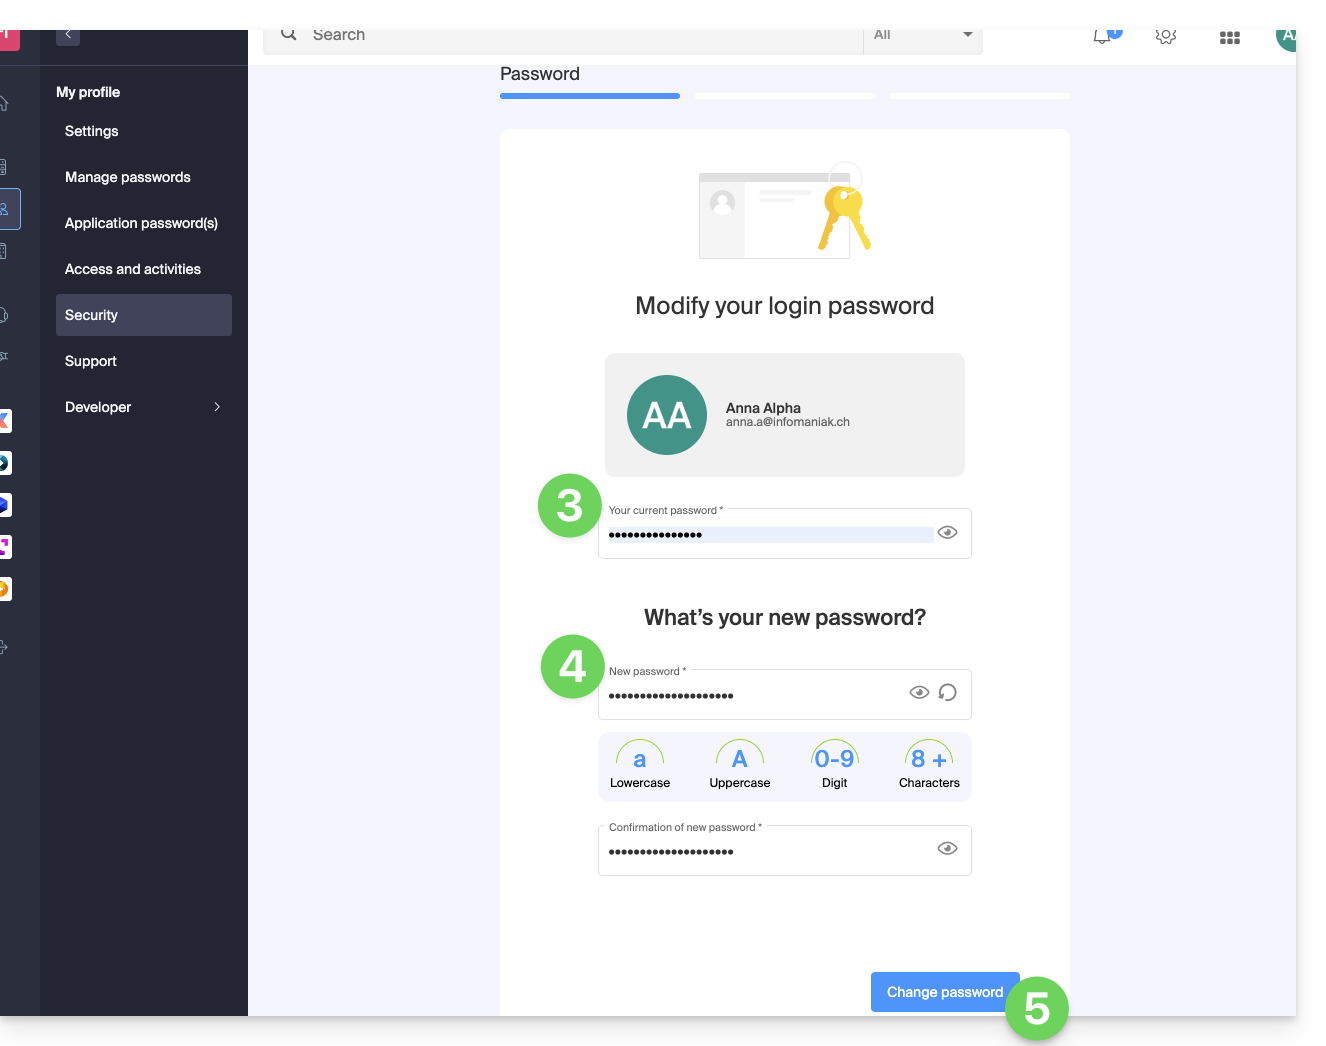
- Continue the procedure to erase connected devices, application passwords and tokens (API), then to access the verification of your security settings.
Also refer to this other guide to secure the access of the different users of the Organization.
Link to this FAQ:
Has this FAQ been helpful?
This guide explains how to modify the current user with the highest status within your Organization, a status similar to that of an administrator that includes additional legal responsibility.
Prerequisites
- Switch to the desired Organization first if you do not find the expected user list.
- Be Legal Responsible within the Organization.
- Be aware of the different permissions (access rights to products for example) and administrative contact preferences of a user within an Organization.
Modify the legal responsible of an Organization
Warning, it is impossible to remove a legal responsible if there is no other legal responsible.
You can therefore:
- Add a new user with the role legal responsible in the Organization.
- Assign the role legal responsible to an existing user in the Organization.
- Remove an existing legal responsible (if there is already another one — implies naming a new legal responsible in advance if necessary).
Link to this FAQ:
Has this FAQ been helpful?
This guide is for you if you have received a payment reminder for an Infomaniak invoice even though everything seems to be in order.
Reminder email from Infomaniak?
Check that the reminder received is not a phishing attempt (fake email / message not from Infomaniak / scam).
Standing order
If you have set up a standing order, the reference number will not match the invoice number.
Since each invoice has an individual reference number, check the invoice for the month or period concerned.
Amount / currency discrepancy
The amount of your payment does not match the invoice amount.
Always pay the exact amount of the invoice, and in the currency of the invoice.
Money on the prepaid account
The payment you made has been received, but due to a problem that occurred when linking your payment to the outstanding invoice, this initial payment was deposited into the prepaid account.
Check the balance of your prepaid account and pay the invoice by this means. Also refer to this other guide.
Reminder that crosses the payment
A payment has been made, but if it was by bank transfer, a reminder may have been sent before the invoice was settled.
You can change how payments should be made:
Link to this FAQ:
Has this FAQ been helpful?
This guide explains what a support code and a VIP code are (not to be confused with the authorization code used for domain transfers) on Infomaniak.
Support code and VIP code
The support code allows the Infomaniak Support department to identify you quickly and securely when you contact them and provide this sequence of numbers. It is displayed on the user profile page.
The VIP code is reserved for customers who have subscribed to Premium Support and allows identification when you call the technical contact. It is displayed on the management page for this service.
On this management page, you will also find your various information for contacting Infomaniak as part of the subscribed Support offer.
The code is on your technical document and also appears on the contact window that opens when you want to contact Infomaniak via the help button: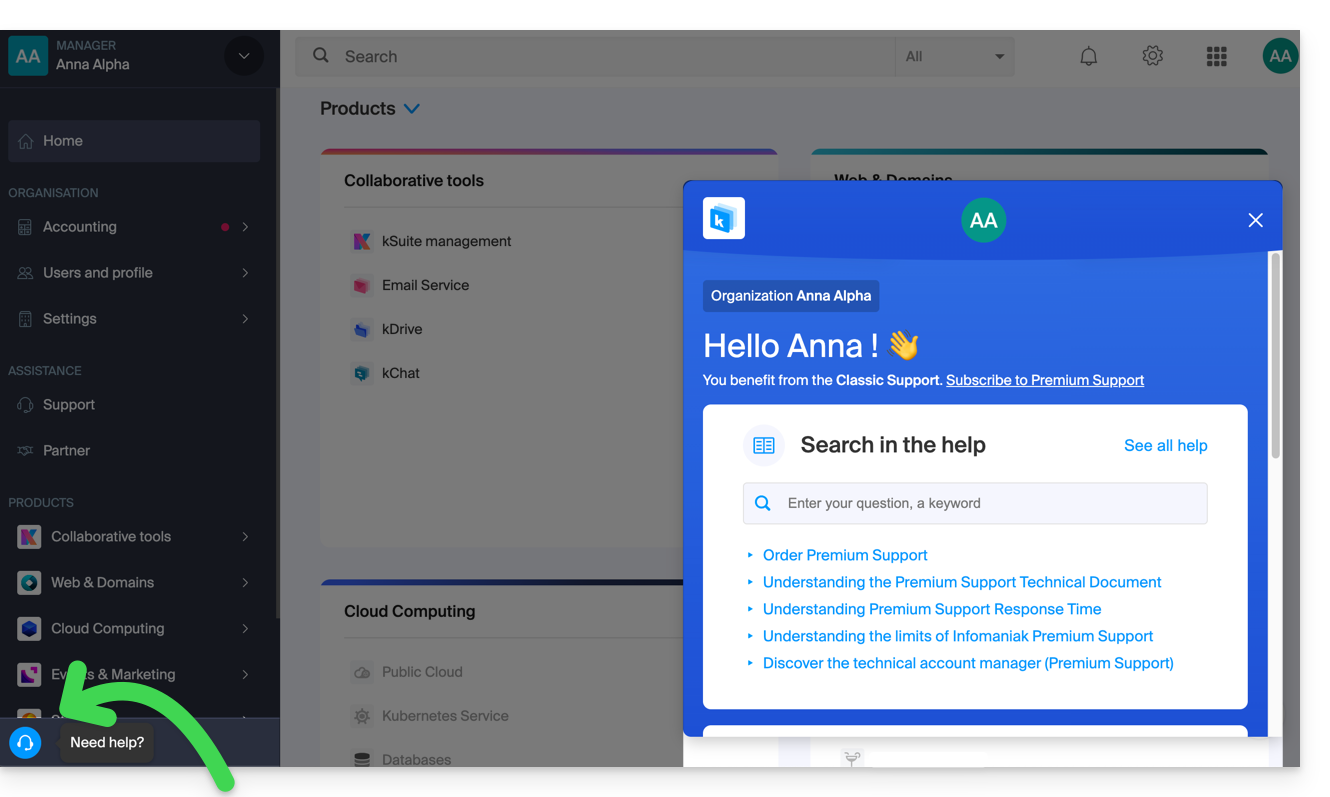
In the same place, you can grant temporary access to your services (for access only possible for Infomaniak Support collaborators):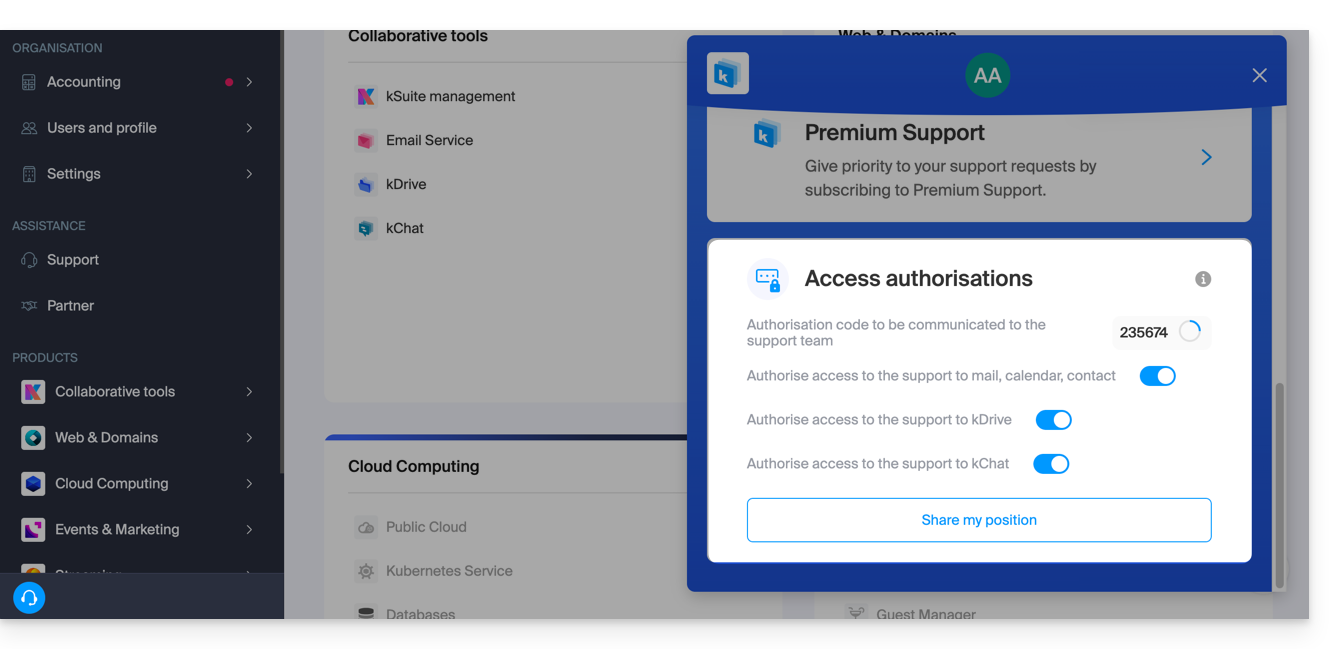
Link to this FAQ:
Has this FAQ been helpful?
This guide explains what the login button for Single Sign-On (SSO) on Infomaniak login pages represents.
Introduction
- Single Sign-On (SSO) is an authentication mechanism that allows users to log in to multiple applications using a single set of credentials.
- SSO simplifies access to Infomaniak services and enhances their security, allowing you to:
- use your professional credentials without an additional password;
- apply the organization's security rules, including multi-factor authentication;
- centralize account and permission management.
- If you are not aware of this feature or if you are a private Infomaniak customer, log in as usual using the standard blue button.
Request SSO activation for your organization
Prerequisites
- Infomaniak offers this option on its various login pages, including in its mobile applications, for users whose organization has enabled this feature.
- SSO login is available with
- Entra ID,
- Okta,
- as well as any other identity provider that supports SAML 2.0 and SCIM 2.0 protocols.
To request SSO activation for your organization, contact Infomaniak support directly by opening a request from support.infomaniak.com. Infomaniak will then provide the necessary information to connect its platform to your organization's identity provider.
Link to this FAQ:
Has this FAQ been helpful?
This guide explains how to contact Infomaniak Support and grant them access to your online products, particularly their content, and provide useful details when submitting a support request.
Contacting Infomaniak Support
Some email addresses, such as support@infomaniak.com, are not intended for receiving direct support requests.
Messages sent to these addresses are not processed by the teams and do not allow for tracking the request.
To ensure proper support, each request must be submitted only through the support center:
- This process generates a ticket, automatically routes the request to the relevant department, and ensures complete follow-up until resolution.
- Once the request is registered, the communication can then continue directly via email with the support team.
Before contacting support, it is also recommended to consult the knowledge base, which contains many guides and answers to frequently asked questions.
Granting Support Access to a Type of Content
Infomaniak Support may ask you to grant temporary access to a portion of your content; this saves time in the diagnosis by avoiding unnecessary back-and-forth communication:
- This access is strictly limited to the context of the analysis and is used only to identify the source of the problem:
- Only Infomaniak employees directly handling your support request.
- Access is only granted from Infomaniak's controlled facilities.
- In accordance with Infomaniak's privacy policy, your data will never be used for other purposes:
- You can revoke this access at any time.
- Otherwise, it will expire automatically after 7 days.
To allow Infomaniak to access a specific part of your services (granting access to one type of content never opens access to others; each authorization is specific and independent):
- Click here to access the access management section in the Infomaniak Manager.
- Click on the toggle switch to allow access to the content of…
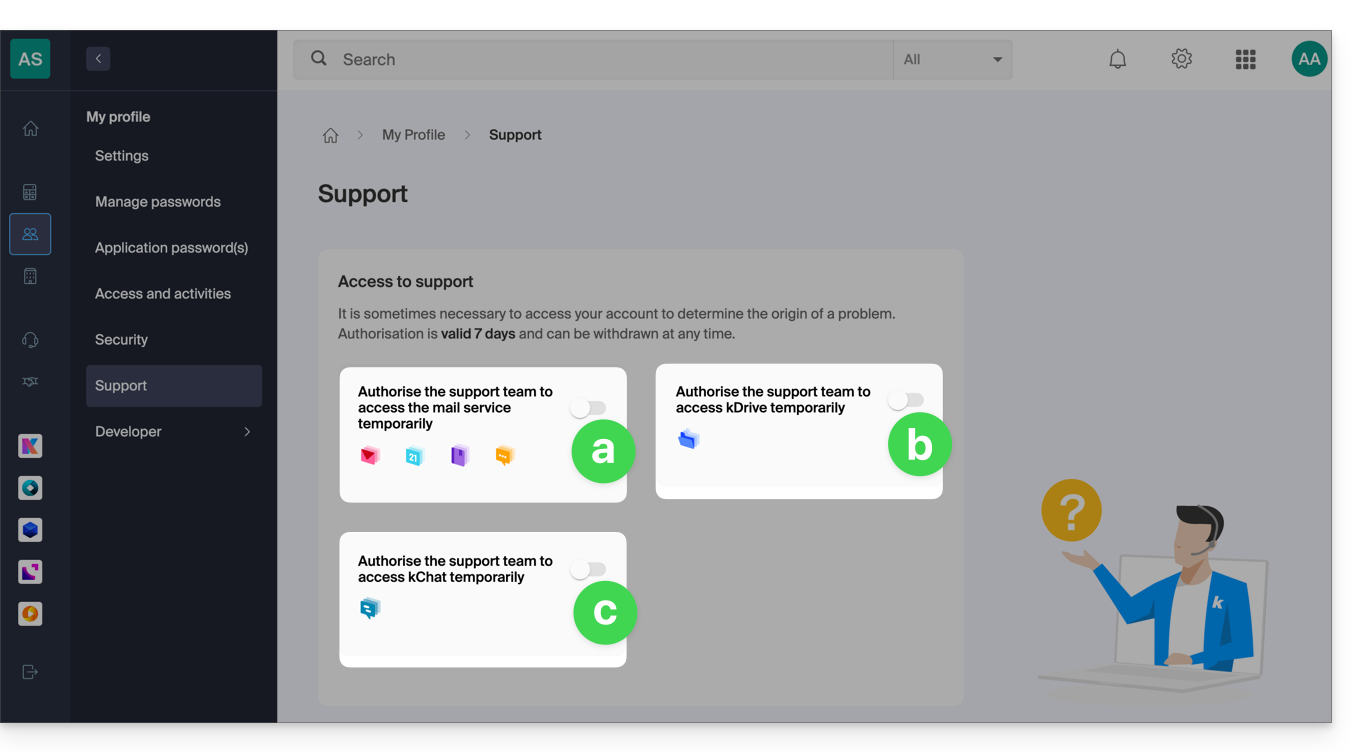
- … email addresses associated with the Mail web app (online service ksuite.infomaniak.com/mail) + contacts & calendars,
- … folders within the existing kDrive accounts in the Organizations to which the current user belongs,
- … conversations within the existing kChat products in the Organizations to which the current user belongs.
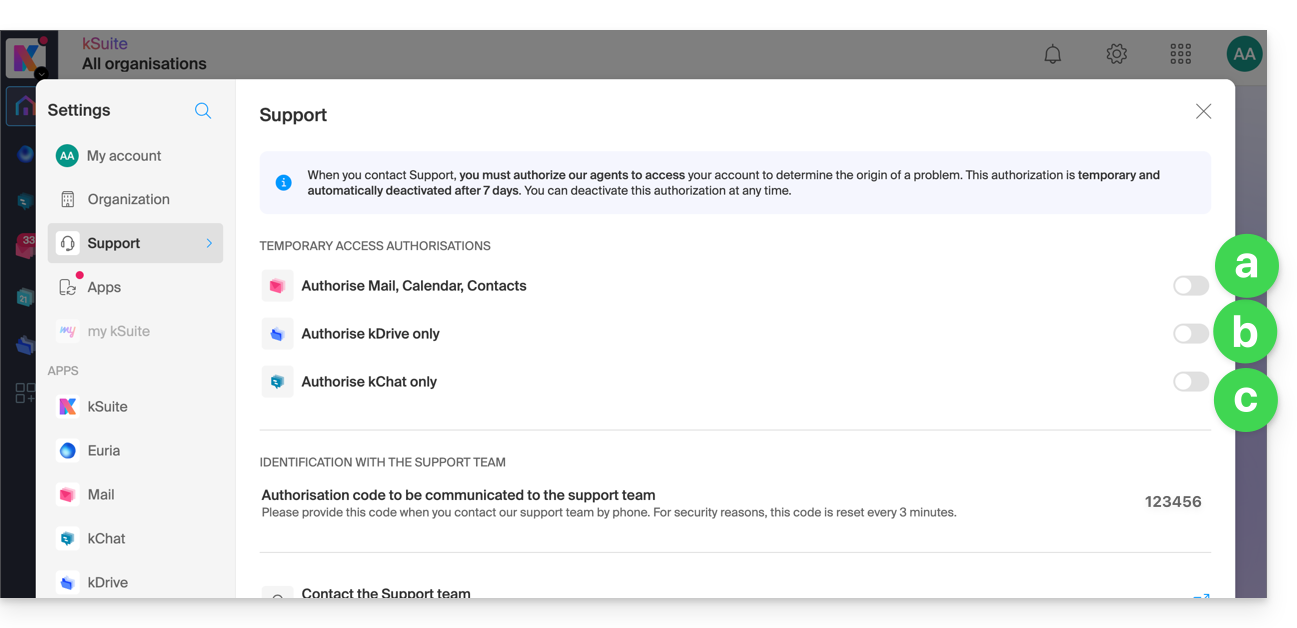
With kSuite, you can also do this by clicking here or proceed as follows:
- Click on the Settings icon in the top right corner of your kSuite window.
- Click on Support in the left-hand menu:
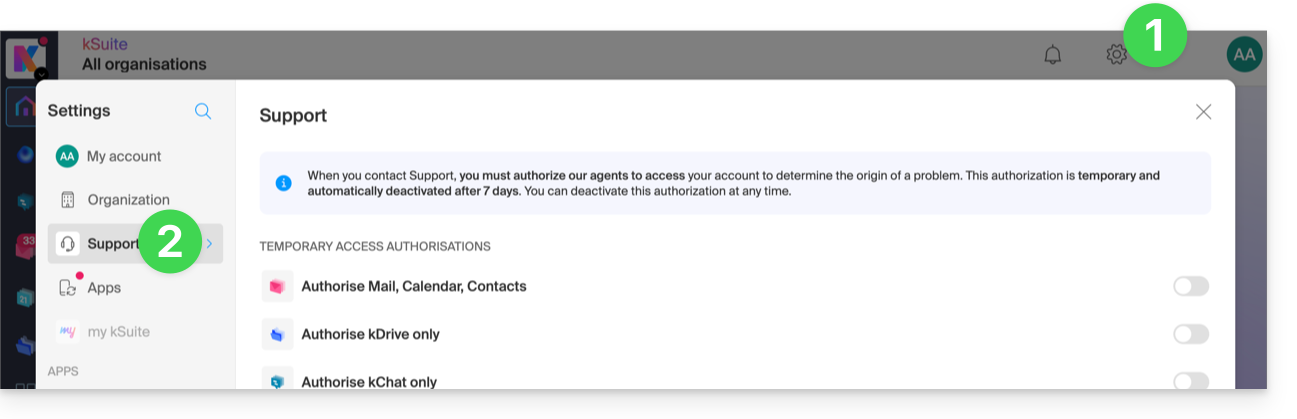
- Click on the toggle switch to allow access to the content of…
You can also share a single specific email very easily.
Taking screenshots
… on Windows
Microsoft offers a software pre-installed that is dedicated to taking screenshots. But to do it manually:
- Display what you want/need to show on the screen.
- Press the PRINTSCREEN key on your keyboard (or
PRTSCR,IMPR. ECRAN, etc.) once. - In Microsoft Word (or similar), go to "Edit" -> "Paste" to place your image on the page.
- "Save" your file.
- Repeat the operation from step 1 to step 5 as many times as the number of screenshots desired.
… on macOS
- Press the "
CMD" + "shift" (the upward-pointing arrow — shift) + "3" keys simultaneously. - Each time you press these keys, an image file is created on your computer's desktop.
… on iOS (iPhone, iPad...)
- Press the "
Power" + "Home" buttons simultaneously (the two physical buttons). - Then, retrieve the screenshots in the "Photos" app on your device.
… on Android (e.g. Samsung, LG or Huawei)
- Simultaneously press the “Volume Down” button (on the side) and the lock button.
- The captured image is automatically saved in a Screenshots folder in your gallery.
Copying the content of an alert window
… on Windows
To copy and paste a Windows “popup” error message as text, simply press the CTRL + C keys on your keyboard to copy the message to the clipboard. You can then paste it (CTRL + V) into the body of the message you are sending.
Accessing the browser's JavaScript console
… on Windows
Chrome, Firefox, and Safari: enter the key combination CTRL + SHIFT + i
Internet Explorer and Edge: press the F12 key
… on macOS
Chrome: enter the key combination ⌘ + ⌥ + J
Safari: enter the key combination ⌘ + ⌥ + C
- Then, click on the icon with a crossed-out circle or similar to reset the log.
- Display the page of your site that is experiencing the issue.
- The console tab displays JavaScript errors and online resources that could not be found.
Link to this FAQ:
Has this FAQ been helpful?
This guide addresses issues that may arise when using Infomaniak applications (such as kChat, kDrive, Infomaniak Authenticator, etc.) or tools (such as config.infomaniak.com, the Infomaniak Manager, etc.) with old / outdated / obsolete hardware (OS, browser, devices, etc.).
Introduction
- For example, it will not be possible to comfortably access Infomaniak services with an iPhone 5s or 6 on iOS 12.
- It is therefore recommended to regularly update browsers and operating systems to benefit from the best possible experience with the Infomaniak infrastructure.
- Also, please refer to this other guide which focuses specifically on browsers and their components.
- And are you using the latest version of the Infomaniak app in question?
Update the OS, browser, etc.
Old systems or browsers can cause slowdowns, errors, or incorrect display. It is therefore preferable to rely on components that are regularly updated, as Infomaniak apps work optimally on updated systems and with recent hardware.
Example for kChat:
| kChat | Minimum requirement |
|---|---|
| Web app (browser) | Chrome 134+, Firefox 128+, Safari 17.4+, Edge 134+ |
| Mobile app (iOS) | iOS 15.1+ (iPhone 6s or later) |
| Mobile app (Android) | Android 7.0+ with updated Chrome |
| Desktop app (macOS) | macOS 12 (Monterey) or later |
| Desktop app (Windows) | Windows 10 or later |
| Desktop app (Linux) | Ubuntu 22.04 LTS or an equivalent maintained distribution |
If you encounter issues with your web browser, try updating it or installing an alternative:
- Google Chrome
https://www.google.com/chrome/
(The site automatically detects the operating system and offers the latest version) - Mozilla Firefox
https://www.mozilla.org/firefox/new/
(Download and update page for Windows, macOS, and Linux) - Microsoft Edge
https://www.microsoft.com/edge
(The link offers automatic updates or downloads depending on the system) - Safari (macOS only)
https://support.apple.com/fr-fr/HT204416
(Safari updates are done through macOS system updates) - Opera
https://www.opera.com/fr/download
(Allows you to download the latest version for your system) - Brave
https://brave.com/download/
(Download page with automatic operating system detection)
Technologies used by Infomaniak
Many web tools developed by Infomaniak use Angular. The need for updated or recent hardware to run the applications is not specific to Angular itself but rather a general requirement for running any modern web application. Here are some reasons why updated hardware is often necessary:
- Angular relies on advanced features of modern browsers, which are often absent or poorly managed in older versions.
- Recent browsers optimize JavaScript execution and graphics rendering, which improves the responsiveness of Angular applications.
- Updated versions fix known vulnerabilities, reducing the risk of compromise.
- Modern browsers are more compliant with the latest HTML, CSS, and JavaScript specifications, ensuring better compatibility.
- Modern APIs (camera, geolocation, notifications, etc.) are only accessible via recent browsers, which are essential for interactive experiences.
Link to this FAQ:
Has this FAQ been helpful?
This guide is intended for users who have chosen Infomaniak, a hosting provider committed to the planet: you will find below the details of the calculation method used to display CO2 on invoices, as well as tips to reduce your own digital footprint.
Preamble
- For Web hosting and Mail services, Infomaniak displays the amount of CO2 emitted annually, data that is based on a rigorous Life Cycle Analysis (LCA) method that adds two key factors:
- Material impact (Full life cycle)
- Thanks to the emission factors of the ResilioDB database, the calculation includes the emissions generated during the manufacturing (BLD), transport (DIS) and end-of-life/recycling (EOL) of each piece of equipment (servers, RAM, disks, etc.).
- Energy impact (Actual consumption)
- The actual electrical consumption of the servers is measured via IPMI probes.
- This energy is then converted into CO2 equivalent according to Infomaniak's specific energy mix, which is very low in carbon (11.77g CO2eq/kWh).
- Material impact (Full life cycle)
- The total impact is then distributed according to the unit of use of the customers (per hosted website or per mailbox).
How can you act at your level?
If the hosting provider optimizes its infrastructures upstream, the end user also plays a key role. Here's how to reduce the footprint of your services.
For Websites
The goal is to minimize the energy consumption of servers and visitors' terminals:
- Technical optimization: Compress images, minify scripts, and use modern formats (WebP).
- Clean design: Limit autoplay videos, ads, and heavy scripts that consume bandwidth.
- Best practices: For WordPress in particular, it is recommended to consult the GreenIT sheets.
For Messaging
Email communication can also be optimized:
- Sobriety: Prefer plain text emails over HTML and limit heavy graphical signatures.
- Attachments: Prefer sending download links (via kDrive or SwissTransfer) to large attachments, or use the compressed PDF format.
- Cleanup: Unsubscribe from unnecessary newsletters and use tracking tools to avoid sending unopened emails.
It is recommended to regularly monitor statistics to improve ecological performance. While waiting for Infomaniak's future integrated tools, it is possible to audit the impact of web pages via GreenFrame.io.
Link to this FAQ:
Has this FAQ been helpful?
This guide concerns potential additional bank charges that may be incurred for your Infomaniak payment or renewal if made using dual-logo (co-branded) cards or cards issued abroad.
How co-branded cards work
The CB (Groupement des Cartes Bancaires) manages the French national interbank network. Infomaniak accepts cards bearing the CB logo for payment of services.
The majority of cards issued in France are so-called co-branded cards: they bear the CB logo (for the national network) and a second international logo, usually Visa or Mastercard.
Risk of additional bank charges
When making online transactions, if your card is a CB/Visa or CB/Mastercard co-branded card and the payment is processed via the international network:
- Your issuing bank may interpret the transaction as an international transaction, even if the amount is in euros (€).
- This interpretation may result in the application of transaction fees or non-euro fees.
These fees result in fixed fees or an additional percentage charged by your bank on the transaction amount.
Infomaniak recommends that you consult your bank's fee schedule to find out about these potential fees.
The term "Carte Bleue"
The term "Carte Bleue" was a former trademark historically used by some banks in the CB network. This trademark has been gradually replaced by the generic term "CB (Cartes Bancaires)", which designates the current French payment network.
Link to this FAQ:
Has this FAQ been helpful?
This guide presents the security model that allows you to assign users to an email address or dedicate a different password to it for each device or software that needs to access it.
Introduction
- When creating an email address, no password is defined.
- If you remain within the Infomaniak ecosystem, i.e., you only use the Infomaniak Mail web app (online service ksuite.infomaniak.com/mail) and/or the Infomaniak Mail mobile app (application for iOS/Android smartphones or tablets), you do not need to manage passwords because everything is configured with a notion of user, i.e., an Infomaniak account (which does have a password):
- An email address can be viewed/used on these Infomaniak Mail apps without a password other than the one that already allows you to access your Infomaniak account, simply after being invited to do so.
- You only need to authorize your own account or invite someone you know to be a user of the email address.
- Otherwise, outside of this ecosystem, you simply create a password (or several) for your devices (Outlook, iPhone, CRM, etc.) according to your needs:
- Each password can be revoked individually, without affecting other users or devices linked to this address.
- It is not possible to display a previously created password; you simply need to create a new one!
Add a user
= Allow a person to view the address on the Infomaniak Mail interfaces
To allow a user (including yourself) to view the email address on Infomaniak:
- From the Mail Service dashboard:
- add the email address to your Infomaniak Mail apps so you can use the address,
- or decide which other external user should have access to the address on their Infomaniak Mail apps,
- or remove access for a user: other accesses to the email address will remain active.
- Any user of an email address on Infomaniak can view the list of other users who have access from the Mail web app directly.
Add a device
= Add a password to allow a person to view the address on a device (Outlook, iPhone, CRM, etc.)
To allow a user (including yourself) to view the email address on a connected device:
- From the Mail Service dashboard:
- create passwords specific to each device (Outlook, iPhone, CRM, etc.) as needed,
- or revoke the password in question: other accesses to the email address will remain active.
- You can manage connected devices from the Mail web app directly.
Link to this FAQ:
Has this FAQ been helpful?
This guide explains how to manually pay your Infomaniak invoices and what payment methods are accepted. Please refer to this other guide if you wish to automatically renew certain products.
Introduction
- If invoices are not paid within the specified timeframe, the services in question will be blocked and then terminated.
- In case of a problem, it is therefore important to react quickly.
- To be notified by email of a product's due date, check the billing message settings in your Manager.
Pay or renew a product
To renew a product before or on its due date:
- Click here to access the payment management section in the Infomaniak Manager.
- Access requires authentication with a user who has sufficient rights.
- If necessary, click on the date filter (next 2 months) to Show All.
- Select the products to pay:
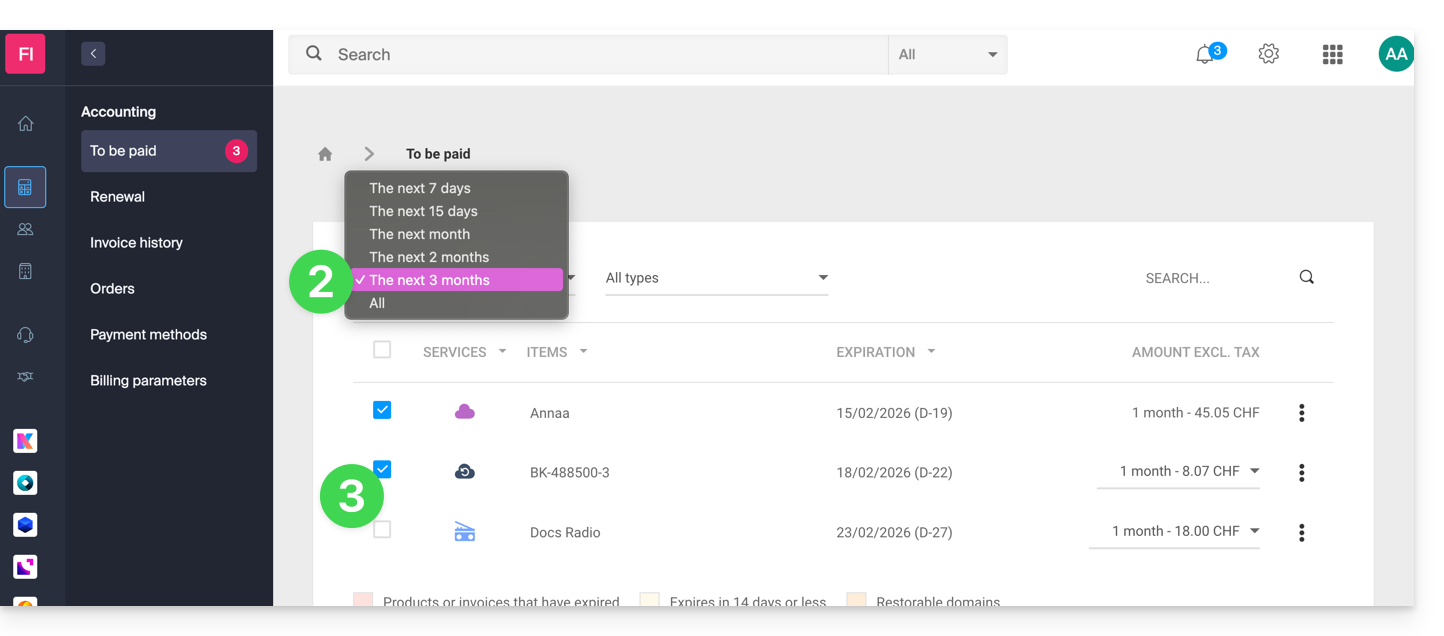
- Click on the Pay my selection button (or on the button to its left to obtain a Pro Forma invoice before payment):
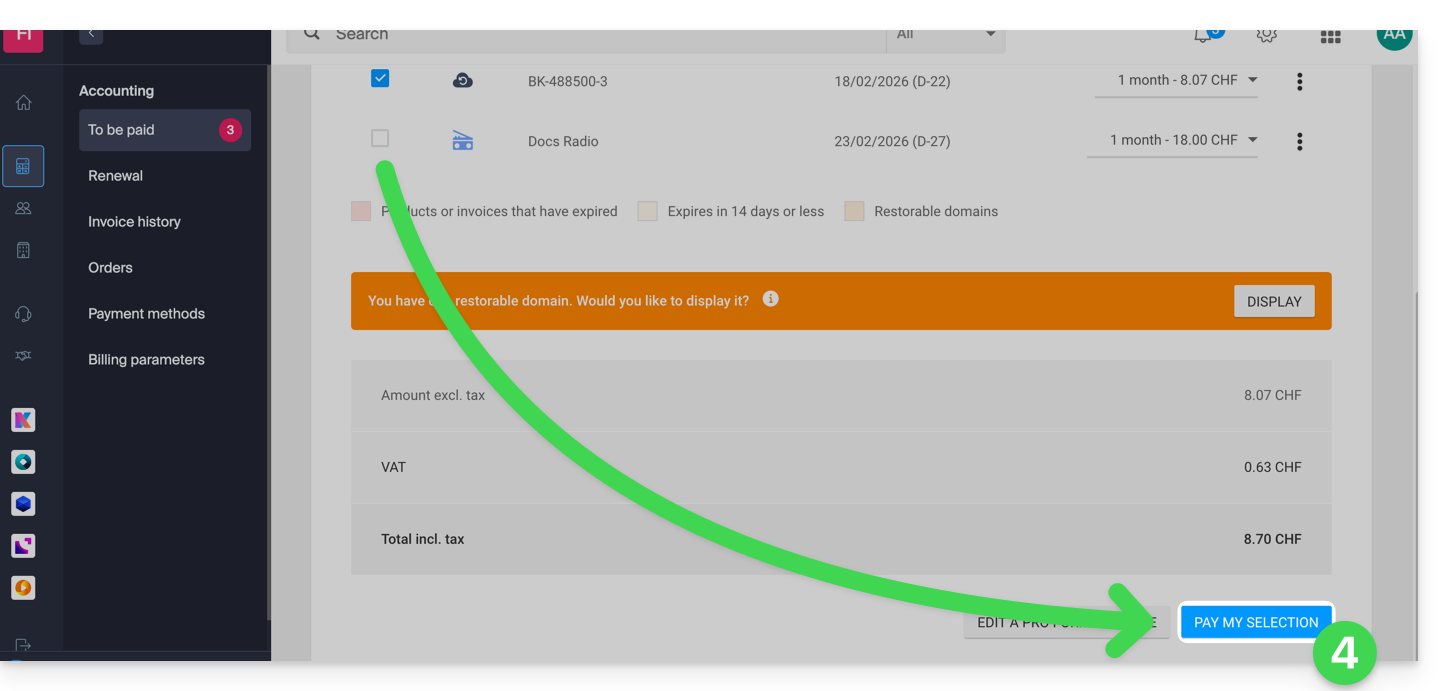
- Enable or ignore any options offered.
- Choose a payment method and complete the process.
Pay an outstanding order
To pay for your order:
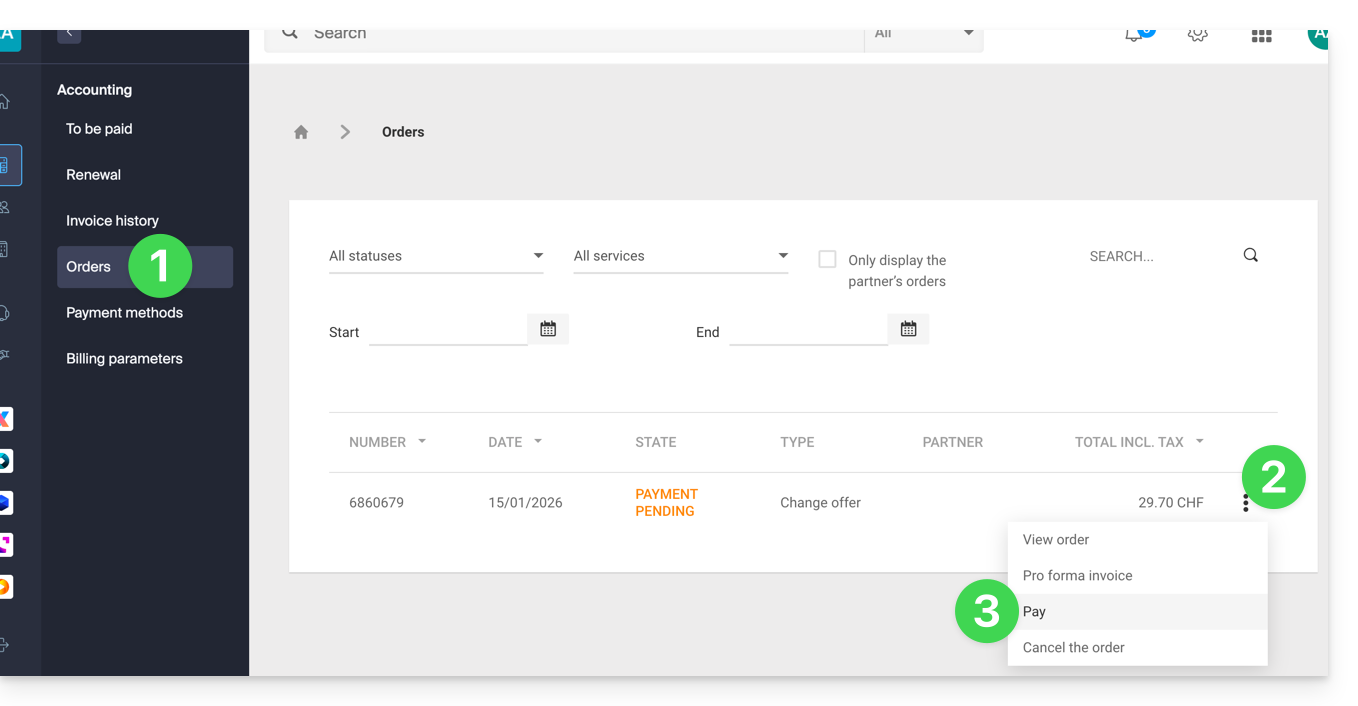
- Click here to access the order management section in the Infomaniak Manager.
- Click on the action menu ⋮ located to the right of the order in question.
- Choose Pay:
- Choose a payment method and complete the process.
Accepted payment methods
To pay for a new order, a renewal, or a plan change, you can use:
- credit card Visa, MasterCard, CB Carte Bleue
- PostFinance card (if the currency is in CHF)
- IBAN bank transfer (any bank charges will be your responsibility)
- PayPal
- Twint: clike credit cards, when making a payment in the Manager or the Shop, the Twint profile will be saved in your account as a payment method that can then be used to make automatic renewals or payments without having to scan a QR code again
- the prepaid account (it is possible to use the available balance and pay the remainder of an invoice by another payment method)
To credit a prepaid account, you can use:
- credit card Visa, MasterCard, CB Carte Bleue
- PostFinance card (if the currency is CHF)
- IBAN bank transfer (any bank charges are your responsibility)
The deposit limits for a prepaid account are from 0.1 CHF/EUR to 9999 CHF/EUR.
Generate or print a PDF invoice
Refer to this other guide if you are looking for information about Infomaniak invoices.
Link to this FAQ:
Has this FAQ been helpful?
This guide explains how to add a user to an Organization within the Infomaniak Manager. This will allow you to grant the user access to specific Infomaniak products, as needed.
Introduction
- Since you opened your account with Infomaniak, you have been a member of at least one Organization.
- If you were the only user and it wasn't an invitation, an Organization was created in your name, and you automatically became its legal representative.
- Otherwise, you belong to the Organization that invited you (to join its kSuite, manage a product, etc.).
- You can define whether a user…
- … is a member of your Organization and whether they should be:
- Legal Representative
- Administrator
- Collaborator
- … is external to your Organization (limited rights):
- External users are not included in calendar and address book sharing across the entire Organization.
- … is a member of your Organization and whether they should be:
Invite the new user
Prerequisites
- Switch to the desired Organization beforehand if you cannot find the expected list of users.
- Be an Administrator or Legal Representative within the Organization.
- Familiarize yourself with the various permissions (e.g., access rights to products) and administrative contact preferences of a user within an Organization.
To add, and if necessary, create the new user for your Organization:
- Click here to access user management in the Infomaniak Manager (need help?).
- Click the Add User button:
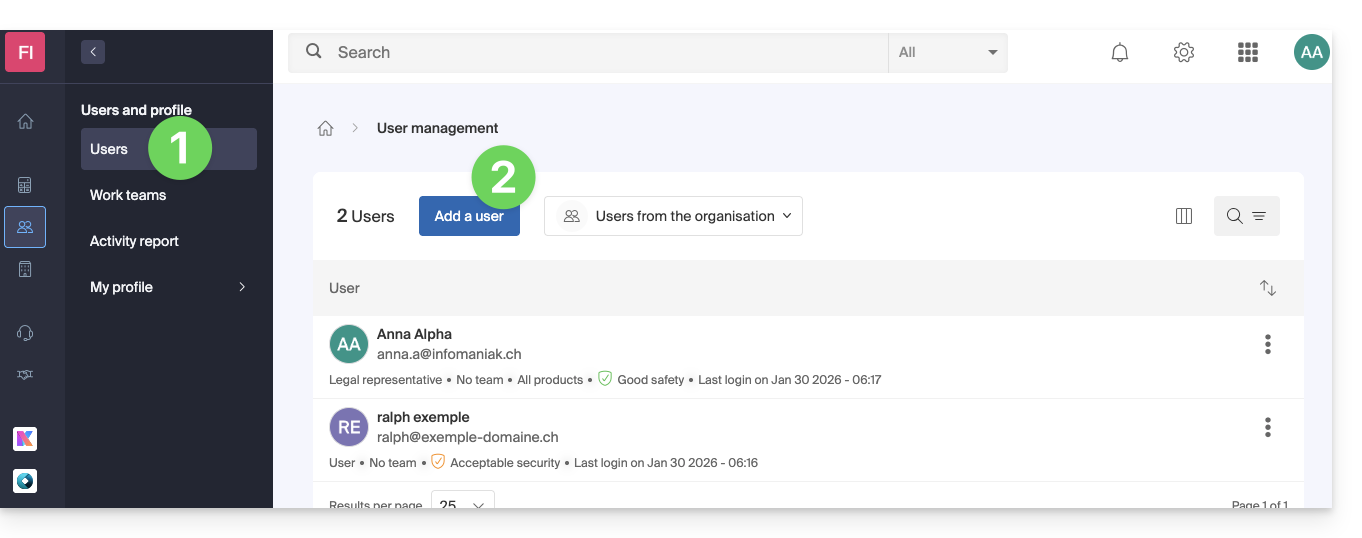
- Follow the wizard to complete the process:
- If the added user does not yet have an Infomaniak user account, they will be prompted to create one.
- If the added user already has an Infomaniak account, they will be prompted and will then be able to switch from their original Organization to the new one.
Link to this FAQ:
Has this FAQ been helpful?
This guide explains how to create a request for proposal as an Infomaniak Customer in need of support, how to delete the request if you have found a solution, and how an Infomaniak Partner can respond to this request.
Creating a Request for Proposal
Here is the process that takes place when you want to submit a request for proposal:
- Click here to access the request for proposal submission page.
- This is a free service that allows you to address your needs to all Infomaniak Partners who wish to receive this type of request.
- Once your request for proposal is sent, each relevant Partner receives a message with an excerpt from the request.
- They are then offered the opportunity to view your complete request for proposal on a dedicated interface within their Partner account on the Infomaniak Manager.
- If the request is still valid (see below), the Partner will view your request and discover your contact details.
- They can then make a proposal tailored to your needs, and you decide how to proceed:
- Collaborate with the Partner (e.g., become their Customer within Infomaniak), and in this case, you can delete the request for proposal (see below).
- Wait to receive other proposals over the next few days.
Deleting the Current Request for Proposal
When you submit a request for proposal, you will automatically receive an email at your contact address:
- This email contains a link to cancel your request for proposal.
- Please note that the effect is immediate.
- It will no longer be visible on the interface available to Infomaniak Partners.
Link to this FAQ:
Has this FAQ been helpful?
This guide details the various roles, rights, permissions, and privileges that users can obtain within an Infomaniak Organization.
Roles and administrative contact preferences
You will be able to define the permissions (access rights to products for example) as well as the administrative contact preferences when adding a user or later.
Define the roles of a new user
When you add a new user to an Organization, you must define their role and set their preferences at the administrative level: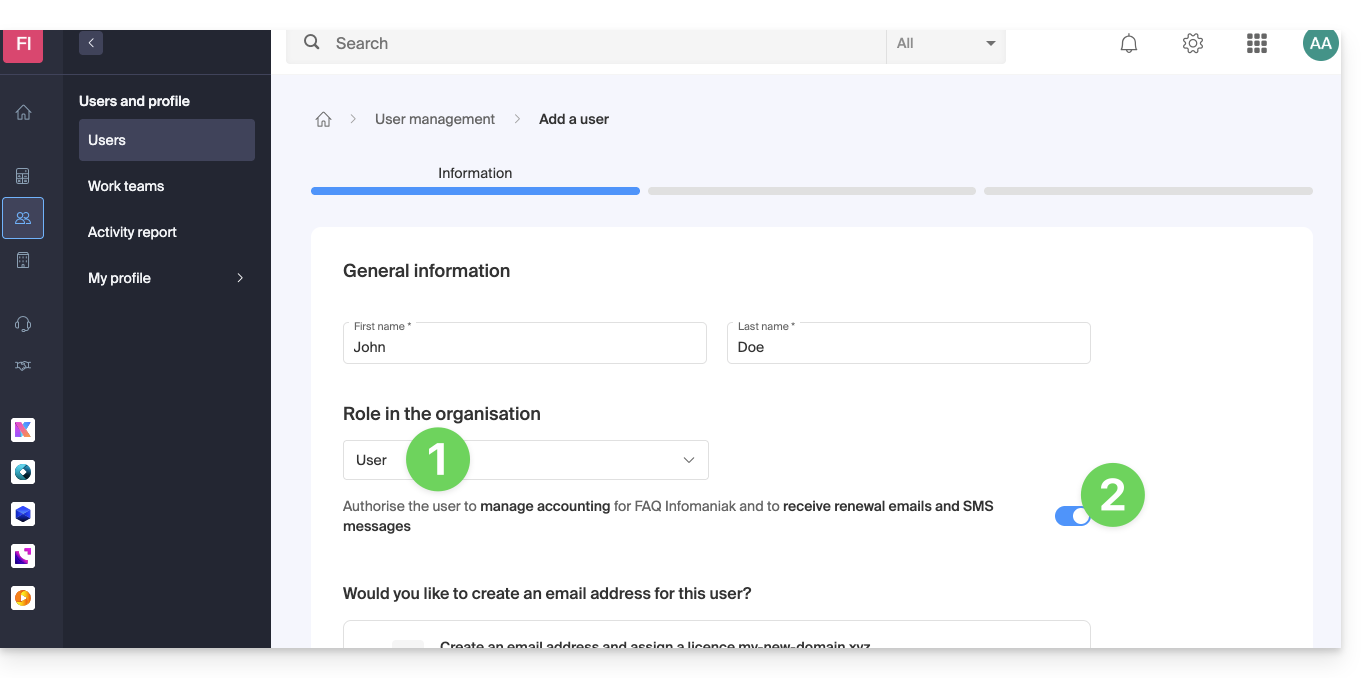
1. Possible roles within the Organization
- Legal representative (all rights + legal responsibility (if you plan to replace your legal role))
- Legal responsibility of the organization
- Can manage all products and users
- Can manage accounting and orders for new products
- Can manage all clients
- Administrator (all rights)
- Can manage all products and users
- Can manage accounting and orders for new products
- Can manage all clients
- User (limited rights, collaborator)
- Can manage the products you authorize
- Can manage accounting if you authorize it
- Can manage the clients you authorize
2. Administrative authorizations
Decide if you want to “allow the receipt (email/SMS) of billing reminders” therefore all communications such as for example:
- New invoice
- Payment made to the account
- Receipt of a payment
- Order canceled
- Automatic renewal planned
- Renewal completed
- PayPal transfer in your favor
- etc.
and if the “User” role should also be able to manage accounting.
Link to this FAQ:
Has this FAQ been helpful?
This guide explains how to modify the postal and nominative coordinates related to the Organization to which you belong.
Preamble
- The postal address mentioned determines the currency (CHF / EUR) used for the next invoices, but it is possible to add billing addresses.
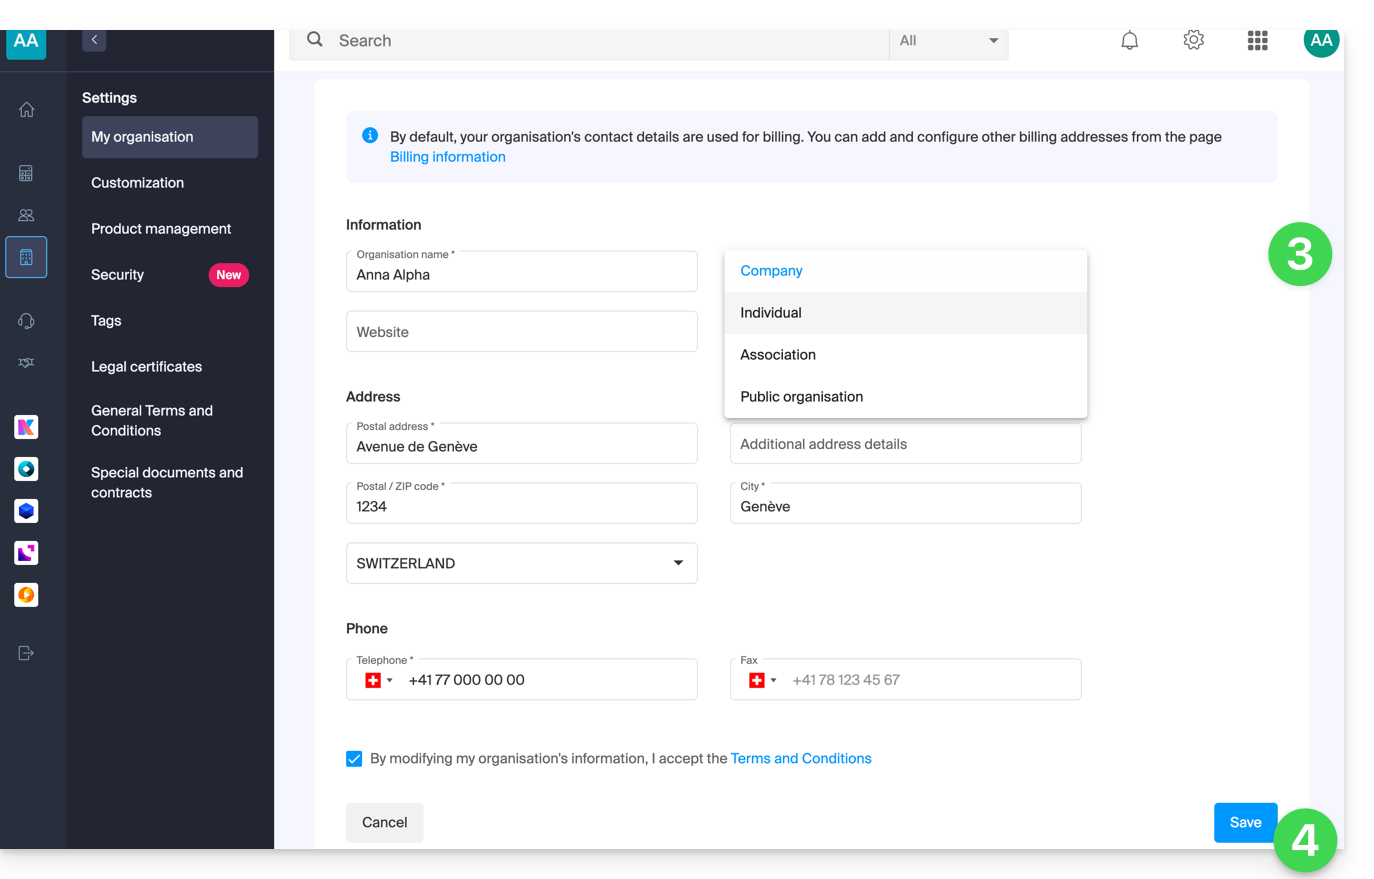
- You can modify, among other things:
- the name
- the postal address
- the contact phone number
- the type of your organization (individual, association, company...)
- The logo
- A summary email is then sent.
- To rather manage the coordinates of your Infomaniak account, refer to this other guide.
Modify the Organization details
Prerequisites
- Be Administrator or Legal Representative within the Organization (a potential collaborator who also has access to your Organization will not be able to modify these coordinates from their restricted account).
- Switch to the desired Organization beforehand if necessary.
To modify the coordinates of this Organization at any time:
- Click here to access the management of your Organization.
- Click on the Edit button (if it is not present, check the prerequisites above):

- Modify the desired information.
- Click on the Save button to save your new information:
In case of problem
If you do not get any menu like in point 2 above, check the prerequisites.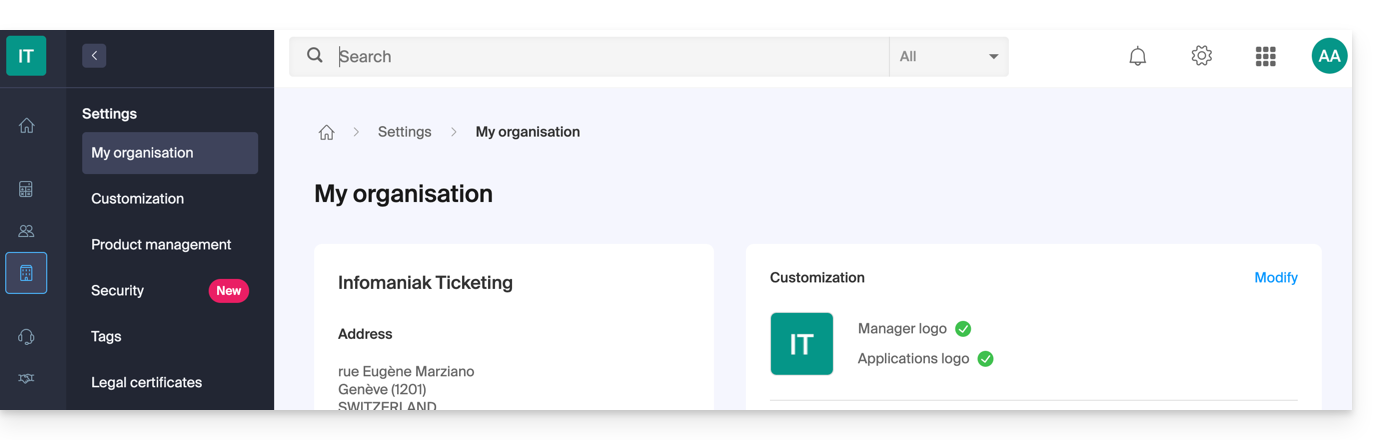
A my kSuite account does not have this possibility either: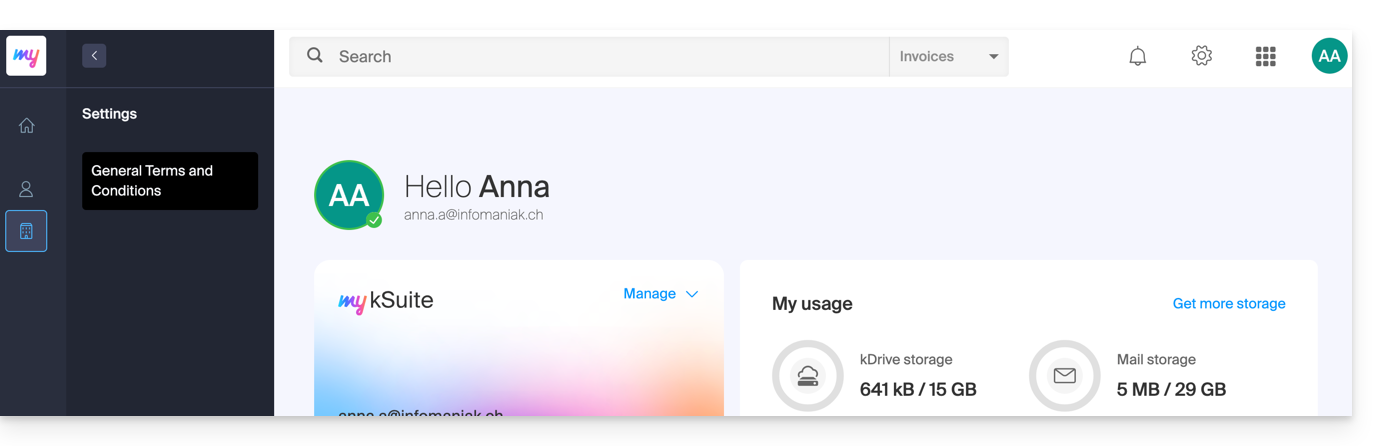
Link to this FAQ:
Has this FAQ been helpful?
This guide explains how to obtain information about the activities performed within your Organization in the Manager.
The same type of logs, but concerning only the activity of your Infomaniak account, is available in your Manager: refer to this other guide.
Prerequisites
- Switch to the desired Organization beforehand.
- Be Administrator or Legal Representative within the Organization.
Obtain the Organization's activity log
To view an activity log of the actions performed on the Infomaniak Manager within the Organization to which you are affiliated:
- Click here to access the Organization's logs in the Infomaniak Manager.
- Review the information.
- Search and filter options for logs are available: term, product, or type of action:
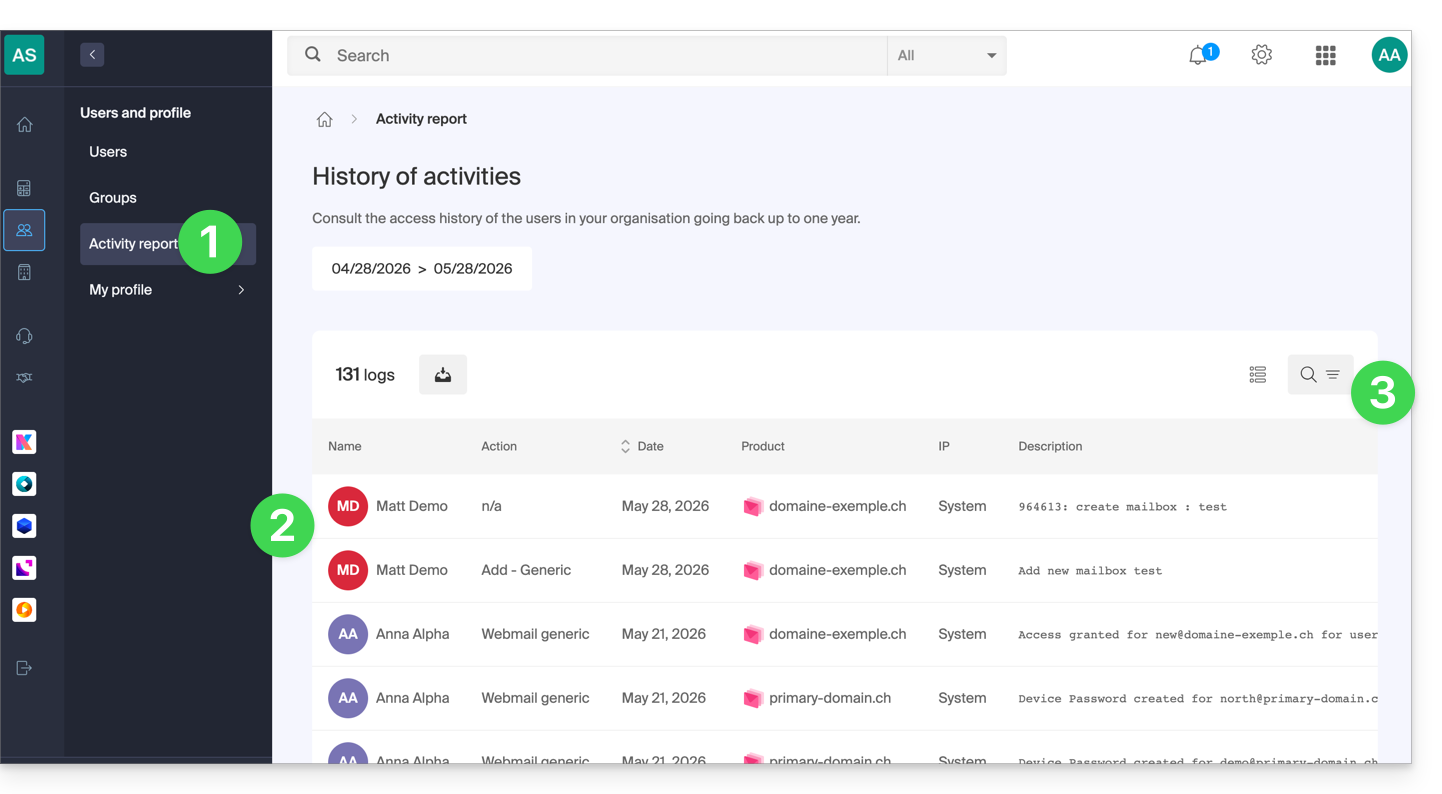
Here are the types of actions that can be listed in this table:
- Login attempt
- Successful login
- Successful cookie login
- Automatic login enabled
- Automatic login disabled
- Password recovery request
- Password recovered
- Password changed
- Username changed
- Email recovery request
- Email recovered
- Email address changed
- Owner role assigned
- Revoke owner role
- Assign administrator role
- Revoke administrator role
- Add a server
- Modify a server
- Delete a server
- Server client action
- Create a repository
- Repository successfully received
- Manage an order
- Generate invoice
- Activate billing
- Deactivate billing
- Transfer funds
- Add an item
- Modify an item
- Delete an item
- Lock an item
- Unlock an item
- Record video stream
- Use webmail
- Automatic email sent
- Send an SMS
- Generic system error
Link to this FAQ:
Has this FAQ been helpful?
This guide explains how to customize the display of the Organization you are in within the Manager Infomaniak.
Preamble
- You can, for example, add a logo to the name of the Organization and completely replace the name display with a small banner.
- For advanced customization of URLs and certain interfaces, including login pages, discover Custom Brand.
Access the customization page
Prerequisites
- Be Administrator or Legal Representative within the Organization.
- Switch to the desired Organization first if necessary.
To customize the Manager interface:
- Click here to access the customization of the Organization on the Infomaniak Manager.
- The left button Customize allows you to edit the part visible at the top left of the Manager:
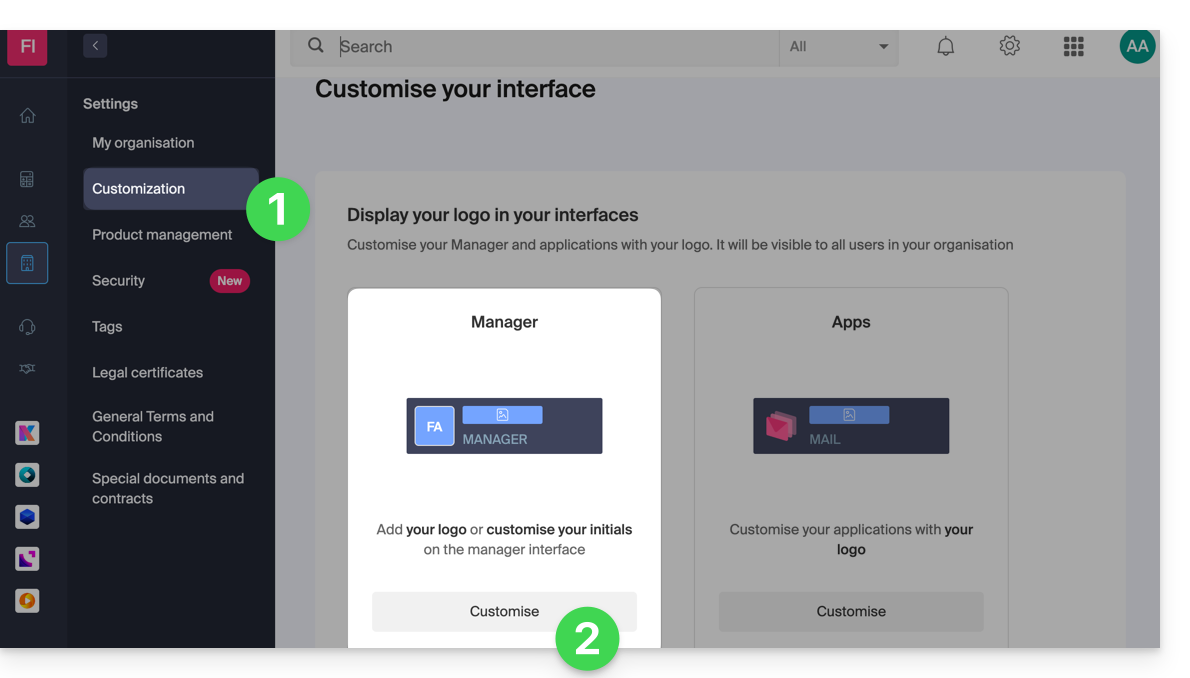
- Choose a square logo alone (in this case, no rectangular logo).
- Choose to put initials in the square (in this case, it is possible to have an additional rectangular logo or no rectangular logo).
- The right button Customize allows you to add a rectangular logo (only) to applications such as kDrive and Mail:
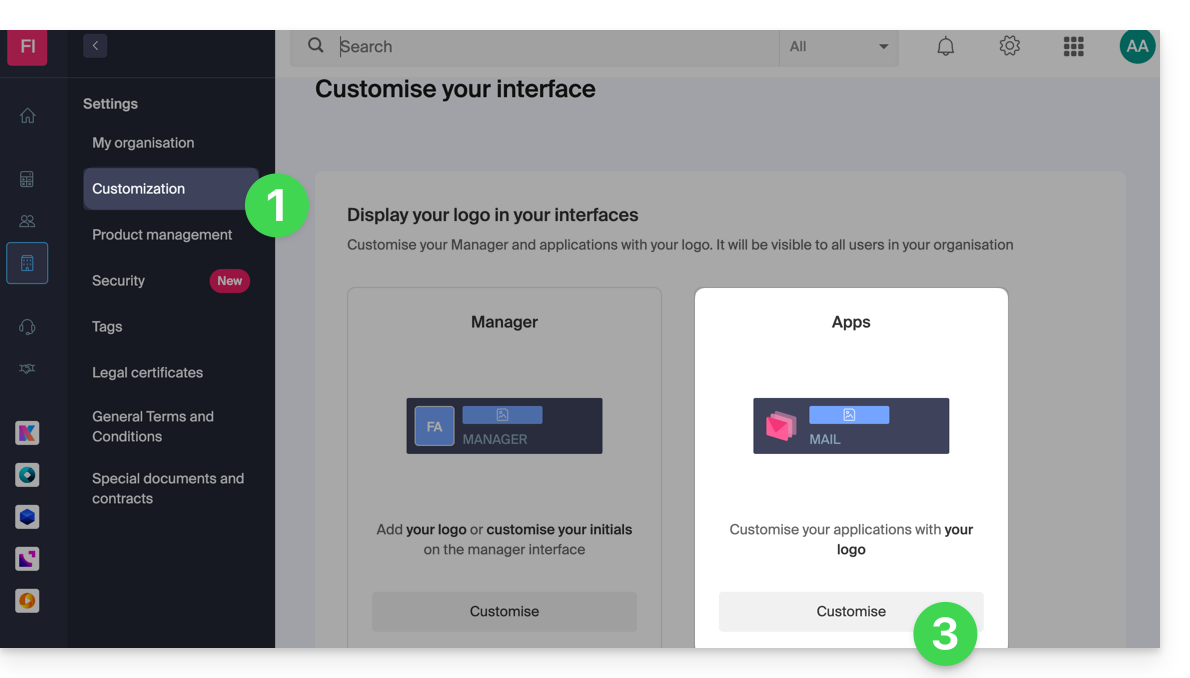
- Note that the rectangular logo will also be taken into account on the Manager side (it is not possible to have a different rectangular logo between these different services).
- If no rectangular logo is configured on the Manager, it simply will not be displayed.
Link to this FAQ:
Has this FAQ been helpful?