
Knowledge base
1000 FAQs, 500 tutorials and explanatory videos. Here, there are only solutions!
This guide helps you subscribe to the Support Premium Infomaniak.
Discover Premium Support
To manage your Premium Support offer:
- Click here to access the Support management of your Organization on the Manager Infomaniak.
- Click on the button to start the subscription:

This guide explains how to add a user to an Organization present in the Manager Infomaniak. You can thus authorize this user to access certain of your Infomaniak products according to your needs.
Preamble
- Since you opened your account with Infomaniak, you are part of at least one Organization.
- If you were alone and it was not an invitation, an Organization was created in your name and you automatically become the legal responsible.
- Otherwise, you belong to the Organization that invited you (to join its kSuite, to manage a product, etc.).
- You can define whether a user…
- … is part of your Organization and should become:
- Legal representative
- Administrator
- Collaborator
- … is external to your Organization (limited rights):
- External users are not included in the sharing of calendars and address books with the entire Organization.
- … is part of your Organization and should become:
Invite the new user
Prerequisites
- Be Administrator or Legal Representative within the Organization.
- Note, it is only possible to assign the role of legal representative if you yourself have this role within the Organisation.
- Familiarize yourself with the various permissions (e.g., access rights to products) and administrative contact preferences for a user within an Organization.
To add, and if necessary, create the new user of your Organization:
- Click here to access user management on the Infomaniak Manager (need help?).
- Click on the Add a user button:

- Follow the assistant to complete the procedure:
- If the added user does not yet have an Infomaniak user account, they will be invited to create one.
- If the added user already has an Infomaniak account, they will be invited and then they will be able to switch from their original Organization to the new one.
This guide explains why you might receive an automatic security email regarding your Infomaniak user account.
Preamble
- Warning: fake messages are circulating and imitating the Infomaniak security email.
- If you are unsure about the authenticity of the warning, access the Infomaniak Manager and check recent activity instead of clicking on any potentially malicious link that might be present in the fake message.
Automatic prevention messages
Connection from a new location
A security email is automatically sent when a new connection to your account occurs from a new location:
This can notably happen if you are using your browser's private browsing mode or if you are accessing your account from a new computer.
If you receive this email immediately after logging into your Infomaniak account yourself, you can safely ignore the connection warning!
Login attempt (wrong password)
A security email is automatically sent when someone enters an incorrect password after entering the email address to log in to the Manager:
See recent activities on the Manager
You can find the recent activities of the platform and configure them in the user account settings:
If you notice actions on your Infomaniak account that you do not think you performed, and/or in case of suspected intrusion:
- Familiarize yourself with this other guide to quickly secure your tools.
- Enable two-factor authentication on your account to enhance its protection and ensure that only you receive a unique code authorizing the connection.
- Change the password of the Manager.
- Change the password of the email addresses linked to Mail Infomaniak.
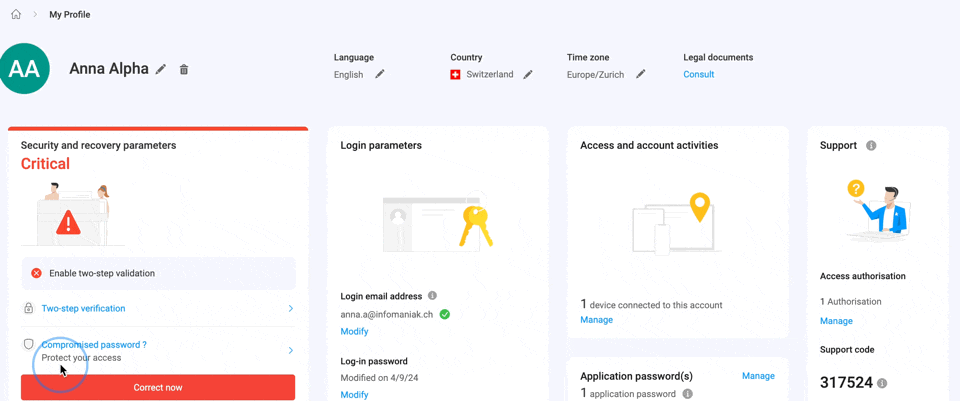
This guide explains how to modify certain language settings of the Manager, the management interface and dashboard for your Infomaniak products and Mail Infomaniak (+ Calendar, Contacts, etc.).
Change the language of your account
To do this:
- Click here (or on the badge with your initials/avatar at the top right of the Infomaniak Manager) to "Manage my profile":

- Click on the pencil icon ✎ (in the Language section):

- Change the language and then click on Save.
Change your account's regional settings
To do this:
- Click here (or on the badge with your initials/avatar at the top right of the Infomaniak Manager) to “Manage my profile”.
- Click on the pencil icon ✎ (in the Country or Time Zone section - see the image above).
- Change the settings and then click on Save.
This guide explains how to change your mobile phone number (used in case you forget the password to access your Manager).
Preamble
- Refer to this other guide if you wish to modify the email used as the login identifier for the platform or this other guide to modify your personal details.
Change the mobile phone number
To change the mobile phone number associated with your user account:
- Click here to access the security information management on the Infomaniak Manager.
- Click on Edit in the Recovery Phone box:

- Enter the country code, the new mobile phone number, and your Manager login password if necessary, then click the Next button to save:

This guide explains how to enable two-step verification, also known as two-factor authentication (2FA) or multi-factor authentication, to secure your connection to your Manager Infomaniak.
Preamble
- This two-step verification protects your account and personal data with your chosen password and a second method of identity verification, such as a code obtained on your mobile device.
- If a malicious person were to crack or steal your password, they would still need a validation code that only the legitimate user can obtain on their mobile device.
- Refer to this other guide if you are an administrator of an Organization and wish to enforce 2FA on all users who have not yet activated it.
Enable two-step verification
To increase the security level of your Infomaniak account:
- Click here to access the management of two-step verification on the Infomaniak Manager.
- Display and choose the authentication method from:
- The app kAuth for iOS / Android devices to simply tap a push notification YES / NO to authorize or deny the connection
- Any OTP application to obtain a unique connection code at a given time
- YubiKey (from Yubico)
- SMS reception (only for countries CH / FR / BE / DE) to obtain a unique connection code at a given time
Follow the on-screen instructions to complete the procedure.
Keep the backup codes safe.
Be mindful of existing synchronizations
Once strong authentication is activated, to access certain tools (such as synchronization tools) it is necessary to create application passwords.
There is no need to call Infomaniak as they do not have any of your codes & passwords in their possession. For any help request regarding 2FA, refer to this other guide.
Authenticate on every browser opening
To request not to save cookies when closing browser windows, and thus request authentication each time you access the Infomaniak Manager when you restart the browser…
... on Chrome
Specify in Google Chrome settings (chrome://settings/content/siteData to paste into the address bar or refer to the official documentation) the address [*.]infomaniak.com:
This guide explains how suspending the administrative management of a product to prevent any user of the Organization from using it within the Organization. Manager Infomaniak. On request, it is also possible to blocking a user of your Organizationwithout, however, deleting it.
Preamble
- By blocking the management of a product:
- Only the directors and the legal guardian will be able to unblock it.
- Users with limited rights (collaborators and customers) who have access to this product will no longer be able to manage it.
- An e-mail is sent to the users of the Organization.
Blocking a product
Prerequisites
- Being an administrator or legal guardian (users with limited rights (collaborators and customers) who have access to this product will not be able to do so).
To block or unblock certain products to the entire organization:
- Click here in order to access product management on the Manager Infomaniak (Need help?).
- Access the service you want to block.
- Click on Manage on the dashboard of the product concerned.
- Click on Block product management:

Suspend e-mails
One Mail Service may not be blocked as indicated above, but it can be maintained.
Prerequisites
- Being an administrator or legal guardian (users with limited rights (collaborators and customers) who have access to this product will not be able to do so).
In order to suspend email addresses:
- Click here in order to access the management of your product on the Manager Infomaniak (Need help?).
- Click on Manage.
- Click on Enable maintenance.
- Confirm by clicking on the red button the suspension of the use of addresses (the reception is not interrupted but the consultation is impossible):

Blocking a user of the Organization
To quickly block a Organization's user, in the event of a security incident, contact Infomaniak support by authenticating (by support code e.g.) and justifying your request.
Thus, key critical services such as the Manager, the kDrive Web app and the Web Mail app will be inaccessible. Depending on the situation also take note of these links in order to block other services such as e-mail (IMAP/SMTP) or Web services.
In order not to block the user yourself but to give him a procedure to follow to secure his account, take note of this other guide.
This guide explains how to renew or restore a domain name registered with Infomaniak.
Preamble
- You are automatically notified by email (at the address you mentioned) when one of your domain names is about to expire.
- If this domain name is not renewed before its expiration date, it enters a redemption period during which it can still be recovered/restored.
- The restoration fees and the duration of the redemption period are variable depending on the extension concerned.
- Once the redemption period has elapsed, the domain name is free and can be reserved again by anyone.
- If your domain is important for your activities, Renewal Warranty ensures that you will never lose it: Infomaniak will do everything in its power to ensure that you keep it even if you do not renew it on time.
Renew a domain name before expiration
Renewing one or several domain names follows the exact same process as renewing any other Infomaniak service. Refer to this other guide if you are looking for information on how to renew the relevant product.
Restore a domain name after expiration
To restore a domain during its redemption period:
- Click here to access the management of your product on the Infomaniak Manager (need help?).
- An expired domain is marked as such:

- Click directly on the name assigned to the product concerned:

- Click on the Restore button:

- Follow the restoration steps to the end.
Troubleshoot an issue
What should you do if the domain does not appear to be visible in your account?
- Check that you are logged in with the correct user account.
- Check the DOMAIN section of the Manager and not in a section for billed or renewable products.
- Repurchase the domain name if it has not been reserved yet.
This guide explains how to regain access to Infomaniak tools (manager.infomaniak.com and mail.infomaniak.com) in case of forgotten password or login identifier.
Preamble
- To log in within an Organization that manages one or more Infomaniak products, go to https://manager.infomaniak.com/ and enter the following information:
- A login email address (identifier).
- The password chosen during your registration.
- A additional code if 2FA (two-factor authentication) is active.
- If you can log in to the platform but need a password for one of your email addresses, refer to this other guide.
You have forgotten...
... the password for the user account
If you have forgotten this password, follow the reset procedure:
- Click here to reset your password.
- Enter the email address associated with your Infomaniak account
- Choose the desired recovery option or follow the identity verification procedure by clicking on “You have no access to any option”.
... the login email address for the user account
When you signed up, you had to provide a phone number; it is possible to recover the login email address using your phone number:
- Click here to retrieve your login email address.
- Enter your mobile number.
- Enter (if necessary) your recovery email address.
Two scenarios are then possible:
- The system manages to identify your account: then choose how to receive your login identifier.
- Otherwise: follow the on-screen assistant to manually verify your identity or via kCheck:

And if the email address no longer exists…
If you have an Infomaniak account where the login ID is in the form of toto123@yahoo.com, there is no issue if the email address toto123@yahoo.com is deleted or no longer valid. You just need to log in one last time to the Infomaniak Manager with this ID toto123@yahoo.com and familiarize yourself with this other guide to change your login email address.
However, if the email address used as the identifier is hosted by Infomaniak (e.g., anna789@assoziation.ch) and an administrator deletes the email address in question or cancels the Mail Service “assoziation.ch”, the situation is different: you automatically receive an email at the secondary address and an SMS on the mobile phone number specified in your user account:

The connection using your old "email address / password" combination will no longer work. You must follow the SMS instructions:
- Click here to access the login page.
- Enter the username specified in the SMS (usually the initials of your account and a series of numbers).
- Enter the usual password (it hasn't changed).
- Enter the requested new information.
- You will be logged back into your account.
The following animation shows this procedure called Infomaniak-Recovery" (or “connection address being changed” for kSuite users):
- The connection is impossible with the old credentials…
- The mandatory connection using the information from the SMS…
- And the update of the information for reconnection:

This guide explains how to require users of your Organization to activate two-factor authentication (2FA), then verify that it remains activated afterwards.
Introduction
- Each Infomaniak user has the ability to activate two-step verification for access to their account, which significantly increases the security of all the Organization's services...
- A legal representative can require this activation, otherwise access to the Manager and Web apps will no longer be possible for the user.
- Access to desktop apps (desktop application on macOS / Windows / Linux) and mobile apps (application for smartphone or iOS / Android tablet) will always be possible without 2FA.
- It is recommended to inform users of your Organization in advance, to allow them to continue using the services.
- If an external user does not wish to perform the operation requested by an Organization administrator, they can choose to leave the Organization instead of activating it.
Identifying users without 2FA
You can easily identify people who have not yet activated this security feature on their account:
- Click here to access your Organization's user management.
- This red symbol means that 2FA is not activated:

- You can also filter long lists with this specific criterion to display only users who have not yet activated 2FA:

- To easily alert a user about the security of their account, click on the action menu ⋮ located to its right.
- Click on Send a security alert to send an automatic email to the user informing them of their different settings:

Require activation of 2FA
Prerequisites
- You must be an Administrator or Legal representative within the Organization.
To access the settings:
- Click here to access the Organization's security management on the Infomaniak Manager (need help?).
- Click on the toggle switch button to activate an additional login verification requirement for all users of the Organization:

- Confirm the activation of the feature in the window that opens.
- Once the feature is activated, Organization users who have not yet activated 2FA receive a message (from the next action on their account) prompting them to configure an additional authentication method from those offered and preventing them from taking any other action before this one:
