Knowledge base
1000 FAQs, 500 tutorials and instructional videos. Here, there are only solutions!
This guide explains how to customize the limits of a website hosted on a shared Web Hosting plan or a Cloud Server.
Increase or adjust website limits
To access website management:
- Click here to access the hosting & website management section in your Infomaniak Manager (❓: help).
- Click on the name of the website in question.
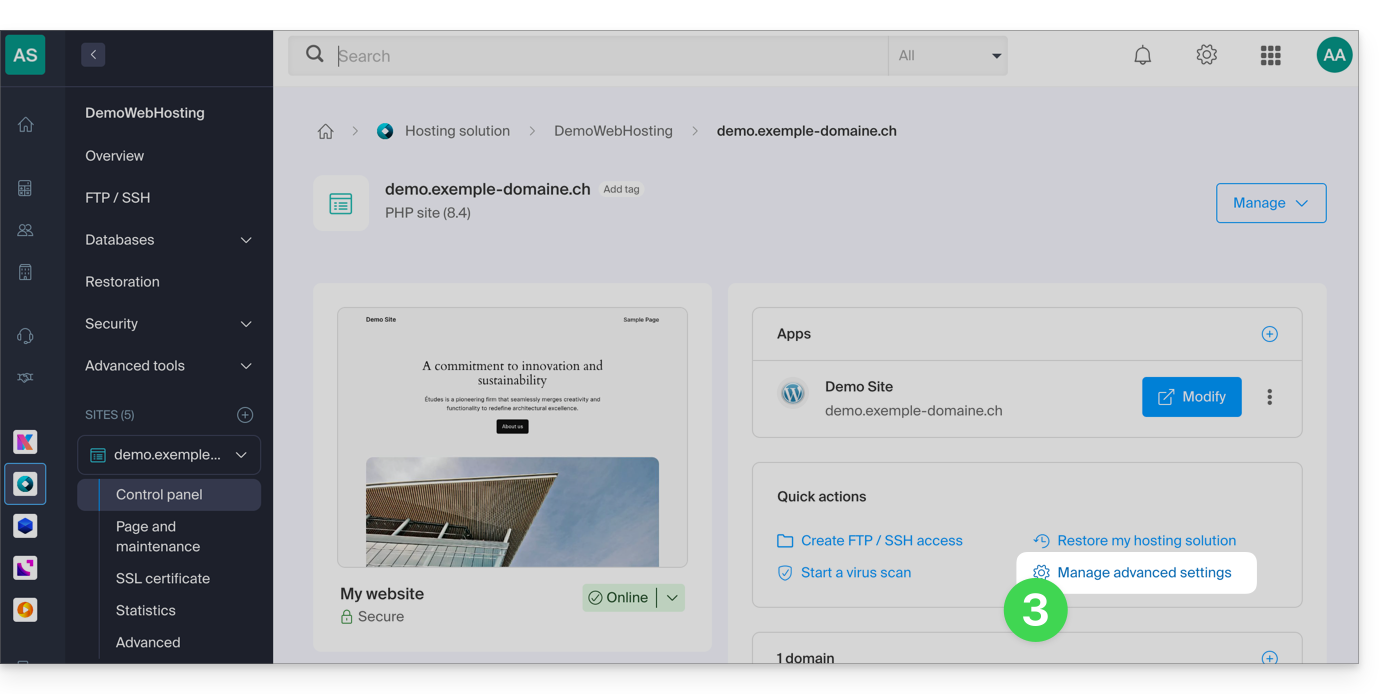
- Click on Manage advanced settings:
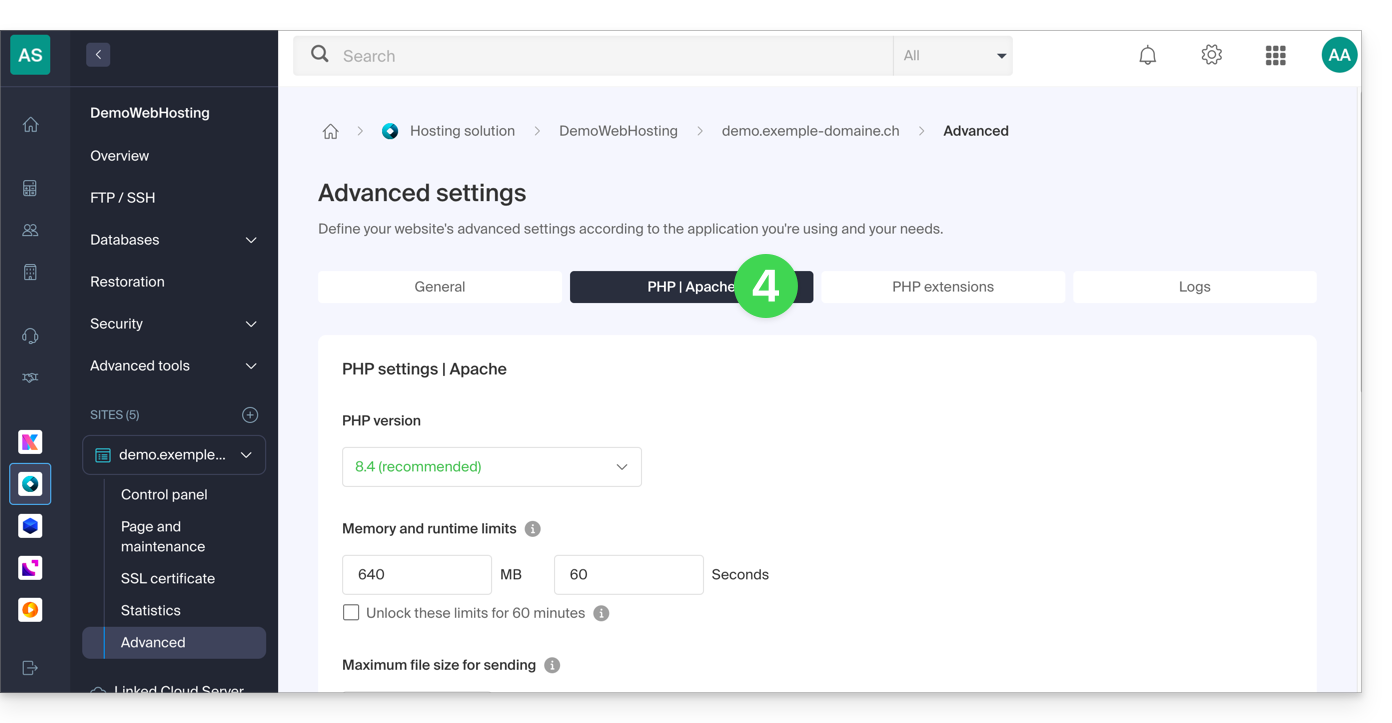
- Click on the PHP / Apache tab:
You will be able to…
- … temporarily increase the memory limit (
memory_limit= 1280 MB) and the maximum script execution time (max_execution_time= 60 minutes) for 60 minutes: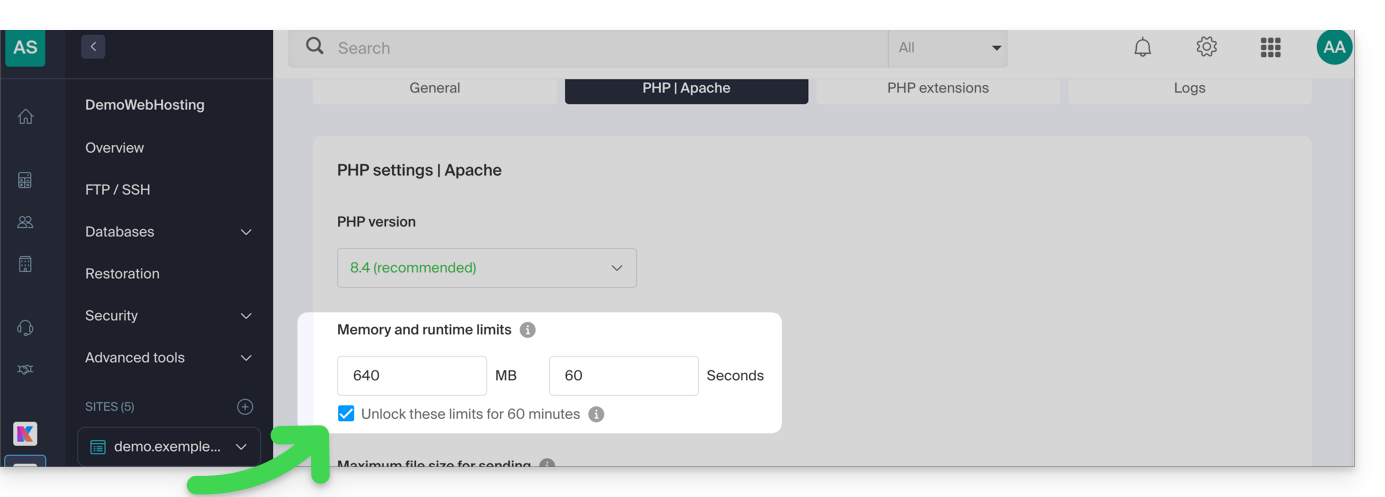
- This increase is possible a maximum of 10 times per year.
- … customize the limits of:
max_execution_time(in seconds)memory_limit(in MB)post_max_size&upload_max_filesize(maximum file size for uploads, in MB)- Cloud Server only:
Max children(refer to this other guide) - Cloud Server only:
Max input time
Don't forget to save the changes at the bottom of the page.
Maximum values per hosting type
| Limits | Shared | Cloud Server | CLI (Cloud Server only) |
|---|---|---|---|
| max_execution_time | 300 s | 3600 s | 0 (unlimited) s max |
| memory_limit | 1280 Mo | 2048 MB max | 512 MB max |
| post_max_size + upload_max_filesize | 9223372036854775807 Mo max | 9223372036854775807 Mo max | 48 MB max |
| max_children | 20 max | 20 (default, can be modified) | |
| simultaneous connections per IP | 30 max | 30 (default, can be modified) | |
| max_input_time | 0 (unlimited) | 0 (default, can be modified) | 0 (unlimited) |
| files (inodes) | no limit on the number of files per hosting account | ||
Link to this FAQ: https://faq.infomaniak.com/2158
Has this FAQ been helpful?
This guide explains how to work without the PECL SSH2 client module, which is not available on Infomaniak Web Hosting and Cloud Servers, by using the phpseclib library instead, which works in native PHP without requiring a specific extension.
Introduction
- Using the
PECL SSH2 clientresults in errors such asNo compatible key exchange algorithms foundorUnable to exchange encryption keysin its latest available version. Phpseclibprovides:- SSH authentication via password or private key.
- Remote command execution.
- Secure file transfer (SFTP).
- SSH key management.
Using phpseclib
To integrate an SSH connection into a PHP script, use phpseclib as follows:
use phpseclib3\Net\SSH2;
use phpseclib3\Crypt\PublicKeyLoader;

$ssh = new SSH2('domain.xyz');
$key = PublicKeyLoader::load(file_get_contents('/path/to/private_key'));

if (!$ssh->login('user', $key)) {
    exit('Authentication Failed');
}

echo $ssh->exec('ls -la');
Link to this FAQ: https://faq.infomaniak.com/767
Has this FAQ been helpful?
This guide explains how to use PHP environment variables with Web Hosting plans that run on php-fpm.
Introduction
- PHP environment variables are system variables used to store information about HTTP requests and redirects.
- They are generally used in web servers to store details about previous requests or redirects that have been performed.
- These variables can contain information such as previous URLs, HTTP methods, or other data related to the client's navigation on the web server.
Using environment variables
To use PHP environment variables:
- Define the PHP environment variables in a
.htaccessfile:SetEnv EXAMPLEVARIABLE hello
- In your PHP file, the name of the variable to call must correspond to the same variable name defined in the environment variable:
<?php getenv('EXAMPLEVARIABLE');
In this example, the result displayed will be hello.
Go further with environment variables
It is possible to configure environment variables directly from the Manager for your entire website:
- Click here to access the hosting & website management section in your Infomaniak Manager (❓: help).
- Click on the name of the website in question.
- Click on Manage advanced settings:
- Click on the PHP / Apache tab:
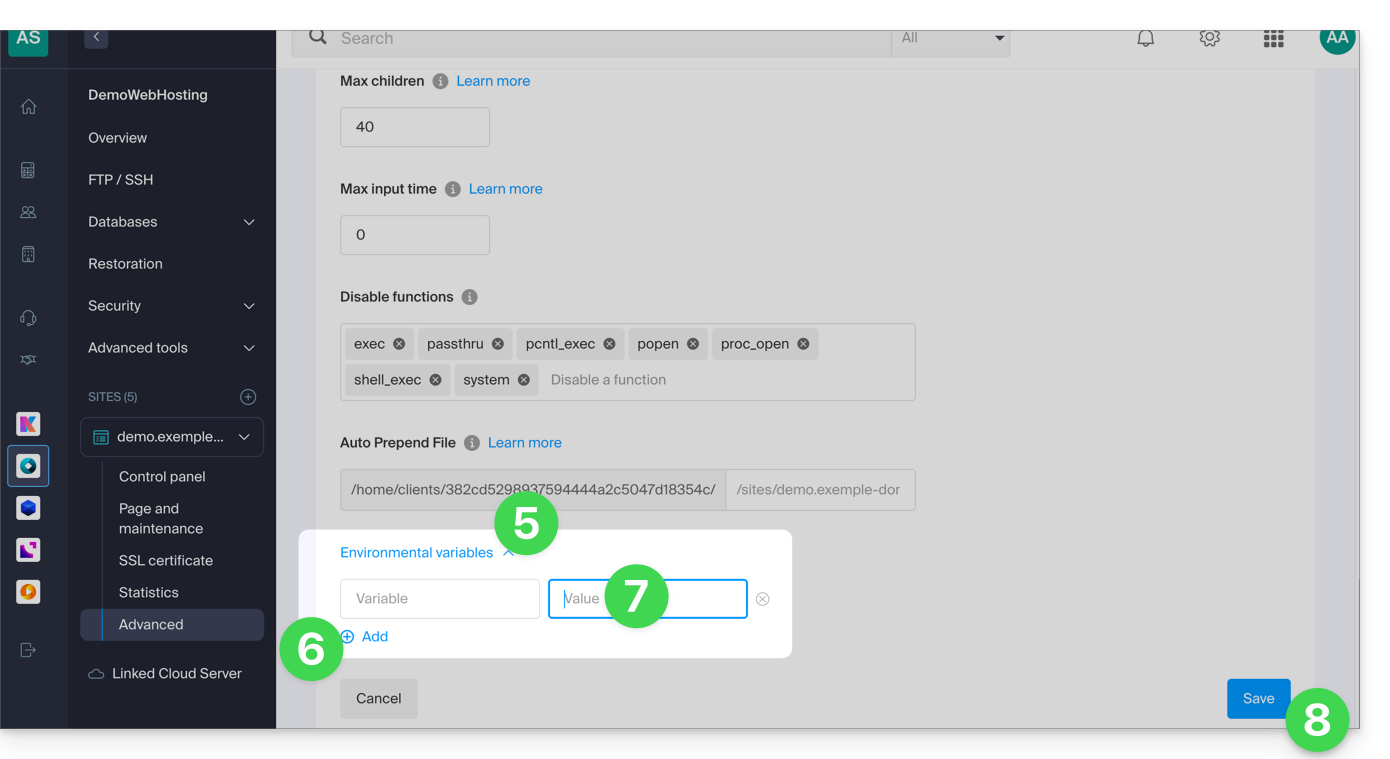
- Further down the page, click on the chevron to expand the Environment Variables section.
- Click on the Add icon.
- Enter the variable and its value.
- Click the button to save:
Link to this FAQ: https://faq.infomaniak.com/2087
Has this FAQ been helpful?
This guide explains how to use GnuPG / PGP with PHP on an Infomaniak Cloud Server, following the obsolescence of the native extension (alternatives using "pure PHP" or modern wrappers are preferred).
Introduction
- The
PHP_GnuPGsystem extension is no longer maintained by the PHP community and is therefore no longer available on recent environments. - Two main alternatives in "Pure PHP" (installable via Composer) allow you to continue signing or encrypting your data securely.
Option 1: Crypt_GPG (Recommended)
This library acts as a wrapper: it communicates directly with the gpg binary installed on your Cloud Server. This is the most efficient and stable solution.
To install it, connect via SSH and run this command at the root of your project:
# Install the PEAR Crypt_GPG package via Composer
composer require pear/crypt_gpg
Example of how to use it to encrypt a message (object-oriented approach):
<?php
require_once 'vendor/autoload.php';

try {
    // Initialize the GPG object
    $gpg = new Crypt_GPG();

    // Set the recipient email (must match a public key already imported on the server)
    $gpg->addEncryptKey('contact@example.com');

    $message = "This is a secret message.";

    // Encrypt the data
    $enveloppe = $gpg->encrypt($message);

    echo $enveloppe;
} catch (Exception $e) {
    // Handle potential encryption errors
    echo "Error: " . $e->getMessage();
}
Option 2: OpenPGP.php (Independent)
This library is entirely written in PHP. Its main advantage is that it does not depend on the gpg binary on the server, guaranteeing complete portability of your code across different environments.
# Install the OpenPGP.php library
composer require singpolyma/openpgp-php
Example of a basic structure:
<?php
require_once 'vendor/autoload.php';

// Use the library classes to handle OpenPGP packets
// directly in PHP without system calls to the GPG binary.
// Example: $msg = OpenPGP_Message::parse(OpenPGP::unarmor($data));
Link to this FAQ: https://faq.infomaniak.com/954
Has this FAQ been helpful?
This guide concerns the ODBC functions of PHP.
The ODBC functions of PHP are only supported on Cloud Server.
Open Database Connectivity Functions
These are the functions used to interact with databases via the ODBC (Open Database Connectivity) interface, a standard for accessing data sources in a uniform manner. Here are some examples of how to use the PHP ODBC functions:
- Be able to read data from an external database and display it on your website.
- Insert or modify data in an external database.
- Perform complex queries on an external database
Link to this FAQ: https://faq.infomaniak.com/296
Has this FAQ been helpful?
This guide explains how to configure the PHP settings for web hosting directly from the command line when running PHP scripts using PHP CLI (Command Line Interface).
Introduction
- This type of configuration can be useful when you need to temporarily modify certain parameters for a specific script or for a PHP session.
- These changes will only be valid for the execution of the current script and will not modify the global PHP configuration.
Modify PHP CLI Settings
For example, to temporarily modify the settings for a specific script without having to modify the global PHP server configuration, follow the method below. With the PHP CLI environment, you can specify multiple PHP settings at the same time by separating them with spaces.
Using the -d parameter
When running PHP from the command line, you can use the -d parameter to specify PHP configurations. This allows you to modify PHP settings for that specific execution. For example, to set the maximum execution time to 90 seconds, the memory limit to 256 MB, and disable safe mode, you can do so as follows:
php -d max_execution_time=90 -d memory_limit=256M -d safe_mode=Off -f test.php
Link to this FAQ: https://faq.infomaniak.com/2156
Has this FAQ been helpful?
This guide explains how to change the PHP version used in the command line (PHP CLI) on an Infomaniak web hosting plan.
Introduction
- Useful for configuring a specific script or a PHP session in the command-line interface (CLI).
- To change the PHP version of the web server (FPM/Apache) via the Manager, please refer to this other guide.
Default PHP CLI Version
The php command uses the server's default version. Check the active version with this command:
# Check current PHP version
php -v
To ensure the stability of your scripts, use an explicit path (e.g., php8.2) or modify your PATH variable.
Change the PHP version in CLI
You can configure the PHP version loaded automatically in your SSH session via two main files.
1. Using .bashrc (Recommended)
The ~/.bashrc file is read when an interactive shell is opened.
Open the file (or create it if it doesn't exist):
touch ~/.bashrc
nano ~/.bashrc
Add this line to define the desired version (example with PHP 8.3):
export PATH="/opt/php8.3/bin:$PATH"Update the configuration:
source ~/.bashrcCheck the change:
php -v
which php
2. Using .profile (Alternative)
The ~/.profile file is read during an SSH connection (login mode).
Edit the file:
nano ~/.profileAdd the export line:
export PATH="/opt/php8.3/bin:$PATH"
3. Load .bashrc systematically
To apply the configuration to all session types, add this code to your ~/.bash_profile or ~/.profile files:
# Load .bashrc if it exists
if [ -f ~/.bashrc ]; then . ~/.bashrc; fi
Run a specific version temporarily
To run a script with a specific version without changing your global environment, call the binary directly:
# Execute with a specific version
/opt/php8.2/bin/php my_script.php
/opt/php8.3/bin/php -v
Once these steps are completed, your SSH sessions and CLI scripts will use the selected PHP version by default.
Link to this FAQ: https://faq.infomaniak.com/2108
Has this FAQ been helpful?
This guide explains how to change the PHP version available for the websites on your Infomaniak Web Hosting.
Introduction
- It is possible to upgrade from an older, potentially vulnerable PHP version to a newer version, but you will no longer be able to revert to that vulnerable versionfor security reasons.
- The change is effective immediately and permanently.
- Refer to this other guide if you are looking for information on configuring the PHP version used in SSH.
- You may need to update your hosting beforehand to access the latest PHP versions offered by Infomaniak.
Change the PHP version used for a website
You can easily change the PHP version used for an entire website:
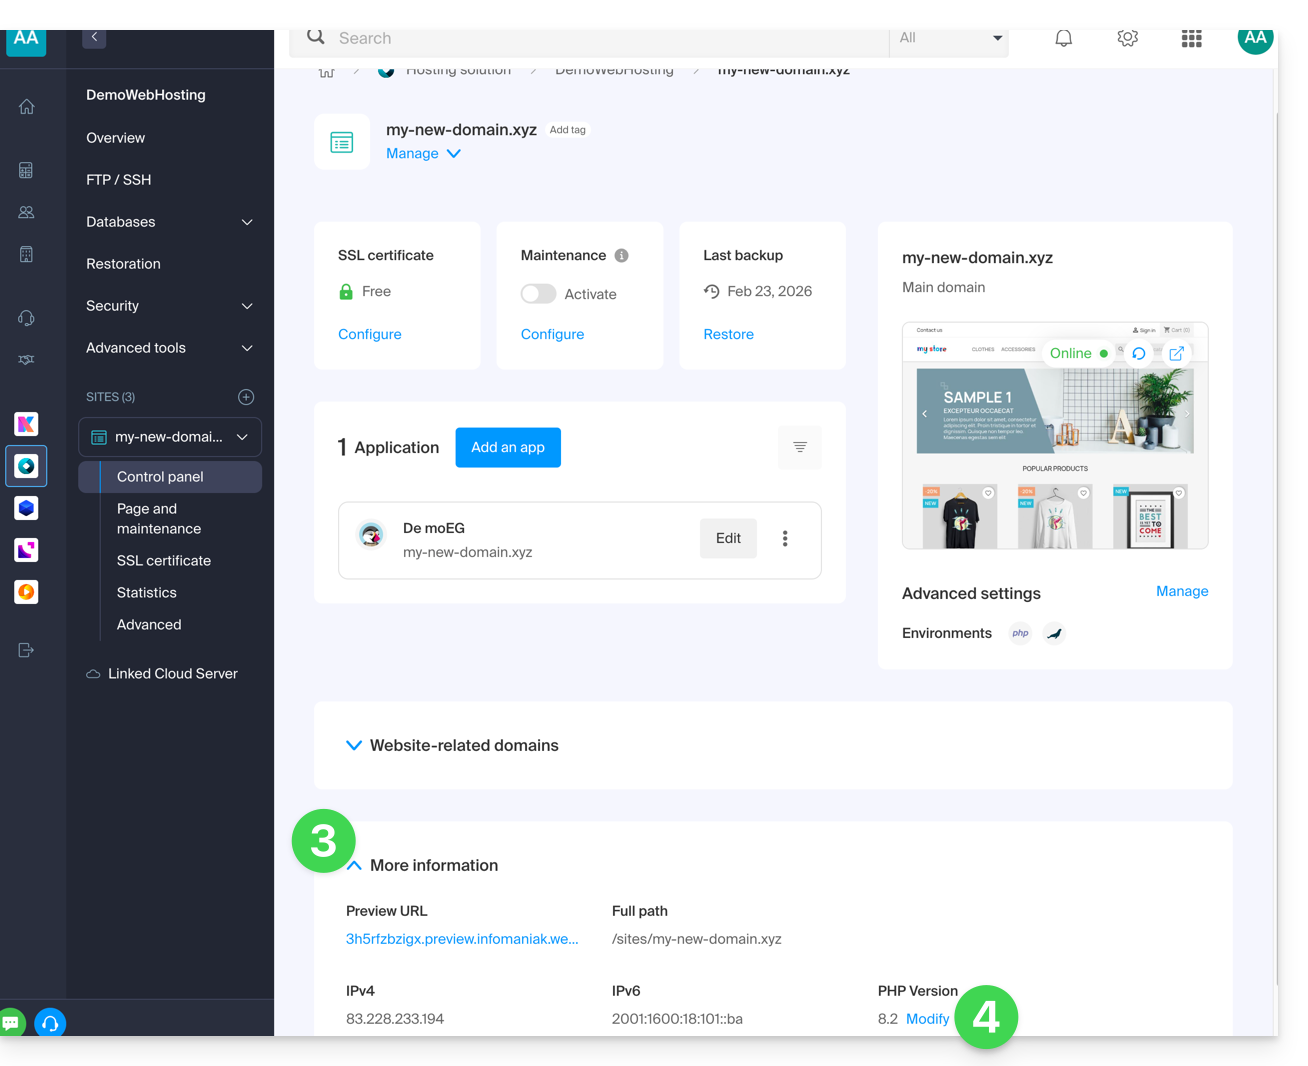
- Click here to access the hosting & website management section in your Infomaniak Manager (❓: help).
- Click on the name of the product in question.
- Click on More information.
- Click on Edit:
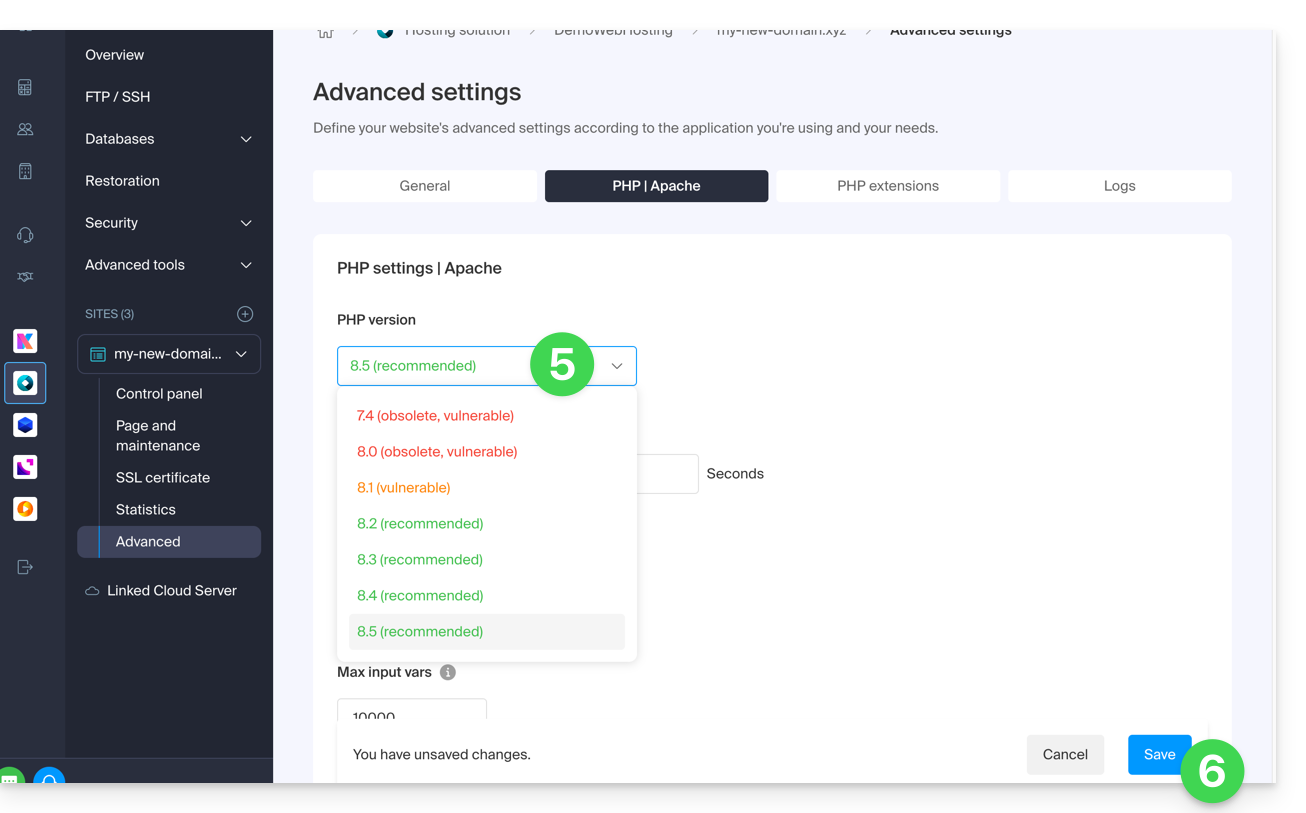
- Choose the desired PHP version.
- Click on Save at the bottom of the page to save the change:
Link to this FAQ: https://faq.infomaniak.com/2053
Has this FAQ been helpful?
This guide explains why using an outdated version of PHP that is no longer officially supported is dangerous and how to use a more recent version of PHP with a website hosted by Infomaniak.
Is an outdated version of PHP dangerous?
When you use a PHP version that is (soon) vulnerable on one or more of your websites, a warning message will appear in the dashboard of the hosting accounts concerned.
The PHP language is constantly evolving, and when you use a PHP version that is no longer updated, you expose your website to security risks. Malicious individuals could, for example, exploit known security vulnerabilities to gain access to your site and modify its content. It is therefore strongly recommended to always use a recent version of PHP.
3 situations are possible:
- the PHP version is fully supported: no action is required
- this PHP version only receives security updates: it is recommended to use a more recent version of PHP
- the PHP version is no longer supported: it is strongly recommended to use a more recent version of PHP
Using a more recent version
The latest versions of PHP offer improved performance and accelerate website loading times.
Before using a more recent version of PHP, it is important to follow these precautions:
- If your website uses a CMS or web application(WordPress, Joomla, Drupal, etc.), ensure that the current version of the CMS is supported by the PHP version you wish to use.
- If your website was developed manually, consult the official PHP documentation to learn about the modified functions and any potential changes that may affect the operation of your code.
If a malfunction occurs after migrating to a newer version of PHP, it is sometimes possible to revert to a previous version, provided that it is still supported!
Link to this FAQ: https://faq.infomaniak.com/2151
Has this FAQ been helpful?
This guide explains how to enable support for certain file types (e.g., .inc) on an Infomaniak web hosting plan, so that they are processed in the same way as a .php file.
Introduction
- Previously, you had to add the following line to a
.htaccessfile:AddType application/x-httpd-php .inc- This prevented the file's content from being displayed as text when accessed via a browser, instead of being correctly interpreted by PHP.
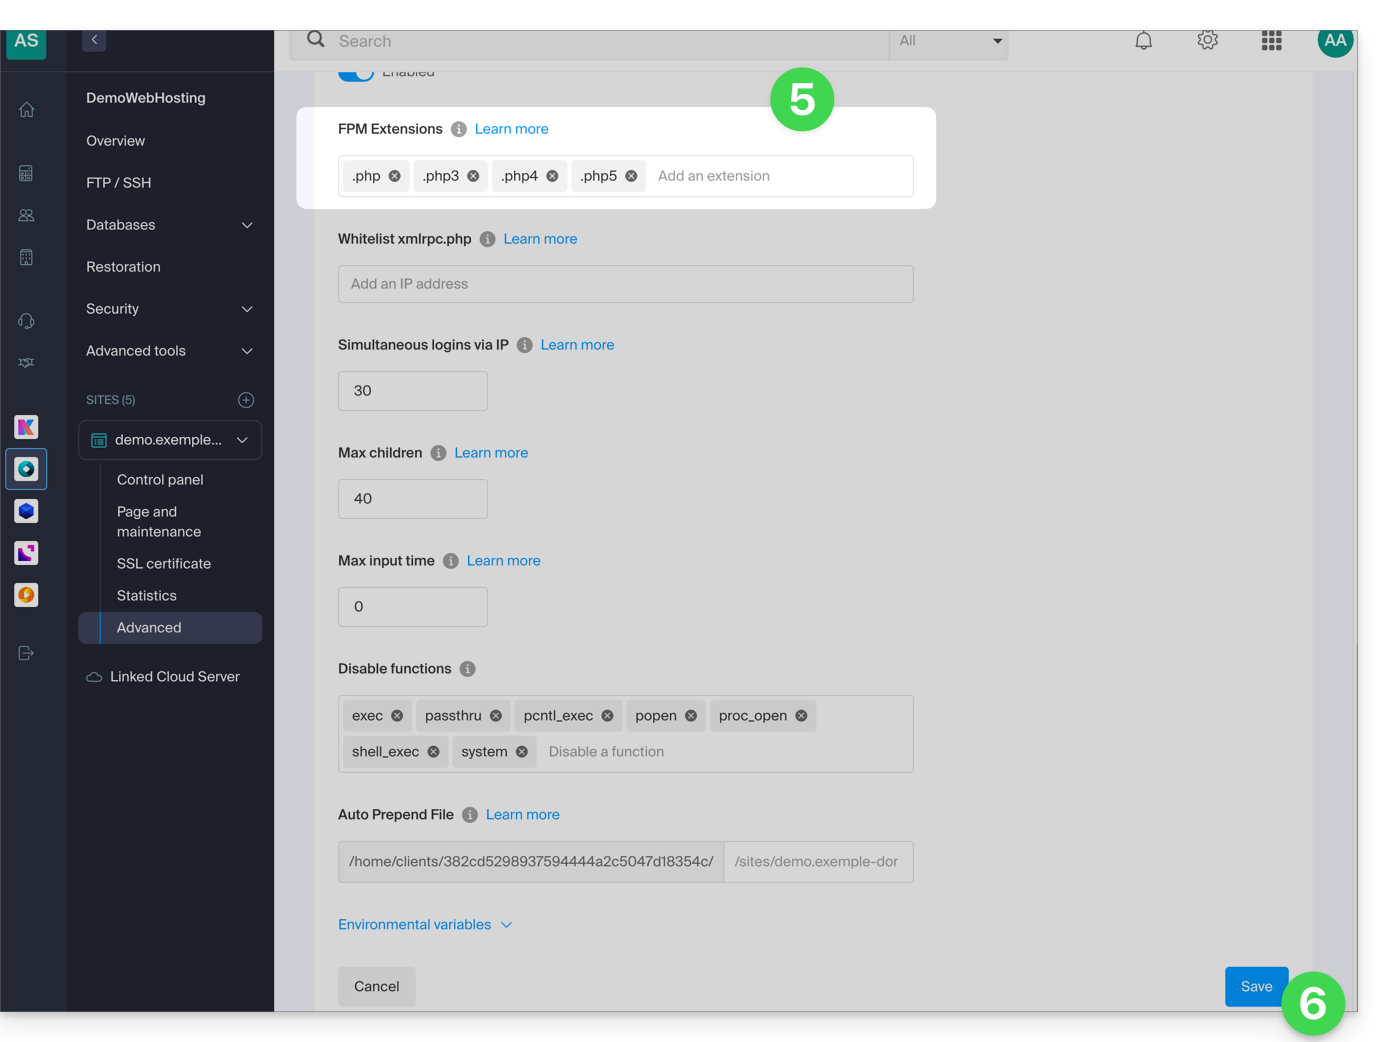
- Now you can manage file extensions via the FPM Extensions field in your hosting's Manager.
Manage PHP-recognized extensions
To add support for a specific file type:
- Click here to access the hosting & website management section in your Infomaniak Manager (❓: help).
- Click on the name of the website in question.
- Click on Manage advanced settings:
- Click on the PHP / Apache tab:
- Edit the FPM Extensions field to add the desired extensions.
- Click the button at the bottom of the page to save:
Link to this FAQ: https://faq.infomaniak.com/82
Has this FAQ been helpful?
This guide explains how to modify the error_reporting() directive on your website.
Enable error reporting
Specify the following 2 pieces of information in your .user.ini file:
display_errors=on
error_reporting=E_ALL & ~E_NOTICE & ~E_STRICT
If your browser displays no errors or warnings, then there are none.
Disable PHP error display
For WordPress, edit the wp-config.php file and replace the following line:
define('WP_DEBUG', false);by:
ini_set('display_errors','Off');
ini_set('error_reporting', E_ALL );
define('WP_DEBUG', false);
define('WP_DEBUG_DISPLAY', false);Alternatively, you can add the following code to the .user.ini file:
display_errors=offLink to this FAQ: https://faq.infomaniak.com/1115
Has this FAQ been helpful?
This guide explains how to quickly install applications, PHP extensions, and technologies (non-exhaustive list below) in just a few clicks on Cloud Server only.
Refer to this other guide if you are looking for information about additional Web Applications that can be installed on any type of hosting, including standard/shared hosting.
Install (or uninstall) PHP apps/extensions…
To find the list of technologies and proceed with their installation:
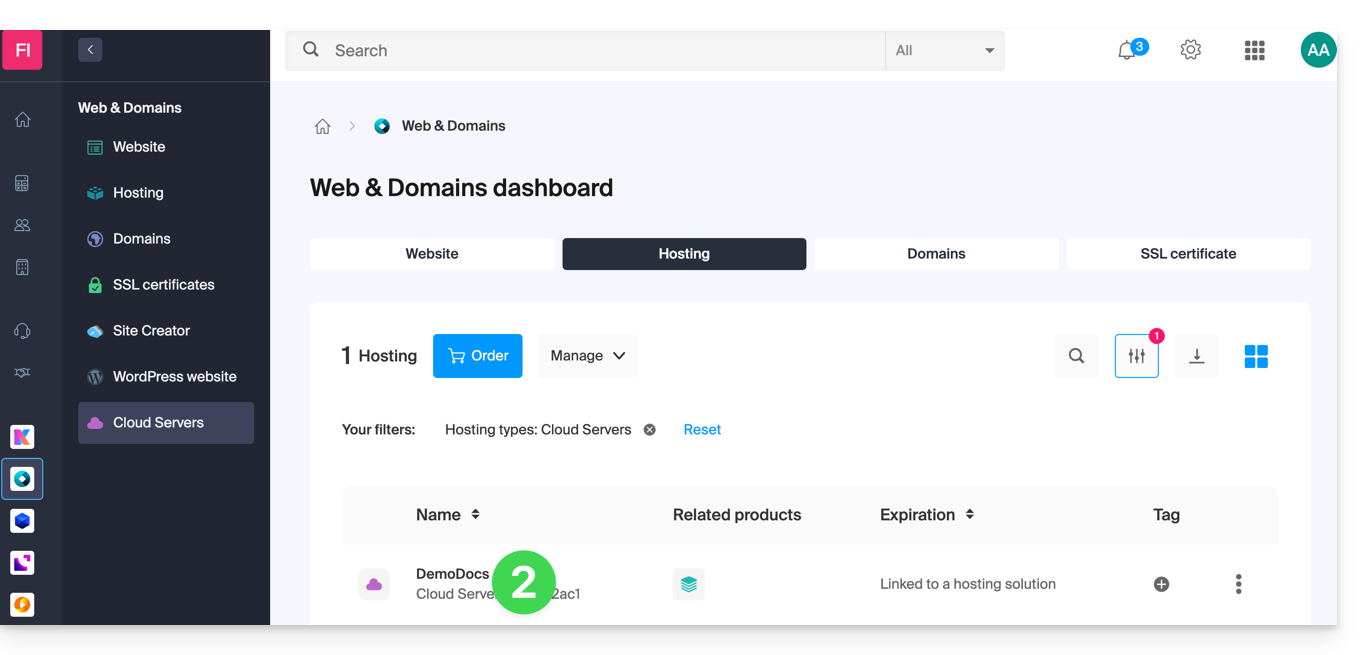
- Click here to access the management of your Cloud Server in the Infomaniak Manager (need help?).
- Click directly on the name assigned to the Cloud Server in question:
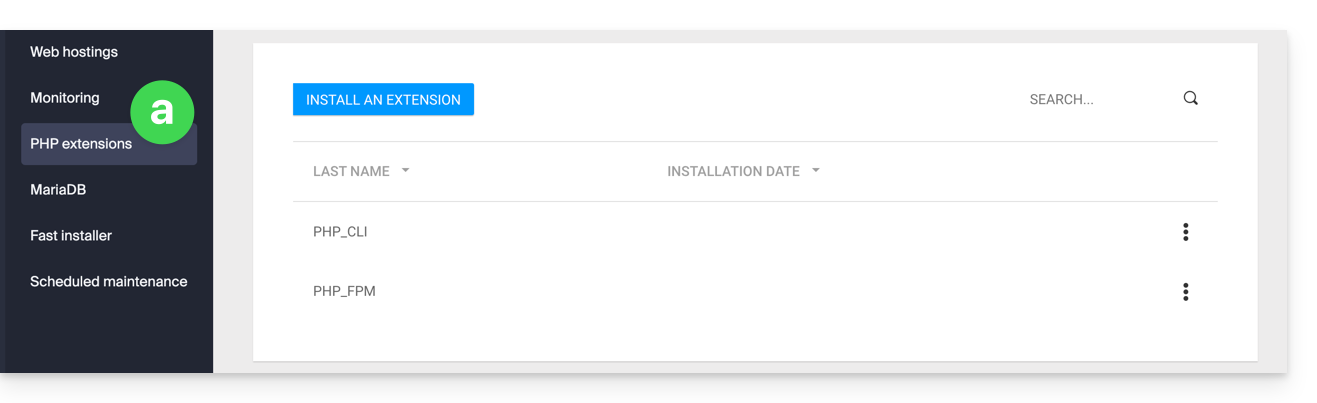
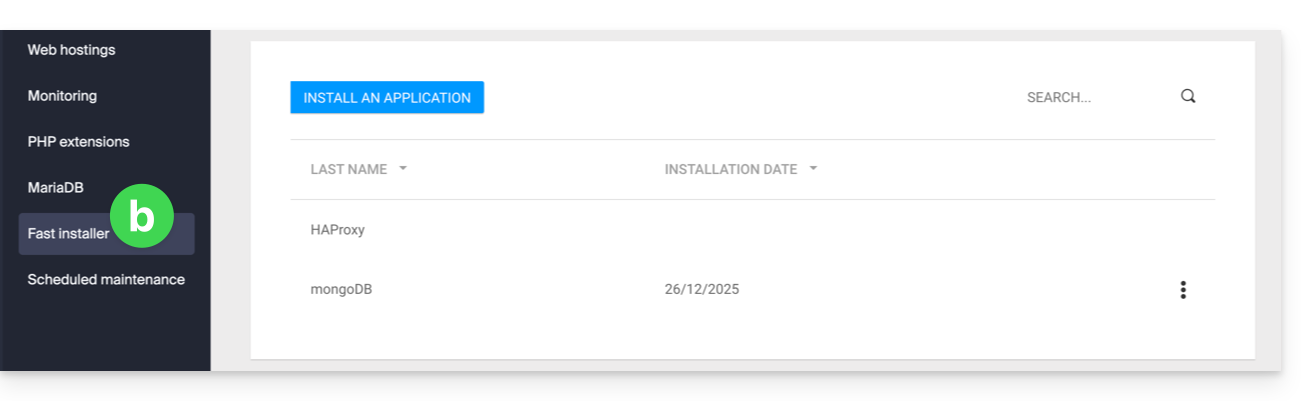
- Click in the left-hand menu:
- PHP Extensions
- Fast Installer
- PHP Extensions
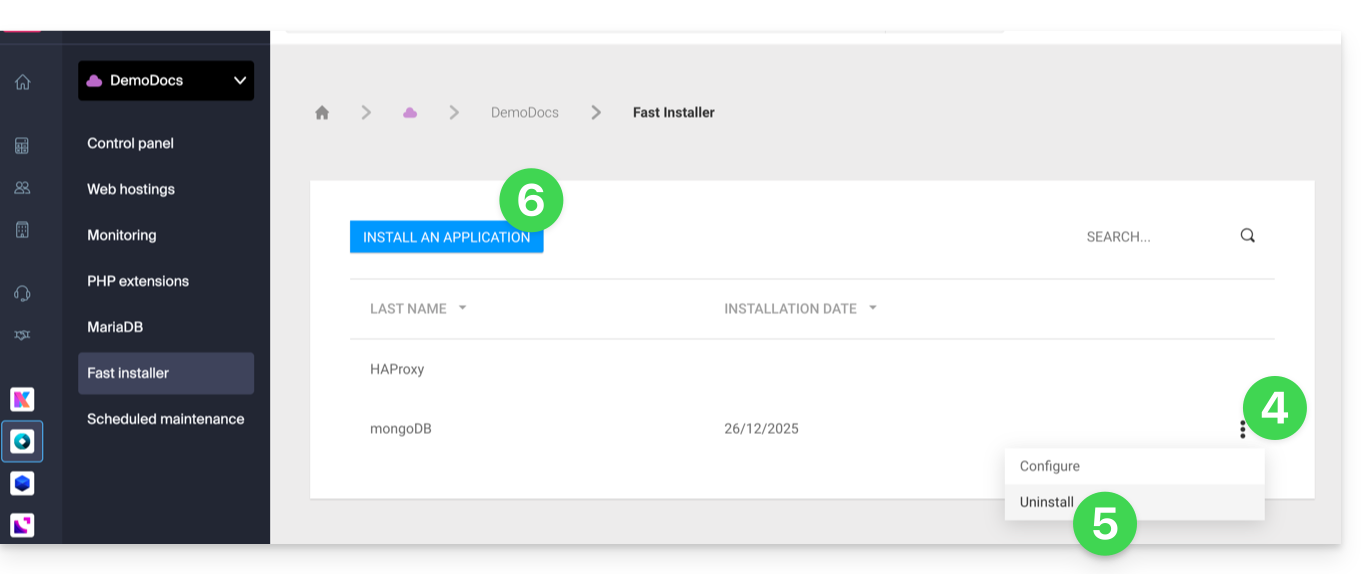
- Click on the action menu ⋮ to the right of the extension you wish to uninstall in the table that appears.
- Click on Uninstall.
- Otherwise, click on the blue button.Install an extension / Install an application:
- Then, select the new installation you want:
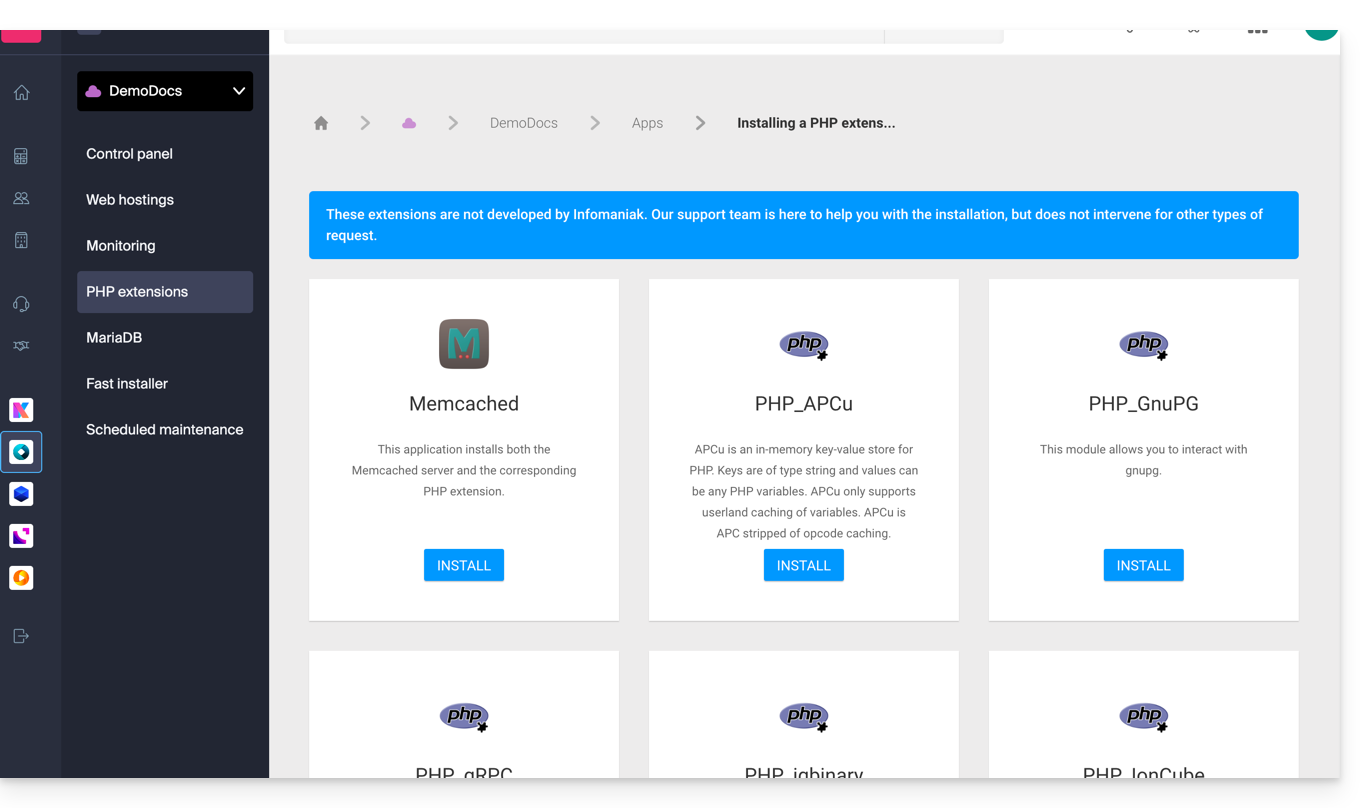
Non-exhaustive list of available apps & extensions
AdvanceCOMPBuildEssentialelectron_devExifToolFFmpeg↗ guideGhostscriptGifsicleGraphicsMagickHAProxyImagemagick↗ guideJpegoptimlibjpeg_turbolibqrencodelibX11_xcb1MidnightCommanderMemcached↗ guidemongoDB↗ guideNVM Node Version ManagerOptiPNGp7zipPDFtkPHP_APCuPHP_CLI↗ guidePHP_FPMPHP_GnuPG(deprecated extension) ↗ guide for the pure PHP alternativePHP_gRPCPHP_igbinaryPHP_IonCube↗ guidePHP_OPcachePHP_PDFPHP_PDO_ODBC↗ guidePHP_SwoolepipPngcrushPngquantRedis↗ guideRRDTool The Round Robin Database ToolRubyCompasssystemd↗ guidetesseract_ocrvarnish↗ guidevirtualenvWebPxauthxpdfxvfbZSH
Link to this FAQ: https://faq.infomaniak.com/877
Has this FAQ been helpful?
This guide explains how to enable the following functions on Web Hosting (in italics, Cloud Server only):
proc_openpopenexec()shell_exec()set_time_limitpassthrusystem
These functions are disabled by default because they pose a significant security risk if a website is hacked. Only enable them if absolutely necessary (for a script or CMS such as ImageMagick, Typo3, CraftCMS, etc.).
Enable PHP functions
To access website management:
- Click here to access the hosting & website management section in your Infomaniak Manager (❓: help).
- Click on the name of the website in question.
- Click on Manage advanced settings:
- Click on the PHP / Apache tab:
- Click on the On/Off toggle buttons as desired:
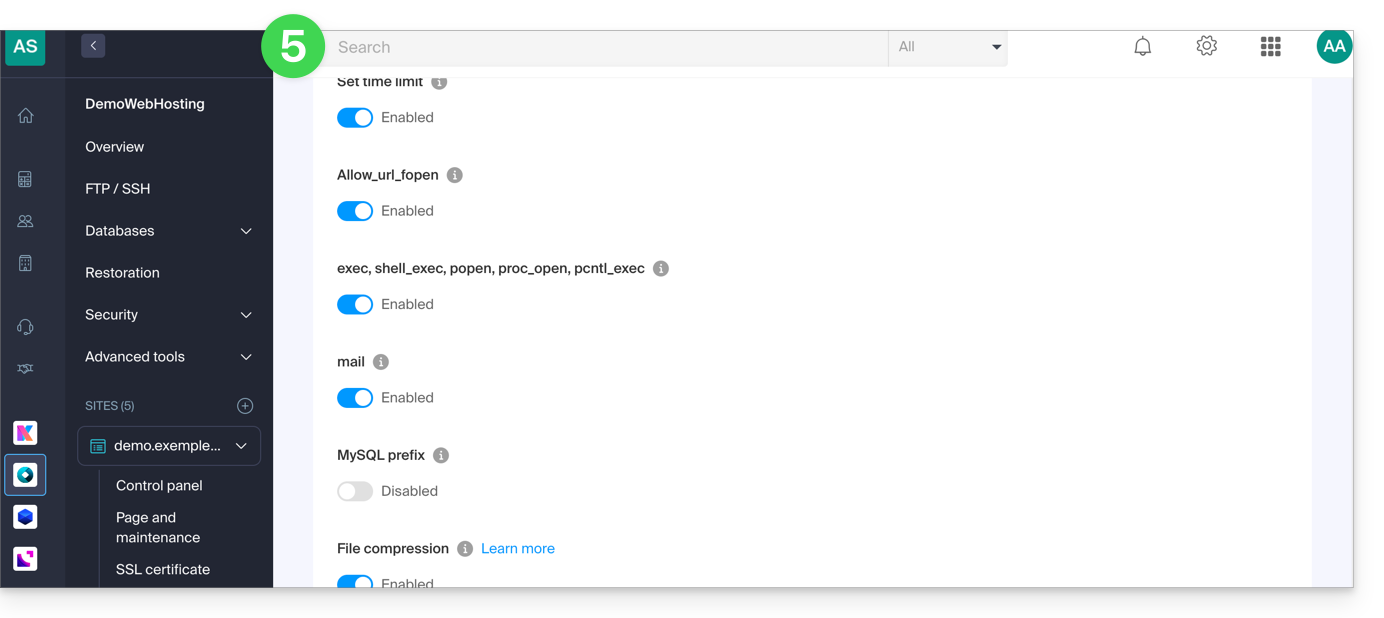
- Click the Save button at the bottom of the page to apply the changes.
Link to this FAQ: https://faq.infomaniak.com/173
Has this FAQ been helpful?
This guide explains the differences between Infomaniak's web hosting plans to help you choose the best solution based on your IT needs.
If you are looking to host your email, please refer to this other guide.
1. Site Creator
Standalone plans, independent of a hosting solution such as the one presented in point 3.
Site Creator is a ready-to-use solution that allows you to easily create a showcase website, a blog, or an e-commerce store without any specific technical skills. Offered as a standalone solution (without requiring traditional web hosting), it is available in several plans to suit your needs:
- Site Creator Free: a free version to test and customize a web page with basic features
- Site Creator Lite: ideal for publishing a showcase website or blog (up to 6 web pages, 15 GB of disk space, and a free domain name for 1 year)
- Site Creator Pro: the complete solution for online stores (unlimited pages, 50 GB of disk space, e-commerce features with payment and inventory management, free domain name for 1 year)
Learn more about the Site Creator plans and compare features.
2. Web Hosting Starter
Simple and free web hosting
The Starter web hosting plan is offered free of charge with every domain name registered with Infomaniak. It offers 10 MB of disk space to create a website (basic pages in HTML only - no PHP, no database) even without specific knowledge, thanks to the Welcome Page tool.
- Register or transfer a domain name to Infomaniak
- Learn more about the benefits included with a domain name
3. Shared Web Hosting
The flagship offer for creating your websites
These web hosting solutions are shared hosting offers (websites will be hosted on servers whose resources are shared with other customers). To guarantee the reliability of these shared services, Infomaniak servers use, on average, only 40% of the CPU power and are equipped with professional, latest-generation SSD disks.
Web hosting offers a minimum of 250 GB of disk space and allows you to manage multiple websites with multiple domain names. This offer includes all the technologies usually used to create professional websites: PHP, MySQL, FTP and SSH access, SSL certificates and easy installation of WordPress or common CMS, etc. It is also possible to add a Node.js site and/or Site Creator.
Please note that without any type of hosting, it is also possible to obtain and use Site Creator in a “standalone” mode. Refer to this other guide.
3. Cloud Server
Professional Web Hosting
With a Cloud Server,the resources allocated to you are not shared with other customersand you can customize the hardware and software configuration of your server according to your needs. A Cloud Server also allows you to use components that are not available on shared web hosting (Node.js, mongoDB, Sol, FFMPEG, etc.).
- A Cloud Server allows you to easily manage your server via the same administration interface as your web hosting – you manage websites in the same way.
- A VPS allows you to manage your server 100% independently with the Windows version or the Linux distribution of your choice (
Debian,Ubuntu,openSUSE, ...) – solid technical skills are required to use a VPS, including VPS Lite.
4. Public Cloud (et Kubernetes Service)
Open, reliable, and secure IaaS solution
For Infomaniak, this is the infrastructure that powers kDrive, Swiss Backup, and Webmail, services used by several million users. But Public Cloud is accessible to everyone and provides the resources you need to develop your projects.
With our custom and tailored offers, you'll have no trouble managing your development budget. No setup fees. No minimum amount. Cancel anytime. You only pay for the resources you actually use with Public Cloud at the end of each month, the same applies to Kubernetes Service.
5. Jelastic Cloud
Custom web hosting with the technologies of your choice
Jelastic Cloud allows you to create custom development environments with the technologies of your choice (PHP, Java, Docker, Ruby, etc.). It is a flexible cloud offering:
- Horizontal and vertical resizing of resources.
- Payment based on actual resource consumption.
- Easy customization of your infrastructure (redundancy, IP, SSL, load balancing, etc.).
Link to this FAQ: https://faq.infomaniak.com/2019
Has this FAQ been helpful?
This guide explains how to transfer to Infomaniak data (Web, Mail, Domain, and even Cloud) currently hosted elsewhereYou remain the owner of your data, with no loss or interruption!
Introduction
- By consolidating your domain names, websites, and email addresses with Infomaniak, you simplify the management of your invoices and services.
- Furthermore, your domains will be automatically linked to your website and email address.
- You will not need to manually configure the DNS settings for your domains with another registrar.
Specific guides
Click on the link corresponding to your current hosting provider:
- Swisscom: complete guide to migrating Web, Mail, and domain name data
Guides for any other hosting provider
To avoid interrupting your website and email services and prevent data loss when importing your existing data, migrate your services in the order indicated:
Import Web data (any PHP, HTML, etc. website)
- For WordPress specifically, please refer to this other guide…
- For WordPress specifically, please refer to this other guide…
Copy Mail data (addresses and mailbox content, etc.) to kSuite or a simple Mail Service
Transfer the domain name (domain management, DNS zone, etc.)
You can also transfer other types of data to Infomaniak servers:
- Dropbox, Google Drive, etc. content: refer to this other guide
- Data on Synology or QNAP NAS: please refer to this other guide
Link to this FAQ: https://faq.infomaniak.com/2057
Has this FAQ been helpful?
This guide details the security measures implemented as part of the Infomaniak email offers to detect abusive and abnormal use of an email address.
Introduction
- Number of outgoing emails possible per 24 hours:
- kSuite Free = 200
- kSuite Standard = 500
- kSuite Business = 500
- kSuite Enterprise = 500
- my kSuite = 200
- my kSuite+ = 500
- Mail Service Starter = 200
- Mail Service Premium = 500
- Web Hosting = limit depends on the email service used; otherwise, 50 emails max. via PHP Mail() without authentication.
- For sending emails to a large number of recipients, the Newsletter tool is the most suitable.
- You should also consult these other guides:
How are sending quotas calculated?
Quotas are calculated over a rolling 24-hour window and are not reset at midnight. Each email sent is counted for 24 hours from the time it was sent, after which it is automatically released from the quota.
For example, if the limit is reached at 11 a.m., emails sent from that time onwards can only be sent as the previously sent messages reach 24 hours of age. Sending rights are therefore released gradually the next day, and not all at once at midnight.
Why are there sending limits?
Sending limits are applied to protect email services against abusive or abnormal use, including the mass sending of messages from a compromised account.
They also help to limit the risks associated with spam and to preserve the reputation of Infomaniak's servers, in order to maintain good email deliverability.
These limits apply to all emails sent from an address, regardless of the software or application used. Messages addressed to multiple recipients are counted individually: 1 message sent to 2, 42, or 99 people in CC/BCC counts as 2, 42, and 99 messages, respectively.
Upon a written, justified, and authenticated request, it is possible to modify these security rules for a specific paid email address.
Link to this FAQ: https://faq.infomaniak.com/2065
Has this FAQ been helpful?
This guide details Infomaniak's Managed Cloud Server offering and Infomaniak's VPS offering, which are intended for different uses.
Introduction
- Infomaniak offers two advanced hosting solutions:
- the Managed Cloud Server, which allows you to create multiple hosting accounts (FTP/SSH spaces) on which you can add your websites (Apache vhosts),
- and the VPS (Virtual Private Server), which offers complete administrative freedom and meets different needs.
Managed Cloud Server
The Cloud Server allows you to overcome the limitations of shared hosting. You can create and distribute your websites as you wish, define the root directory for each site, and adjust parameters such as memory_limit and max_execution_time.
Integrated tools are provided: cron jobs, Site Creator, simplified WordPress installation, and access and error logs. It is also possible to add specific Apache modules or install a caching system.
The software environment is managed by Infomaniak (FastCGI, PHP-FPM). You do not have complete freedom to configure the server (no arbitrary software installation), but some specific programs can be installed.
VPS (unmanaged)
The VPS gives you complete control over the server, but you are responsible for its management. Infomaniak manages the hardware and installs the version of Linux or Windows that you selected when placing your order. Infomaniak does not perform any software-related operations: you administer the system, install, and configure the software.
You can restart the server via the Infomaniak Manager. A snapshot system is available (except for the VPS Lite offer).
Video content and alternatives
If your project mainly involves a large volume of videos, it is often preferable to separate video streaming from the main hosting. Combined with shared hosting, the Infomaniak VOD/AOD service allows you to efficiently store and stream videos, handle traffic spikes, and obtain detailed viewing statistics.
Migration between Cloud Server and VPS
There is no automated migration solution between a managed Cloud Server and a VPS.To switch from one plan to another, you must cancel the product you no longer use and order the new plan. Infomaniak will refund any new server upon request if the cancellation occurs within 30 days of the order.
Link to this FAQ: https://faq.infomaniak.com/1730
Has this FAQ been helpful?
Jelastic Cloud Infomaniak is one of the most comprehensive and flexible PaaS solutions on the market.
Introduction
Node.js= the official name of the language/environment.NodeJS= the "technical" or simplified name used in certain contexts (often for practical reasons; there is no real technical difference).
Supported languages
You can deploy Java, PHP, Ruby, Node.js, Python, and Go applications without having to adapt your code by using Docker, Kubernetes, GIT, SVN, or integrated extensions such as Maven, Ant, Eclipse, NetBeans, or IntelliJ IDEA.
Supported SQL and NoSQL databases
MariaDB, MongoDB, MySQL, Postgre, Redis, Neo4j, Cassandra, OrientDB, PerconaDB, CouchDB, Couchbase.
Supported application servers
Tomcat, TomEE, Jetty, GlassFish, Payara, Apache PHP, Apache Ruby, Apache Python, NGINX PHP, NGINX Ruby, NodeJS, JBoss, SmartFoxServer, SpringBoot, WildFly, Golang.
Supported load balancers
NGINX, Apache Balancer, HAProxy, Varnish.
Link to this FAQ: https://faq.infomaniak.com/2257
Has this FAQ been helpful?
This guide explains what you need to determine as a website visitor or administrator if you encounter a 403 error in order to resolve this issue.
Introduction
- The HTTP 403 error code generally means that the server is denying the client access to a resource.
- Check your error logs in your Infomaniak Manager to identify the file or rule causing the issue (❓: help).
When does this error occur?
The user is not authenticated: authentication is required (e.g., for private pages).
The user does not have the necessary permissions: permission issue on a folder (403 Forbidden) or a file (failed to open stream: Permission denied). Ensure that the permissions are at least 644 for a file and 755 for a folder (❓: help).
The IP address is blocked or restricted: the server is blocking the IP address for security or anti-attack protection reasons (❓: help).
The requested resource does not exist: the server returns a 403 error instead of a 404 for privacy reasons. Make sure that a homepage (index.html, .htm, or .php) is present in the correct location (root /web or a subdirectory), in lowercase, without accents or spaces.
Error related to the script or antivirus: a security filter or Infomaniak's antivirus blocks a suspicious upload (via FTP, forms, or insecure scripts) and generates the following message:
Accès interdit!
Vous n'avez pas le droit d'accéder à l'objet demandé.
Soit celui-ci est protégé, soit il ne peut être lu par le serveur.
Si vous pensez qu'il s'agit d'une erreur du serveur, veuillez contacter le gestionnaire du site.
Error 403
Other causes may also trigger this message (PHP scripts, Perl, mod_security, .htaccess file, etc.).
Link to this FAQ: https://faq.infomaniak.com/1609
Has this FAQ been helpful?
This guide explains how to redirect a domain name directly to another, or how to automatically send visitors to your website to another page address (internal or external URL).
Introduction
- To redirect traffic, you will need to take action…
- … either on the domain name itself (it must be hosted by Infomaniak and its DNS must also be Infomaniak's),
- … or on the code present in your pages (e.g., .htaccess page, homepage, etc.) if you have a website.
Acting on the domain name
Via Web Redirection Tool
The tool available in the Manager allows you to easily manage your domain name (or subdomain) and redirect it to the internet address of your choice.
via DNS modifications or A record updates
Change the DNS of the domain name or modify its A/AAAA records to redirect web traffic to another provider.
Modify the page code…
… by inserting HTML code
Insert this line of code between the <head> and </head> tags of your homepage (usually named index.html):
<meta http-equiv="refresh" content="5;url=INSERT-HERE-NEW-URL">Replace 5 with the desired wait time in seconds (0 for immediate execution).
The Google search engine indicates that it is preferable to use a 301 redirect on the server-side (see below). The W3C also advises against using it.
… via PHP code to be inserted
If the website page has a .php extension, insert this function call at the very top of the file:
header("refresh: 5; url=INSERT-HERE-NEW-PAGE-URL");
```
… via the .htaccess file
… via fichier .htaccess
To redirect all traffic to your site (regardless of the page being accessed) to another address, insert the following into the .htaccess file at the root of your site:
RewriteEngine On
RewriteRule ^(.*)$ INSERT-HERE-NEW-URL/$1 [R=301]
To target the page that should be redirected:
Redirect permanent /old_page.html insert destination URL hereRedirectpermanent, Redirect permanent, and Redirect 301 are equivalent commands.
The following is another example of redirecting a sub-section to the homepage (this directive has the advantage of working with "deep links" unlike a permanent redirect):
RewriteEngine on
RewriteRule "old/path/url" "/" [L]
Refer to this other guide for more information.
Link to this FAQ: https://faq.infomaniak.com/79
Has this FAQ been helpful?