Knowledge base
1000 FAQs, 500 tutorials and instructional videos. Here, there are only solutions!
If your domain is important for your activity, then Renewal Warranty is the assurance of never losing it. As a leading registrar, Infomaniak is daily confronted with clients who have not been able to renew their domain on time. Their website and email addresses are no longer accessible, and this often represents significant damage to their activity.
Infomaniak also offers the possibility to protect your personal information from the WHOIS with Domain Privacy.
It is easy and costly to lose a domain
A domain name is registered for a specific period after which it must be renewed to retain ownership. When a domain is not renewed, it enters a redemption period and then falls into the public domain awaiting a new buyer.
The redemption period is a grace period during which it is still possible to act to retain ownership of your domain. However, this last resort is fraught with consequences and incurs fees. In the best-case scenario, it results in the interruption of your website and email addresses for many hours, the time it takes to urgently remove your domain from redemption.
In the worst-case scenario, if there is no intention to reactivate the domain name, it is lost.
Renewal Warranty, the assurance of never losing a domain
With this guarantee, Infomaniak commits to renewing your domain if necessary (blocked payment method, renewal emails not received, prolonged absence, etc.) and will personally contact you by email, SMS, phone, and postal mail to ensure you keep it.
Renewal Warranty is a unique solution that protects you from the involuntary expiration of your domains. You remain the sole owner of your domains and are free to stop Renewal Warranty or cancel your domains whenever you decide.
Activate Renewal Warranty on an existing domain
Refer to this other guide to activate the option in a few clicks.
Link to this FAQ: https://faq.infomaniak.com/2235
Has this FAQ been helpful?
This guide lists the Windows operating system versions that can be installed when ordering a VPS Cloud / VPS Lite.
Regarding Linux, please refer to this other guide.
Supported Windows versions
When ordering your Server, you will be able to choose the version of Windows to install.
Windows Server
Possible versions with Windows Server 2025, 2022 or 2019:
- Windows Server Standard designed for low-density or non-virtualized environments
- Windows Server Datacenter ideal for datacenter-defined and highly virtualized environments
Note:
- As a Microsoft partner, Infomaniak provides VPS Cloud / VPS Lite Windows Server 2025, 2022 or 2019 containing a Microsoft Windows Server license. In case of activation failure, refer to this other guide.
- As a Microsoft partner, Infomaniak does not offer the possibility to use your own Windows Server license (or Bring Your Own License).
- If you use Microsoft software within Windows Server that requires a License Mobility, such as Microsoft SQL Server, Microsoft Sharepoint Server or Microsoft Exchange Server, you must submit the Software Assurance document via the Infomaniak contact form.
Windows 11 Professional Evaluation
Windows 11 Professional has all the features of Windows 11 Home as well as professional features for encryption, remote connection, virtual machine creation and more.
The version 10 of Windows Professional Evaluation is also available.
Note:
- It will be necessary to activate Windows, Infomaniak provides only an evaluation version.
Link to this FAQ: https://faq.infomaniak.com/2230
Has this FAQ been helpful?
This guide explains how to create a custom MX record (mx.domain.xyz assuming that domain.xyz belongs to you) to be used later in the MX configuration of your NAS.
An MX record cannot be declared directly as an IP address, for example 178.123.456.789
Custom MX record
To access your domain names:
- Click here to access the management of your domain on the Infomaniak Manager (need help?).
- Click directly on the name assigned to the domain in question.
- Click on DNS Zone in the left sidebar.
- Click on the blue button Add a record:

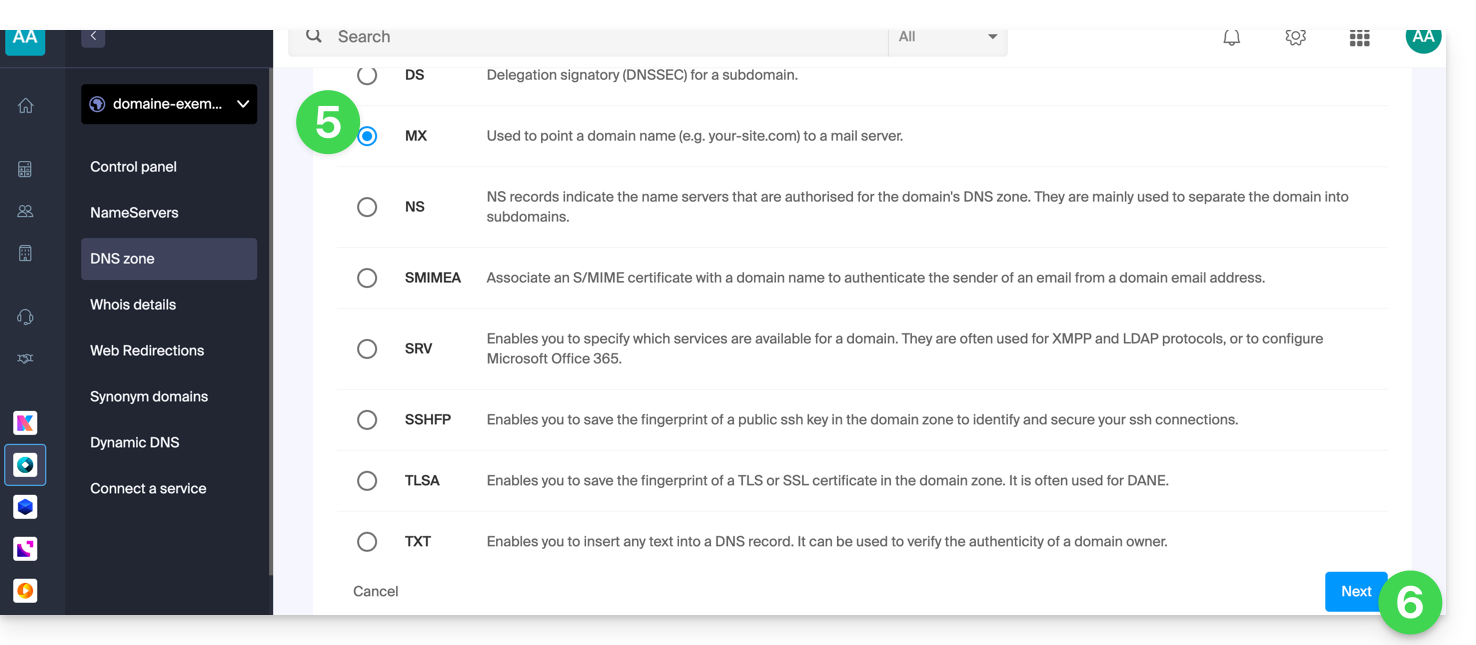
- Select MX as the record type.
- Click on Next:
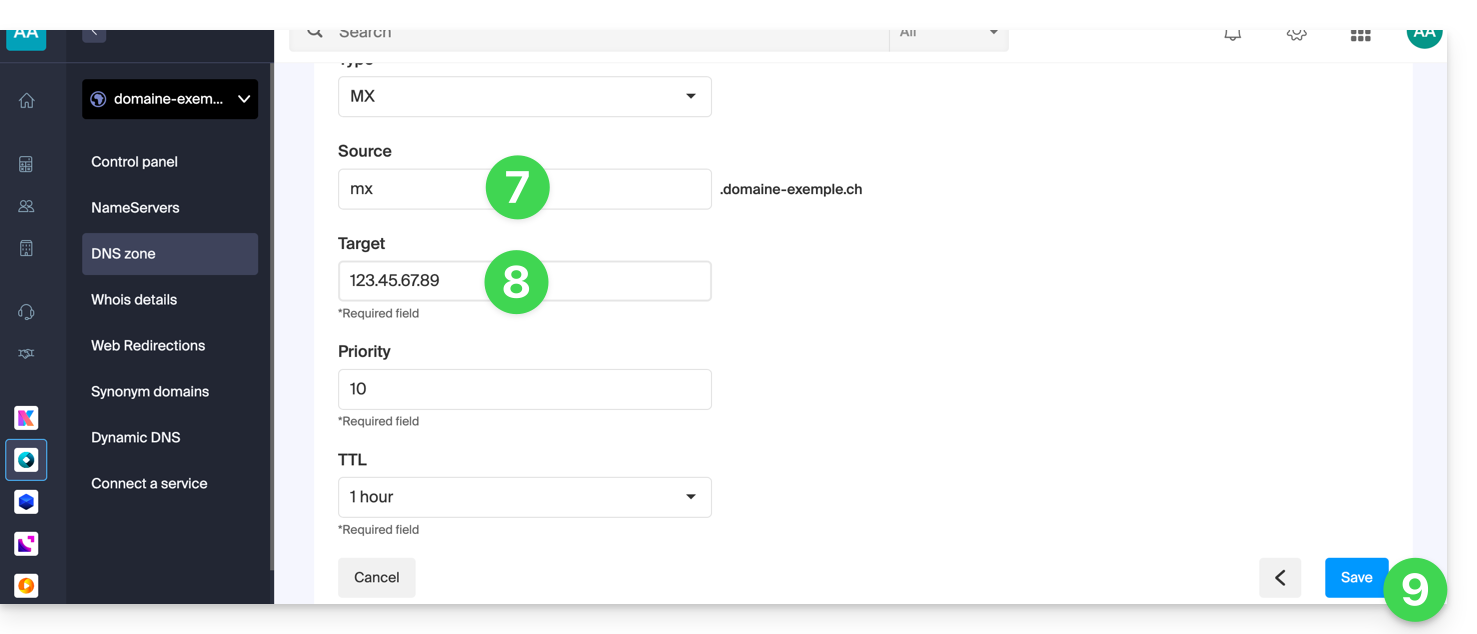
- Enter the desired MX record ("
mx.domain.xyz" for example). - Point the record to the desired IP address (target).
- Click on the Save button:
Link to this FAQ: https://faq.infomaniak.com/1896
Has this FAQ been helpful?
This guide explains how to renew or restore a domain name registered with Infomaniak.
Preamble
- You are automatically notified by email (at the address you provided) when one of your domain names is about to expire.
- If this domain name is not renewed before its expiration date, it enters a redemption period during which it can still be recovered/restored.
- The restoration fees and the duration of the redemption period are variable depending on the extension concerned.
- Once the redemption period has elapsed, the domain name is free and can be reserved again by anyone.
- If your domain is important for your activities, Renewal Warranty offers you the assurance of never losing it: Infomaniak will do everything in its power to ensure that you keep it even if you do not provide timely updates at its expiration.
Renew a domain name before expiration
The renewal of one or more domain names is done exactly the same way as any other Infomaniak service renewal. Refer to this other guide if you are looking for information on how to renew the product in question.
Restore a domain name after expiration
To restore a domain during its redemption period:
- Click here to access the management of your product on the Infomaniak Manager (need help?).
- An expired domain is indicated as such:
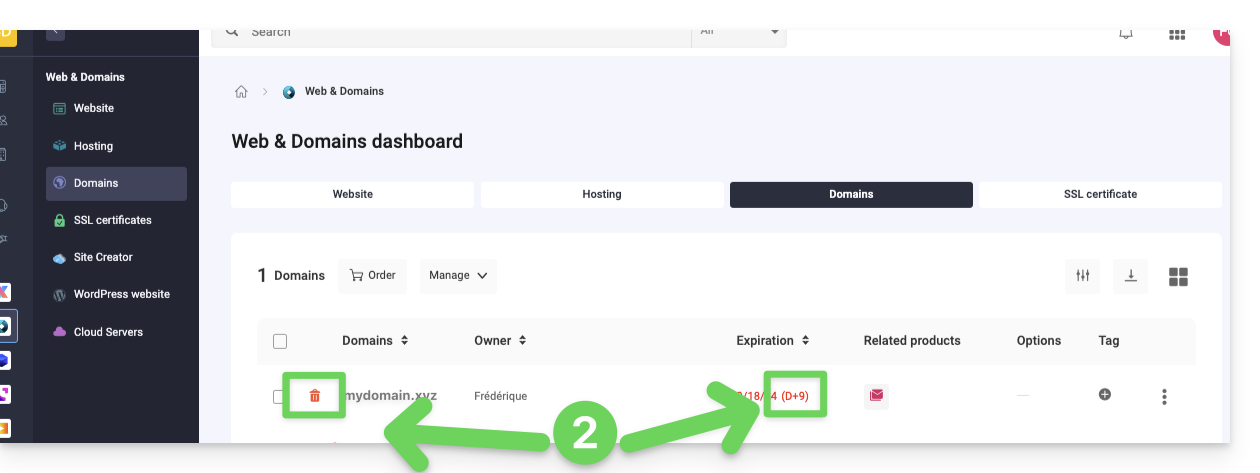
- Click directly on the name assigned to the product concerned:
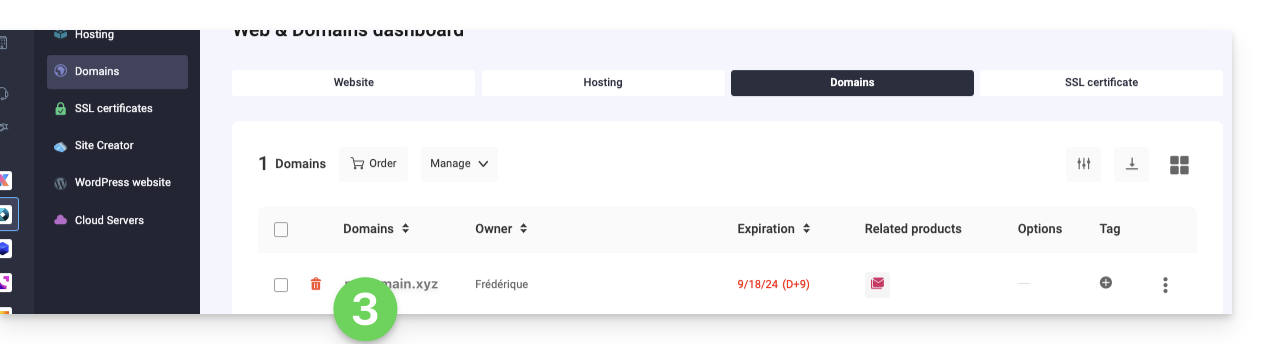
- Click the Restore button:
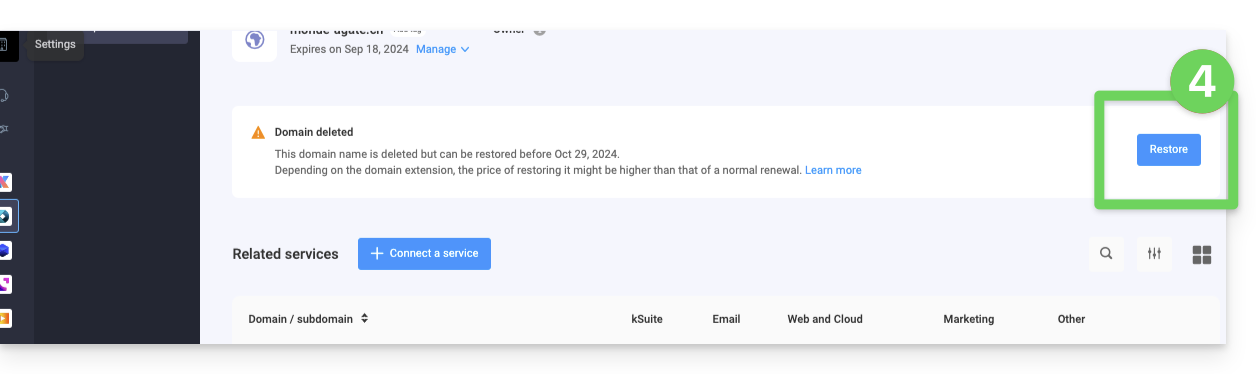
- Follow the restoration steps to the end.
Resolve an issue
What to do if the domain does not seem visible in your account?
- Check that you are logged in with the correct user account, and that you are displaying the correct Organization if you are affiliated with multiple entities.
- Consult the DOMAIN section of the Manager and not in a section of billed or renewable products.
- Repurchase the domain name if it has not been reserved since.
Link to this FAQ: https://faq.infomaniak.com/1825
Has this FAQ been helpful?
This guide provides some information about Windows licenses for Infomaniak Public Cloud.
Windows license information
As a Microsoft Partner, Infomaniak provides and automatically bills Microsoft licenses for the following operating systems:
- Windows Server 2019 standard and datacenter
- Windows Server 2022 standard and datacenter
- Windows Server 2025 standard and datacenter
Billing is based on the number of VCPU of the instance.
The license belongs to Infomaniak and is not the property of the client. It starts when the client uses one of these versions of Windows Server and stops when the instance is destroyed.
There is no license billing in case of pause or stop of the instance.
Microsoft Partner
- As a Microsoft partner, Infomaniak provides pre-activated corresponding images on Public Cloud, via Horizon or the Openstack CLI.
- In case of activation failure, refer to this other guide on the subject.
- As a Microsoft partner, Infomaniak does not allow the use of a personal client license (Bring Your Own License); in the case of using its own license, Infomaniak provides and automatically bills the licenses provided by Infomaniak.
- The client can then activate their OS via the activation procedure.
- As a Microsoft partner, the non-use of licenses (i.e., a 180-day Evaluation version) is also not allowed.
- These versions are for testing in an internal environment.
- In the case of using an evaluation version, Infomaniak provides and automatically bills the licenses provided by Infomaniak.
- The client can then activate their OS via the procedure for converting an evaluation version to a normal activated version.
- If you use Microsoft software within Windows Server that requires a License Mobility, such as Microsoft SQL Server, Microsoft Sharepoint Server, or Microsoft Exchange Server, you must submit the Software Assurance document via the Infomaniak contact form.
Link to this FAQ: https://faq.infomaniak.com/2797
Has this FAQ been helpful?
This guide explains how to obtain a Synology High Availability NAS from Infomaniak to ensure perfect data redundancy in case of an unexpected incident.
Preamble
- A Synology High Availability NAS combines two Synology NAS servers into a single high-availability cluster.
- One server assumes the role of the active server, while the other becomes a passive standby server.
- The active server handles all data requests and services, while everything is continuously replicated to the passive server.
- When the active server is unavailable, the passive server automatically takes over to ensure the resumption of file services and applications in a few minutes.
Order a Synology High Availability (SHA)
To do this:
- Order 2 identical Synology NAS from the site (all models are compatible)
- Contact Infomaniak support specifying…
- …the email address associated with your Infomaniak account,
- …the two NAS you wish to link.
- Infomaniak support will send you an email confirmation when everything is ready.
Link to this FAQ: https://faq.infomaniak.com/2421
Has this FAQ been helpful?
This guide provides 2 methods to change the billing frequency of services subscribed to with Infomaniak.
Change the billing frequency
First method
The first method involves changing the frequency during a payment:
- Click here to access payment management on the Infomaniak Manager (need help?).
- Select the product concerned.
- Click on the dropdown menu to the right of the item concerned to modify the duration for which the payment should apply:
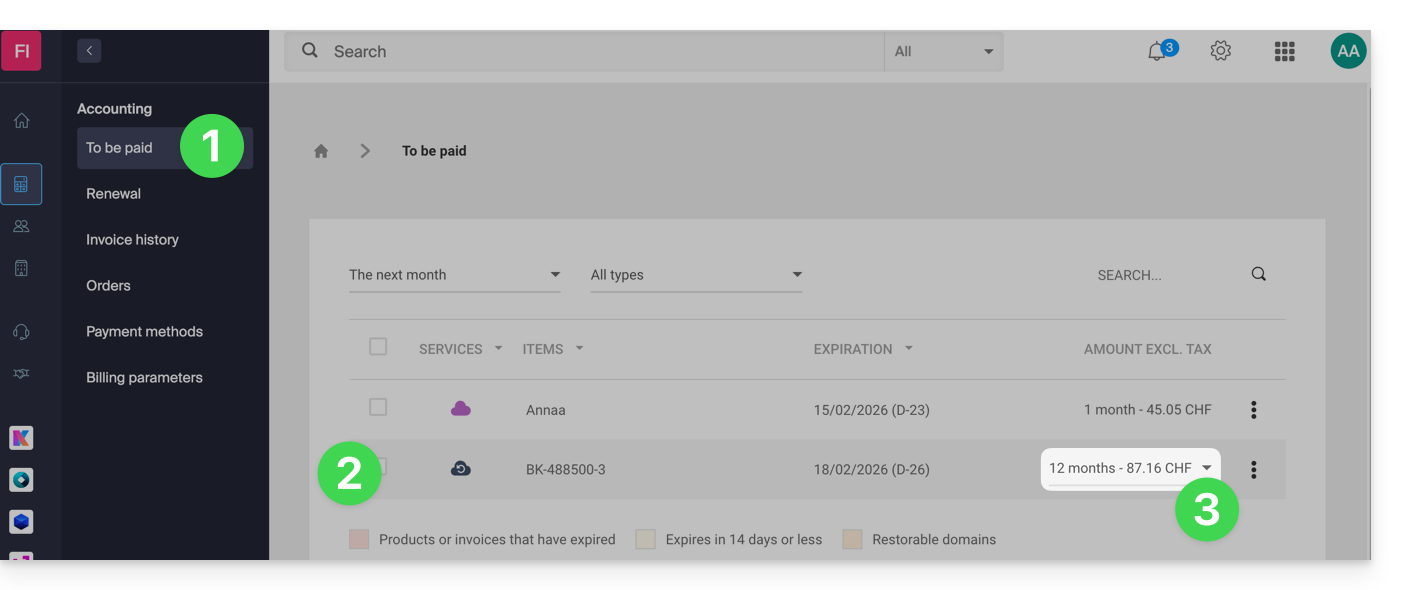
- Click the blue button at the bottom of the page to pay the selection and change the billing frequency of the selected product.
For this to be taken into account, it is essential to change the frequency AND pay the invoice including the product at the changed frequency.
Second method
The second method is as follows:
- Click here to access the management of your products on the Infomaniak Manager (need help?).
- Click on the type of product concerned (e.g. hosting, Cloud Server, etc.)
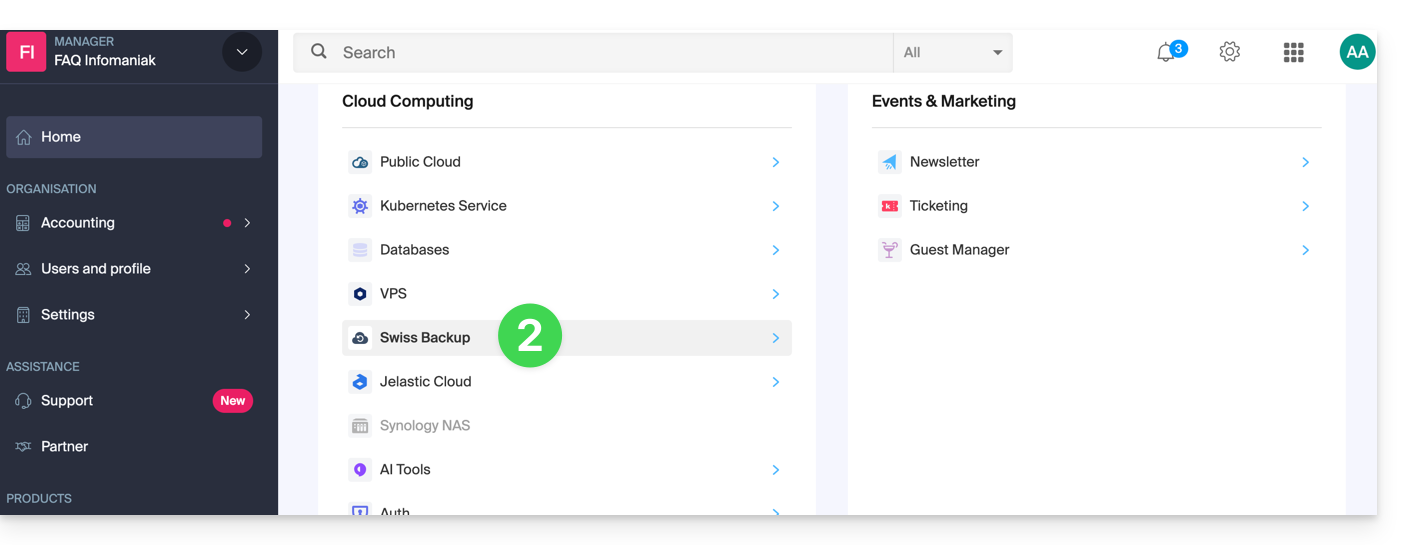
- Click on the name of the product concerned:
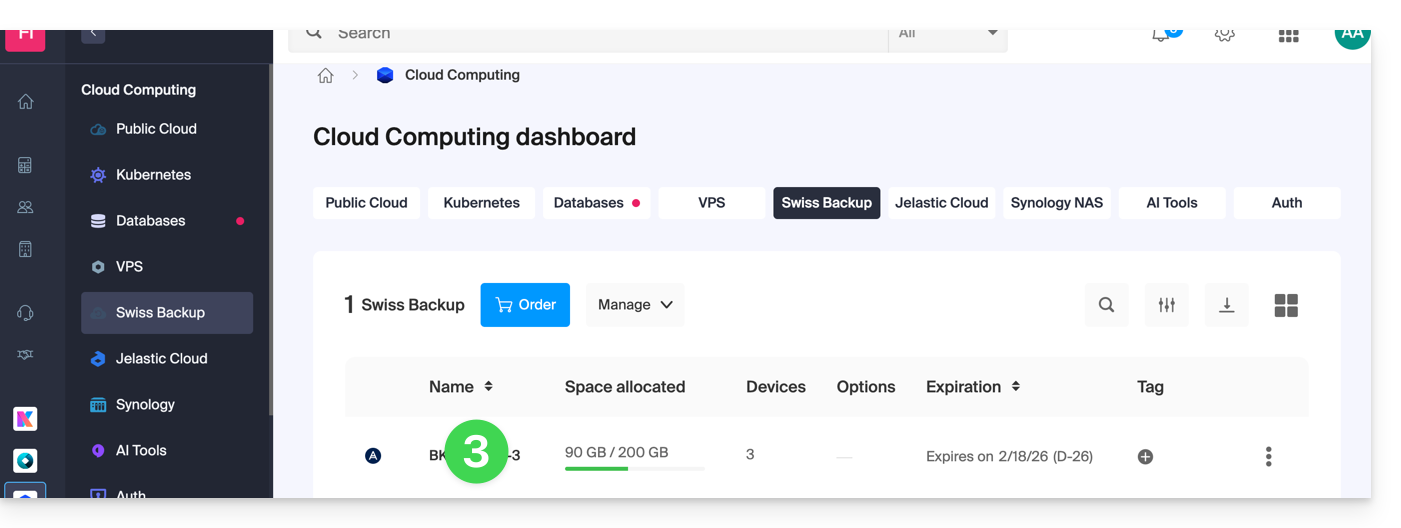
- Click on the Manage button.
- Click on Modify the offer:
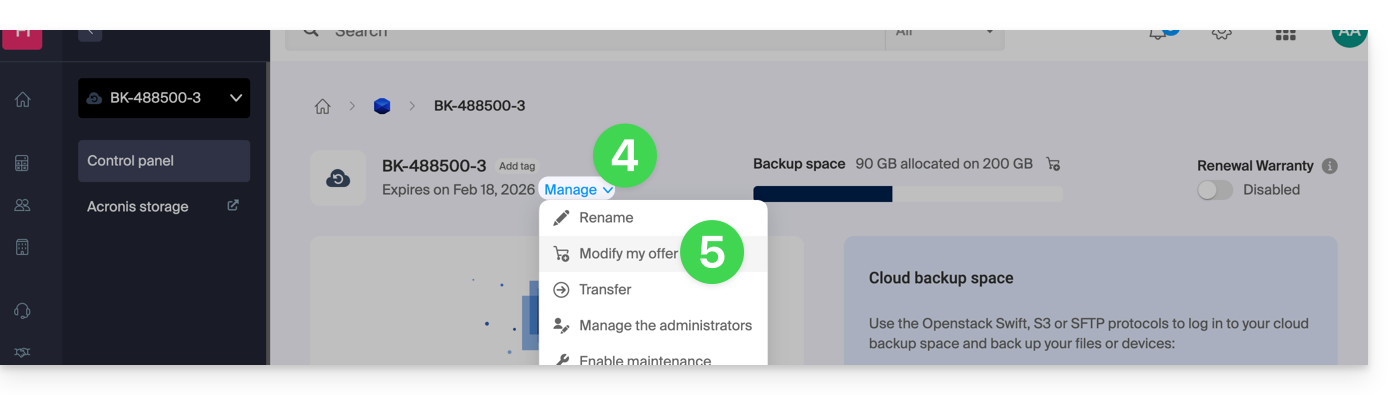
- Choose the desired billing frequency (only possible from a certain amount).
- Confirm the change:

If you switch from annual to monthly billing or from quarterly to monthly billing, only modify the billing frequency during the month preceding the end of the current term. For example, if you paid for or renewed your Cloud hosting for 1 year on January 1st, 2026, do not change the billing frequency before December 1st, 2026, otherwise you will be billed again for all the remaining months of 2026 and it will be necessary to contact Support to be refunded.
Link to this FAQ: https://faq.infomaniak.com/2100
Has this FAQ been helpful?
This guide explains how to set up a pass or subscription renewal system (as part of the Infomaniak ticketing system). This feature will allow visitors with subscriptions to renew them for the new season.
Preamble
- It is not mandatory to have seasonal or annual subscriptions to use the pass renewal, but it is imperative to have a new period with configured passes.
- If the subscriptions are configured with fixed numbered seats on an unchanged seating plan, the renewed subscriptions will keep the same seats for the new season.
- Renewed subscriptions will keep the same QR codes from season to season.
Create a renewal
Prerequisites
- For renewals to be activated on your ticketing system, you will need to create the passes for the new period.
Next:
- Click here to access the management of your product on the Infomaniak Manager (need help?).
- Click directly on the name assigned to the ticketing system concerned by the event (go to the period on which the renewals will be offered).
- Click on Programming in the left sidebar.
- Click on Pass in the left sidebar.
- Click on Subscription renewal:
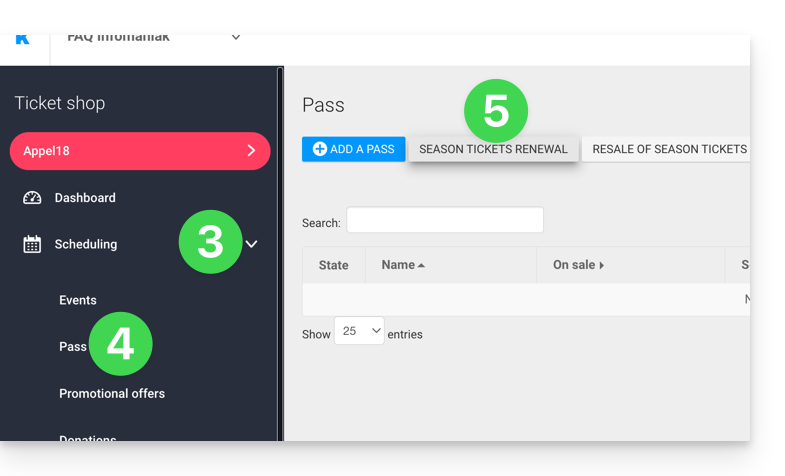
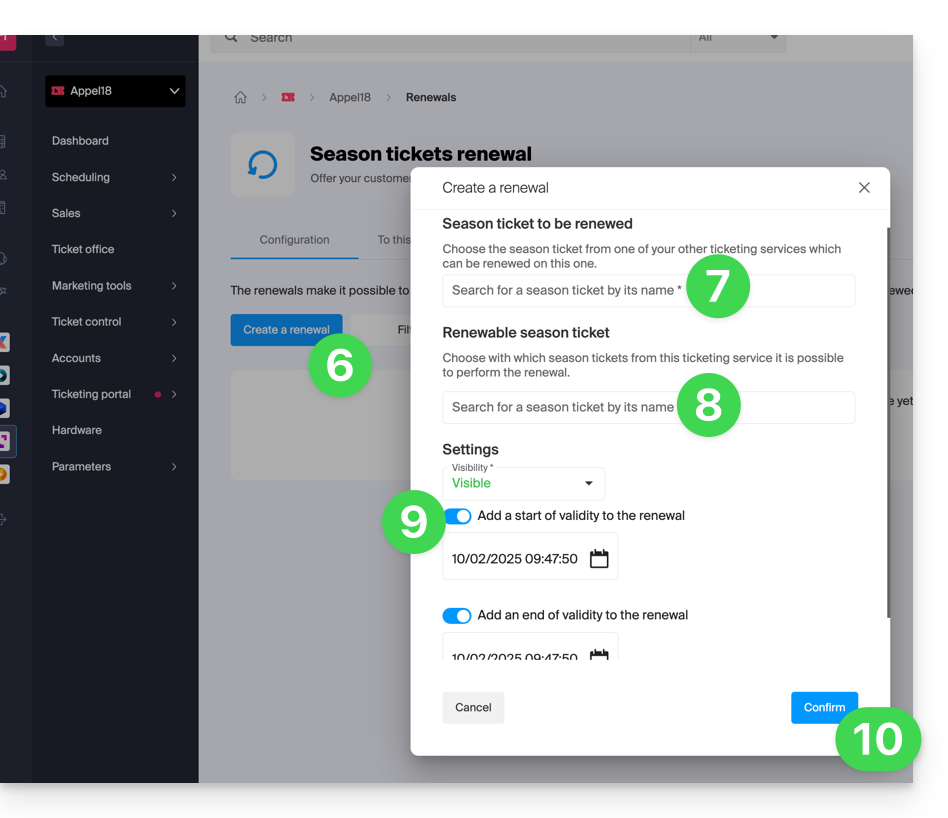
- Click on Create a renewal.
- On the pop-up, enter, in order, the subscription from the previous period…
- …then the subscriptions that visitors can take during the renewal; multiple subscriptions can be offered at this stage.
- If you wish, indicate a validity period for the renewal.
- Click the button to Confirm:
Renewal procedure for the visitor
The visitor can renew their subscription by following this procedure from the renewal link that will be located by default at the bottom of your ticketing page.
For direct integration, it is possible to use the URL of the desired ticketing page, and add /pass-renew at the end. For example: https://infomaniak.events/shop/abcABC4242I/pass-renew
Renewal tracking
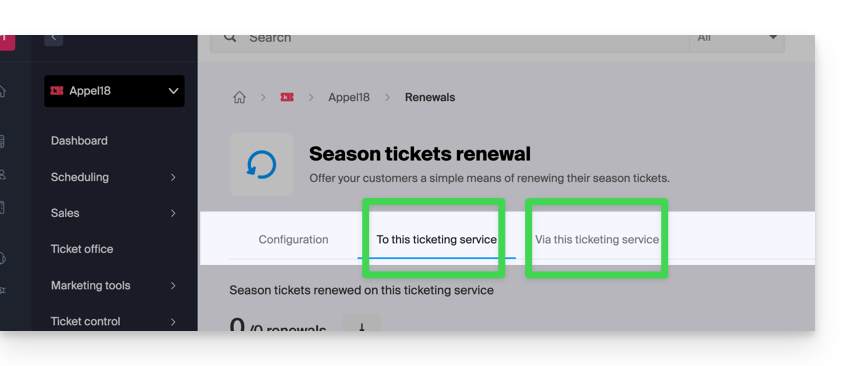
It is possible to track each renewal via the renewal tabs:
- To this ticketing page : indicates the renewals made from a previous season to the one you are currently on
- From this ticketing page : indicates the subscriptions renewed from the selected ticketing page to a new period
Link to this FAQ: https://faq.infomaniak.com/2788
Has this FAQ been helpful?
This guide explains how to resolve an issue with importing a .csv file into a MySQL table. The proposed alternative is to read the CSV file line by line with PHP and insert the data into the MySQL database.
Disabled “LOAD DATA LOCAL INFILE” function
The LOAD DATA LOCAL INFILE function allows importing a CSV file directly into a MySQL table. However, this feature is often exploited by attackers to gain unauthorized access to sites hosted on servers that accept it.
To prevent any security risks and protect customer data, Infomaniak has disabled the LOAD DATA LOCAL INFILE function. Users who import their CSV files via phpMyAdmin (without checking the “CSV via LOAD DATA” option) are not affected.
Here is an alternative method to import CSV-formatted data into a MySQL table. The example below shows how to properly handle errors when opening the CSV file and inserting data into the database.
This script uses mysqli to connect to the database and prepared statements to insert the data. This ensures better security, optimal compatibility with recent versions of PHP, and simple integration into your project, whether in an existing script or a new file located in the /web directory:
$fileName = "data.csv";

// Connect to MySQL database using mysqli
$link = new mysqli("localhost", "username", "password", "database");

// Check database connection
if ($link->connect_error) {
   die("Connection failed: " . $link->connect_error);
}

// Open the CSV file for reading
if (($handle = fopen($fileName, "r")) !== FALSE) {

   // Read each line of the CSV file
   while (($data = fgetcsv($handle, 1000, ";")) !== FALSE) {

       // Prepare the SQL query dynamically
       $query = "INSERT INTO `test` VALUES (" . str_repeat('?,', count($data) - 1) . "?)";
       $stmt = $link->prepare($query);

       // Check if query preparation was successful
       if ($stmt === FALSE) {
           die("Query preparation failed: " . $link->error);
       }

       // Bind parameters (assuming all columns are strings)
       $types = str_repeat('s', count($data));
       $stmt->bind_param($types, ...$data);

       // Execute the query
       if (!$stmt->execute()) {
           die("Query execution failed: " . $stmt->error);
       }

       // Close the statement
       $stmt->close();
   }

   // Close the CSV file
   fclose($handle);

} else {
   echo "Error: unable to open the file.\n";
   exit(1);
}

// Close the database connection
$link->close();
?>
Get help
Unfortunately, it is not possible to specify exactly where in the script these lines of code should be inserted.
If this method causes issues (for example, when importing multiple CSV files simultaneously without an error message), it is possible that the table structure or field indexing is the cause. In this case, contact your webmaster for verification.
Also refer to the official PHP documentation regarding the fgetcsv() function.
Link to this FAQ: https://faq.infomaniak.com/1312
Has this FAQ been helpful?
This guide is intended for users who have chosen Infomaniak, a hosting provider committed to the planet: you will find below the details of the calculation method used to display CO2 on invoices, as well as tips to reduce your own digital footprint.
Preamble
- For Web hosting and Mail services, Infomaniak displays the amount of CO2 emitted annually, data that is based on a rigorous Life Cycle Analysis (LCA) method that adds two key factors:
- Material impact (Full life cycle)
- Thanks to the emission factors of the ResilioDB database, the calculation includes the emissions generated during the manufacturing (BLD), transport (DIS) and end-of-life/recycling (EOL) of each piece of equipment (servers, RAM, disks, etc.).
- Energy impact (Actual consumption)
- The actual electrical consumption of the servers is measured via IPMI probes.
- This energy is then converted into CO2 equivalent according to Infomaniak's specific energy mix, which is very low in carbon (11.77g CO2eq/kWh).
- Material impact (Full life cycle)
- The total impact is then distributed according to the unit of use of the customers (per hosted website or per mailbox).
How can you act at your level?
If the hosting provider optimizes its infrastructures upstream, the end user also plays a key role. Here's how to reduce the footprint of your services.
For Websites
The goal is to minimize the energy consumption of servers and visitors' terminals:
- Technical optimization: Compress images, minify scripts, and use modern formats (WebP).
- Clean design: Limit autoplay videos, ads, and heavy scripts that consume bandwidth.
- Best practices: For WordPress in particular, it is recommended to consult the GreenIT sheets.
For Messaging
Email communication can also be optimized:
- Sobriety: Prefer plain text emails over HTML and limit heavy graphical signatures.
- Attachments: Prefer sending download links (via kDrive or SwissTransfer) to large attachments, or use the compressed PDF format.
- Cleanup: Unsubscribe from unnecessary newsletters and use tracking tools to avoid sending unopened emails.
It is recommended to regularly monitor statistics to improve ecological performance. While waiting for Infomaniak's future integrated tools, it is possible to audit the impact of web pages via GreenFrame.io.
Link to this FAQ: https://faq.infomaniak.com/1160
Has this FAQ been helpful?
Thank you for choosing Infomaniak for hosting your IT solutions and congratulations on optimizing your customer experience. You are taking it to the next level with the Premium Support offer.
Preamble
- Since the beginning of Infomaniak, the Support department has been working to resolve customer issues.
- Free and unlimited, it responds to all your requests in the shortest possible time, this 5/7 from 9 am to 6 pm by phone and 7/7 by email from 6 am to 11 pm.
- Infomaniak does not intervene directly on your machines or networks but may request access to Mail or kDrive on a case-by-case basis.
- Many technical guides answer common questions, and specialized partners offer personalized support beyond the role of the host.
- The Premium Support commitment is for a minimum of 6 months, with no possibility of canceling before the end of the term.
Infomaniak Premium Support
By choosing one of the 3 support options, you benefit from personalized advice, product optimization, and faster response times and extended hours compared to standard support. Here are the details of these 3 versions:
Support Plus
- The partners can benefit from this support.
- A first response is guaranteed within 4 hours (opening hours above).
Support Pro
- A response is guaranteed within 2 hours (opening hours above).
- Emergency calls can be made 24/7.
- You benefit from a designated account manager, 5/7 from 9 am to 6 pm.
Support Enterprise
- A response is guaranteed within 1 hour (opening hours above).
- Emergency calls can be made 24/7.
- Customized advice is provided 5/7 from 9 am to 6 pm.
- You benefit from two designated account managers (including one technical).
Frequently Asked Questions
- What is the VIP code and where to get it?
- What is the technical PDF document?
- Commitment period
- Premium Support limits
- Is it advantageous to pay annually?
- What does guaranteed response time mean?
The entire Infomaniak team is eager to provide you with superior service and help you get the most out of its offers.
Link to this FAQ: https://faq.infomaniak.com/2500
Has this FAQ been helpful?
This guide explains how to view information about visitors who have accessed your Web Hosting sites (traffic statistics).
Preamble
- The result is presented in a simple format with graphs, allowing for easy interpretation.
- Annual, monthly, daily, and hourly statistics are displayed by site, HTTP address, referring site, country, etc.
- Refer to this other guide if you are specifically looking for access logs.
Accessing visit statistics
To view public traffic statistics:
- Click here to access your site management on the Infomaniak Manager (need help?).
- Click directly on the name assigned to the site in question.
- Click on Statistics in the left sidebar:
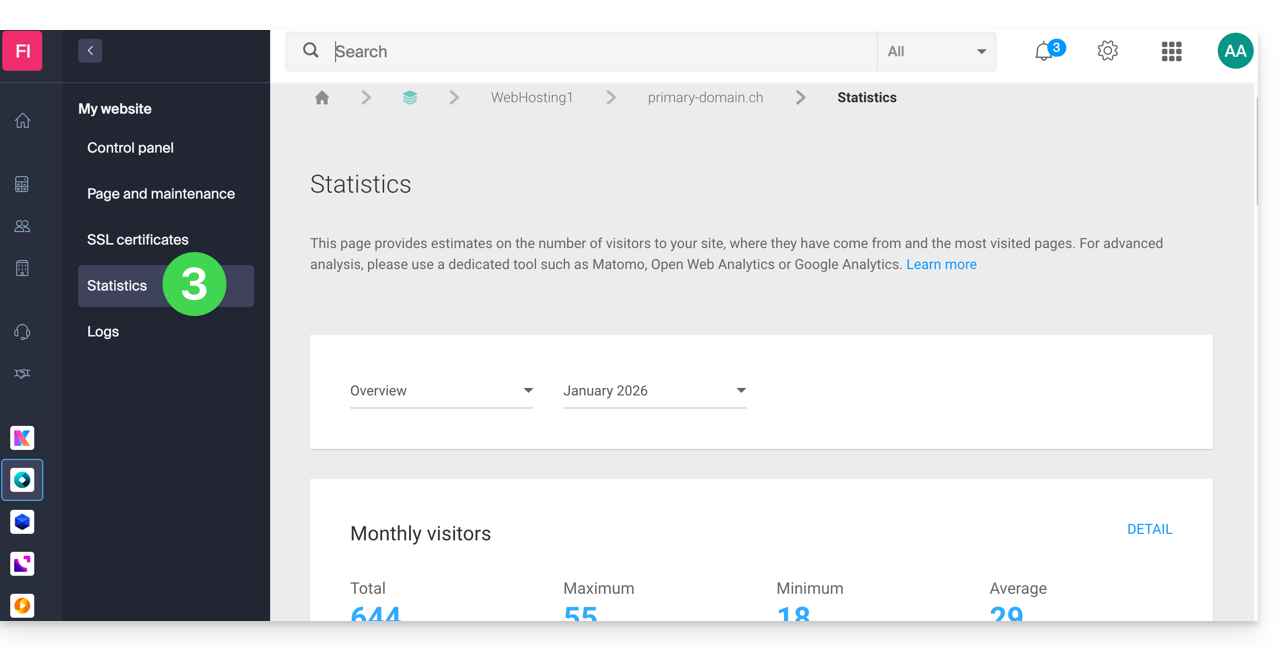
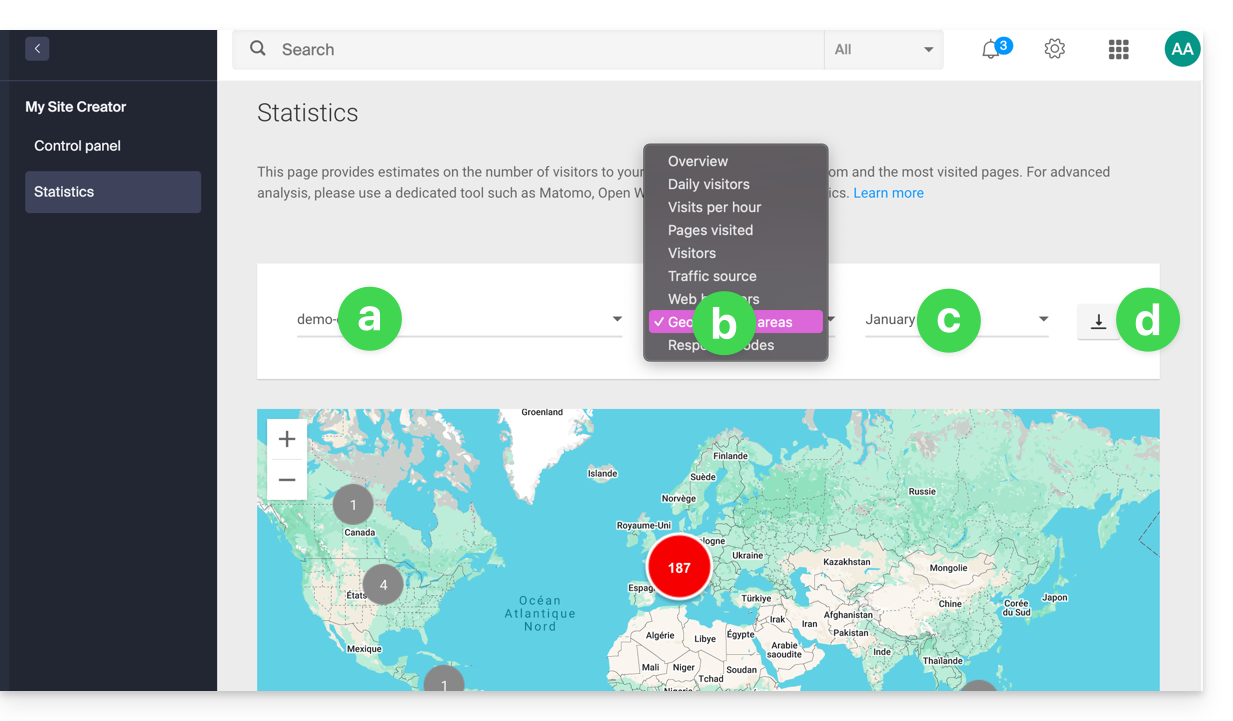
- The upper part allows you to choose:
- the site,
- the type of statistics,
- the period,
- or to download the data for a third-party tool:
Explanation of terms
There is no distinction between humans and robots. You can also use tools like Matomo, Open Web Analytics, or Google Analytics.
| Category | Description | Details |
|---|---|---|
| Hits | Any request addressed to the server. | Includes everything (HTML, images, audio, etc.). Each element requested, visible or not, counts as a hit. It's as if a visitor activates an invisible button with each interaction. |
| Files | Requests requiring data to be sent back. | Records requests that require the server to return a file (graphic, HTML). The difference with hits corresponds to the ratio between incoming requests and outgoing data. |
| Pages | Number of pages displayed on your site. | Measures the HTML pages viewed, excluding graphic or audio files. Each access to a new HTML page is recorded as a page view. |
| Visits | Sessions based on the IP address. | A visit begins with an IP request. If the address returns within 30 minutes, it is a unique visit. Beyond that, a new visit is counted. |
| Sites | Estimation of visits via fixed IP addresses. | Excludes mobile or dynamic connections. This targets regular visitors (companies, institutions) to better understand your target audience. |
| KB | Volume of data sent by the server. | Total amount of data transferred during the period, calculated via log files (with a possible margin of error depending on the size of the files). |
| Total hits | Overall cumulative requests. | A page with 3 images and a text generates 5 hits (the page + the text + the 3 images). This total is therefore much higher than the number of pages viewed. |
| Total Pages / Visits | Engagement indicators. | The number of pages viewed relative to unique visits allows you to assess the interest of internet users in your content. |
| Total unique sites | Number of distinct IPs. | Represents the diversity of traffic sources and helps identify the most active audience segments during the period. |
| Total unique URLs | Distinct paths taken. | Corresponds to the different pages or files consulted, providing an overview of your navigation structure and the most popular content. |
| Total unique referrers | Number of source sites. | External sites that have directed traffic to you. This is a key indicator of the effectiveness of your marketing and partnerships. |
Meaning of 'Commercial (com)' and 'Unresolved'
"Commercial" often represents a significant portion of geographic traffic. It includes users connected through Internet Service Providers (ISPs) using a .com domain. Since this extension is used by many ISPs and companies worldwide, it does not allow for the determination of a specific country.
"Unresolved" are geographically unresolved IP addresses, often due to privacy settings, the use of VPNs, or network restrictions.
Link to this FAQ: https://faq.infomaniak.com/83
Has this FAQ been helpful?
This guide explains how to create a pass (as part of the Infomaniak ticketing system). The pass can then be configured in several steps:
- Define the type during creation (subscription, ticket pack, etc.) as well as basic information and parameters (below)
- Associate events with passes
- Configure the visual and information related to the pass
- Define and collect information from subscribers who will be linked to the passes
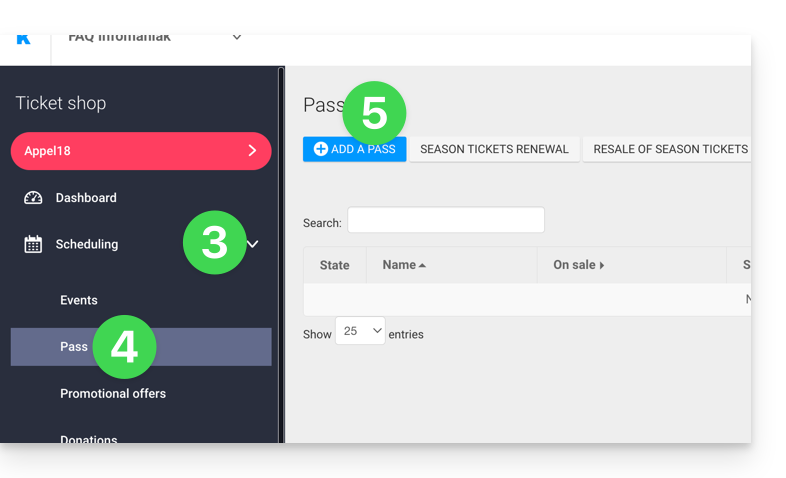
1. Start creating a pass
To do this:
- Click here to access the management of your product on the Infomaniak Manager (need help?).
- Click directly on the name assigned to the ticketing concerned by the event.
- Click on Programming in the left sidebar menu.
- Click on Pass in the left sidebar menu.
- Click on Add a pass:
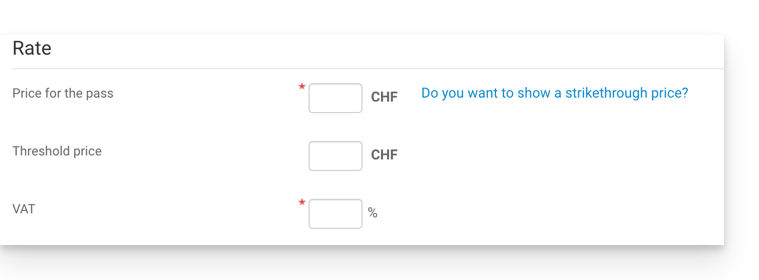
Name and description of the pass
This section allows you to define the name of the pass as well as a description of the pass: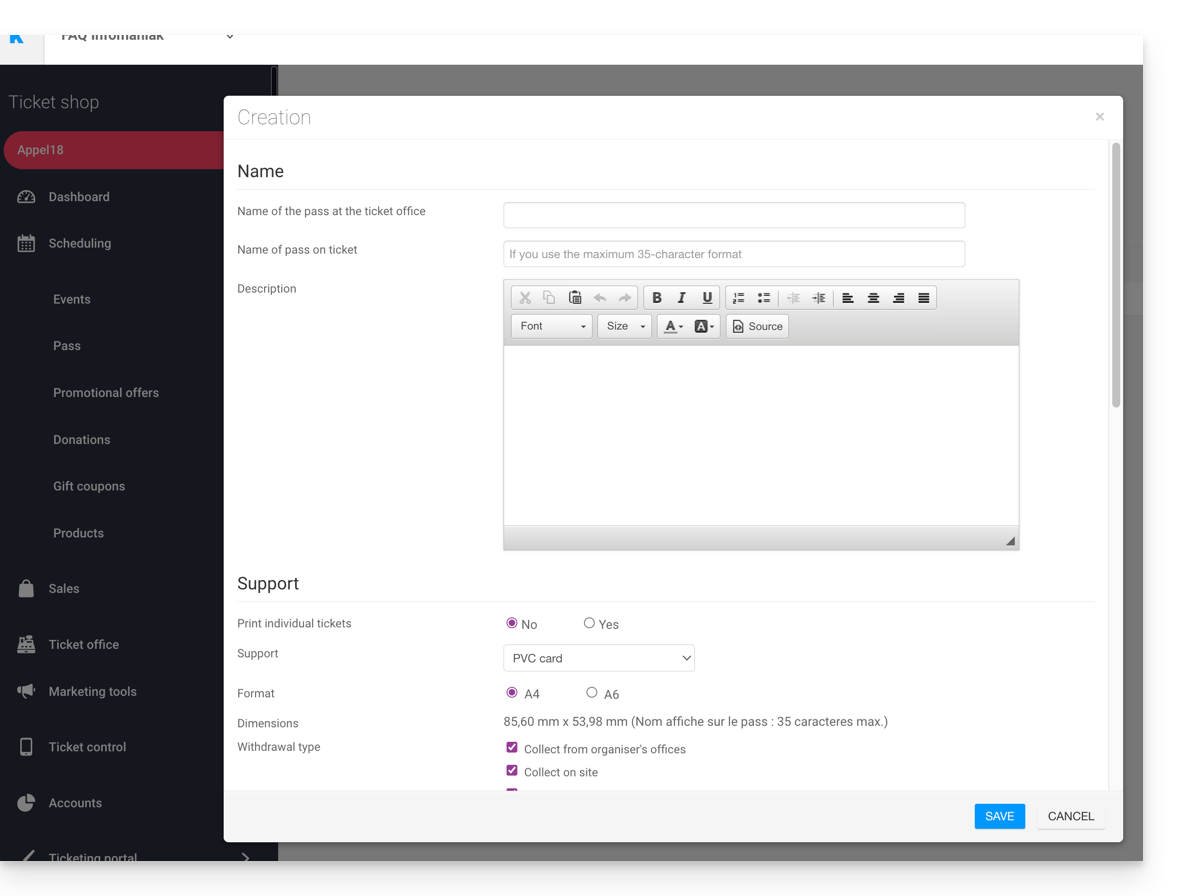
It is recommended to use a sufficiently short name in the Pass name on the ticket section, which will be printed directly on the pass.
Pass support
You can choose two types of support:
- The PVC card, credit card type, often used for seasonal or annual subscriptions.
- Pay attention to the size of the text used for the Name displayed on the ticket which will be taken up here and which will be limited to 35 characters.
- Choose the withdrawal mode that will be made available to the customer.
- The Phone/Paper format, which prioritizes the use of the phone but also allows printing the ticket on A4 or A6 paper.
- The visitor will receive their pass in digital format in an email.
- They will be able to download their pass in PDF format from the link included in the email.
Infomaniak does not send physical passes or tickets to visitors. The sending of the pass is the responsibility of the organizer.
The appearance of the pass can be configured once the pass is created (see step 3).
Manage the display during scan checks
The two options present here allow you to define the parameters used for pass control:
- The passes will have random barcodes upon creation, but the organizer can modify them freely from the management of each pass.
- The icon that will be displayed during the pass check:

Pass price
- Enter the desired amount:
Validity period
- The validity period will be used if you want to ensure that this pass is only available for a limited period.
- It is possible, for example, to configure a ticket pack that can only be used during the winter season for a seasonal promotion.
- Note that if a pass is outside the validity period, it can be purchased but cannot be used or accessed to add tickets to it.
Pass types
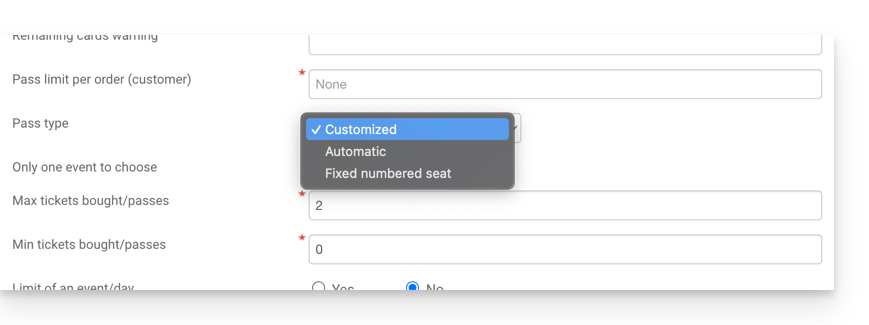
1. Custom
This pass allows the customer to choose the events and dates from the options provided. You must therefore decide on the limitations of the pass:
- Single event choice:
- The customer can only choose one event, but depending on the ticket limit, they can choose one or more for the chosen event.
- Warning: When a customer buys a card, the system will deduct the number of seats entered in this field from all events linked to the pass.
- These seats will be "reserved" for this pass.
- When the customer passes through the scanners, the system will release the seats for all other events.
- Maximum tickets
- The number of tickets that can be associated with the pass.
- Minimum tickets
- If a minimum of 0 is set, the customer can buy an empty pass and choose their seats later.
- Any number other than 0 will force the customer to choose tickets when purchasing the pass.
- Limit of one event per day
- The pass has a limit of one event per day.
- The customer cannot order more than one ticket per day for this pass.
- All seats on the same day
- Allows you to choose a date and then choose the events for that date.
- Limit of one performance per event
- Allows you to define whether the customer can participate multiple times in an event (in the case of multiple dates).
- If enabled, the customer can only take one ticket per event of the "same name" (or "same performance") for this pass.
- Warning: The spelling of the event name must be identical.
- Minimum number of different events / pass
- The customer will have to purchase as many tickets for different shows available on the pass.
- It will be used to prevent the visitor from taking all their tickets for a single show.
2. Automatic
The pass will not be customizable by the customer: it will automatically take the tickets that will be defined by the organizer.
3. Fixed numbered seat
In the event that the event takes place in a venue with a seating plan, this type of pass allows the customer to choose the pass with a numbered seat on the seating plan. This seat will remain unchanged for all events associated with the pass taking place in the same venue.
An Organizer may want to set up passes with registration validation.
After creating the pass, the next step is to associate the corresponding events and configure the various available options.
Link to this FAQ: https://faq.infomaniak.com/2770
Has this FAQ been helpful?
This guide covers data protection regulations in Switzerland and Europe, and the measures taken by Infomaniak to secure your customer data and data within Web Hosting and Mail Services.
Understanding the difference between data security and data privacy
Data security aims to prevent unauthorized access to your information. It relies on measures such as encryption, firewalls, or VPNs. A security breach can have disastrous consequences: imagine a hacker stealing your entire customer database and demanding a ransom to recover it. This type of attack – ransomware – can cripple a company overnight.
Data privacy concerns who can access your information and how it is used. Even if your data is secure against hacking, it can be collected, analyzed, and resold… perfectly legally.
Example: you carefully store your customers' information, but without realizing it, a service you use shares – anonymously – this data with third parties. Result? Your competitors can obtain valuable insights into your market and target your own customers without ever needing to hack into your systems.
FDPA & GDPR
In Switzerland, the FDPA (Federal Act on Data Protection) and nFDPA (for the "new Act" in force since September 2023) protect the privacy of residents by regulating the collection and processing of personal data by organizations.
The EU's GDPR (General Data Protection Regulation), which has been in effect since May 2018, affects global companies that process the data of European residents, including in Switzerland. While the Swiss Federal Act on Data Protection (FADP) applies to the data of Swiss residents, the GDPR concerns the data of EU residents. Swiss companies that manage European data must comply with the GDPR requirements, including the designation of a Data Protection Officer and the performance of Impact Assessments in the event of risky processing.
Your Role as an Infomaniak Customer
With regard to the data hosted that belongs to you – and in particular if this data contains personal data of your visitors, contacts or customers – it is your responsibility to ensure its compliance.
When processing this personal data, it is essential to inform users about the purpose and methods of this processing. This is generally done through a privacy policy or a data processing agreement (DPA).
Agreement between Data Controller and Data Processor
A DPA (Data Processing Agreement), called AVV (Auftragsverarbeitungsvertrag) in German, ATD (Accordo di Trattamento dei Dati) in Italian and CTA (Contrato de Tratamiento de Datos) in Spanish, translates to Data Processing Agreement or Data Processing Contract.
This is a mandatory contract provided for by the GDPR between a data controller and a data processor. It defines the purpose, duration, and nature of the processing, as well as the obligations and security measures. Its objective is to protect the personal data entrusted to a service provider.
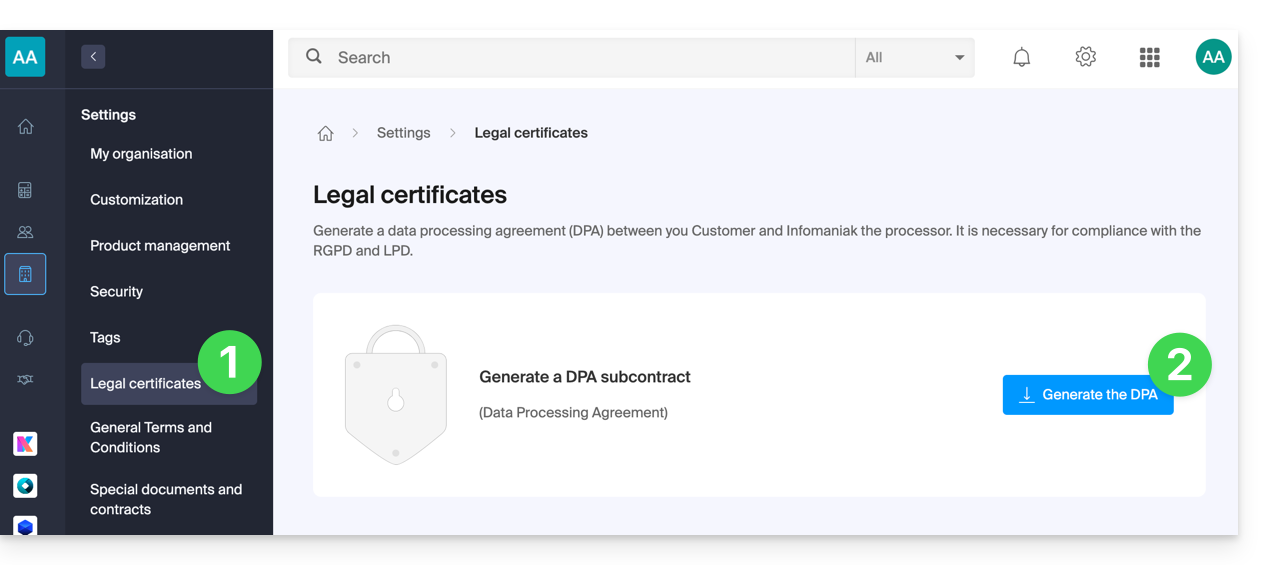
This GDPR certificate (in PDF format) can be generated and downloaded from the Manager (accessible to users of the organization who are owners or administrators):
- Click here to access the Data Processing Agreement (DPA) management in the Infomaniak Manager (need help?).
- Click the Generate button to download the customized PDF document:
Here are some tips:
- Provide information on all data processing activities, not just those related to the website.
- Ensure easy access to the privacy policy on the website, for example in the footer of each page.
- In general, it is not necessary to obtain user approval for privacy policies (e.g., for forms); simply indicate where to find the policy (example Site Creator).
- Keep in mind that the new, more detailed information rules may require adjustments to existing privacy policies.
It is crucial to differentiate between the security of the infrastructure where your data is hosted and the management and implementation of data on your side. As a hosting provider, Infomaniak acts as a data processor for your GDPR-related obligations. In this context, its privacy policy and cookie policy, as well as its terms and conditions, provide you with the necessary guarantees regarding its compliance as a data processor.
If necessary, you can find professionals or online guides to help you with the compliance process.
Infomaniak's Role
Like companies that work with user data, Infomaniak must comply with the LPD and, because some of its users are European citizens, also with the GDPR:
- the data privacy policy details the data that Infomaniak stores to provide and deliver its services
- the policy related to the protection of your personal data describes Infomaniak's commitments as a subcontractor that hosts all of your data, including personal data
These commitments, as outlined in the general and specific terms and conditions, are as follows:
- store your data within data centers exclusively located in Switzerland and never transfer your information outside of these infrastructures
- apply rigorous security standards and continuously improve processes to guarantee a high level of security across all services
- promptly inform you in the event of a data breach
- ensure transparency towards you when Infomaniak uses subcontractors that may process your data
- strengthen and develop physical security measures to prevent unauthorized access to the infrastructures where your data is stored
- implement physical and/or logical isolation systems (depending on the services) to separate the hosting of different clients; in addition, Infomaniak conducts annual penetration tests to guarantee data isolation between clients
- demonstrate a high level of responsiveness in securely updating the systems under their responsibility
Manage cookies on the infomaniak.com website
When you visit the infomaniak.com page, you must make a choice regarding the acceptance of certain cookies. To change this choice later, access your preferences from the footer of the website: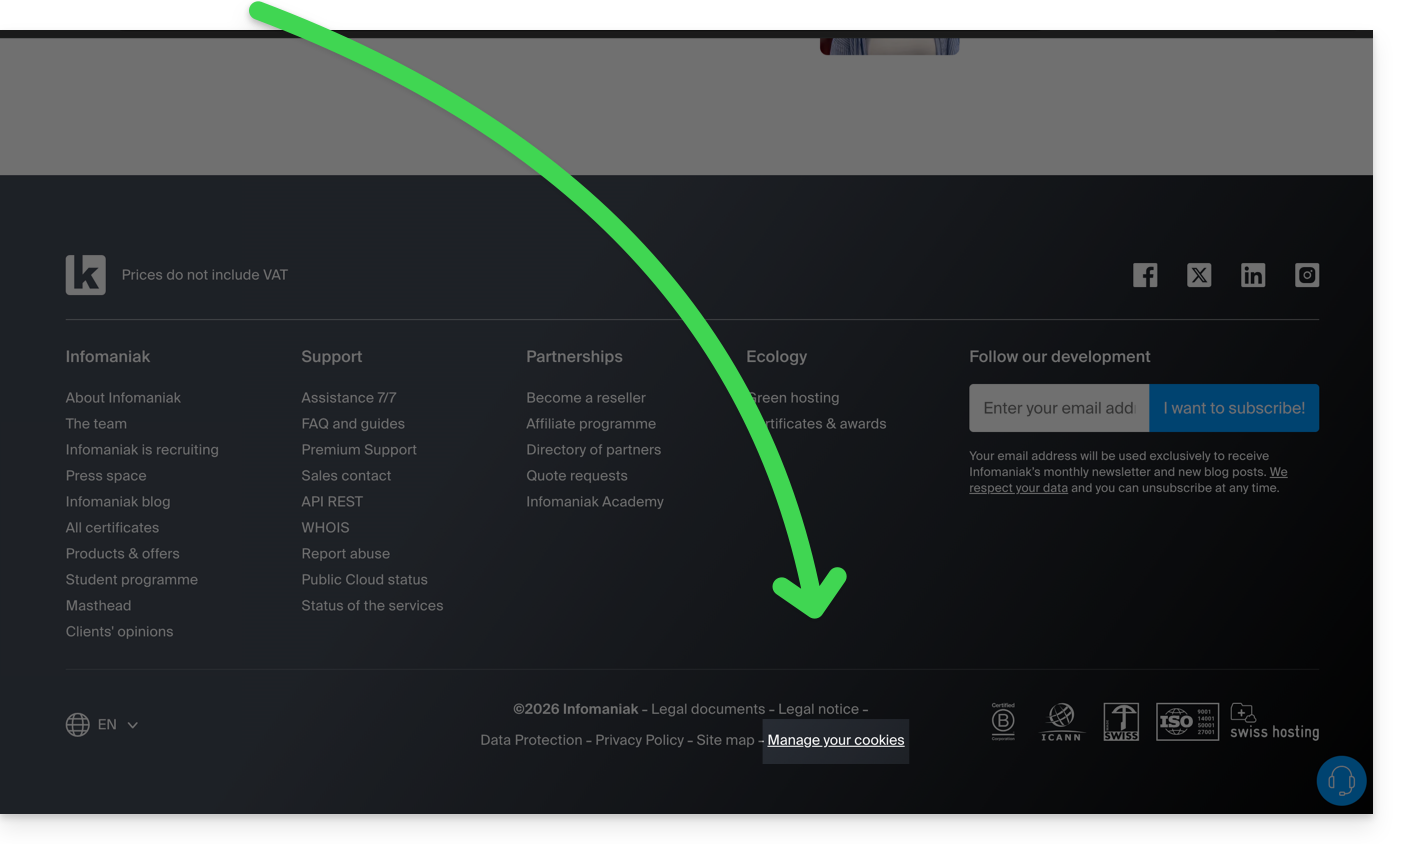
Link to this FAQ: https://faq.infomaniak.com/2820
Has this FAQ been helpful?