
Knowledge base
1000 FAQs, 500 tutorials and explanatory videos. Here, there are only solutions!
Here are the different ticket formats that are available at the time of the on-site sale (as part of the ticketing system Infomaniak).
Printing with thermal printer
- Show Format : 82 x 203.2 mm

- Cinema Format : 101.6 x 76.2 mm

Use of digital banknotes
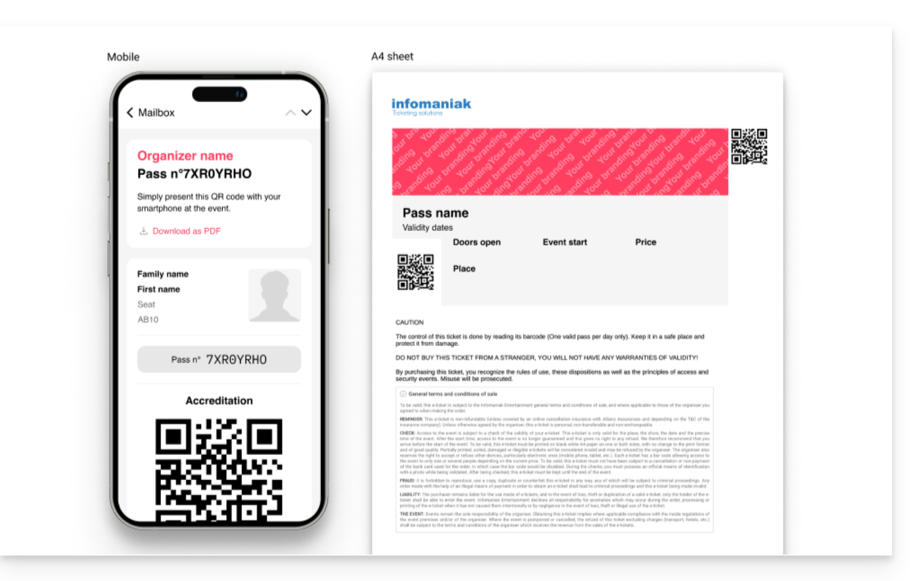
You can also send digital tickets directly to the customer's email address. To do this, when finalizing the order, you only need to link a customer card and the option to send the tickets will appear directly on the validation window of the order:

This guide details the integration tool of your ticket office (as part of the ticketing system Infomaniak) to best promote your events.
Preamble
- More ergonomic and efficient than before, you'll only need a few clicks to set up all the online store options and publish them to make your sales.
- Now, complete the links you need to update every season or edition of your event: keep the same link, and simply update the elements contained in it.
Your old ticketing URLs will continue to work and will have automatic redirection to your new online store. However, it is recommended to migrate on this new tool for any new season or edition of your events.
Manage the presentation of your events online
To access the online ticketing options:
- Click here in order to access the management of your product on the Manager Infomaniak (Need help?).
- Click directly on the name the ticket office concerned.
- Click on Ticket Portal in the left side menu:

- Click on Online store in the left side menu:

You arrive on the page of the online shops of the Ticket portal:
A. Create a store visible on infomaniak.events 
- Make your events visible in the search for the Infomaniak event portal.
- Allow traditional search engines to reference your events.
- Customize the appearance of your ticket office's main store.
B. Integrate your multiple ticketing machines
- Go to a page bringing together all the shops "infomaniak.events" of your Organization.
C. Create a custom shop
- Create shops for your specific uses (integration on your pages, e.g.).
- Add HTML / JavaScript or CSS scripts (for advanced users / developers).
This guide explains how to exchange a ticket via Infomaniak’s Ticketing tool. If you have the wrong date or tickets, this operation will allow you to make an exchange and order new tickets using the Ticketing service
Enter the tickets to be exchanged
- Go to the organiser’s ticketing service, as if ordering tickets
- Scroll to the bottom of the page and click on the button Ticket exchange
- In the new window, enter the email address used when booking, and the number(s) of your tickets and click on Validate
- Click on Exchange more tickets or Order tickets to proceed to the next step
Order the new tickets
- Proceed as you would for a normal ticket order, choosing the new event and date, and the number of tickets to be ordered.
- When the basket is validated, the exchanged tickets will be shown as credits at the top of the page.
- Complete the order, and if necessary, pay the balance of the basket
This guide explains how to implement an invoice payment (as part of the ticketing system Infomaniak).
Preamble
- This payment method is ideal to allow your customers to pay for their order later.
- Whatever the method of payment, it is you who cash the money. So it's up to you to validate the command manually.
- In case of transfer the payment will arrive directly on the RIB / IBAN configured in your ticketing under Accounting then Cashing Infomaniak in the left side menu:

- This method of payment is subject to a fixed fee of 0.20 cts per ticket (see rates).
Activation of payment on invoice
To this end:
- Click here in order to access the management of your product on the Manager Infomaniak (Need help?).
- Click directly on the nameallocated to the ticket office concerned by the event.
- Click on Sales in the left side menu.
- Click on Methods of payment in the left side menu:

- Pass the toggle switch button on ON to the right of the item On Invoice:

Payment settings on invoice
Information on the method of payment by invoice
The first part allows you to define the name of this payment method, add a description and add a message at the end of the generated document:
Here's the result:
Customisation of the payment method on invoice
You can customize the invoice to send it to the customer and put a personalized message.
If you wish to send the invoice directly to the customer, in the form Mr. Smith, Please make sure that the customer records have the fields Civility and Name filled in and informed.

Here is an example of customization with the above settings:
Payment method parameters
The following parameters are used to manage the use of this method of payment:
- The possibility to choose the availability of this method of payment:
- client: for online orders by the visitor
- reseller and administrator: for the web and mobile window
- The ability to set a deadline to use this method of payment when ordering.
- It will always be possible to pay an invoice generated before the deadline, but it will no longer be possible to choose this method of payment during orders during the period indicated in this field
- Add a file fee to offset the cost of managing this method of payment.

Managing the maturity of payments On Invoice
In order to ensure that places will not remain blocked indefinitely by this method of payment, you can define a payment period Be aware of this other guide if you are looking for information on the number of days before each recall and the number of reminders.
Validation of an order pending payment
There are several ways to validate a payment method:
From Manager Infomaniak
- Click here in order to access the management of your product on the Manager Infomaniak (Need help?).
- Click directly on the nameallocated to the ticket office concerned by the event.
- Click on Sales in the left side menu.
- Click on Commands in the left side menu.
- Click on an order pending payment.
- Click on the tab Transactions, overfly payment on invoice not validated and click on the icon Validate:

From the Web Shop
- Log in to Web Window.
- Launch an order search pending payment by:
- Order number
- Name of client
- Click on the order pending payment.
- See you on the tab Transaction and click on the icon Validate:

From the Mobile Shop
- Log in to Mobile counter.
- Launch an order search pending payment.
- From the payment mode list, choose the one to validate and select Confirm:

This guide explains how to set up automatic e-mails to visitors who have ordered a ticket (as part of the ticketing system Infomaniak).
Preamble
- This allows to send a reminder email to your customers 2 days or more before the event with ticket information, address and schedule of the event.
Enable and preview automatic mail
Prerequisites
- You'll have to create an event in order to access the visual options of mobile tickets.
- The image at the top of the mail will take over the logo of your ticket office to set up in Parameters and Ticketing parameters.
Next:
- Click here in order to access the management of your product on the Manager Infomaniak (Need help?).
- Click directly on the nameallocated to the ticket office concerned by the event.
- Click on Tools Marketing in the left side menu.
- Click on Automatic e-mails in the left side menu.
- Click on the button for Create an automatic e-mail:

- Configure the cases in which to send your automatic messages (several configuration pages).
You can also edit, preview, enable/ disable or remove a message already written, even if it is not active at the moment. Click on the action menu to the right of the item:
This guide explains how to create and manage promotional codes.
Create a promotional offer
- Connect to your Infomaniak space (manager.infomaniak.com)
- Go to the
Ticket Office
- From the left menu under Programming click on Promotional offers
- Click on Get started
Promotional offer setting
- Set a name for the promotional offer. This name will be visible to the customer when using the promotional code
- Select the type of reduction. It is possible to put a percentage on the basket, a fixed amount per ticket/pass, or a fixed amount on the basket total.
- Define the currency and price of the discount or discount percentage to apply
- It is possible to define 3 additional options
- The maximum number of tickets that can benefit from this offer. Once this quota is reached, no promotional code can be validated. Useful if you want to give a large number of codes, but only the first X people to arrive will be able to take advantage of the offer. Please note that orders in progress will count towards the quota unless the order is canceled en route.
- The maximum number of tickets per order. If the order has more than this number, an error message will indicate that the code cannot be used because the maximum number has been exceeded.
- The validity period. It defines when this offer can be used
Configuring promotional offer limitations
Steps 2 and 3 allow you to define the events, subscriptions, and customers who can benefit from this promotional offer.
- Limit to events: Limit to events, certain areas, or even certain prices. It is also possible to set maximum quotas and limits per order per item.
- Limit to passes/subscriptions: Limit this offer for a particular pass
- Limit to customers: Limit to customers who have already ordered on the ticket office and who are therefore already present on the customer list on the ticket office, to those who have subscribed to the newsletter, or to a manually chosen customer list
Add codes
Once the offer has been created, you must now create the codes that customers can use when ordering.
- Click on the blue Add codes button at the bottom of the page
- Choose code type
- Custom: Allows you to set a code manually, as well as the maximum number of uses. It is thus possible to generate codes with words that can be easy to memorize or broadcast on different media, even personalized for certain people.
- Random: Generates a number to be defined with a unique code randomly. Useful if the code itself is of little importance
- Once the codes have been generated, it is possible to download a CSV file of all the codes by clicking on the icon
- The different options also allow you to manage the different promotional code limitation conditions.
Learn more
- Getting started guide: Ticketing
- Automatic promotional offer
This guide explains how to manage the different payment methods (as part of the ticketing system Infomaniak).
Payment methods available
There is a need to differentiate between the 3 payment methods available:
- online methods
- methods on site or in your account directly
- exchange payments
| 1. online | 2. on-site or directly in your account | 3. exchange/invitation | |
|---|---|---|---|
| Methods of payment | Postcard Credit card Twint | in cash Postcard Credit card payments per invoice on-the-spot | exchanges on the window exchanges on online ticketing free / invitation |
| Rates | 0.89 + 1% + bank charges | 0.20 per banknote | free |
In addition, there is a Test credit card which makes it possible to simulate a payment.
Enable and manage payment methods
To this end:
- Click here in order to access the management of your product on the Manager Infomaniak (Need help?).
- Click directly on the nameallocated to the ticket office concerned by the event.
- Click on Sales in the left side menu.
- Click on Methods of payment in the left side menu:
- To enable or disable a payment method, pass the toggle switch button on ON or OFF to the right of the desired payment method:

- To manage the details of a payment method, click on the left arrow of the payment method to set up different aspects:

- Designation : the name indicated for this method of payment
- Description : for the description of this method of payment in the case where explanations would be necessary
- Minimum necessary for the method of payment to be available
- Mode availability payments (customers, resellers and administrators)
- Costs of folders or banknotes (for the exchange mode)
This guide explains how to create a new ticketing service on your ticketing tool. Each period therefore allows you to distinguish each edition of your ticketing services or to manage different ticketing services managed by an organiser. Each ticketing service can be managed independent of the other ticketing services in the tool.
Requirement: Create the ticketing tool online
- Log in to your Infomaniak account
- Click on the Ticketing tile or go to the online sales page
- Click on Test free of charge at the top right of the page

Create the period
- If ticketing services already exist, click on the blue Add
button - Indicate the name of the ticketing service, the currencies to be used and the languages to be used on the ticketing service
- Indicate the user’s contact details
- Select the default appearance of the ticketing service
This information can be modified at any time in the ticketing service settings
Find out more
- Quickstart guide: ticketing service
- Create an event in the ticketing service
- Create an event with several dates
- Create a pass or a season ticket
This guide explains how to make sales from an organizer account as well as on-site sales using Infomaniak's Ticketing tool. If you want, for example, to print free tickets, invitations, VIP tickets, or paid tickets, you can place an order from the counter and generate these tickets.
Access the Counter
- Log in to your Infomaniak space (manager.infomaniak.com)
- Go to the
- Click on Counter in the left menu
Create a New Order from the Counter
- Choose whether the sale concerns an event, a pass, or a gift card
- Choose the desired event or item, as well as the number of tickets to add to the basket
- Set parameters in the basket, such as the seat on the seating plan, form information by rates, and the use of a promotional code or gift card.
- It is possible to customize the information on the tickets to be printed at this time
- Choose a payment method. For a free ticket, such as an invitation, select the Free/Invitation payment method
- Once the information is entered, Validate the order
Associate the Order with a Customer
On the counter, assigning an order to a customer is optional. It is necessary to enter it if you want to be able to find an order with the customer's name or email, send them tickets by email, or display the customer's name and surname on the ticket.
To do this, click on the Customer tab and search for an existing customer or create a new customer record.
Print or Send Tickets
You can print or send tickets by email. To do this, go to the corresponding tab and choose the type of printing or email sending.
Other Uses of the Counter
The counter allows for other important operations, such as ticket exchanges or reservation validations.
For more information on these operations, please refer to the relevant guide:
This guide explains how to add users as resellers so they can sell tickets for your events (as part of the ticketing system Infomaniak).
Preamble
- If you have sales points, partners, or simply caisses at the entrance to the event, you can give them access Resellers.
- You will be able to grant them sales rights from the counter.
- Profile management is done at the level of your Organizer account; be aware of this other guide on this subject.
Add Reseller
To this end:
- Click here in order to access user management on the Manager Infomaniak (Need help?).
- Click on the button Add User Top right:

- Follow the creation assistant by filling in the user's various information.
- Choose User with limited rights at the role selection stage:

- Choose the Ticketing at the selection stage of the products to which the user will be able to access:

- A side pane opens — select the boxes in order to give access to the tickets concerned:

- Finish the addition, an e-mail is sent for the activation of the user account.
Next step
You can now create profiles to detail reseller accesses...