Knowledge base
1000 FAQs, 500 tutorials and explanatory videos. Here, there are only solutions!
This guide details the Kubernetes system of Public Cloud that can be ordered and installed directly on your Manager:
Interfaces and pricing for the Kubernetes Service of Infomaniak
Infomaniak offers a complete Kubernetes solution with several management interfaces and flexible pricing tailored to your needs.
Available interfaces
The Infomaniak Kubernetes service offers several access and management methods:
- Kubernetes native API: Interact directly with your cluster via the standard Kubernetes API
- kubeconfig file: Easily configure your command-line tools like kubectl
- Terraform/OpenTofu: Manage your infrastructure as code (IaC)
- Kubernetes Manager: Intuitive web interface to manage your clusters
- Infomaniak CLI: Automate your operations via command line
Pricing structure
The Kubernetes service from Infomaniak offers several plans that correspond to the price of the control plane. It is important to note that instances (compute nodes) are not included in this base price.
The instances necessary for the operation of your applications are billed at the standard rates of Infomaniak's Public Cloud. You automatically benefit from Infomaniak's pricing advantages, including included traffic and low-cost instances, available on the Prices page.
- Instances (VMs): starting at an hourly rate based on the chosen configuration
- Block Storage: starting at a rate per GB per month
- Snapshot: starting at a rate per GB per month
This structure allows you to pay only for the resources you actually use, while benefiting from a fully managed Kubernetes control plane by Infomaniak.
This guide concerns the creation of private networks between different Infomaniak hosting offers such as VPS Cloud / VPS Lite, Public Cloud, NAS Synology, etc.
Create a VLAN between VPS
It is not possible to create a private network (VLAN) between VPS Cloud / VPS Lite and other products, such as NAS Synology for example, because they are installed on separate networks.
However, it is possible to create a VLAN between at least 10 VPS Cloud / VPS Lite that you own (contact Infomaniak support) however a dedicated private network will not be able to communicate with another.
It is recommended to migrate to the **Public Cloud** offer to create such private networks between VM.
This guide concerns Public Cloud and the possibility in some cases to increase resources by requesting the activation of certain services.
Prerequisites
- You will need to provide certain information via kCheck and, if necessary, to recharge the available credits.
Enable performance levels and special services
To obtain the possibility to create instances with a higher performance level and/or specific resources such as the ability to use instances with GPU, contact the support department of Infomaniak by email specifying the Public Cloud project ID (PCP-XXXXX) and the desired resources.
For example:
I would like to increase the quotas for project PCP-XXXXX, can you activate resource level 2 and large sizes (XXL).
This guide explains how to navigate the Public Cloud interface from the Infomaniak Manager and presents the various limits of this service.
Discovering Public Cloud
To access the Public Cloud homepage:
- Click here to access the management of your product on the Infomaniak Manager (need help?).
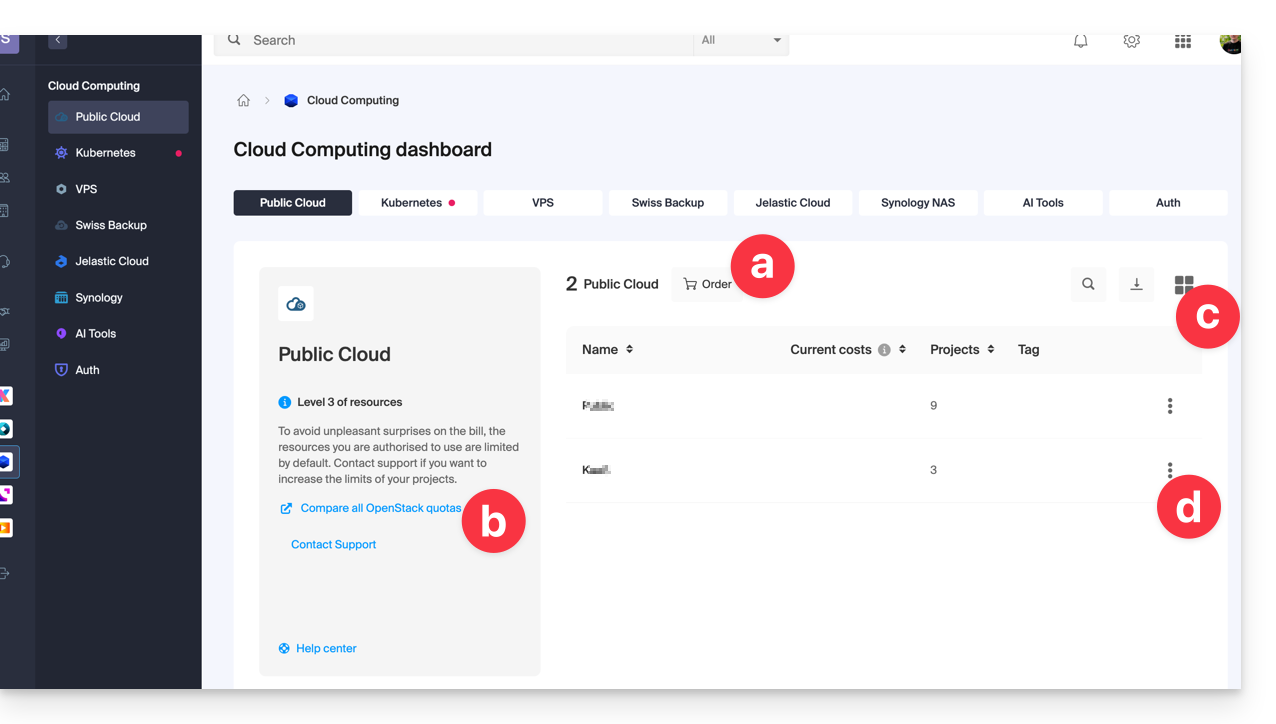
- You arrive on a page where all the Public Cloud services you have ordered are listed:

- This button allows you to order a new Public Cloud.
- This link allows you to access the page comparing the different subscription formulas for Public Cloud.
- This button allows you to switch between list or thumbnail view.
- Click on the action menu ⋮ to the right of the relevant object to access the options:
- The pencil icon ✎ allows you to rename your Public Cloud
- The tree icon allows you to access the projects page related to the selected Public Cloud
- From this projects page linked to the Public Cloud, you will have access to all of your projects:

- This button allows you to create a new project that will be linked to the Public Cloud.
- This button allows you to switch between list or thumbnail view.
- Click on the action menu ⋮ to the right of the relevant object to access the options:
- The first item allows you to access the dashboard of the project
- The pencil icon ✎ allows you to rename your project
- The right arrow icon allows you to access the OpenStack Horizon dashboard directly.
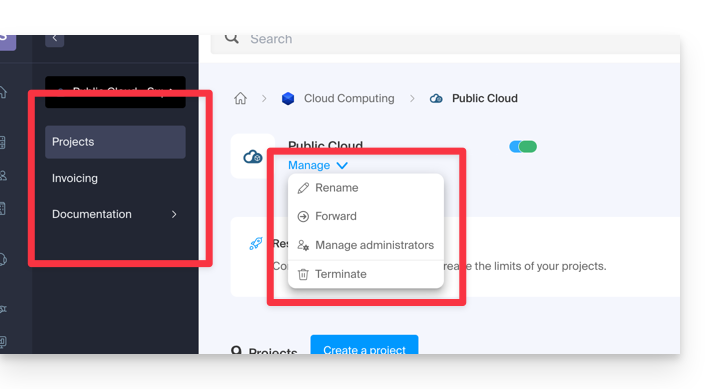
Additional options are accessible from the left sidebar and under Manage:
To invite new users to your project, it is essential to go directly through the OpenStack administration interface.
Public Cloud Limits
By default, the resources that can be used in a project are limited (for security reasons - to avoid ending up with a bill that is too high at the end of the month, for example).
Learn about the 3 levels of limits detailed in this other guide.
The Manager indicates which level of limit is assigned to the Organization:
To increase the limit of the projects, contact support Infomaniak.
The limits apply to all projects within the Organization. In an Organization with 5 projects, where 1 requires level 3, the other 4 projects will inherit a level 3 limit.
This guide explains how to manage users for your Public Cloud project.
Preamble
- To access a project's resources, it is necessary to create OpenStack type users (read below).
- These OpenStack users have no relation to Infomaniak Manager users.
- The username is automatically generated and communicated after creation.
- These OpenStack users are tied to a single project and cannot access multiple projects.
- All operations on users (addition, modification, deletion, etc.) are asynchronous and may sometimes take several minutes to complete.
Create a user for your Public Cloud
To create an OpenStack user once your Public Cloud has been ordered:
- Click here to access the management of your product on the Infomaniak Manager (need help?).
- Click directly on the name assigned to the product in question.
- Create a new Project.
- The user defined at the creation of your project will be in the form
PCU-XXXXand you can assign it a description for your convenience.
User Password Management
The password for the OpenStack user can be set immediately upon creation or generated later using a link sent by email to the address of your choice.
To modify it later:
- Click here to access the management of your product on the Infomaniak Manager (need help?).
- Click directly on the name assigned to the product in question.
- Click on Manage in the Users column of the relevant project.
- Click on the menu to the right of the relevant user to access password change.
Add a new user to a project
To add other users to your project:
- Click here to access the management of your product on the Infomaniak Manager (need help?).
- Click directly on the name assigned to the product in question.
- Click on Manage in the Users column of the relevant project.
- Click at the top of the page on Add an OpenStack user.
Delete a user
To delete an existing user:
- Click here to access the management of your product on the Infomaniak Manager (need help?).
- Click directly on the name assigned to the product in question.
- Click on Manage in the Users column of the relevant project.
- Click on the menu to the right of the user in question to delete them.
Find out more
- Getting Started Guide: Public Cloud
- Public Cloud: Action on an existing project
- Complete product documentation: https://docs.infomaniak.cloud
This guide provides some information about Windows licenses for Public Cloud Infomaniak.
Windows Licensing Information
As a Microsoft Partner, Infomaniak provides and automatically bills Microsoft licenses for the following operating systems:
- Windows Server 2019 standard and datacenter
- Windows Server 2022 standard and datacenter
- Windows Server 2025 standard and datacenter
Billing is based on the number of vCPUs of the instance.
The license belongs to Infomaniak and is not the property of the client. It starts when the client uses one of these versions of Windows Server and stops when the instance is destroyed.
There is no licensing billing in case of instance pause or stop.
Microsoft Partner
- As a Microsoft partner, Infomaniak provides pre-activated images on Public Cloud, via Horizon or the Openstack CLI. In case of activation failure, refer to this other guide for more information.
- As a Microsoft partner, Infomaniak does not allow the use of a client's personal license (Bring Your Own License); in the case of using their own license, Infomaniak provides and automatically bills for the licenses provided by Infomaniak. The client can then activate their OS via the activation procedure.
- As a Microsoft partner, the non-use of licenses (i.e., a 180-day Evaluation version) is also not allowed. These versions are for testing purposes in an internal environment. In case of using an evaluation version, Infomaniak provides and automatically bills the licenses provided by Infomaniak. The client can then activate their OS via the procedure for converting an evaluation version into a normally activated version.
- If you use Microsoft software within Windows Server that requires a License Mobility, such as Microsoft SQL Server, Microsoft Sharepoint Server or Microsoft Exchange Server, you must necessarily transmit the Software Assurance document via the Infomaniak contact form.
This guide concerns the recovery of the password for a Windows image (any version) on Public Cloud.
Connecting to the Windows instance
The default username is Administrator.
The password is generated during the first boot sequence of the instance.
If you cannot establish the first connection to your Windows instance, you need the private key used during the deployment process. Enter this command to install or check that nova-client is installed:
pip3 install python-novaclientThen to retrieve the password for the instance:
nova get-password <INSTANCE_ID> <PRIVATE_KEY_FILE>Refer to the official documentation.

