Knowledge base
1000 FAQs, 500 tutorials and instructional videos. Here, there are only solutions!
This guide covers the installation of kChat, the instant messaging solution of my kSuite. Also refer to the getting started guide.
Get kChat
kChat is offered with my kSuite, with capabilities adapted to each version of my kSuite.
Once you have set up my kSuite within your Organization:
- Access the kChat Web app (online service ksuite.infomaniak.com/kchat)
- … or click here to download the mobile app (application for iOS / Android smartphone or tablet) and the desktop app (desktop application on macOS / Windows / Linux).
Install kChat
macOS
- kChat requests access to the macOS Keychain for “
Chromium Safe Storage”, which is used to store your access token. - This request is normal and necessary for kChat to function properly; no additional sensitive data is requested and nothing is sent outside.
Linux
- On Linux, kChat is distributed in AppImage format, so depending on your system configuration, it may be necessary to disable sandboxing for the application to work correctly:
- If kChat does not start, run it from a terminal with the following command:
./kchat.AppImage --no-sandbox - You can also create a launcher or a script including this parameter to avoid having to enter it each time you use it.
- If kChat does not start, run it from a terminal with the following command:
Link to this FAQ:
Has this FAQ been helpful?
This guide details how to use smileys and other emojis to react to and interact with the discussions in the kChat service.
Add a reaction to a message
To react at any time to any message you have access to in kChat, simply hover over the message and select…
- either the emoticon from the selection
- or the smiley with the small +:
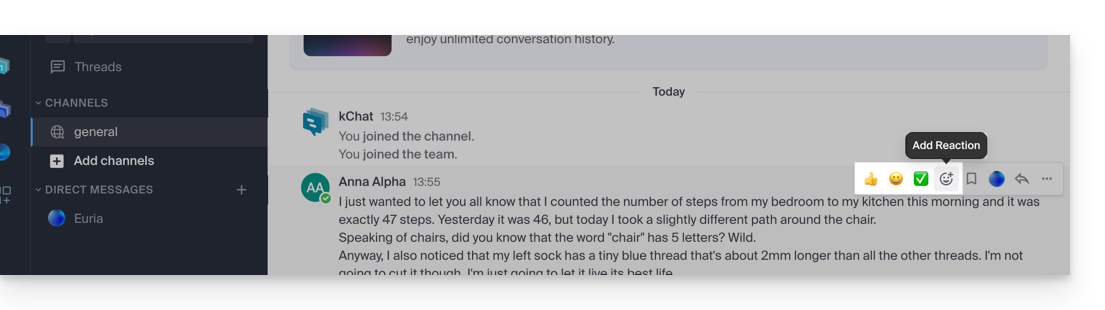
- If there are already reactions (displayed below the messages), you can add one in the same place:
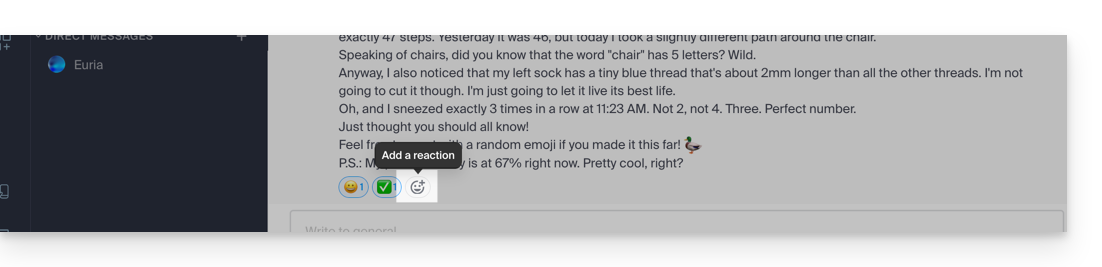
This will open the panel with hundreds of emoticons available (and even custom emojis - see below).
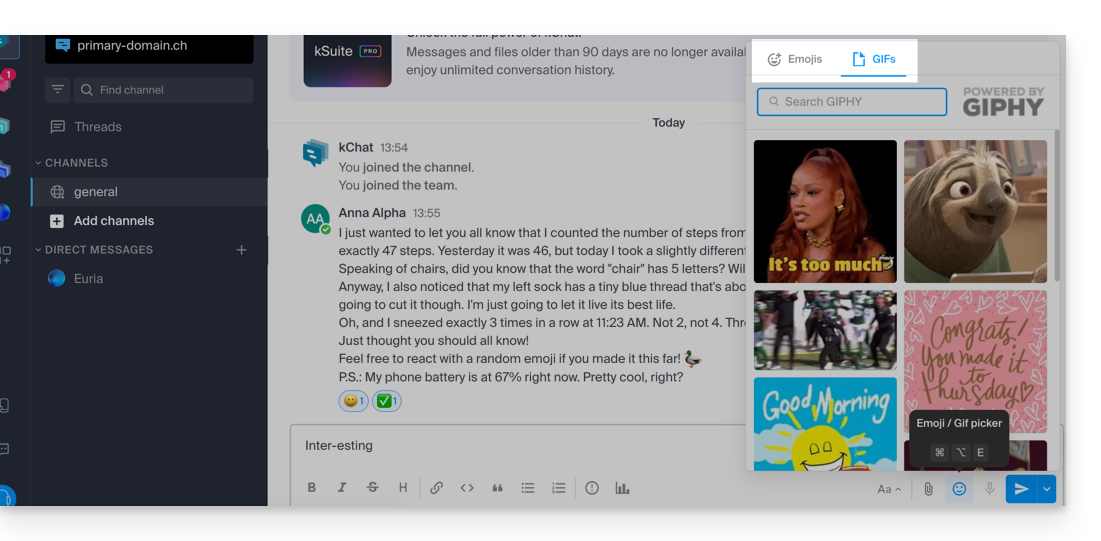
Express yourself with an emoticon or GIF
Adding an emoji within the message you are writing is very simple:
- Simply click on the smiling face icon in the message formatting bar:
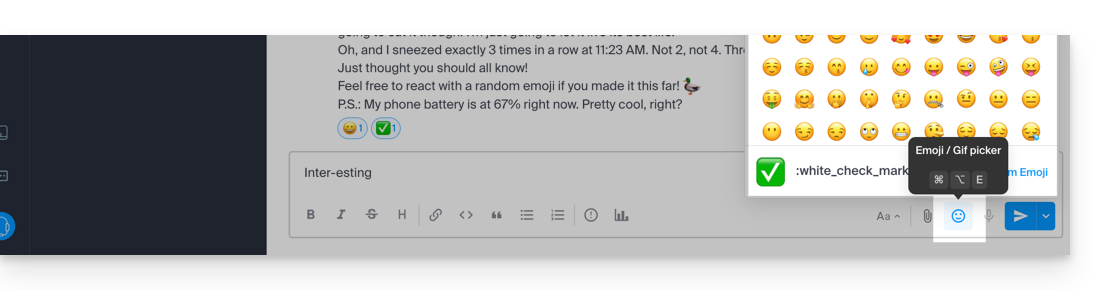
- You can then choose an emoji or insert short animated GIFs instead of an emoticon using the tab at the top of the panel that appears when you click on the smiling face:
- If you know the name of the symbol you want to insert, you can also type
:(colon) followed by at least the first two characters: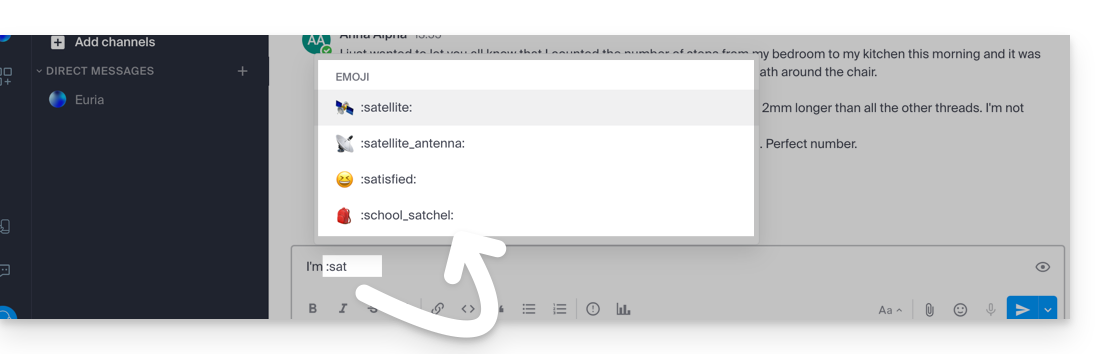
Tip: if you add #, ##, or ### as the first character of a new line containing an emoticon, you can use a larger emoticon. To try it, send a message like '# :smile:' (note that your custom settings may "disable" this display feature in your interface).
To set the default tint for human emojis, click on this symbol in the emoji panel: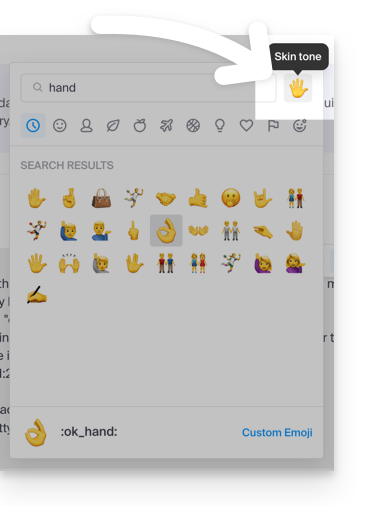
Custom Emojis
To manage additional emojis, click on this button in the emoji panel: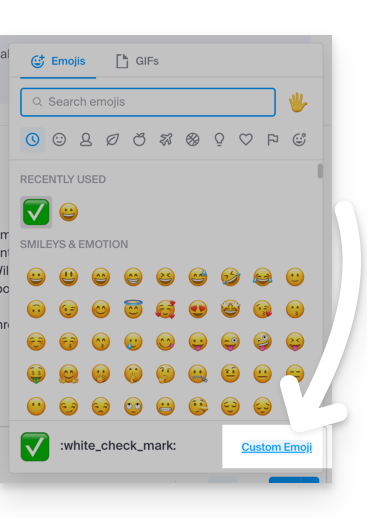
Specify a name up to 64 characters long. It can contain lowercase letters, numbers, and the characters "-", "+", and "_".
Specify a .gif, .png, or .jpg file for your emoji. The file can be up to 1 MB in size. The size is automatically resized to 128x128 pixels, while maintaining the aspect ratio.
The emoji can then be used by all kChat users in your Organization using the unique name you assigned to it: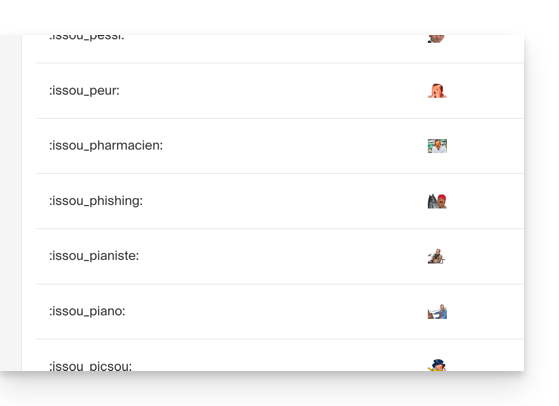
Link to this FAQ:
Has this FAQ been helpful?
This guide explains how to insert rich text and images into your messages on kChat.
Formatting message text (markdown)
Here are the symbols to add before and after your text to format it in the desired style:
| Symbols | Result | Example |
|---|---|---|
* | italic | *This will be italic* |
** | bold | **This will be bold** |
*** | italic+bold | ***This will be italic+bold*** |
~~ | strikethrough | ~~This will be strikethrough~~ |
``` | | ```This is code``` |
You can also insert the following:
| Symbols | Result | Example |
|---|---|---|
*** | (separator / line / horizontal line) | 1st part***2nd part |
Inserting an image into the message…
… from a URL
Insert the following code into your message, replacing the alt text and the image address (URL) with the image link (the latter must be accessible and visible on the Web):

Example
Message with the image insertion syntax:
And if the URL to the image is in your clipboard, simply paste the link into a conversation and the image will be added to your message.
… from your hard drive or kDrive
Click on the paperclip icon to insert an existing image from your hard drive or from kDrive:
The image will be inserted into the message, which you can then send directly in the conversation without necessarily adding additional text.
Link to this FAQ:
Has this FAQ been helpful?
This guide explains how to invite a user to kChat who is not yet part of your Organization but will be counted as a kSuite user.
Introduction
- Refer to this other guide to grant access to one or more kChat channels to an external user, who can then interact with your team without being counted as a kSuite user and without having any specific rights within the Organization (of which they will not be a part).
- You can also invite an entire Group from kChat.
- Refer to this other guide if you want to manage the channels to which new members will automatically belong.
Invite to use kSuite
Prerequisites
- Be a kChat administrator:
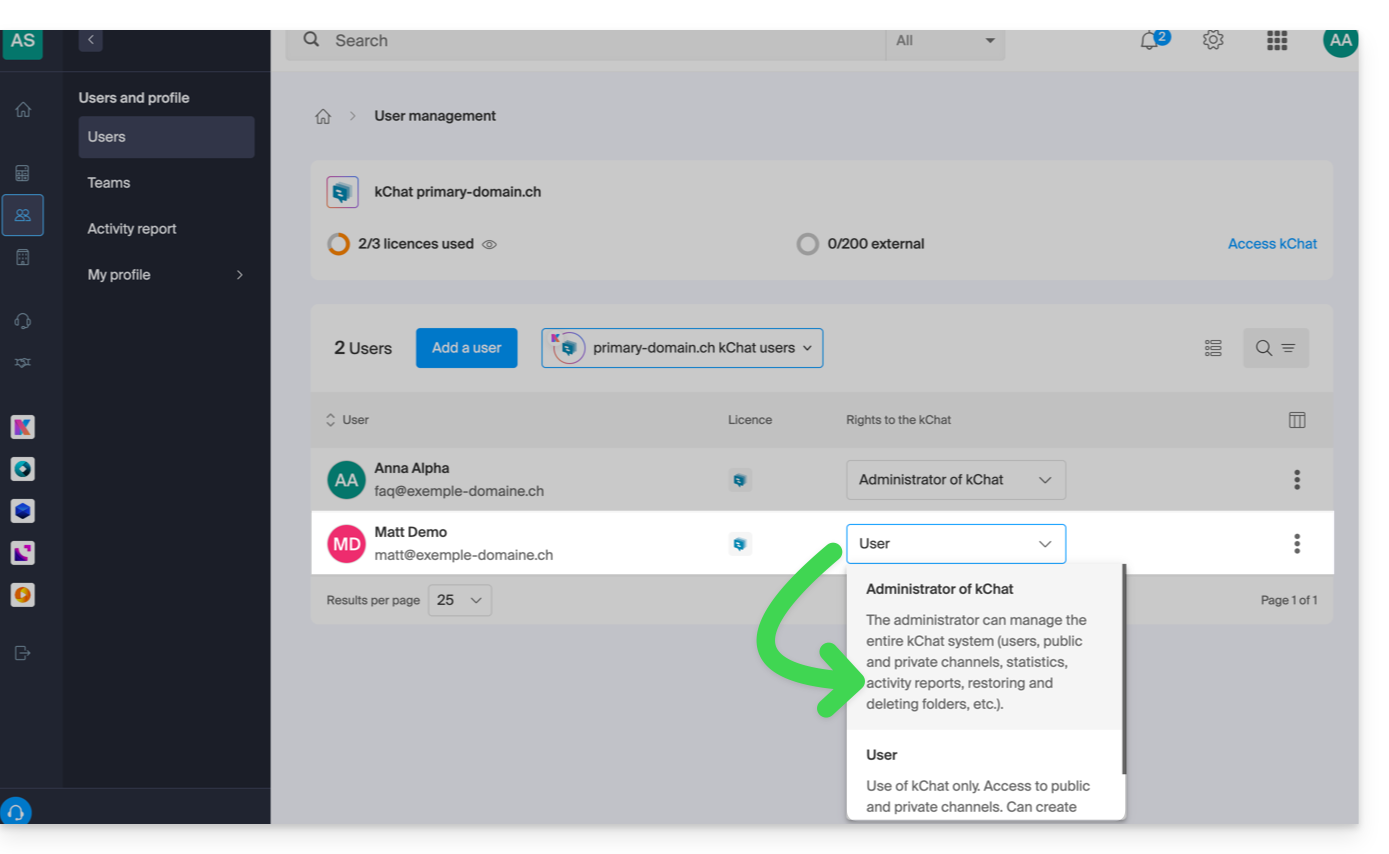
- The role within the Organization is irrelevant; being an Organization administrator in the Organization that has the kSuite (and therefore kChat) is not required, and is not sufficient in any case:
- The role within the Organization is irrelevant; being an Organization administrator in the Organization that has the kSuite (and therefore kChat) is not required, and is not sufficient in any case:
Then, invite the user using the procedure below. Once invited, the user can confirm their membership and will access kChat with the limited permissions you have granted them:
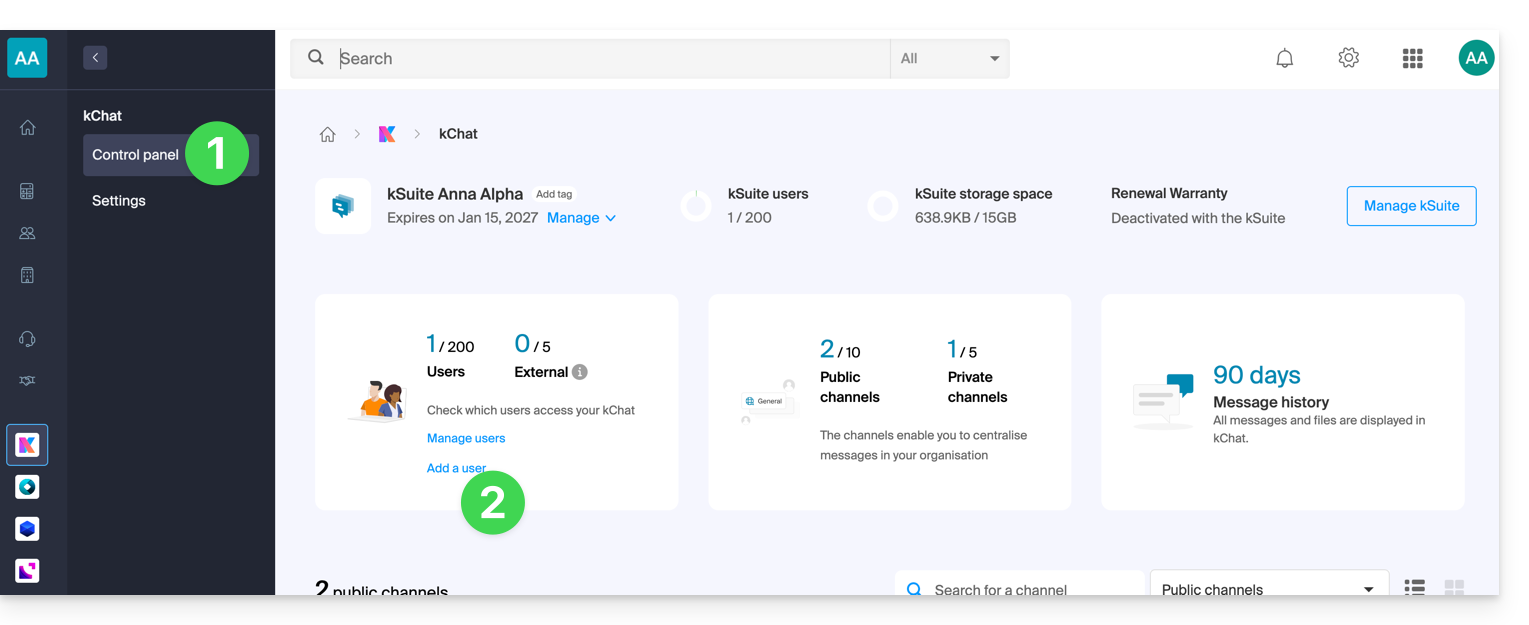
- Click here to access the kChat management section in the Infomaniak Manager (need help?).
- Click on Add a user:
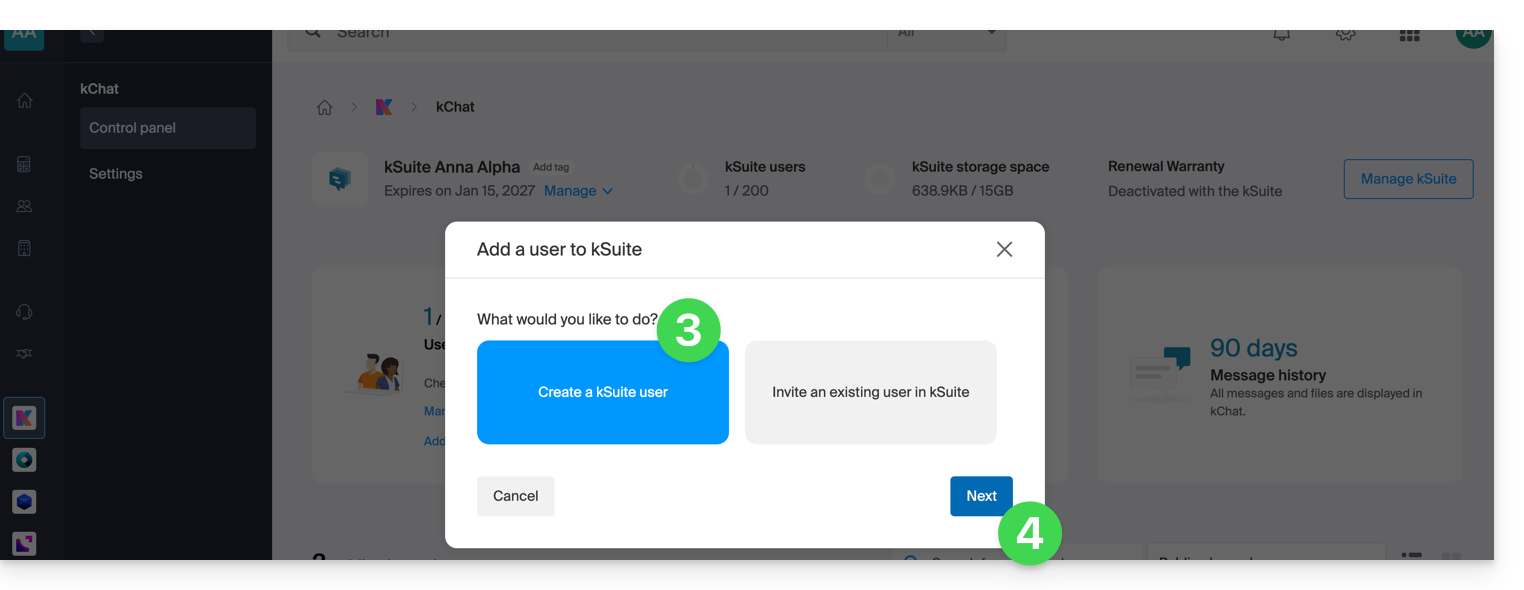
- Click on Create a kSuite user.
- Click on Next:
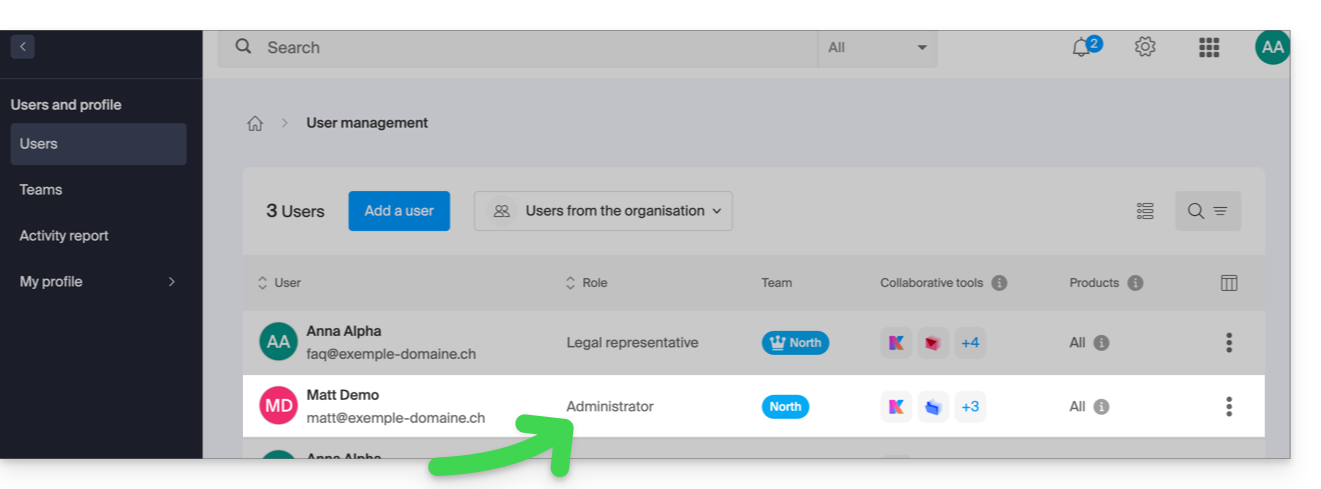
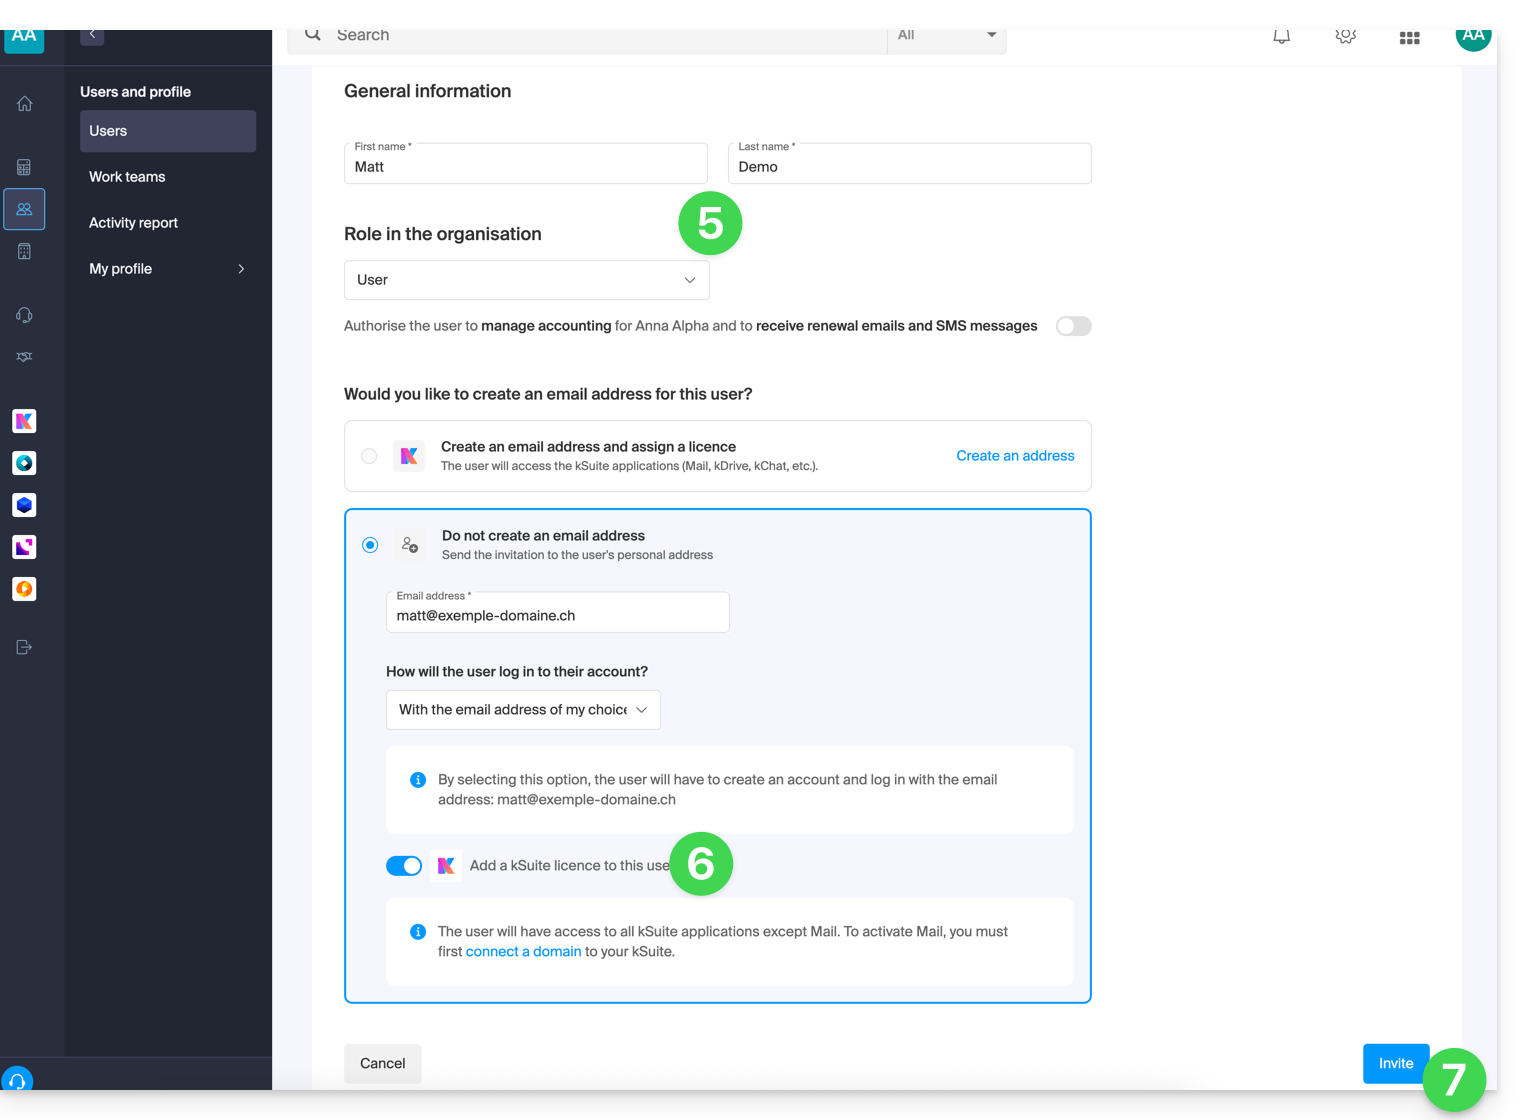
- Enter the user's first name and last name, and define their role as a standard user:
- Legal representative
- Legal responsibility for the organization
- Can manage all products and users
- Can manage accounting and new product orders
- Administrator
- Can manage all products and users
- Can manage accounting and new product orders
- User
- Can manage the products you authorize
- Can manage accounting if you authorize it
- Legal representative
- Do not create a mail address for the user and instead indicate their existing mail address to which the invitation should be sent:
- You can require this future user to log in with this mail address or allow them to specify a different mail address (this is particularly useful if they already have a user account with Infomaniak with a different login ID).
- Add the user to your kSuite using the toggle switch.
- Click the Invite button:
- The invitation is pending until the invited user completes the registration (see below). The organization's user dashboard clearly indicates this status:
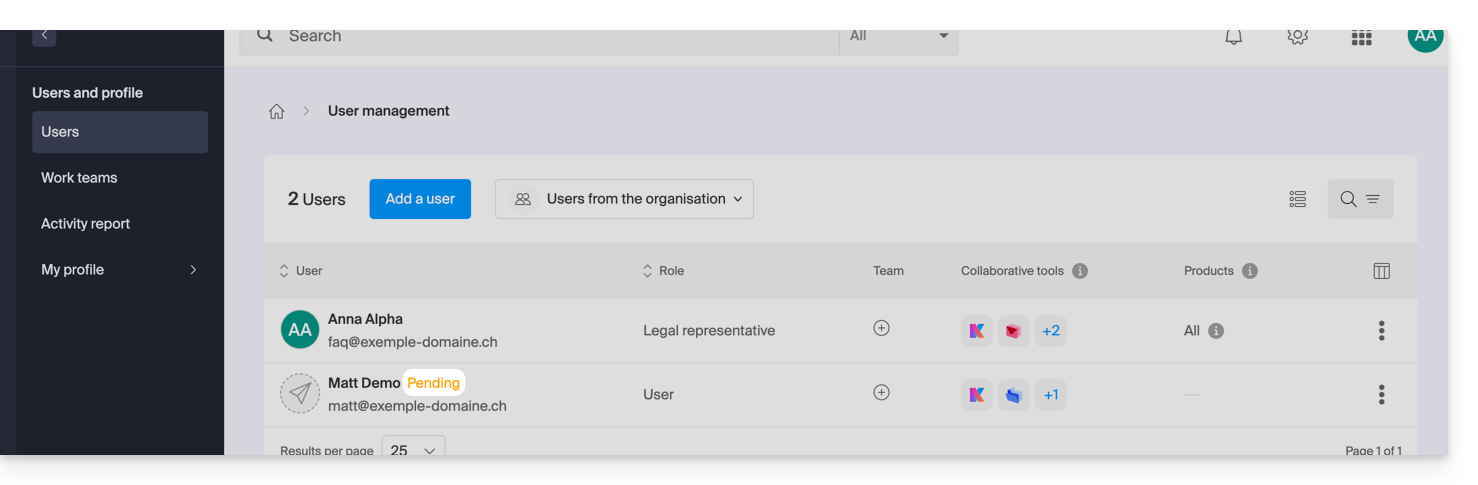
- The invitation is pending until the invited user completes the registration (see below). The organization's user dashboard clearly indicates this status:
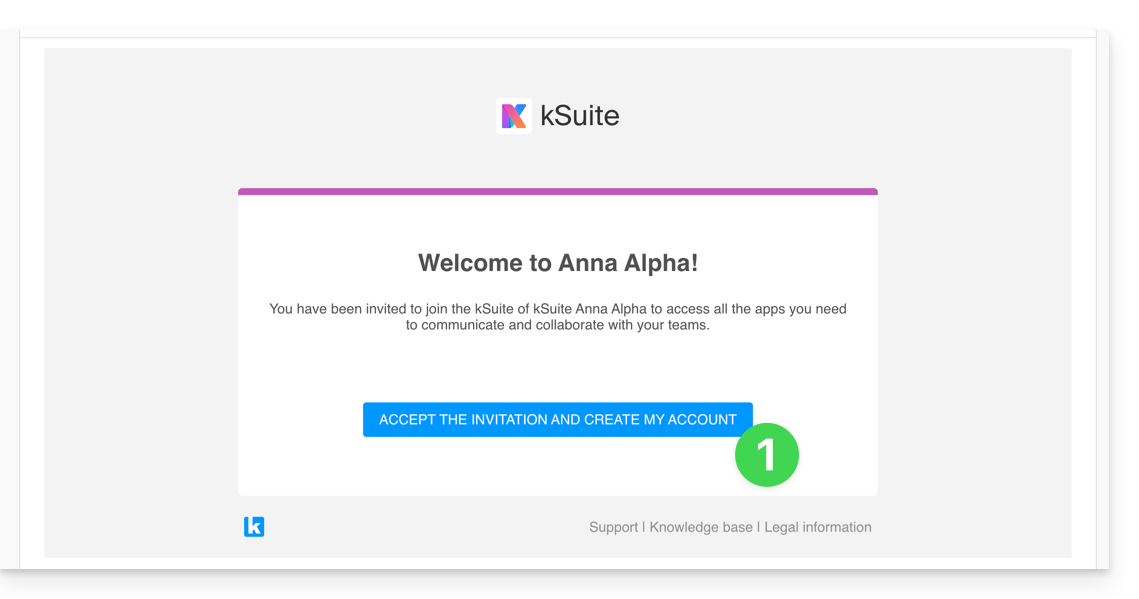
Accept the invitation
To access the organization that owns kChat:
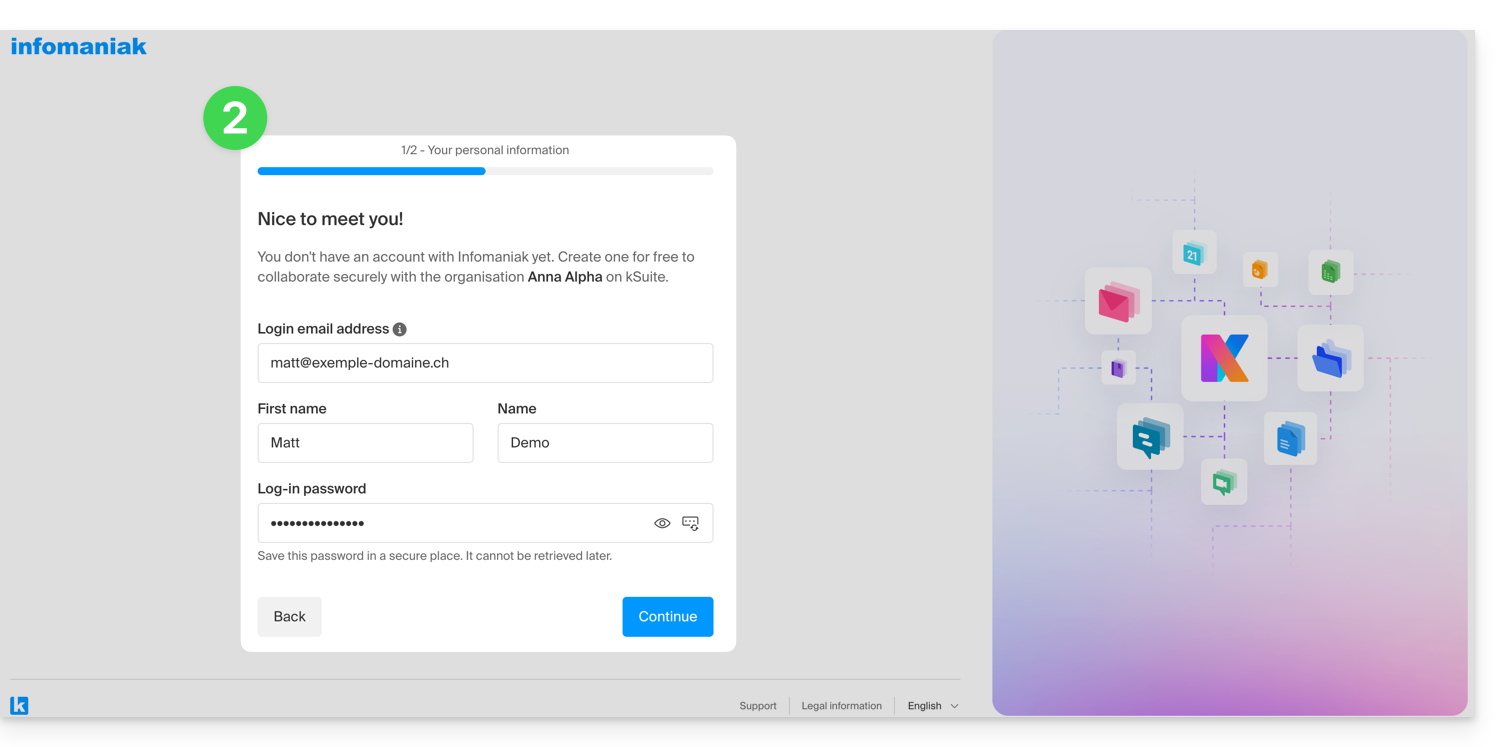
- The invited user receives the invitation at their mail address and clicks the Accept invitation button:
- They specify their contact details as well as the mail address/password they wish to use and complete the registration:
- Once the registration is complete, the newly registered user can log in to their Manager and access the kChat to which they were invited.
- Existing users are automatically notified of the new participant's arrival and can now chat with them. As soon as they are added, the new user receives a welcome message from Euria (Infomaniak's AI Bot):
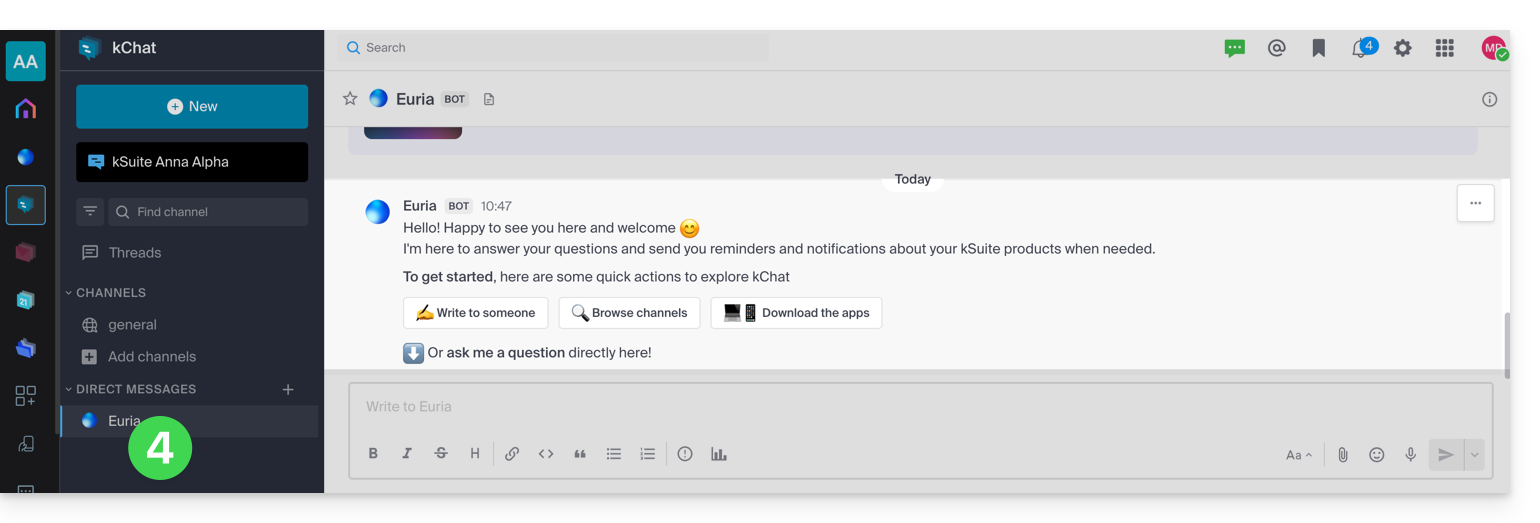
Access to kSuite, not access to kSuite management!
It is important to differentiate between using the kChat app (within kSuite) and managing kSuite itself.
In the invitation example above, the new user was invited to join kChat, so they are now counted as a kSuite user when an administrator accesses the kChat user management section: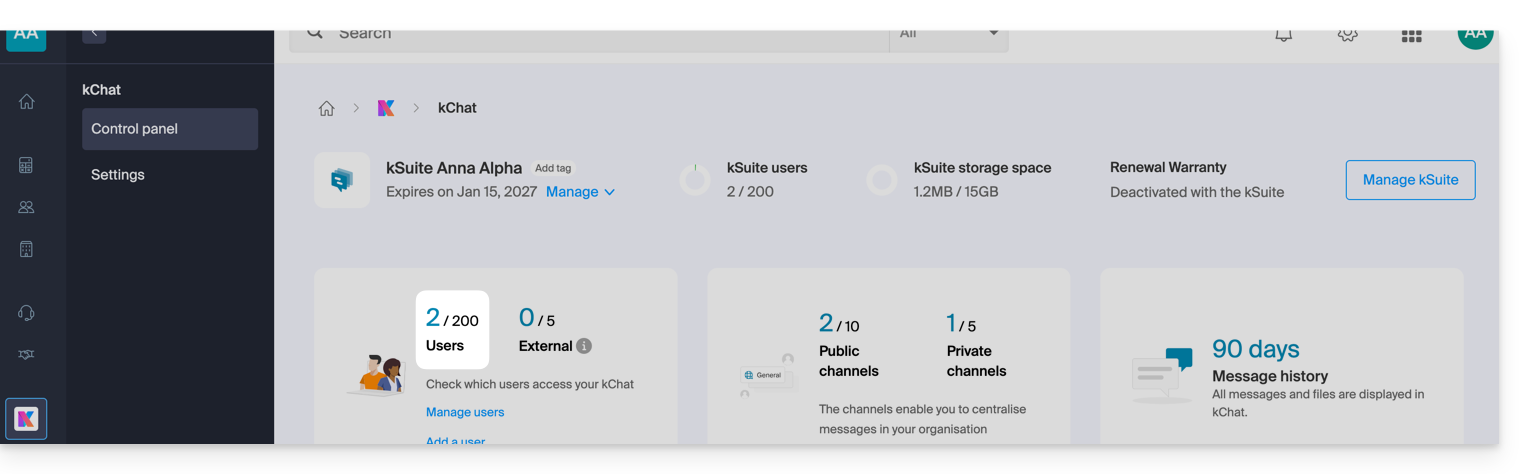
The same applies to kSuite user management:
However, this new user will not be able to directly manage the kSuite to which they were invited, since their role (defined in point 5 above) does not authorize them to do so: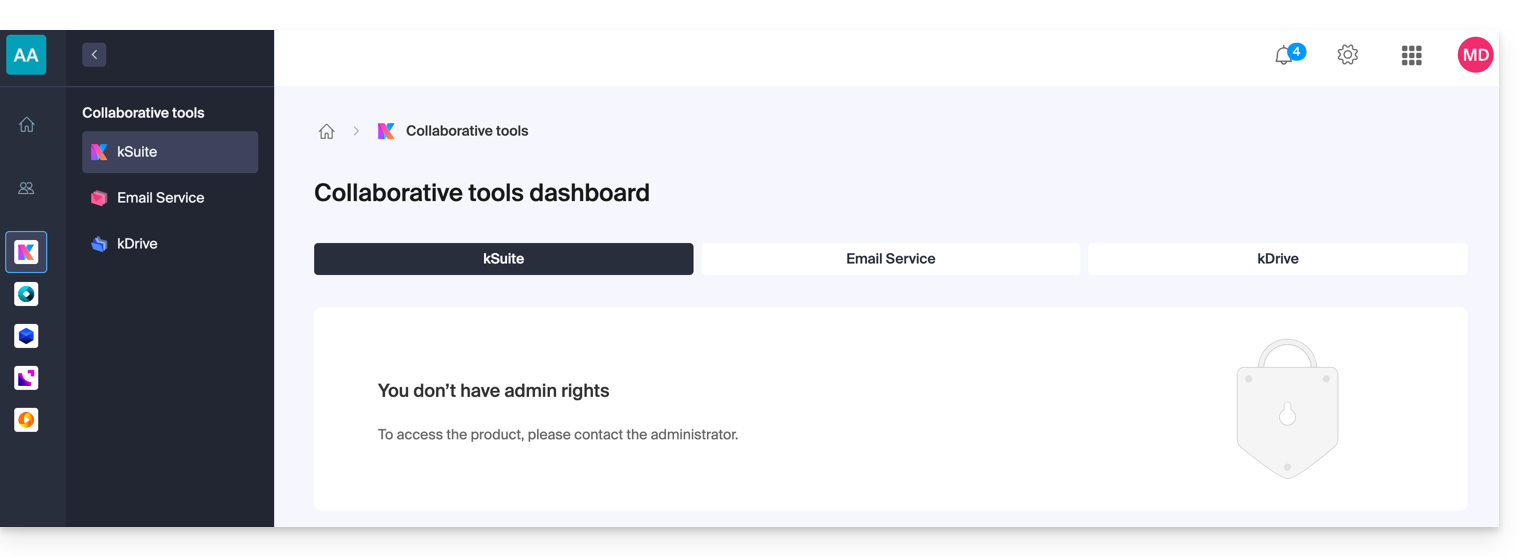
- This is why this user will not see any active links in the Collaborative Tools → kSuite section of their Infomaniak Manager.
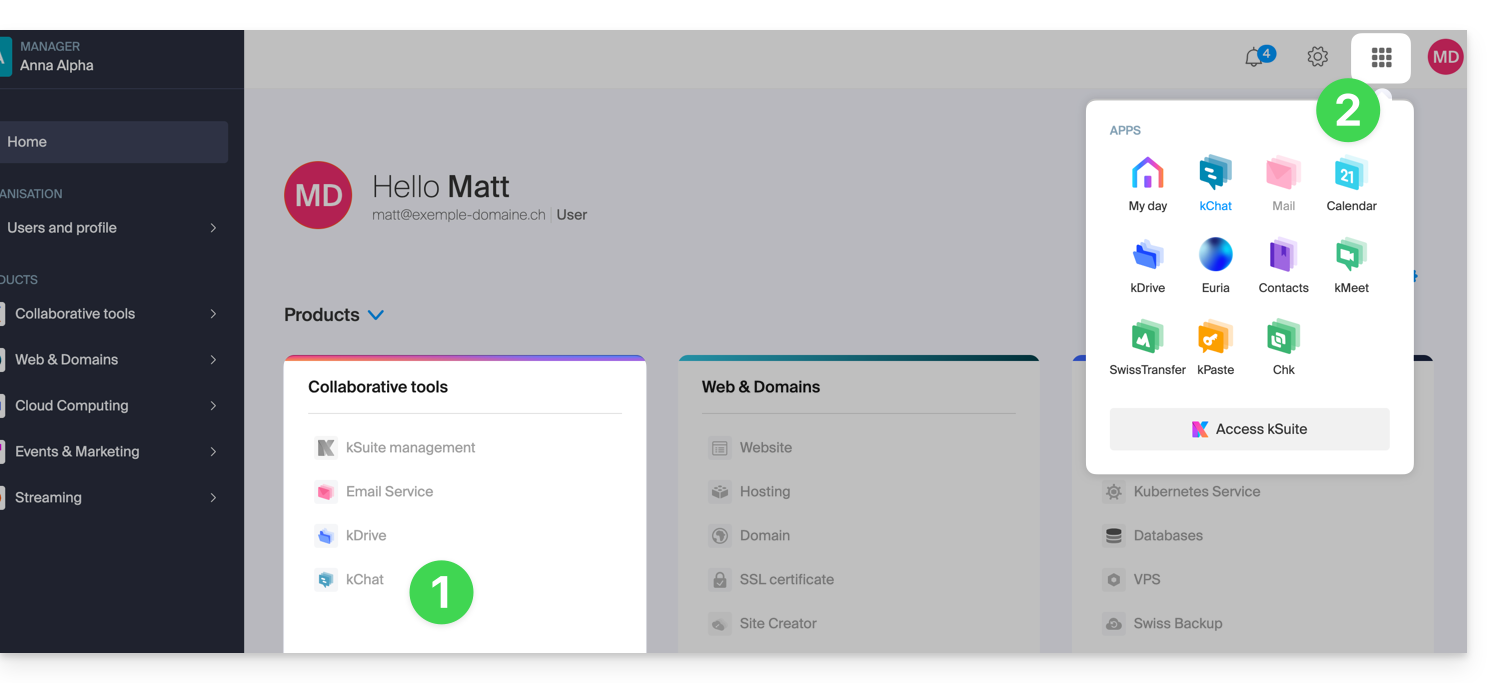
- They will need to switch to the Infomaniak applications using the menu in the top right corner:
Note that, if desired, this user can order their own kSuite, independent of the kSuite to which they were invited.
Link to this FAQ:
Has this FAQ been helpful?
This guide details the important elements to ensure you don't miss any kChat discussions that concern you.
Preamble
- If notifications are correctly configured to work on the kChat mobile app, they will also work on connected watches (smartwatch) such as Garmin or Apple Watch.
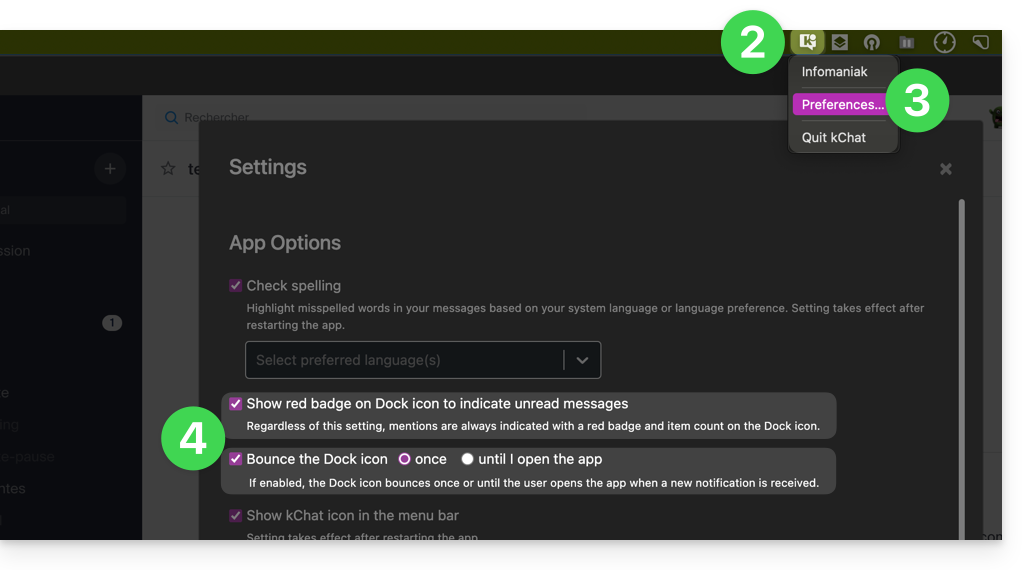
Manage desktop app icon notifications
For example, you can decide to animate the desktop app icon when a new message arrives:
- Open the kChat desktop app (desktop application on macOS / Windows / Linux).
- Left-click on the desktop app icon in the notification area of your computer (top right on macOS, bottom right on Windows and a double left-click in the taskbar on Linux).
- Click on Preferences...
- Under Application Options, set the operating system notification preferences:
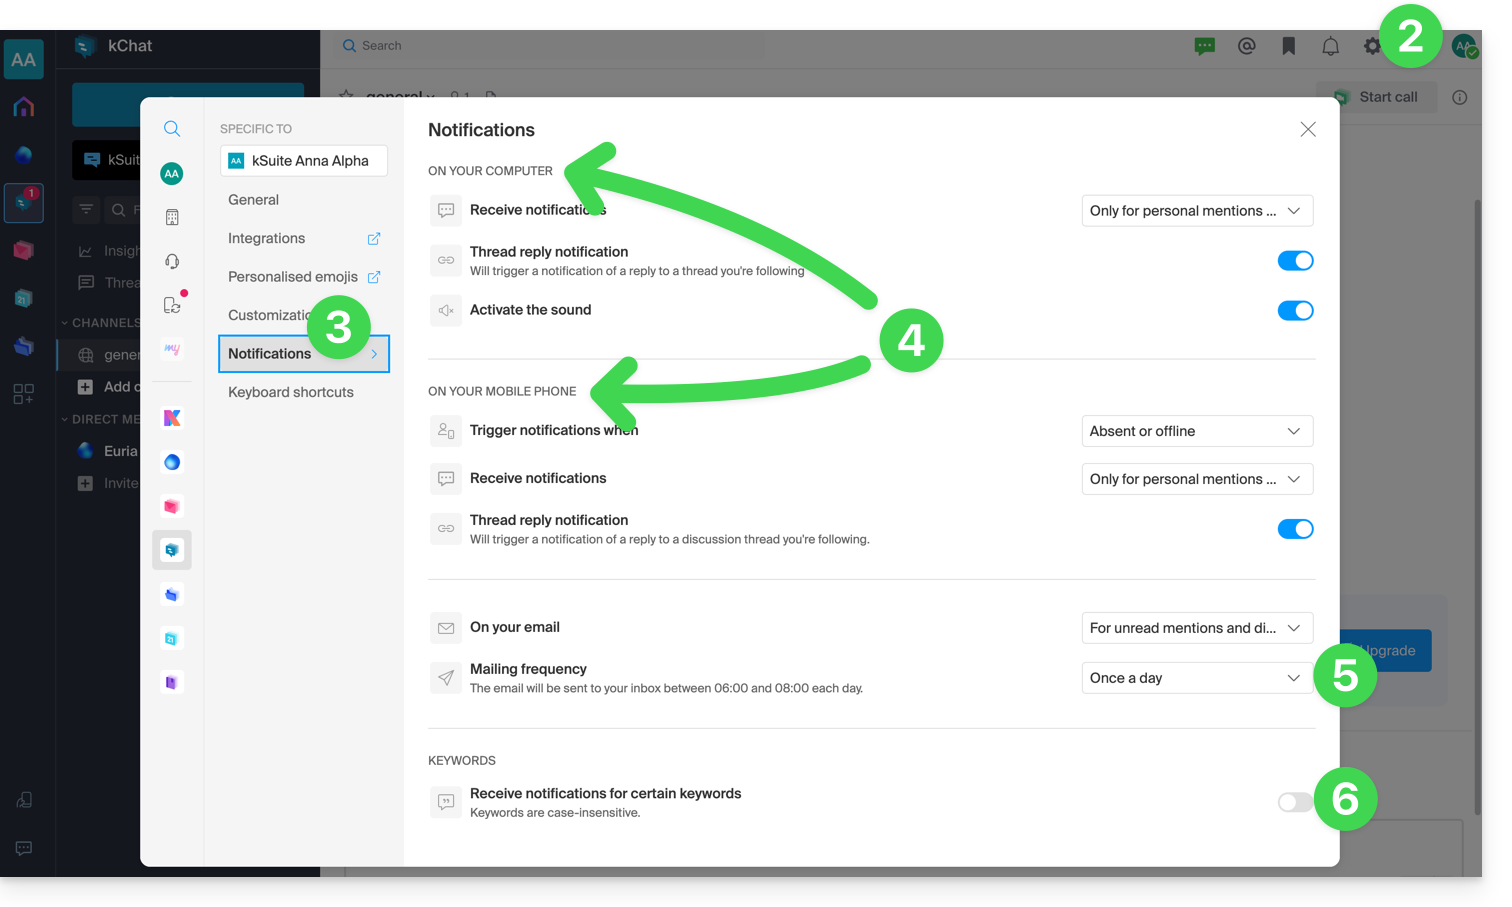
Manage chat & event notifications
To manage kChat notifications, and thus be notified for example when a new message is sent directly to you or when you follow a specific message, including based on certain keywords:
- Click here to access the kChat Web app (online service ksuite.infomaniak.com/kchat) or open the kChat mobile app (application for iOS / Android smartphone or tablet) or the kChat desktop app (desktop application on macOS / Windows / Linux).
- Click on the Settings icon at the top right of the interface.
- Click on Notifications.
- Define how to be notified (computer/mobile, present/absent, etc.) and in what case (all messages or only messages with mention, followed message, etc.).
- Choose to receive regular email notifications:
- This email is sent either every day or once a week, between 6 and 8 am and indicates to the user the messages they may not have read.
- The user receives an email per kChat product they have access to.
- Define a keyword to be alerted when a new message is published:
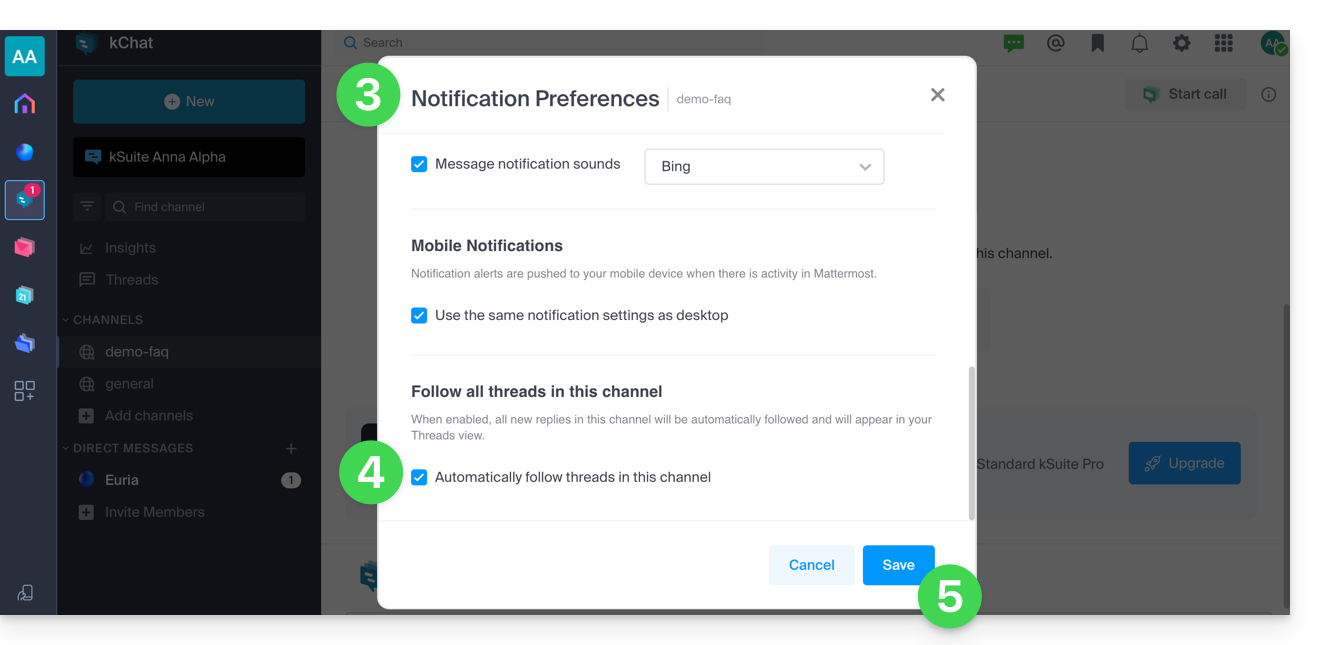
Manage notifications from a specific channel
In the relevant discussion channel:
- Click on the chevron to the right of the name of the relevant channel.
- Click on Notification preferences (or directly on the dedicated icon at the top of the channel):
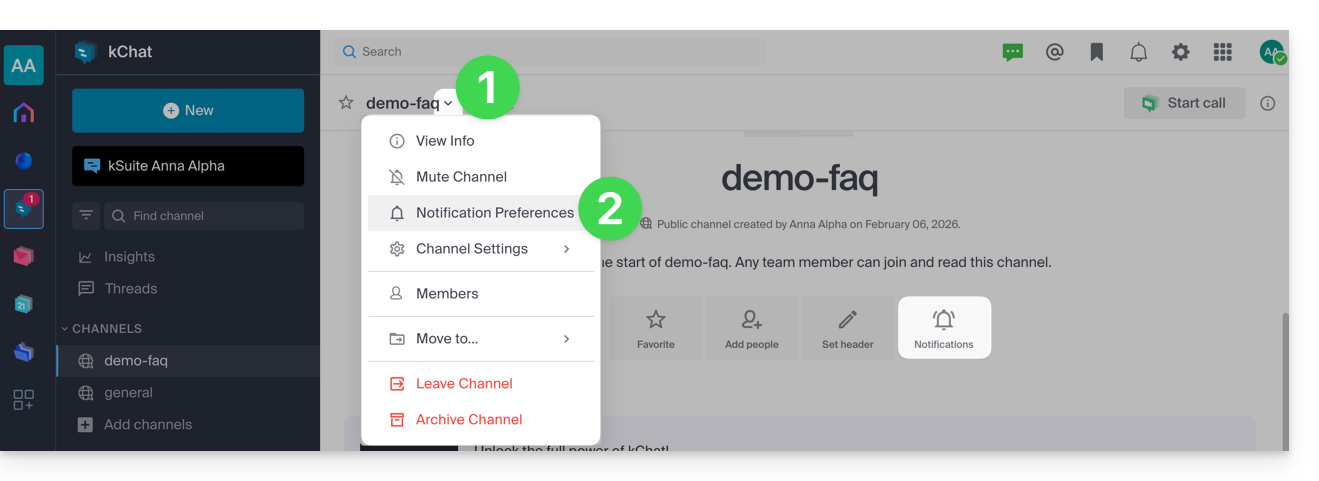
- Navigate and activate the various desired notifications.
- One of the options offered allows you to be automatically notified as soon as a discussion thread (thread) starts following a message posted in the relevant channel.
- Save your choices by clicking on the button at the bottom:
Manage notifications for a specific discussion
To be notified of a new message in a specific discussion thread (thread), even if you are not directly participating, you need to enable Follow:
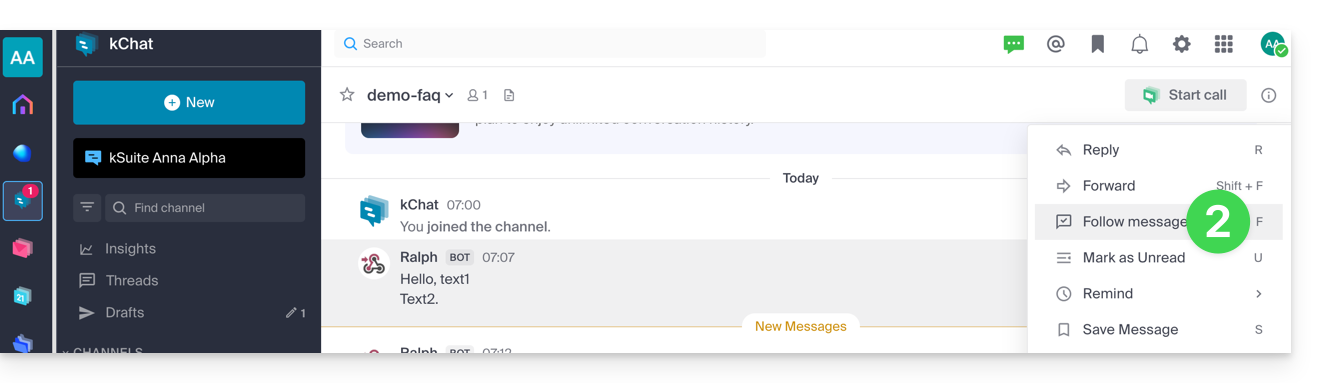
- either by hovering over the action menu ••• to the right of a user in a discussion:
- and by clicking on More…:
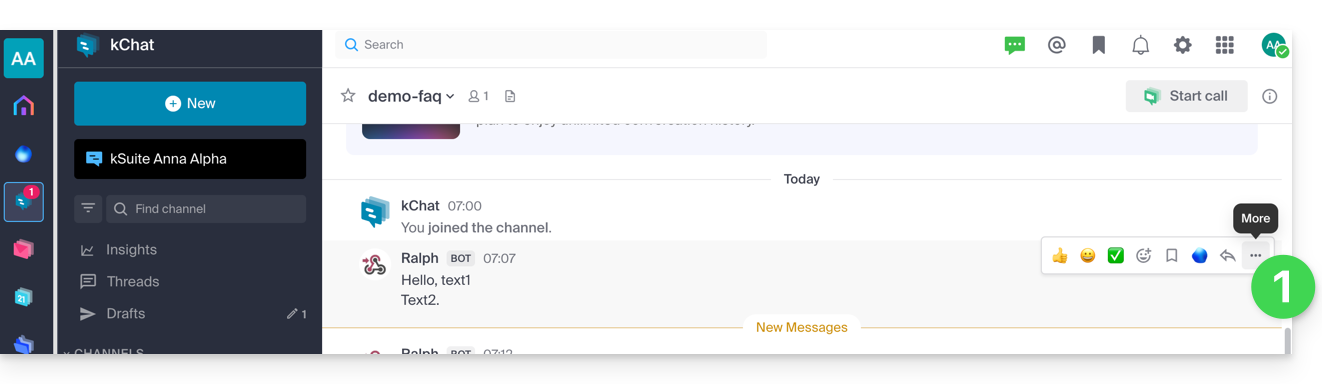
- then Follow the message:
- and by clicking on More…:
- or in a discussion thread (reply to a message):
- click on Follow at the top of the discussion (you automatically follow the discussion from the moment you post a message, and you can then Unfollow the exchanges in this discussion thread):
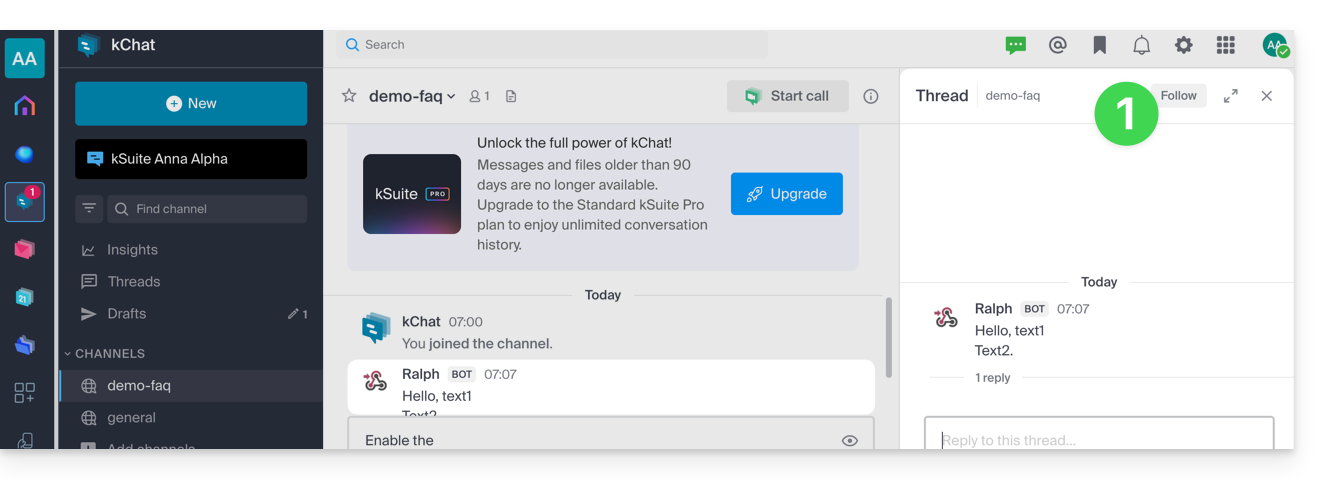
- click on Follow at the top of the discussion (you automatically follow the discussion from the moment you post a message, and you can then Unfollow the exchanges in this discussion thread):
Link to this FAQ:
Has this FAQ been helpful?
This guide details the automatic translation service integrated into the kChat app by Infomaniak.
Translate text while reading
To automatically translate a message received in a foreign language into your language:
- Click here to access the Infomaniak Web app kChat (online service ksuite.infomaniak.com/kchat) or open the mobile app (application for iOS/Android smartphones or tablets) or the desktop app (desktop application on macOS/Windows/Linux).
- Go to the message to be translated.
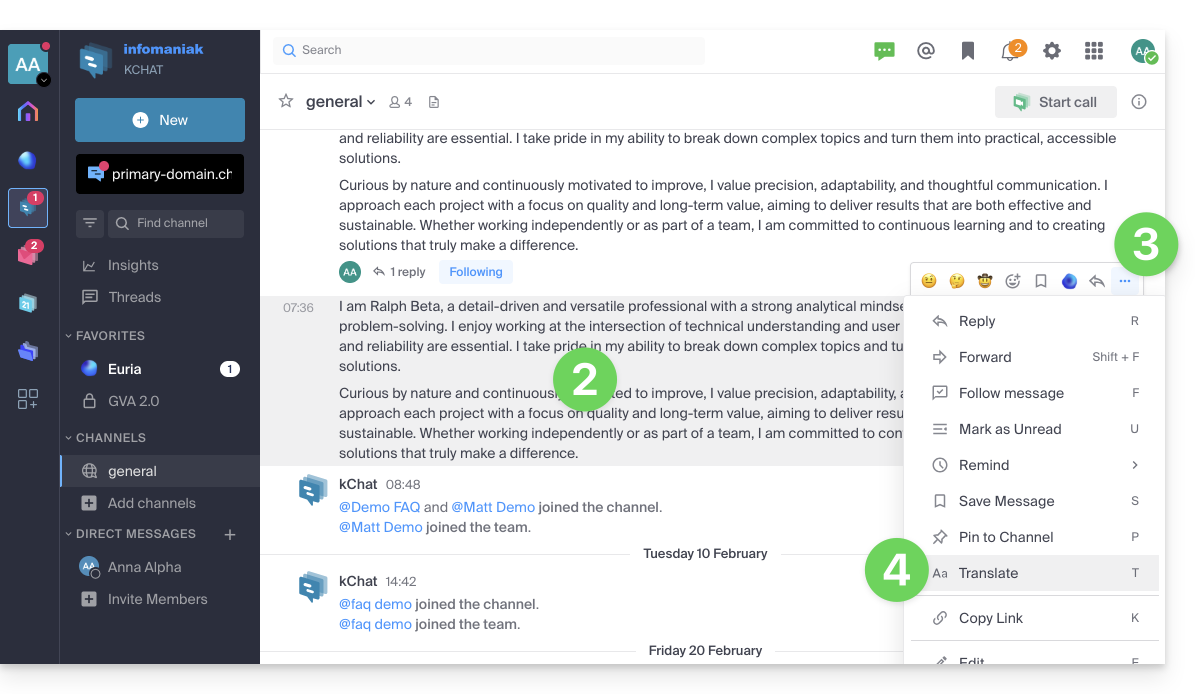
- Click on the action menu ••• located in the upper right corner of the item in question.
- Click on Translate:
- The translated message will be displayed after the last message in your conversation and will only be visible to you:
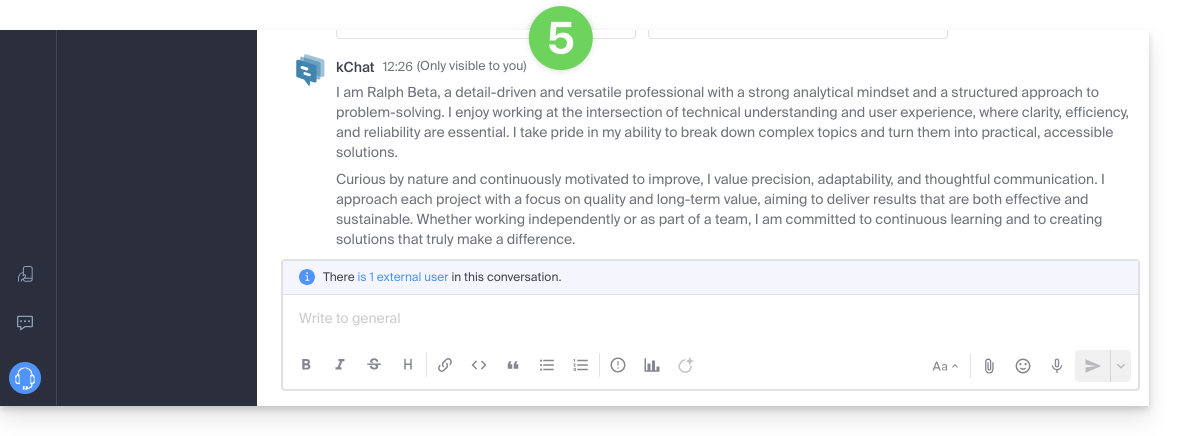
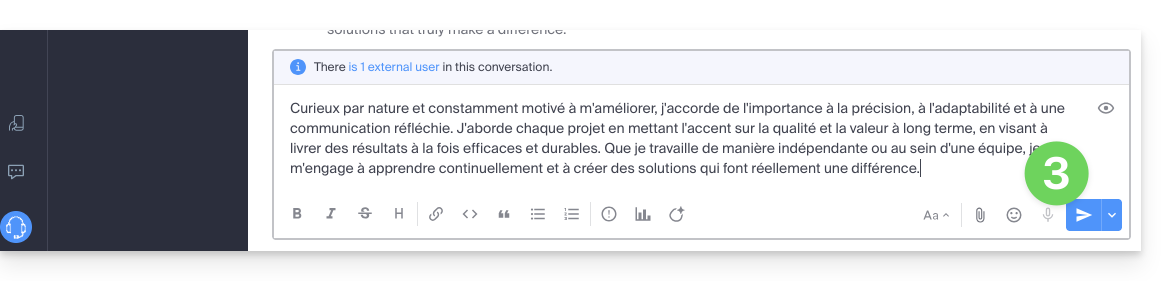
Translate text with Euria while writing
You can ask Euria to translate the text you are writing:
- Click on the Euria icon.
- Enter your instructions:
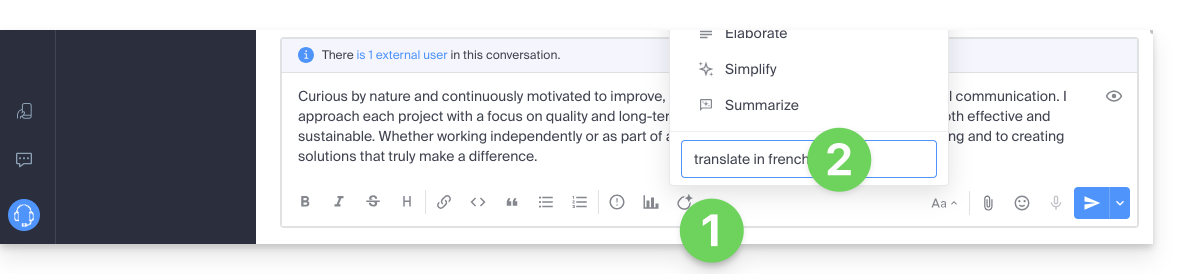
- The text will then be displayed in the desired language, and you can send it as is:
Link to this FAQ:
Has this FAQ been helpful?
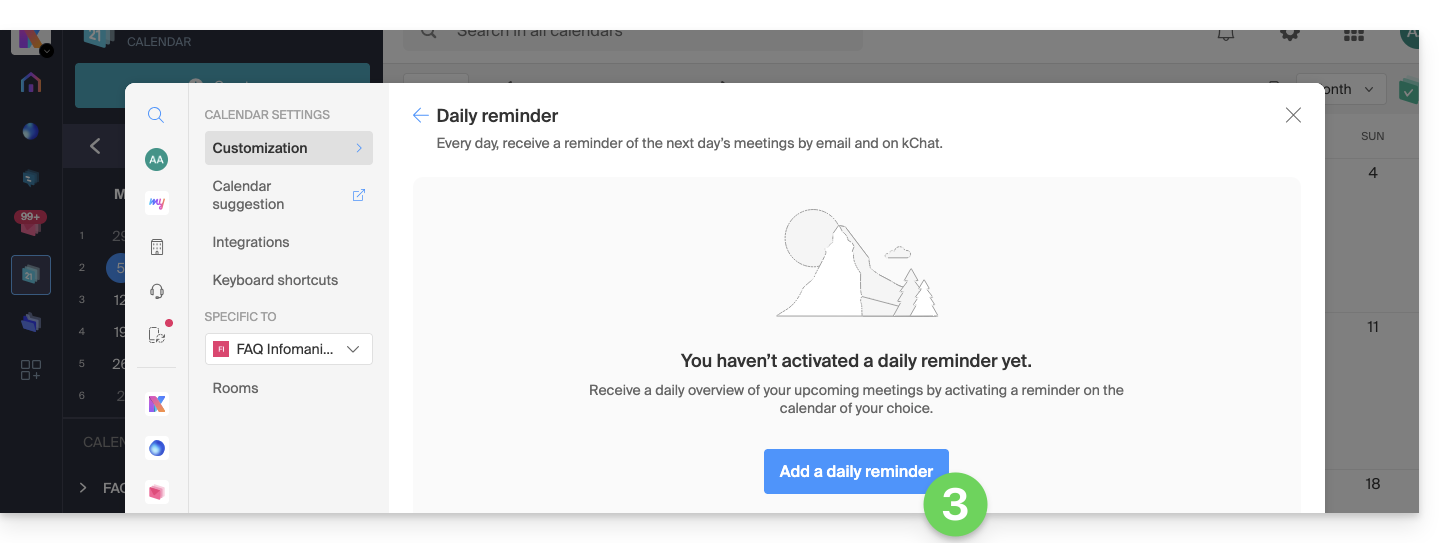
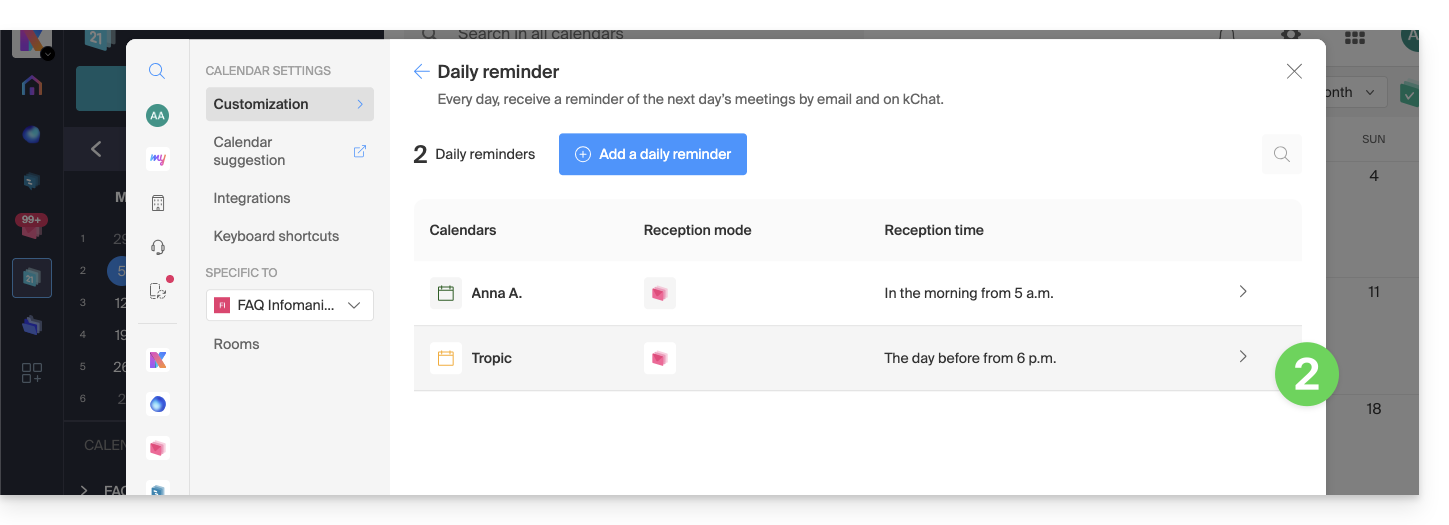
This guide explains how to automatically receive a summary of your activities scheduled on Calendar Infomaniak in your Mail and/or kChat inbox every morning.
Preamble
- This feature is disabled by default on all calendars.
- This summary is sent to your email address (the one used to log in to your Infomaniak account).
- It contains a list of all the day's events with their most important information (possible kMeet link, location, times, etc.).
- You can even imagine forwarding this daily schedule to your team or assistant so they know the best time to contact you, even by creating a rule for automatic forwarding based on the criteria corresponding to the received email.
Obtain a schedule automatically and daily
Prerequisites
- Sending a summary on kChat requires having kChat within your Organization.
To start the day by consulting a message in your Infomaniak inbox containing the schedule based on your Infomaniak agenda:
- Click here to log in to the unified settings of your Infomaniak Web apps and more specifically to the settings of the daily reminder of the Calendar app.
- Check or select the relevant Organization in the dropdown menu of the left sidebar.
- If you modify it, return to the settings by clicking on the daily reminder item to access the settings:
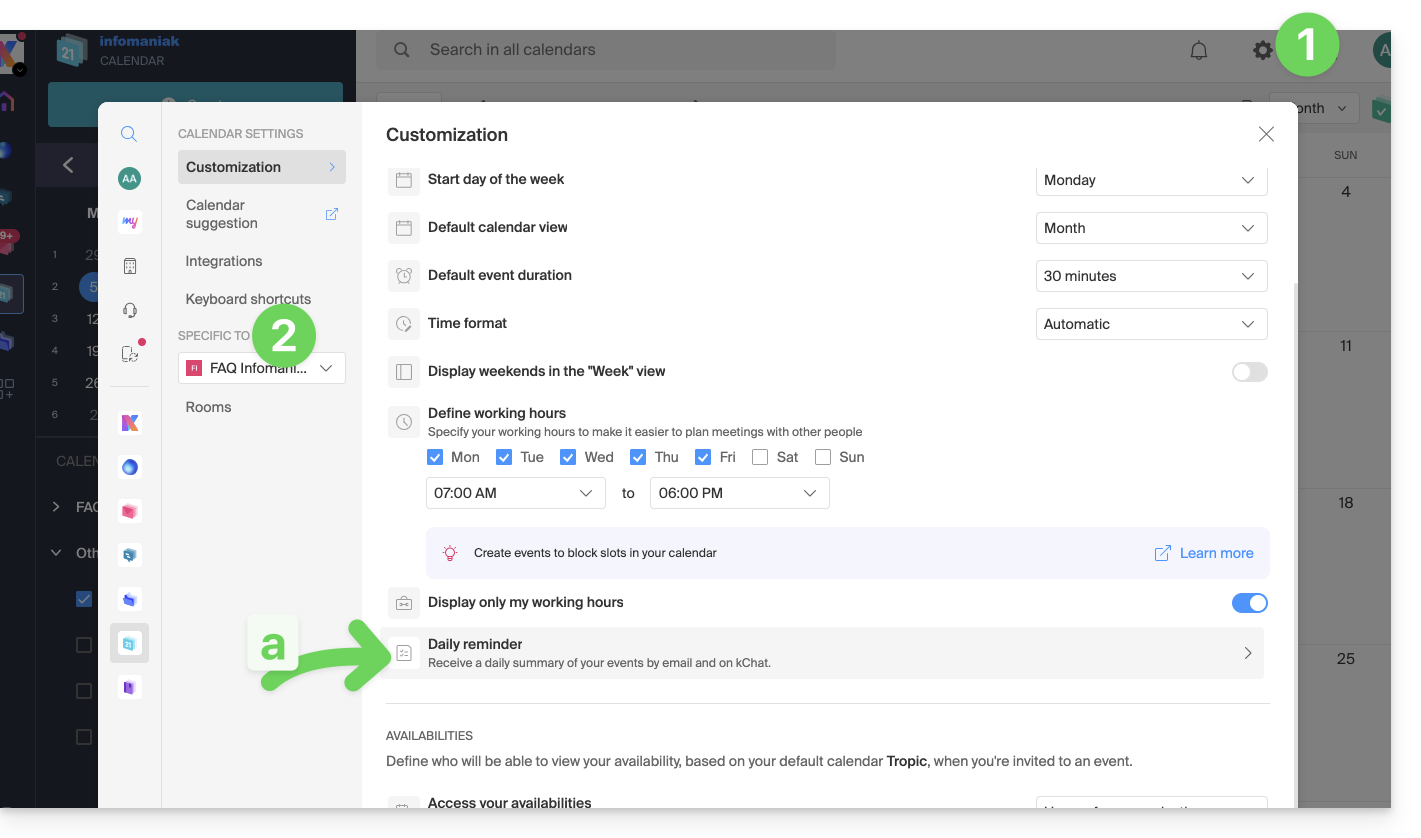
- If you modify it, return to the settings by clicking on the daily reminder item to access the settings:
- Click the button to Add a daily reminder and configure it:
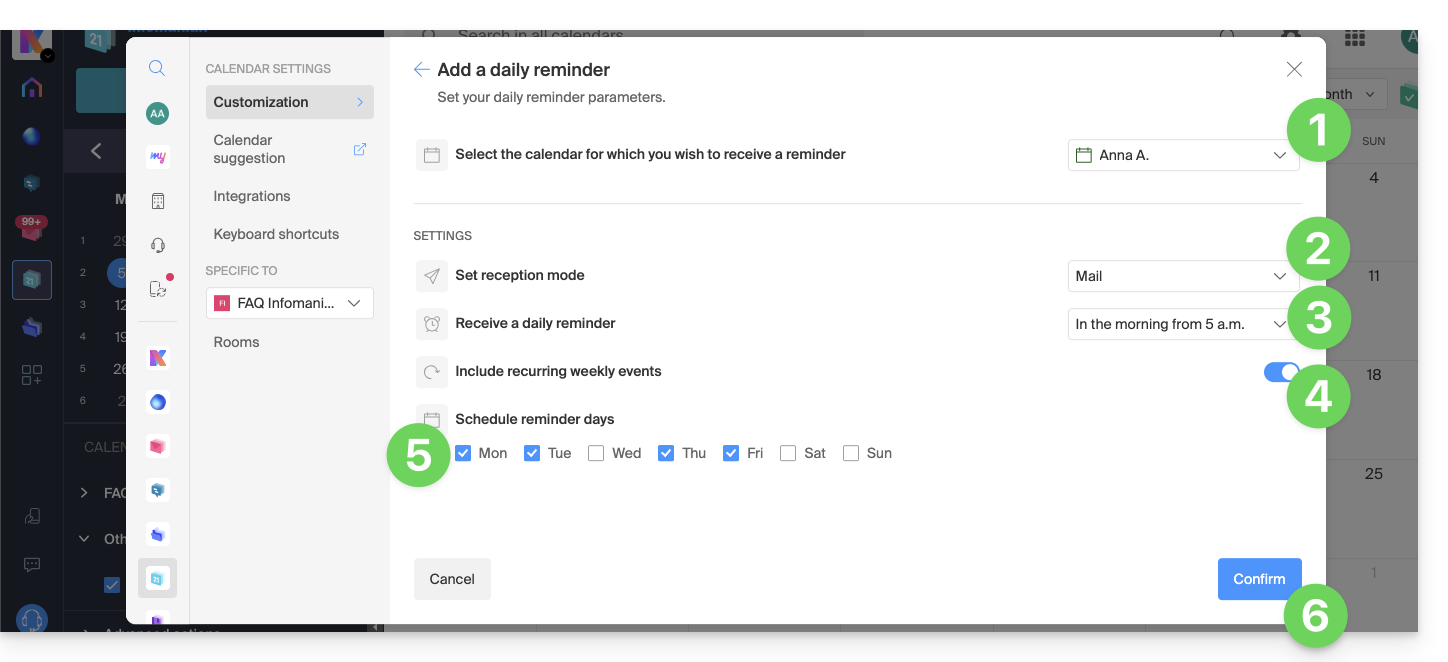
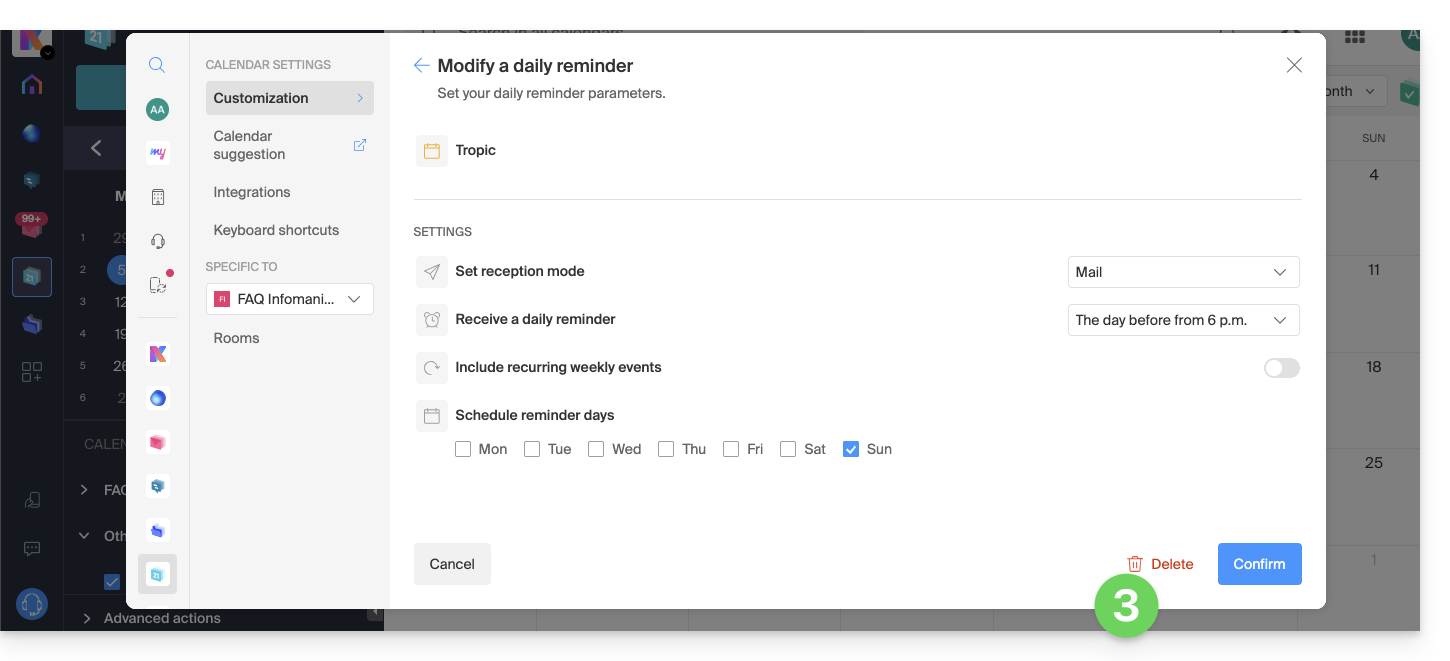
To customize your reminder according to your needs:
- Select the relevant calendar.
- Choose the reception mode (Mail, kChat or both).
- Choose the time you want to receive the reminder (the evening before or early the same day).
- Choose whether or not to include recurring events.
- Choose the days on which the daily reminder will be sent.
- Confirm your choices at the bottom of the page:
Disable the daily reminder
To stop receiving the daily summary by email or via Euria on kChat:
- Click on the link located at the bottom of the notification received:

- Click on the reminder to delete:
- Delete the reminder from the edit page:
Link to this FAQ:
Has this FAQ been helpful?
This guide explains how to obtain a notification to review a specific kChat message at a determined / customizable time (depending on the offers, read below) in 30-minute increments.
✘ UNAVAILABLE with
my kSuite / my kSuite+ (ik.me, etik.com, ikmail.com)
Free kSuite does not allow customization of the schedule when planning.
Remind a kChat message at a fixed time
To review a message with a future notification:
- Hover over the message to remind and select the additional actions icon ••• in the top right.
- Click on Remind.
- Choose the desired time to be notified:

- A notification in the channel (visible only to you) indicates the next reminder of the message:
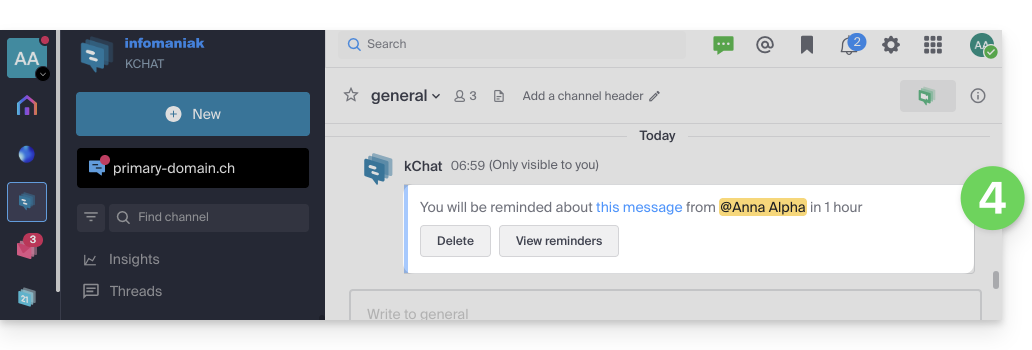
- You will thus receive at the chosen time a notification from the Euria channel in the left sidebar, leading to the reminder containing a quote of the message, as well as the necessary information to view the message, restart a reminder later, cancel any other potential reminders, etc.
Link to this FAQ:
Has this FAQ been helpful?
This guide details the principle of kChat conversations, organized within private and public chat channels, and direct discussions between users.
Starting a conversation
To write to a user in your Organization, click on their name in the list of members on the left side of your kChat interface: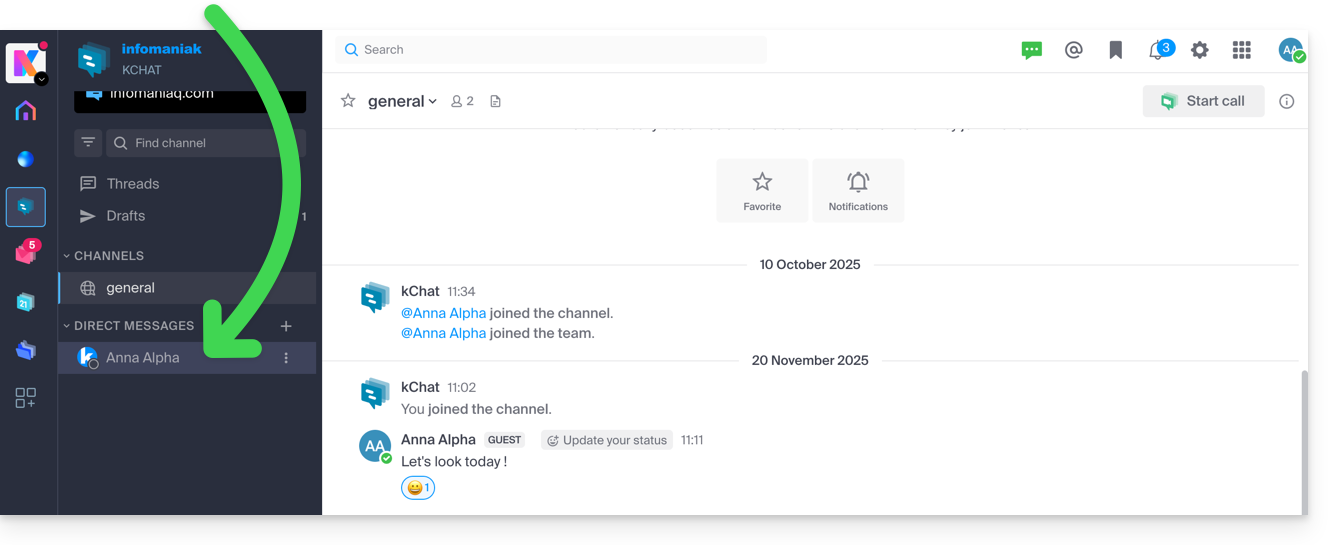
You can also click on the + to the right of Personal Messages to select up to 7 members and create a group conversation:
Write and send your message by pressing the send button: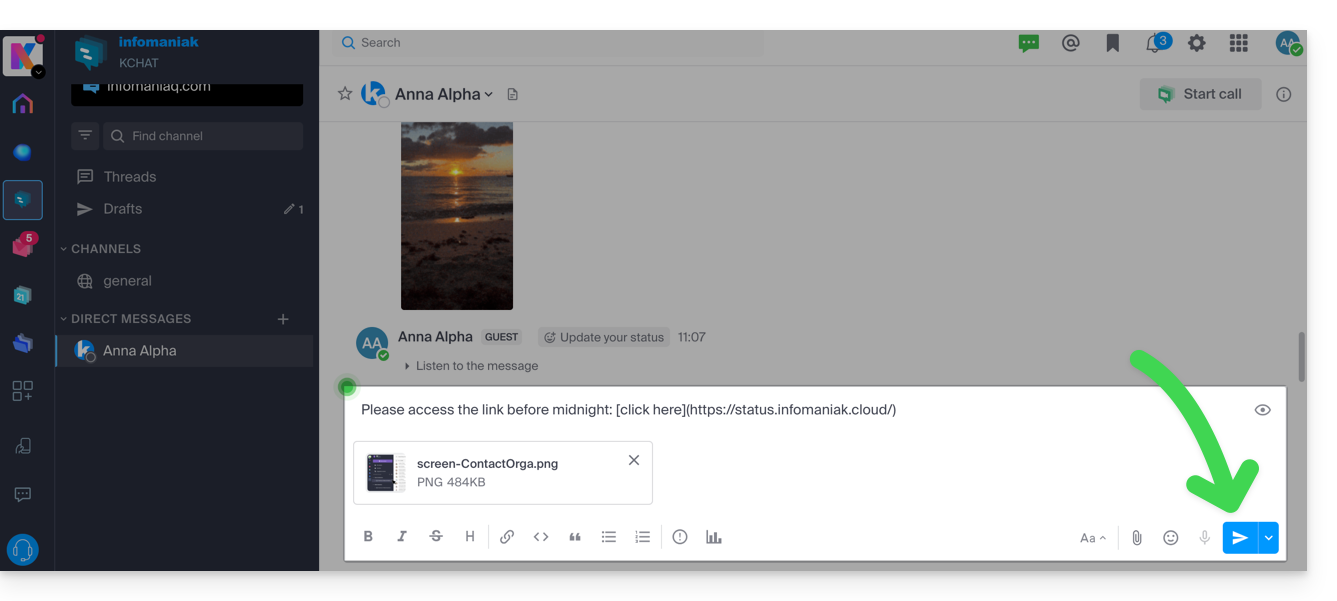
If necessary, you can attach files up to 100 MB. You can also use “reactions”.
Scheduled sending: plan a message
✘ NOT AVAILABLE with
my kSuite / my kSuite+ (ik.me, etik.com, ikmail.com)
kSuite free does not allow customization of the schedule when planning.
To schedule a message to be sent at a later date/time, simply click on the chevron to the right of the send button and then choose the time the message should be sent: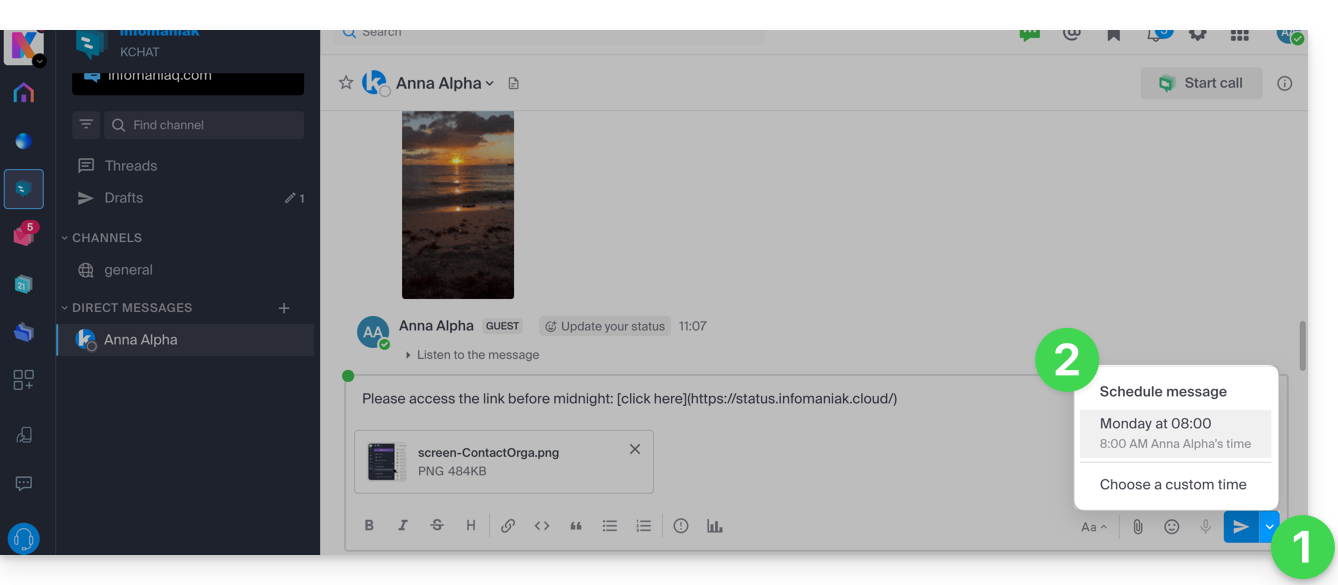
On the kChat mobile app (application for iOS/Android smartphones or tablets), press and hold the send button for a few seconds, and a menu will appear to schedule the message.
Mention another user
To contact one of the members of the Organization (or an entire Group) via a message, type the at symbol @ to display the people or channels to mention:

Please note that, depending on the type of channel, mentioning a user will display a message allowing you to add them to the discussion (or notify them); otherwise, they will not see the mention.
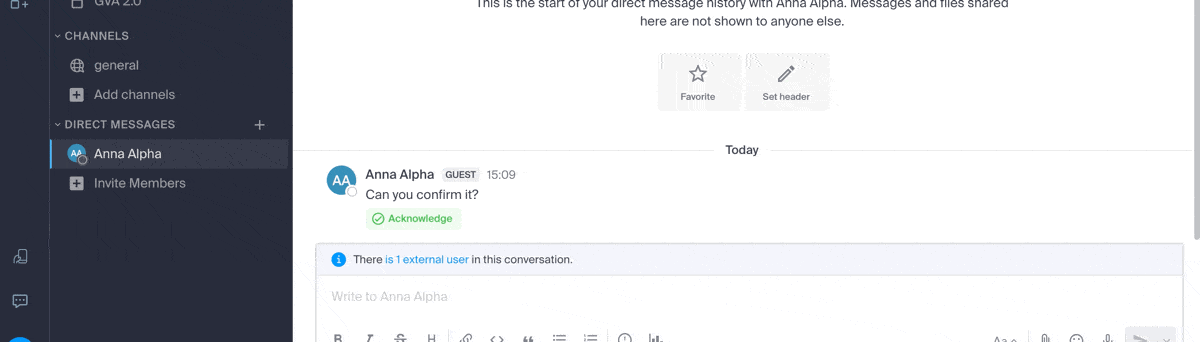
Request a read receipt
To allow users to acknowledge receipt of your message and indicate that they have read it, activate a read receipt before sending the message on the channel by clicking on the (!) icon and then activating the toggle switch: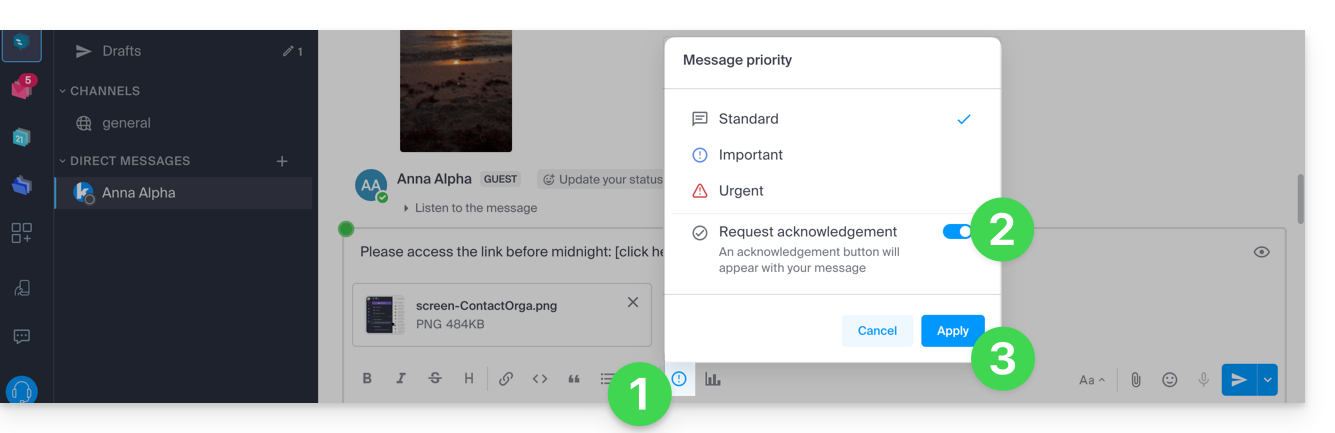
Once the message is sent, the result will be as follows:
Edit/delete a message, or pin it
To edit a message (which will then include a "message edited" notification), click on the action menu to the right of the message to be edited. In the same place, you can also delete your message, which will then disappear from the discussion for all users:
A notification regarding the deletion will appear for all other users of the channel at the original location of the message.
In the same place, you can pin a message:
- Pinned messages are visible to all members of the channel, whether it is public or private.
- Pinned messages in a private channel are only accessible to the members of that channel.
- You can view the list of all pinned messages via the “Pinned Messages” option in the channel.
- To remove a pinned message, hover over it again and select “Unpin.”
Organizing Conversations in kChat
The type of sorting for the items you manage on the left side of the screen is very important.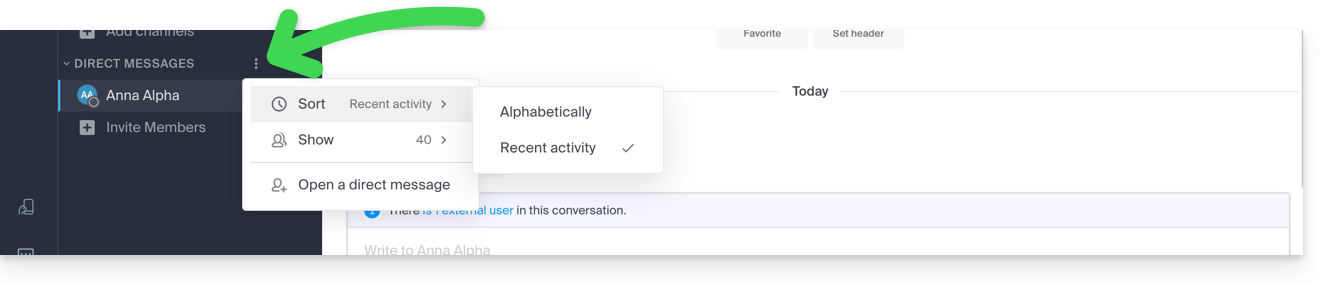
Imagine opening kChat after several days of absence; unread conversations will be displayed one after the other. After reading them, you may want to find information from a conversation you have already read. Sorting by recent activity, for example (see below for other options), allows you to find the latest conversations that are relevant to you.
This choice of sorting type is available for all items: discussion channels, categories, direct messages, etc. 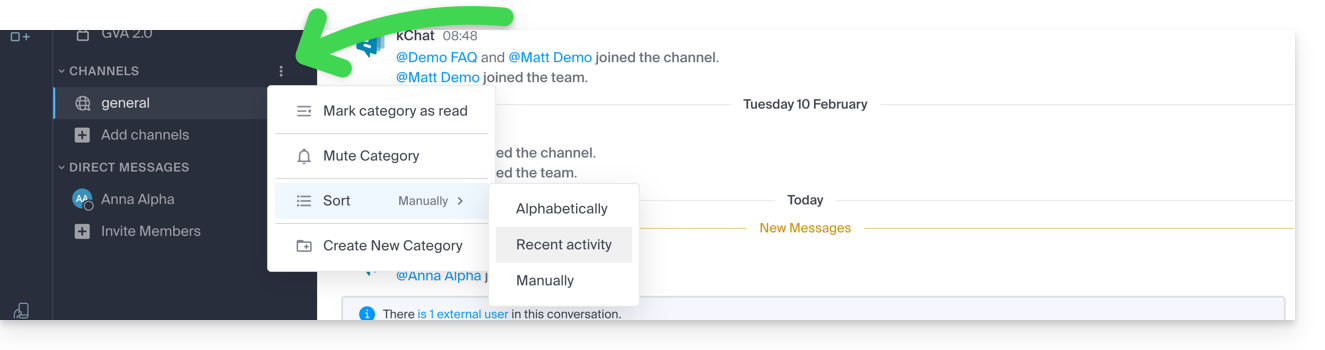
Searching for a Conversation
The search function for items (word, participant, file) is located at the top of the window. Once results are found, they appear on the right side of the window: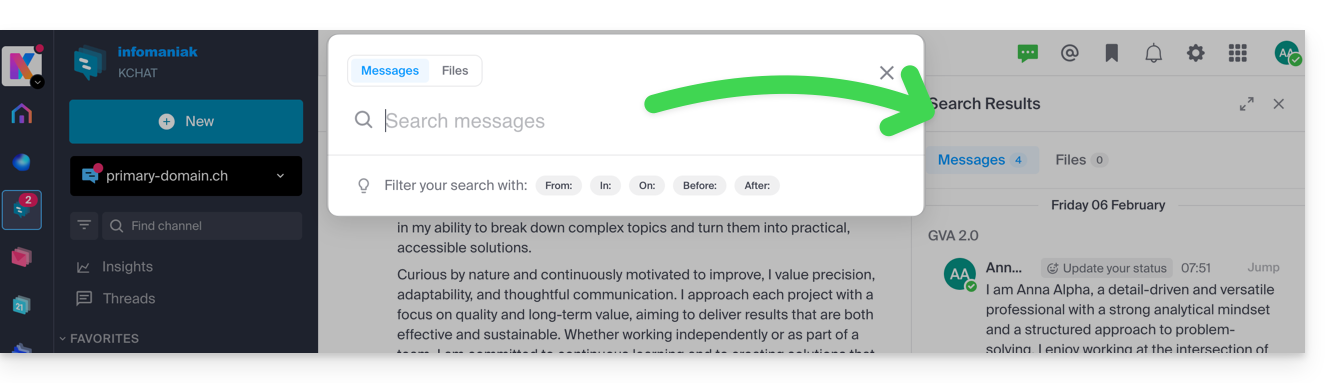
Thread
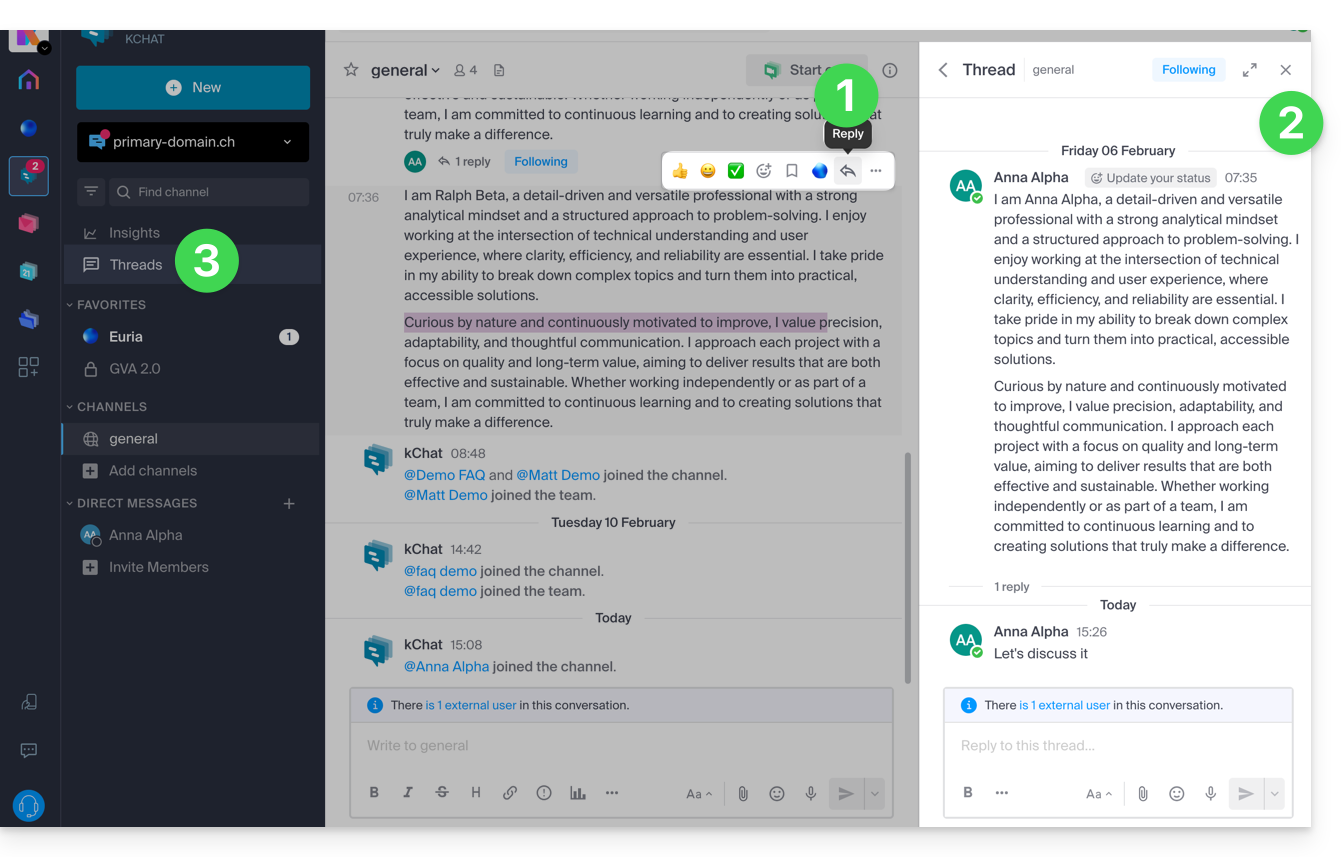
- Regardless of the channel or private chat with another user, you can start a thread from another simply by choosing Reply on the desired message.
- A discussion thread will open in a sidebar on the right, allowing each user in the channel to contribute to this specific thread without disrupting any new topics in the current channel (this thread can then be followed or ignored to stop receiving notifications for new messages – following is managed at the top of the sidebar).
- These discussion threads are then centralized for easy reading and review in the Discussion threads section of the left sidebar.
Link to this FAQ:
Has this FAQ been helpful?
This guide details how to manage the members of your kChat service.
Refer to this other guide if you want to manage the channels to which new members will automatically belong.
Prerequisites
- Be a kChat administrator:
- The role within the Organization is irrelevant; being an Organization administrator in the Organization that has the kSuite (and therefore kChat) is not required, and is not sufficient in any case:
- The role within the Organization is irrelevant; being an Organization administrator in the Organization that has the kSuite (and therefore kChat) is not required, and is not sufficient in any case:
- Invite a user to join kChat.
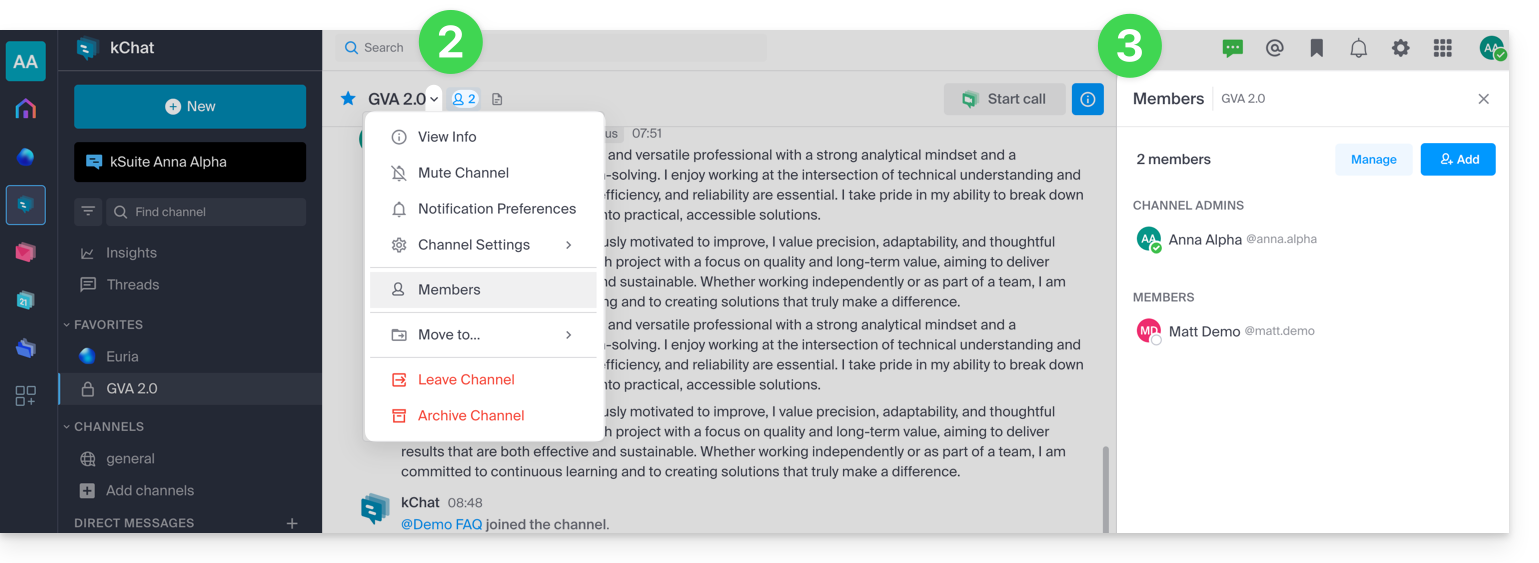
View the members of a channel
To view the users who have access to the selected channel:
- Click here to access the kChat web app (online service ksuite.infomaniak.com/kchat) or open the kChat desktop app (desktop application on macOS / Windows / Linux).
- Click on the person icon to the right of the channel title or go through the Members menu.
- The participants are displayed on the right side of kChat:
Invite or remove a member from a private channel
When you have opened the members panel of a channel:
- The current participants are displayed on the right side of kChat.
- The Manage button allows you to remove a member from this channel or designate them as the channel Administrator, so that they can, in turn, manage the members:

- The blue Add button allows you to invite a kChat user or an entire Group who does not yet have access to this channel:
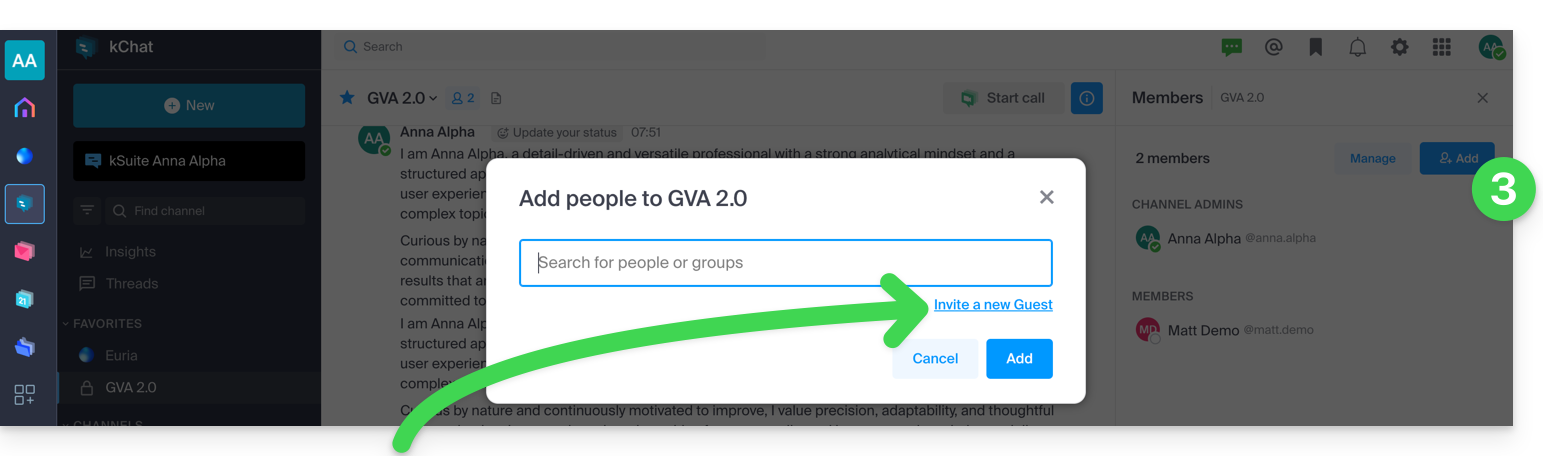
- Refer to this other guide regarding adding guests, members who will not use a kSuite license to chat with you on kChat.
Link to this FAQ:
Has this FAQ been helpful?
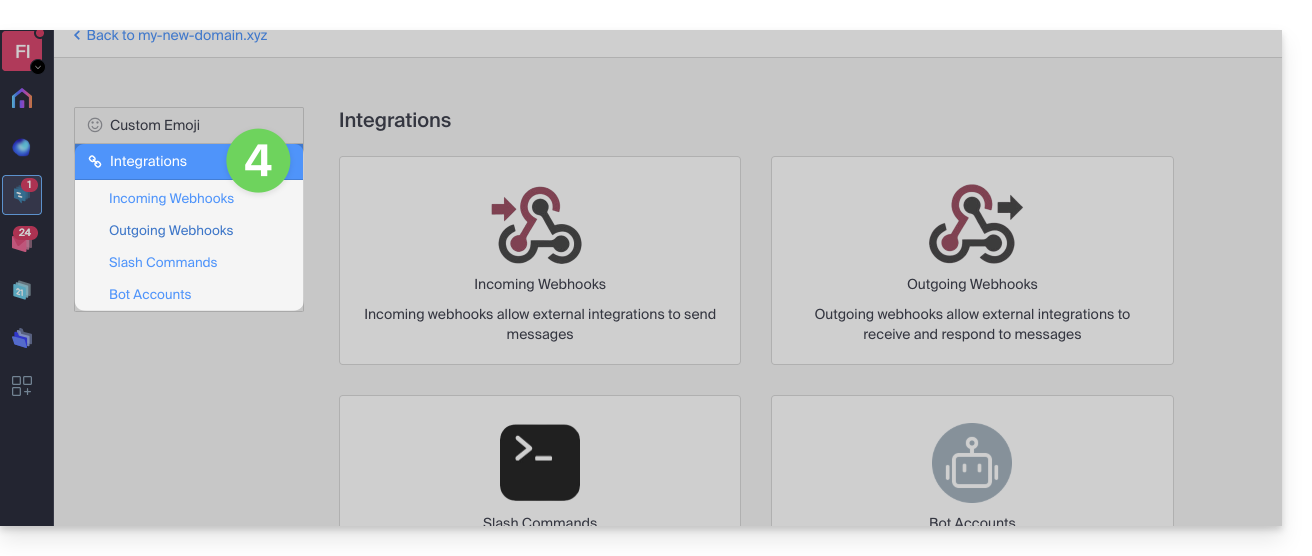
This guide allows you to manage external applications with kChat using webhooks.
Preamble
- A webhook is a method that allows an application to be immediately informed when a particular event occurs in another application, rather than constantly asking this application if something new has happened ("polling").
- Outgoing webhook: kChat communicates information to other apps when an event occurs in kChat.
- Incoming webhook: kChat receives information from other apps to trigger actions in kChat.
- It is not possible to import the chat history from another application (Slack, Teams, Jabber, etc.) or from another Organization.
⚠ Max. number of incoming/outgoing webhooks:
| kSuite | free | 1 / 1 |
| Standard | 20 / 20 | |
| Business | unlimited | |
| Enterprise | unlimited | |
Access the kChat webhooks interface
Prerequisites
- Not being an external user (this user will not see the menu Integrations).
To configure a webhook, find self-hosted or third-party applications and integrations:
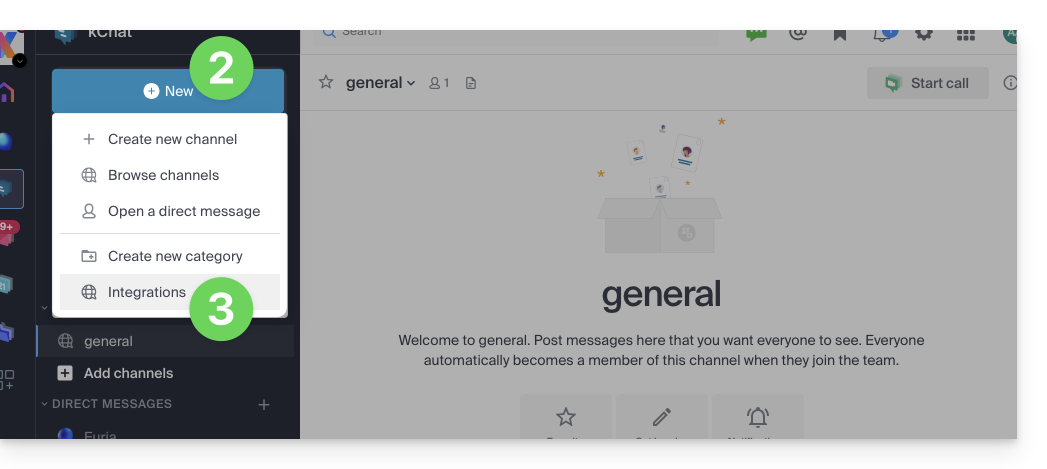
- Click here to access the Web app kChat (online service ksuite.infomaniak.com/kchat) or open the desktop app kChat (desktop application on macOS / Windows / Linux).
- Click on the New icon next to your kChat organization's name.
- Click on Integrations:
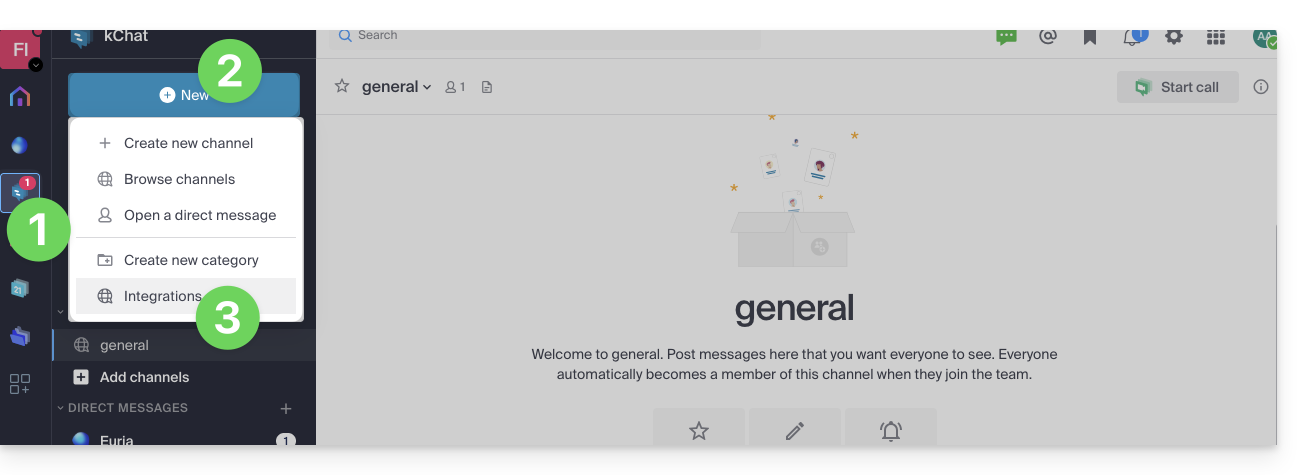
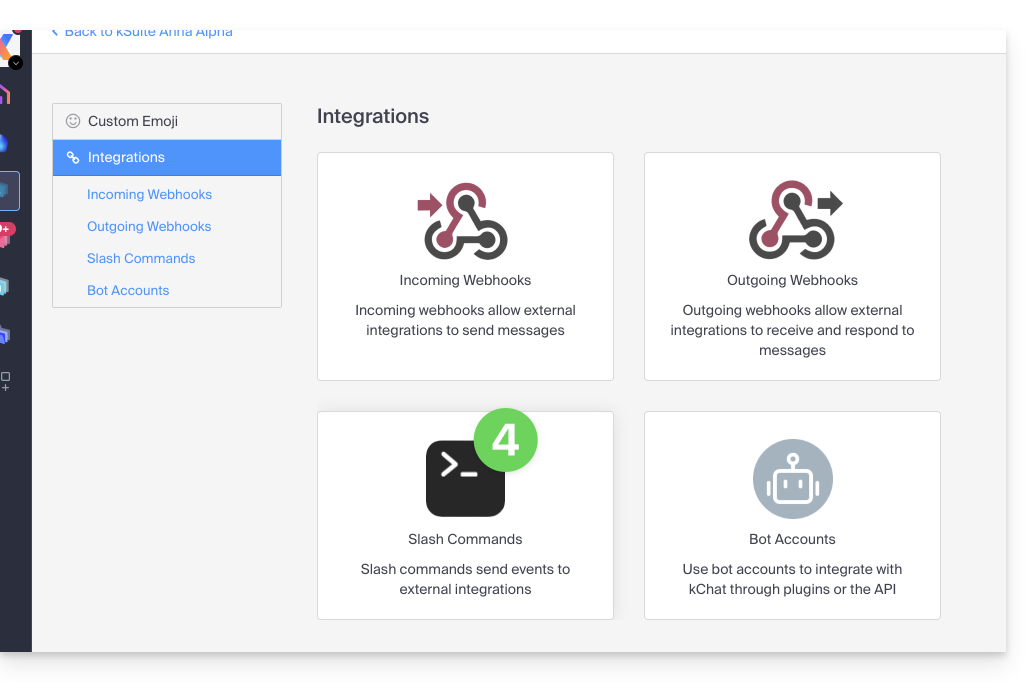
- Access the categories:
Specific guides
Integration examples on kChat:
- Calendar Infomaniak: display an event reminder on kChat
- application n8n: trigger sending a message on kChat
Guides for any other use
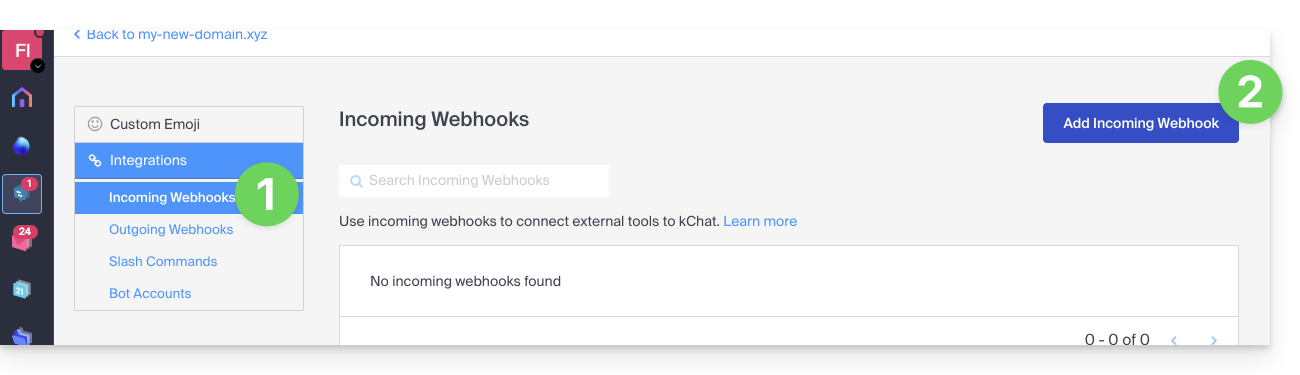
To create an incoming webhook (to display an external event on kChat):
- Click on the Incoming Webhooks category.
- Click on the blue button Add incoming webhooks:
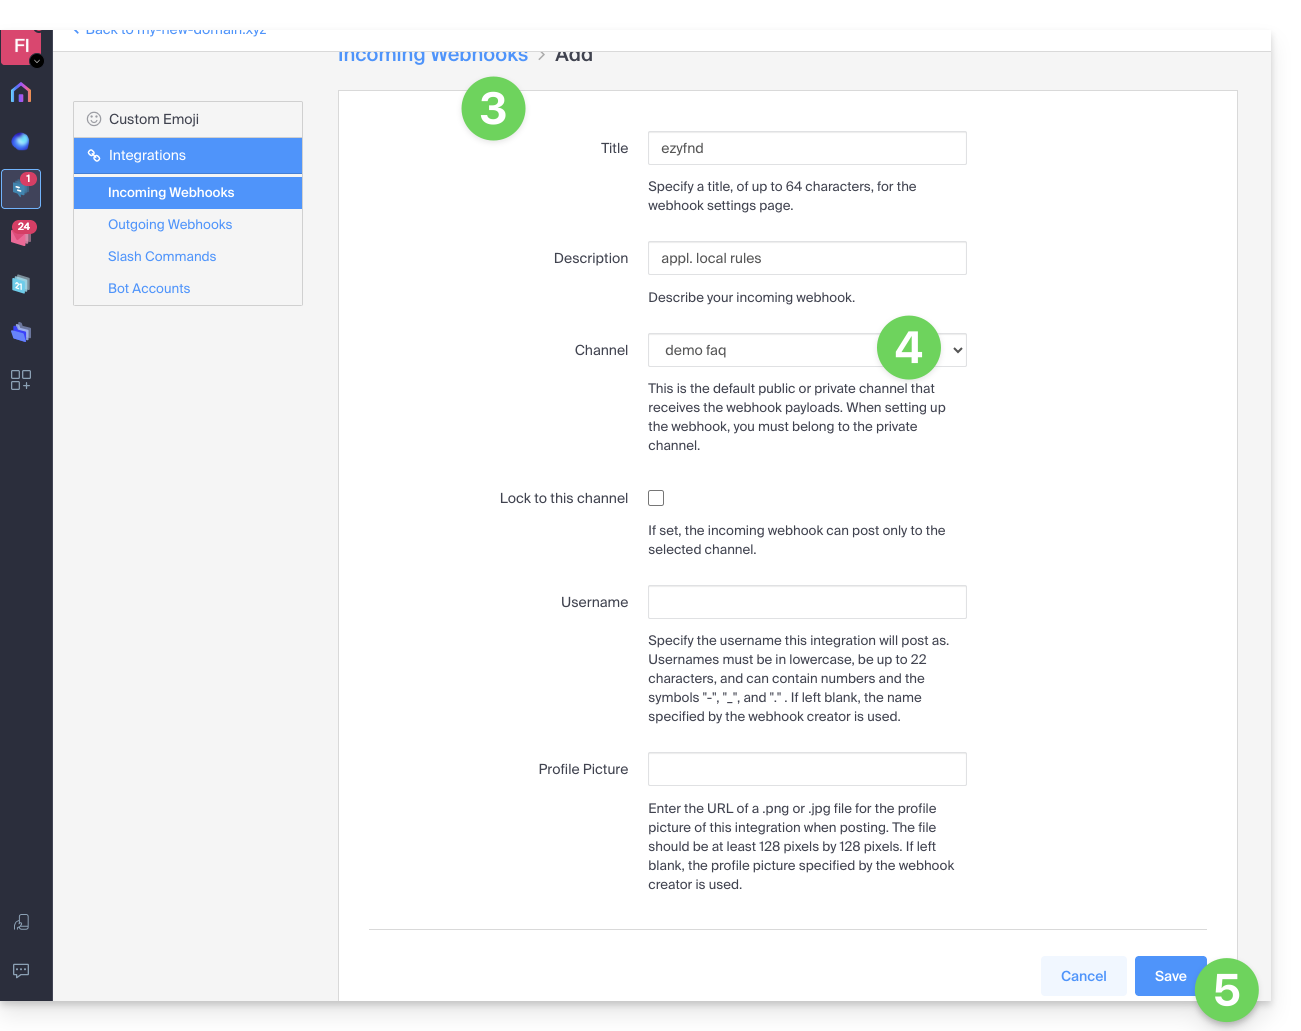
- Add a name and description for the webhook.
- Select the channel that will receive the messages.
- Click on the button to Save:
- The URL to keep for your developments is displayed (do not disclose it publicly); example “
https://your-server-kchat.xyz/hooks/xxx-key-generated-xxx”: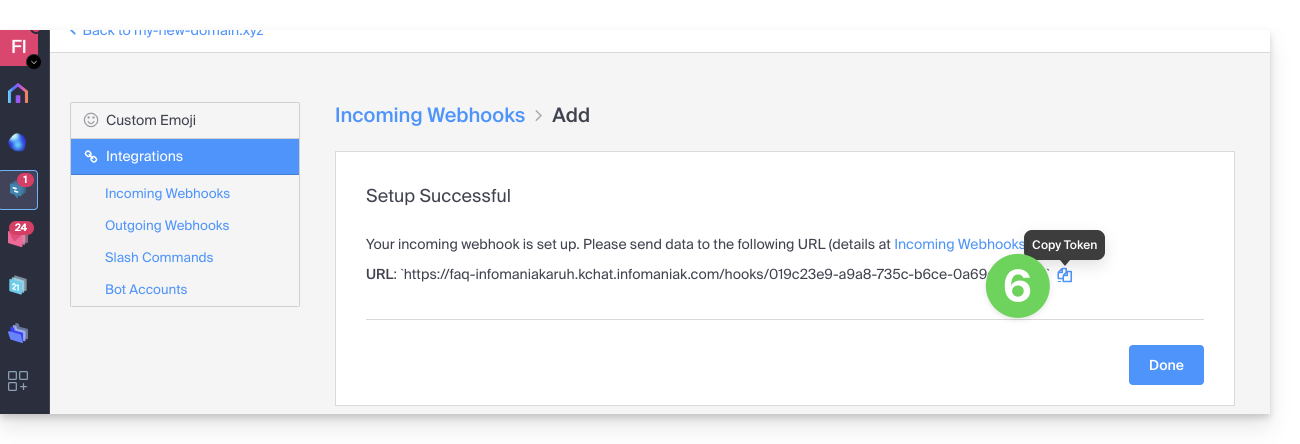
Webhook usage
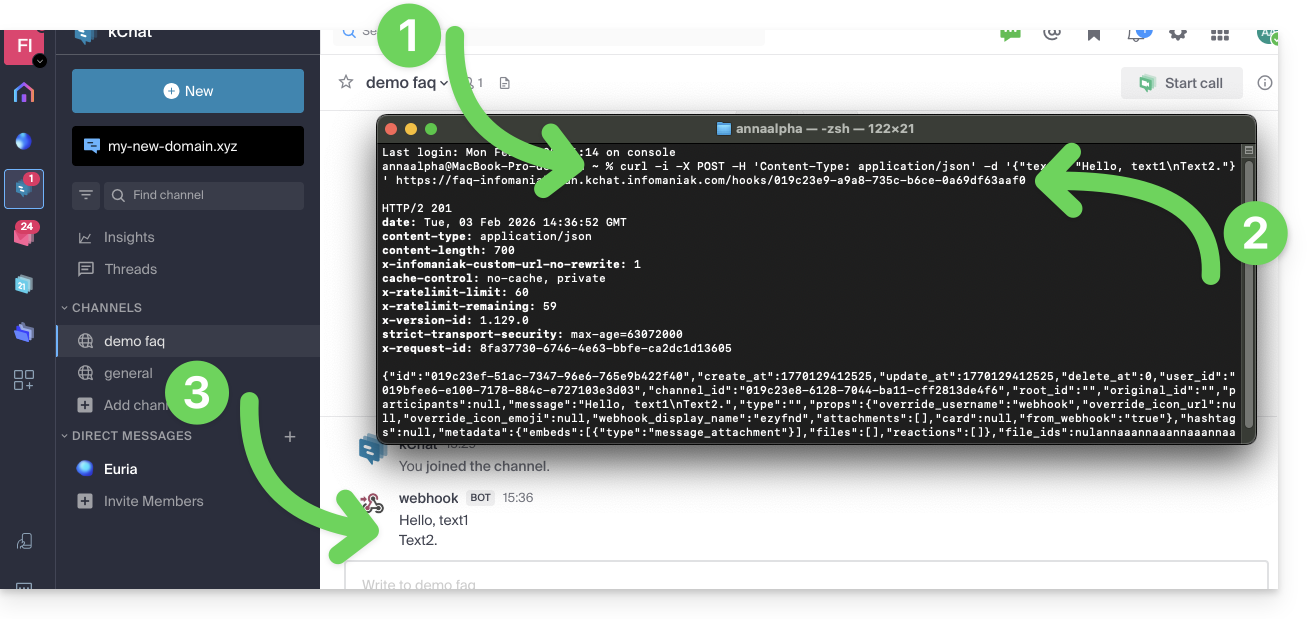
Quick example
- A specific
curlcommand (detailed below) is entered in a terminal. - The command contains the URL obtained in point 6 above.
- The command will result in posting a message in the channel specified in point 4 above:
Details
On the application that needs to post on kChat:
Adjust the code below according to the URL obtained on kChat:
POST /hooks/xxx-key-generated-xxx HTTP/1.1
Host: your-server-kchat.xyz
Content-Type: application/json
Content-Length: 63
{
    "text": "Hello, text1\nText2."
}
Optionally, use the same request but in
curl(to test from aTerminaltype application (command line interface,CLI / Command Line Interface) on your device) as in the image example above:curl -i -X POST -H 'Content-Type: application/json' -d '{"text": "Hello, text1\nText2."}' https://your-server-kchat.xyz/hooks/xxx-key-generated-xxx
The BOT indication is added next to the username on kChat for security reasons.
If no Content-Type header is defined, the request body must be preceded by payload= as follows:
payload={"text": "Hello, text1\nText2."}A successful request will receive the following response:
HTTP/1.1 200 OK
Content-Type: application/json
X-Version-Id: 4.7.1.dev.12799dvd77e172e8a2eba0f4041ec1471.false
Date: Sun, 01 Jun 2023 17:00:00 GMT
Content-Length: 58

{
    "id":"x",
    "create_at":1713198308869,
    "update_at":1713198308869,
    "delete_at":0,
    "user_id":"x",
    "channel_id":"x",
    "root_id":"",
    "original_id":"",
    "participants":null,
    "message":"test",
    "type":"",
    "props":{
        "override_username":"webhook",
        "override_icon_url":null,
        "override_icon_emoji":null,
        "webhook_display_name":"test",
        "attachments":[

        ],
        "card":null,
        "from_webhook":"true"
    },
    "hashtags":null,
    "metadata":{
        "embeds":[
            {
                "type":"message_attachment"
            }
        ],
        "files":[

        ],
        "reactions":[

        ]
    },
    "file_ids":null,
    "has_reactions":false,
    "edit_at":0,
    "is_pinned":false,
    "remote_id":null,
    "reply_count":0,
    "pending_post_id":null,
    "is_following":false
}
If you want to have the same response format as Slack:
HTTP/1.1 200 OK
Content-Type: text/plain
X-Request-Id: hoan69ws7rp5xj7wu9rmystry
X-Version-Id: 4.7.1.dev.12799dvd77e172e8a2eba0f4041ec1471.false
Date: Sun, 01 Jun 2023 17:00:00 GMT
Content-Length: 2
ok
you must add ?slack_return_format=true to the webhook URL.
Parameters
In addition to the text field, here is the complete list of supported parameters:
| Parameter | Description | Required |
|---|---|---|
text | Markdown-formatted message to display in the post. To trigger notifications, use “@<username>”, “@channel” and “@here” as you would in other kChat messages. | If attachments is not defined, yes |
channel | Replaces the channel in which the message is posted. Use the channel name, not the display name, for example “town-square”, not “Place de la ville”. Use “@” followed by a username to send a direct message. By default, uses the channel defined when the webhook was created. The webhook can post in any public and private channel where the webhook creator is present. Posts in direct messages will appear in the direct message between the targeted user and the webhook creator. | No |
username | Replaces the username under which the message is posted. By default, uses the username defined when the webhook was created; if no username was defined during creation, uses webhook. | No |
icon_url | Replaces the profile picture with which the message is posted. By default, uses the URL defined when the webhook was created; if no icon was defined during creation, the standard webhook icon () is displayed. The configuration parameter Allow integrations to replace profile picture icons must be enabled for the icon replacement to take effect. | No |
icon_emoji | Replaces the profile picture and the parameter icon_url.By default, nothing is defined when creating the webhook. The expected value is the name of an emoji as it is typed in a message, with or without colons ( :).The configuration parameter Allow integrations to replace profile picture icons must be enabled for the replacement to take effect. | No |
attachments | Attachments to the message used for richer formatting options. | If text is not defined, yes |
type | Defines the type of publication, mainly for use by plugins.If not empty, must start with " custom_". | No |
Example code with parameters
Here is how to generate a more complete message with parameters, some of which can replace parameters already set when creating the webhook (username, preferred channel, avatar...) as indicated in the table above:
curl -i -X POST -H 'Content-Type: application/json' \
-d '{
"username": "System Monitor",
  "icon_url": "https://cdn-icons-png.flaticon.com/512/5971/5971593.png",
  "text": "### System Status Report\nEnvironment: PRODUCTION\nStatus: SUCCESSFUL\n\n---\n\n| Component | Version | Build ID | Status |\n|:----------|:-------:|:---------|:-------|\n| API-Core  | 2.4.1   | #88421   | OK     |\n| Web-UI    | 1.9.0   | #88425   | OK     |\n| Database  | 14.5    | N/A      | OK     |\n\n---\n\n**Commit Reference:**\n`git-ref: a7f8e9c21b` \n\n**Summary:**\nAll automated integration tests passed successfully. No manual intervention is required. Please contact the DevOps team for further details regarding this release."
}' \
https://faq-infomaniakaruh.kchat.infomaniak.com/hooks/019c23e9-a9a8-735c-b6ce-0a69df63aaf0
Result of a similar example in image: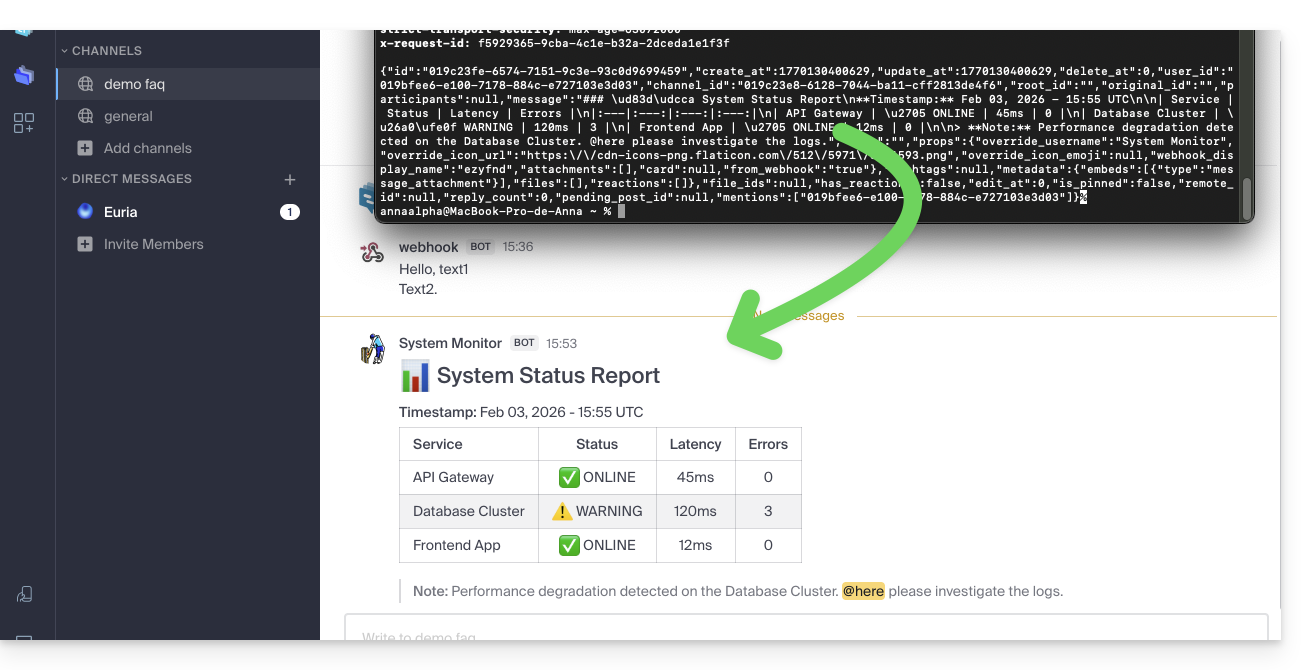
Link to this FAQ:
Has this FAQ been helpful?
Thank you for choosing Infomaniak and kChat as your discussion solution between you, your contacts, or your company! These guides will help you organize your channels, users, conversations, and more!
Preamble
- Multiplatform, kChat is the instant messaging of my kSuite that allows you to exchange, share, and coordinate your teams securely from…
- … your Web browser
- … your iOS / Android device
- … your macOS / Windows / Linux computer
- Download the kChat app on your devices!
- It is not possible to change the location of the
kchat-desktopfolder on your hard drive. - The content of conversations, photos, videos, is stored online on Infomaniak's secure servers.
- The available storage size is that of my kSuite.
- It is not possible to change the location of the
What would you like to do?
- Set up kChat
- Manage users
- Manage a channel
- Manage a conversation
- React to messages
- Manage kChat notifications
- Format messages and insert images
- Send a voice message and its automatic transcription
- Translate the content of a message on the kChat Infomaniak app
A question or feedback?
- In case of a problem, please consult the knowledge base before contacting support.
- Click here to share feedback or a suggestion on an Infomaniak product.
Link to this FAQ:
Has this FAQ been helpful?
This guide covers messages that start with / on kChat interpreted as slash commands.
Execute a slash command on kChat
To access slash commands on kChat:
- Click in the composition field within a channel.
- Enter a
/(slash or forward slash) and the attached command. - Confirm to send the command.
If you type only the / sign, a modal appears with the commands that can be executed, such as going offline, for example.
Here is a table of the main commands:
| command | description |
|---|---|
| /away | marks your status as "away" |
| /offline | marks your status as "offline" |
| /online | marks your status as "online" |
| /dnd | marks your status as "do not disturb" |
| /code | used to format text as code |
| /collapse | hides the content of the element in the message |
| /expand | expands the content of the element in the message |
| /echo | repeats the text following the command |
| /header | displays a header in a message |
| /purpose | defines or displays the channel description |
| /rename | renames the current channel |
| /leave | leaves the current channel |
| /mute | mutes the current channel |
| /reminders | manages reminders |
| /search | searches for messages and other content |
| /settings | opens the settings |
| /shortcuts | displays keyboard shortcuts |
Create a custom slash command
Prerequisites
- Not be an external user (they will not see the menu Integrations).
To create a custom slash command:
- Click here to access the Web kChat app (online service kchat.infomaniak.com) or open the desktop kChat app (desktop application on macOS / Windows / Linux).
- Click on the New icon next to your kChat organization name.
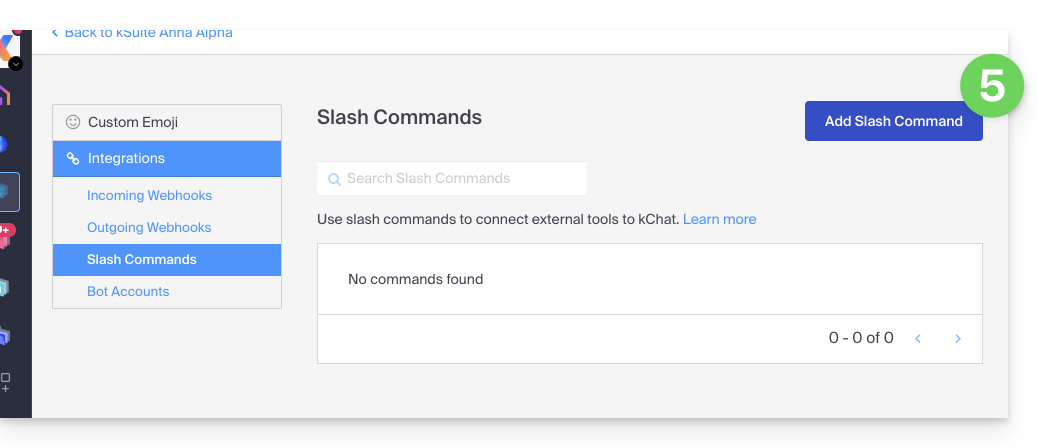
- Click on Integrations:
- Click on Slash command:
- Click the blue button to Add a command:
- Configure the slash command (name, trigger (without the
/), expected content type, action to execute*, etc., including whether the command should appear in the help modal mentioned in the chapter above).- * This can include calling an external API, running a script, displaying a specific response, etc. For this, you will generally need an external script or application that will respond to the commands. You can also set additional parameters for the command, such as dropdown options, checkboxes, etc., depending on your needs.
- Save the command.
- Make sure to test the command to ensure it works as expected.
Remember that creating custom slash commands may require additional programming skills, especially if you need to integrate custom features or interactions with external systems. Also, make sure to follow security best practices when creating these commands to avoid potential security vulnerabilities.
Link to this FAQ:
Has this FAQ been helpful?
This guide explains how to receive event reminders from the Infomaniak Calendar web app (online service ksuite.infomaniak.com/calendar) on a messaging system like kChat, so you can be notified in the chat thread of your choice when an event is approaching.
⚠ Available with:
| kSuite | free | * |
| Standard | ||
| Business | ||
| Enterprise | ||
| my kSuite | ||
| my kSuite+ | ||
| Mail Service | Starter 1 address max. | |
| Premium 5 addresses min. |
* limited to 1 webhook
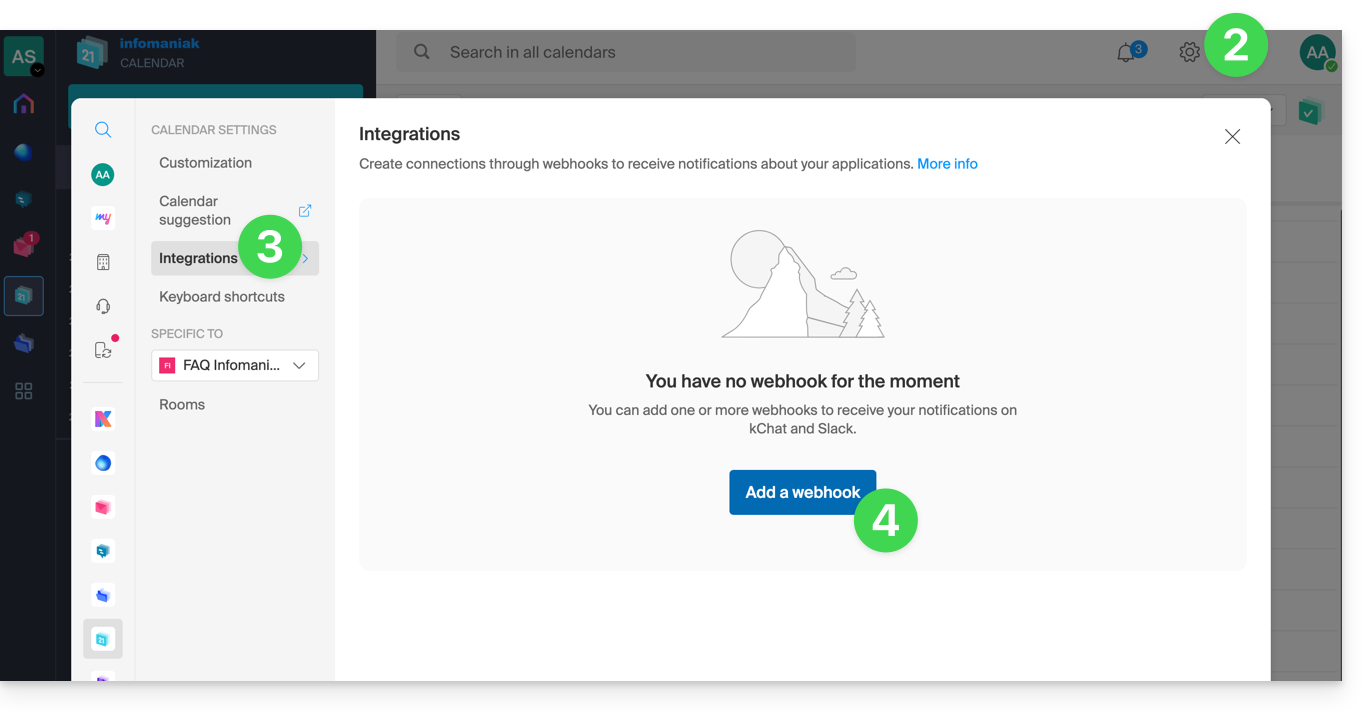
Prerequisites
- Create an inbound webhook on the kChat app to obtain a URL of the type
https://your-server-kchat.xyz/hooks/xxx-key-generated-xxx: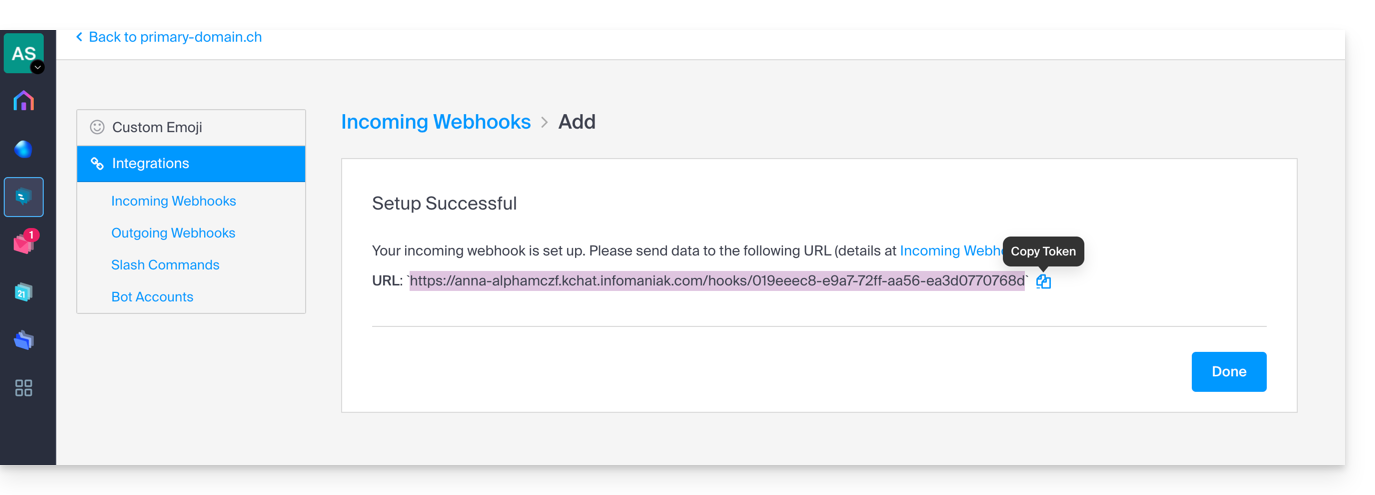
Link the kChat webhook to Calendar
To add the webhook from your messaging system to the Calendar app:
- Click here to access the Infomaniak Calendar web app (online service ksuite.infomaniak.com/calendar).
- Click on the Settings icon in the top right corner.
- Click on Integrations in the left-hand menu.
- Click on the Add a webhook button:
- Define:
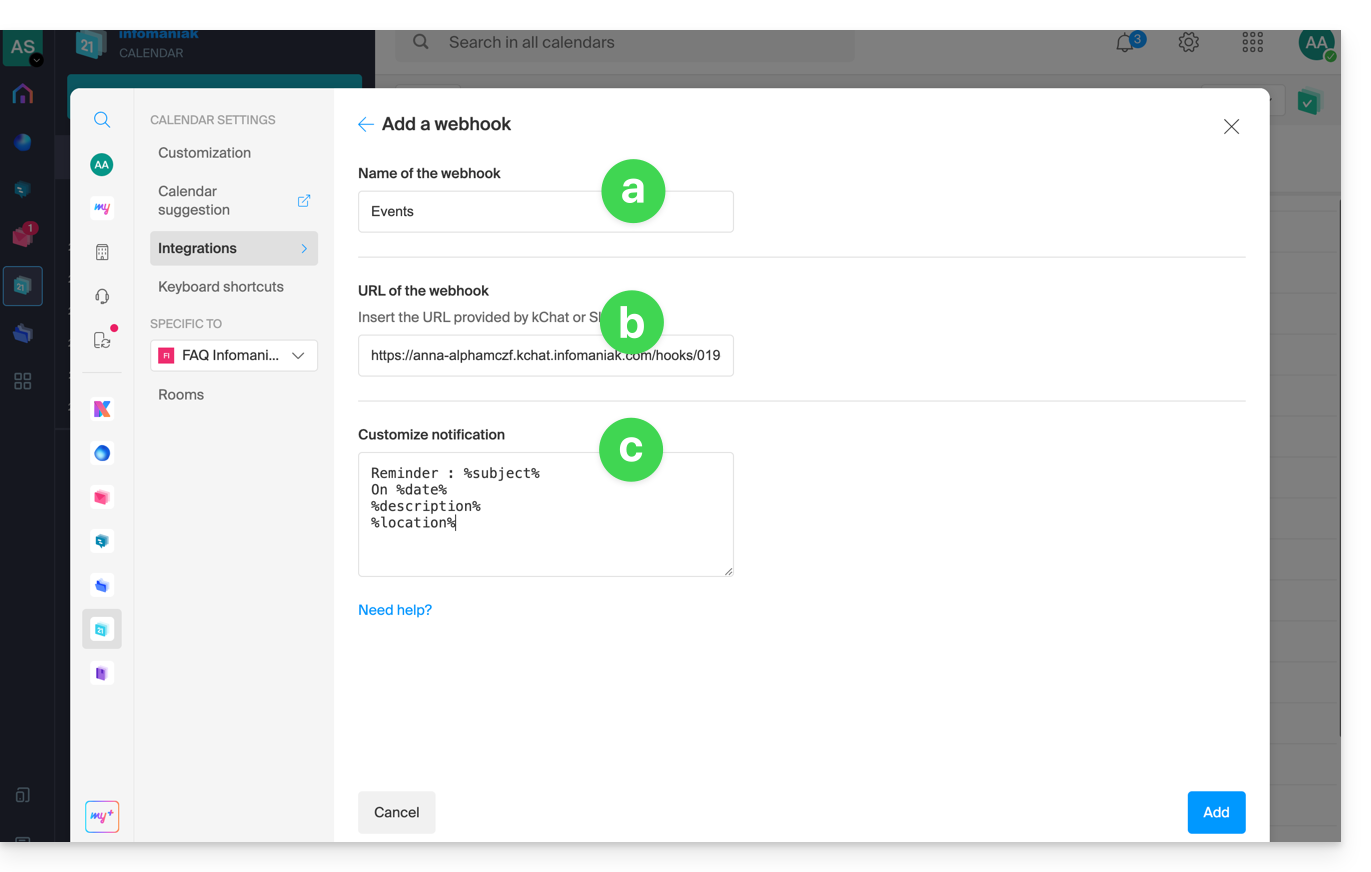
- A name to easily identify the Webhook when adding reminders.
- The webhook URL (obtained from your chat system).
- The elements (automatically taken from your event and/or added manually here) and their layout in the message that will be sent:
- Insert %subject% to include the event subject.
- Insert %date% to include the event date.
- Insert %description% to include the event description.
- Insert %location% to include the event location, if applicable.
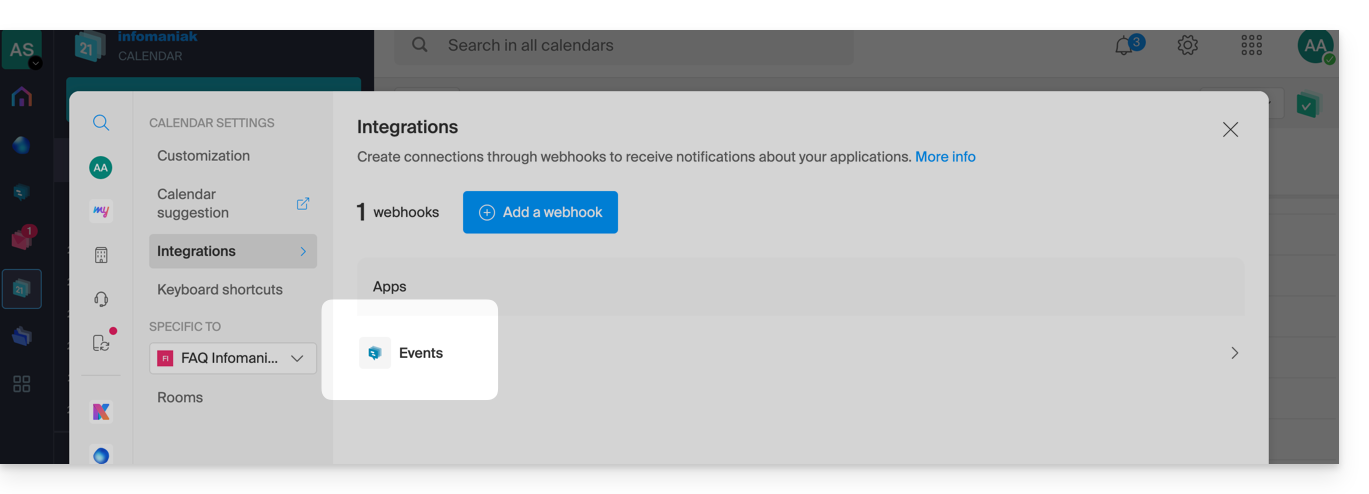
- Click on the button to Add the configured element and see it now created:
Create an event with chat-based reminder
Now that Calendar is linked to your chat system account, you can choose to be notified in a chat when you add a reminder to an event:
- Click here to access the Infomaniak Calendar web app (online service ksuite.infomaniak.com/calendar).
- Click the Create button in the top left corner.
- Click on Event:
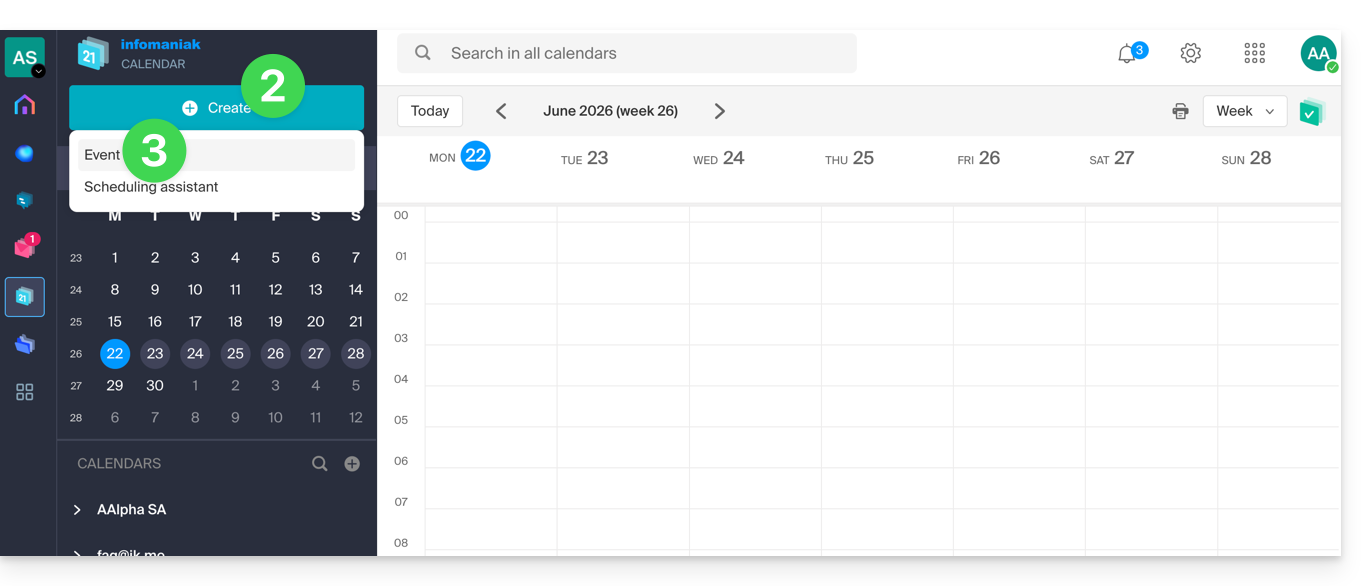
- You can also click on an existing event in the calendar to edit it.
- Enter the event details.
- Click on Add a reminder to configure it:
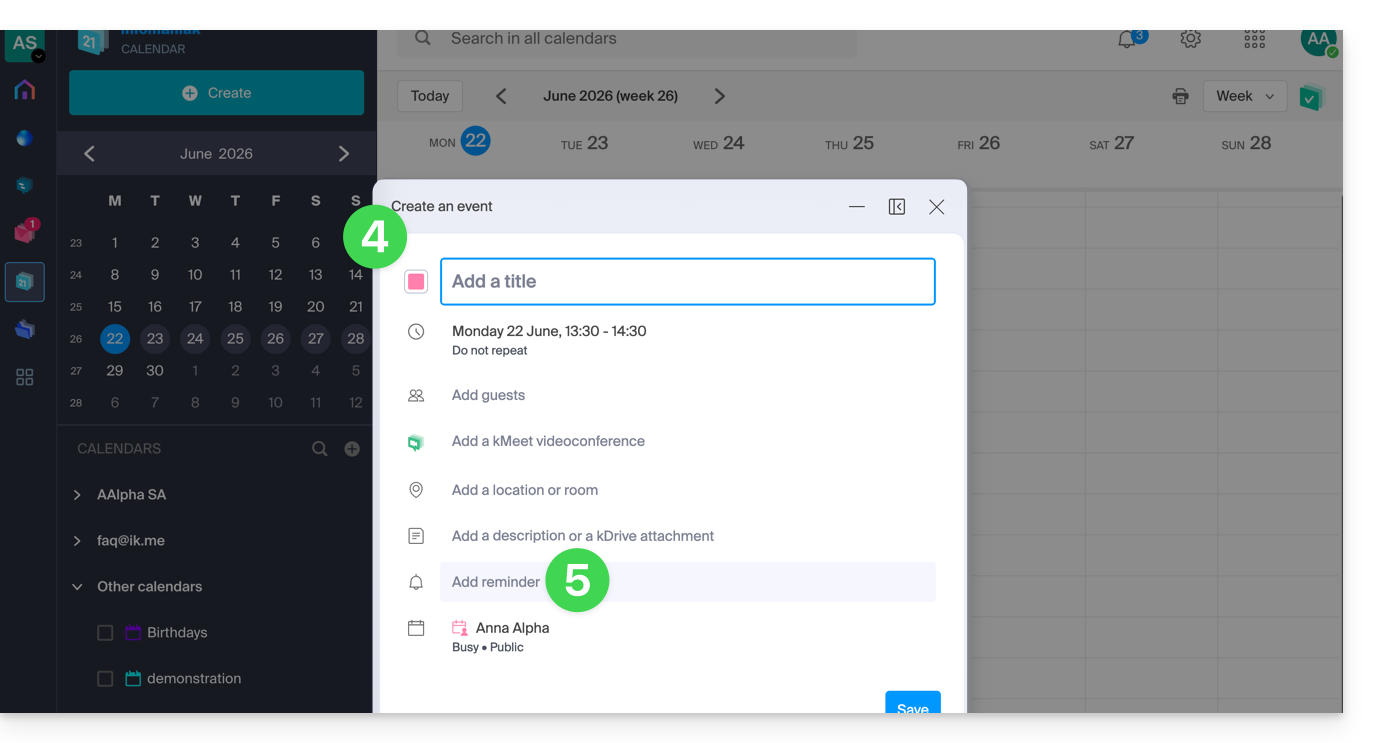
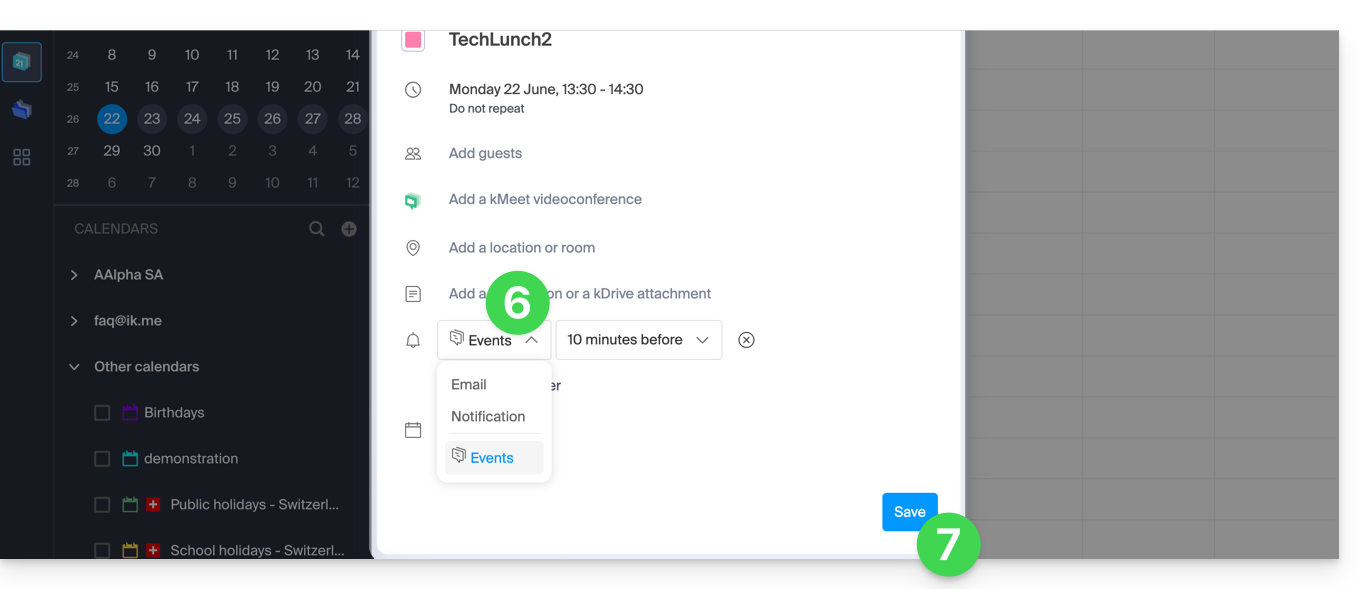
- In the reminder type dropdown menu, choose the webhook you configured (according to the name given in step 5a above).
- Save the event at the bottom of the page:
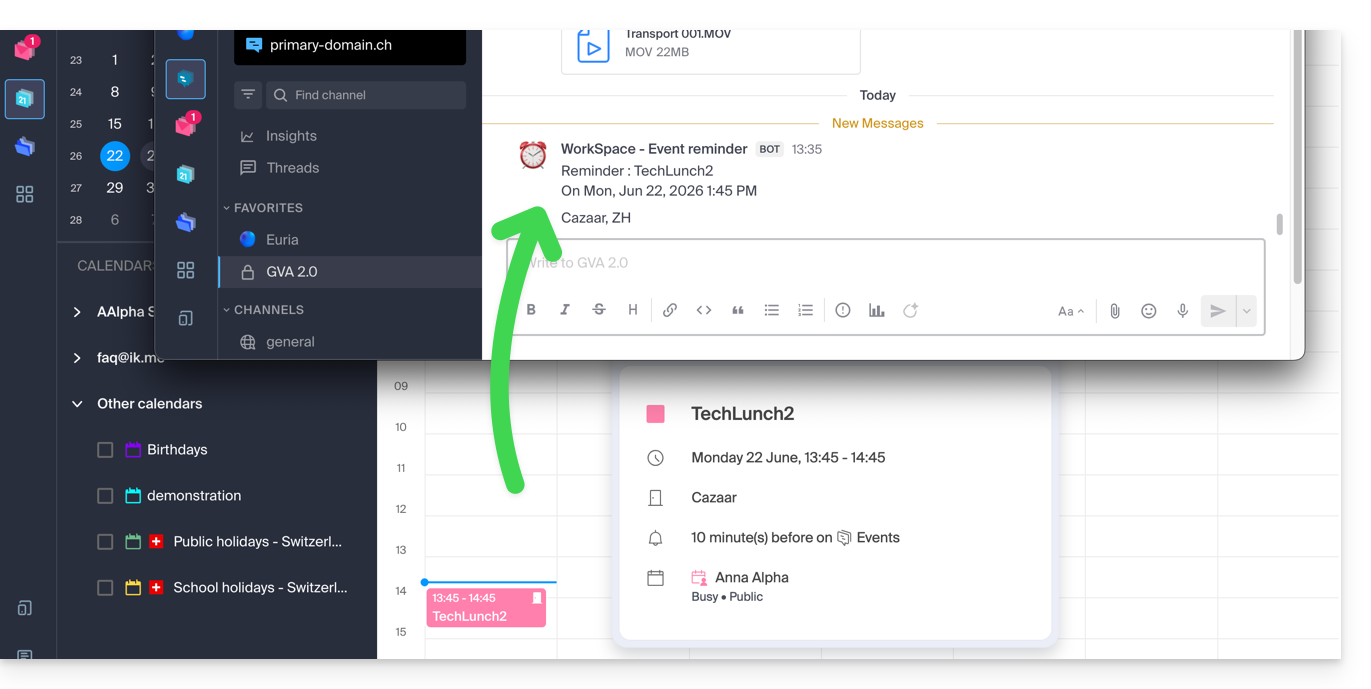
- When the reminder time arrives, a message (in the format configured in step 5c above) is sent to the specified channel (configured in the webhook - see prerequisites) regarding the event (here, on kChat):
And on other messaging systems?
Slack
- Click here to access the Slack WebHooks.
- Choose the channel where your reminders will appear (e.g., @slackbot or #general):
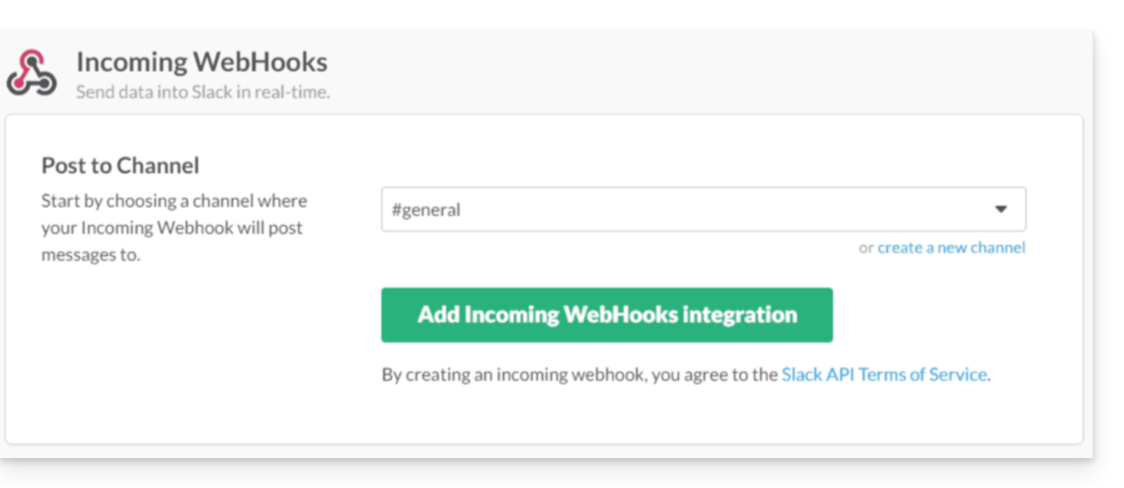
- Save to obtain the webhook URL.
Create other webhooks to set up reminders in other channels.
You can freely use Slack's formatting options in your notifications. Example in French:
N'oubliez pas de %subject% pour le %date%.
À prendre avec le jour J : %description%.
Lieu de l'évènement : %location%
Link to this FAQ:
Has this FAQ been helpful?
This guide explains how to configure an action on n8n to send a message to kChat when the conditions are met.
Prerequisites
- Install n8n on an Infomaniak hosting.
- Create a webhook on the Infomaniak kChat app.
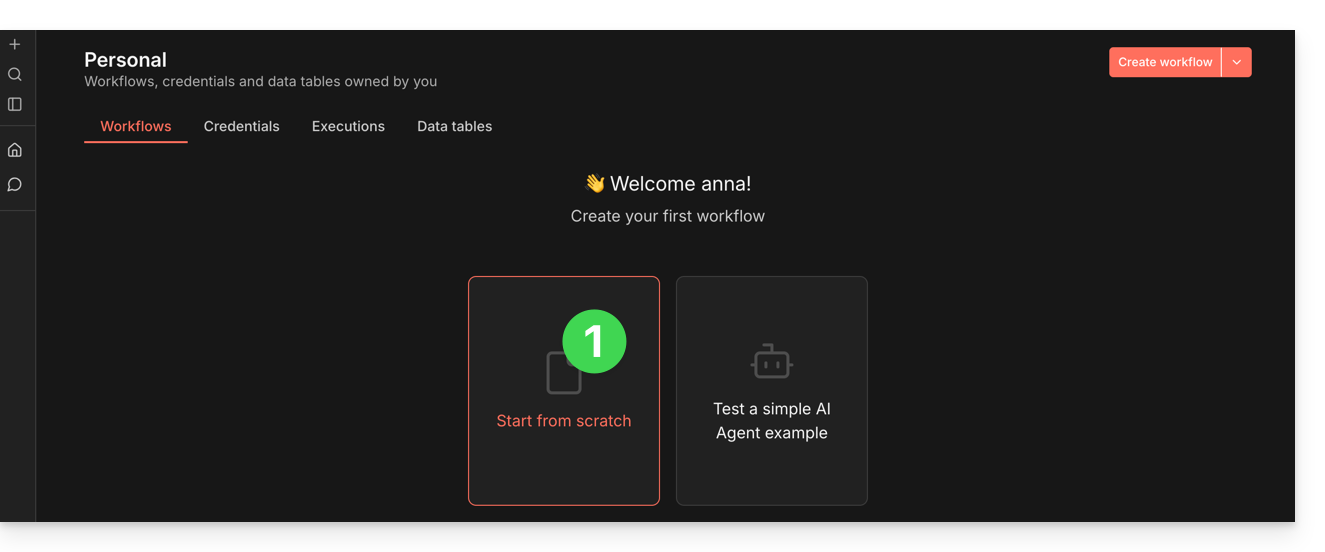
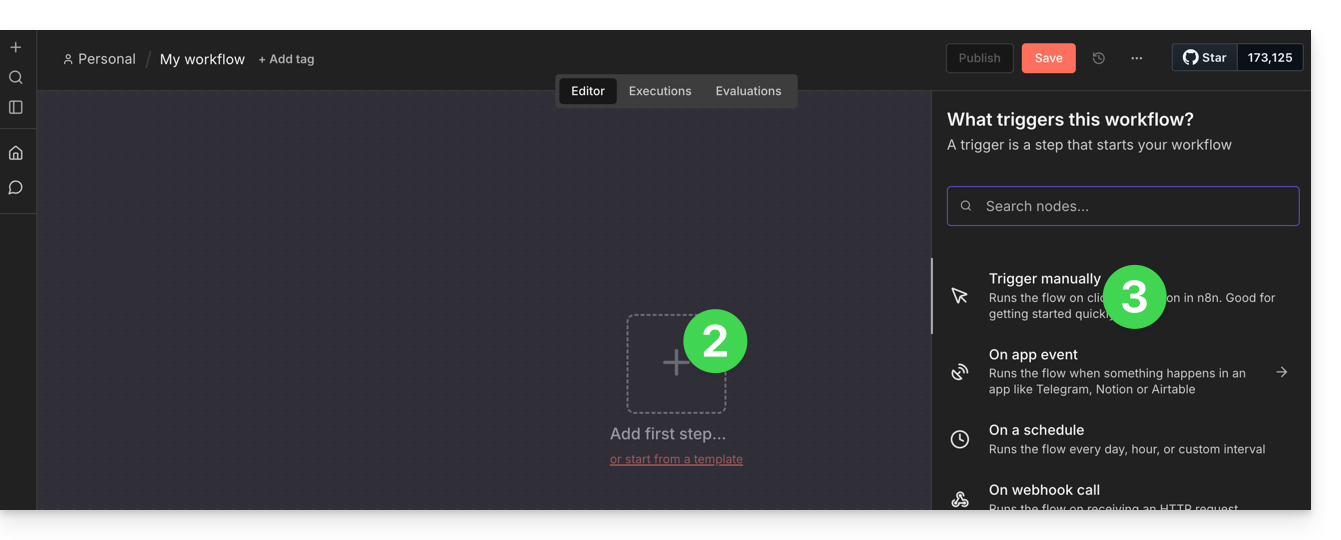
Create the action on n8n
In your n8n session:
- Click to start from scratch:
- Click to add a first action.
- Choose a manual trigger:
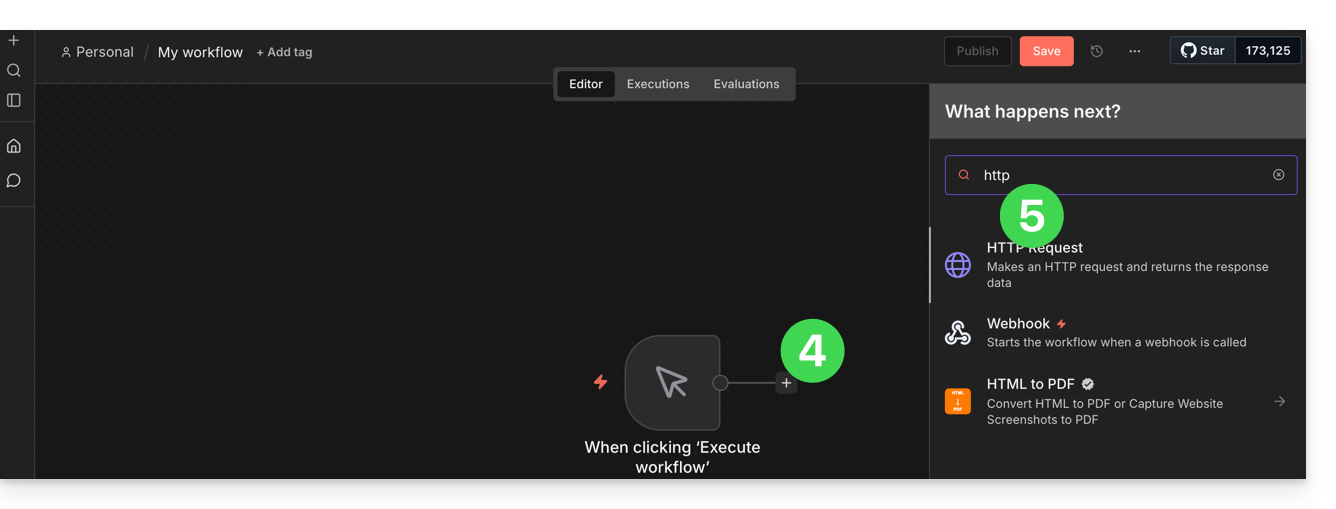
- Click to add an action to trigger.
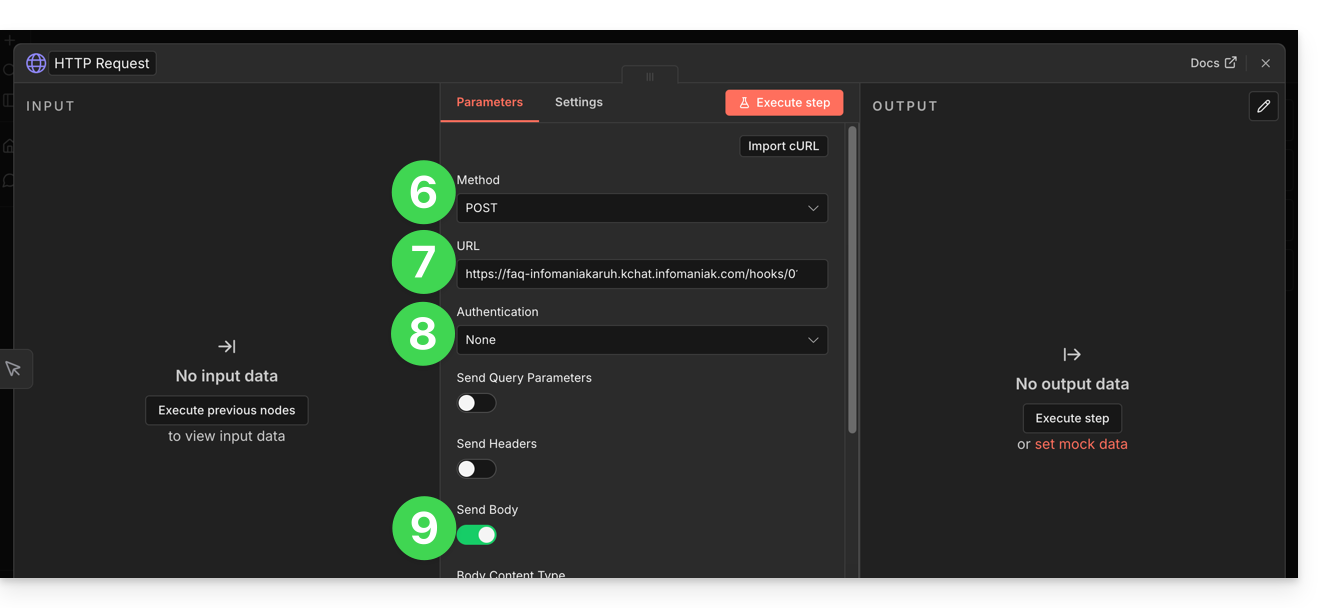
- Search for and activate an action of type “HTTP Request”:
- Choose the POST method.
- Enter the URL of your kChat webhook.
- Authentication is not required (already applied in the URL).
- Activate the “Send body” toggle switch to specify content:
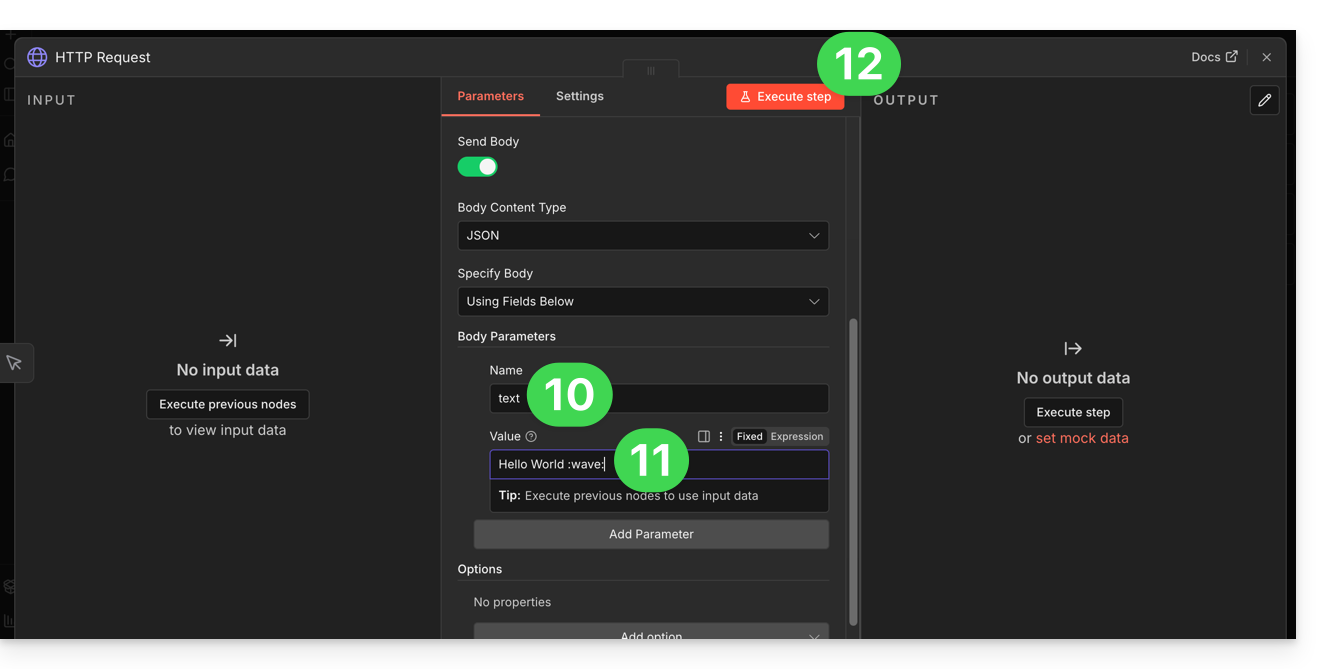
- In the “Name” field, enter the exact term “text” as expected by kChat.
- In the “Value” field, enter the information you want to display on kChat.
- Click the button to test and apply your manual command:
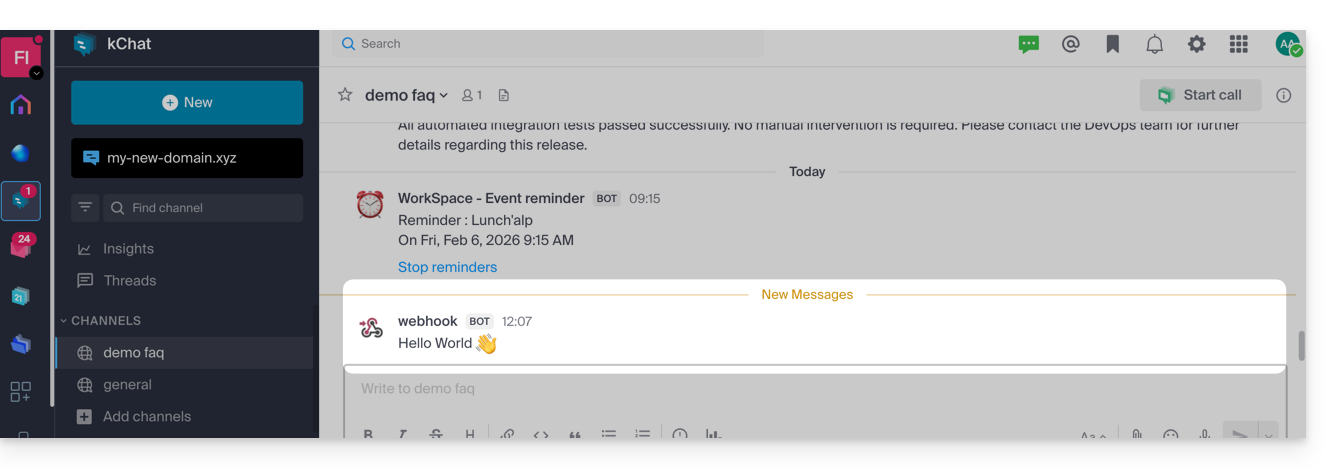
- The message specified on n8n then appears on kChat:
Now that this base works, you might imagine replacing the fixed text with data from elsewhere. For example, add an “Imap” or “RSS Feed” node before the HTTP Request node. Thus, instead of writing the text by hand, click on the small gear next to Value > Expression to say: “Send to kChat the title of the last received email”…
Link to this FAQ:
Has this FAQ been helpful?
This guide will quickly introduce you to the essential functions of Euria, the artificial intelligence available within kSuite, which is particularly effective for summarizing discussions on the kChat app.
Introduction
- Euria can help you perform all kinds of calculations, translations, provide information on various topics, and answer your questions.
- Please read this other guide about the model used and the responsibilities of each party.
- When a new user is added, they receive a welcome message from Euria.
- Please read this other guide about the possibilities for discussing with the AI in kChat.
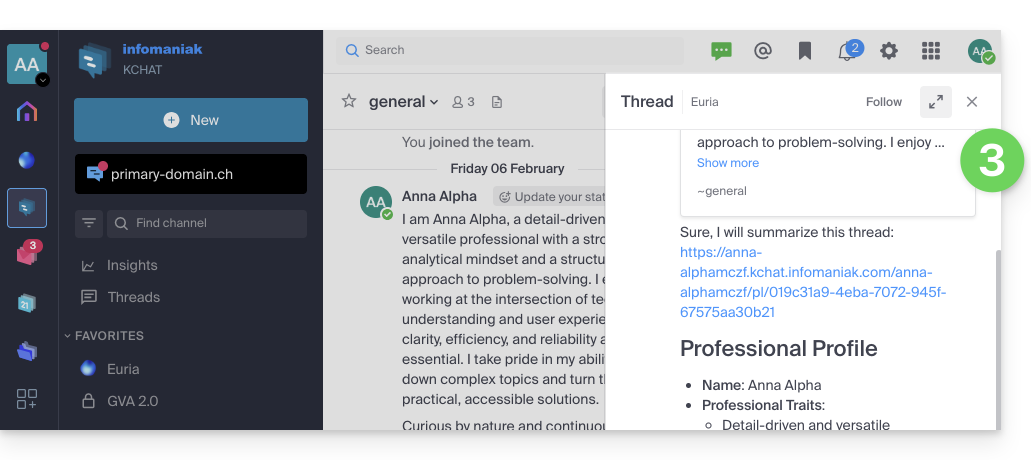
Automatically summarize a kChat message
To obtain a summary of a kChat message:
- Hover over the message and select the Euria actions icon in the upper right corner.
- Click on Summarize the conversation:
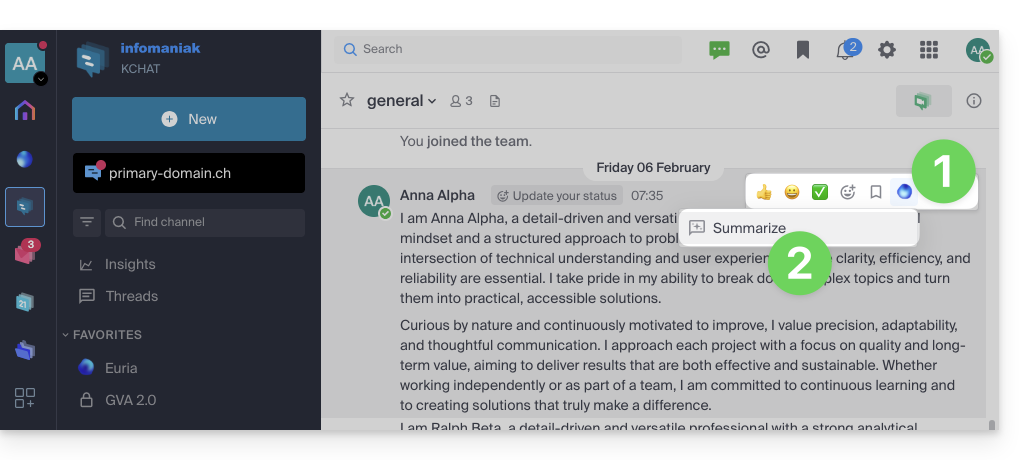
- Get the summary, generated by Euria in the right sidebar:
Link to this FAQ:
Has this FAQ been helpful?
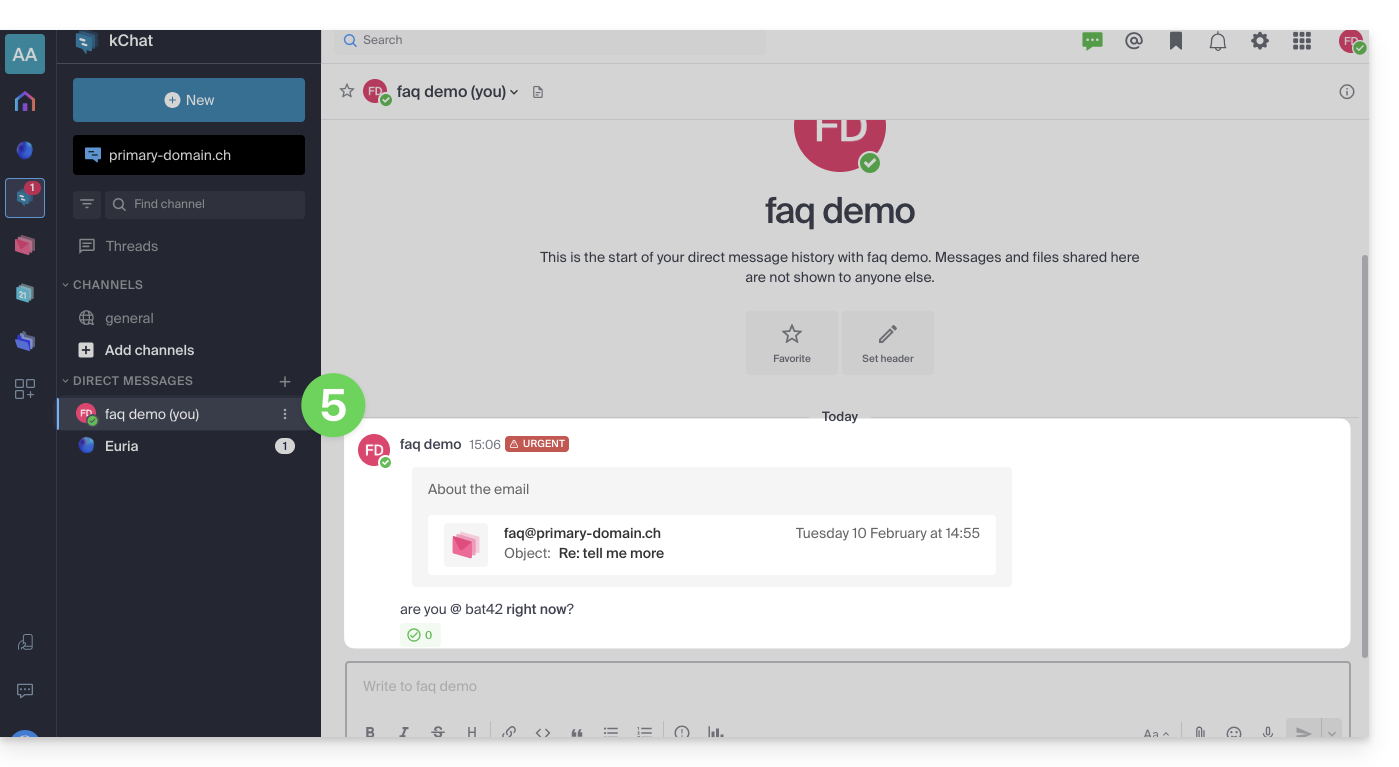
This guide explains how to respond to an email visible on the Web app Mail Infomaniak (online service ksuite.infomaniak.com/mail) by sending the response directly in the Web app kChat (online service ksuite.infomaniak.com/kchat) or the desktop app, in the form of a private message to the email sender.
Preamble
- This feature allows you to respond to an email directly in kChat, with a reminder of the original message to facilitate understanding.
- It aims to streamline collaboration by allowing you to react quickly to an email without leaving the kSuite environment.
- It reduces the back and forth between classic messaging and the collaborative workspace.
Send a response to an email via kChat
Prerequisites
- The button providing access to the feature will only appear in the case of an email received from a sender attached to the kSuite, and this within the same Organization as the user who wishes to respond.
- To display a shortcut to this feature as in the first point 3 below, refer to this other guide.
When you have received an email from a colleague and you want to respond to them directly on kChat:
- Click here to access the Web app Mail Infomaniak (online service ksuite.infomaniak.com/mail).
- Open the message to be replied to by kChat.
- Click on the kChat icon in the email toolbar:
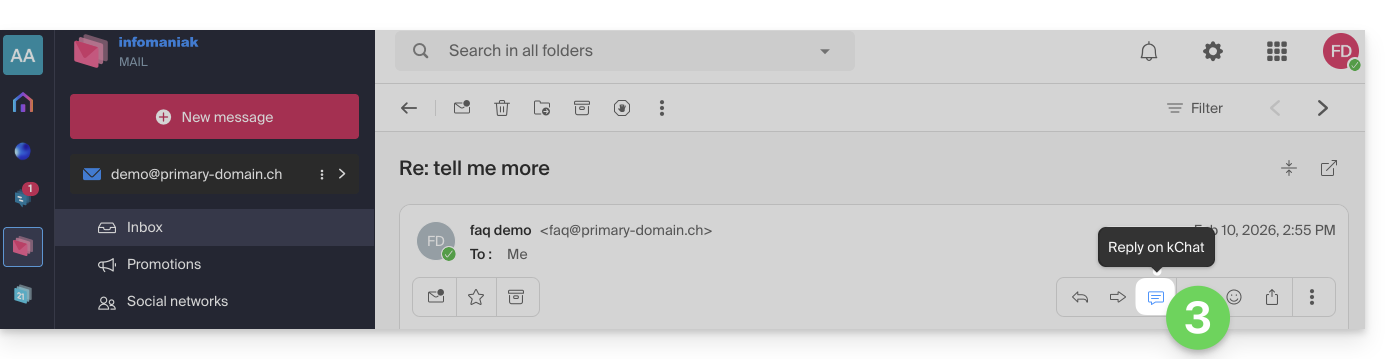
- It is also possible to click on a button below the message:
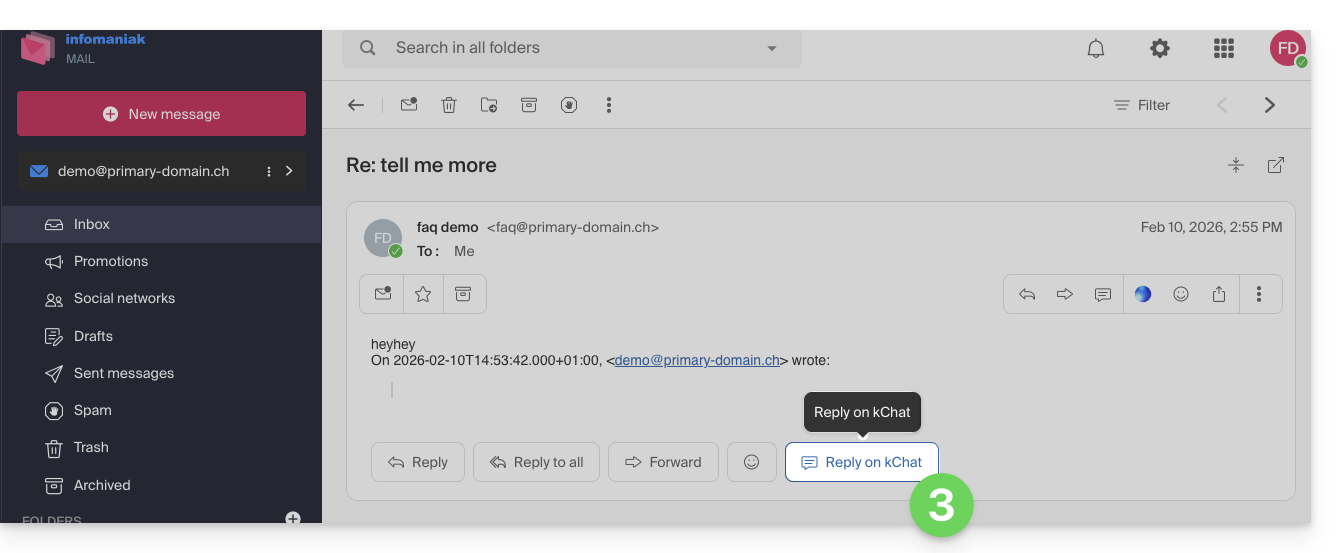
- It is also possible to click on a button below the message:
- Write your kChat message, format it if necessary and click on the Send button at the bottom right:
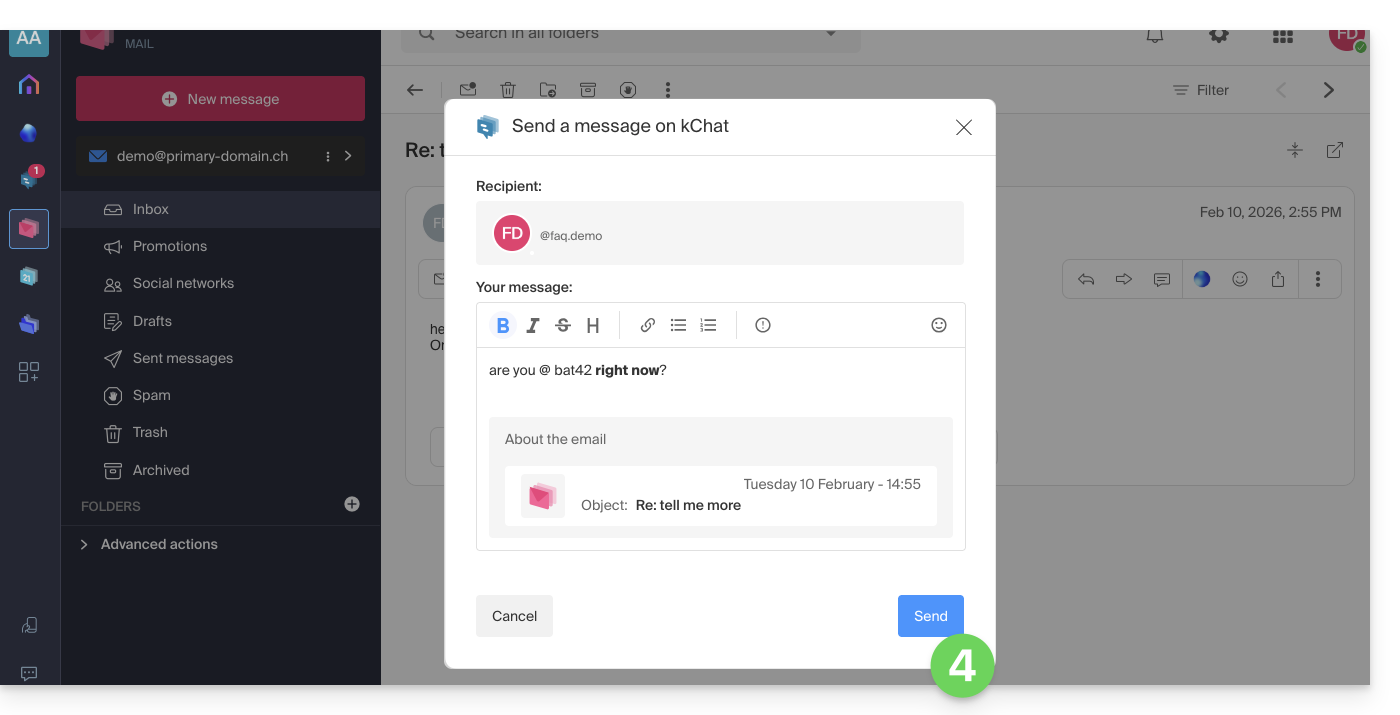
- Your correspondent receives the message on kChat accompanied by a box representing the original email (date & time, subject):
You can access this message on kChat (in the thread of private messages exchanged with your correspondent as above) but also:
- in an information banner on the email conversation,
- in the send confirmation message:

Link to this FAQ:
Has this FAQ been helpful?
This guide details the use and management of channels in kChat.
Preamble
- A kChat channel is a communication space dedicated to a project, a theme, or a team in which members can exchange documents, write in real-time, and organize video conferences.
- The number of private (and public) channels and guests is limited according to the kSuite offer acquired; refer to the comparison table on the sales page for more information.
⚠ History kept visible (in days):
| kSuite | free | 90 (and deleted after 365) |
| Standard | unlimited | |
| Business | unlimited | |
| Enterprise | unlimited | |
General Channel
Each Organization on kChat automatically has a General Channel in which all users are automatically invited:
You can use this channel to share information that concerns your entire organization, such as company outings or motivating good news.
You can of course start a new conversation thread within the General Channel.
Additional Channel
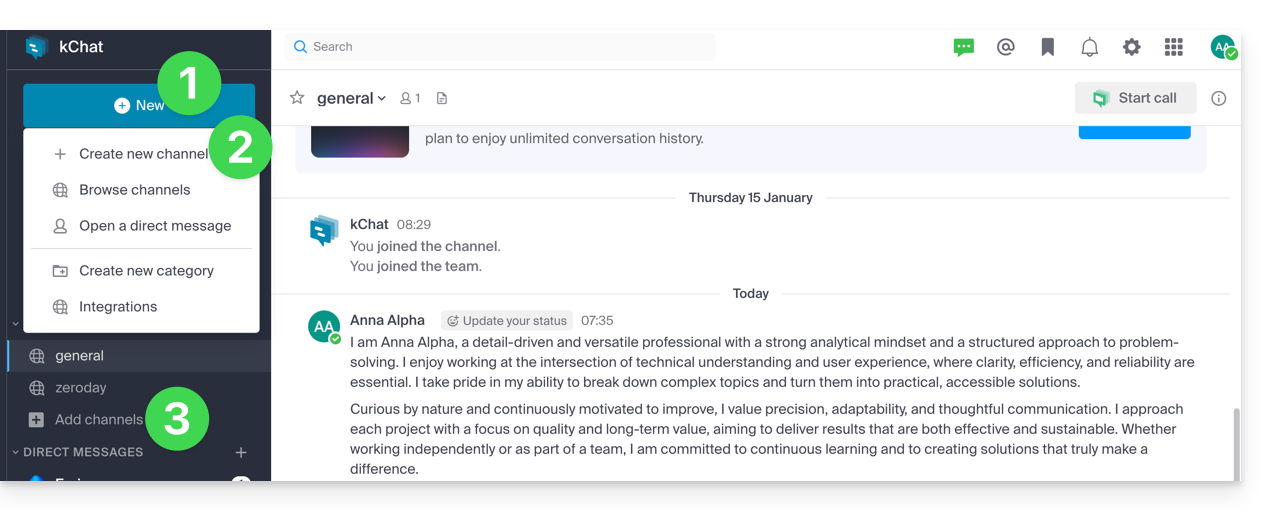
To add a new discussion channel:
- Click on the New button located in the left sidebar of the kChat Web app (online service ksuite.infomaniak.com/kchat).
- Click on Create a new channel.
- You can also click on Add channels below the list of channels:
Information related to a channel
When you create a new channel, you can choose: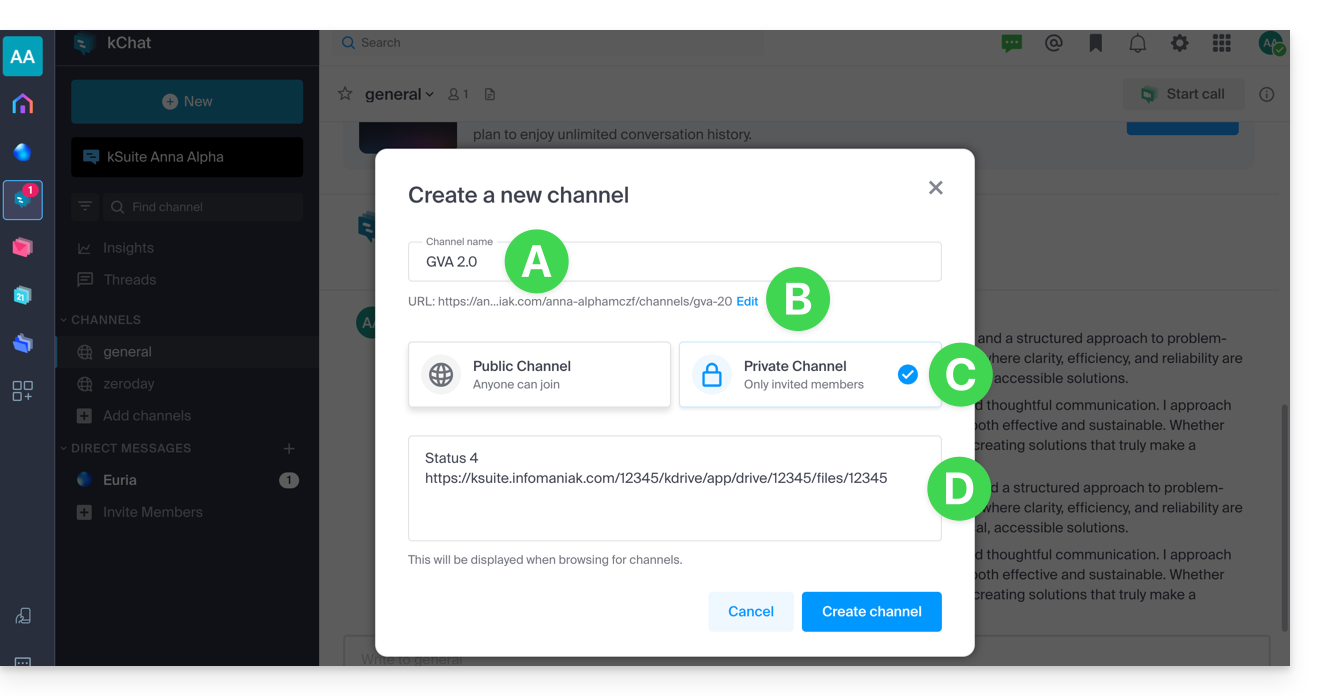
A. its name
It will be modifiable later.
B. its URL
By default, it takes the name of the channel, but you can modify it using lowercase letters, numbers, dots, dashes, and underscores - also modifiable later.
C. its PRIVATE or PUBLIC status
It will be modifiable later (read more below).
D. its description
The description allows you to specify how this channel should be used. This text appears in the list of channels in the "More..." menu and gives an indication to users about whether they should join the channel or not.
Once the channel is created, you can still define:
E. a header
and you can click on Information (F)…
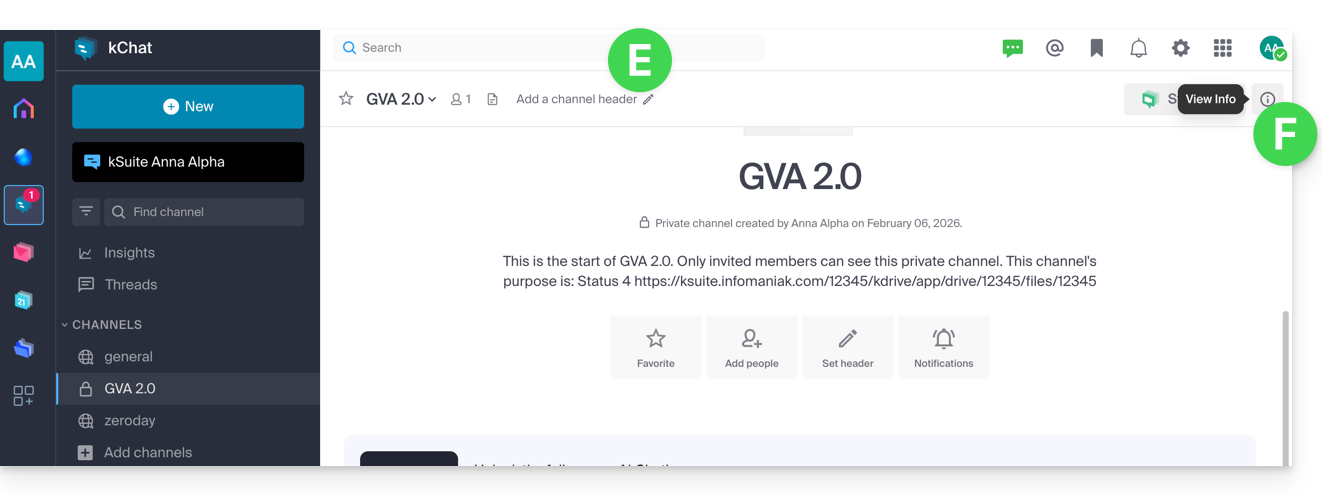
...to find the information and be able to edit some of it: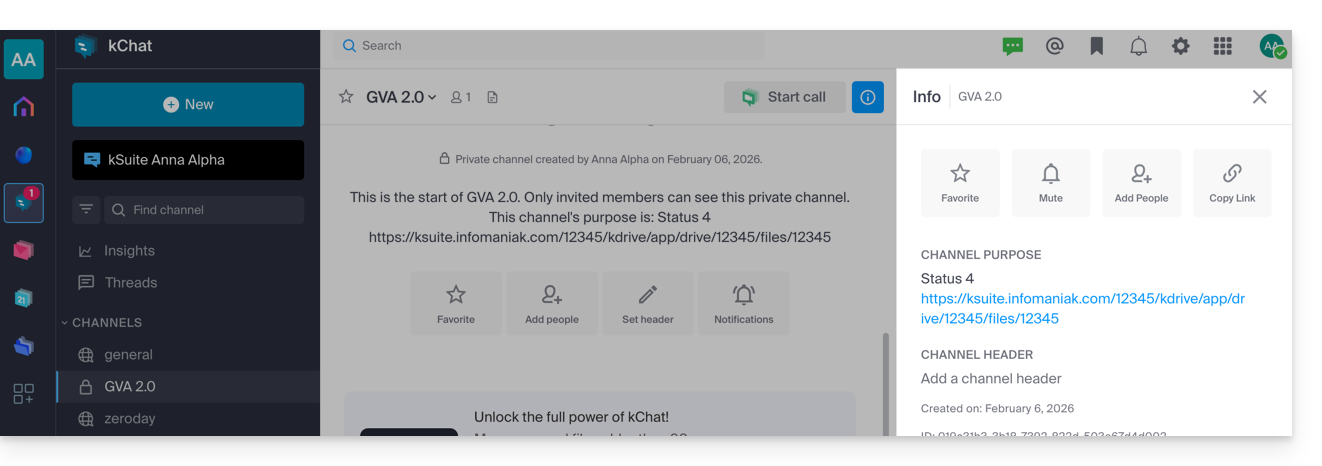
Differences between PRIVATE and PUBLIC channel
PUBLIC channels increase transparency. All users can see and join a public channel, ensuring that all individuals involved in a project, topic, or team have access to the same information.
PRIVATE channels allow you to restrict sensitive content to users of your choice. Only an existing member can invite another user to a private channel. There are also differences in the management of archiving/deletion (read more below).
⚠ Maximum number of PRIVATE/PUBLIC channels:
| kSuite | free | 5 / 10 |
| Standard | 50 / 50 | |
| Business | 100 / 100 | |
| Enterprise | 1000 / 1000 | |
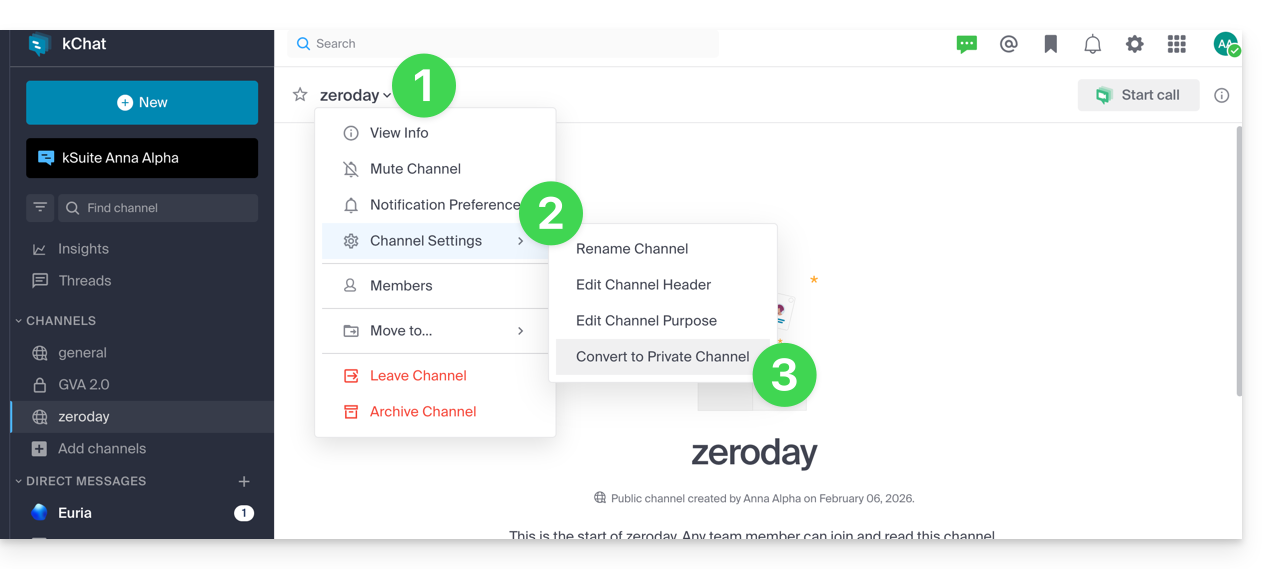
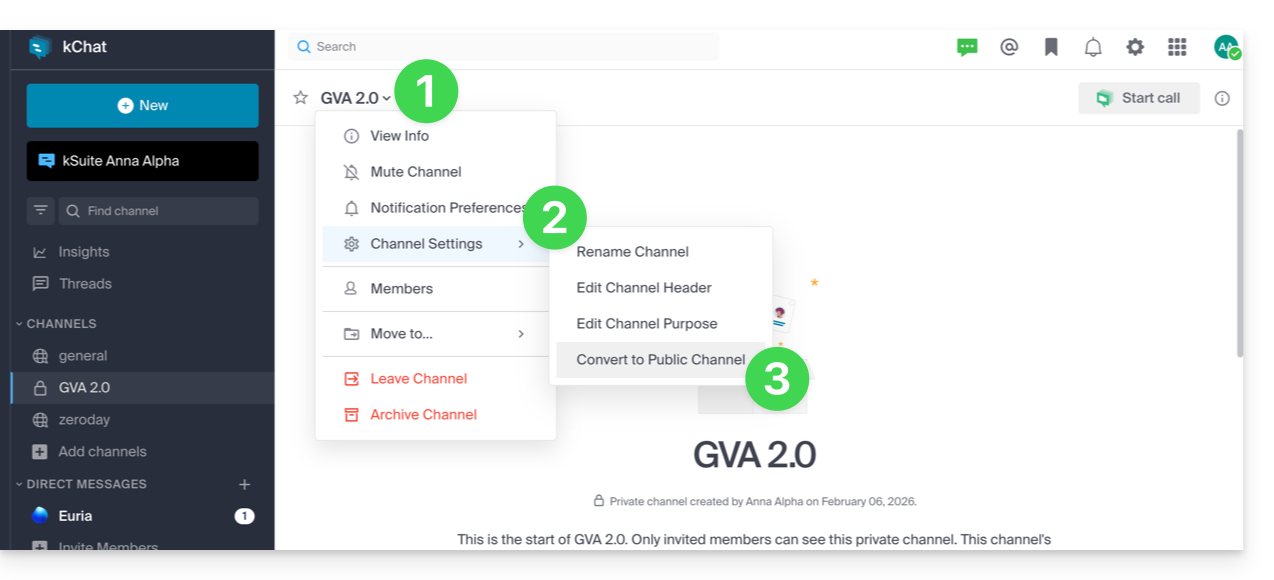
Convert a public channel to a private channel, or vice versa
Prerequisites
- Be a kChat administrator user (being an administrator of the channel is not sufficient).
It is possible to modify a Public channel to a Private channel or vice versa, make a private channel public. The message history and members who already have access to the channel will be preserved.
To lock a previously public channel (publicly shared files remain accessible to anyone with the link; the change is permanent and cannot be undone):
- Click on the chevron on the channel title at the top of the discussion in the Public channel.
- Click on the channel settings.
- Choose Convert:
To make accessible a previously private channel (the channel will be accessible to all users of the other public channels of the Organization except external users who will need to be manually invited):
- Click on the chevron on the channel title at the top of the discussion in the Private channel.
- Click on the channel settings.
- Choose Convert:
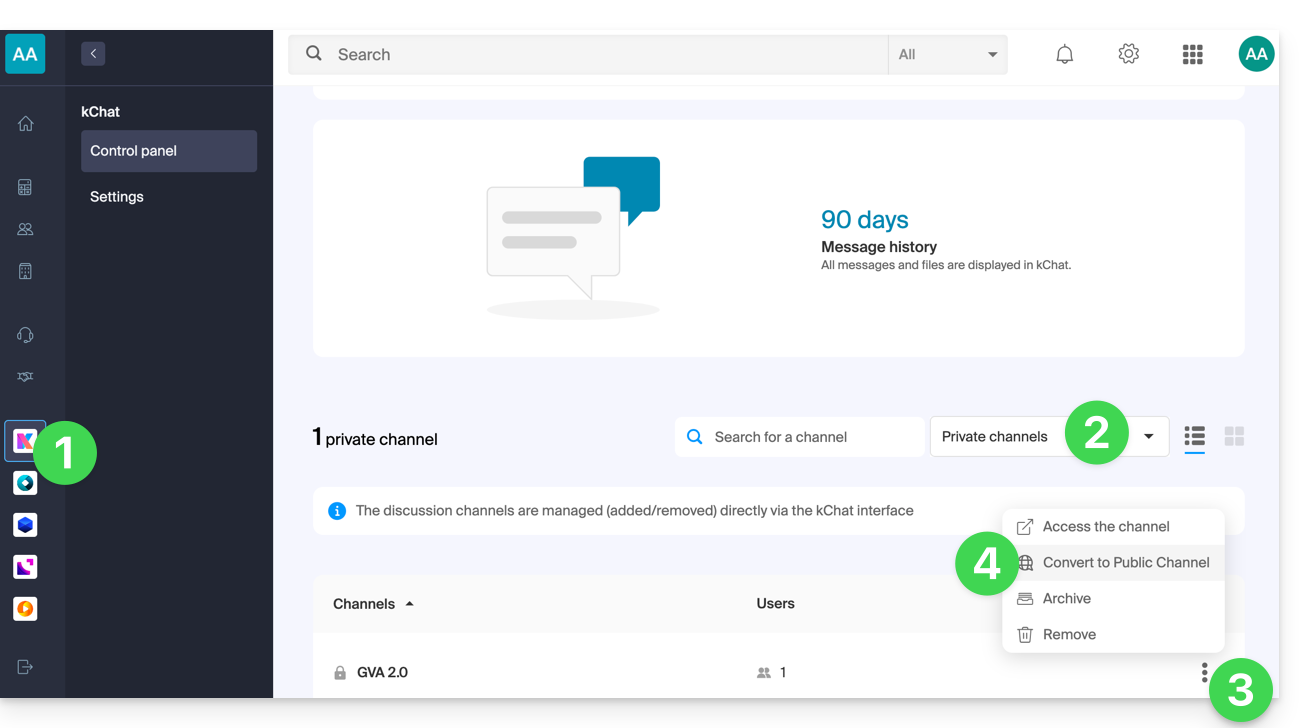
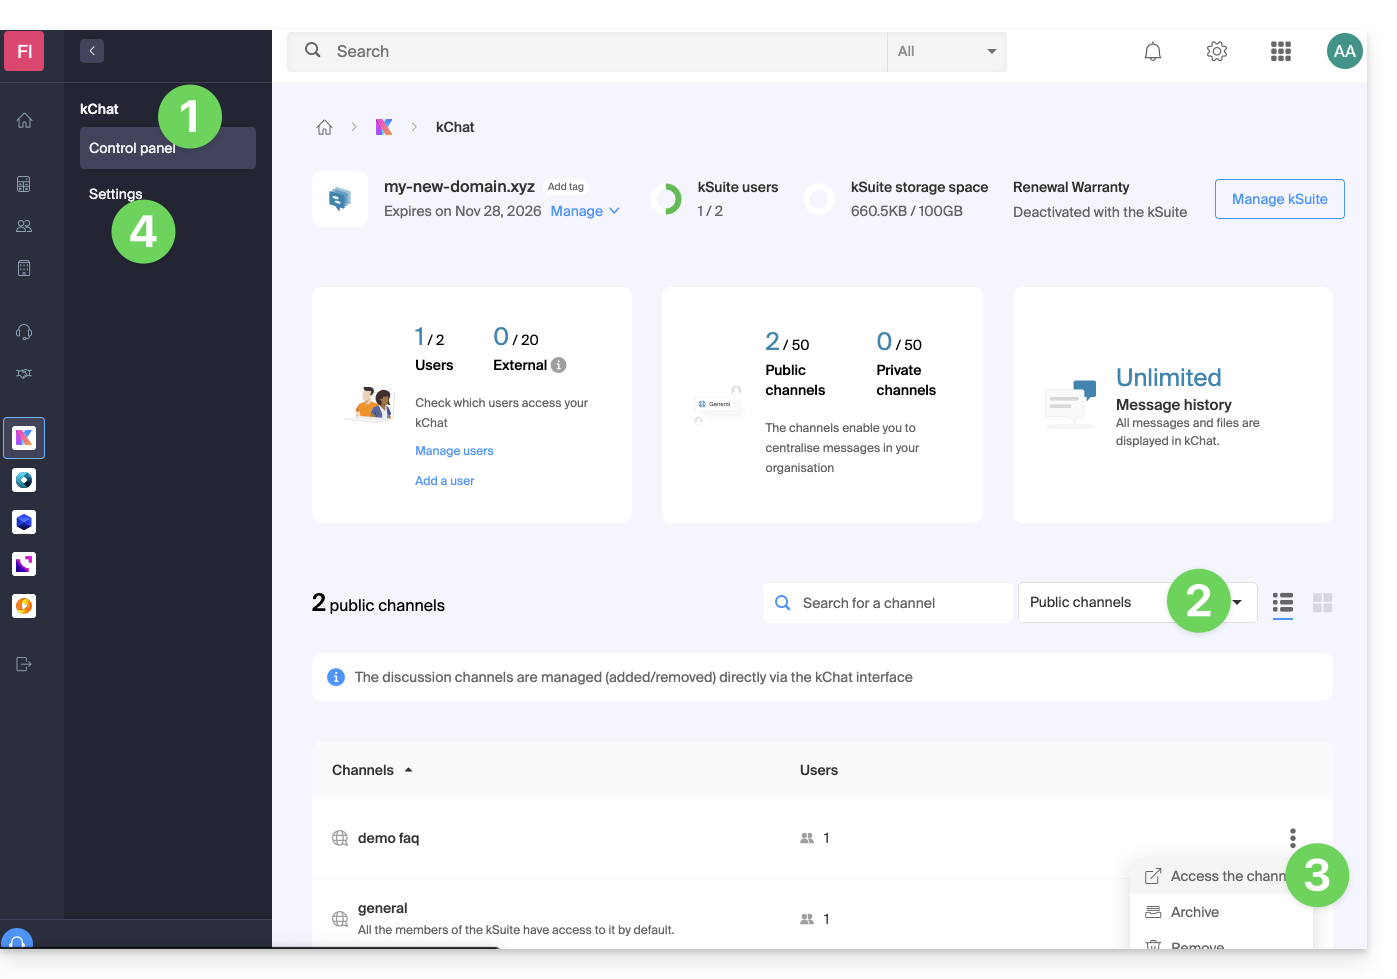
You can also perform the conversion from the kChat management on the Manager:
- Click here to access the management of your kChat on the Infomaniak Manager (need help?).
- Click on the dropdown menu to display the private channels.
- Click on the action menu ⋮ located to the right of the item concerned.
- Click on Convert to public channel:
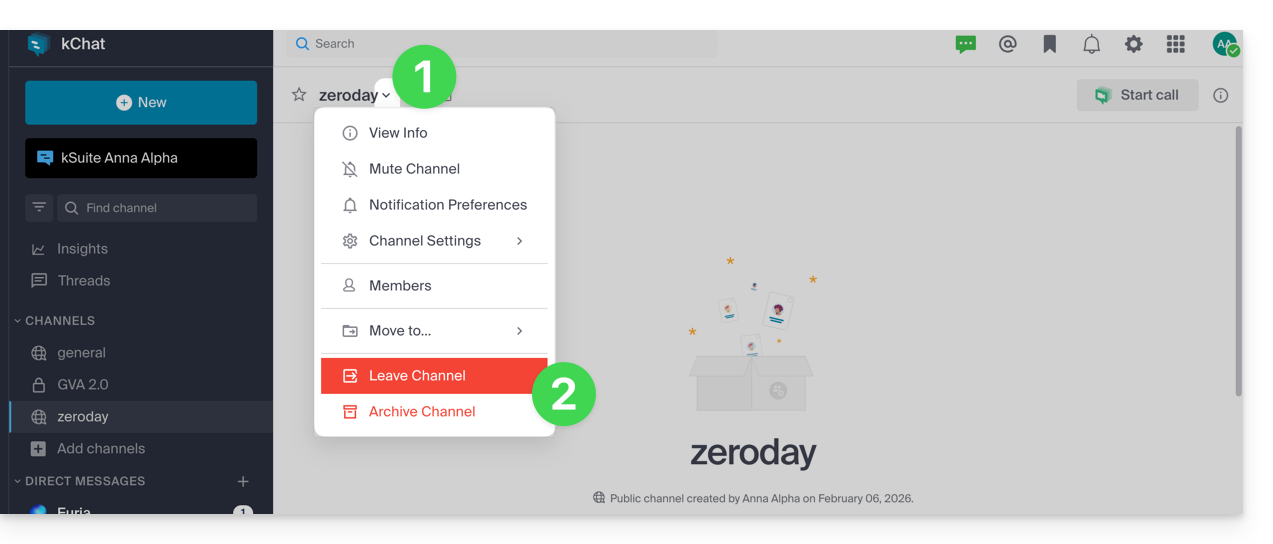
Leave a channel
Apart from the main channel named General, you can leave a channel at any time:
- Click on the chevron on the channel title at the top of the discussion.
- Click on Leave the channel:
If you leave a private channel, you will no longer find it in the search but only via its URL if you have it or by being reinvited by a member of the channel.
If you leave a public channel, you leave it immediately but can rejoin it whenever you want simply by finding it with its name (2) in the search (1), including if it has been archived: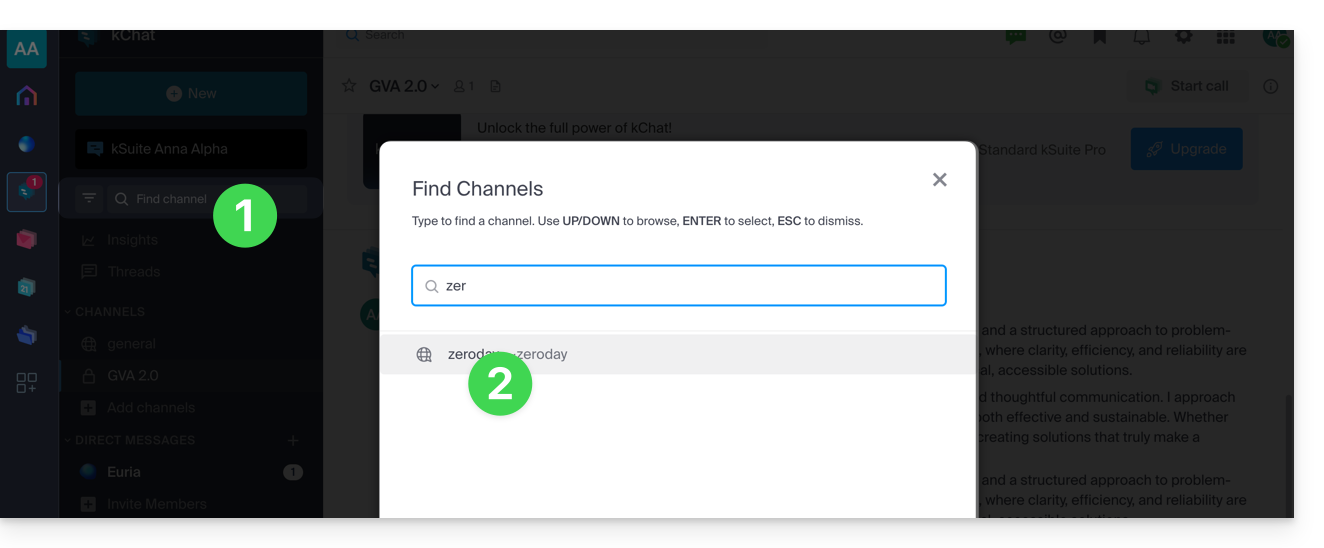
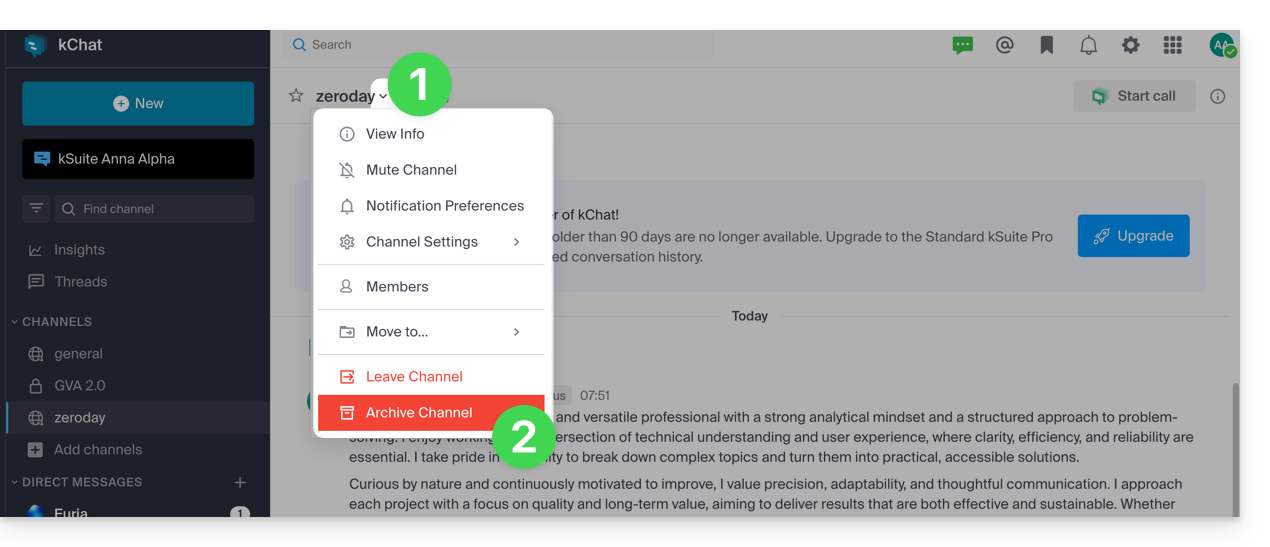
Archive / delete a channel
Apart from the main channel named General, you can archive a channel at any time, which prevents any new messages and will no longer count it in the quota of your available channels. The operation is possible from the Manager or directly on the kChat interface:
- Click on the chevron on the channel title at the top of the discussion.
- Click on Archive the channel:
If you create a channel and then archive it, you can join it whenever you want by simply finding it by its name (2) in the search (1):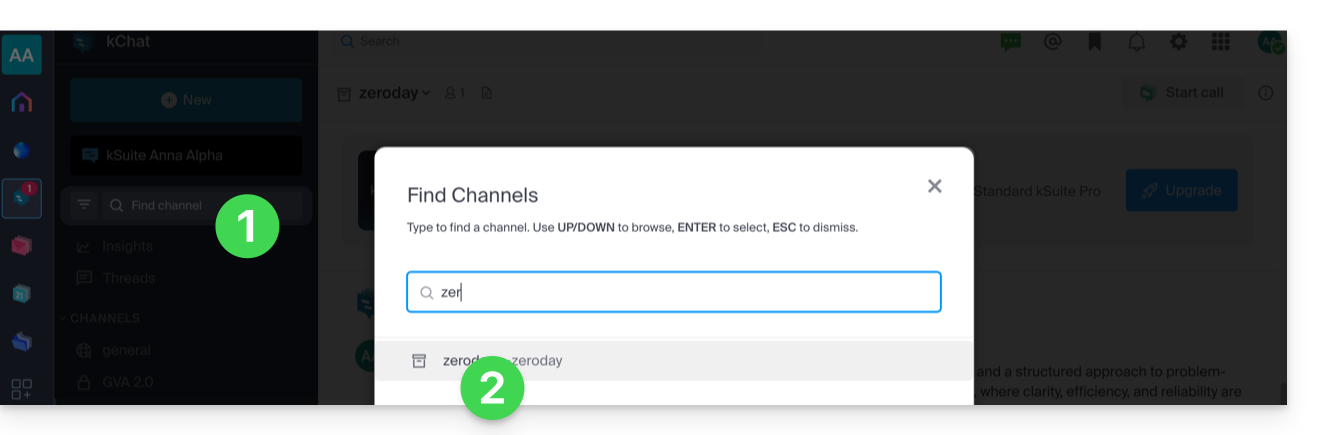
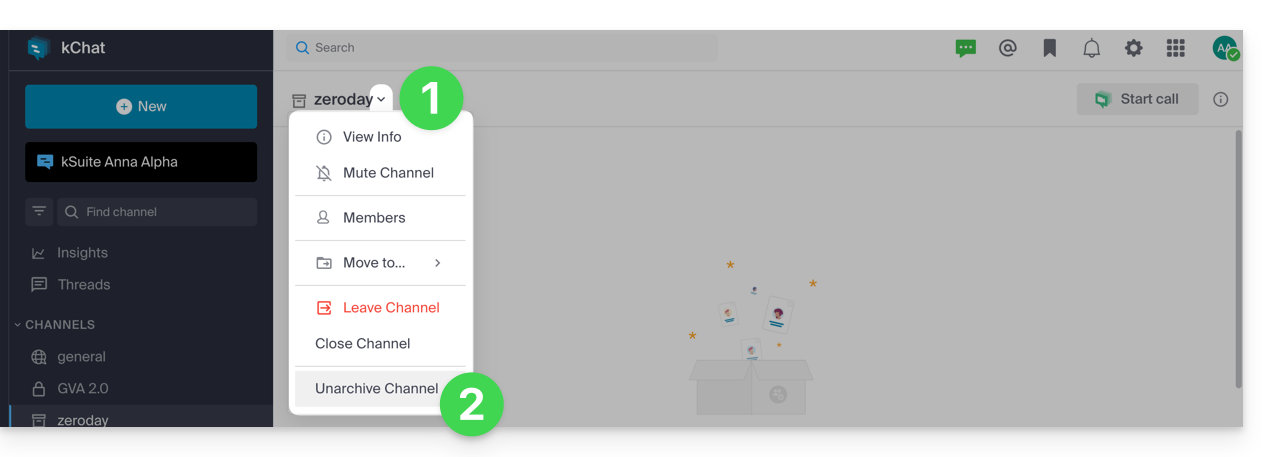
You can then unarchive it:
- Click on the chevron on the channel title at the top of the discussion.
- Click on Unarchive the channel:
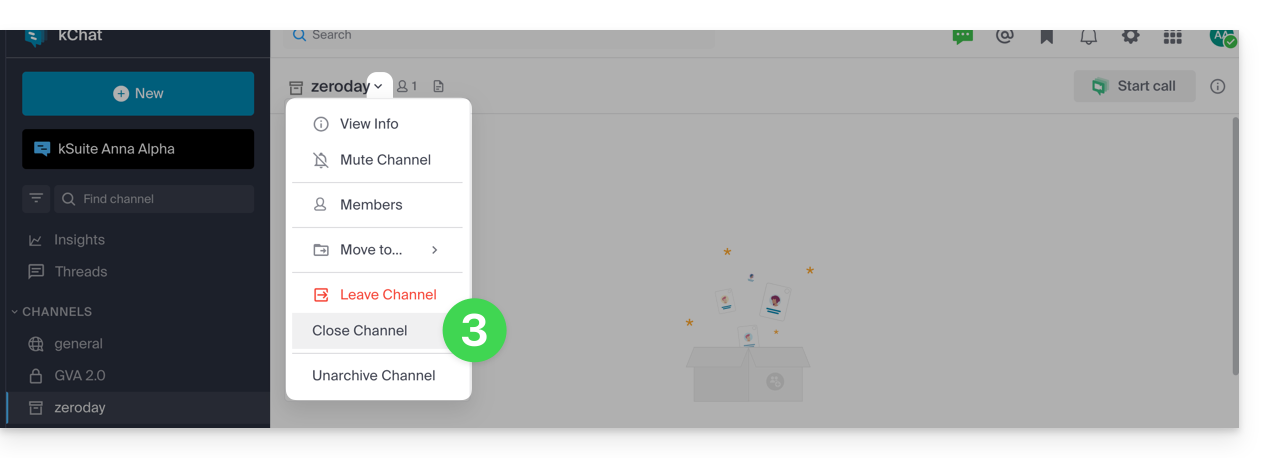
- ... or close it to no longer see it on your interface:
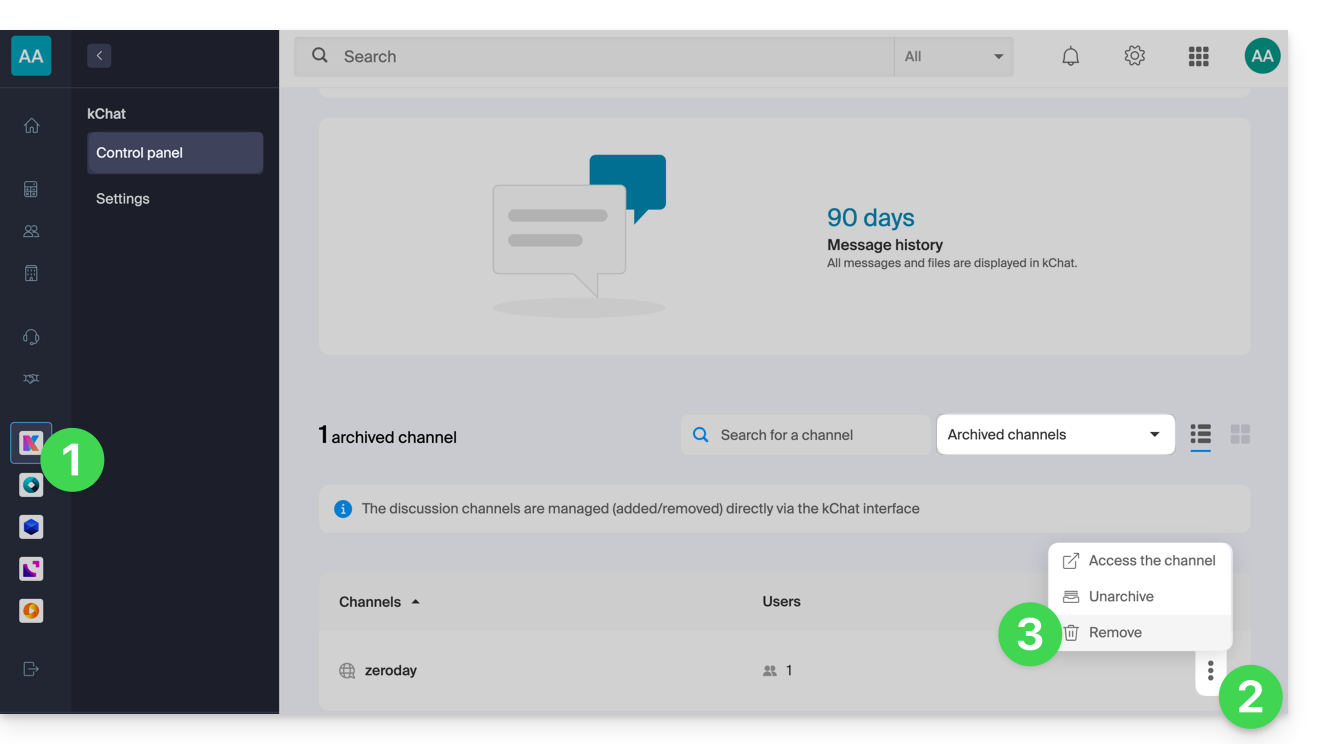
You can also delete a channel, and in this case, all associated data will be permanently deleted:
- Click here to access the management of your kChat on the Infomaniak Manager (need help?).
- Click on the action menu ⋮ located to the right of the item concerned.
- Click on Delete:
Add to favorites
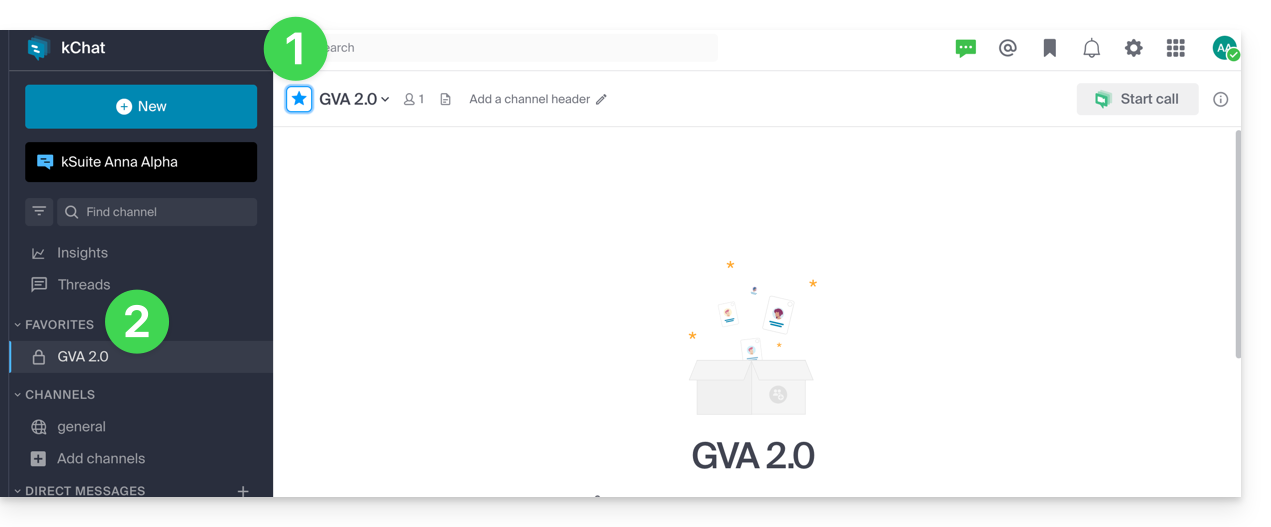
To add any channel (or user) to favorites:
- From the kChat Web app (online service ksuite.infomaniak.com/kchat), click on the star icon located at the top of a channel or user.
- A new Favorites menu will appear in the left sidebar, grouping all the items you have added to favorites (visible only to your user):
Mute a channel
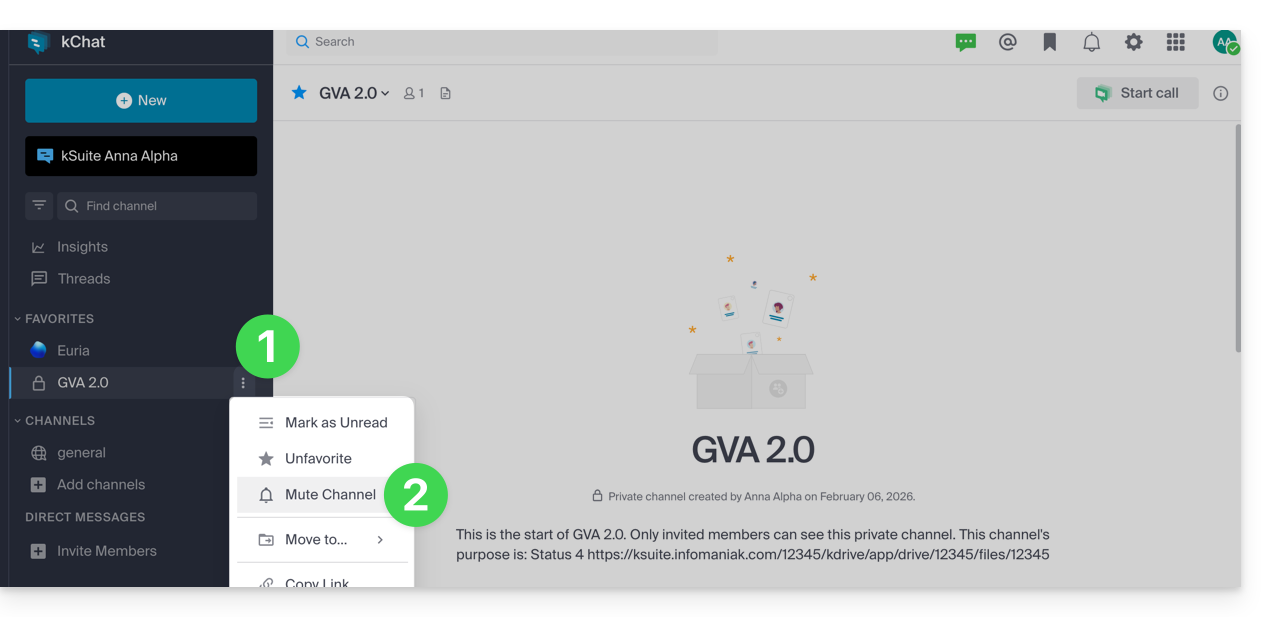
You can hide the notifications of a channel to no longer receive them when a new message is posted:
- From the kChat Web app (online service ksuite.infomaniak.com/kchat), click on the action menu ⋮ to the right of the channel concerned (in the left sidebar).
- Choose Mute:
Organize by categories
⚠ Maximum number of categories (per user):
| kSuite | free | 1 (excluding Favorites) |
| Standard | unlimited | |
| Business | unlimited | |
| Enterprise | unlimited | |
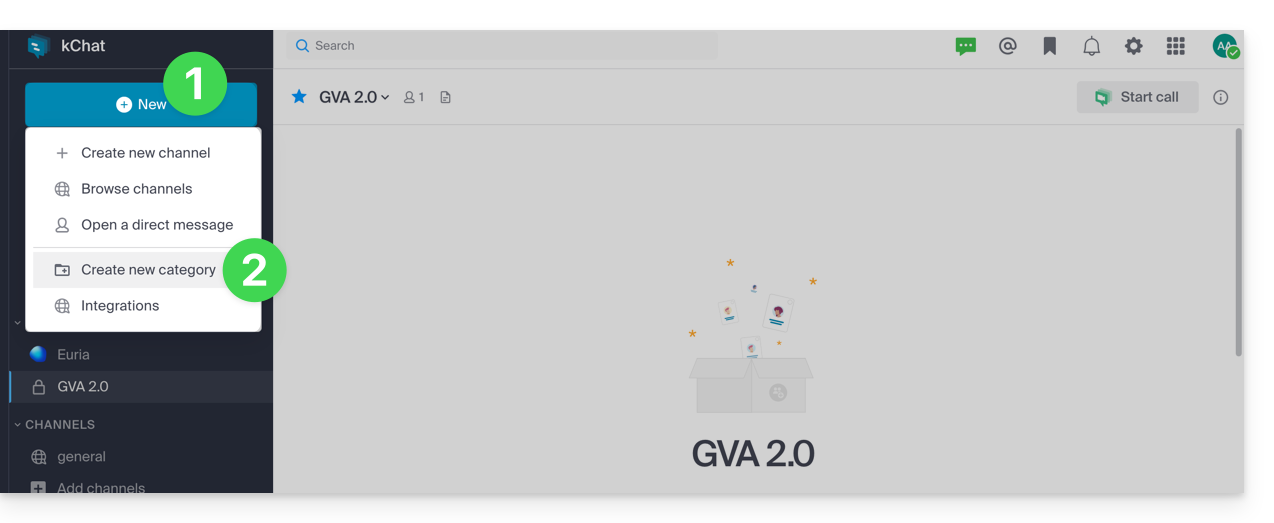
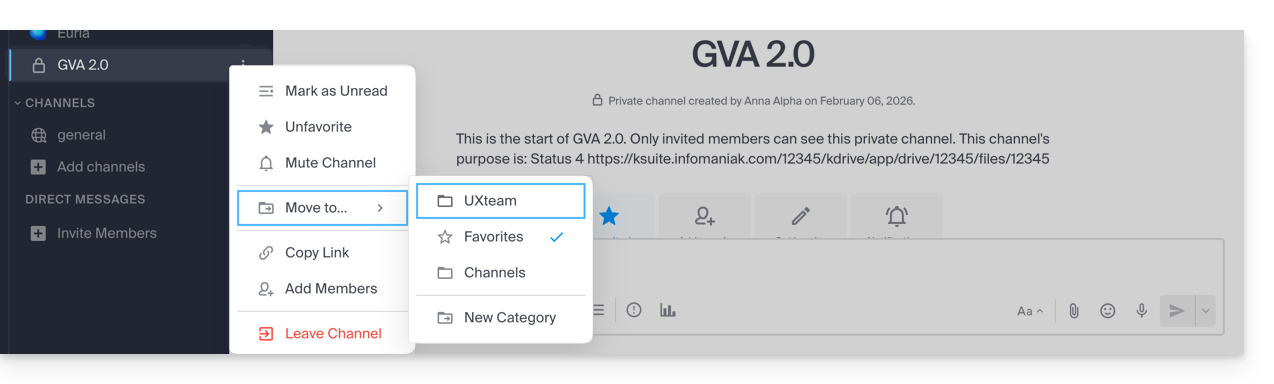
You can add one or more categories that allow you to place items (channel, contact, etc.) within them:
- Click on the New button located in the left sidebar of the kChat Web app (online service ksuite.infomaniak.com/kchat).
- Click on Create a new category:
- Then drag the desired channel to the created category (valid for your user only):
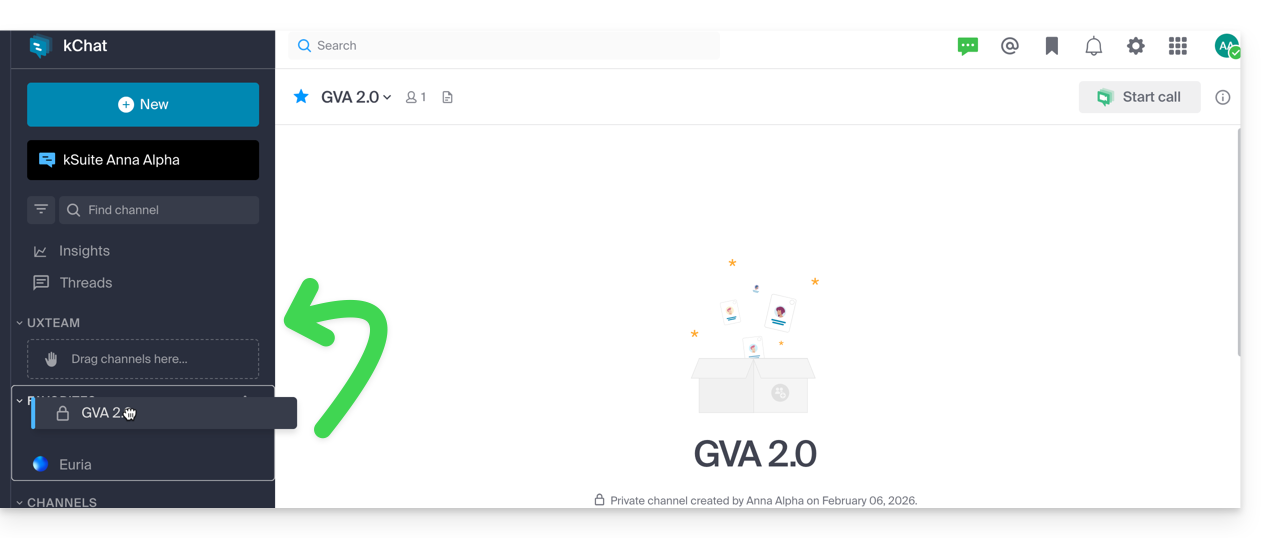
- You can also use the action menu ⋮ to the right of the channel in question (in the left sidebar) to perform these operations:
User-to-user chat channel
The personal messages are direct conversations between two or more people that take place outside of channels.
Each user of an Organization can freely create personal messages whose content will only be visible to the people concerned: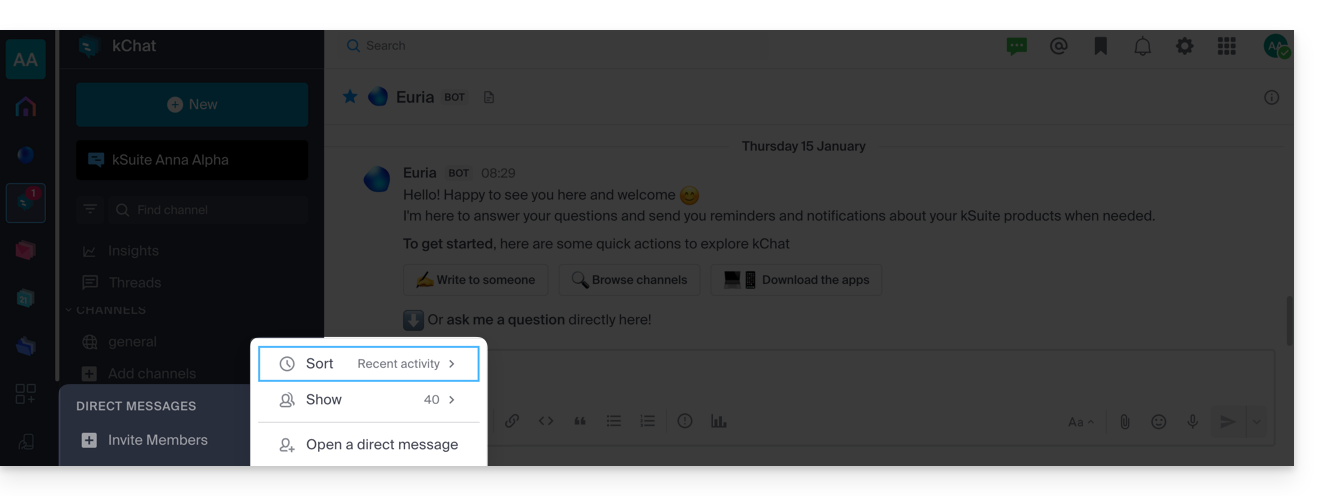
Link to this FAQ:
Has this FAQ been helpful?
Infomaniak is a Swiss company certified ISO 27001 and ISO 9001 that complies with the GDPR.
Its main objective is to ensure the security and confidentiality of the data entrusted to it.
Numerous measures are implemented to ensure the protection of your communications with kChat:
- The Infomaniak Manager allows you to check if the users of your Organization have activated two-factor authentication.
- Data at rest and in transit is encrypted, as are the backups automatically performed by Infomaniak.
- Data is hosted in Switzerland in data centers developed and managed exclusively by Infomaniak.
kChat avoids spam and other deceptive methods that are responsible for the majority of security issues and data leaks in businesses.
By using kChat to communicate, you…
- … receive messages only from your colleagues or external users you have approved.
- … can create private channels to restrict sensitive information to specific individuals.
- … control the access rights of users who can access kChat at all times.
Link to this FAQ:
Has this FAQ been helpful?
This guide details the different elements that can be configured and customized on kChat to best suit your usage preferences.
Change the kChat interface language
The kChat web app displays in the language chosen for the Manager and, just like your avatar/profile photo, these settings are managed within your Infomaniak profile.
The desktop app is configured to use the language of the operating system; you can manage this in the app's settings: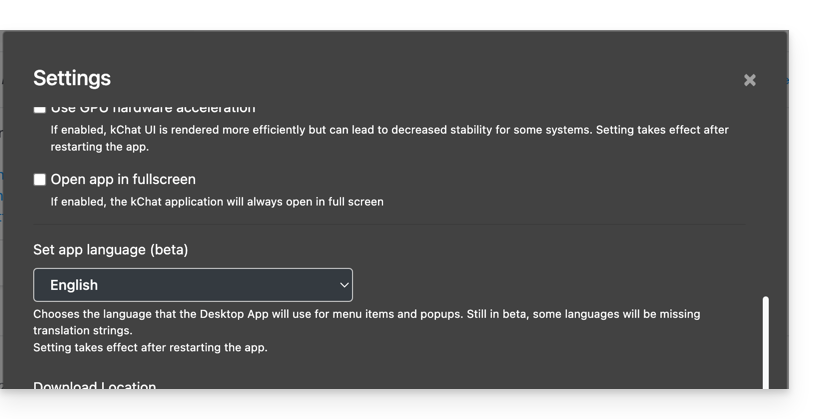
Set up kChat on the Manager
To access kChat preferences on the Infomaniak Manager:
- Click here to access kChat management on the Infomaniak Manager (need help?).
- Access the different types of channels.
- Archive or delete channels from the bottom section.
- Click on Settings in the left sidebar:
- Add the channels (one or more channels possible) to which new users (excluding external users) will be automatically added in addition to belonging to the channel General.
- Choose whether everyone can post in the General channel:
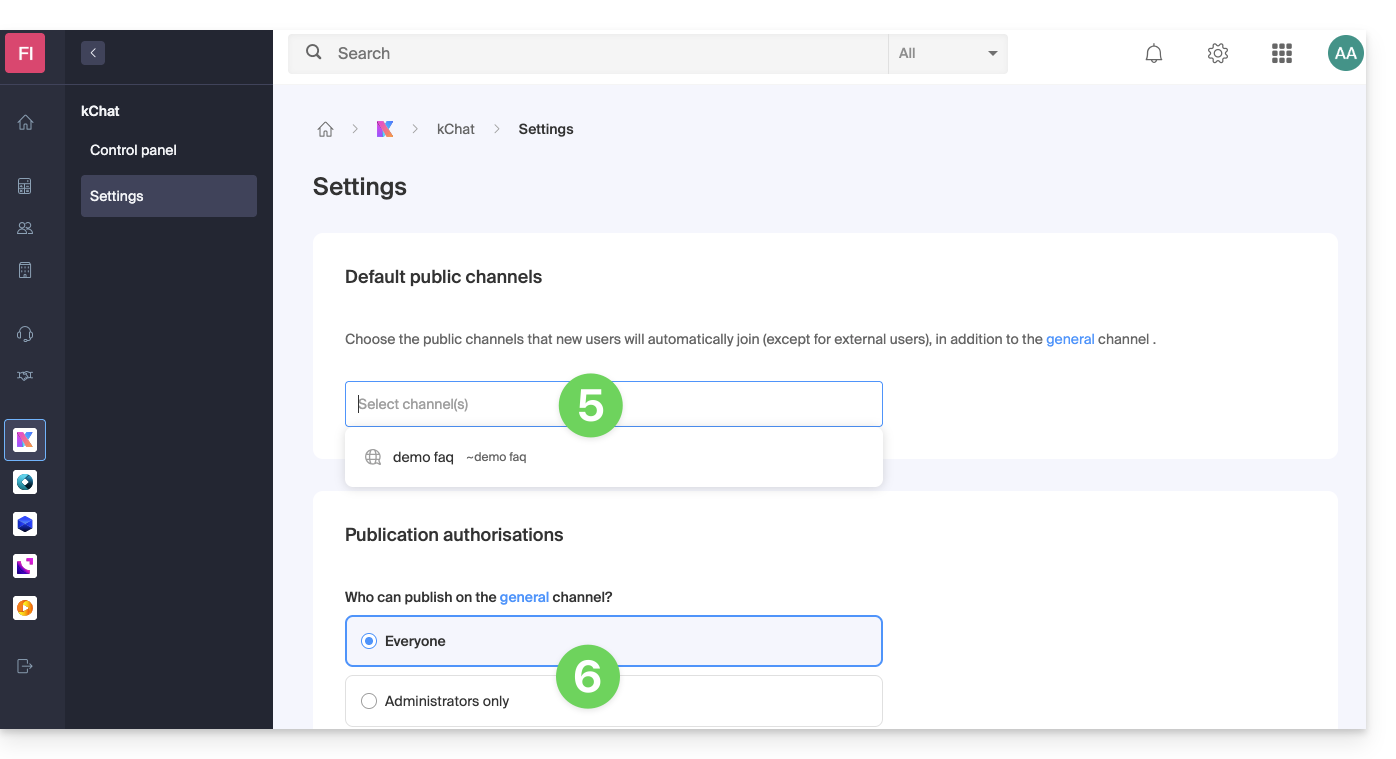
- Save your changes at the bottom of the page.
Customize the general display of kChat
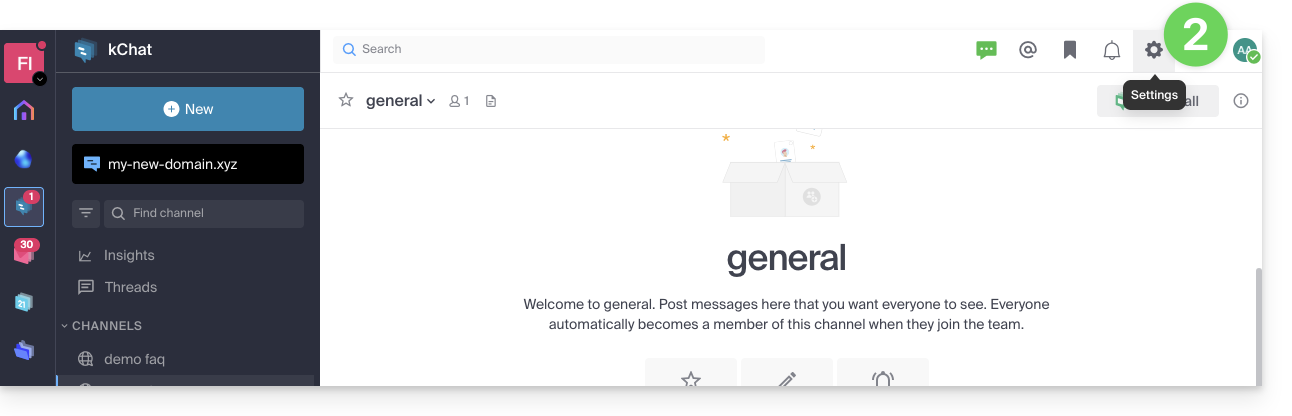
To access kChat app settings:
- Click here to access the kChat web app (online service ksuite.infomaniak.com/kchat) or open the kChat mobile app (app for iOS/Android smartphone or tablet) or the kChat desktop app (desktop app on macOS/Windows/Linux).
- Click on the icon in the top right of the interface:
- You can choose:
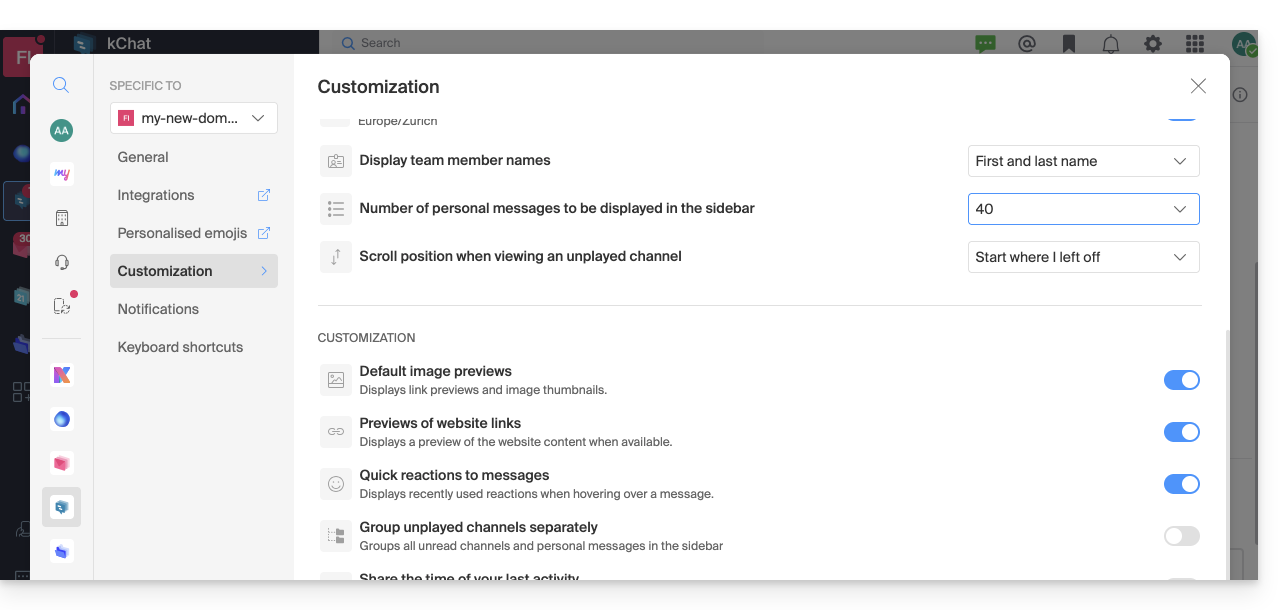
- a display density, and possible color display in compact density
- whether or not to display previews in your conversations
- the size of a channel (width)
- the starting position when you return to an unread channel
- the number of personal messages to display
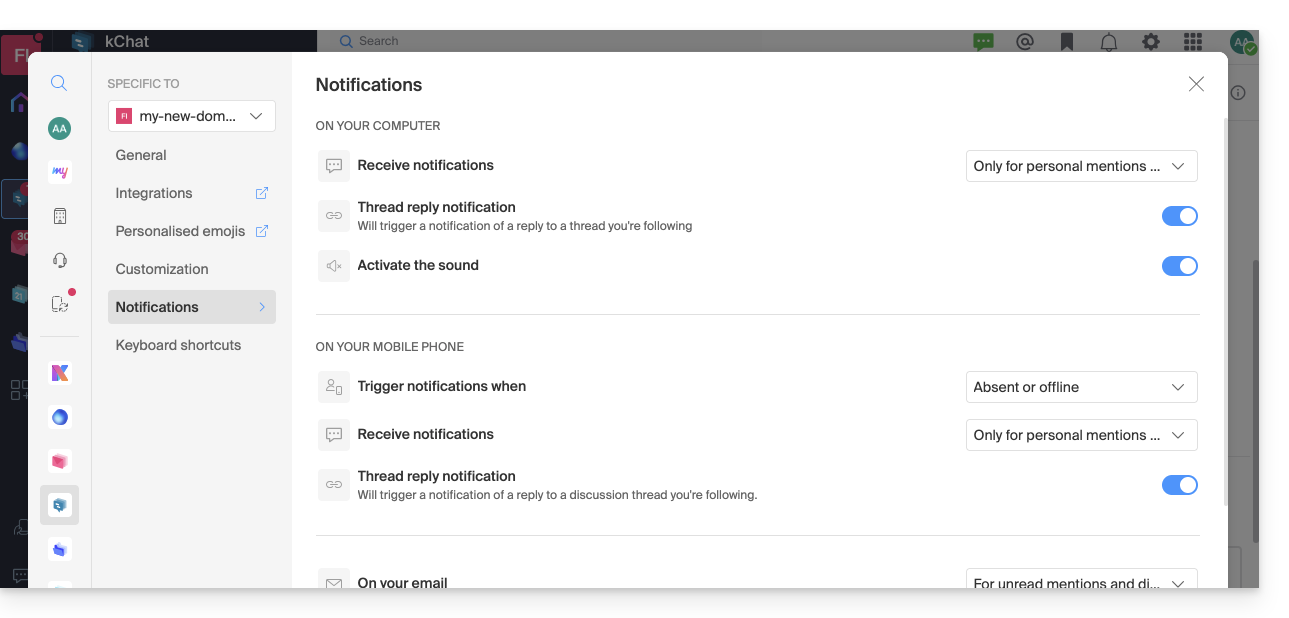
- The Notifications tab allows you to customize kChat notifications:
- The Shortcuts tab indicates the list of keyboard shortcuts available to work faster with kChat:
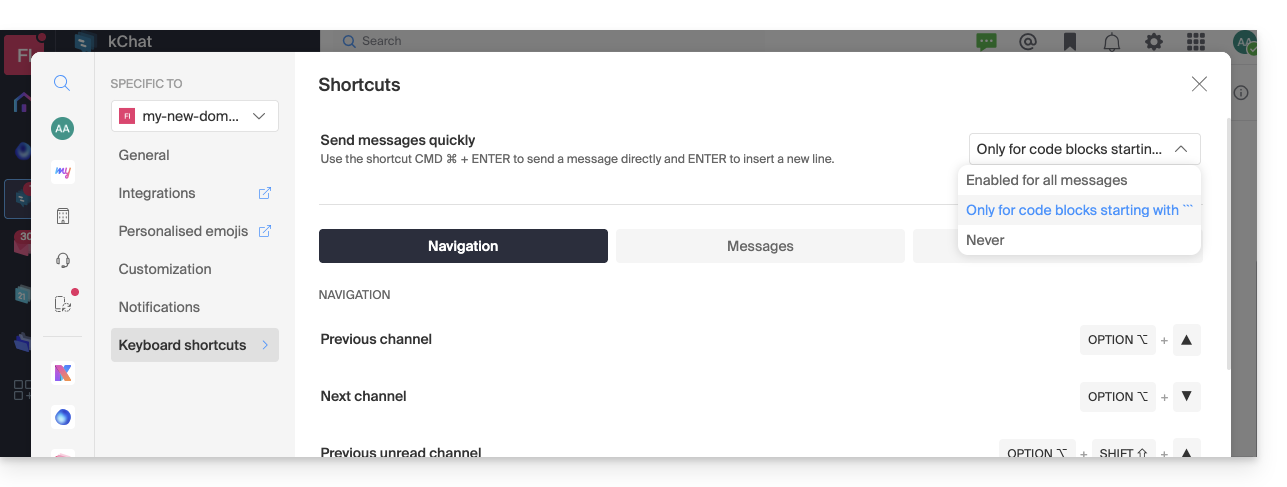
Resolve a display zoom issue
To zoom in or out of the display that has become unreadable, you need to use the following keyboard shortcuts:
- as in a browser,
CTRL/CMDand-to zoom out CTRL/CMDand+to zoom inCTRL/CMDand0to reapply the default size
Dark Mode / Light Mode
The light or dark theme of the Web app is configured globally (refer to this other guide). However, the desktop app can be configured independently of the rest; this is set from the icon at the top right of the interface: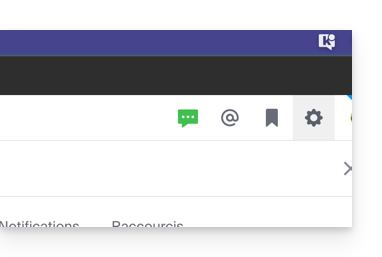
Customize a discussion, a channel, etc.
Next to each element of the left sidebar is an action menu ⋮ allowing you to define the sort order (alphabetical, by recent activity, manual):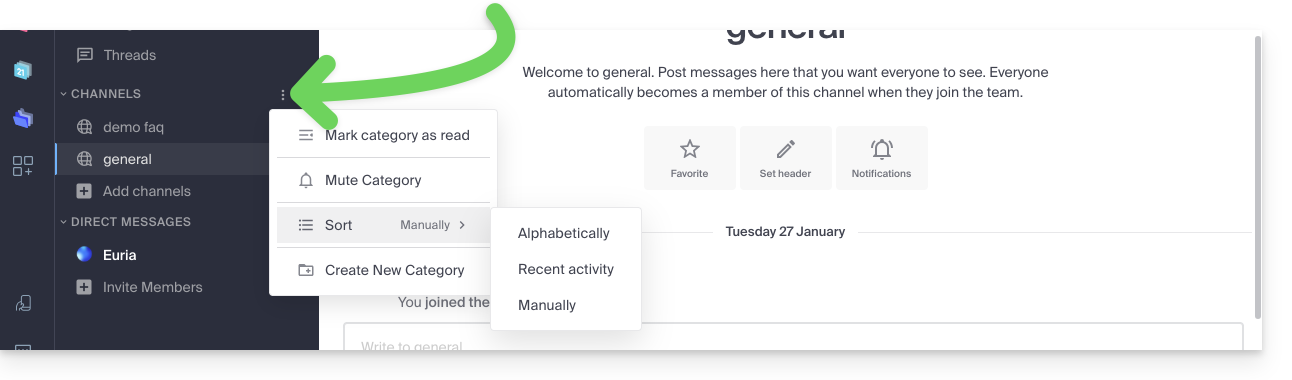
Set a status
To enhance your profile and its display in kChat discussions as well as on the various kSuite pages and tools, you can set a status in the form of text and/or emoticons, with an optional expiration date:
- Click on your avatar or initials at the top right of the interface.
- Click on Choose a custom status:
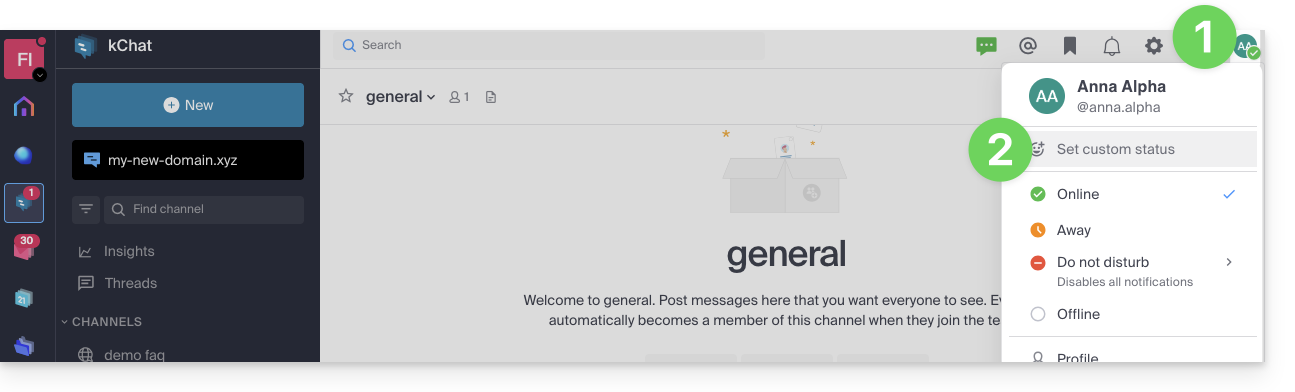
- Enter a custom status or choose one from the suggestions.
- Enter an expiration date if necessary:
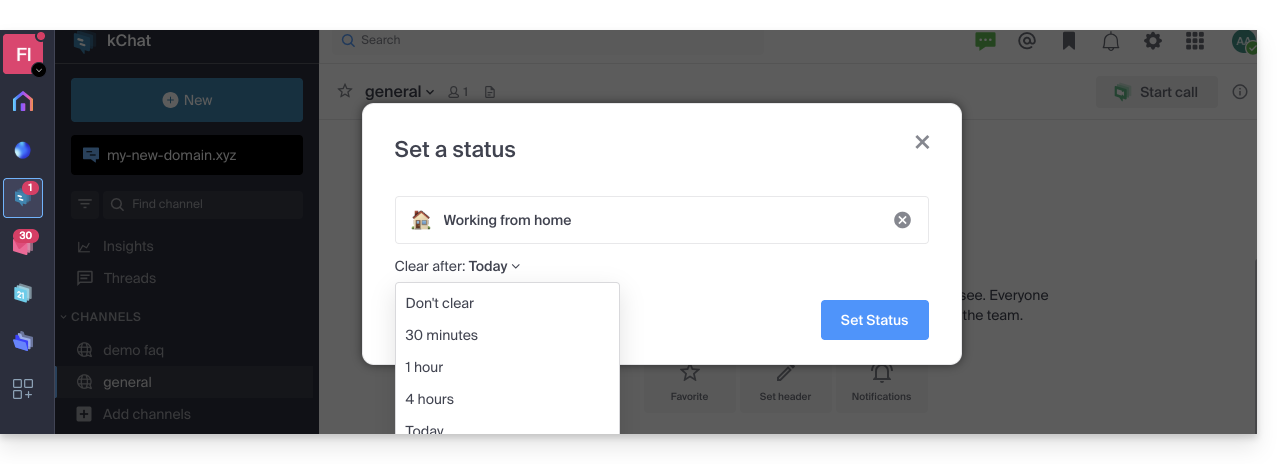
- Click on the smiley icon if you want to choose an emoji next to your name.
- Confirm with the Set status button.
⚠ Max. number of custom emoticons:
| kSuite | free | 5 |
| Standard | 100 | |
| Business | 500 | |
| Enterprise | unlimited | |
Use kChat with your domain and brand
With Custom Brand (included in the kSuite Enterprise offer, otherwise optional), you can customize kChat with your logo, your colors and the URL of your domain name. Your employees are immersed in your brand. Refer to this other guide on this subject.
Link to this FAQ:
Has this FAQ been helpful?